Skil Masters 1790 MB SDS Plus Rotary Hammer ... - Tooled-Up.com
Skil Masters 1790 MB SDS Plus Rotary Hammer ... - Tooled-Up.com
Skil Masters 1790 MB SDS Plus Rotary Hammer ... - Tooled-Up.com

Create successful ePaper yourself
Turn your PDF publications into a flip-book with our unique Google optimized e-Paper software.
ORIGINAL INSTRUCTIONS 6<br />
NOTICE ORIGINALE 9<br />
ORIGINALBETRIEBSANLEITUNG 13<br />
ORIGINELE GEBRUIKSAANWIJZING 16<br />
BRUKSANVISNING I ORIGINtAL 20<br />
ORIGINAL BRUGSANVISNING 23<br />
ORIGINAL BRUKSANVISNING 26<br />
ALKUPERÄISET OHJEET 30<br />
MANUAL ORIGINAL 33<br />
MANUAL ORIGINAL 36<br />
ISTRUZIONI ORIGINALI 40<br />
EREDETI HASZNÁLATI UTASÍTÁS 44<br />
PŮVODNÍM NÁVODEM K POUŽÍVÁNÍ 47<br />
ORİJİNAL İŞLETME TALİMATI 51<br />
INSTRUKCJA ORYGINALNA 54<br />
ПОДЛИННИК РУКОВОДСТВА<br />
ПО ЭКСПЛУАТАЦИИ 58<br />
www.skilmasters.<strong>com</strong><br />
HAMMER<br />
<strong>1790</strong> (F015<strong>1790</strong>..)<br />
ОРИГІНАЛЬНА ІНСТРУКЦІЯ<br />
З ЕКСПЛУАТАЦІЇ 62<br />
ΠΡΩΤΟΤΥΠΟ Ο∆ΗΓΙΩΝ ΧΡΗΣΗΣ 66<br />
INSTRUCŢIUNI DE FOLOSIRE<br />
ORIGINALE 70<br />
ОРИГИНАЛНО РЪКОВОДСТВО<br />
ЗА ЕКСПЛОАТАЦИЯ 74<br />
PÔVODNÝ NÁVOD NA POUŽITIE 78<br />
ORIGINALNE UPUTE ZA RAD 82<br />
ORIGINALNO UPUTSTVO ZA RAD 85<br />
IZVIRNA NAVODILA 88<br />
ALGUPÄRANE KASUTUSJUHEND 91<br />
ORIĢINĀLĀ LIETOŠANAS PAMĀCĪBA 94<br />
ORIGINALI INSTRUKCIJA 98<br />
ИЗВОРНО УПАТСТВО ЗА РАБОТА 101<br />
UDHËZIMET ORIGJINALE 105<br />
115<br />
113<br />
SKIL Europe BV - Konijnenberg 60 01/13 2610Z01892<br />
4825 BD Breda - The Netherlands
1 <strong>1790</strong><br />
2<br />
<br />
<br />
<br />
<br />
3 4<br />
4.0 J power<br />
<br />
0-3000 p/min<br />
J F<br />
C D H<br />
G<br />
✱<br />
2<br />
<br />
<br />
<br />
B<br />
<br />
A<br />
E
5<br />
8<br />
B<br />
3<br />
PLASTICS<br />
6<br />
D<br />
7<br />
C<br />
E
9<br />
0 F !<br />
4
@ #<br />
$<br />
%<br />
30 gr.<br />
5
<strong>Hammer</strong> <strong>1790</strong><br />
INTRODUCTION<br />
• This tool is intended for impact drilling in concrete, brick<br />
and stone as well as for light chiseling work; for drilling in<br />
wood, metal and plastic as well as for screwdriving<br />
specific accessories should be used<br />
• The hammering system in this tool outperforms any<br />
traditional ratcheting drill when drilling in concrete<br />
• This tool is designed for use in <strong>com</strong>bination with all<br />
standard <strong>SDS</strong>+ accessories<br />
• Read and save this instruction manual 3<br />
TECHNICAL SPECIFICATIONS 1<br />
✱) Impact energy per stroke according to EPTA-Procedure<br />
05/2009 (value not available yet)<br />
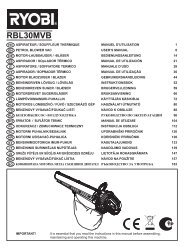
TOOL ELEMENTS 2<br />
A Switch for on/off<br />
B Wheel for maximum speed control<br />
C Rotation switch<br />
D Unlocking button<br />
E <strong>Hammer</strong> switch<br />
F Locking sleeve<br />
G Auxiliary handle<br />
H Grease storage<br />
J Adapter + 13 mm chuck<br />
SAFETY<br />
GENERAL SAFETY INSTRUCTIONS<br />
WARNING! Read all safety warnings and all<br />
instructions. Failure to follow the warnings and instructions<br />
may result in electric shock, fire and/or serious injury. Save<br />
all warnings and instructions for future reference. The<br />
term “power tool” in the warnings refers to your mainsoperated<br />
(corded) power tool or battery-operated (cordless)<br />
power tool.<br />
1) WORK AREA SAFETY<br />
a) Keep work area clean and well lit. Cluttered or dark<br />
areas invite accidents.<br />
b) Do not operate power tools in explosive<br />
atmospheres, such as in the presence of flammable<br />
liquids, gases or dust. Power tools create sparks which<br />
may ignite the dust or fumes.<br />
c) Keep children and bystanders away while operating<br />
a power tool. Distractions can cause you to lose control.<br />
2) ELECTRICAL SAFETY<br />
a) Power tool plugs must match the outlet. Never<br />
modify the plug in any way. Do not use any adapter<br />
plugs with earthed (grounded) power tools.<br />
Unmodified plugs and matching outlets will reduce risk of<br />
electric shock.<br />
6<br />
b) Avoid body contact with earthed or grounded<br />
surfaces such as pipes, radiators, ranges and<br />
refrigerators. There is an increased risk of electric<br />
shock if your body is earthed or grounded.<br />
c) Do not expose power tools to rain or wet conditions.<br />
Water entering a power tool will increase the risk of<br />
electric shock.<br />
d) Do not abuse the cord. Never use the cord for<br />
carrying, pulling or unplugging the power tool. Keep<br />
cord away from heat, oil, sharp edges or moving<br />
parts. Damaged or entangled cords increase the risk of<br />
electric shock.<br />
e) When operating a power tool outdoors, use an<br />
extension cord suitable for outdoor use. Use of a<br />
cord suitable for outdoor use reduces the risk of<br />
electric shock.<br />
f) If operating a power tool in a damp location is<br />
unavoidable, use an earth leakage circuit breaker.<br />
Use of an earth leakage circuit breaker reduces the risk<br />
of electric shock.<br />
3) PERSONAL SAFETY<br />
a) Stay alert, watch what you are doing and use<br />
<strong>com</strong>mon sense when operating a power tool. Do not<br />
use a power tool while you are tired or under the<br />
influence of drugs, alcohol or medication. A moment<br />
of inattention while operating power tools may result in<br />
serious personal injury.<br />
b) Use personal protective equipment. Always wear<br />
eye protection. Protective equipment such as dust<br />
mask, non-skid safety shoes, hard hat, or hearing<br />
protection used for appropriate conditions will reduce<br />
personal injuries.<br />
c) Prevent unintentional starting. Ensure the switch is<br />
in the off-position before connecting to power<br />
source and/or battery pack, picking up or carrying<br />
the tool. Carrying power tools with your finger on the<br />
switch or energising power tools that have the switch on<br />
invites accidents.<br />
d) Remove any adjusting key or wrench before turning<br />
the power tool on. A wrench or a key left attached to a<br />
rotating part of the power tool may result in<br />
personal injury.<br />
e) Do not overreach. Keep proper footing and balance<br />
at all times. This enables better control of the power tool<br />
in unexpected situations.<br />
f) Dress properly. Do not wear loose clothing or<br />
jewellery. Keep your hair, clothing and gloves away<br />
from moving parts. Loose clothes, jewellery or long hair<br />
can be caught in moving parts.<br />
g) If devices are provided for the connection of dust<br />
extraction and collection facilities, ensure these are<br />
connected and properly used. Use of dust collection<br />
can reduce dust-related hazards.<br />
4) POWER TOOL USE AND CARE<br />
a) Do not force the power tool. Use the correct power<br />
tool for your application. The correct power tool will do<br />
the job better and safer at the rate for which it<br />
was designed.<br />
b) Do not use the power tool if the switch does not turn<br />
it on and off. Any power tool that cannot be controlled<br />
with the switch is dangerous and must be repaired.
c) Disconnect the plug from the power source and/or<br />
the battery pack from the power tool before making<br />
any adjustments, changing accessories, or storing<br />
power tools. Such preventive safety measures reduce<br />
the risk of starting the power tool accidentally.<br />
d) Store idle power tools out of the reach of children<br />
and do not allow persons unfamiliar with the power<br />
tool or these instructions to operate the power tool.<br />
Power tools are dangerous in the hands of<br />
untrained users.<br />
e) Maintain power tools. Check for misalignment or<br />
binding of moving parts, breakage of parts and any<br />
other condition that may affect the power tool’s<br />
operation. If damaged, have the power tool repaired<br />
before use. Many accidents are caused by poorly<br />
maintained power tools.<br />
f) Keep cutting tools sharp and clean. Properly<br />
maintained cutting tools with sharp cutting edges are less<br />
likely to bind and are easier to control.<br />
g) Use the power tool, accessories and tool bits etc., in<br />
accordance with these instructions, taking into<br />
account the working conditions and the work to be<br />
performed. Use of the power tool for operations different<br />
from those intended could result in a hazardous situation.<br />
5) SERVICE<br />
a) Have your power tool serviced by a qualified repair<br />
person using only identical replacement parts. This<br />
will ensure that the safety of the power tool is maintained.<br />
SAFETY INSTRUCTIONS FOR HAMMERS<br />
• Wear ear protectors (exposure to noise can cause<br />
hearing loss)<br />
• Use auxiliary handle(s), if supplied with the tool<br />
(loss of control can cause personal injury)<br />
• Avoid damage that can be caused by screws, nails and<br />
other elements in your workpiece; remove them before<br />
you start working<br />
• Always keep the cord away from moving parts of the tool<br />
• Secure the workpiece (a workpiece clamped with<br />
clamping devices or in a vice is held more securely than<br />
by hand)<br />
• When you put away the tool, switch off the motor and<br />
ensure that all moving parts have <strong>com</strong>e to a<br />
<strong>com</strong>plete standstill<br />
• Use <strong>com</strong>pletely unrolled and safe extension cords with a<br />
capacity of 16 Amps (U.K. 13 Amps)<br />
• In case of electrical or mechanical malfunction,<br />
immediately switch off the tool and disconnect the plug<br />
• SKIL can assure flawless functioning of the tool only<br />
when the correct accessories are used which can be<br />
obtained from your SKIL dealer<br />
• Use only accessories with an allowable speed matching<br />
at least the highest no-load speed of the tool<br />
• This tool should not be used by people under the age of<br />
16 years<br />
• If the drill bit be<strong>com</strong>es unexpectedly jammed (causing a<br />
sudden, dangerous reaction), immediately switch off<br />
the tool<br />
7<br />
• Use suitable detectors to find hidden utility lines or<br />
call the local utility <strong>com</strong>pany for assistance (contact<br />
with electric lines can lead to fire or electrical shock;<br />
damaging a gas line can result in an explosion;<br />
penetrating a water pipe will cause property damage or<br />
an electrical shock)<br />
• Hold power tool by insulated gripping surfaces,<br />
when performing an operation where the cutting<br />
accessory may contact hidden wiring or its own<br />
cord (a cutting accessory contacting a “live” wire may<br />
make exposed metal parts of the power tool “live” and<br />
could give the operator an electric shock)<br />
• Dust from material such as paint containing lead, some<br />
wood species, minerals and metal may be harmful<br />
(contact with or inhalation of the dust may cause allergic<br />
reactions and/or respiratory diseases to the operator or<br />
bystanders); wear a dust mask and work with a dust<br />
extraction device when connectable<br />
• Certain kinds of dust are classified as carcinogenic (such<br />
as oak and beech dust) especially in conjunction with<br />
additives for wood conditioning; wear a dust mask<br />
and work with a dust extraction device<br />
when connectable<br />
• Follow the dust-related national requirements for the<br />
materials you want to work with<br />
• Do not work materials containing asbestos (asbestos<br />
is considered carcinogenic)<br />
• If the cord is damaged or cut through while working, do<br />
not touch the cord, but immediately disconnect the plug<br />
• Never use the tool when cord is damaged; have it<br />
replaced by a qualified person<br />
• Always check that the supply voltage is the same as the<br />
voltage indicated on the nameplate of the tool (tools with<br />
a rating of 230V or 240V can also be connected to a<br />
220V supply)<br />
• Be aware of the forces that occur as a result of jamming<br />
(especially when drilling metals); always use auxiliary<br />
handle G 2 and take a secure stance<br />
• Always disconnect plug from power source before<br />
making any adjustment or changing any accessory<br />
WHEN CONNECTING NEW 3-PIN PLUG (U.K. ONLY):<br />
• Do not connect the blue (= neutral) or brown (= live) wire<br />
in the cord of this tool to the earth terminal of the plug<br />
• If for any reason the old plug is cut off the cord of this tool,<br />
it must be disposed of safely and not left unattended<br />
USE<br />
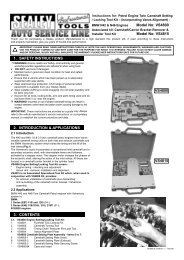
• On/off 4<br />
• Maximum speed control 5<br />
With wheel B the maximum speed can be adjusted from<br />
low to high (1-6)<br />
• Activating rotation switch C 6<br />
- press button D to unlock switch C<br />
- turn switch C along the bottom side to position “1” until<br />
it snap-locks<br />
! do not turn switch C along the upper side<br />
! start working only when switch C is locked<br />
• Activating hammer switch E 7<br />
- turn switch E along the upper side to position “1”<br />
! do not turn switch E along the bottom side
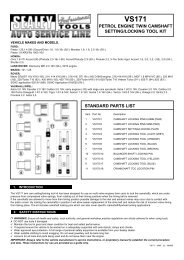
• Operating the tool 8<br />
! select operating mode only when tool is switched<br />
off and plug is disconnected<br />
- for chiseling see relevant paragraph<br />
- for impact drilling set switch C in position “1” and<br />
switch E in position “1”<br />
- for normal drilling as well as for screwdriving set switch<br />
C in position “1” and switch E in position “0” and use<br />
adapter J 2<br />
- the hammer mechanism is activated by applying a<br />
slight pressure on the tool when the drill bit is in<br />
contact with the workpiece<br />
- best impact drilling results can be obtained by only a<br />
slight pressure on the tool needed to keep the<br />
automatic clutch engaged; drilling performance will not<br />
improve by applying more pressure on the tool<br />
• Chiseling 9<br />
! select operating mode only when tool is switched<br />
off and plug is disconnected<br />
- first set switch E as well as switch C in position “1”<br />
- rotate chisel into desired position<br />
- then maintain switch E in position “1”, but set switch C<br />
in position “0”<br />
• Mounting adapter J 0<br />
! clean and lightly lubricate the <strong>SDS</strong>+ adapter<br />
before insertion<br />
- pull back locking sleeve F 2 and insert adapter in<br />
<strong>SDS</strong>+ chuck while turning and pushing it until it<br />
engages; the adapter locks in position automatically<br />
- pull adapter to check whether is it locked correctly<br />
• Changing bits !<br />
! clean and lightly lubricate the <strong>SDS</strong>+ accessory<br />
before insertion<br />
- pull back locking sleeve F 2 and insert accessory in<br />
<strong>SDS</strong>+ chuck while turning and pushing it until it<br />
engages; the accessory locks in position automatically<br />
- pull accessory to check that it is locked correctly<br />
- remove accessory by pulling back locking sleeve F<br />
! the <strong>SDS</strong>+ accessory requires freedom of<br />
movement which causes eccentricity when tool is<br />
off-load; however, the accessory automatically<br />
centres itself during operation without affecting<br />
drilling precision<br />
! only use sharp bits/chisels<br />
! do not use bits/chisels with a damaged shank<br />
• Safety clutch<br />
If the accessory gets jammed, the drive to the spindle is<br />
interrupted (causing a rattling noise)<br />
- immediately switch off tool<br />
- remove the jammed accessory<br />
- switch on tool again<br />
• Adjusting drilling depth @<br />
• AUTO-STOP Carbon brushes<br />
- this tool is equipped with carbon brushes which pop<br />
up automatically when worn, thus preventing the motor<br />
from being damaged<br />
- when the tool stops unexpectedly, send it to your<br />
dealer or the nearest SKIL service-station for having<br />
the brushes replaced<br />
• Holding and guiding the tool #<br />
! while working, always hold the tool at the<br />
grey-coloured grip area(s)<br />
8<br />
- always use auxiliary handle G 2 (can be adjusted<br />
as illustrated)<br />
- keep the ventilation slots uncovered<br />
- do not apply too much pressure on the tool; let the tool<br />
do the work for you<br />
APPLICATION ADVICE<br />
• When drilling ferrous metals<br />
- pre-drill a smaller hole, when a large hole is required<br />
- lubricate drill bit occasionally with oil<br />
• When turning in a screw at/near the cross cut end or an<br />
edge of wood, pre-drill a hole in order to avoid cracking of<br />
the wood<br />
MAINTENANCE / SERVICE<br />
• After approximately 30 working hours refill grease<br />
storage H with 30 grams of grease $<br />
• Always keep tool and cord clean (especially the<br />
ventilation slots)<br />
! disconnect the plug before cleaning<br />
• If the tool should fail despite the care taken in<br />
manufacturing and testing procedures, repair should be<br />
carried out by an after-sales service centre for SKIL<br />
power tools<br />
- send the tool undismantled together with proof of<br />
purchase to your dealer or the nearest SKIL service<br />
station (addresses as well as the service diagram of<br />
the tool are listed on www.skilmasters.<strong>com</strong>)<br />
ENVIRONMENT<br />
• Do not dispose of electric tools, accessories and<br />
packaging together with household waste material<br />
(only for EU countries)<br />
- in observance of European Directive 2002/96/EC on<br />
waste of electric and electronic equipment and its<br />
implementation in accordance with national law,<br />
electric tools that have reached the end of their life<br />
must be collected separately and returned to an<br />
environmentally <strong>com</strong>patible recycling facility<br />
- symbol % will remind you of this when the need for<br />
disposing occurs<br />
DECLARATION OF CONFORMITY<br />
• We declare under our sole responsibility that this product<br />
is in conformity with the following standards or<br />
standardized documents: EN 60745, EN 61000,<br />
EN 55014, in accordance with the provisions of the<br />
directives 2004/108/EC, 2006/42/EC, 2011/65/EU<br />
• Technical file at: SKIL Europe BV (PT-SEU/ENG1),<br />
4825 BD Breda, NL<br />
<br />
<br />
<br />
22.01.2013
NOISE/VIBRATION<br />
• Measured in accordance with EN 60745 the sound<br />
pressure level of this tool is 95 dB(A) and the sound<br />
power level 106 dB(A) (standard deviation: 3 dB), and the<br />
vibration ✱ (hand-arm method; uncertainty K = 1.5 m/s²)<br />
✱ when impact drilling in concrete 21.8 m/s²<br />
✱ when chiseling 16.0 m/s²<br />
• The vibration emission level has been measured in<br />
accordance with a standardised test given in EN 60745; it<br />
may be used to <strong>com</strong>pare one tool with another and as a<br />
preliminary assessment of exposure to vibration when<br />
using the tool for the applications mentioned<br />
- using the tool for different applications, or with different<br />
or poorly maintainted accessories, may significantly<br />
increase the exposure level<br />
- the times when the tool is switched off or when it is<br />
running but not actually doing the job, may significantly<br />
reduce the exposure level<br />
! protect yourself against the effects of vibration<br />
by maintaining the tool and its accessories,<br />
keeping your hands warm, and organizing your<br />
work patterns<br />
<br />
Perforateur <strong>1790</strong><br />
INTRODUCTION<br />
• L’outil est conçu pour le perçage de percussion dans le<br />
béton, la brique et dans la pierre naturelle ainsi que pour<br />
d’autres travaux de burinage légers; pour le perçage<br />
dans le bois, le métal et les matières plastiques ainsi que<br />
pour le vissage il est nécessaire d’utiliser des<br />
accessoires spécifiques<br />
• Le système de percussion de cet outil surpasse<br />
largement la performance des perceuses à percussion<br />
traditionelles lorsqu’il est utilisé dans le béton<br />
• Cet outil convient parfaitement pour une utilisation avec<br />
tous les accessoires <strong>SDS</strong>+ standards<br />
• Lisez et conservez ce manuel d’instruction 3<br />
SPECIFICATIONS TECHNIQUES 1<br />
✱) Puissance de frappe individuelle suivant EPTA-<br />
Procedure 05/2009 (valeur non disponible encore)<br />
ELEMENTS DE L’OUTIL 2<br />
A Interrupteur pour mise en marche/arrêt<br />
B Molette de réglage de la vitesse maximum<br />
C Commutateur de la rotation<br />
D Bouton de déblocage<br />
E Commutateur du marteau<br />
F Douille de verrouillage<br />
G Poignée auxiliaire<br />
H Compartiment à graisse<br />
J Adaptateur + mandrin de 13 mm<br />
9<br />
SECURITE<br />
INSTRUCTIONS GENERALES DE SECURITE<br />
ATTENTION! Lisez tous les avertissements de<br />
sécurité et toutes les instructions. Ne pas suivre les<br />
avertissements et instructions peut entraîner un choc<br />
électrique, un incendie et/ou de graves blessures sur les<br />
personnes. Conservez tous les avertissements et<br />
toutes les instructions pour pouvoir s’y reporter<br />
ultérieurement. La notion d’”outil électroportatif” dans les<br />
avertissements se rapporte à des outils électriques<br />
raccordés au secteur (avec câble de raccordement) et à<br />
des outils électriques à batterie (sans câble<br />
de raccordement).<br />
1) SECURITE DE LA ZONE DE TRAVAIL<br />
a) Maintenez l’endroit de travail propre et bien éclairé.<br />
Un lieu de travail en désordre ou mal éclairé augmente le<br />
risque d’accidents.<br />
b) N’utilisez pas l’appareil dans un environnement<br />
présentant des risques d’explosion et où se<br />
trouvent des liquides, des gaz ou poussières<br />
inflammables. Les outils électroportatifs génèrent des<br />
étincelles risquant d’enflammer les poussières ou<br />
les vapeurs.<br />
c) Tenez les enfants et autres personnes éloignés<br />
durant l’utilisation de l’outil électroportatif. En cas<br />
d’inattention vous risquez de perdre le contrôle<br />
sur l’appareil.<br />
2) SECURITE RELATIVE AU SYSTEME ELECTRIQUE<br />
a) La fiche de secteur de l’outil électroportatif doit être<br />
appropriée à la prise de courant. Ne modifiez en<br />
aucun cas la fiche. N’utilisez pas de fiches<br />
d’adaptateur avec des appareils avec mise à la<br />
terre. Les fiches non modifiées et les prises de courant<br />
appropriées réduisent le risque de choc électrique.<br />
b) Evitez le contact physique avec des surfaces mises<br />
à la terre telles que tuyaux, radiateurs, fours et<br />
réfrigérateurs. Il y a un risque élevé de choc électrique<br />
au cas où votre corps serait relié à la terre.<br />
c) N’exposez pas l’outil électroportatif à la pluie ou à<br />
l’humidité. La pénétration d’eau dans un outil<br />
électroportatif augmente le risque d’un choc électrique.<br />
d) N’utilisez pas le câble à d’autres fins que celles<br />
prévues, n’utilisez pas le câble pour porter l’appareil<br />
ou pour l’accrocher ou encore pour le débrancher<br />
de la prise de courant. Maintenez le câble éloigné<br />
des sources de chaleur, des parties grasses, des<br />
bords tranchants ou des parties de l’appareil en<br />
rotation. Un câble endommagé ou torsadé augmente le<br />
risque d’un choc électrique.<br />
e) Au cas où vous utiliseriez l’outil électroportatif à<br />
l’extérieur, utilisez une rallonge autorisée<br />
homologuée pour les applications extérieures.<br />
L’utilisation d’une rallonge électrique homologuée pour<br />
les applications extérieures réduit le risque<br />
d’un choc électrique.<br />
f) Si l’usage d’un outil dans un emplacement humide<br />
est inévitable, utilisez un disjoncteur de fuite à la<br />
terre. L’utilisation d’un disjoncteur de fuite à la terre réduit<br />
le risque de choc électrique.