Create successful ePaper yourself
Turn your PDF publications into a flip-book with our unique Google optimized e-Paper software.
®ÂØÒňΠ®<br />
<strong>TD</strong>-<strong>12</strong><br />
Percussion<br />
Sound Module<br />
Q&A<br />
A collection of popular articles from the <strong>TD</strong>-<strong>12</strong> knowledge base<br />
How Do I Select Instruments? ......................................................................... 2<br />
How Do I Play Patterns from the Pads? ........................................................... 3<br />
How Do I Copy a Drum Kit? ............................................................................ 4<br />
How Do I Prevent Crosstalk? ........................................................................... 5<br />
How Do I Assign Instruments to the Direct Outs? .............................................. 6<br />
How Do I Find <strong>TD</strong>-<strong>12</strong> Articles in the <strong>Roland</strong>US.com Knowledge Base? ............... 7<br />
©2009 <strong>Roland</strong> Corporation US<br />
1
®ÂØÒňΠ®<br />
<strong>TD</strong>-<strong>12</strong><br />
Ho w Do I Se l e c t In S t r u m e n t S?<br />
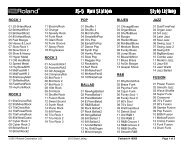
There are 50 drum kits in the <strong>TD</strong>-<strong>12</strong>, ready to go. Use the following steps to select and try out a few:<br />
1<br />
Press the KIT button so it’s lit.<br />
2 Turn the VALUE dial or press the +/- buttons to select 19 UNIVERSE.<br />
3<br />
Play the pads, including trying out some rim shots on the toms.<br />
4 Turn the VALUE dial clockwise or press the + button to select 21 Rock Band.<br />
5<br />
6<br />
7<br />
Play the pads.<br />
Strike the bow of Crash 1—this starts one of the patterns in the <strong>TD</strong>-<strong>12</strong>, using the Pad Pattern feature. Hit<br />
some of the other pads to trigger additional tap-type patterns as the first pattern keeps playing.<br />
Strike the bow of Crash 1 again to stop its pattern.<br />
How Do I Select Instruments?<br />
2
®ÂØÒňΠ®<br />
<strong>TD</strong>-<strong>12</strong><br />
Ho w Do I Pl ay Pat t e r n S f r o m t H e Pa D S?<br />
You can hit one of the pads in a kit to start and stop—or tap through—a pattern. Use the following steps to assign<br />
a pattern to a pad:<br />
1<br />
2<br />
3<br />
4<br />
5<br />
6<br />
Select the desired kit.<br />
Press the INST button so it’s lit.<br />
Press F4 (CONTROL).<br />
Hit the pad to which you want to assign a pattern.<br />
Turn the VALUE dial or press the + / - buttons to select the desired pattern.<br />
Strike the same pad again to start and stop the pattern.<br />
Tip: Some of the <strong>TD</strong>-<strong>12</strong>’s preset kits have a pattern already assigned to a pad. If you’d like to turn off the Pad<br />
Pattern feature for such a kit, follow Steps 2-5 above. At Step 5, turn the VALUE dial counter-clockwise or press<br />
the - button to select OFF. If you’d like to turn the Pad Pattern feature off for all kits, press CURSOR 5 to select<br />
the Pad Ptn Master SW setting, and then turn the VALUE dial to choose ALL OFF.<br />
How Do I Play Patterns from the Pads?<br />
3
®ÂØÒňΠ®<br />
<strong>TD</strong>-<strong>12</strong><br />
Ho w Do I co P y a Dr u m KIt?<br />
Use the following steps to copy a kit in the <strong>TD</strong>-<strong>12</strong>:<br />
1<br />
2<br />
While pressing SHIFT, press the SETUP•COPY button.<br />
Press F1 (KIT).<br />
3 Press CURSOR 3.<br />
4 Turn the VALUE dial counterclockwise to select PRESET.<br />
5 Press CURSOR 4.<br />
6<br />
Turn the VALUE dial to select the kit you’d like to copy.<br />
7 Press CURSOR 6.<br />
8<br />
9<br />
10<br />
Turn the VALUE dial to select the location, from 1 to 50, to which you’d like to copy the selected kit.<br />
Press F5 (COPY).<br />
Press the EXIT button when you’re finished.<br />
How Do I Copy a Drum Kit?<br />
4
®ÂØÒňΠ®<br />
<strong>TD</strong>-<strong>12</strong><br />
Ho w Do I Pr e v e n t cr o S S ta l K?<br />
When two or more pads are mounted to the same stand, hitting one pad may unintentionally trigger the other pad.<br />
This is referred to as “crosstalk.” Increasing the Crosstalk Cancel value—shown onscreen as “XTALK CANCEL”—<br />
for a pad can help reduce the possibility of crosstalk. Here’s how to adjust this setting:<br />
1<br />
2<br />
Press the TRIGGER button.<br />
Press F4 (XTALK).<br />
3 Hit the pad that’s being inadvertently triggered by another. For example, if you hit one of the tom pads and it<br />
triggers one of the crash pads, you’ll want to increase the X-TALK CANCEL value for the crash pad.<br />
4 Turn the VALUE dial to adjust the XTALK CANCEL value from OFF to 80.<br />
5 Repeat Steps 3-4 for any other pads that need to be adjusted.<br />
6 When you’re finished, press KIT—the new settings are saved automatically.<br />
How Do I Fix Crosstalk?<br />
5
®ÂØÒňΠ®<br />
<strong>TD</strong>-<strong>12</strong><br />
Ho w Do I aS S I g n In S t r u m e n t S t o t H e DI r e c t ou t S?<br />
You can assign an instrument in the <strong>TD</strong>-<strong>12</strong> to the DIRECT OUT 1 or 2 jack. Here’s how to do this:<br />
1<br />
2<br />
3<br />
4<br />
5<br />
6<br />
Press the SETUP button.<br />
Press F2 (OUTPUT).<br />
Hit the pad that plays the instrument you want to send to a DIRECT OUT jack.<br />
Turn the VALUE dial to select the desired DIRECT OUT jack.<br />
Repeat Steps 3 and 4 for any other pads you want to set up.<br />
Press KIT when you’re finished—the new settings are saved automatically.<br />
How Do I Assign Instruments to the Direct Outs?<br />
6
®ÂØÒňΠ®<br />
<strong>TD</strong>-<strong>12</strong><br />
Ho w Do I fI n D tD-<strong>12</strong> art I c l e S In t H e ro l a n DuS.c o m Kn o w l e D g e Ba S e?<br />
1 Point your browser to the <strong>TD</strong>-<strong>12</strong> Support area on <strong>Roland</strong>US.com.<br />
2<br />
3<br />
4<br />
5<br />
6<br />
Click “Knowledge Base.”<br />
If you’re not already logged into <strong>Roland</strong> Backstage, the <strong>Roland</strong> Backstage login appears.<br />
If you’re:<br />
• a <strong>Roland</strong> Backstage member— enter your email address and password, and then click the Login button.<br />
• not yet a <strong>Roland</strong> Backstage member— click “Create New Profile” to create a free new user account. As a<br />
<strong>Roland</strong> Backstage member, you become part of the online <strong>Roland</strong> US.com community and gain access to<br />
helpful tools and services.<br />
Once you’re logged in, click the large Knowledge Base button.<br />
On the Knowledge Base screen, enter “<strong>TD</strong>-<strong>12</strong>” in the Product field.<br />
Click the Find button in the middle of the screen to browse the available <strong>TD</strong>-<strong>12</strong> Knowledge Base articles.<br />
How Do I Find <strong>TD</strong>-<strong>12</strong> Articles in the Knowledge Base?<br />
7