InFocus 01—An Introduction to MIDI - Roland
InFocus 01—An Introduction to MIDI - Roland
InFocus 01—An Introduction to MIDI - Roland

Create successful ePaper yourself
Turn your PDF publications into a flip-book with our unique Google optimized e-Paper software.
®ÂØÒňΠ®<br />
An <strong>Introduction</strong> <strong>to</strong> <strong>MIDI</strong><br />
© 2006, 2009 <strong>Roland</strong> Corporation U.S.<br />
All rights reserved. No part of this publication may be reproduced in any form without the<br />
written permission of <strong>Roland</strong> Corporation U.S.<br />
INFOCUS01<br />
<strong>InFocus</strong><br />
1
About <strong>Roland</strong> <strong>InFocus</strong> Booklets<br />
<strong>Roland</strong>’s <strong>InFocus</strong> booklets provide important basic background information<br />
that can help you get the most out of your <strong>Roland</strong>/BOSS/Edirol products.<br />
While there’s always plenty <strong>to</strong> say about any one instrument, there are some<br />
<strong>to</strong>pics that apply <strong>to</strong> a wide range of instruments. Each <strong>InFocus</strong> booklet<br />
discusses one of these larger <strong>to</strong>pics.<br />
For information about a specific product, check out the <strong>Roland</strong> U.S. Web site<br />
at www.<strong>Roland</strong>US.com.<br />
About This Booklet<br />
Electronic musical instruments offer an incredible array of sounds <strong>to</strong><br />
professional and amateur musicians. They place at a musician’s fingertips<br />
everything from traditional, real-world sounds <strong>to</strong> noises that have never<br />
been heard before.<br />
They come in all shapes and sizes, <strong>to</strong>o, from solid, physical instruments such<br />
as keyboards, beat boxes, and electronic drum kits, <strong>to</strong> computer-based<br />
“virtual” instruments, or “soft synths.”<br />
All of these devices rely on something called “<strong>MIDI</strong>.” You really can’t get <strong>to</strong>o<br />
far with an electronic instrument without bumping in<strong>to</strong> <strong>MIDI</strong>. This is actually<br />
a good thing, though, since <strong>MIDI</strong> allows you <strong>to</strong> do all sorts of exciting<br />
musical things.<br />
Of course, it helps <strong>to</strong> know what <strong>MIDI</strong> is—that’s what this booklet’s for. Once<br />
you understand the basics, you can consult the documentation for your<br />
device <strong>to</strong> learn more about how it uses <strong>MIDI</strong>.<br />
Understanding the Symbols in This Booklet<br />
Throughout this booklet, you’ll come across information that deserves<br />
special attention—that’s the reason it’s labeled with one of the following<br />
symbols.<br />
A note is something that adds information about the <strong>to</strong>pic at hand.<br />
A tip offers suggestions for using the feature being discussed.<br />
Warnings contain important information that can help you avoid<br />
possible damage <strong>to</strong> your equipment, your data, or yourself.<br />
Hot Links<br />
Each <strong>InFocus</strong> booklet is designed <strong>to</strong> be read in order from beginning<br />
<strong>to</strong> end. However, when you see this arrow symbol <strong>to</strong> the right of<br />
an upcoming section we’ve mentioned, you can click the arrow <strong>to</strong><br />
jump <strong>to</strong> the section immediately.<br />
Understanding <strong>MIDI</strong><br />
What <strong>MIDI</strong> Isn’t<br />
Yes, it’s an odd place <strong>to</strong> start, but one of the things that confuses people new<br />
<strong>to</strong> <strong>MIDI</strong> is that they assume <strong>MIDI</strong> is some type of sound, or audio, that travels<br />
through <strong>MIDI</strong> cables. It’s not.<br />
What <strong>MIDI</strong> Is<br />
<strong>MIDI</strong>, which stands for “Musical Instrument Digital Interface,” is a system that<br />
allows electronic musical instruments and computers <strong>to</strong> send instructions<br />
<strong>to</strong> each other. It sounds simple, but <strong>MIDI</strong> provides some profound creative<br />
opportunities.<br />
2
Why <strong>MIDI</strong> Matters<br />
Here are just some of the things <strong>MIDI</strong> makes possible:<br />
•<br />
•<br />
•<br />
•<br />
•<br />
•<br />
You can use a <strong>MIDI</strong> instrument with which you’re comfortable <strong>to</strong> play<br />
the sounds belonging <strong>to</strong> any other <strong>MIDI</strong> device, including soft synths.<br />
Create rich musical textures by layering sounds from multiple <strong>MIDI</strong><br />
devices, or assign different sounds <strong>to</strong> play in different pitch ranges.<br />
When you play a <strong>MIDI</strong> instrument, it produces data that can be captured<br />
by a <strong>MIDI</strong> “sequencer.” When the sequencer plays back the data,<br />
your original performance is recreated. Sequencers aren’t just <strong>MIDI</strong><br />
recorders, though—they let you fix mistakes, change the pitches of<br />
your notes, fix their timing, the way they play, the sounds they use, and<br />
more. In addition, most sequencers can capture multiple performances<br />
on separate “tracks,” allowing you <strong>to</strong> build up full musical arrangements,<br />
one track at a time.<br />
You can create spellbinding video performances onstage using <strong>MIDI</strong><br />
devices such as <strong>Roland</strong>’s motion dive .<strong>to</strong>kyo, or <strong>Roland</strong> keyboards that<br />
feature V-LINK in conjunction with a video playback device.<br />
The General <strong>MIDI</strong> sound set allows you <strong>to</strong> instantly play back prerecorded<br />
music on many <strong>MIDI</strong> instruments, or on a computer.<br />
One <strong>MIDI</strong> device can control another, letting you use the most convenient<br />
<strong>to</strong>ol for any job. Edit <strong>MIDI</strong> instrument sounds on your computer, operate<br />
an audio recorder from a <strong>MIDI</strong> beat box, and on and on.<br />
We’ll discuss all of these things later in this booklet.<br />
What <strong>MIDI</strong> Does<br />
When one <strong>MIDI</strong> device communicates with another, it’s all about instructions:<br />
It’s just one <strong>MIDI</strong> device telling another one what <strong>to</strong> do. Here’s how playing<br />
a note—the most common <strong>MIDI</strong> activity—happens.<br />
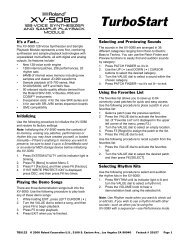
Suppose you’ve got a <strong>MIDI</strong> keyboard connected <strong>to</strong> a <strong>MIDI</strong> synthesizer box, or<br />
“module,” and you want <strong>to</strong> play the module from the keyboard.<br />
When you hold down the Middle C on the keyboard, the keyboard sends<br />
out a Middle C “key down” <strong>MIDI</strong> message <strong>to</strong> the module. The module says <strong>to</strong><br />
itself, “Ah, right, Middle C,” and plays Middle C.<br />
Middle C<br />
When you let go of Middle C, the keyboard sends a Middle C “note off”<br />
message <strong>to</strong> the module, and the module s<strong>to</strong>ps playing its Middle C note.<br />
Note-on and note-off messages are just the beginning, though. Most <strong>MIDI</strong><br />
controllers can also sense how hard you play a note, transmitting a <strong>MIDI</strong><br />
“velocity” value <strong>to</strong> the receiving device so the volume or brightness of its<br />
note responds <strong>to</strong> your <strong>to</strong>uch.<br />
And, of course, you’ll usually play more than one note at a time.<br />
We’ll discuss other types of <strong>MIDI</strong> messages a bit later, and explain how<br />
they’re put <strong>to</strong>gether.<br />
A World of <strong>MIDI</strong> Controllers<br />
A <strong>MIDI</strong> device that controls another is referred <strong>to</strong> as a <strong>MIDI</strong> “controller.”<br />
Though most people think of <strong>MIDI</strong> as being just for keyboard players, a wide<br />
range of <strong>MIDI</strong> controllers and control surfaces make it easy for all sorts of<br />
players and engineers <strong>to</strong> harness the power of <strong>MIDI</strong>.<br />
Let’s talk about some of the available controllers just <strong>to</strong> give you some idea<br />
of the possibilities.<br />
3
Guitar Controllers<br />
A steel-stringed guitar, a <strong>Roland</strong> GK-3 divided pickup, and a <strong>Roland</strong> guitar<br />
synthesizer such as the GR-20 turn the guitar in<strong>to</strong> a full-fledged <strong>MIDI</strong><br />
controller of exceptional expressiveness.<br />
Whether you’re playing the guitar synth’s own sounds or external <strong>MIDI</strong><br />
sounds, standard guitar techniques can make <strong>MIDI</strong> sounds come alive.<br />
Drum Controllers<br />
Instruments such as <strong>Roland</strong>’s V-Drum sets offer a <strong>to</strong>tally natural playing<br />
experience along with incredible sounds, all without the hassles of a<br />
traditional kit. Practice on headphones all night if you want, or record drum<br />
tracks straight in<strong>to</strong> a <strong>MIDI</strong> sequencer from a V-Drum kit’s pad and cymbal<br />
controllers.<br />
There are also smaller drum controllers you can play<br />
with sticks, or even with your hands, such as <strong>Roland</strong>’s<br />
HPD-10.<br />
You can also control <strong>MIDI</strong> devices from traditional acoustic drums by<br />
installing <strong>MIDI</strong> drum triggers such as <strong>Roland</strong>’s RT-series Acoustic Drum<br />
Triggers.<br />
Accordion Controllers<br />
Skilled accordion players known there’s nothing quite like the dynamic<br />
control of an accordion. <strong>Roland</strong>’s V-Accordions open up the world of <strong>MIDI</strong><br />
<strong>to</strong> accordion players. Built-in accordion sounds—and more—provide an<br />
unprecedented variety of timbres, and a V-Accordion offers a great way <strong>to</strong><br />
control any <strong>MIDI</strong> device you like.<br />
The Power of <strong>MIDI</strong> Sequencers<br />
A <strong>MIDI</strong> sequencer can provide a tremendous amount of fun for the amateur<br />
musician, and it’s a powerful <strong>to</strong>ol in the hands of a professional. In fact,<br />
sequencers play an important role in many modern commercial recordings.<br />
During recording, the sequencer captures and plays back live <strong>MIDI</strong><br />
performances. Performances can also be constructed slowly, note-by-note,<br />
using a variety of methods that may include “step sequencing” and onscreen<br />
pencil <strong>to</strong>ols that let you “draw” the notes you want.<br />
Each recorded performance is typically s<strong>to</strong>red on its own track, and a<br />
sequencer may offer anywhere from 16 tracks <strong>to</strong> over a hundred.<br />
Remember, <strong>to</strong>o, that a captured <strong>MIDI</strong> performance is just a set of<br />
instructions for recreating the performance. Since it doesn’t contain<br />
any actual sound, you can choose the best sound for a performance<br />
even after it’s been recorded.<br />
4
A sequencer may let you view notes in an variety of ways, from a list of <strong>MIDI</strong><br />
events, <strong>to</strong> a piano-roll-type view, <strong>to</strong> onscreen notation. (Many sequencers<br />
also allow you <strong>to</strong> print the notation you see onscreen.)<br />
The capturing of <strong>MIDI</strong> notes is just the beginning, since a sequencer allows<br />
you <strong>to</strong> do all sorts of things <strong>to</strong> perfect your music. Some of the most<br />
commonly used sequencer <strong>to</strong>ols are:<br />
• quantization—that<br />
corrects the timing of notes.<br />
• transposition—that<br />
moves notes <strong>to</strong> new musical keys.<br />
• scaling—that<br />
changes the feel of recorded musical phrases by adjusting<br />
recorded velocity values, note lengths, and more.<br />
Some instruments—such as <strong>Roland</strong>’s Fan<strong>to</strong>m-G, JUNO-G, and the MV-8800—<br />
contain a built-in sequencer, giving you sounds and sequencing in a<br />
single “workstation.” There are also numerous computer-based sequencing<br />
programs and standalone hardware sequencers.<br />
Some sequencers can record audio in addition <strong>to</strong> <strong>MIDI</strong>, allowing you <strong>to</strong> work<br />
on all of the elements in a song at the same time. The Fan<strong>to</strong>m-G offers this<br />
capability, as do computer-based sequencing programs called “DAWs,” an<br />
acronym for “Digital Audio Workstations.”<br />
Standard <strong>MIDI</strong> Files, or “SMFs”<br />
Whether a sequencer’s in a workstation, on a computer, or a standalone<br />
device, each song’s data has <strong>to</strong> be s<strong>to</strong>red as a file somewhere, somehow.<br />
Each manufacturer has their own type of sequencer file that works for their<br />
products’ features, resulting in files that only their sequencers can play. This<br />
presents a roadblock for musicians who want <strong>to</strong> collaborate or otherwise<br />
share sequencer files.<br />
The solution is the Standard <strong>MIDI</strong> File, or “SMF,” format.<br />
This standardized sequence file format allows music <strong>to</strong><br />
travel from one sequencer <strong>to</strong> another, since most modern<br />
sequencers can play SMFs, and s<strong>to</strong>re songs as SMFs. An<br />
SMF may not contain all of the bells and whistles that<br />
make any one sequencer unique, but it supports the<br />
features that are common <strong>to</strong> all sequencers, and this<br />
makes them extremely handy.<br />
Two Types of SMFs<br />
SMFs come in two flavors:<br />
• Type 0 SMFs—contain<br />
a single sequencer track that holds recorded<br />
performances for up <strong>to</strong> 16 different sounds.<br />
• Type 1 SMFs—can contain multiple sequencer tracks.<br />
<strong>MIDI</strong> and Video<br />
<strong>MIDI</strong> doesn’t have <strong>to</strong> be simply about<br />
music. <strong>MIDI</strong> devices such as <strong>Roland</strong>’s<br />
motion dive.<strong>to</strong>kyo allow performers—<br />
called “VJs”—<strong>to</strong> manipulate video images<br />
onstage, creating exciting visuals. Special<br />
software on a lap<strong>to</strong>p computer along<br />
with DJ-style physical controls open up a<br />
world of video possibilities, letting VJs<br />
remotely select clips and control how<br />
they behave.<br />
Also, most <strong>Roland</strong> keyboards have a V-LINK but<strong>to</strong>n that, when<br />
pressed, instantly reconfigures the keyboard’s knobs, sliders,<br />
but<strong>to</strong>ns, and D Beam as controllers for an attached video<br />
playback system.<br />
All SMF files have<br />
“.mid” at the end of<br />
their name.<br />
5
General <strong>MIDI</strong> and General <strong>MIDI</strong> 2<br />
General <strong>MIDI</strong>, or “GM,” is very specific set of standards that<br />
allows <strong>MIDI</strong> composers and arrangers <strong>to</strong> create music that<br />
always plays correctly on any device that supports General<br />
<strong>MIDI</strong>.<br />
Why Do We Need GM?<br />
<strong>MIDI</strong> instruments s<strong>to</strong>re their sounds in numbered memory locations,<br />
and each manufacturer can use any location for any sound. However,<br />
if a composer’s <strong>MIDI</strong> recording is played by someone who has different<br />
equipment, there’s no way for the composer <strong>to</strong> know where the required<br />
sounds are.<br />
The GM Solution<br />
General <strong>MIDI</strong> solves this since all General <strong>MIDI</strong> devices contain the same set<br />
of 128 standard sounds and drum kit sounds, s<strong>to</strong>red in a specified order.<br />
Each product creates these sounds using its own unique capabilities, but the<br />
goal is <strong>to</strong> make them all sound like the sounds in a <strong>Roland</strong> SoundCanvas.<br />
The General <strong>MIDI</strong> sounds originally came from <strong>Roland</strong>’s SoundCanvas<br />
sound module. These sounds did such a good job of meeting musicians’<br />
needs they became the foundation of the General <strong>MIDI</strong> standard.<br />
Instruments that support GM may also have lots of other sounds<br />
s<strong>to</strong>red elsewhere in their memories, but these sounds can’t be used in<br />
General <strong>MIDI</strong> recordings.<br />
General <strong>MIDI</strong> also specifies certain <strong>MIDI</strong> messages for controlling the<br />
behavior of sounds and effects.<br />
GM recordings are always SMF files.<br />
What GM Makes Possible<br />
There are lots of GM recordings on the Internet, and you can also purchase<br />
them from a variety of sources. These easy-<strong>to</strong>-use files can be great for<br />
singing or playing along with, allowing you <strong>to</strong> enjoy <strong>MIDI</strong> music without<br />
having <strong>to</strong> deal with any of its complexities.<br />
Most computers ship with a set of General <strong>MIDI</strong> sounds, and some computer<br />
games use them. Often, all you need <strong>to</strong> do is double-click a GM file and hit<br />
Play on a computer. GM-enabled <strong>MIDI</strong> instruments may also require little or<br />
no effort on the user’s part—on <strong>Roland</strong>’s GM-supporting instruments, you<br />
often simply select a GM song and press PLAY.<br />
General <strong>MIDI</strong> 2<br />
General <strong>MIDI</strong> 2 includes everything in General <strong>MIDI</strong> 1,<br />
adding more sounds, standards for sound editing, and<br />
some other niceties. If a device supports GM 2, it sports<br />
the GM 2 logo.<br />
<strong>MIDI</strong> Connections<br />
<strong>MIDI</strong> Cables<br />
<strong>MIDI</strong> devices are typically connected <strong>to</strong> each other using<br />
<strong>MIDI</strong> cables. All <strong>MIDI</strong> cables use the same wiring and have<br />
the same type of 5-pin-DIN-type connec<strong>to</strong>r on each end.<br />
A <strong>MIDI</strong> cable’s<br />
connec<strong>to</strong>r<br />
Some instruments offer <strong>MIDI</strong> communication with a computer using a<br />
standard USB cable instead of a <strong>MIDI</strong> cable, as we’ll see.<br />
Many instruments also use <strong>MIDI</strong> on the inside as a way for one internal<br />
component <strong>to</strong> talk <strong>to</strong> another. These private conversations happen<br />
under-the-hood, using internal <strong>MIDI</strong> wiring you obviously don’t see.<br />
6
<strong>MIDI</strong> Channels<br />
A single <strong>MIDI</strong> connection can carry 16 independent streams, or “channels,” of<br />
<strong>MIDI</strong> information. The ability <strong>to</strong> have 16 separate <strong>MIDI</strong> conversations going<br />
on at the same time allows a couple of important things.<br />
One <strong>MIDI</strong> Device Can Control All of Your Other <strong>MIDI</strong> Devices<br />
By setting up each <strong>MIDI</strong> device <strong>to</strong> listen only <strong>to</strong> <strong>MIDI</strong> instructions on a<br />
particular <strong>MIDI</strong> channel, you can control a whole roomful of <strong>MIDI</strong> devices<br />
from a single central <strong>MIDI</strong> device, such as a controller or a computer.<br />
Channel 14’s<br />
<strong>MIDI</strong> Device<br />
Channel 13’s<br />
<strong>MIDI</strong> Device<br />
Channel 12’s<br />
<strong>MIDI</strong> Device<br />
Channel 11’s<br />
<strong>MIDI</strong> Device<br />
Channel 15’s<br />
<strong>MIDI</strong> Device<br />
Channel 10’s<br />
<strong>MIDI</strong> Device<br />
Channel 16’s<br />
<strong>MIDI</strong> Device<br />
Channel 9’s<br />
<strong>MIDI</strong> Device<br />
Channel 1’s<br />
<strong>MIDI</strong> Device<br />
Channel 8’s<br />
<strong>MIDI</strong> Device<br />
Channel 2’s<br />
<strong>MIDI</strong> Device<br />
Channel 7’s<br />
<strong>MIDI</strong> Device<br />
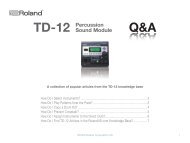
You Can Play Multiple Sounds in a Single <strong>MIDI</strong> Device<br />
Channel 3’s<br />
<strong>MIDI</strong> Device<br />
Channel 4’s<br />
<strong>MIDI</strong> Device<br />
Channel 5’s<br />
<strong>MIDI</strong> Device<br />
Channel 6’s<br />
<strong>MIDI</strong> Device<br />
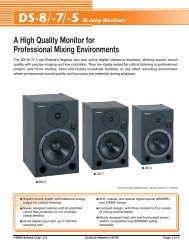
“Multitimbral” <strong>MIDI</strong> devices can play multiple sounds at the same time. Each<br />
sound responds <strong>to</strong> <strong>MIDI</strong> instructions received on a specified <strong>MIDI</strong> channel,<br />
whether they’re coming live from a controller or being played back by a<br />
sequencer track.<br />
<strong>MIDI</strong> Channel 1<br />
Music Bells<br />
<strong>MIDI</strong> Channel 2<br />
Full Strings<br />
<strong>MIDI</strong> Channel 3<br />
MC-404 Bass<br />
<strong>MIDI</strong> Channel 4<br />
Elec Perc<br />
<strong>MIDI</strong> Channel 5<br />
UltimatGrand<br />
<strong>MIDI</strong> Channel 6<br />
Strat Gtr<br />
<strong>MIDI</strong> Channel 7<br />
Wired Synth<br />
<strong>MIDI</strong> Channel 8<br />
DynamicBrass<br />
<strong>MIDI</strong> Channel 9<br />
Stage EP<br />
<strong>MIDI</strong> Channel 10<br />
Rock Kit 1<br />
<strong>MIDI</strong> Channel 11<br />
Dark Trumpet<br />
<strong>MIDI</strong> Channel 12<br />
Motion Pad<br />
<strong>MIDI</strong> Channel 13<br />
Purple Organ<br />
<strong>MIDI</strong> Channel 14<br />
Epic Lead<br />
<strong>MIDI</strong> Channel 15<br />
Good Old Hit<br />
<strong>MIDI</strong> Channel 16<br />
Choral Sweep<br />
<strong>MIDI</strong> keyboards typically allow you <strong>to</strong> split the keyboard in<strong>to</strong> different<br />
areas with their own <strong>MIDI</strong> channels so you can play different sounds<br />
from different areas of the keyboard.<br />
In General <strong>MIDI</strong> music, <strong>MIDI</strong> Channels 1-9 and 11-16 play standard<br />
sounds. Each note on <strong>MIDI</strong> Channel 10 plays a different drum kit<br />
sound.<br />
<strong>MIDI</strong> Jacks<br />
A typical <strong>MIDI</strong> device provides <strong>MIDI</strong> jacks, or “ports,” in<strong>to</strong> which you can plug<br />
a <strong>MIDI</strong> cable’s connec<strong>to</strong>r. There are three types of <strong>MIDI</strong> ports, and a device<br />
may offer one, two, or all three, depending on what the device does:<br />
• <strong>MIDI</strong> IN—A<br />
<strong>MIDI</strong> IN jack receives <strong>MIDI</strong> data from some other <strong>MIDI</strong><br />
device.<br />
• <strong>MIDI</strong> OUT—A<br />
<strong>MIDI</strong> OUT jack sends <strong>MIDI</strong> data produced by the device<br />
out <strong>to</strong> another <strong>MIDI</strong> device.<br />
• <strong>MIDI</strong> THRU—A<br />
device’s <strong>MIDI</strong> IN port receives <strong>MIDI</strong> data and passes it<br />
back out unchanged through the <strong>MIDI</strong> THRU port.<br />
7
Some devices have a “soft THRU.” These devices have no actual <strong>MIDI</strong><br />
THRU port, but their <strong>MIDI</strong> OUT port can be set <strong>to</strong> act as one.<br />
<strong>MIDI</strong> devices that communicate via USB may not provide <strong>MIDI</strong> ports.<br />
How <strong>MIDI</strong> Devices Are Connected<br />
<strong>MIDI</strong> vs Audio, Part Two<br />
In this section, we’ll talk about the connections that allow <strong>MIDI</strong> devices <strong>to</strong><br />
communicate. Once <strong>MIDI</strong> communication is established, you can connect<br />
the audio outputs of the devices you’re using <strong>to</strong> amps or <strong>to</strong> a mixing console<br />
in order <strong>to</strong> hear the sounds they produce.<br />
One-<strong>to</strong>-One <strong>MIDI</strong> Setups<br />
The simplest type of <strong>MIDI</strong> setup is a connection between two <strong>MIDI</strong> devices<br />
where one device controls the other one. The controlling device’s <strong>MIDI</strong> OUT<br />
port is connected using a single <strong>MIDI</strong> cable <strong>to</strong> the <strong>MIDI</strong> IN port of the device<br />
being controlled.<br />
<strong>MIDI</strong> OUT <strong>MIDI</strong> IN<br />
Some situations call for two-way <strong>MIDI</strong> communication, such as:<br />
• Recording in<strong>to</strong> an external sequencer—You<br />
record in<strong>to</strong> a sequencer from<br />
a <strong>MIDI</strong> instrument, and the sequencer then plays the <strong>MIDI</strong> instrument’s<br />
sounds.<br />
• S<strong>to</strong>ring both devices’ data in one place—It<br />
can be convenient <strong>to</strong> s<strong>to</strong>re<br />
patch data and other settings for both devices in the controlling device.<br />
This frees you from having <strong>to</strong> remember where all your data is later on.<br />
For two-way <strong>MIDI</strong> communication, a <strong>MIDI</strong> cable connects the <strong>MIDI</strong> OUT port<br />
of each of the two devices <strong>to</strong> the <strong>MIDI</strong> IN port of the other device.<br />
<strong>MIDI</strong> IN <strong>MIDI</strong> OUT <strong>MIDI</strong> IN <strong>MIDI</strong> OUT<br />
<strong>MIDI</strong> instruments may also allow you <strong>to</strong> establish two-way <strong>MIDI</strong><br />
communication with a computer using a single USB cable. We’ll discuss<br />
this type of connection later.<br />
<strong>MIDI</strong> Devices with Multiple <strong>MIDI</strong> OUT Ports<br />
Some instruments—such as <strong>Roland</strong>’s MV-8800—have two <strong>MIDI</strong> OUT ports,<br />
allowing the instrument <strong>to</strong> act as a controller for two devices, with 32<br />
independent <strong>MIDI</strong> channels.<br />
<strong>MIDI</strong> OUT A <strong>MIDI</strong> OUT B<br />
<strong>MIDI</strong> IN<br />
<strong>MIDI</strong> IN<br />
An instrument with two <strong>MIDI</strong> OUT ports and one <strong>MIDI</strong> IN port can have<br />
two-way communication with one of the <strong>MIDI</strong> devices <strong>to</strong> which it’s<br />
connected.<br />
Larger <strong>MIDI</strong> Setups<br />
You can set up <strong>MIDI</strong> communication between larger numbers of <strong>MIDI</strong><br />
devices with “daisychaining,” or by using a <strong>MIDI</strong> patchbay.<br />
8
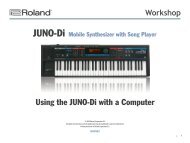
Daisychaining<br />
With daisychaining, <strong>MIDI</strong> devices are connected in a series. Here’s how a<br />
daisychain is constructed:<br />
• The <strong>MIDI</strong> OUT of the controlling <strong>MIDI</strong> device is connected <strong>to</strong> a second<br />
device’s <strong>MIDI</strong> IN.<br />
• The second device’s <strong>MIDI</strong> THRU port passes the controller device’s data<br />
<strong>to</strong> a third device’s <strong>MIDI</strong> IN port.<br />
• Each remaining device’s <strong>MIDI</strong> THRU port passes the controller device’s<br />
data <strong>to</strong> the following device’s <strong>MIDI</strong> IN port.<br />
Controller<br />
To get different sounds from<br />
each device, each one should<br />
use <strong>MIDI</strong> channels that no other<br />
device uses. You can layer sounds<br />
from different devices <strong>to</strong>gether<br />
by having them respond <strong>to</strong><br />
common <strong>MIDI</strong> channels.<br />
OUT<br />
IN<br />
IN<br />
IN<br />
THRU<br />
Device 1<br />
THRU<br />
Device 2<br />
THRU<br />
Device 3<br />
The advantage of a daisychain is that it requires no additional hardware<br />
other than <strong>MIDI</strong> cables. The disadvantage is that each device in the<br />
daisychain receives the controlling device’s data a little later than the device<br />
before it, causing its sounds <strong>to</strong> play a little later, <strong>to</strong>o. This can sometimes<br />
cause noticeable timing issues, especially with longer daisychains. If you<br />
experience timing issues with a daisychain, you can remove devices until it<br />
goes away, or use shorter <strong>MIDI</strong> cables.<br />
Using a <strong>MIDI</strong> Patchbay<br />
The best way <strong>to</strong> connect a large number of <strong>MIDI</strong> devices is by using a <strong>MIDI</strong><br />
patchbay. The patchbay receives <strong>MIDI</strong> data from a controlling device and<br />
passes it <strong>to</strong> the rest of your devices at the same time for much tighter<br />
musical timing.<br />
<strong>MIDI</strong> IN<br />
Device 1<br />
<strong>MIDI</strong> IN<br />
Device 2<br />
<strong>MIDI</strong> OUT<br />
Controller<br />
<strong>MIDI</strong> IN<br />
<strong>MIDI</strong> Patchbay<br />
<strong>MIDI</strong> IN<br />
Device 3<br />
<strong>MIDI</strong> IN<br />
Device 4<br />
<strong>MIDI</strong> patchbays of varying degrees of complexity are available. The simplest<br />
are “<strong>MIDI</strong> THRU” boxes—like the one above—that receive <strong>MIDI</strong> data from<br />
a single controlling device and distribute it simultaneously <strong>to</strong> all other<br />
connected <strong>MIDI</strong> devices. Other patchbays allow you <strong>to</strong> designate one or<br />
more masters from among your connected devices, and then send the <strong>MIDI</strong><br />
data <strong>to</strong> <strong>MIDI</strong> devices of your choice.<br />
About Computers and <strong>MIDI</strong> Connections<br />
Computers rarely have built-in <strong>MIDI</strong> ports. <strong>MIDI</strong> connectivity can be added<br />
<strong>to</strong> a computer with a:<br />
• <strong>MIDI</strong> interface—A<br />
<strong>MIDI</strong> interface is usually a rack-mounted or table<strong>to</strong>p<br />
box that connects <strong>to</strong> the computer via USB or FireWire, and provides<br />
<strong>MIDI</strong> ports you can connect <strong>to</strong> your other <strong>MIDI</strong> devices. An interface<br />
may simply provide <strong>MIDI</strong> ports for the computer, or it may be more<br />
complex, acting as a central <strong>MIDI</strong> patchbay for your entire <strong>MIDI</strong> setup.<br />
You may even be able <strong>to</strong> stack multiple <strong>MIDI</strong> interfaces for lots of <strong>MIDI</strong><br />
connections.<br />
• sound card—Sound<br />
cards can offer direct <strong>MIDI</strong> connectivity or a game<br />
port <strong>to</strong> which you connect a special cable that adds <strong>MIDI</strong> ports <strong>to</strong> the<br />
computer.<br />
9
• USB connection—Some<br />
<strong>MIDI</strong> devices, like<br />
<strong>Roland</strong>’s Fan<strong>to</strong>m-G, JUNO-Di, and SonicCell,<br />
can communicate with a computer through<br />
a USB connection. This form of two-way <strong>MIDI</strong><br />
communication is especially easy <strong>to</strong> set up since<br />
it requires only a standard A-<strong>to</strong>-B USB cable and<br />
no additional interface.<br />
You may need <strong>to</strong> install driver software on your computer for USB <strong>MIDI</strong><br />
communication.<br />
You can connect multiple USB <strong>MIDI</strong> devices <strong>to</strong> your computer at the<br />
same time. (Mixing USB <strong>MIDI</strong> devices from different manufacturers may<br />
require an understanding of how <strong>to</strong> configure your computer.)<br />
<strong>MIDI</strong> Messages<br />
USB A-Type Plug<br />
USB B-Type Plug<br />
In order for <strong>MIDI</strong> devices from different manufacturers <strong>to</strong> understand each<br />
other, <strong>MIDI</strong> uses its own language that all <strong>MIDI</strong> devices understand. This<br />
language consists of an agreed-upon set of messages. The messages cover<br />
just about anything you might want <strong>to</strong> do with a <strong>MIDI</strong> device.<br />
Not all <strong>MIDI</strong> devices respond <strong>to</strong> all <strong>MIDI</strong> messages. The documentation<br />
for most <strong>MIDI</strong> devices contains a <strong>MIDI</strong> implementation chart that details<br />
the <strong>MIDI</strong> messages the device understands.<br />
<strong>MIDI</strong> messages typically have 128 possible values. Most manufacturers,<br />
such as <strong>Roland</strong>, list them as “0-127.” Some use “1-128.” Again, check a<br />
device’s documentation <strong>to</strong> learn the numbering scheme it uses.<br />
Basic Performance Messages<br />
We’ve already <strong>to</strong>uched on the <strong>MIDI</strong> messages that represent the most<br />
significant elements of a performance when you’re playing a <strong>MIDI</strong> device’s<br />
sounds:<br />
• Note-on and note-off messages—When<br />
you begin <strong>to</strong> play a note on a<br />
<strong>MIDI</strong> controller, a note-on message is sent <strong>to</strong> the receiving <strong>MIDI</strong> device,<br />
which starts playing the note. When you s<strong>to</strong>p playing the note on the<br />
controller, a note-off message is transmitted and the receiving device<br />
s<strong>to</strong>ps sounding the note.<br />
Note-on<br />
message<br />
Note-off<br />
message<br />
• Velocity—The<br />
force with which you play a note on the controller is<br />
measured as the speed, or “velocity,” with which you play the note.<br />
When you play a note, a velocity value representing the force with<br />
which you played the note is transmitted <strong>to</strong> the receiving device along<br />
with the note’s note-on message. Settings in the receiving device’s<br />
sound determine if and how the sound of the note is <strong>to</strong> change in<br />
response <strong>to</strong> velocity. Typically, notes get louder or quieter as you play<br />
harder or softer, respectively. They may also get brighter with higher<br />
velocity values. Sounds can be programmed <strong>to</strong> respond in all sorts of<br />
ways <strong>to</strong> velocity.<br />
Soft notes produce<br />
low <strong>MIDI</strong> velocity<br />
values<br />
Hard notes produce<br />
high <strong>MIDI</strong> velocity<br />
values<br />
10
• Pitch bend—These<br />
messages instruct a <strong>MIDI</strong><br />
device <strong>to</strong> raise or lower the played note’s<br />
pitch. Pitch bend messages are usually<br />
transmitted by moving a pitch bend/<br />
modulation lever or pitch bend wheel at<br />
the left of a keyboard controller, though<br />
they can be transmitted from any knob,<br />
but<strong>to</strong>n, or joystick programmed <strong>to</strong> do so.<br />
String-bending on a guitar controller can<br />
also generate pitch bend messages.<br />
Channel and polyphonic after<strong>to</strong>uch<br />
• —”After<strong>to</strong>uch” is most often<br />
generated by keyboard controllers. You can generate after<strong>to</strong>uch<br />
messages by pressing down on a key you’ve played. The after<strong>to</strong>uch<br />
value reflects how hard you press. On the receiving device, a sound can<br />
be programmed <strong>to</strong> respond <strong>to</strong> after<strong>to</strong>uch in any number of ways. With<br />
“channel” after<strong>to</strong>uch, pressing down on any one key affects all currently<br />
sounding notes. “Polyphonic” after<strong>to</strong>uch affects only the note actually<br />
being pressed down.<br />
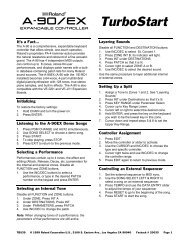
Program Changes<br />
Press down in<strong>to</strong> a key <strong>to</strong><br />
create <strong>MIDI</strong> after<strong>to</strong>uch data.<br />
Push a pitch bend/<br />
modulation lever right or left<br />
<strong>to</strong> raise or lower, respectively,<br />
a sound’s pitch.<br />
A <strong>MIDI</strong> device can select sounds in another <strong>MIDI</strong> device. This can be handy<br />
onstage, letting you <strong>to</strong> change sounds in all of your connected <strong>MIDI</strong> devices<br />
without your hands leaving the instrument you’re playing. It also allows a<br />
sequencer <strong>to</strong> remember the sounds you want it <strong>to</strong> play and au<strong>to</strong>matically<br />
select them for you in your receiving devices.<br />
Program Change values run from 0-127, since <strong>MIDI</strong>-device sounds are<br />
arranged in “banks” containing up <strong>to</strong> 128 sounds each. (You can change<br />
banks using Bank Select Control Change messages, as we’ll discuss on<br />
Page 12.)<br />
Control Change Messages<br />
What Control Change Messages Are<br />
There’s an separate category of <strong>MIDI</strong> messages called Control Change, or<br />
“CC,” messages. Control Change messages cover a wide range of behaviors<br />
that can be controlled via <strong>MIDI</strong>.<br />
Control Change messages are numbered from 0-127, like so many<br />
things in <strong>MIDI</strong>. There’s a complete list of <strong>MIDI</strong> Control Change<br />
messages later in this book. For now, let’s discuss how they work.<br />
Some <strong>Roland</strong> instruments—such as the Fan<strong>to</strong>m-G and the MV-8800—allow<br />
you <strong>to</strong> easily send any Control Change message <strong>to</strong> another device.<br />
In the following sections, we’ll explain how <strong>to</strong> properly construct<br />
Control Change messages. While most instruments take care of this for<br />
you, you can manually build your own in some <strong>MIDI</strong> sequencers.<br />
How Control Change Messages Work<br />
About <strong>MIDI</strong> Device Sounds<br />
Each sound-producing <strong>MIDI</strong> device contains an engine of some sort for<br />
producing its sounds. This engine has a collection of settings, or “parameters,”<br />
that control its behavior. These parameters, and their values, allow the device<br />
<strong>to</strong> produce a range of different sounds. A sound, often called a “patch,” is<br />
really nothing more than one set of values for the engine’s parameters.<br />
Control Change Messages and Sound Parameters<br />
Many sound/patch parameters correspond <strong>to</strong> a Control Change number.<br />
This allows a <strong>MIDI</strong> controller <strong>to</strong> set the parameters remotely. A properly<br />
constructed Control Change message has two elements:<br />
• First, the desired parameter’s Control Change number is transmitted <strong>to</strong><br />
the receiving device <strong>to</strong> let it know the parameter <strong>to</strong> be set.<br />
• Second, the desired value for the parameter is transmitted.<br />
11
For example:<br />
1<br />
2<br />
First, you send a CC #7 message—CC #7 is the Volume Control Change<br />
message—<strong>to</strong> tell the receiving unit you want <strong>to</strong> adjust its loudness.<br />
Next, you send a value that sets the unit’s loudness as desired.<br />
A Control Change message can act as an:<br />
• override—that<br />
sets the parameter <strong>to</strong> the transmitted value.<br />
• offset—that<br />
adjusts the parameter up or down by the value’s amount.<br />
MSB and LSB<br />
“MSB” and “LSB” stand for “Most Significant Byte” and “Least Significant Byte,”<br />
respectively. MSB Control Change messages typically act as coarse controls,<br />
while LSB messages generally allow fine adjustments.<br />
A number of the Control Change messages have both MSB and LSB versions.<br />
<strong>MIDI</strong> devices that contain sounds/patches typically respond <strong>to</strong> both Bank<br />
Select MSB and LSB Control Change messages. Beyond that, <strong>MIDI</strong> devices<br />
may respond only <strong>to</strong> Control Change MSB messages, or <strong>to</strong> both MSB and<br />
LSB—you can check a device’s documentation for details.<br />
Bank Selects<br />
As we noted earlier, Program Changes allow you <strong>to</strong> select sounds within<br />
the current sound bank. Many instruments, however, have more than 128<br />
sounds, and therefore offer multiple sound banks. Bank Select Control<br />
Change messages, or simply “Bank Selects,” allow you <strong>to</strong> choose different<br />
banks within the receiving <strong>MIDI</strong> device.<br />
In fact, a full Program Change message includes the Bank Select MSB and<br />
LSB values that choose the desired sound’s bank, and then the Program<br />
Change value for the sound itself within the bank. The message therefore<br />
has five elements, sent in the following order:<br />
1 CC #0—the<br />
Bank Select MSB Control Change message<br />
2 the MSB value—for<br />
the sound bank you want<br />
3 CC #32—the<br />
Bank Select LSB Control Change message<br />
4 the LSB value—for<br />
the sound bank you want<br />
5 the Program Change number—for<br />
the desired sound within the nowselected<br />
bank.<br />
Traditional Bank Selection and <strong>Roland</strong> Bank Selection<br />
His<strong>to</strong>rically, Bank Select MSB values were always 0, and actual bank selection<br />
was performed using only the Bank Select LSB value.<br />
There’s a problem with this system, though. With instruments that<br />
accommodate sound expansion cards, this type of bank selection works<br />
reliably only if the sound cards are always installed in the same expansion<br />
slots. For people swapping sound cards in and out of instruments, or for<br />
those installing their cards in instruments belonging <strong>to</strong> other musicians or<br />
studios with whom they’re working, this can be challenging.<br />
<strong>Roland</strong>’s solves this problem by assigning permanent<br />
Bank Select MSB and LSB addresses <strong>to</strong> each of<br />
its SR-JV80-series, SRX-series, and ARX-series sound<br />
expansion boards. You can download a booklet<br />
containing the Bank Select messages for your expansion board from the<br />
<strong>Roland</strong> US Web site at www.<strong>Roland</strong>US.com. To find the list, go <strong>to</strong> the sound<br />
card’s web page and click its Support tab.<br />
The booklet for:<br />
• SR-JV80-series sound expansion boards—is<br />
Selecting Internal and SR-JV80<br />
Sounds Via <strong>MIDI</strong>.<br />
• SRX-series sound expansion boards—<br />
is Selecting SRX-Series Sounds Via<br />
<strong>MIDI</strong>.<br />
• ARX-series sound expansion boards— is Selecting Fan<strong>to</strong>m-G and<br />
ARX-Series Sounds Via <strong>MIDI</strong><br />
Other Common Control Change Messages<br />
Some of the other most commonly used messages are:<br />
• CC #1 Modulation—Modulation<br />
can add vibra<strong>to</strong> or other changes <strong>to</strong> a<br />
sound. Modulation messages are usually produced by pushing a pitch<br />
bend/modulation lever or modulation wheel forward.<br />
• CC #7 Volume—This<br />
message can control the overall level of the<br />
receiving device’s sound.<br />
• CC # 64 Sustain—This<br />
message instructs the receiving unit’s sound that<br />
a sustain pedal is being pressed, or not, causing notes <strong>to</strong> hold, or not.<br />
• CC #74 Brightness—Brightness<br />
adjusts a sound’s filter cu<strong>to</strong>ff, allowing<br />
you <strong>to</strong> create filter “sweeps” in the sound.<br />
12
<strong>MIDI</strong> Messages for the Adventurous<br />
Undefined CC Numbers<br />
Some of the 128 Control Change numbers aren’t assigned <strong>to</strong> <strong>MIDI</strong> device<br />
behaviors. These “undefined” Control Change numbers can be used by <strong>MIDI</strong><br />
device manufacturers for unique purposes within their own products.<br />
RPNs and NRPNs<br />
“Registered Parameter Numbers,” or “RPNs,” and “Non-Registered Parameter<br />
Numbers,” or “NRPNs” are special Control Change subgroups that provide<br />
control over other significant <strong>MIDI</strong>-device behaviors.<br />
• RPNs—allow<br />
for the <strong>MIDI</strong> control of important global settings, including<br />
things like coarse and fine tuning. As the “Registered” in their name<br />
suggests, RPNs control a standardized set of parameters, regardless of<br />
manufacturer.<br />
• NRPNs—allow<br />
manufacturers <strong>to</strong> control parameters in their products<br />
that are otherwise not controlled via <strong>MIDI</strong>.<br />
Properly constructed RPN and NRPN messages contain the appropriate RPN<br />
or NRPN MSB and LSB values—<strong>to</strong> identify the parameter being set—along<br />
with a Data Entry MSB (and sometimes LSB) value <strong>to</strong> set the targeted<br />
parameter as desired.<br />
As always, consult a device’s documentation <strong>to</strong> learn if and how it<br />
responds <strong>to</strong> RPNs and/or NRPNs.<br />
System Exclusive Messages<br />
While <strong>MIDI</strong> is usually about standardized messages that every <strong>MIDI</strong> device<br />
can understand, <strong>MIDI</strong> can also be used for communicating things specific <strong>to</strong><br />
particular devices, such as:<br />
• the device’s global settings<br />
• the contents of a device’s memory<br />
• messages that can remotely operate its controls<br />
These types of data and more can be transmitted and received as “System<br />
Exclusive,” or “SysEx,” <strong>MIDI</strong> data. At the beginning of each SysEx message<br />
is information that only the intended receiving device can understand. It’s<br />
manufacturer-specific, product-specific, and even individual-device specific,<br />
since a SysEx message always contains a SysEx ID number that tags the data<br />
as being for a particular device—this is important in situations where there<br />
are more than one of the same type of device.<br />
Bulk Dumps<br />
You may be able <strong>to</strong> back up all of a device’s settings by performing a SysEx<br />
“bulk dump” <strong>to</strong> an external s<strong>to</strong>rage device, such as a computer’s hard drive.<br />
The charm of a bulk dump is that the s<strong>to</strong>rage device doesn’t need <strong>to</strong> have<br />
any idea what the data does or means—it simply directs the data back <strong>to</strong> its<br />
originating device for re-loading.<br />
Synchronization<br />
<strong>MIDI</strong> can synchronize the timing of multiple <strong>MIDI</strong> devices that contain<br />
sequencers, from full-blown production suites <strong>to</strong> simple beat boxes.<br />
• <strong>MIDI</strong> clocks—provide<br />
timing information from the controlling device<br />
<strong>to</strong> other connected devices. This keeps them all running at the same<br />
speed.<br />
• Song Position Pointer Messages—or<br />
“SPP” messages, accompany <strong>MIDI</strong><br />
clocks, and pass tempo and time signature information from one <strong>MIDI</strong><br />
device <strong>to</strong> another.<br />
• MTC—or<br />
“<strong>MIDI</strong> Time Code,” keeps the time counters of connected<br />
devices in sync.<br />
When synchronizing <strong>MIDI</strong> devices, the controlling device is called the<br />
“master,” and any device being controlled is called a “slave.”<br />
13
<strong>MIDI</strong> Control Change List<br />
CC # Control Function Value Value Used As<br />
0 Bank Select MSB 0-127 MSB<br />
1 Modulation Wheel or Lever 0-127 MSB<br />
2 Breath Controller 0-127 MSB<br />
3 Undefined 0-127 MSB<br />
4 Foot Controller 0-127 MSB<br />
5 Portamen<strong>to</strong> Time 0-127 MSB<br />
6 Data Entry MSB 0-127 MSB<br />
7 Channel Volume 0-127 MSB<br />
8 Balance 0-127 MSB<br />
9 Undefined 0-127 MSB<br />
10 Pan 0-127 MSB<br />
11 Expression Controller 0-127 MSB<br />
12 Effect Control 1 0-127 MSB<br />
13 Effect Control 2 0-127 MSB<br />
14 Undefined 0-127 MSB<br />
15 Undefined 0-127 MSB<br />
16 General Purpose Controller 1 0-127 MSB<br />
17 General Purpose Controller 2 0-127 MSB<br />
18 General Purpose Controller 3 0-127 MSB<br />
19 General Purpose Controller 4 0-127 MSB<br />
20 Undefined 0-127 MSB<br />
21 Undefined 0-127 MSB<br />
22 Undefined 0-127 MSB<br />
23 Undefined 0-127 MSB<br />
24 Undefined 0-127 MSB<br />
25 Undefined 0-127 MSB<br />
26 Undefined 0-127 MSB<br />
27 Undefined 0-127 MSB<br />
28 Undefined 0-127 MSB<br />
CC # Control Function Value Value Used As<br />
29 Undefined 0-127 MSB<br />
30 Undefined 0-127 MSB<br />
31 Undefined 0-127 MSB<br />
32 Bank Select LSB 0-127 LSB<br />
33 LSB for Control 1 (Modulation Wheel<br />
or Lever)<br />
0-127 LSB<br />
34 LSB for Control 2 (Breath Controller) 0-127 LSB<br />
35 LSB for Control 3 (Undefined) 0-127 LSB<br />
36 LSB for Control 4 (Foot Controller) 0-127 LSB<br />
37 LSB for Control 5 (Portamen<strong>to</strong> Time) 0-127 LSB<br />
38 LSB for Control 6 (Data Entry) 0-127 LSB<br />
39 LSB for Control 7 (Channel Volume,<br />
formerly Main Volume)<br />
0-127 LSB<br />
40 LSB for Control 8 (Balance) 0-127 LSB<br />
41 LSB for Control 9 (Undefined) 0-127 LSB<br />
42 LSB for Control 10 (Pan) 0-127 LSB<br />
43 LSB for Control 11 (Expression<br />
Controller)<br />
0-127 LSB<br />
44 LSB for Control 12 (Effect control 1) 0-127 LSB<br />
45 LSB for Control 13 (Effect control 2) 0-127 LSB<br />
46 LSB for Control 14 (Undefined) 0-127 LSB<br />
47 LSB for Control 15 (Undefined) 0-127 LSB<br />
48 LSB for Control 16 (General Purpose<br />
Controller 1)<br />
0-127 LSB<br />
49 LSB for Control 17 (General Purpose<br />
Controller 2)<br />
0-127 LSB<br />
50 LSB for Control 18 (General Purpose<br />
Controller 3)<br />
0-127 LSB<br />
51 LSB for Control 19 (General Purpose<br />
Controller 4)<br />
0-127 LSB<br />
14
CC # Control Function Value Value Used As<br />
52 LSB for Control 20 (Undefined) 0-127 LSB<br />
53 LSB for Control 21 (Undefined) 0-127 LSB<br />
54 LSB for Control 22 (Undefined) 0-127 LSB<br />
55 LSB for Control 23 (Undefined) 0-127 LSB<br />
56 LSB for Control 24 (Undefined) 0-127 LSB<br />
57 LSB for Control 25 (Undefined) 0-127 LSB<br />
58 LSB for Control 26 (Undefined) 0-127 LSB<br />
59 LSB for Control 27 (Undefined) 0-127 LSB<br />
60 LSB for Control 28 (Undefined) 0-127 LSB<br />
61 LSB for Control 29 (Undefined) 0-127 LSB<br />
62 LSB for Control 30 (Undefined) 0-127 LSB<br />
63 LSB for Control 31 (Undefined) 0-127 LSB<br />
64 Damper Pedal on/off (Sustain) 64 on --<br />
65 Portamen<strong>to</strong> On/Off 64 on<br />
66 Sustenu<strong>to</strong> On/Off 64 on --<br />
67 Soft Pedal On/Off 64 on --<br />
68 Lega<strong>to</strong> Footswitch 64 Lega<strong>to</strong><br />
64 on<br />
70 Sound Controller 1 (Sound Variation) 0-127 LSB<br />
71 Sound Controller 2 (Timbre) 0-127 LSB<br />
72 Sound Controller 3 (Release Time) 0-127 LSB<br />
73 Sound Controller 4 (Attack Time) 0-127 LSB<br />
74 Sound Controller 5 (Brightness) 0-127 LSB<br />
75 Sound Controller 6 (Decay Time) 0-127 LSB<br />
76 Sound Controller 7 (Vibra<strong>to</strong> Rate) 0-127 LSB<br />
77 Sound Controller 8 (Vibra<strong>to</strong> Depth) 0-127 LSB<br />
78 Sound Controller 9 (Vibra<strong>to</strong> Delay) 0-127 LSB<br />
79 Sound Controller 10 (undefined) 0-127 LSB<br />
80 General Purpose Controller 5 0-127 LSB<br />
81 General Purpose Controller 6 0-127 LSB<br />
82 General Purpose Controller 7 0-127 LSB<br />
CC # Control Function Value Value Used As<br />
83 General Purpose Controller 8 0-127 LSB<br />
84 Portamen<strong>to</strong> Control 0-127<br />
85 Undefined --- LSB<br />
86 Undefined --- LSB<br />
87 Undefined --- LSB<br />
88 Undefined --- LSB<br />
89 Undefined --- LSB<br />
90 Undefined --- LSB<br />
91 Effects 1 Depth LSB<br />
92 Effects 2 Depth 0-127 LSB<br />
93 Effects 3 Depth LSB<br />
94 Effects 4 Depth 0-127 LSB<br />
95 Effects 5 Depth 0-127 LSB<br />
96 Data Increment (Data Entry +1) N/A LSB<br />
97 Data Decrement (Data Entry -1) N/A LSB<br />
98 Non-Registered Parameter Number<br />
(NRPN) LSB<br />
0-127 LSB<br />
99 Non-Registered Parameter Number<br />
(NRPN) MSB<br />
0-127 MSB<br />
100 Registered Parameter Number (RPN)<br />
LSB<br />
0-127 LSB<br />
101 Registered Parameter Number (RPN)<br />
MSB<br />
0-127 MSB<br />
102 Undefined ---<br />
103 Undefined ---<br />
104 Undefined ---<br />
105 Undefined ---<br />
106 Undefined ---<br />
107 Undefined ---<br />
108 Undefined ---<br />
109 Undefined ---<br />
110 Undefined ---<br />
15
The End<br />
CC # Control Function Value Value Used As<br />
111 Undefined ---<br />
112 Undefined ---<br />
113 Undefined ---<br />
114 Undefined ---<br />
115 Undefined ---<br />
116 Undefined ---<br />
117 Undefined ---<br />
118 Undefined ---<br />
119 Undefined ---<br />
120 All Sound Off 0<br />
121 Reset All Controllers<br />
122 Local Control On/Off 0 off, 127 on<br />
123 All Notes Off 0<br />
124 Omni Mode Off (+ all notes off) 0<br />
125 Omni Mode On (+ all notes off) 0<br />
126 Poly Mode On/Off (+ all notes off) **<br />
127 Poly Mode On (+ mono off +all notes<br />
off)<br />
0<br />
We hope you’ve found this <strong>InFocus</strong> booklet helpful. Look for other <strong>InFocus</strong><br />
booklets at www.<strong>Roland</strong>US.com.<br />
For complete <strong>MIDI</strong> technical documentation, visit the <strong>MIDI</strong> Manufacturers<br />
Association Web site at http://midi.org.<br />
16