Logical Decisions - Classweb
Logical Decisions - Classweb
Logical Decisions - Classweb

Create successful ePaper yourself
Turn your PDF publications into a flip-book with our unique Google optimized e-Paper software.
<strong>Logical</strong><br />
<strong>Decisions</strong><br />
Decision Support<br />
Software<br />
User’s Manual<br />
<strong>Logical</strong> <strong>Decisions</strong>, Fairfax, VA, USA
TM<br />
This manual supports <strong>Logical</strong> <strong>Decisions</strong>7 for Windows , Version<br />
6.0.<br />
<strong>Logical</strong> <strong>Decisions</strong> would like to acknowledge the following<br />
people: and organizations:<br />
Gary R. Smith -- Developer,<br />
Pearson Design, Evergreen, CO -- Graphic Design,<br />
Little Booklets & Manuals, Evergreen, CO -- Production.<br />
© January, 2007 <strong>Logical</strong> <strong>Decisions</strong><br />
9206 Saint Marks Pl<br />
Fairfax, VA 22031<br />
(800) 35-LOGIC<br />
(703) 218-1801<br />
This manual is copyrighted. All rights reserved. This manual<br />
may not be copied, photocopied, reproduced, translated or<br />
reduced to any electronic or machine readable form, in whole or<br />
in part, without prior written consent of <strong>Logical</strong> <strong>Decisions</strong>.
Table of Contents<br />
Table of Contents ......................................... i<br />
Introduction........................................... 1 - 1<br />
Organization of Manual................................ 1 - 2<br />
Requirements and Installation . . . . . . . . . . . . . . . . . . . . . . . . . . . 2 - 1<br />
Equipment Requirements .............................. 2 - 1<br />
Installation ........................................... 2 - 1<br />
Quick Start ............................................ 3 - 1<br />
Introduction .......................................... 3 - 1<br />
What <strong>Logical</strong> <strong>Decisions</strong> does . . . . . . . . . . . . . . . . . . . . . 3 - 1<br />
The Steps of a <strong>Logical</strong> <strong>Decisions</strong> Analysis . . . . . . . . . . . . . . . . 3 - 1<br />
Structuring Your Problem .............................. 3 - 2<br />
Describing your Alternatives ........................... 3 - 3<br />
Assessing Your Preferences............................. 3 - 3<br />
Storing your preference information . . . . . . . . . . . . . . 3 - 4<br />
Converting the Measures to Common Units . . . . . . . . 3 - 4<br />
Non-linear conversions.......................... 3 - 4<br />
Combining the measures utilities into an overall score<br />
........................................ 3 - 5<br />
Ranking Your Alternatives and Displaying Results . . . . . . . . 3 - 6<br />
Learning more about <strong>Logical</strong> <strong>Decisions</strong> . . . . . . . . . . . . . . . . . . 3 - 7<br />
Final Comments ...................................... 3 - 7<br />
Introductory Tutorial ................................... 4 - 1<br />
Tutorial Overview..................................... 4 - 1<br />
Initial Steps........................................... 4 - 3<br />
Defining Alternatives .................................. 4 - 3<br />
Defining Goals -- How You Will Compare the Trucks . . . . . . 4 - 4<br />
Defining Measures .................................... 4 - 5<br />
Describing the alternatives in detail . . . . . . . . . . . . . . . . . . . . . 4 - 9<br />
Defining Preferences ................................. 4 - 10<br />
Defining a Preference Set ....................... 4 - 10<br />
Defining Preferences for Individual Measures . . . . . 4 - 11<br />
Defining Preferences Over Goals . . . . . . . . . . . . . . . . 4 - 16<br />
Displaying Results ................................... 4 - 25<br />
Graph Alternatives ............................ 4 - 26<br />
Sensitivity Analysis ............................ 4 - 27<br />
Comparing Alternatives ........................ 4 - 28<br />
Summary ..................................... 4 - 29<br />
<strong>Logical</strong> <strong>Decisions</strong> i
Advanced Tutorial .....................................5 - 1<br />
Measure Categories ...................................5 - 1<br />
Probabilities ..........................................5 - 3<br />
Results Displays for Probabilities . . . . . . . . . . . . . . . . . 5 - 9<br />
Importing and Exporting Data . . . . . . . . . . . . . . . . . . . . . . . . . 5 - 12<br />
Defining Interactions Between Goal Members . . . . . . . . . . . . 5 - 15<br />
Using LDW 1: Structuring ...............................6 - 1<br />
Introduction ..........................................6 - 1<br />
Structuring a <strong>Logical</strong> <strong>Decisions</strong> Analysis . . . . . . . . . . . . . . . . . 6 - 1<br />
Editing Options for Structuring Your Analysis . . . . . . . . . . . . 6 - 1<br />
Views for structuring your analysis . . . . . . . . . . . . . . . . . . . . . . 6 - 3<br />
The Summary View ............................6 - 4<br />
The Goals Hierarchy View .......................6 - 5<br />
The Matrix View...............................6 - 10<br />
The Quick Entry View ..........................6 - 13<br />
Structuring Alternatives...............................6 - 14<br />
Structuring Goals ....................................6 - 16<br />
Structuring Evaluation Measures . . . . . . . . . . . . . . . . . . . . . . . 6 - 17<br />
Structuring Measure Levels............................6 - 20<br />
Probabilistic Measure Levels . . . . . . . . . . . . . . . . . . . . 6 - 21<br />
Levels with labels..............................6 - 29<br />
Measure Categories ............................6 - 30<br />
Printing Evaluation Forms.............................6 - 32<br />
Using LDW 2: Assessing ................................7 - 1<br />
Introduction ..........................................7 - 1<br />
Preference Sets .................................7 - 1<br />
Overview of Preference Assessments . . . . . . . . . . . . . . . . . . . . 7 - 5<br />
Defining Category Multipliers . . . . . . . . . . . . . . . . . . . . . . . . . . 7 - 5<br />
Converting Measure Levels to Common Units . . . . . . . . . . . . 7 - 6<br />
Common Units Using SUFs ......................7 - 8<br />
Common Units Using Analytic Hierarchy Process<br />
.......................................7 - 15<br />
Common Units Using Adjusted AHP . . . . . . . . . . . . . 7 - 19<br />
Common Units Using AHP SUFs . . . . . . . . . . . . . . . . 7 - 19<br />
Common Units Using Direct Entry . . . . . . . . . . . . . . . 7 - 21<br />
Common Units for Measures With Labels . . . . . . . . . 7 - 22<br />
Assessing Weights....................................7 - 23<br />
Selecting Goals With a MUF . . . . . . . . . . . . . . . . . . . . . 7 - 23<br />
Preparing for Assessing Weights . . . . . . . . . . . . . . . . 7 - 24<br />
Assessing Weights with Tradeoffs . . . . . . . . . . . . . . . . 7 - 26<br />
Assessing Weights by Direct Entry . . . . . . . . . . . . . . . 7 - 31<br />
Assessing Weights with the "Smarter" Method . . . . . 7 - 33<br />
Assessing Weights with the "Smart Method" . . . . . . 7 - 35<br />
ii <strong>Logical</strong> <strong>Decisions</strong>
Assessing Weights with Weight Ratios . . . . . . . . . . . . 7 - 37<br />
Assessing Weights with the Analytic Hierarchy Process<br />
....................................... 7 - 38<br />
Changing Assessment Methods . . . . . . . . . . . . . . . . . 7 - 40<br />
Defining Interactions ................................. 7 - 41<br />
Interactions When Directly Entering Weights . . . . . . 7 - 44<br />
Printing Questionnaires............................... 7 - 45<br />
Consistency Checks .................................. 7 - 45<br />
Using LDW 3: Reviewing Results . . . . . . . . . . . . . . . . . . . . . . . . 8 - 1<br />
Introduction .......................................... 8 - 1<br />
Reviewing Your Preferences ............................ 8 - 1<br />
Common Units (SUF) Graphs . . . . . . . . . . . . . . . . . . . . 8 - 2<br />
Computing Utilities From Measure Levels . . . . . . . . . 8 - 3<br />
Graphs of Single Tradeoffs ....................... 8 - 4<br />
Tradeoffs by One Measure ....................... 8 - 5<br />
Tradeoff Summary Graphs ....................... 8 - 6<br />
Graph Pairs of Measures......................... 8 - 9<br />
Comments Summary........................... 8 - 12<br />
Assessment Summary .......................... 8 - 12<br />
Percentage Weights ............................ 8 - 13<br />
MUF Formulas ................................ 8 - 15<br />
SUF Formulas ................................. 8 - 17<br />
Graph Weights ................................ 8 - 19<br />
Viewing Your Results ................................. 8 - 19<br />
Rank Alternatives ............................. 8 - 20<br />
Stacked Bar Ranking ........................... 8 - 22<br />
Measure Equivalents Ranking . . . . . . . . . . . . . . . . . . . 8 - 24<br />
Uncertainty Summary.......................... 8 - 25<br />
Dynamic Sensitivity............................ 8 - 27<br />
Sensitivity Graphs ............................. 8 - 29<br />
Sensitivity Table ............................... 8 - 30<br />
Scatter Diagrams .............................. 8 - 31<br />
Efficient Frontier .............................. 8 - 33<br />
Ranking Results Graph ......................... 8 - 36<br />
Ranking Results Matrix......................... 8 - 38<br />
Preference Set Summary........................ 8 - 38<br />
Cutoff Summary............................... 8 - 40<br />
Graph an Alternative........................... 8 - 41<br />
Alternative Uncertainty Graph . . . . . . . . . . . . . . . . . . 8 - 44<br />
Compare Alternatives .......................... 8 - 45<br />
............................................. 8 - 48<br />
Printing and Saving Windows ......................... 8 - 49<br />
Printing Graphics.............................. 8 - 49<br />
Copying Graphics Images to the Clipboard . . . . . . . 8 - 50<br />
Saving Windows to a File ....................... 8 - 50<br />
<strong>Logical</strong> <strong>Decisions</strong> iii
Modifying Graphics ..................................8 - 51<br />
Changing the appearance of windows . . . . . . . . . . . . 8 - 51<br />
Selecting Objects to Modify . . . . . . . . . . . . . . . . . . . . . 8 - 60<br />
Modifying Selected Objects . . . . . . . . . . . . . . . . . . . . . 8 - 60<br />
Loading and Saving LDW Files . . . . . . . . . . . . . . . . . . . . . . . . 8 - 62<br />
Creating a New LDW analysis . . . . . . . . . . . . . . . . . . . 8 - 62<br />
Saving an LDW Analysis .......................8 - 63<br />
Loading an LDW Analysis ......................8 - 64<br />
Importing Data Into LDW ......................8 - 64<br />
Exporting Data From LDW......................8 - 72<br />
Other Options .......................................8 - 73<br />
In Depth ..............................................9 - 1<br />
Introduction ..........................................9 - 1<br />
Identifying and Describing Alternatives . . . . . . . . . . . . . . . . . . 9 - 3<br />
Identifying Alternatives .........................9 - 4<br />
Composite Alternatives..........................9 - 4<br />
Describing Alternatives..........................9 - 4<br />
Identifying and Defining Alternatives in LDW . . . . . 9 - 6<br />
Identifying Goals and Objectives . . . . . . . . . . . . . . . . . . . . . . . . 9 - 6<br />
Developing a Goals Hierarchy . . . . . . . . . . . . . . . . . . . 9 - 6<br />
Goals and Objectives in LDW . . . . . . . . . . . . . . . . . . . . 9 - 7<br />
Defining Measures ....................................9 - 8<br />
Measures in LDW...............................9 - 9<br />
Quantifying Measure Levels ............................9 - 9<br />
Entering Measure Levels in LDW . . . . . . . . . . . . . . . . 9 - 10<br />
Defining Levels With Measure Categories . . . . . . . . . 9 - 10<br />
Quantifying Preferences ..............................9 - 12<br />
Converting the Measures to Common Units . . . . . . . . . . . . . 9 - 12<br />
Single Measure Utility Functions . . . . . . . . . . . . . . . . 9 - 14<br />
Computing Common Units With The Analytic Hierarchy<br />
Process ................................9 - 26<br />
Estimates of Consistency in AHP . . . . . . . . . . . . . . . . 9 - 30<br />
Computing Common Units With AHP SUFs . . . . . . 9 - 30<br />
Establishing the Importance of Each Measure . . . . . . . . . . . . 9 - 31<br />
Deciding which Goals Should Have a MUF . . . . . . . 9 - 32<br />
Formulas for MUFs ............................9 - 36<br />
Approaches for Assessing MUFs . . . . . . . . . . . . . . . . . 9 - 36<br />
Assessing Weights Using Importance Orderings . . . 9 - 37<br />
Assessing Weights Using Importance Ratios . . . . . . . 9 - 39<br />
Assessing Weights by Comparing Pairs of Alternatives<br />
.......................................9 - 41<br />
Interpreting Directly Entered Weights . . . . . . . . . . . . 9 - 48<br />
Changing Weight Assessment Methods . . . . . . . . . . . 9 - 50<br />
The Relationship Between Measure Ranges and Weights<br />
.......................................9 - 50<br />
iv <strong>Logical</strong> <strong>Decisions</strong>
Assessing Interactions Between Measures . . . . . . . . . . . . . . . 9 - 55<br />
Ranking Alternatives ................................. 9 - 64<br />
Interpreting the Ranking Results . . . . . . . . . . . . . . . . 9 - 65<br />
Examples ............................................ 10 - 1<br />
Introduction ......................................... 10 - 1<br />
Buying a Computer................................... 10 - 1<br />
Buying a House ...................................... 10 - 6<br />
Reservoir Location Selection . . . . . . . . . . . . . . . . . . . . . . . . . . 10 - 12<br />
Commands Summary ................................. 11 - 1<br />
AHP Menu .......................................... 11 - 1<br />
Assess Menu ........................................ 11 - 2<br />
Edit Menu........................................... 11 - 2<br />
File Menu ........................................... 11 - 4<br />
Help Menu .......................................... 11 - 5<br />
Hierarchy Menu ..................................... 11 - 5<br />
Main Menu.......................................... 11 - 7<br />
Matrix Menu ........................................ 11 - 8<br />
Preferences Menu .................................... 11 - 8<br />
Results Menu ........................................ 11 - 9<br />
Review Menu....................................... 11 - 11<br />
SUF Menu.......................................... 11 - 13<br />
Tradeoff Menu...................................... 11 - 14<br />
View Menu......................................... 11 - 14<br />
Window Menu...................................... 11 - 15<br />
Glossary ............................................. 12 - 1<br />
Bibliography ..........................................B - 1<br />
Appendix ............................................ A - 1<br />
Computing Relative Weights from a Tradeoff . . . . . . . . . . . . A - 1<br />
Example of Relative Weight Computation . . . . . . . . . . . . . . . A - 2<br />
Index ................................................. I - 1<br />
<strong>Logical</strong> <strong>Decisions</strong> v
S E C T I O N<br />
Introduction<br />
1
Introduction<br />
Real decisions aren't simple. Uncertainties, complicated<br />
alternatives, and varied preferences can make it hard to choose<br />
what to do. Once you decide, it may be hard to explain your<br />
choice.<br />
<strong>Logical</strong> <strong>Decisions</strong>® for Windows (LDW) helps you evaluate your<br />
decisions. You define alternatives and variables to describe them.<br />
Next, LDW helps you formulate your preferences about the<br />
variables and uses the information to rank your alternatives.<br />
You can rank your alternatives and create displays that clarify the<br />
rankings. Afterwards, the results should seem obvious, because<br />
the process helps you to think carefully about the choices and<br />
your preferences.<br />
LDW gives you great flexibility in modeling your decisions. You<br />
define the alternatives and describe them in the way that makes<br />
the best sense to you. If your preferences are complex, or your<br />
choices have uncertainties, LDW can handle them.<br />
LDW uses powerful methods from the field of Decision Analysis<br />
to help you quantify your preferences. LDW's interactive features<br />
let you evaluate alternatives instantly once you have quantified<br />
the alternatives and your preferences.<br />
At the heart of LDW are sophisticated methods for assessing<br />
preferences. LDW provides a variety of preference assessment<br />
methods ranging from very simple methods to the "gold<br />
standard" of pairwise tradeoffs. With LDW you can select the<br />
method you feel most comfortable with.<br />
LDW provides many features not found in other ranking<br />
programs:<br />
! Freedom in defining evaluation measures. Scales can<br />
be discrete or continuous, increasing or decreasing,<br />
numeric or descriptive. There are no limits on the<br />
range or number of scale points you can have.<br />
! No limits on the number of alternatives and evaluation<br />
measures you can have.<br />
Section 1 -- Introduction 1-1
! Describe your alternatives using probabilities.<br />
! Organize your measures into a hierarchy showing how<br />
the measures relate to your overall goals.<br />
! Assess your preferences graphically.<br />
! Model interactions between the evaluation measures.<br />
! Quickly find the important differences between any<br />
two alternatives.<br />
! Display the effects of changes in the weights for the<br />
measures.<br />
You can use LDW for many types of problems. You can use it for<br />
personal decisions like choosing the best car or truck to buy, for<br />
business decisions like who to hire or what to invest in, or for<br />
large scale planning decisions, like the Air Force did to help<br />
them decide the mix of capabilities most useful to them in the next<br />
century. The possibilities are endless.<br />
Organization of Manual<br />
Section 2 tells you how to install LDW. Section 3 briefly describes<br />
the features of the program. Sections 4 and 5 are a tutorial<br />
introduction and Sections 6 through 8 describe in detail how to<br />
use the program. Section 9 is a more detailed discussion of the<br />
ideas behind LDW. Section 10 gives several real-life examples of<br />
how to use LDW. Section 11 is a summary of all of LDW's menus<br />
and options. Section 12 is the glossary. Finally, there is a brief<br />
bibliography and an appendix summarizing some of the<br />
mathematics used in the program.<br />
1-2 Section 1 -- Introduction
S E C T I O N<br />
Requirements and Installation<br />
2
Requirements and Installation<br />
Equipment Requirements<br />
Installation<br />
<strong>Logical</strong> <strong>Decisions</strong> for Windows requires the following equipment<br />
and software:<br />
! Windows compatible computer,<br />
! Hard disk drive with at least 10 mb free space,<br />
! CD drive for installing program,<br />
TM TM<br />
! Microsoft Windows 2000 , Windows XP , Windows<br />
TM<br />
XP Pro, or later.<br />
! A valid license key provided by <strong>Logical</strong> <strong>Decisions</strong><br />
MS Office 2003 or later is recommended for export to Word or<br />
Excel.<br />
Installing <strong>Logical</strong> <strong>Decisions</strong> for Windows 95 is easy. Just put the<br />
<strong>Logical</strong> <strong>Decisions</strong> CD into your computer=s CD ROM drive. Then<br />
start Windows and select the File::Run option in the program<br />
manager. Type the command D:Setup and press Enter. You may<br />
have to change this command slightly if your CD ROM drive is<br />
not the "D:" drive. This will start LDW's automatic installation<br />
process. The Setup program will prompt you for the name of the<br />
directory where the program files will be installed. We<br />
recommend that you accept the default directory name of<br />
"C:\Program Files\<strong>Logical</strong> <strong>Decisions</strong>\<strong>Logical</strong> <strong>Decisions</strong> v6.0".<br />
After you select a directory, the Install program will copy all of<br />
the files on the distribution disk(s) to the directory you selected.<br />
Note that the files on the distribution disks are compressed, so<br />
that you can't copy them directly to the hard disk and be able to<br />
run the program. After the Setup program has completed<br />
copying the files, it will create a new program group called<br />
Section 2 -- Installation 2-1
"<strong>Logical</strong> <strong>Decisions</strong>". This program group will contain the icon for<br />
the LDW program. To start LDW, just double click on the icon.<br />
When you first start LDW, you will see a dialog box telling you<br />
that this is an evaluation copy. To activate your LDW copy, Click<br />
the “Enter Key” button and enter the name and key provided to<br />
you when you bought the product. LDW will start up without the<br />
dialog box thereafter.<br />
2-2 Section 2 -- Installation
S E C T I O N<br />
Quick Start<br />
3
Quick Start<br />
Introduction<br />
This section gets you started with <strong>Logical</strong> <strong>Decisions</strong> for Windows<br />
(LDW) and points the way to additional information on LDW's<br />
more advanced features. It describes the steps needed to evaluate<br />
a set of alternatives and the options available at any step.<br />
This section is an overview rather than a tutorial, and you will<br />
need to review the Tutorial and Using LDW sections to learn the<br />
details of the various commands.<br />
What <strong>Logical</strong> <strong>Decisions</strong> does<br />
LDW helps you evaluate alternatives. The alternatives can be<br />
anything you need to choose between -- jobs, potential employees,<br />
factory locations, or even what wine to have for dinner.<br />
LDW lets you systematically look at your alternatives by<br />
following a series of steps. The steps help you define and<br />
describe your alternatives. They also help you think about the<br />
preference and value judgments that you need to make to be able<br />
to tell the best alternative from the rest of the alternatives.<br />
When you complete the steps you will have a quantitative<br />
ranking of your alternatives.<br />
You will also be able to review your results with a variety of<br />
displays that are specifically designed to help you feel confident<br />
that you are making the best choice.<br />
The Steps of a <strong>Logical</strong> <strong>Decisions</strong> Analysis<br />
LDW provides a great deal of flexibility in how you evaluate your<br />
alternatives, but you will need to do these basic steps:<br />
! Structure your problem,<br />
! Describe the alternatives,<br />
Section 3 -- Quick Start 3-1
! Assess your preferences,<br />
! Rank the alternatives and choose the best one.<br />
Structuring Your Problem<br />
You will structure your problem using three of the windows<br />
accessible under LDW’s View menu -- the Matrix view, the Goals<br />
Hierarchy view and the Quick Entry view.<br />
In these views you will define the alternatives you will evaluate.<br />
But just defining alternatives is not enough. You also need a way<br />
to describe what makes an alternative desirable or undesirable for<br />
your particular decision. In LDW you do this with goals and<br />
evaluation measures.<br />
Evaluation measures (or just measures) are variables you use to<br />
describe your alternatives. They capture a specific aspect of your<br />
alternatives, such as their price. You will generally have many<br />
measures to describe your alternatives.<br />
To organize your measures, you define goals. Goals are<br />
containers that can hold measures and other goals. For example,<br />
you might put related measures like purchase price and annual<br />
maintenance cost into a goal called Minimize Cost.<br />
In LDW, you organize your goals and measures into a tree-like<br />
structure called a goals hierarchy. The goals hierarchy has the<br />
broad goals like make the best decision at the top and more<br />
specific goals beneath them. The evaluation measures are at the<br />
lowest levels of the goals hierarchy.<br />
You will describe how well each alternative does on each of the<br />
evaluation measures and then use the goals hierarchy as a<br />
framework for combining the performance of an alternative on<br />
individual measures into an overall score for the alternative.<br />
Defining alternatives. In LDW, you define alternatives in the<br />
Matrix view (the View::Matrix menu option) or the Quick Entry<br />
view (View::Quick Entry).<br />
Initially you define an alternative with a just name and an<br />
optional ID number. Later, after you have defined your<br />
evaluation measures, you will describe your alternatives in detail<br />
by how well they perform on the measures.<br />
3-2 Section 3 -- Quick Start
Defining goals and measures. In LDW you define the goals and<br />
measures in the Goals Hierarchy view (View::Goals Hierarchy) or<br />
the Quick Entry view (View::Quick Entry). Both views have the<br />
tree structure of the goals hierarchy.<br />
Goals and measures both have names and ID numbers. Measures<br />
also have a scale, which can be either numbers or text. Scales that<br />
use numbers are defined by their units and their most and least<br />
preferred levels. You define text scales with a set of short<br />
descriptions called labels.<br />
Describing your Alternatives<br />
You describe your alternatives by entering a score (called a level)<br />
for each alternative on each measure. You do this in the Matrix<br />
view (View::Matrix). The matrix view is a spreadsheet with rows<br />
representing alternatives and columns representing measures.<br />
Each cell in the spreadsheet represents the level for a particular<br />
alternative and measure. The levels are either numbers or text,<br />
depending on how you defined the scale for the measure. You<br />
enter a numeric level by typing a number into the cell and enter a<br />
text level by picking from a list of text labels for the measure.<br />
Two other types of levels are available in LDW – probabilistic and<br />
measure category. These are described further in the tutorials<br />
and elsewhere in this manual.<br />
Assessing Your Preferences<br />
After you have defined an alternative's levels on the measures,<br />
you need to tell LDW how it should combine the levels to<br />
compute the alternative's overall score.<br />
You do this by describing your preferences about the relative<br />
importances of the measures and goals. The process of describing<br />
your preferences is called a preference assessment.<br />
Assessing preferences in LDW has two main parts. First, you<br />
define how to convert measure levels to common units, and then<br />
you define the relative importances of the measures and<br />
(optionally) their interactions.<br />
Section 3 -- Quick Start 3-3
Storing your preference information<br />
LDW stores your preference information in what are called<br />
preference sets. When you start LDW it creates the first<br />
preference set for you.<br />
You can define many preference sets for a single decision<br />
(perhaps for different people). You can add more preference sets<br />
with the Edit::Add or View::Select/Change Preference Sets option.<br />
Converting the Measures to Common Units<br />
LDW converts an alternative's measure levels to common units<br />
called utility before it combines them.<br />
Each measure's most preferred level is assigned a utility of one<br />
(1.0) while its least preferred level is assigned a utility of zero<br />
(0.0). Intermediate levels are assigned with what is called a utility<br />
function, or more specifically a SUF (for Single-measure Utility<br />
Function).<br />
The easiest conversion is a straight line, where each unit change<br />
in a measure level results in an equal change in utility. This is the<br />
most common case, and the default. (Defaults are the initial<br />
settings used by LDW in various situations). So, if you want a<br />
straight line conversion from a measure's original units to<br />
utility you don't have to do anything.<br />
Non-linear conversions<br />
Sometimes a straight line SUFs isn’t right. Suppose you are hiring<br />
employees and "years of experience" is one of your measures.<br />
You might feel that after a certain point additional years of<br />
experience aren't that helpful.<br />
In this case you might think that the first few years of experience<br />
add more utility than the last few. You can use a curved (“nonlinear”)<br />
SUF to capture this idea.<br />
In the example above, suppose two years experience is the least<br />
preferred level and 30 years is the most preferred level, but that<br />
you really want someone with around 5-10 years of experience.<br />
In terms of desirability, you might end up defining the preference<br />
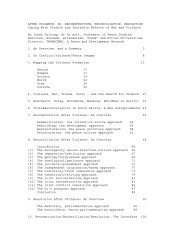
mid-point of the 2-30 year range as five years. Figure 3-1 shows<br />
the resulting curve for years of experience.<br />
3-4 Section 3 -- Quick Start
Figure 3-1. The SUF for "Years of Experience" converts years to utility.<br />
Two years is the least preferred level, 30 is most preferred. 5 years is the<br />
mid-point in terms of preference.<br />
LDW provides two interactive methods for identifying midpreference<br />
levels. These are described in the In-Depth section,<br />
(page 9-13). LDW also provides several alternate methods for<br />
converting levels to common units. These include direct<br />
assessment and the Analytic Hierarchy Process.<br />
Combining the measures utilities into an overall score<br />
As with measures, the desirability of each alternative on a goal is<br />
described by a number called utility. LDW computes an<br />
alternative’s utility for a goal by combining its utility for each of<br />
the goal’s members (measures or sub-goals) using a weighted<br />
average.<br />
The influence of an alternative’s level on a measure on the<br />
alternative’s utility on the goal the measure belongs to is<br />
determined by the measure’s weight.<br />
LDW uses the structure of the goals hierarchy to aggregate<br />
measure utilities into utilities for the lower level goals and then<br />
Section 3 -- Quick Start 3-5
continues aggregating lower level goals and measures until a<br />
utility for the overall (highest level) goal has been computed.<br />
LDW provides several methods for assessing weights.<br />
The easiest method uses a simple ordering of the measures'<br />
relative importances to compute a reasonable set of weights.<br />
Other methods have you enter ratios of the measures' relative<br />
weights. The "Smart" method and the "Analytic Hierarchy<br />
Process" are examples of this type of approach.<br />
The most sophisticated method is to assess what are called<br />
tradeoffs. In the tradeoff method, LDW helps you define pairs of<br />
simple alternatives that you prefer equally. Then LDW computes<br />
weights that will give the equally preferred alternatives in each<br />
tradeoff pair equal utility scores.<br />
Interactions. In addition to helping you assess the weights for<br />
the measures and goals, LDW also lets you define interactions<br />
between a goal's members. Interactions are an advanced LDW<br />
feature that you can use when the utility for a goal should not be a<br />
simple weighted average of the utilities of the goal's members.<br />
Preference assessment menus. The options for assessing<br />
common units and weights can be found in the Assess menu in<br />
LDW. Many options and views for reviewing your preference<br />
assessments can be found in the Review menu.<br />
Ranking Your Alternatives and Displaying<br />
Results<br />
Once you have completed the steps above (or even before if you<br />
want preliminary results) you will be ready to rank your<br />
alternatives and display your results.<br />
LDW provides many ways to review your results. You can rank<br />
the alternatives on the overall goal or on any other goal or<br />
measure with the Results::Rank Alternatives option. LDW sorts<br />
the alternatives by utility and displays them in a bar graph.<br />
Other results options include a bar graph showing the utilities for<br />
a single alternative, a graph with a detailed comparison between<br />
two alternatives, and a graph of the effects of changes in the<br />
3-6 Section 3 -- Quick Start
weights of the measures. All of the results options can be found<br />
under the Results menu.<br />
Learning more about <strong>Logical</strong> <strong>Decisions</strong><br />
The rest of this User's Manual provides many resources for<br />
learning and using LDW:<br />
Final Comments<br />
! Introductory Tutorial (section 4) -- takes you through a<br />
simple example step-by-step.<br />
! Advanced Tutorial (section 5) -- takes you through some<br />
of the more advanced features of LDW.<br />
! Using <strong>Logical</strong> <strong>Decisions</strong> (sections 6 - 8) -- Describes<br />
LDW’s user interface.<br />
! In Depth (section 9) -- a more detailed discussion of the<br />
decision analysis approach that is the core of LDW.<br />
! Examples (section 10) -- example applications of LDW.<br />
! Commands Reference (section 11) -- Describes each<br />
menu item in LDW.<br />
! Glossary (section 12) -- Defines the terms used in the<br />
program and manual.<br />
! LDW help system -- LDW has an extensive help system<br />
that can answer your questions about specific parts<br />
of the software.<br />
! If all else fails... Call <strong>Logical</strong> <strong>Decisions</strong> at<br />
(800) 35-LOGIC (800-355-6442) or (703) 218-1801.<br />
You are also welcome to visit our web site at<br />
www.logicaldecisions.com<br />
LDW is a powerful tool to help you analyze your decision<br />
problem, but it's only a tool. It isn't a black box that tells you what<br />
to do.<br />
It helps provide insights into your alternatives and helps you<br />
think through difficult choices in a logical way. After you have<br />
Section 3 -- Quick Start 3-7
anked the alternatives and reviewed their differences, the<br />
reasons for the ranking results should be obvious. The results<br />
should reflect your preferences and intuition.<br />
If you don't like the ranking, it often means that you could gain<br />
insights from more study of the results. Or, it may mean that you<br />
have not captured important considerations in the measures.<br />
The quality of the answers generated by LDW depends critically<br />
on the quality of the data that it receives. In particular, you<br />
should take the time to<br />
! Define your alternatives in detail.<br />
! Make sure you have included all available alternatives.<br />
! Think carefully about which measures are most<br />
appropriate for your alternatives.<br />
! Make sure that your measures cover all of the important<br />
considerations for choosing alternatives, that they<br />
are not redundant, that you can measure them for<br />
each alternative and that they are meaningful for<br />
decision making.<br />
! Think carefully when defining SUF curves and<br />
answering the weight assessment questions.<br />
3-8 Section 3 -- Quick Start
S E C T I O N<br />
Basic Tutorial<br />
4
Introductory Tutorial<br />
This introductory tutorial guides you through a simple example<br />
using <strong>Logical</strong> <strong>Decisions</strong> (LDW). You will try to decide which of<br />
several small trucks is the best buy. You want to choose the truck<br />
that has the best performance for the price.<br />
Tutorial Overview<br />
In the introductory tutorial you will go through the steps needed<br />
to evaluate a simple set of alternatives -- three trucks that you are<br />
thinking about buying. Here's what you will be doing:<br />
! Defining the alternatives by naming the trucks you will<br />
rank,<br />
! Defining the goals that influence your decision,<br />
! Defining the measures you will use to evaluate the<br />
trucks,<br />
! Entering the levels on the measures for each truck,<br />
! Assessing preferences to define how the measures<br />
should be combined,<br />
! Computing and displaying the results.<br />
Figure 4-1 summarizes these steps.<br />
Section 4 -- Introductory Tutorial 4-1
Figure 4-1. Tutorial overview.<br />
4-2 Section 4 -- Introductory Tutorial
Initial Steps<br />
Before you can begin the analysis you need to install the program<br />
and start it. See page 2-1 for how to install LDW. To start LDW,<br />
just double-click its icon in the <strong>Logical</strong> <strong>Decisions</strong> program group.<br />
If you have opened one of the example files, you should select the<br />
File::New option to begin a new analysis.<br />
Defining Alternatives<br />
The first step in your decision analysis is to define the alternatives<br />
to be ranked. You will rank the following (hypothetical) small<br />
pickup trucks:<br />
! Coyote<br />
! Mountain Lion<br />
! Wolf<br />
The alternatives are new pickup trucks with roughly the same<br />
levels of accessories.<br />
We will define the alternatives in the Matrix view. LDW displays<br />
the Matrix view when you first start it. It is the window with the<br />
spreadsheet table of measures and alternatives.<br />
If you have closed the Matrix view, you can get a new one by<br />
selecting the View::Matrix option. Initially, there is just one<br />
alternative -- "New Alternative" -- and one evaluation measure --<br />
"New Measure" – in the spreadsheet.<br />
We can quickly add the alternatives in the matrix view. Here’s<br />
how:<br />
1. Double Click the cell labeled “New Alternative” in the<br />
Matrix. This will open its properties dialog box.<br />
2. Type the name “Coyote” into the name edit.<br />
3. Click the “Add Another Alternative” button to add a<br />
new alternative and open its properties dialog box.<br />
4. Type the name “Mountain Lion<br />
5. Click “Add Another Alternative” again and call it<br />
“Wolf”<br />
Section 4 -- Introductory Tutorial 4-3
Now lets make sure the alternatives are in alphabetical order.<br />
Click on the (Preferences::Sort) option and select the "Name"<br />
and "Ascending" radio buttons under both "Sort Rows" and "Sort<br />
Columns." The alternative rows should be in the order Coyote,<br />
Mountain Lion, Wolf. The columns for the measures will also be<br />
sorted alphabetically.<br />
This completes the preliminary definition of the alternatives. We<br />
will describe them in detail by entering their levels (raw scores)<br />
after we have defined the measures.<br />
Defining Goals -- How You Will Compare the<br />
Trucks<br />
Goals let you define the concerns important to you when selecting<br />
a truck to buy. You will organize those concerns in a goals<br />
hierarchy with general concerns at the top and more specific<br />
concerns toward the bottom. Goals hierarchies are discussed more<br />
on page 9-6. In LDW, goals are collections of measures and other<br />
(lower level) goals.<br />
Let's assume you have very simple requirements. Your overall<br />
goal is to Select the Best Truck, and you will do this by comparing<br />
price, performance, and styling. So, under the overall goal you<br />
have the sub-goals:<br />
! Minimize Cost<br />
! Maximize Performance<br />
! Maximize Styling Quality<br />
To represent this hierarchy, you can define four goals --<br />
! Overall<br />
! Cost<br />
! Performance<br />
! Styling<br />
LDW predefines the Overall goal -- selecting the best truck -- so<br />
you do not need to add it explicitly.<br />
The cost and styling goals will only have one measure each (price<br />
and styling) so you don't need to define separate goals for them.<br />
(Goals should generally have at least two members).<br />
4-4 Section 4 -- Introductory Tutorial
So, for this example, you only need to define the Performance goal,<br />
which will consist of measures of power and fuel economy.<br />
We will define the goals in the Goals Hierarchy view. This the<br />
other window you see when you start LDW. Initially, it shows a<br />
box labeled "Overall" for the overall goal and an oval labeled "New<br />
Measure" for the single evaluation measure in the new analysis.<br />
First select the Goals Hierarchy window. If you have closed the<br />
goals hierarchy window, you can open another one with the<br />
View::Goals Hierarchy option. Just select the default options in<br />
the dialog box for now by clicking OK.<br />
Then you will change the name of the "Overall" goal to "Buy the<br />
best Truck." Here’s how:<br />
1. Double click on the box for the "Overall" goal<br />
2. LDW will display its properties dialog box.<br />
3. Change the "Name" field to "Buy The Best Truck" and<br />
click OK.<br />
Next we will add the "Performance" goal. We will do this with the<br />
Add a Goal button. Here’s how:<br />
1. Click the “Buy the Best Truck” box so that it is highlighted<br />
in green.<br />
2. Click the Add a Goal button.<br />
3. LDW will add the new goal under the active goal (“Buy<br />
the Best Truck”<br />
4. Change the “Name” field to "Performance" and click<br />
OK.<br />
Defining Measures<br />
You have now defined the alternatives and goals for your decision.<br />
Next you will define the evaluation measures. The measures will<br />
describe how well each alternative meets one of the goals. The<br />
measures you will add are Price, Power, Styling and Fuel<br />
Economy.<br />
Section 4 -- Introductory Tutorial 4-5
Assume you have decided that you will measure cost by the price<br />
of each truck and that you can define Performance by two<br />
measures -- Power (with units of horsepower) and Fuel Economy<br />
(in miles per gallon). Assume that you can describe the styling of<br />
each truck with one of the following labels -- Attractive, Muscular,<br />
Nondescript, Mediocre or Ugly.<br />
Finally, assume that you have collected the following data on your<br />
trucks:<br />
Table T-1<br />
Fuel<br />
Name Economy Power Price Styling<br />
(mpg) (hp) ($) (labels)<br />
Coyote 23 109 15,000 Muscular<br />
Mountain Lion 21 130 17,500 Mediocre<br />
Wolf 16 175 23,000 Nondescript<br />
With this information you can define these measures in LDW. We<br />
will do this in the goals hierarchy view.<br />
First we will define the price measure, which is directly under the<br />
"Best Truck" goal. Since the "New Measure" measure is in this<br />
position, we will just modify it. Here’s how:<br />
1. Double click on the oval for "New Measure" to get its<br />
properties dialog box.<br />
2. Change the “Name” field from “New Measure” to<br />
“Price.”<br />
3. Click the “Scale” tab where we will define the range<br />
and units for Price.<br />
4. Change the “Units” field from “new units” to “dollars.”<br />
Next you will define the range for the Price measure based on the<br />
range in prices for the three alternatives.<br />
Since a less expensive truck is more desirable, the most preferred<br />
alternative from a price standpoint is the Coyote at $15,000. The<br />
least preferred alternative is the Wolf at $23,000. We will use these<br />
two extremes to define the range of the Price measure. The range<br />
will go from a most preferred level of $15,000 to a least preferred<br />
level of $23,000. Tell this to LDW:<br />
4-6 Section 4 -- Introductory Tutorial
1. Enter 15000 into the “Most Preferred Level” edit box.<br />
2. Enter 23000 into the “Least Preferred Level” edit box.<br />
After you have entered this data, click OK and LDW will update<br />
the goals hierarchy to show the new name “Price.”<br />
Next we will define the "Styling" measure. Here’s how:<br />
1. If the "Price" measure is not still selected, click on its<br />
oval.<br />
2. Click the Add a Measure button<br />
3. LDW will add a new measure next to the "Price"<br />
measure and display its properties dialog box.<br />
4. Change the “Name” field to “Styling.”<br />
There is no natural scale like dollars for “Styling”, so you will<br />
define the various types of styling with labels.<br />
Labels are brief text descriptions of the possible levels of<br />
achievement for a measure. Here’s how to define the labels for<br />
“Styling”:<br />
1. Click the “Labels” tab in the properties dialog box.<br />
2. Click the “Use Labels” check box.<br />
3. When you do this, LDW will ask you to confirm.<br />
Confirm by clicking “OK”<br />
4. LDW will show you a default (High, Medium, Low) set<br />
of labels for styling.<br />
5. Select the entire list of labels by dragging over it with<br />
your mouse. Overwrite the list with the following list,<br />
pressing enter between each item:<br />
Attractive<br />
Muscular<br />
Nondescript<br />
Mediocre<br />
Ugly<br />
6. Click the “OK” button to confirm and return to the<br />
goals hierarchy window.<br />
Section 4 -- Introductory Tutorial 4-7
Next we will enter the measures for the performance goal:<br />
1. Select the "Performance" goal's box by clicking it. This<br />
will ensure that the new measures will be added below it.<br />
2. Click the Add a Measure button<br />
3. LDW will add a new measure under the "Performance"<br />
goal and display its dialog box.<br />
4. Change the name of the new measure to “Power.”<br />
5. Click the “Scale” tab.<br />
6. Change the units to “horsepower.”<br />
The range of horsepower for the three alternatives is from 109 hp<br />
to 175 hp. Describe this range to LDW as follows:<br />
1. Enter 175 into the “Most Preferred Level” edit box.<br />
2. Enter 109 into the “Least Preferred Level” edit box.<br />
Notice that -- unlike the "Price" measure -- more horsepower is<br />
preferred to less. LDW will know this since the most preferred<br />
level for "Power" is more than the least preferred level.<br />
Finally, we will define the "Fuel Economy" measure:<br />
1. If the "Power" measure is still highlighted, click the<br />
Add a Measure button again<br />
2. LDW will insert a new measure next to the "Power"<br />
measure (under the "Performance" goal).<br />
3. Change the name of the new measure to “Fuel Economy.”<br />
4. Click on the Scale tab.<br />
5. Change the units to “miles per gallon.”<br />
6. Enter 23 into the “Most Preferred Level” edit box.<br />
7. Enter 16 into the “Least Preferred Level” edit box.<br />
When you are finished, click "OK" and LDW will update the goals<br />
hierarchy to its final form. It should look like the hierarchy in<br />
Figure 4-2.<br />
4-8 Section 4 -- Introductory Tutorial
Figure 4-2. Completed Goals Hierarchy for Introductory Tutorial example.<br />
Describing the alternatives in detail<br />
Now it's time to enter the data for the alternatives. We will do this<br />
in the Matrix view. If you have closed the Matrix view window<br />
you can get a new one by selecting the View::Matrix option.<br />
Next, you will enter the data in table T-1 above into the matrix. To<br />
enter a level in a cell (box for a level), just select the cell by clicking<br />
it and type in the proper number. You should tell LDW you have<br />
finished by pressing Enter. For the "Styling" measure, click the cell<br />
and you will see a pull down list of the available labels. Just select<br />
the label you want from the list. Your finished matrix should look<br />
like the one in Figure 4-3.<br />
Figure 4-3. Completed matrix for Introductory Tutorial.<br />
This completes the measure and alternatives definitions. At this<br />
point you may want to save your analysis using the File::Save As<br />
option. The suggested name is TUTOR.LDW.<br />
Section 4 -- Introductory Tutorial 4-9
Defining Preferences<br />
The alternative, goal, and measure definitions, along with the<br />
measure levels, represent the "objective" data for the decision<br />
(although we have made many subjective judgments in defining<br />
the alternatives and measures).<br />
The next step is to characterize your preferences concerning various<br />
levels of the measures. This is a two-step process. First, you<br />
define preferences concerning individual measures (to convert the<br />
levels of the measures to common units). Then, you define<br />
preferences over goals — that is, weights -- to combine the<br />
measures' common units into an overall score.<br />
Before you do this you need a place to store your preferences.<br />
Defining a Preference Set<br />
A preference set is where LDW stores the preference information<br />
for a single person.<br />
You can define a new preference set using the Edit::Add or<br />
View::Select/Change Preference Sets option. But the skeleton<br />
analysis created when you start LDW already includes a<br />
preference set, so we'll just modify that.<br />
You modify a preference set in its properties dialog box Here’s<br />
how:<br />
1. Select the View::Select/Change Preference Sets option.<br />
2. Click the “Properties” button.<br />
3. Change the name for the preference set to "Tutorial."<br />
Next we will tell LDW which goals will have their own utility<br />
function (or MUF for multi-measure utility function).<br />
LDW uses utility functions to combine the utilities of a goal's<br />
members into a utility (or overall score) for the goal. If you do not<br />
define a MUF for a goal, its members will be included in the next<br />
higher goal's MUF.<br />
For the tutorial, we will define a MUF for both the "Best Truck"<br />
and "Performance" goals:<br />
4-10 Section 4 -- Introductory Tutorial
3. Click on the “Structure” tab in the Preference Set dialog<br />
box.<br />
4. Click on the "Performance" line in the box called "Goals<br />
with a MUF." Both the "Best Truck" and "Performance"<br />
lines should be highlighted, showing that both goals<br />
will have their own MUF.<br />
We will use the defaults for the other options in the dialog box, so<br />
click OK to close it.<br />
Defining Preferences for Individual Measures<br />
Next you will tell LDW how to convert different levels on each<br />
measure into common units (called utility). The formula to do the<br />
conversion is the measure's Single-measure Utility Function (SUF -<br />
- see page 3-4 for a brief discussion of SUFs).<br />
LDW assigns the least preferred level on each measure a utility of<br />
zero (0.0) and the most preferred level a utility of one (1.0). The<br />
SUF defines how to convert intermediate levels to utility. As a<br />
default, LDW uses a straight line (linear) conversion. Intermediate<br />
levels are assigned utilities that are proportional to their distance<br />
from the endpoints, so that a graph of levels vs. utility is a straight<br />
line.<br />
Assume that a straight line adequately models your preferences<br />
concerning Price and Fuel Economy. You could check this by<br />
using the mid-level splitting technique described on page 9-16.<br />
Entering a Non-Linear SUF. Let's also assume that for Power you<br />
don't feel that a straight line SUF is right. Suppose you feel that<br />
130 horsepower is about the right amount and that anything under<br />
about 115 horsepower is starting to get underpowered.<br />
Using the mid-level splitting method, you find that you prefer a<br />
change from 109 to 130 hp and a change from 130 to 175 hp<br />
equally. Although the change from 175 to 130 is larger than from<br />
130 and 109, horsepowers near 109 are starting to seem<br />
uncomfortably low, making each hp change more important in<br />
this range. This means that 130 hp is your mid-preference level for the<br />
range from 109 to 175 hp.<br />
To describe this to LDW, you use the Assess::Common Units<br />
option.:<br />
Section 4 -- Introductory Tutorial 4-11
1. Select the Assess::Common Units option<br />
2. LDW will display the Common Units dialog box that<br />
identifies the method used to define each measure’s<br />
SUF.<br />
3. Select "Power" from the combo box at the top of the<br />
dialog box and make sure that the selected assessment<br />
method is "SUF."<br />
4. Click on the Assess button to begin the assessment<br />
process. You should see a display like the one in Figure<br />
4-4.<br />
Figure 4-4. Initial display for assessing Power SUF.<br />
Entering the Mid-Preference Level. To tell LDW that your midpreference<br />
level is 130 hp you will use the split range option. The<br />
split range option splits the current range (the range highlighted in<br />
green -- initially the whole range from 109 hp to 175 hp to start)<br />
into two parts. You want to split the range at the mid-preference<br />
level of 130 hp. This lets you tell LDW the utility to assign to 130<br />
hp. It will also let you make further modifications to the SUF curve<br />
above and below 130 hp in a moment. Here’s how to split the<br />
SUF:<br />
4-12 Section 4 -- Introductory Tutorial
First we will move the current mid-preference point from 142 to<br />
130. You can see the mid-preference point as the green box in the<br />
middle of the current range.<br />
1. Either drag the (142,0.5) point with the mouse to<br />
(130,0.5) or enter a new level in the "Level" edit box at<br />
the bottom of the window. The second way is more<br />
accurate. Just type 130 into this box and press Enter.<br />
The mid-preference point will move to (130,0.5) on the<br />
graph and the SUF will become a smooth curve that<br />
passes through it.<br />
2. Next, select the SUF::Split Range option.<br />
3. LDW will split the current range in two at the midpreference<br />
point. LDW initializes the two new subranges<br />
to straight lines.<br />
You should now see a screen similar to Figure 4-5.<br />
Figure 4-5. Results after splitting range.<br />
Defining the SUF Curve for Low Power Levels. Suppose you feel<br />
that powers between, say, 109 and 115 hp are so bad as to be<br />
Section 4 -- Introductory Tutorial 4-13
almost equally unacceptable, while as power increases above 122<br />
hp each additional horsepower really makes a difference. Suppose<br />
you again use the mid-level splitting technique and find that your<br />
mid-preference level for the range from 109 to 130 is 122 hp. We<br />
want to modify the lower SUF range to reflect this. Make the<br />
modification as follows:<br />
1. Select the 109-130 range by clicking on its line. You can<br />
also use the left arrow key to move the selection from<br />
the split point to the adjacent sub-range.<br />
2. Set the mid-preference level by typing the number "122"<br />
in the "Level" edit box.<br />
This results in the SUF shown in Figure 4-6.<br />
Figure 4-6. Result of setting mid-preference level of 122 for range from<br />
109 to 130 hp.<br />
Similarly, you can set the mid-preference level for the higher<br />
range. Assume that the mid-level splitting technique tells you that<br />
your mid-preference level is 140 for the range from 130 to 175 hp.<br />
You might get this result if you feel that there are decreasing<br />
returns for horsepowers over 130.<br />
4-14 Section 4 -- Introductory Tutorial
1. Press the left arrow key to "wrap around" and select the<br />
upper 130-175 range.<br />
2. Set the mid-preference level for the range by typing<br />
"140" in the "Level" edit box. Don't forget to press Enter<br />
to update the graph.<br />
You should get the SUF shown in Figure 4-7. This completes the<br />
definition of the SUF for Power.<br />
Figure 4-7. Final SUF for Power.<br />
Assessing the SUF for a Measure With Labels. Since the<br />
"Styling" measure uses discrete labels rather than a continuous<br />
scale, we need to use a different method to convert its levels to<br />
common units. We will use the direct assessment method to<br />
directly assign a utility for each label. To do this:<br />
Section 4 -- Introductory Tutorial 4-15
1. Select the Assess::Common Units option<br />
2. Select the "Styling" measure. Make sure the "direct<br />
Assessment" method has been selected<br />
3. Click the "Assess" button.<br />
You will see a bar graph like the one in Figure 4-8.<br />
Figure 4-8. Initial SUF assessment screen for Styling measure.<br />
In the figure, each label has a bar showing its utility. The<br />
"Attractive" label has the highest utility of 1.0, while the "Ugly"<br />
label has the lowest utility of 0.0 (no bar). The other labels have<br />
intermediate utilities. You can adjust the utility for a label by<br />
entering a new utility in its edit box or by dragging the end of a<br />
bar with your mouse. Lets change the utility of the "Mediocre" bar<br />
from 0.25 to 0.20. To do this:<br />
1. Enter 0.2 in the edit box next to “Mediocre” and press<br />
Enter<br />
We'll keep the other utilities the same. Click "Done" when you are<br />
finished.<br />
Defining Preferences Over Goals<br />
You have defined two goals, "Performance" and "Best Truck" in the<br />
example. Now you will define the weights (relative importances)<br />
4-16 Section 4 -- Introductory Tutorial
of the members of these two goals. You will do this using the<br />
Assess::Weights option.<br />
When you select this option. You will see the weight assessment<br />
dialog box. You use this dialog box to set up the weight<br />
assessments for the goals.<br />
We will assess weights for the "Performance" goal and then for the<br />
"Best Truck" goal. To begin the “Performance” goal assessment:<br />
1. Select the Assess::Weights option.<br />
2. In the dialog box, click the “Weights” tab to go to the<br />
weight assessment part of the dialog box.<br />
3. Select "Performance" from the list of goals at the top of<br />
the dialog box.<br />
We will be using the "tradeoff" approach for weight assessments.<br />
4. Select the ‘tradeoff” weight assessment method from<br />
the list. It should already be highlighted, but select it if<br />
it is not.<br />
5. Click the "Assess" button to begin the tradeoff<br />
assessment<br />
6. When you do this, you will see the tradeoff assessment<br />
dialog box.<br />
The tradeoff assessment dialog box is where you will identify pairs<br />
of members under the "Performance" goal to use in tradeoffs.<br />
To identify the two members for the next tradeoff, pick one from<br />
the "First Member:" list and one from the "Second Member:" list.<br />
Since the "Performance Goal" only has two members, one will<br />
always be highlighted in each list. Thus, we can go directly to the<br />
tradeoff assessment window by<br />
1. Clicking the "Assess" button.<br />
Section 4 -- Introductory Tutorial 4-17
When you do this, the tradeoff graph shown in Figure 4-9<br />
appears.<br />
Figure 4-9. Tradeoff graph for Power vs. Fuel Economy.<br />
In Figure 4-9, LDW asks you to compare two hypothetical<br />
alternatives, labeled A and B. Alternative A is a truck with 175 hp<br />
that gets 16 mpg. Alternative B has 109 hp and gets 23 mpg.<br />
Always assume that all measures that aren't mentioned have the<br />
nominal utility defined in the goals dialog box. Specifically, you<br />
should assume that the Price measure has its most preferred level<br />
of $15,000 and the Styling measure has its most preferred level of<br />
"Attractive" for both alternatives A and B.<br />
All you have to do is tell LDW whether you prefer A or B.<br />
4-18 Section 4 -- Introductory Tutorial
Assume that you prefer A and B equally. This means that the<br />
decrease in Power for B compared with A is just compensated for<br />
by the increase in Fuel Economy.<br />
This implies that the Power and Fuel Economy measures should<br />
have equal weights given their ranges in this example. Assume<br />
that you feel A and B are equally preferred. To let LDW know,<br />
1. Click on the "Equal" button at the right of the window.<br />
2. LDW will connect A and B with a line of equally<br />
preferred possibilities and ask you of the proposed<br />
tradeoff is OK.<br />
3. Click “OK” to accept the tradeoff.<br />
This returns you to the tradeoff dialog box. You will see the<br />
tradeoff you just did listed in the "Previous Tradeoffs" box. You<br />
will also see that you don't need any new tradeoffs for the<br />
"Performance" goal.<br />
Click the "Done" button to return to the assess weights dialog box.<br />
We are done with the weight assessments for the "Performance"<br />
goal.<br />
Now we will do the assessments for the “Buy The Best Truck”<br />
goal:<br />
1. Select the "Buy the Best Truck" goal from the goals list.<br />
2. Click on the "Assess" button to begin the assessment for<br />
the "Best Truck" goal.<br />
3. LDW will again display the tradeoff assessment dialog<br />
box, but with a new list of measures and goals to select<br />
from.<br />
The list should now contain the "Performance" goal, the "Styling"<br />
measure and the "Price" measure. The "Power" and "Fuel<br />
Economy" measures don't appear on the list because they are in<br />
the "Performance" goal. The list only contains the measures and<br />
goals that are members of the "Buy the Best Truck" goal.<br />
First, we will assess a tradeoff between Performance and Price.<br />
Section 4 -- Introductory Tutorial 4-19
1. Select "Performance" and "Price" as the members for the<br />
first tradeoff<br />
2. Click the "Assess" button to begin.<br />
The next dialog box asks you to select a representative from the<br />
Performance goal for use in the tradeoff question. The<br />
representative can be any measure or goal under a goal in the goals<br />
hierarchy or the goal itself.<br />
3. Select "Power" as the representative for the Performance<br />
goal.<br />
A new tradeoff question should appear. This time alternative B is<br />
a hypothetical truck with a Price of $15,000 and 109 hp.<br />
Alternative A is a truck with 175 hp and a price of $23,000.<br />
Here, you might feel that you prefer alternative B, which is $8,000<br />
cheaper.<br />
4. Click on the "B" button to tell LDW.<br />
5. LDW updates the screen and asks you to improve<br />
alternative A by reducing its price until it becomes<br />
equally preferred to alternative B.<br />
You should be able to make A equally preferred because if you<br />
reduce A's price to $15,000 it will equal the price of alternative B,<br />
and have 175 hp to B's 109 hp. Then you should definitely prefer<br />
A.<br />
You can use your mouse to move the square for A or you can type<br />
a new price for A in the edit box at the bottom of the screen.<br />
Suppose that, after looking at a few possible levels and comparing<br />
the alternatives, you decide that you would prefer A equally to B if<br />
its Price were $20,000.<br />
4-20 Section 4 -- Introductory Tutorial
6. Type 20000 and press Enter to select $20,000 as the price<br />
for alternative A.<br />
7. LDW will draw the revised alternative A on the graph<br />
and will draw a line will be drawn to connect it with<br />
alternative B.<br />
The graph should look like Figure 4-10.<br />
Figure 4-10. Tradeoff between Price and Power<br />
Section 4 -- Introductory Tutorial 4-21
8. Click on the "Equal" button to tell LDW that you now<br />
prefer A and B equally.<br />
9. LDW will ask you to confirm that the tradeoff is OK<br />
10. Click “OK” and you will return to the assess tradeoffs<br />
dialog box.<br />
Next we will do a tradeoff between price and styling.<br />
1. Select the "Price" and "Styling" measures in the tradeoff<br />
dialog box.<br />
2. Click the "Assess" button.<br />
3. LDW will generate and display a tradeoff comparing<br />
price and styling.<br />
In the tradeoff, assume that we prefer the $15,000 "Ugly" truck<br />
(alternative B) to the $23,000 "Attractive" truck (alternative A).<br />
4. Click the "B" button to tell LDW<br />
5. LDW will redraw the tradeoff graph to let you lower<br />
the price on alternative A to make it more desirable.<br />
Suppose that a price of $17,000 for the "Attractive" truck would<br />
make it equally preferable to the $15,000 "Ugly" truck.<br />
6. Type 17000 in the edit box and press Enter to tell LDW.<br />
7. Click the "Equal" button to tell LDW that A and B are<br />
now equal.<br />
8. LDW will ask you to confirm that the tradeoff is OK.<br />
9. Click “OK” and you will return to the assess tradeoffs<br />
dialog box.<br />
You will see that there are no new assessments needed for the<br />
"Best Truck" goal, so<br />
4-22 Section 4 -- Introductory Tutorial
10. Click on the "Done" button to return to the assess<br />
weights dialog box.<br />
We can quickly review the weights that LDW has computed by<br />
1. Select the Review::Tradeoff Summary Graph option.<br />
2. Click on “Price” as the “Starting Measure.”<br />
3. Select the “Color by goal” radio button.<br />
4. Click “OK”<br />
The display shown in Figure 4-11 appears. In this display, each<br />
measure is shown by a circle whose size is proportional to the<br />
measure's weight. The lines connecting the circles show which<br />
pairs of measures were used in tradeoffs.<br />
Section 4 -- Introductory Tutorial 4-23
Figure 4-11. Display generated by Review::Tradeoff Summary Graph<br />
option.<br />
You can also display the actual formulas for the goal MUFs.<br />
1. Select the Review::Weights::MUF Formulas option.<br />
When you select this option, LDW shows you a listing of the<br />
scaling constants for the goals and measures similar to Figure 4-12.<br />
The scaling constants define how LDW will combine the utilities of<br />
the measures and goals to get an overall utility. Figure 4-12 shows<br />
that the overall utility is computed using a weighted average of<br />
the utilities for the "Performance" goal, the "Price" measure and the<br />
4-24 Section 4 -- Introductory Tutorial
“Styling” measure, with most weight assigned to the<br />
"Performance" goal.<br />
Figure 4-12. Table of scaling constants generated by<br />
Review::Weights::Scaling Constants option for truck example<br />
Now you are ready to see the results of your analysis.<br />
Displaying Results<br />
The most important result of an LDW session is the ranking of the<br />
alternatives. LDW lets you rank on any measure or goal. The<br />
most important ranking is that for the “Buy the Best Truck” goal,<br />
which is the overall ranking of the alternatives.<br />
To get an overall ranking of the alternatives:<br />
1. Select the Results::Rank Alternatives option.<br />
2. Select the "Buy the Best Truck" goal from the list.<br />
3. Click “OK”<br />
LDW computes the ranking formula and displays the ranking of<br />
the three alternatives shown in Figure 4-13. As the figure shows,<br />
the "Coyote" ranks first followed by the "Mountain Lion" and the<br />
"Wolf".<br />
Section 4 -- Introductory Tutorial 4-25
Figure 4-13. Overall ranking for truck example.<br />
Based on this information alone, the Coyote seems to be the best<br />
choice. LDW lets you explore and understand the reasons why the<br />
Coyote ranks the highest. You can do this in a variety of ways<br />
using the different displays available from the Results Menu.<br />
Some of these options are described below.<br />
Graph Alternatives<br />
The Results::Graph an Alternative option lets you display a bar<br />
chart or “petal diagram” showing the utilities for an alternative on<br />
the measures and goals. You can display the graph for any goal.<br />
When you have picked the option, LDW shows you a dialog box<br />
with many options. You can display bars for the measures under<br />
the goal or for the members of the goal (which can be either<br />
measures or other goals). You also have a choice of displaying the<br />
bars in their nominal order or sorted by weight. Figure 4-14<br />
shows a graph for the Mountain Lion for the Best Truck goal with<br />
all measures in their nominal order. Try seeing what other bar<br />
graphs and petal diagrams look like.<br />
4-26 Section 4 -- Introductory Tutorial
Figure 4-14. Sample bar graph created with Results::Graph an<br />
Alternative option.<br />
A unique feature of LDW alternative graphs is that the width of<br />
the bars is proportional to the weight for the measure or goal<br />
being graphed. This makes the area of all of the bars equal to the<br />
utility of the alternative for goal you selected. Alternatives with<br />
tall wide bars are preferred.<br />
Sensitivity Analysis<br />
The Results::Sensitivity Graph option lets you see the effects of<br />
changing the weights for a single measure or goal<br />
When you select the option you will first see a list of the measures<br />
and goals defined for the analysis (excluding Overall). Let's select<br />
the "Price" measure for our example. LDW will display graph like<br />
the one in Figure 4-15.<br />
Section 4 -- Introductory Tutorial 4-27
Figure 4-15. Graph showing sensitivity to the weight for Price, created<br />
using the Results::Sensitivity Graph option.<br />
The horizontal axis of this graph represents the weight on Price.<br />
This weight can range from zero to 100 percent, with zero meaning<br />
price is not considered at all and 100 percent meaning price is the<br />
only consideration. The thin vertical line is the current weight for<br />
Price. The vertical axis represents utility, and the lines represent<br />
the utilities for particular alternatives at each possible weight for<br />
price.<br />
By examining this graph you see that if price is not considered, the<br />
three alternatives will rank very closely. This is shown by the<br />
closely spaced line ends on the left-hand side of the graph.<br />
However, as more weight is placed on price, the lowest price<br />
alternative (the Coyote) becomes more preferred. It appears that<br />
because Power and Fuel Economy tend to be inversely correlated<br />
that price becomes the primary consideration in the ranking.<br />
Comparing Alternatives<br />
The Results::Compare Alternatives option lets you directly<br />
compare two alternatives. You can use this option to increase your<br />
understanding of why the Mountain Lion ranked lower than the<br />
Coyote. When you select the option, LDW asks you to select from<br />
two lists of alternatives. Select the Mountain Lion and the Coyote.<br />
4-28 Section 4 -- Introductory Tutorial
The graph shown in Figure 4-16 lists the contribution of each<br />
measure to the difference in overall utility between the two<br />
alternatives.<br />
Figure 4-16. Comparison between Coyote and Wolf generated using the<br />
Results::Compare Alternatives option.<br />
The the bar for each measure represents how much of the<br />
difference between the alternatives is caused by the measure. The<br />
bar lengths add up to the length of the "Total Difference" bar,<br />
which always goes to the right.<br />
You can see the numbers that underlie this bar graph with the<br />
table option in the Results::Compare Alternatives dialog box.<br />
Summary<br />
This completes the introductory tutorial for LDW. You have<br />
learned how to<br />
• define the alternatives you will rank,<br />
• define the measures and goals that you will use to evaluate<br />
the alternatives,<br />
• enter the data that describes the alternatives' performance<br />
on the measures,<br />
• convert levels on the measures into common units,<br />
• assess the weights for the measures and goals using the<br />
tradeoff method, and<br />
• how to see the results of your analysis with the displays in<br />
the Results menu.<br />
Section 4 -- Introductory Tutorial 4-29
You can see the completed introductory tutorial in the file called<br />
TUTOR1.LDW.<br />
LDW is a sophisticated program with many features and<br />
capabilities. You will want to experiment with the many display<br />
screens available in the Review and Results menus. You can<br />
experiment with these screens freely since none of them affects the<br />
underlying structure or preference assessments for your analysis.<br />
All of these screens are described in the "Using <strong>Logical</strong> <strong>Decisions</strong>"<br />
sections.<br />
You will also want to experiment with the different methods for<br />
assessing preferences, including methods for converting to<br />
common units, assessing weights and assessing interactions. These<br />
are described in the "Using <strong>Logical</strong> <strong>Decisions</strong>" section and in the "In<br />
Depth" section. Interactions are also discussed in the "Advanced<br />
Tutorial" section.<br />
The advanced tutorial builds on the introductory tutorial with<br />
examples of using probabilities, defining measure categories,<br />
assessing interactions between measures, and importing and<br />
exporting data to other programs.<br />
4-30 Section 4 -- Introductory Tutorial
S E C T I O N<br />
Advanced Tutorial<br />
5
Advanced Tutorial<br />
This tutorial section covers some of LDW's more advanced<br />
features, including measure categories, probabilities, importing<br />
data from outside sources, and interactions.<br />
We will work with the truck example from the Introductory<br />
Tutorial. To retrieve this example, use the File::Open option to<br />
load in the file TUTOR1.LDW. To avoid overwriting this file, you<br />
should immediately use the File::Save As option to save it with<br />
the name TUTOR2.LDW.<br />
Measure Categories<br />
Measure categories are sub-measures you can use to combine<br />
related pieces of data into a single measure level. Measure<br />
categories are useful when you want a measure to be the<br />
weighted average or sum of several numbers. We will use<br />
categories in this tutorial to combine two fuel economy estimates<br />
into a single measure.<br />
We will add two categories to the "Fuel Economy" measure. The<br />
categories will represent the EPA City and EPA Highway miles<br />
per gallon estimates for the truck alternatives.<br />
When a measure has categories, its levels are computed as a<br />
weighted sum of its category levels. When you add a category for<br />
a measure, any previously defined levels for the measure will be<br />
overwritten.<br />
Suppose we want the levels for the "Fuel Economy" measure to be<br />
the average of each truck's City and Highway mpg estimates, and<br />
suppose we have collected the following data:<br />
Section 5 -- Advanced Tutorial 5-1
Truck Fuel Economy City Highway<br />
(mpg) (mpg) (mpg)<br />
Coyote 23 19 27<br />
Mountain Lion 21.25 16.5 26<br />
Wolf 16.5 14 19<br />
We will make the changes in the Matrix view:<br />
1. Select the Matrix view or create a new one with the<br />
View::Matrix option.<br />
2. In the Matrix view, click the cell labeled "Fuel<br />
Economy."<br />
3. Click the Add a Category button.<br />
4. LDW will create a new category for the "Fuel Economy"<br />
measure and display its properties dialog box.<br />
5. In the dialog box, change the name for the category to<br />
"City."<br />
6. Change the units to "mpg".<br />
7. Click “OK” when you are done.<br />
You will see a column for the new "City" category to the right of<br />
the column for the "Fuel Economy" measure. The cells in a<br />
category column are shown in green. The cells in the "Fuel<br />
Economy" column will now be shown in red to indicate that you<br />
can’t change them directly.<br />
To create the "Highway" category, click the Add a Category<br />
option again. Repeat the process you did for the "City" category,<br />
using the name "Highway" and the units "mpg". You should now<br />
see the columns for two categories to the left of the column for the<br />
"Fuel Economy" measure.<br />
Now you will enter the levels for the new categories. Just click on<br />
the cell you want and type in the number.<br />
1. Now you should type in the City and Highway mileage<br />
numbers from the table above. As you do this, the<br />
numbers in the Fuel Economy column will change.<br />
5-2 Section 5 -- Advanced Tutorial
Probabilities<br />
There is a problem with the numbers in the Fuel Economy<br />
column. The numbers are the sum of the two category numbers,<br />
not the average.<br />
To get the proper numbers you must change the category<br />
multipliers. They are the numbers at the top of the column for<br />
each category. (Did you notice that LDW added this row when<br />
you created the first category?) LDW computes the measure<br />
levels by multiplying each category level by the category's<br />
multiplier and then summing the adjusted levels.<br />
Initially, LDW sets each new category multiplier to 1.0. To get the<br />
average of the two categories, we need to set each category's<br />
multiplier to ½ (0.5). To do this:<br />
1. Type in 0.5 in the cell for each category multiplier.<br />
You should now see the proper averages in the cells for the "Fuel<br />
Economy" measure.<br />
The category multipliers are preference judgements. For<br />
example, a buyer that does 80% city driving might want to use<br />
multipliers of 0.8 for "City" and 0.2 for "Highway". For this<br />
reason, each preference set has its own set of multipliers. You<br />
could use this feature to see the effects on the overall ranking of<br />
different multipliers for the two mileage categories.<br />
LDW lets you define levels as probability distributions. With this<br />
ability you can see how uncertainties in the levels might influence<br />
the desirability of the alternatives.<br />
To see how LDW uses probabilities, we will add a new measure<br />
called “Resale Value” to the truck analysis. The units for "Resale<br />
Value" will be the percent of the original price we would be able<br />
to get if we resold the truck after five years.<br />
Since we don't know what we will be able to get when we sell the<br />
car, we will use probability distributions as the levels for "Resale<br />
Value."<br />
Section 5 -- Advanced Tutorial 5-3
Adding a Measure for Resale Value. First, let's add the "Resale<br />
Value" measure. Since this is a cost related measure we will<br />
associate it with the "Price" measure under a new "Cost" goal.<br />
First we will add the "Cost" goal:<br />
1. Select the Goals Hierarchy window or create a new one<br />
with the View::Goals Hierarchy option.<br />
2. Click on the “Buy the Best Truck” box to select it.<br />
3. Click the Add a Goal button.<br />
4. LDW will display the Goal dialog box.<br />
5. Change the name of the goal to "Cost."<br />
6. Click on the “Position” tab.<br />
7. Click on the "Price" measure in the "Members" list to tell<br />
LDW to move the "Price" measure to under the "Cost"<br />
goal.<br />
8. Click "OK" to close the goal dialog box.<br />
9. LDW will ask you to confirm that the “Price” measure<br />
should be moved.<br />
10. Click "OK" to confirm.<br />
You should see the new "Cost" goal below the "Buy the Best<br />
Truck" goal in the Goals Hierarchy window.<br />
Now we will add the "Resale Value" measure.<br />
1. In the Goals Hierarchy view, click on the "Cost" goal to<br />
select it.<br />
2. Click the Add a Measure button and click "OK".<br />
3. In the measure dialog box, change the name to “Resale<br />
Value.”<br />
4. Click on the “Scale” tab.<br />
5. Change the units to “percent of original purchase price”<br />
6. Change the Most Preferred Level to 75.<br />
7. Change the Least Preferred Level to 45<br />
8. Click “OK”<br />
5-4 Section 5 -- Advanced Tutorial
This information indicates that the range for “Resale Value” is<br />
from 45% to 75% percent of the original purchase price, with 75%<br />
being preferred.<br />
Next we will assess the weight for the new measure. We'll<br />
prepare for this by adding a utility function for the "Cost" goal.<br />
We can do this in the Assess::Weights dialog box:<br />
1. Select the Assess::Weights option.<br />
2. In the mini-hierarchy, click in the “Cost” goal.<br />
3. Click the “Has a MUF” radio button.<br />
4. LDW will ask you to confirm that it should add a new<br />
MUF for the “Cost” goal.<br />
5. Click “Yes.”<br />
Now you will assess the weights for the two members of the cost<br />
goal using the “Smart” method:<br />
6. Click on the “Weights” tab and make sure that the<br />
“Cost” goal is shown in the “Goal” combo box..<br />
7. Select the "Smart method (Swing Weights)” from the<br />
"Weight Assessment Method" combo box<br />
8. Click the "Assess" button.<br />
In the Smart assessment method, we assess swing weights that<br />
represent the relative importance of "swinging" a measure from<br />
its worst to its best level. For now we'll assume that the "Price"<br />
measure has a swing weight twice that of the "Resale Value"<br />
measure. To indicate this:<br />
Section 5 -- Advanced Tutorial 5-5
9. Enter 100 in the edit box for "Price."<br />
10. Enter 50 in the edit box for "Resale Value." Remember<br />
to press Enter after you type each number.<br />
11. Click "Done."<br />
12. LDW will compute weights that sum to 1.0 based on<br />
your swing weights.<br />
You should see weights of 0.667 and 0.333 for "Price" and "Resale<br />
Value" respectively.<br />
13. Click "OK" to return to the assess weights dialog box.<br />
14. Click "Done" to return to the Goals Hierarchy view.<br />
Now that we have added the "Resale Value" measure, we need to<br />
enter its levels. To do this select the Matrix view (or create a new<br />
one with the View::Matrix option). We will now add the levels<br />
for "Resale Value" as probability distributions.<br />
Adding the Probability Distributions. First, we will add a<br />
uniform probability distribution for the “Wolf” alternative.<br />
1. In the Matrix view, double-click the cell for the "Wolf"<br />
alternative and “Resale Value” measure.<br />
2. LDW will display the "Define a Probabilistic Level"<br />
dialog box.<br />
The “Define a Probabilistic Level” dialog box is where you can<br />
define probability distributions over the measure levels. There<br />
you will see radio buttons to select the type of probability<br />
distribution you will define. There are seven possibilities, one of<br />
which is the default point estimate (no uncertainty) option. We<br />
will define a uniform probability distribution for the "Wolf" truck.<br />
3. Click on the "Uniform Distribution" radio button.<br />
4. LDW will display a dialog box where you can enter the<br />
parameters for the uniform distribution.<br />
5-6 Section 5 -- Advanced Tutorial
A uniform distribution is defined by an upper and lower limit.<br />
Any level between the two limits is equally likely to occur.<br />
Assume that we feel that the "Resale Value" for the "Wolf" truck is<br />
equally likely to be anywhere between 60 and 70 percent.<br />
5. Enter 70 as the "Upper Bound."<br />
6. Enter 60 as the "Lower Bound."<br />
7. Click "OK” twice to return to the Matrix view.<br />
The cell for "Resale Value" for the "Wolf" truck should now be<br />
highlighted in red. This indicates that you can't directly modify<br />
this cell. You must make any new changes in the probability<br />
dialog box.<br />
Next we will enter the level for the "Mountain Lion" truck.<br />
Assume we think that the resale value for this truck has a Normal<br />
distribution (bell shaped curve) with a mean of 60 percent and a<br />
standard deviation of 5 percent. To enter this distribution:<br />
1. In the Matrix view, double-click on the "Resale Value"<br />
cell for the "Mountain Lion" truck.<br />
2. LDW will display the probability dialog box.<br />
3. Click on the "Normal Distribution" radio button.<br />
4. LDW will display a dialog box where you enter the<br />
parameters for the Normal distribution.<br />
5. Enter a Mean of 60.<br />
6. Enter a Standard Deviation of 5.<br />
7. Click "OK" twice to return to the Matrix view.<br />
.<br />
Finally, we'll define the probability distribution for the "Coyote"<br />
truck as a discrete distribution with three possible outcomes. The<br />
possibilities are:<br />
Probability % Resale Value<br />
0.25 50<br />
0.50 60<br />
0.25 65<br />
To enter this distribution:<br />
Section 5 -- Advanced Tutorial 5-7
1. In the Matrix view, double-click on the "Resale Value"<br />
cell for the "Coyote" truck.<br />
2. Click the "Discrete Distribution" radio button.<br />
3. LDW will display a data entry dialog box for the<br />
discrete distribution.<br />
4. Enter 3 in the "Number of Levels" edit box to tell LDW<br />
there will be three possible discrete levels. Don’t Press<br />
Enter.<br />
5. Enter the levels and their probabilities. Enter 0.25 in the<br />
"Prob 1" edit box and 50 in the "Level 1" to define the<br />
first level-probability combination.<br />
6. Enter 0.5 in the "Prob. 2" edit box, 60 in the "Level 2"<br />
edit box.<br />
7. Enter 0.25 in the "Prob 3" edit box, and 65 in the "Level<br />
3" edit box to complete the definition of the distribution.<br />
8. Click "OK" twice to return to the Matrix view.<br />
Probabilities for Measures With Labels. You can also define<br />
probability distributions for measures that use labels. However,<br />
since continuous distributions are inappropriate, you are<br />
restricted to a discrete distribution over the different labels. To<br />
see how this works, lets define a probability distribution over<br />
"Styling" for the "Mountain Lion" truck:<br />
1. In the Matrix view, click on the "Styling" cell for the<br />
"Mountain Lion" truck.<br />
2. Select the Matrix::Define Probability option.<br />
3. LDW will display the "Define Label Probabilities"<br />
dialog box.<br />
5-8 Section 5 -- Advanced Tutorial
On the left is a list of the possible labels. On the right is an edit<br />
box showing the probability of the selected label. To define the<br />
probability distribution:<br />
4. Move through the list and enter the following<br />
probability for each label:<br />
Label Probability<br />
Attractive 0.0<br />
Muscular 0.0<br />
Nondescript 0.25<br />
Mediocre 0.5<br />
Ugly 0.25<br />
5. Click "OK" to return to the Matrix view.<br />
The cell will be highlighted in red to show it has a probability<br />
distribution. The label with the highest probability is shown in<br />
the cell. If you want to convert from a probability distribution<br />
back to a single label, enter a probability of 1.0 for one of the<br />
labels and 0.0 for the others.<br />
Now might be a good time to save your analysis. Use the<br />
File::Save option.<br />
Results Displays for Probabilities<br />
Several results displays are available to see how probabilities<br />
affect your results. The results are computed using Monte Carlo<br />
Simulation. Monte Carlo simulation uses random numbers to<br />
estimate possible outcomes for the probabilistic levels. The<br />
utilities of these possible outcomes are computed and saved.<br />
After this has been done many times, LDW can use the saved<br />
results as an estimate of the cumulative probability over the<br />
utility or level of interest.<br />
The default number of simulation trials is 100. You can change<br />
this with the Preferences::Simulation Options option.<br />
Section 5 -- Advanced Tutorial 5-9
You can see the simulation results in the Results::Rank<br />
Alternatives option:<br />
1. Select the option.<br />
2. Choose the "Best Truck Goal" from the list.<br />
3. Click on the "Show Uncertainties" check box.<br />
4. Click “OK.”<br />
You will see a display like the one in Figure 5-1.<br />
Figure 5-1. Results::Rank Alternatives display showing uncertainty<br />
ranges.<br />
In the figure, the thin black bars represent the range of<br />
uncertainty for each alternative, based on the Monte Carlo<br />
simulation. From this you can see that for certain outcomes the<br />
"Mountain Lion" could rank higher than the "Coyote", but that the<br />
"Wolf" ranks lower under all scenarios.<br />
To see more details about the uncertainties, use the<br />
Results::Uncertainty Summary option.<br />
1. Select the option.<br />
2. Choose the "Best Truck Goal" from the list.<br />
3. Click “OK.”<br />
You will see a table like the one in Figure 5-2.<br />
5-10 Section 5 -- Advanced Tutorial
Figure 5-2. Example of Results::Uncertainty Summary display.<br />
The figure presents statistics summarizing the probability over<br />
the selected member for each alternative.<br />
The Results::Alternative Uncertainty Graph option provides a<br />
graphical summary of the uncertainty for a single alternative over<br />
a selected member.<br />
1. Select the option.<br />
2. Choose the "Mountain Lion" alternative.<br />
3. Choose the "Buy the Best Truck" goal to evaluate.<br />
4. Select the defaults for the other choices by clicking<br />
"OK".<br />
When you do this, LDW will display a graph like the one in<br />
Figure 5-3.<br />
Section 5 -- Advanced Tutorial 5-11
Figure 5-3. Example of Results::Alternative Uncertainty Graph option.<br />
In the figure, the bars represent the number of simulation trials<br />
that fell within the bar’s range. The bars use the scale at the right<br />
of the graph.<br />
The line in the figure represents the cumulative probability<br />
distribution, as estimated by the simulation results. Each point on<br />
the line represents the probability (the scale at the left of the<br />
graph) that the utility will be less than the utility on the x-axis of<br />
the graph.<br />
Note that this graph combines the effects of the uncertainties for<br />
the "Mountain Lion" truck on both the "Resale Value" and<br />
"Styling" measures on the "Mountain Lion's" overall utility.<br />
Importing and Exporting Data<br />
LDW provides powerful features for importing and exporting<br />
data from external databases. These features can let you quickly<br />
5-12 Section 5 -- Advanced Tutorial
screen a large database for the alternatives that are most likely to<br />
meet your needs.<br />
We will show how you could use a data file to update the truck<br />
example we have been developing. If you have skipped any steps<br />
in the tutorial, you should use the File::Open option to load in the<br />
file TUTOR2.LDW now.<br />
We will update the analysis from the file TUTOR.TAB. The<br />
contents of this file are shown in Figure 5-4.<br />
ALTERNATIVES<br />
NAME NUMBER NUMBER NUMBER NUMBER NUMBER NUMBER LABEL<br />
NAME Price Power Fuel Economy City Highway Resale Value Styling<br />
Crocodile 21000 140 16.5 15 18 45 Laughable<br />
Mountain Lion 19000 109 21.25 16.5 26 65 Mediocre<br />
Tiger 18000 125 21 18 24 75 Mediocre<br />
Falcon 27000 160 17.5 16 19 66.3 Attractive<br />
Coyote 22000 109 23 19 27 55 Muscular<br />
Wolf 17500 175 15.5 14 17 65 Nondescript<br />
Figure 5-4. Data file for updating tutorial example.<br />
The tab delimited file in the figure has some special clues that<br />
help LDW interpret it. The word "ALTERNATIVES" in the upper<br />
left tells LDW that this is a file it knows how to interpret. The<br />
next line (with NAME, NUMBER, etc.) tells LDW the type of data<br />
to expect in each column. The next row has the names of the data<br />
columns. Notice that the names can correspond to either<br />
measures or measure categories. The names of the alternatives<br />
are on the left of the matrix.<br />
The easiest way to create a file that LDW can read is to first use<br />
the File::Export option to create a file of the type you want, and<br />
then modify it to include the data you want to import.<br />
Setting Cutoffs. Notice also in the figure that the current<br />
alternatives ("Coyote", "Mountain Lion" and "Wolf") have their<br />
current levels (but with no uncertainties). Note also that the<br />
"Falcon" has a price ($27,000) that is above the least preferred<br />
level, and that the "Crocodile" has a label for "Styling" --<br />
"Laughable" -- that is not on the list. Lets assume that these<br />
alternatives are unacceptable and we don't want to add them to<br />
the analysis.<br />
For measures with labels, LDW assumes that any label not on the<br />
list fails the cutoff for the measure. for other measures, we must<br />
explicitly assign an upper and lower cutoff. To set a cutoff for<br />
"Price:"<br />
Section 5 -- Advanced Tutorial 5-13
1. Double click on the cell for "Price" in the Matrix or<br />
Goals Hierarchy view to view its dialog box.<br />
2. Click on the “Scale” tab.<br />
3. Enter 25000 in the "Upper Cutoff Level" edit box to set<br />
the cutoff for "Price" at $25,000.<br />
4. Click “OK.”<br />
Importing the Data. Now we will import the data from the text<br />
file:<br />
1. Select the File::Import option.<br />
2. LDW will display a dialog box called "Import Options".<br />
3. In the dialog box, select the "Tab Delimited" Import File<br />
Format and click on the "Append to Current File" radio<br />
button. Click "OK" when you are done.<br />
4. LDW will display the standard "Open File" dialog box.<br />
5. Select TUTOR.TAB and click "OK."<br />
6. LDW will display a dialog box called "Select Measures<br />
to Update". This is where you match database fields to<br />
measures and categories.<br />
7. Scroll through each line in the "Measures" list to make<br />
sure each measure and category has an asterisk next to<br />
it. This indicates that it will be updated. If a measure or<br />
category does not have an asterisk, select it by clicking<br />
on it and then click on the field with the same name in<br />
the "Database Fields" list. An asterisk should appear<br />
beside the name in each list.<br />
8. When each item has an asterisk, click "Select" to go on.<br />
Note that you only have to do this once. LDW will<br />
remember the fields you used to do the updating for the<br />
next time.<br />
5-14 Section 5 -- Advanced Tutorial
9. LDW will ask if you want to append new alternatives<br />
whose names match existing alternatives.<br />
10. We don't want to do this, so answer "No."<br />
11. LDW will ask if you want to "Apply Cutoffs". If you<br />
answer yes, LDW will not append an alternative that<br />
fails any of the cutoffs.<br />
12. We don't want to append failing alternatives, so answer<br />
"Yes."<br />
13. LDW will ask you to enter the maximum number to<br />
append. If you enter a number less than the number of<br />
records in the file (say 10), LDW will rank each<br />
alternative as it reads it and will only append the top 10<br />
ranking alternatives.<br />
14. For now, just accept the default large number by<br />
clicking “OK.”<br />
When you click "OK", LDW will scan the database and append<br />
any records that pass all the cutoffs.<br />
If you next look at the Matrix view, you will see that only one new<br />
alternative has been appended -- the "Tiger". The "Coyote",<br />
"Mountain Lion" and "Wolf" records were not appended because<br />
their names matched existing alternatives.<br />
The "Falcon" alternative was not appended because its price of<br />
$27,000 was above the upper cutoff of $25,000. The "Crocodile"<br />
alternative was not appended because its styling label --<br />
"Laughable" -- was not on the list of acceptable labels.<br />
Defining Interactions Between Goal Members<br />
The final (optional) step in the preference assessment process is to<br />
define the interactions between the members of the goals. This is<br />
probably the most unfamiliar part of the process and the most<br />
difficult to explain. Fortunately, in most situations interactions<br />
are not needed and the default weighted average is the<br />
appropriate way to combine an alternatives utilities on the<br />
measures. See page 9-55.<br />
Section 5 -- Advanced Tutorial 5-15
Suppose you have a feeling that there is some interaction between<br />
the members of the Performance goal. Specifically, you want it all<br />
-- both high power and good fuel economy. In other words, if a<br />
truck does poorly on “Power” or “Fuel Economy,” you feel it<br />
should have a low “Performance” utility no matter how well the<br />
truck does on the other measure.<br />
In addition, you prefer a truck that does moderately well on both<br />
measures to a truck that does very well on one measure and<br />
poorly on the other. This is called "destructive interaction."<br />
To quantify this idea you must answer another preference<br />
assessment question:<br />
1. Select the Assess::Weights option.<br />
2. LDW will display the assess weights dialog box.<br />
3. Click the “Interactions” tab.<br />
4. Select the "Performance" goal from the “Goal” combo<br />
box.<br />
The several ways to define interactions are listed in the<br />
“Interactions Assessment Method” combo box. Of these methods,<br />
the most easily understood is the probability method.<br />
5. Select the probability method for defining interactions<br />
from the combo box.<br />
6. Click the "Assess" button to begin the assessment<br />
process.<br />
Normally, LDW would ask you to select an existing tradeoff in the<br />
performance goal to use as a basis for the probability question.<br />
However, in this example, there is only one tradeoff to select (the<br />
one between Power and Fuel Economy). After you select the<br />
tradeoff, LDW displays the screen shown in Figure 5-5.<br />
The alternatives in the question are both made up of two<br />
possibilities, each of which occurs with 50 percent probability. It<br />
may be difficult to visualize a situation where such alternatives<br />
would occur. For our example you might think of the alternatives<br />
as a special deal offered by two truck manufacturers to get you to<br />
5-16 Section 5 -- Advanced Tutorial
commit to buying their truck before the engine specifications have<br />
been finalized.<br />
Please enter P so that A and B are equally preferred:<br />
Alternative A<br />
50 percent chance of<br />
Power = 175 and Fuel Economy = 16<br />
and 50 percent chance of<br />
Power = 109 and Fuel Economy = 23<br />
Alternative B<br />
P = 50 percent chance of<br />
Power = 175 and Fuel Economy = 23<br />
and 100 - P percent chance of<br />
Power = 109 and Fuel Economy = 16<br />
Figure 5-5. Question for assessing the interaction between Power and<br />
Fuel Economy using the probability method.<br />
Let's look more closely at the two alternatives. Alternative A is<br />
the "hedge your bet" option. You will get the most preferred level<br />
on either Power or Fuel Economy, but not both. Alternative B is the<br />
"all or nothing" alternative. You will get the most preferred level<br />
on both measures with probability P or the least preferred level on<br />
both measures with probability (1-P).<br />
The discussion above about the interactions between Power and<br />
Fuel Economy gives us a clue about how to answer the question.<br />
Since we are looking for both Fuel Economy and Power and since<br />
for alternative A, one of these measures is guaranteed to have its<br />
least preferred level, neither of the possibilities in alternative A<br />
may look very attractive.<br />
On the other hand, although alternative B has a 50 percent chance<br />
(as a default) of having the least preferred level on both measures,<br />
it also has a 50 percent chance of getting the most preferred level<br />
on both measures. Since the most preferred part of alternative B<br />
is the only one of the four possibilities that looks attractive, you<br />
will pick alternative B when P = 50 percent.<br />
The question on the screen is asking you to choose a particular<br />
probability for B that makes alternatives A and B equally<br />
preferred. In the probability assessment method, Ps less than 50<br />
Section 5 -- Advanced Tutorial 5-17
percent show destructive interaction, while Ps greater than 50<br />
percent show constructive interaction. Since alternative B is<br />
preferred when P is equal to 50 percent you must make alternative<br />
B less desirable.<br />
You do this by reducing P, so that the probability of getting the<br />
least preferred level on both measures is increased. Since your P<br />
will be less than 50 percent, your answer will show destructive<br />
interaction between the Power and Fuel Economy measures.<br />
To find a particular level for P you can try different probabilities<br />
until you zero in on one that makes alternatives A and B seem<br />
equally desirable. If you try P = 5 percent, you choose alternative<br />
A because the chance of getting your preferred option in<br />
alternative B is too remote. You might feel the same way even if P<br />
= 30 percent. At 40 percent, alternative B still seems preferable to<br />
alternative A. If this is the case, then you might select P = 35<br />
percent as the level of P that makes it most difficult to choose<br />
between alternatives A and B.<br />
7. Answer the probability question by replacing the<br />
default of 50 percent with 35 percent.<br />
8. Click “Equal.”<br />
LDW will use this answer when computing the MUF for the<br />
Performance goal.<br />
LDW computes the utility of the Performance goal using the<br />
multiplicative MUF formula described on page 9-55.<br />
You can see the new scaling constants for performance by<br />
selecting the Review::Weights::Scaling Constants option. In the<br />
table, you will see that the big K for performance is 2.45 and that<br />
the scaling constants for the two members are both 0.35. Since the<br />
scaling constant big K is greater than zero, destructive interaction<br />
is indicated. This is also shown by the fact that the individual<br />
weights (small ks) for the members of the Performance goal (the<br />
Power and Fuel Economy measures) do not sum to one as they do<br />
for the members of the Best Truck goal, which has neutral<br />
interaction.<br />
If we now use the Results::Rank Alternatives option to see the<br />
ranking of the alternatives on the "Buy the Best Truck" goal, we<br />
5-18 Section 5 -- Advanced Tutorial
see that the rankings for all the alternatives have gone down<br />
slightly.<br />
The "Coyote's" ranking goes from 0.681 to 0.647, the "Mountain<br />
Lion's" ranking goes from 0.592 to 0.562, and the "Wolf's" ranking<br />
goes from 0.376 to 0.310. Thus the addition of interactions seems<br />
to have had a somewhat larger negative effect on the "Wolf"<br />
alternative than on the others.<br />
This ends the Advanced Tutorial.<br />
Section 5 -- Advanced Tutorial 5-19
5-20 Section 5 -- Advanced Tutorial
S E C T I O N<br />
Using LDW 1: Structuring<br />
6
Using LDW 1: Structuring<br />
Introduction<br />
The next three sections describe how to use <strong>Logical</strong> <strong>Decisions</strong><br />
(LDW) by providing detailed instructions on the three main steps<br />
in an LDW analysis:<br />
! Structuring the analysis,<br />
! Assessing preferences, and<br />
! Reviewing results.<br />
This section describes the LDW options related to structuring the<br />
analysis. The next sections describe options for assessing<br />
preferences and reviewing results. You should read the Quick<br />
Start section before these sections.<br />
Structuring a <strong>Logical</strong> <strong>Decisions</strong> Analysis<br />
You structure an LDW analysis by defining the alternatives you<br />
will rank, the measures you will use to describe the alternatives,<br />
and the goals you will use to group the measures. Its best to<br />
finish structuring your analysis before you begin the preference<br />
assessment step. However, since this is not always possible, LDW<br />
lets you make structural changes any time with only a minimum<br />
loss of preference data<br />
.<br />
This section includes descriptions of the editing options available<br />
for structuring your analysis and of the views where the<br />
structuring takes place. Then there is a discussion of the<br />
information you need and how you structure each of the objects<br />
that make up an LDW analysis.<br />
Editing Options for Structuring Your Analysis<br />
The options in the Edit menu provide the tools you will need to<br />
structure your analysis. These options let you add, delete, or<br />
modify the various objects that make up an LDW analysis. These<br />
options are briefly discussed here and are discussed in more<br />
detail in the sections for the different views below.<br />
Section 6 -- Using LDW 1: Structuring 6-1
The Edit::Insert option. The Insert option is like the Paste option<br />
except that LDW adds a new object with the default settings<br />
instead of an object you have previously cut or copied. You can<br />
use the Insert option anywhere you can use the Paste option,<br />
except that you can't insert a level.<br />
If you use the Insert option in the Goals Hierarchy view LDW will<br />
ask you if it should insert a new goal or a new measure, since this<br />
is not clear from the context. In the Matrix view, LDW asks if you<br />
would like to insert a measure or a measure category. LDW<br />
always shows you the new object's dialog box so you can make<br />
changes after inserting.<br />
The Edit::Add option. The Add option lets you add a new object<br />
to your analysis no matter which window, if any, is active. When<br />
you select the option, you will see a dialog box with a list of the<br />
different types of items you can add. You can add a new<br />
measure, goal, alternative, preference set or measure category.<br />
Just click the radio button for the object you want and click "OK."<br />
LDW will usually ask you if you want to copy the new object from<br />
an existing object. If you say "Yes," you will pick the object to<br />
copy from a list. Otherwise, a new object with the default settings<br />
will be added.<br />
The Add a... buttons. The LDW toolbar contains buttons that<br />
add specific objects. You can add alternatives, goals, measures<br />
and measure categories using these buttons. These buttons are all<br />
available in the View::Quick Entry view. The add a measure and<br />
goal buttons are available in the View::Goals Hierarchy view. The<br />
add a measure, measure category and alternative buttons are<br />
available in the View::Matrix view.<br />
The Edit::Cut option. The Cut option lets you delete the object<br />
you have selected but save it for later pasting into the analysis.<br />
If you cut a goal, LDW also cuts all of the goals and measures<br />
below it and saves them for pasting.<br />
The Edit::Copy option. The Copy option lets you save the object<br />
you have selected for later pasting into the analysis without<br />
deleting it.<br />
If you copy a goal, LDW also copies all of the goals and measures<br />
below it and saves them for pasting.<br />
6-2 Section 6 -- Using LDW 1: Structuring
The Edit::Paste option. The Paste option lets you retrieve an<br />
object you've saved using the Cut or Copy option.<br />
If you paste a goal, LDW also pastes all of the goals and measures<br />
below it.<br />
The Edit::Delete option. You can use the Delete option to delete<br />
an object you have selected in a view window. LDW will not save<br />
the object you delete for later pasting, and will ask you to confirm<br />
before the deletion takes place.<br />
LDW does not delete the members of a goal you delete, but makes<br />
them members of the next higher goal in the hierarchy.<br />
If the active window is not a view window, the Delete option<br />
becomes the opposite of the Add option. Then you can delete any<br />
of the objects in your analysis. When you select the option, you<br />
will see a dialog box with a list of the different types of items you<br />
can delete. You can delete a measure, goal, alternative, preference<br />
set or measure category. Just click the radio button for the object<br />
you want and click OK. You will pick the object to delete from a<br />
list.<br />
The Edit::Modify option. The Modify option lets you view the<br />
dialog box for any existing object in your analysis no matter<br />
which window, if any, is active. When you select the option, you<br />
will see a dialog box with a list of the different types of items you<br />
can modify. You can modify a measure, goal, alternative,<br />
preference set or measure category. Just click on the radio button<br />
for the object you want and click OK. You will pick the object to<br />
modify from a list.<br />
The Edit::Undo option. The Undo option lets you undo many<br />
actions you have taken in LDW.<br />
Views for structuring your analysis<br />
You develop the structure for an LDW analysis in the windows<br />
you can create in the View menu. LDW automatically displays<br />
the two most important windows -- the Goals Hierarchy view and<br />
the Matrix view when you start it or when you load in a new<br />
LDW file. You can create as many copies of these windows as<br />
you want. This can be useful for viewing several different parts<br />
of a complicated analysis all at once. The following options are<br />
available in the View menu:<br />
Section 6 -- Using LDW 1: Structuring 6-3
! Summary -- view a dialog box that summarizes your<br />
entire analysis.<br />
! Goals Hierarchy -- create a window showing the<br />
hierarchy of goals and objectives for your analysis.<br />
! Matrix -- create a window showing the alternatives,<br />
measures and measure levels for your analysis.<br />
! Quick Entry -- create a window showing the<br />
alternatives, goals, measures and measure<br />
categories for your analysis in a tree structure for<br />
quick modifications.<br />
! Select/Change Preference Sets -- view a dialog box<br />
where you can select the active preference set. You<br />
can also add and delete preference sets and view<br />
their properties in this dialog box.<br />
Next we will discuss these options in more detail.<br />
The Summary View<br />
When you select the View::Summary option LDW will display the<br />
dialog box shown in Figure 6-1.<br />
6-4 Section 6 -- Using LDW 1: Structuring
Figure 6-1. Dialog box for View::Summary option.<br />
This dialog box summarizes the objects in your analysis and lets<br />
you add a title and comments to your analysis.<br />
The four list boxes in the summary dialog box display the four<br />
object types that make up an LDW analysis -- alternatives,<br />
measures, goals, and preference sets. You can view the properties<br />
of any of these objects by double clicking its name. You can also<br />
select the active preference set by clicking its name in the list of<br />
preference sets.<br />
You can also view the summary dialog box by clicking on the<br />
upper-left corner cell in the Matrix view.<br />
The Goals Hierarchy View<br />
The goals hierarchy view is where you can organize the goals,<br />
measures and measure categories for your analysis into a<br />
Section 6 -- Using LDW 1: Structuring 6-5
structure like an organization chart. The goals hierarchy lets you<br />
see how the measures and goals relate to one another and to the<br />
overall objectives of your decision.<br />
There is only one goals hierarchy for an analysis, but LDW<br />
provides many options for customizing how you display it.<br />
The goals hierarchy view is structured like an organization chart,<br />
with goals shown as rectangles, measures shown as ellipses and<br />
measure categories shown as rounded rectangles.<br />
You can create a new goals hierarchy window by selecting the<br />
View::Goals Hierarchy option. When you do this you will see the<br />
dialog box shown in Figure 6-2. This dialog box lets you<br />
customize the appearance and functions of the goals hierarchy<br />
window.<br />
Figure 6-2. Dialog box for View::Goals Hierarchy option.<br />
The list at the left of the dialog box controls the highest level goal<br />
shown in the display. Normally you will want to have the<br />
"Overall" goal at the top, since this lets you view your entire goals<br />
hierarchy. If you select another goal, LDW will show only the<br />
part of the hierarchy underneath that goal.<br />
6-6 Section 6 -- Using LDW 1: Structuring
The radio buttons below the goals list control how the goals<br />
hierarchy is drawn. The default is a Vertical Display. LDW<br />
shows the highest level goal at the upper left and shows the<br />
members of each goal in a column to the right of it. Figure 6-3<br />
shows a goals hierarchy displayed vertically. The other option is<br />
a Horizontal Display. LDW puts the highest level goal at the top<br />
center of the hierarchy and puts the members of each goal in a<br />
horizontal line below it. Figure 6-4 shows a goals hierarchy<br />
displayed horizontally.<br />
Figure 6-3. Example of Goals Hierarchy View with "Vertical Display"<br />
option selected.<br />
Figure 6-4. Goals Hierarchy with "Horizontal Display" option selected.<br />
Section 6 -- Using LDW 1: Structuring 6-7
If you check the Show Assessment Status box, LDW will color<br />
the goals hierarchy to indicate whether you have completed the<br />
preference assessment process for each goal and measure.<br />
Measures and goals with completed assessments are shown in<br />
blue. Those with uncompleted assessments are shown in red.<br />
Goals that don't have their own utility function are shown in gray.<br />
If you check the Show Drop Shadows box, LDW will draw the<br />
goals hierarchy with the black rectangles that highlight each goal<br />
and measure, otherwise LDW will not draw the rectangles.<br />
The Number of levels to show edit box lets you specify how deep<br />
to draw the hierarchy. The default is to show the whole<br />
hierarchy. The figures above were drawn showing three levels.<br />
The buttons in the lower right of the dialog box determine the<br />
description for each goal and measure.<br />
! The default Object Type button causes LDW to show<br />
the type of each object (goal, measure, measure<br />
category) below its name.<br />
! The Local Weight button causes LDW to display each<br />
member's weight in the utility function it belongs<br />
to.<br />
! The Global Weight button causes LDW to display each<br />
member's weight as a fraction of the total weight.<br />
The multiplier for each measure category is<br />
displayed instead of a weight<br />
! The Units button causes LDW to display the units for<br />
each member.<br />
! The No Description button causes LDW to display the<br />
member names with no further description.<br />
The Hierarchy Menu. The Hierarchy menu item appears when<br />
you select a goals hierarchy as the active window. The Hierarchy<br />
menu has the following options (many of which correspond to<br />
options in the Goals Hierarchy dialog box):<br />
! Horizontal Display -- redraw the hierarchy in horizontal<br />
orientation,<br />
! Vertical Display -- redraw the hierarchy in vertical<br />
orientation,<br />
6-8 Section 6 -- Using LDW 1: Structuring
! Show Shadows -- toggle the display of drop shadows in<br />
the hierarchy,<br />
! Show Assessment Status -- redraw the hierarchy and<br />
color it to show the status of the preference<br />
assessments -- blue for completed, red for not<br />
completed and gray for no assessment necessary.<br />
! Expand -- Toggle whether goals, measures and<br />
measure categories below the active object are<br />
shown,<br />
! Description — this sub-menu determines what to<br />
display beneath the name for each member.<br />
Type of Object -- show the type of each object<br />
Local Weights -- show the weight for each object in<br />
the MUF it belongs to<br />
Global Weights -- show the weight for each object<br />
as a fraction of the overall weight<br />
Units — show the units for each object<br />
No Description — show nothing below each object<br />
! Promote/Demote — Promote or demote the currently<br />
selected object. Goals can be demoted to measures,<br />
measures can be promoted to goals and measure<br />
categories can be promoted to measures<br />
! Has a MUF -- Toggles whether the currently selected<br />
goal has a utility function. The utility function will<br />
include any goals and measures not already in a<br />
lower level utility function.<br />
Right clidk menus. When you right click on an object in the<br />
goals hierarchy, LDW will display a menu with options<br />
appropriate to that object.<br />
Active member. When you click on an object in the goals<br />
hierarchy, it becomes active and is highlighted in green. Actions<br />
you perform subsequently will apply to the active object.<br />
You can delete the active measure or goal with the Edit::Cut or<br />
Edit::Delete option. The cut option deletes the active member but<br />
Section 6 -- Using LDW 1: Structuring 6-9
saves it for later pasting. When you cut a goal, LDW also cuts all<br />
of the members below it in the hierarchy.<br />
The Edit::Delete option deletes the member without saving a<br />
copy. When you delete a goal with the Edit::Delete option its<br />
members are not deleted. Instead, they become members of the<br />
next higher goal in the hierarchy.<br />
The Edit::Copy option lets you copy the active member for later<br />
pasting without deleting it.<br />
The active goal or measure also determines where LDW positions<br />
new members in the goals hierarchy. LDW puts new members<br />
below the active goal (that is, they become members of the active<br />
goal). LDW puts new members next to the active measure (they<br />
become members of the same goal as the active measure).<br />
You can add a new measure or goal with the Add a Goal<br />
and Add a Measure options.<br />
The Matrix View<br />
The Matrix view is where you can add and delete alternatives,<br />
measures, and measure categories and where you can define the<br />
levels for the alternatives on the measures and categories. When<br />
you select the View::Matrix option, LDW will create a display like<br />
the one from the tutorial in Figure 6-5.<br />
Figure 6-5. Example of View::Matrix display.<br />
The matrix has four different types of cells -- measure/category<br />
cells (along the top of the matrix), alternative cells (on the left side<br />
of the matrix), level cells (in the center of the matrix), and the<br />
upper left corner cell. Double clicking the upper left corner cell<br />
displays the View::Summary dialog box.<br />
Measure, measure category and alternative cells. Selecting a<br />
cell at the top or left of the matrix prepares you to delete or cut the<br />
object. The Edit::Delete option deletes the active object<br />
without saving it. LDW asks you to confirm before the deletion<br />
6-10 Section 6 -- Using LDW 1: Structuring
takes place. The Edit::Cut option also deletes the active object, but<br />
LDW saves a copy for later pasting. The Edit::Copy option saves<br />
a copy of the object without deleting it.<br />
You can insert a new object into the matrix with the Add a<br />
Measure, Add a Category, or Add an Alternative<br />
option. When you select one of these options, LDW adds the<br />
objects and shows its properties dialog box. If you add a new<br />
measure or measure category, LDW sets its levels for the<br />
alternatives to zero. If you add an alternative, LDW sets its levels<br />
on the measures to their least preferred levels.<br />
You can view an object’s properties dialog box by double clicking<br />
on its cell.<br />
Level cells. Since each alternative must have a level on each<br />
measure, LDW does not allow you to insert or delete levels.<br />
However, you can use the Edit::Copy and Edit::Paste options to<br />
copy levels from one cell to another. If you double click on a level<br />
cell, you will see the probability dialog box, where you can define<br />
probabilistic measure levels and add comments. See the<br />
discussion starting on Page 6-20 for complete information on how<br />
to define measure levels.<br />
LDW also marks certain level cells to show special situations.<br />
Cells with probabilistic levels or levels defined by measure<br />
categories have a red background. You can't modify these levels<br />
by just typing in a number. You must make all modifications<br />
using the probability dialog box or by modifying the levels of the<br />
measure's categories. Level cells for measure categories have a<br />
green background.<br />
When LDW shows measure categories, it adds one more row to<br />
the matrix. The additional row shows the category multipliers.<br />
These multipliers are the basis of the weighted sum of the<br />
categories that makes up the measure levels for the alternatives.<br />
For example, in the tutorial, LDW computes the level of 23 for the<br />
"Coyote" alternative as 0.5*(19)+0.5*(27), the sum of the<br />
multipliers times the category levels.<br />
You can modify a category multiplier by clicking on it and typing<br />
in the number you want. There is no requirement that the<br />
multipliers sum to one.<br />
Section 6 -- Using LDW 1: Structuring 6-11
You can create a new Matrix view by selecting the View::Matrix<br />
option. When you select this option, you are shown the dialog<br />
box in Figure 6-6.<br />
Figure 6-6. Matrix options dialog box.<br />
The goal you select from the list at the left of the dialog box<br />
determines which measures will be shown in the matrix. Only<br />
those measures below the selected goal in the goals hierarchy will<br />
be shown. When you check the box labeled "Show Categories",<br />
LDW will display the columns for the measure categories<br />
associated with the measures in the matrix. If you don't check the<br />
box, the measure category columns will be hidden. You will be<br />
able to view them later by selecting the Matrix::Show Measure<br />
Categories option.<br />
The Matrix Menu. When you have selected a matrix view<br />
window as the active window, LDW will display the Matrix menu<br />
item, which has the following options:<br />
! Show/Hide Measure Categories -- this option is<br />
only available when you have selected a measure<br />
that has one or more measure categories When the<br />
option is on, LDW displays the columns for the<br />
measure's categories in the matrix.<br />
6-12 Section 6 -- Using LDW 1: Structuring
! Define Probability -- this option is only available<br />
when you have selected a level cell in the matrix<br />
view. When you select it, LDW will display the<br />
"Define a Probabilistic Level" dialog box, where<br />
you can define a probability distribution for the<br />
active level. You can also get to this dialog box by<br />
double clicking on a level cell.<br />
The Quick Entry View<br />
The quick entry view is designed to let you quickly structure your<br />
analysis without worrying about measure scales and levels. The<br />
Quick Entry view is a tree structure like those seen in the<br />
Windows Explorer Folders option. You select the Quick Entry<br />
view with the View::Quick Entry option. LDW displays a tree<br />
window like the one shown in Figure 6-7.<br />
Figure 6-7. Example of Quick Entry view.<br />
Section 6 -- Using LDW 1: Structuring 6-13
The quick entry view shows the alternatives, goals, measures and<br />
measure categories as leafs in the tree.<br />
You select an object by clicking it. If you click again you can edit<br />
the object’s name, ID number or both, depending on the setting of<br />
the Preferences::Name Preferences option.<br />
If you double click on a leaf you can see the object’s properties<br />
dialog box.<br />
You can move goal, measure and measure category leafs by<br />
dragging and dropping them where you want them to go.<br />
You can use the Edit::Cut, Edit::Copy and Edit::Paste and the<br />
options as usual. The Add a Goal, Add an Alternative,<br />
Add a Measure and Add a Measure Category options<br />
are all available. You can delete the active object with the<br />
Edit::Delete option.<br />
The confirmations that are required in other views are not<br />
activated in the Quick Entry view.<br />
Note that you are not allowed to modify objects in other views<br />
when the Quick Entry view is active.<br />
Structuring Alternatives<br />
The alternatives in an LDW analysis are the choices that you are<br />
evaluating. You describe the alternatives in terms of their levels<br />
on the evaluation measures, but you also must name each<br />
alternative. You can also add comments and an ID number if you<br />
want.<br />
You enter the measure levels that describe an alternative in the<br />
Matrix view. See the discussion on the Matrix view on page 6-10<br />
and the discussion on measure levels on page 6-20 for the details<br />
on how to do this.<br />
You can view or modify the other information about an<br />
alternative in its properties dialog box. You can view an<br />
alternative's properties dialog box by double clicking on its box in<br />
6-14 Section 6 -- Using LDW 1: Structuring
the Matrix view, double clicking its line in the Summary dialog<br />
box, or by selecting Properties from the right click menu. Figure<br />
6-8 is an example of an alternative properties dialog box.<br />
Figure 6-8. Example alternative properties dialog box.<br />
In the dialog box, the "Name" field in the upper left corner defines<br />
how to describe the alternative in various lists and tables. The "ID<br />
Number" field allows an alternate description or code for the<br />
alternative. You can use the Preferences::Names option to control<br />
how LDW uses these two fields to describe the alternatives. The<br />
comments field at the bottom of the dialog box lets you provide a<br />
more detailed description of your alternative.<br />
Adding an Alternative. You can add an alternative at any time<br />
using the Edit::Add option. Just select the "Alternative" button<br />
and click OK. LDW will give you the option of copying an<br />
existing alternative or adding a new default alternative. You can<br />
also add alternatives in the Matrix or Quick Entry view with the<br />
Add an Alternative option. If you have previously saved an<br />
alternative using the Edit::Cut or Edit::Copy option you can<br />
retrieve it with the Edit::Paste option. Finally, you can click the<br />
“Add Another Alternative.”<br />
Deleting an Alternative. You can delete an alternative at any<br />
time by selecting it and using the Edit::Delete option. LDW<br />
will ask you to confirm before it deletes the alternative in the<br />
Matrix view.<br />
Section 6 -- Using LDW 1: Structuring 6-15
Structuring Goals<br />
The goals in an LDW analysis are the concerns or objectives that<br />
are affected by selecting an alternative. You describe the goals in<br />
terms of the measures and sub-goals that are their members, but<br />
you also must name each goal. You can also add comments and<br />
an ID number.<br />
You define a goal's members in the Goals Hierarchy or Quick<br />
Entry view. The members of a goal are those measures and other<br />
goals that are directly under the goal in the hierarchy. You can<br />
use the options in the Edit menu to add, delete or modify the<br />
members of a goal. Each measure and goal is a member of exactly<br />
one goal, except the "Overall" goal, which defines the top of the<br />
goals hierarchy.<br />
You can view or modify the other information about a goal in its<br />
goal properties dialog box. You can view a goal's properties box<br />
by double clicking on its box in the Goals Hierarchy or Quick<br />
Entry view, double clicking its line in the Summary dialog box, or<br />
with the Edit::Modify option.<br />
In the dialog box, the "Name" field defines how LDW refers to the<br />
goal in various lists and tables. The "ID Number" field allows an<br />
alternate description or code for the goal. You can use the<br />
Option::Change Names option to control how LDW uses these<br />
two fields to describe each goal. The comments field at the<br />
bottom of the dialog box lets you provide a more detailed<br />
description of your goal.<br />
LDW needs the "Nominal Utility" field when using<br />
representatives for the goal in assessing weights. It is the utility<br />
that LDW assigns to the other members (besides the<br />
representative) when computing the goal's weight from the<br />
weight of the representative. You should leave the nominal<br />
utility at one unless you are a very advanced LDW user.<br />
The options under the “Position” tab control where the goal is<br />
located in the goals hierarchy. The "Goal Under" combo box<br />
identifies the goal directly above the active goal in the goals<br />
hierarchy. You can change the selection in this box to move the<br />
active goal beneath any other goal in the hierarchy. If you do this,<br />
LDW also moves all of the members of the selected goal. LDW<br />
asks you to confirm this change when you close the dialog box.<br />
6-16 Section 6 -- Using LDW 1: Structuring
The "Members" list is a list of all the measures and goals in the<br />
analysis. The measures and goals highlighted in the list are the<br />
members of the selected goal. You can add a member to the goal<br />
by clicking on an un-highlighted measure or goal to make it a<br />
member. You can delete a member from the goal by clicking on it<br />
to unhighlight it. LDW asks you to confirm all changes in the<br />
goal's member list when you close the dialog box. Some changes<br />
create loops in the hierarchy and aren't allowed.<br />
Adding a Goal. You can add a goal at any time using the<br />
Edit::Add option. Just select the "Goal" button and click OK. You<br />
can also use the Add a Goal option in the Goals Hierarchy or<br />
Quick Entry view. To do this you must first select an existing goal<br />
or measure to tell LDW where to add the new goal. If you have<br />
previously saved a goal using the Edit::Cut or Edit::Copy option<br />
you can retrieve it with the Edit::Paste option. New goals are<br />
added below the active goal or below the goal the active measure<br />
belongs to in the hierarchy.<br />
Deleting a Goal. You can delete a goal at any time using the<br />
Edit::Delete option. The deleted goal's members will become<br />
members of the next higher goal in the hierarchy. You can also<br />
delete a goal by clicking on it and then selecting the Edit::Cut<br />
option. The Cut option saves a copy of the goal and its members<br />
for later pasting.<br />
Structuring Evaluation Measures<br />
The measures in an LDW analysis are the variables that describe<br />
an alternative and are also the lowest level objectives of the<br />
analysis. You describe the alternatives in terms of their levels on<br />
the measures. You define a measure in terms of its scale, units and<br />
range, but you also must name each measure. You can also add<br />
comments and an ID number if you want.<br />
You can view or modify the information about a measure in its<br />
properties dialog box. You can view a measure's properties<br />
dialog box by double clicking on its box in the Goals Hierarchy<br />
view, Matrix view, or Quick Edit view, double clicking its line in<br />
the Summary dialog box, or with the Edit::Modify option.<br />
In the dialog box, the "Name" field defines how LDW describes<br />
the measure in various lists and tables. The "ID Number" field<br />
allows an alternate description or code for the measure. You can<br />
use the Option::Change Names option to control how LDW uses<br />
Section 6 -- Using LDW 1: Structuring 6-17
these two fields to describe each measure. The comments field at<br />
the bottom of the dialog box lets you provide a more detailed<br />
description of your measure.<br />
The "Goal Above" combo box identifies the goal directly above the<br />
active measure in the goals hierarchy. You can change the<br />
selection in this box to move the active measure beneath any other<br />
goal in the hierarchy. LDW asks you to confirm this change when<br />
you close the dialog box.<br />
The items under the “Scale” tab describe the scale associated with<br />
the measure.<br />
The "Units" box is a text description of the scale of your measure.<br />
LDW shows the units in many assessment and results displays.<br />
The "Most Preferred Level" and "Least Preferred Level" boxes are<br />
where you tell LDW the range for the measure. LDW uses the<br />
range in converting the measure's levels to common units and in<br />
some methods for computing the measure's weight.<br />
A measure's scale is "increasing" if the most preferred level in the<br />
range is higher than the least preferred level and is "decreasing"<br />
otherwise. If levels in the middle of the range are more preferred<br />
(or less preferred) than the levels at the ends of the range, you will<br />
describe this to LDW in the Assess::Common Units option and you<br />
can define either end of the range as the most preferred level in<br />
the measure dialog box.<br />
To help you define the measure's range, LDW displays the current<br />
levels for the most and least preferred alternative.<br />
The item labeled "Number of Categories," just tells you how many<br />
measure categories are associated with this measure.<br />
Cutoffs. The "Upper Cutoff Level" box lets you define a level<br />
above which an alternative is unacceptable. Similarly, the "Lower<br />
Cutoff Level" box lets you define a level below which an alternative<br />
is unacceptable. These cutoffs do not affect any of LDW's<br />
calculations. LDW simply marks measures failing one or more<br />
cutoffs in the Results::Rank Alternatives and other options. You<br />
can also get a summary of the alternatives failing cutoffs by<br />
selecting the Results::Cutoff Summary option.<br />
Labels. The items under the “Labels” tab let you define a scale<br />
based on text descriptions rather than numbers.<br />
6-18 Section 6 -- Using LDW 1: Structuring
When you check the "Use Labels" box, LDW first asks you to<br />
confirm and then defines a default set of text labels ("High",<br />
"Medium", and "Low") for the measure. It is also necessary for<br />
LDW to delete any measure categories associated with the<br />
measure and to delete any probabilistic levels. LDW sets the level<br />
for all alternatives to "High".<br />
If you uncheck the "Use Labels" box, LDW will delete the labels<br />
and assign numeric levels for the measure. The initial level will be<br />
1.0 for all alternatives. The “Use Labels” check box appears under<br />
both the “Scale” and “Labels” tabs.<br />
The list box under the “Labels” tab lets you define the labels for<br />
your measure. Figure 6-9 shows this part of the measure dialog<br />
box.<br />
Figure 6-9. Define Labels section of measure dialog box.<br />
At the bottom is the current list of labels. To modify the list, just<br />
edit it, making sure that each label is on a separate line.<br />
Adding an Measure. You can add a measure at any time using<br />
the Edit::Add option. Just select the "Measure" button and click<br />
OK. You can also add measures in the Goals Hierarchy, Quick<br />
Entry or Matrix view with the Add a Measure option. If you<br />
have previously saved a measure using the Edit::Cut or Edit::Copy<br />
option you can retrieve it with the Edit::Paste option. In the Goals<br />
Hierarchy and Quick Entry views, new measures are added below<br />
the active goal or below the goal the active measure belongs to in<br />
Section 6 -- Using LDW 1: Structuring 6-19
the hierarchy. In the Matrix view, new measures are added to the<br />
left of the selected measure as members of the "Overall" goal.<br />
Deleting a Measure. You can delete the active measure in a view<br />
window using the Edit::Delete or Edit::Cut option. The Cut<br />
option saves a copy of the measure. The Delete option does not<br />
save a copy and requires confirmation before it deletes the<br />
measure.<br />
Structuring Measure Levels<br />
A measure level describes an alternative’s performance on a<br />
measure. Each alternative has one level for each measure or<br />
measure category. Thus, LDW does not let you add or delete<br />
measure levels, only change them. You set measure levels in the<br />
Matrix view. Each cell in the matrix defines the level for the<br />
measure at the top of the column and the alternative at the start of<br />
the row for the cell.<br />
Types of Measure Levels. Most measure levels are "point<br />
estimates." That is, they are single numbers with no uncertainty.<br />
However, LDW lets you define several other types of levels.<br />
"Probabilistic levels" are levels with uncertainty. You describe the<br />
uncertainty by defining a probability distribution for the level.<br />
Measures that have measure categories have their levels defined<br />
by a weighted sum of the category levels.<br />
Measures that use labels describe levels with brief textual<br />
descriptions (such as "High", Medium" or "Low").<br />
You can define all types of levels in the Matrix view.<br />
Levels and AHP. If you are planning to use the Analytic Hierarchy<br />
Process to convert a measure to common units, you don't need to<br />
worry about levels, since LDW does not use the levels for the<br />
measure when doing the conversion. In AHP you directly<br />
compare the alternatives.<br />
Defining "Point Estimate" Levels. Point estimate levels are easy<br />
to define. Just select the level you want to define and type in the<br />
number. Remember to confirm that you have finished by pressing<br />
the Enter key or the Up-Arrow or Down-Arrow key. There are no<br />
restrictions on the numbers you can enter as measure levels.<br />
6-20 Section 6 -- Using LDW 1: Structuring
In particular, the levels you enter do not need to be within the measure's<br />
range as defined in its properties dialog box. Just be aware that LDW<br />
will convert levels outside a measure's range to common units<br />
(utilities) greater than one or less than zero.<br />
There are many options available for defining probabilistic<br />
measure levels, so they are discussed in the next section.<br />
Probabilistic Measure Levels<br />
You define probabilistic measure levels from the Matrix view. To<br />
start the process, select the level you want to make probabilistic<br />
and double-click on its cell. Or, you can select the cell by clicking<br />
on it and select the Matrix::Define Probability option. In<br />
either case you will see the probability dialog box shown in Figure<br />
6-10.<br />
Figure 6-10. Probability dialog box.<br />
The probability dialog box shows the level being modified and its<br />
current probability distribution. The following types are available:<br />
Section 6 -- Using LDW 1: Structuring 6-21
! Point Estimate -- use a single number as the level. This is<br />
the default.<br />
! Uniform Distribution -- define the level with a uniform<br />
probability distribution defined by an upper and<br />
lower limit.<br />
! Discrete Distribution -- define the level as several<br />
different levels, each of which with its own<br />
probability.<br />
! Piecewise Linear Cumulative Distribution -- define the<br />
level with several levels that define a cumulative<br />
probability distribution.<br />
! Normal Distribution -- define the level with a Normal<br />
(bell shaped curve) probability distribution.<br />
! Three Point Estimate -- define the level with three points<br />
of the probability distribution: the 0.05 level, the<br />
0.50 level and the 0.95 percent level.<br />
! Triangle Distribution -- define the level with a triangle<br />
distribution defined by the minimum, most likely<br />
and maximum levels.<br />
You select a distribution type by clicking the radio button for that<br />
type. Then LDW asks you to enter the parameters for that<br />
distribution.<br />
After you enter the data, LDW displays the resulting certainty<br />
equivalent. The certainty equivalent is the point estimate level<br />
that has the same utility as the expected utility of the probabilistic<br />
level. LDW computes expected utility by combining the level's<br />
probability distribution with the associated measure’s utility<br />
function.<br />
The sections below describe the parameters that define the<br />
different probability distributions.<br />
Point Estimate. The Point Estimate option lets you define a single<br />
number as the level of the active measure and alternative. Point<br />
estimates are the default, and the measure levels entered<br />
elsewhere are point estimates.<br />
6-22 Section 6 -- Using LDW 1: Structuring
When you select this option, LDW replaces the probability<br />
distribution with its certainty equivalent. Any previously entered<br />
probability information is lost.<br />
Uniform Distribution. The Uniform Distribution option lets you<br />
describe the level for a measure and alternative as a uniform<br />
probability distribution. A uniform distribution is one where all<br />
levels between two endpoints are equally likely and there is no<br />
probability of being outside the endpoints. See Figure 6-10.<br />
Figure 6-11. Example of a level defined by a uniform distribution<br />
When you select this option, LDW asks you to enter the minimum<br />
and maximum levels for the range.<br />
Discrete Distribution. The Discrete Distribution option lets you<br />
to enter a discrete probability distribution as the level for a<br />
measure and alternative. A discrete distribution has probabilities<br />
defined for several different levels such that the probabilities sum<br />
to 1.0. Thus, the level will be one of several possibilities, with the<br />
likelihood of each possibility defined by its probability and the<br />
probability of any other level being zero. See Figure 6-12.<br />
Section 6 -- Using LDW 1: Structuring 6-23
Figure 6-12. Example of a measure level defined by a discrete probability<br />
distribution<br />
When you select this option, LDW asks you to enter the number of<br />
points (up to 10) that you will define. You then enter a level and a<br />
probability for each point. If your probabilities do not sum to 1.0,<br />
LDW will proportionally adjust them so that they do. The levels<br />
do not have to be in increasing order, although this will make it<br />
easier to see what's going on.<br />
Piecewise Linear Cumulative. The Piecewise Linear Cumulative<br />
option lets you describe the level of a measure for an alternative as<br />
a Piecewise Linear Cumulative probability distribution. A<br />
Piecewise Linear Cumulative distribution is described by several<br />
levels where the probability of being less than or equal to that<br />
level is defined. These points are connected by straight lines to<br />
form a complete cumulative probability distribution function. See<br />
Figure 6-13.<br />
6-24 Section 6 -- Using LDW 1: Structuring
Figure 6-13. Example of a measure level defined by a Piecewise Linear<br />
Cumulative probability distribution<br />
When you select this option, LDW asks you to enter the number of<br />
points you will define. Next, you enter pairs of probabilities and<br />
levels. The probabilities represent the chance that the actual level<br />
is less than or equal to the level for that point. The first probability<br />
must be 0.0, the last 1.0, and the probabilities must be increasing.<br />
Normal Distribution. The Normal Distribution option lets you<br />
describe the level of a measure for an alternative with a Normal<br />
probability distribution. A Normal (Gaussian) distribution is the<br />
familiar bell shaped curve and is defined by a mean and a<br />
standard deviation. See Figure 6-14.<br />
Section 6 -- Using LDW 1: Structuring 6-25
Figure 6-14. Example of a measure level defined by a Normal probability<br />
distribution<br />
When you select this option, LDW asks you to enter the mean and<br />
standard deviation for the selected measure and alternative.<br />
Triangle distribution. The Triangle Distribution option lets you<br />
describe the level for a measure and alternative with a triangle<br />
distribution defined by the minimum, most likely and maximum<br />
levels. See Figure 6-15.<br />
Figure 6-15. Example of a measure level defined by a triangle distribution<br />
6-26 Section 6 -- Using LDW 1: Structuring
When you select this option, LDW asks you to enter the three<br />
levels.<br />
Three Point Estimate. The Three Point Estimate option lets you<br />
describe the level for a measure and alternative by defining the 5<br />
percent, 95 percent, and 50 percent levels of its cumulative<br />
probability distribution function. See Figure 6-16.<br />
Figure 6-16. Example of a measure level defined by a three point estimate<br />
When you select this option, LDW asks you to enter the three<br />
levels. You can use this option when you are unsure of the actual<br />
form of the distribution, and still get reasonably accurate results.<br />
How LDW uses Probabilities. LDW generally treats probabilities<br />
as certainty equivalents -- single numbers that are equal in terms<br />
of preference to the entire probability distribution. The theory of<br />
decision analysis tells us that this certainty equivalent alone<br />
should be sufficient for decision making.<br />
LDW also provides options that let you see how the uncertainties<br />
in measure levels result in uncertainties in the overall results.<br />
LDW does this by using Monte Carlo Simulation.<br />
In Monte Carlo simulation, a number of passes are made to<br />
compute an alternative's utility on a measure or goal. For each<br />
Section 6 -- Using LDW 1: Structuring 6-27
pass, LDW replaces each probabilistic level with a single number<br />
that is sampled from the probability distribution for the level. A<br />
sample is a number that is randomly drawn from a probability<br />
distribution with a likelihood that is based on the probability<br />
distribution.<br />
For example, if a level with units of horsepower has a discrete<br />
distribution of p(150hp) = 0.5, p(160hp) = 0.3, and p(170hp = 0.2),<br />
then about 50% of the samples will have a level of 150hp, about<br />
30% of them will have a level of 160hp and about 20% of them will<br />
have a level of 170hp.<br />
Because the samples are based on random numbers, the<br />
proportions won't exactly match the fractions in the probability<br />
distribution. However after a large number of samples have been<br />
taken the proportions should be very close.<br />
After each probabilistic level has been sampled, LDW computes<br />
the alternative’s utility and saves it. After many passes, you will<br />
get an idea of the probability distribution of the alternative’s<br />
utility.<br />
The following LDW options use Monte Carlo simulations:<br />
! the Options::Simulation Options option lets you define<br />
the number of samples to use when doing a Monte<br />
Carlo simulation.<br />
! the Results::Alternative Uncertainty Graph option lets<br />
you see a histogram and cumulative probability<br />
distribution for any alternative and measure or<br />
goal.<br />
! the Results::Uncertainty Summary option lets you<br />
generate a table comparing the uncertainties for all<br />
the alternatives for any measure or goal.<br />
! the Results::Rank Alternatives option has a feature that<br />
lets you show the uncertainty range for each<br />
alternative along with its expected utility.<br />
Adding Comments to Levels. The probability dialog box shown<br />
in Figure 6-10 includes an edit box for entering comments. You<br />
can use this comment field for any level, regardless of whether the<br />
level is probabilistic. This comment field lets you add a comment<br />
6-28 Section 6 -- Using LDW 1: Structuring
to any particular measure level. A similar comment field is<br />
provided in the probability dialog box for labeled levels.<br />
Levels with labels<br />
Measure labels let you describe the level on a measure with a brief<br />
text description rather than a number. You define the allowable<br />
labels in the measure's properties dialog as described on page 6-19.<br />
To select a particular label for an alternative you first select the<br />
level's cell in the matrix view. When you click a cell for a measure<br />
that has labels, it turns into a combo-box showing the current label<br />
with a drop down list of the possible levels. To select a new level<br />
just click one of the labels in the list. The combo-box will<br />
disappear when you select another cell.<br />
Defining probabilities with labels. Since labels provide only a<br />
discrete set of possible levels for a measure, LDW only allows a<br />
discrete distribution that specifies the probability of each label on<br />
the list.<br />
To define a probability distribution over the labels, select the cell<br />
for the level you want to define and select the Matrix::Define<br />
Probability. When you select the option, LDW displays the dialog<br />
box shown in Figure 6-17.<br />
The left side of this dialog box has a list of the labels for the active<br />
measure. When you select a label, its probability appears in the<br />
edit box on the right. Initially the probability is 1.0 for the current<br />
"point-estimate" label and zero for the other labels. You should<br />
assign the proper probability for each label and then click "OK."<br />
LDW will adjust your probabilities if they don't sum to one. If<br />
only one label has a positive probability, LDW will convert the<br />
probabilistic level to a point estimate level.<br />
LDW displays the label with the highest probability in the Matrix<br />
view.<br />
Section 6 -- Using LDW 1: Structuring 6-29
Figure 6-17. Dialog box for defining label probabilities.<br />
Measure Categories<br />
Measure categories are sub-measures that define an alternative's<br />
level as a weighted average of its category levels. A measure<br />
category is defined by a multiplier for the category and a category<br />
level for each alternative.<br />
Different preference sets can have different multipliers for the<br />
categories.<br />
You define category levels in the Matrix view in the same way as<br />
you define measure levels. You can define probabilistic category<br />
levels but you can't define category levels using labels.<br />
If you have defined categories for a measure, LDW will compute<br />
the levels for that measure from the category levels. LDW will<br />
override any levels you have previously defined in the Matrix<br />
view and will lock the measure's level cells when you define the<br />
first category for the measure.<br />
6-30 Section 6 -- Using LDW 1: Structuring
Adding a Measure Category. You can add a measure category at<br />
any time using the Edit::Add option. Just select the "Measure<br />
Category" button and click OK. You can also add measure<br />
categories in the Matrix or Quick Entry view. To do this you first<br />
select an existing measure or measure category and then add the<br />
new category with the Add a Category option. If you have<br />
previously saved a measure category using the Edit::Cut or<br />
Edit::Copy option you can retrieve it with the Edit::Paste option.<br />
The category will belong to the active measure, which can be<br />
different from the measure the category was copied from. You can<br />
view measure categories in the Goals Hierarchy view, and you can<br />
also cut and paste them, but you can't insert them.<br />
Deleting a Measure Category. You can delete measure<br />
categories in the Matrix, Goals Hierarchy or Quick Entry view. To<br />
do this you first select the category you want to delete and then<br />
delete it with the Edit::Delete option or the Edit::Cut option.<br />
The Cut option saves a copy of the measure category. The Delete<br />
option does not.<br />
Modifying a Measure Category. Generally you will modify a<br />
measure category by changing its levels on the alternatives. You<br />
can also modify the name and other information about a measure<br />
category by reviewing the properties dialog box shown in Figure<br />
6-18. You can view this dialog box by double clicking on a<br />
category's cell in the Matrix, Goals Hierarchy or Quick Entry view<br />
or by selecting the Edit::Modify option.<br />
Section 6 -- Using LDW 1: Structuring 6-31
Figure 6-18. Measure Category Dialog Box.<br />
Printing Evaluation Forms<br />
The Assess::Evaluation Form option lets you generate a form that<br />
you can use to evaluate alternatives. When you select the option,<br />
LDW generates a form similar to that shown in Figure 6-19.<br />
6-32 Section 6 -- Using LDW 1: Structuring
Figure 6-19. Example evaluation form.<br />
You can print the form out directly from logical decisions or save it<br />
as a .doc or other text format file and then use it to collect data for<br />
your alternatives.<br />
Section 6 -- Using LDW 1: Structuring 6-33
S E C T I O N<br />
Using LDW 2: Assessing<br />
7
Using LDW 2: Assessing<br />
Introduction<br />
The second major step of an LDW analysis is to assess<br />
preferences. LDW needs your preferences to define how to<br />
convert the measures to common units and how to compute the<br />
weights of the measures and goals.<br />
The information you enter in the "Structuring the Problem" step is<br />
often relatively objective. Different experts can often agree on the<br />
the structure of the goals hierarchy and the levels for the<br />
alternatives.<br />
The information collected in the preference assessment step is<br />
different. There are generally no objectively right answers to the<br />
preference questions and reasonable people can disagree.<br />
There is no way to avoid the preference assessment step in<br />
decisions with more than one evaluation measure. Some<br />
approaches claim to avoid the step, but usually they just hide it by<br />
combining it with the more objective parts of the analysis. This<br />
makes it very difficult to see what's going on and severely limits<br />
the usefulness of the analysis.<br />
LDW takes a better approach. It clearly separates the objective<br />
parts of the analysis (structuring the problem) from the more<br />
subjective parts (the preference assessments). LDW then provides<br />
tools to identify the effects of different preferences and to identify<br />
those preference judgments that are crucial to the results of the<br />
analysis. This can help focus the discussion about the decision to<br />
those aspects that are most critical.<br />
Preference Sets<br />
Preference sets are where LDW stores the preference judgments<br />
for a single individual or homogeneous group. A preference set<br />
contains all the information LDW needs to compute a ranking of<br />
the alternatives for the "Overall" goal. This information includes<br />
category multipliers, single-measure utility functions, and the<br />
weight assessment information that lets LDW compute the multi-<br />
Section 7 -- Using LDW 2: Assessing 7-1
measure utility functions for the goals. The information stored<br />
varies based on the preference assessment methods selected.<br />
LDW always has an active preference set. The active preference<br />
set is the basis for any results displays. In addition, any<br />
preference assessments done with the options in the Assess menu<br />
are part of the active preference set.<br />
You can select the active preference set with the<br />
View::Select/Change Preference Sets option. When you select this<br />
option, LDW displays the dialog box shown in Figure 7-1. At the<br />
left of this dialog box is a list of the preference sets in the analysis.<br />
Double clicking one of these will select it as the new active<br />
preference set. You can also use the "Select" button to select the<br />
highlighted preference set. You can use the "Add" button to add a<br />
new preference set to the analysis or the "Delete" button to delete<br />
the highlighted preference set from the analysis. LDW will ask<br />
you to confirm before deleting a preference set. Finally, you can<br />
click the “Properties” to view the properties dialog box for the<br />
highlighted preference set.<br />
Figure 7-1. Preference Set Selection Dialog Box.<br />
You can also change the active preference set by clicking on a<br />
preference set name in the Summary dialog box.<br />
LDW displays the active preference set in the lower right-hand<br />
corner of the <strong>Logical</strong> <strong>Decisions</strong> main window.<br />
7-2 Section 7 -- Using LDW 2: Assessing
Adding a Preference Set. You can add a new preference set to<br />
your analysis using the Edit::Add option. Just select the<br />
"Preference Set" radio button and click OK. LDW will give you<br />
the option of copying an existing preference set or adding a new<br />
default preference set. If you copy an existing preference set,<br />
LDW also copies all of the preference information associated with<br />
the preference set. LDW assigns new preference sets the defaults<br />
for all needed preference information. You can also add a new<br />
preference by selecting the View::Select/Change Preference<br />
Sets option as described above.<br />
Deleting a Preference Set. You can delete a preference set using<br />
the Edit::Delete option. Just select the "Preference Set" radio<br />
button and click OK. LDW will ask you to select a preference set<br />
from a list and then to confirm before it deletes the preference set.<br />
You can also delete a preference set by selecting the<br />
View::Select/Change Preference Sets option as described above.<br />
If you just want to initialize all or part of your preference<br />
information to the default values, don't delete the preference set.<br />
Instead, use the initialization options in the preference set<br />
properties dialog box discussed in the next section.<br />
Modifying a Preference Set. You can change the name and other<br />
information about a preference set by using its preference set<br />
dialog box. You can view the preference set dialog box by double<br />
clicking on the name of a preference set in the View::Summary<br />
option's dialog box or by clicking the “Properties” button in the<br />
View::Select/Change Preference Sets option.<br />
In the preference set dialog box, the "Name" edit box in the upper<br />
left corner defines how LDW describes the preference set. The<br />
"ID Number" field allows an alternate description or code for the<br />
measure. You can use the Preferences::Change Names option to<br />
control how LDW uses these two fields to describe each<br />
preference set. The comments field at the bottom of the dialog<br />
box lets you provide a more detailed description of your<br />
preference set.<br />
Under the “Structure” tab in the preference set dialog box, the<br />
"Goals with a MUF" list box identifies which of the goals in the<br />
analysis will have their own utility function. You can select a<br />
goal to have a utility function by clicking on an un-highlighted<br />
goal. You can delete the utility function for a goal by clicking on<br />
its name to un-highlight it. LDW saves as much preference<br />
Section 7 -- Using LDW 2: Assessing 7-3
information as possible when you change the "Goals With a MUF"<br />
list.<br />
The "Common Units Default" combo box lets you identify the<br />
default method to use for converting measures to common units.<br />
When you select a method from the list, LDW converts all<br />
measures currently having default SUFs to the defaults for the<br />
new method. LDW does not make changes to measures for which<br />
you have already entered preferences. In addition, when you<br />
select the Assess::Common Units option, LDW will preselect<br />
the default method for you.<br />
The "Weight Assessment Default" has a similar function for the<br />
assessment methods for the Assess::Weights option.<br />
Under the “Status” tab in the preference set dialog box, the<br />
"Reset" check boxes let you initialize parts of the preference<br />
information for the active preference set. The initialized parts are<br />
set to their default values.<br />
Checking the "All SUFs" box initializes the SUF curves for all<br />
measures to straight lines.<br />
Checking the "All MUFs" box initializes all weights to equality.<br />
Any tradeoffs or other weight information assessed is deleted.<br />
Checking the "All Category Multipliers" box initializes all<br />
category multipliers to one. You must confirm any initializations<br />
when you close the properties dialog box.<br />
Finally, the "Status" line informs you of how far you have<br />
progressed in your preference assessments. The possibilities are<br />
! Defaults Used -- no assessments have been done and<br />
LDW uses the defaults for all needed preference<br />
information.<br />
! Partial Assessment -- some assessments have been<br />
done, but some defaults are still being used.<br />
! Assessments Complete -- all needed preference<br />
assessments have been completed.<br />
7-4 Section 7 -- Using LDW 2: Assessing
Overview of Preference Assessments<br />
The purpose of the preference assessments is to collect the<br />
judgments needed to combine the measure levels for an<br />
alternative into an overall utility for that alternative. Three types<br />
of preference judgments may be needed:<br />
! Category Multipliers -- to allow measure category levels<br />
to be combined into measure levels,<br />
! Common Units Conversions -- to allow the measure<br />
levels to be converted from their original units to<br />
standardized units called utility, and<br />
! Weight Assessments -- to allow the utilities for<br />
individual measures and goals to be combined into<br />
utilities for the higher level goals.<br />
LDW gives you lots of freedom in the order and methods you use<br />
for these assessments. In addition, LDW provides defaults so you<br />
can skip steps and still do a ranking of your alternatives. LDW<br />
lets you compute results based on your preference assessments at<br />
any time.<br />
Just before LDW displays the results, it computes the needed<br />
ranking functions based on your preference assessments so far.<br />
This computation is quite fast, so you probably won't even notice<br />
when it is happening.<br />
You should generally do the preference assessments in the order<br />
of the options in the Assess menu. This will allow the most<br />
detailed information to be aggregated first and will make the<br />
results displayed in the weight assessment process more accurate.<br />
Thus, we recommend that you assign the multipliers for any<br />
measure categories first. Next, you should do the assessments for<br />
the single measure utility functions that convert the measures to<br />
common units. Finally, you should do the weight assessments.<br />
Defining Category Multipliers<br />
Measures with categories compute their level for an alternative as<br />
the weighted sum of the alternative’s category levels. Thus,<br />
Section 7 -- Using LDW 2: Assessing 7-5
measures with categories require multipliers to define how to<br />
weight each category in the weighted sum.<br />
Since LDW lets you have different multipliers for different<br />
preference sets, you should make sure you define multipliers in<br />
each preference set in your analysis.<br />
LDW provides two places to define category multipliers. The<br />
"Category Multipliers" row in the Measure Categories view<br />
(accessible with the View::Matrix option) shows the multipliers<br />
for the active preference set.<br />
The Category Multipliers row is only shown if you have elected to<br />
show the categories for at least one measure. Once the multipliers<br />
are visible, you can click on the multiplier you want and type in<br />
the multiplier.<br />
You can also set the multipliers with the Assess::Category<br />
Multipliers option. When you select this option, LDW asks you to<br />
select a measure from a list and then lets you type in a multiplier<br />
for each category for that measure.<br />
LDW assigns a default value of one (1.0) for each category<br />
multiplier. See the discussion on page 9-10 for suggestions on<br />
how to assess category multipliers.<br />
Note that you should generally use a straight line (linear)<br />
conversion to common units for measures that use categories.<br />
Converting Measure Levels to Common Units<br />
LDW converts measure levels to common units using what are<br />
called single measure utility functions (SUFs). Since that<br />
conversion is always needed, each preference set has a SUF for<br />
each measure.<br />
SUFs are defined so that the least preferred level of the measure<br />
(as defined in the measure's properties dialog box) is assigned the<br />
least preferred utility level – 0.0. The most preferred measure<br />
level is assigned the most preferred utility level - 1.0. (You can<br />
change the most and least preferred utility levels in the<br />
Preferences::Utility Options option.)<br />
The default SUF for any measure is a straight line (linear)<br />
conversion from the measure's original scale to utility. This<br />
means that each additional unit on the measure's scale represents<br />
7-6 Section 7 -- Using LDW 2: Assessing
a constant change in utility. Linear SUFs are often used in<br />
decision analysis. If a linear SUF is appropriate for a measure<br />
then you don't need to do anything to define the measure's SUF.<br />
Just use the default.<br />
LDW provides five methods for converting a measure's levels to<br />
common units -- SUFs, AHP SUFs, Analytic Hierarchy Process,<br />
Adjusted AHP and Direct Assessment.<br />
SUFs are the most traditional method, where you define a curve<br />
to convert measure levels to utility. SUFs and the other<br />
conversion methods are discussed in more detail below.<br />
You define the parameters for any of the assessment methods<br />
using the Assess::Common Units option. When you select<br />
this option you will see the dialog box in Figure 7-2.<br />
Figure 7-2. Assess::Common Units dialog box<br />
In this dialog box, the "Measure:" combo box identifies the active<br />
measure. The status line tells you how much of the assessment<br />
you have completed for the active measure. There are three<br />
possibilities -- "Defaults Used," "Partial Assessment," and<br />
"Assessment Complete."<br />
The "Assessment Method" combo box shows the method selected<br />
for the active measure. Initially this will be the method selected<br />
in the "Common Units Default" combo box in the dialog box for<br />
the active preference set.<br />
Section 7 -- Using LDW 2: Assessing 7-7
The "Reset" button deletes any assessment information for the<br />
active measure and returns its status to "Defaults Used." LDW<br />
will ask you to confirm before this is done.<br />
Finally, the "Assess" button begins the assessment process for the<br />
selected method.<br />
The following sections describe the assessment process for the<br />
various methods for converting measure levels to common units.<br />
Common Units Using SUFs<br />
When you select the "SUF" assessment method in the<br />
Assess::Common Units dialog box and click on the "Assess"<br />
button, you will see a graphical SUF assessment screen like the<br />
one shown in Figure 7-3.<br />
Figure 7-3. Initial screen display for assessing horsepower SUF.<br />
The screen shows a graph with the range of the measure on the<br />
horizontal axis. The vertical utility axis has a range from zero to<br />
one (assuming you haven't changed the utility range with the<br />
Preferences::Utility Options option). LDW displays the current<br />
SUF as a line or curve going from zero to one in utility and from<br />
the least preferred to most preferred level in the active measure's<br />
units. The SUF shows the utility associated with any level of the<br />
active measure.<br />
7-8 Section 7 -- Using LDW 2: Assessing
The options associated with this assess SUFs window will let you<br />
change the shape of the SUF curve by breaking it into pieces<br />
(called sub-ranges) and by changing any sub-range from a<br />
straight line to a curve. Initially there is only one sub-range -- the<br />
whole curve.<br />
LDW highlights the active sub-range on the graph in green. The<br />
shape of the curve for the sub-range is defined by three points -the<br />
lowest and highest levels for the sub-range and the active<br />
point marked by a green square near the middle of the sub-range.<br />
LDW shows the location of the active point in the two edit boxes<br />
at the bottom of the SUF assessment window.<br />
When you begin a SUF assessment, LDW adds the SUF menu to<br />
the main menu. The SUF menu has the following options:<br />
! Done -- save the current SUF and return to the<br />
Common Units dialog box.<br />
! Reset Range -- return the current SUF range to its default<br />
(straight line) value.<br />
! Split Range -- split the active range into two parts at the<br />
active point.<br />
! Delete Split Point -- combine the two sub-ranges<br />
separated by the active point.<br />
! Assess Utility -- assess the utility of the active point<br />
by asking a probability question.<br />
! Assess Value -- assess the utility of the active point<br />
using the "mid-level splitting" method.<br />
! Cancel -- save the current SUF and return to the<br />
Common Units dialog box.<br />
The discussion on page 9-15 describes the assess utility<br />
(probability) and assess value (mid-level splitting) methods for<br />
assessing the shape of the SUF curve for a measure. How these<br />
methods are implemented in LDW is discussed below.<br />
Changing the Shape of the Active Sub-Range. The SUF curve<br />
for the active sub-range always passes through the active point.<br />
Section 7 -- Using LDW 2: Assessing 7-9
You can change the shape of the curve by moving the active point.<br />
You can move the active point in two ways. First, you can drag<br />
the active point with your mouse. You can drag the active point<br />
anywhere in the rectangle defined by the two endpoints of the<br />
active sub-range.<br />
LDW will attempt to fit a smooth (exponential) curve through the<br />
endpoints of the sub-range and the new active point. It is not<br />
always possible to do this if you move the active point near an<br />
endpoint. LDW will move the point if necessary to fit smooth<br />
curve. LDW shows the new location of the point in the edit boxes<br />
at the bottom of the window.<br />
You can also move the active point by changing the values in the<br />
two edit boxes. The box on the left contains the level for the<br />
active point and the box on the right contains its utility. If you<br />
enter a new value for either of these numbers, LDW will update<br />
the location of the active point in the graph and will draw a new<br />
SUF curve through it. You must press Enter to let LDW know<br />
when you have finished changing a number in one of these boxes.<br />
Splitting a Sub-Range. You can split a sub-range into two parts<br />
using the SUF::Split Range option. When you select this option,<br />
LDW will split the active sub-range into two sub-ranges at the<br />
active point. The active point will become the highest level of one<br />
sub-range and the lowest level of the other. LDW will set the SUF<br />
curves for the two new sub-ranges to straight lines.<br />
Changing the Active Point. Two types of points can be the<br />
active point -- points that define the midpoint of a sub-range and<br />
points that define an endpoint of a sub-range. When you select<br />
the midpoint of a sub-range for the active point, LDW highlights<br />
the entire sub-range in green. When you select an endpoint for<br />
the active point, LDW highlights just that point in green.<br />
You can make a point active by clicking on it with your mouse.<br />
Or, you can use the Left and Right-Arrow keys to move the active<br />
point between adjacent midpoints and endpoints.<br />
Combining Two Sub Ranges. You can combine two sub-ranges<br />
using the SUF::Delete Split Point option. Before you can select<br />
this option you must make the endpoint that joins the two subranges<br />
the active point.<br />
7-10 Section 7 -- Using LDW 2: Assessing
When you select the SUF::Delete Split Point option, LDW<br />
combines the two ranges and adjusts the SUF curve for the new<br />
(combined) sub-range to pass through the active point. The active<br />
point becomes the midpoint for the combined sub-range.<br />
Moving an Endpoint. You can move an active endpoint of a subrange<br />
in the same ways you can move a sub-range's midpoint.<br />
You can move the point by dragging it with your mouse. You can<br />
also enter new values for the point's level and utility in the edit<br />
boxes at the bottom of the SUF assessment window. You can<br />
move an endpoint anywhere in the rectangle defined by the two<br />
closest endpoints on the horizontal axis and the zero and one<br />
utility points on the vertical axis. You can raise or lower the<br />
endpoints of the entire measure range but you can't move them<br />
horizontally. This ability to move the endpoints of a measure's<br />
range lets you define SUF curves with their most preferred or<br />
least preferred levels in the middle of a measure's range instead of<br />
at the ends. See page 7-14 for more details on non-monotonic<br />
SUFs.<br />
When you move an endpoint, LDW initializes the SUF curves for<br />
the adjacent sub-ranges to straight lines.<br />
Initializing a Sub-Range. You can reset the SUF curve for the<br />
active sub-range by selecting the SUF::Reset Range option. When<br />
you select this option, LDW resets the SUF curve for the subrange<br />
to a straight line.<br />
Formal Methods of Setting a Point’s Utility. Up till now, there<br />
has been no discussion of how to assign a utility to a particular<br />
level. LDW provides two methods for doing this by posing<br />
preference questions to the decision maker. The “Utility” method<br />
asks the decision maker to compare hypothetical certain and<br />
uncertain outcomes. The “Value” method asks the decision<br />
maker to identify the point that is preferentially halfway between<br />
two endpoints.<br />
Assessing Utility. You can use the SUF::Assess Utility<br />
option to assess the utility of the active point with a probability<br />
question. When you select this option, LDW displays the screen<br />
shown in Figure 7-4. This screen compares a certain outcome<br />
(labeled A) with a lottery (or uncertain outcome, labeled B). A<br />
and B represent simplified hypothetical alternatives that differ<br />
only on a single measure.<br />
Section 7 -- Using LDW 2: Assessing 7-11
Figure 7-4. Utility Assessment Screen.<br />
The screen in the figure shows a comparison based on truck resale<br />
values. In the figure, alternative A has a resale value of 60 percent<br />
of purchase price with no uncertainty.<br />
The < lines for alternative B represent an alternative with<br />
uncertainty in the resale value measure. Specifically, B has a<br />
probability of P = .5 of having a resale value of 75 percent of<br />
purchase price and a probability 1 - P = .5 of having a resale value<br />
of 45 percent of purchase price.<br />
The goal of the assessment is to identify values for the certain<br />
level (L) for alternative A and for the probability P in alternative<br />
B that make alternatives A and B equally preferred. LDW will<br />
then use this information to set the level and utility for the active<br />
point in the main preference assessment screen. You can modify<br />
L and P by entering numbers in the associated edit boxes. Click<br />
on the "Done" button to indicate that you have finished and that A<br />
and B are now equally preferred.<br />
The numbers at the bottom of the utility assessment screen are<br />
two parameters that are useful in understanding the utility<br />
assessment results. The first number, the risk premium indicates<br />
how much you would pay to avoid the uncertainty in the lottery.<br />
It is the difference in the expected value of the lottery B and the<br />
certain level L.<br />
If the risk premium is positive and higher levels of the measure<br />
are preferred, then you would be willing to accept less of the<br />
7-12 Section 7 -- Using LDW 2: Assessing
measure (in terms of expected value) in order to avoid<br />
uncertainty. This type of preference is called risk-averse. The<br />
converse is when the risk premium is negative and you would<br />
have to have a higher expected value in the certain alternative<br />
before it is equally preferred to the lottery. This type of<br />
preference is called risk-seeking.<br />
The local risk aversion (r) is a somewhat less intuitive number. It<br />
is defined as the ratio r = -u''(x)/u'(x), where u'(x) is the first<br />
derivative and u'(x) is the second derivative of the utility function.<br />
In the case of the exponential utility functions used in LDW this<br />
complicated function has a simple result. It is equal to the<br />
-cx<br />
constant c in the exponential formula u(x) = a +be . If r is positive<br />
you are locally risk-averse (for measures where higher levels are<br />
preferred). If r is negative, you are locally risk-seeking.<br />
Assessing Value. You can use the SUF::Assess Value option<br />
to assess the utility of the active point with the mid-level splitting<br />
method. When you select this option, LDW displays the screen<br />
shown in Figure 7-5. This screen has two static outcomes (labeled<br />
A and C) with a variable outcome (labeled B). A, B and C all<br />
represent simplified hypothetical alternatives that differ only on a<br />
single measure.<br />
Figure 7-5. Screen for Value Assessment using Mid-Level Splitting<br />
Method.<br />
The screen in the figure shows a comparison based on truck<br />
prices. In the figure, alternative A has a price of $9,000 dollars<br />
and alternative C has a price of $15,000 dollars. The object of the<br />
mid-level splitting method is to identify a price for alternative B<br />
so that the change in desirability of improving from C to B is the<br />
same as the change in desirability of improving from B to A. In<br />
other words, we want to find a price for B that is halfway in terms<br />
of desirability between the prices for A and C. This price could be<br />
Section 7 -- Using LDW 2: Assessing 7-13
very different from the average of the two prices of $12,000<br />
dollars. You locate the mid-preference level by using the mouse<br />
to drag B to the left or right along the line connecting alternatives<br />
A and C. You can also enter the mid-preference level directly in<br />
the edit box at the bottom of the screen. LDW will use the mid<br />
preference level as the level for the active point and will set the<br />
active point's utility as the average of the utilities for A and C in<br />
the main preference assessment screen. Click on the "Done"<br />
button to indicate that you have finished.<br />
Completing the SUF Assessment. When your SUF curve looks<br />
the way you want it, you can save it and return to the common<br />
units dialog box by clicking on the "Done" button at the left of the<br />
SUF assessment window.<br />
If you want to discard the changes you have made, click on the<br />
"Cancel" button. LDW will restore the SUF curve to its original<br />
shape and you will return to the common units dialog box. The<br />
SUF::Done and SUF::Cancel options echo the functions<br />
of these buttons.<br />
Before LDW saves a SUF, it checks to see that at least one level<br />
receives the most preferred utility (usually one) and that at least<br />
one level receives the least preferred utility (usually zero). If<br />
these conditions are not met, LDW adjusts the vertical range of<br />
the SUF curve until they are.<br />
When you are finished, LDW updates the active measure's SUF<br />
assessment status to "Assessment Complete."<br />
Creating a non-monotonic SUF.. Occasionally it is useful to<br />
have a utility function that has its most or least preferred level in<br />
the middle rather than at an endpoint. An example might be<br />
body temperature in a medical application. Its better to be at 98.6º<br />
F than above or below that ideal number. You can do this as<br />
follows:<br />
7-14 Section 7 -- Using LDW 2: Assessing
1. If you have made any changes to your SUF, reset the SUF to<br />
a straight line using the “Reset” option in the SUF assess<br />
dialog box.<br />
2. Click the “Assess” button.<br />
3. Split the SUF into two pieces with the SUF::Split Range<br />
option.<br />
4. Click and drag the split point between the two ranges up<br />
until it has a utility of 1.0.<br />
5. Click and drag the endpoint that has a utility of 1.0 down<br />
until it has the desired utility.<br />
You should now have a SUF that looks like a triangle. You can<br />
modify either side of the triangle using the SUF assessment<br />
options until your SUF has the desired shape.<br />
Common Units Using Analytic Hierarchy Process<br />
The Analytic Hierarchy Process approach to converting measure<br />
levels to common units does not require you to define explicit<br />
levels for your measures. Instead, you make comparisons<br />
between pairs of alternatives as to their relative performance on<br />
the active measure. The preference information you enter is the<br />
ratio of the alternatives’ performances on the measure.<br />
LDW uses the ratios you enter to compute a score for each<br />
alternative on the measure. We'll call these scores utilities<br />
although they are not really the same as the utilities resulting<br />
from the "SUF" method. One property of the Analytic Hierarchy<br />
Process approach is that the sum of the utilities of all the<br />
alternatives is one (1.0). This differs from the SUF approach,<br />
where the utilities range from 0.0 to 1.0.<br />
When you select the "Analytic Hierarchy Process" method in the<br />
common units dialog box and click "Assess," you will see a matrix<br />
like the one in Figure 7-6.<br />
Section 7 -- Using LDW 2: Assessing 7-15
Figure 7-6. Assessment matrix for Analytic Hierarchy Process.<br />
In this matrix, the rows and columns both represent alternatives.<br />
The cells in the matrix represent the performance ratio of the row<br />
alternative to the column alternative.<br />
Since the ratio of an alternative to itself must be one, LDW does<br />
not need to show the ratios on the diagonal of the matrix. Instead,<br />
LDW uses the diagonal cells to show the current utility for each<br />
alternative based on the assessment so far.<br />
Initially, LDW assumes that all of the alternatives have equal<br />
performance, so that all the ratios off the diagonal equal one.<br />
To complete the assessment for the Analytic Hierarchy Process<br />
method, you need to enter the ratio for each possible pair of<br />
alternatives. This means you need to enter a ratio in each nondiagonal<br />
cell in the matrix.<br />
Since each pair appears twice in the matrix (once above the<br />
diagonal and once below it), you only need to enter ratios for the<br />
cells above the diagonal. LDW automatically enters the proper<br />
ratio in the corresponding cell below the diagonal.<br />
You enter the ratios between alternatives by highlighting the cell<br />
you want to enter and typing in the appropriate ratio.<br />
You can get help with this by double clicking the cell. When you<br />
do this, you will see a dialog box like the one in Figure 7-7.<br />
7-16 Section 7 -- Using LDW 2: Assessing
Figure 7-7. Dialog box for defining the relative performance of two<br />
alternatives.<br />
This dialog box helps you define the relative performance (or<br />
importance) of the two alternatives using terms created by the<br />
developers of the AHP approach. To set a ratio in the dialog box,<br />
first click on the radio button at the top of the dialog box that best<br />
describes the order of the alternatives.<br />
Next click on the performance ratio ("importance strength") that<br />
best describes the ratio of performance of the better performing<br />
alternative to the other alternative. You may find the descriptions<br />
associated with the odd numbered ratios helpful in doing this.<br />
Once you have selected an ordering and a performance ratio, click<br />
OK and LDW will enter the proper ratio in the active cell.<br />
After you have entered a ratio, LDW uses the AHP computation<br />
process to compute a new set of utilities for the alternatives. LDW<br />
shows the computed utilities in the diagonal cells.<br />
LDW marks cells where you have entered performance ratios in<br />
blue. Your assessment will be complete when all the nondiagonal<br />
cells in the matrix are marked in blue.<br />
Section 7 -- Using LDW 2: Assessing 7-17
You can, however, leave the assessment process at any time. The<br />
utilities for the alternatives will be computed based on the ratios<br />
you have entered to that point. Just click the "Done" button<br />
when you have completed your assessments.<br />
The AHP process collects more preference judgments than are<br />
required to compute a set of utilities. Consequently, some<br />
judgments are likely to be inconsistent. LDW represents the<br />
degree of inconsistency by the numbers in the upper left corner of<br />
the matrix. The number labeled "C.I." is the "Consistency Index"<br />
for the matrix. It is an absolute measure of how consistent the<br />
ratios in the matrix are. The number labeled "C.R." is the<br />
consistency ratio and is a relative measure of consistency. The<br />
developers of the AHP approach suggest that C.R.s above 0.10<br />
indicate that you should adjust the matrix to make it more<br />
consistent.<br />
The AHP Menu. When doing an AHP assessment, the AHP menu<br />
appears in the main menu bar. It has the following options:<br />
! Done -- Save the current AHP matrix and return to<br />
the Common Units Dialog Box.<br />
! Cancel -- Return to the Common Units Dialog Box<br />
without saving the AHP matrix.<br />
! Hide Weights -- Don't show the computed AHP levels or<br />
weights along the matrix diagonal. Selecting this<br />
option again will restore the levels/weights.<br />
! Show C.R. Only -- Show only the consistency ratio<br />
statistic in the upper left-hand corner of the matrix.<br />
Selecting this option again will restore the lambdamax<br />
and consistency index statistics.<br />
! Hide All Statistics -- Don't show any of the three<br />
statistics in the upper left-hand corner of the<br />
matrix. Selecting this option again will restore all<br />
three statistics.<br />
! Estimate Ratios -- When checked, LDW computes a<br />
performance ratio for each pair of alternatives<br />
based on the ratios entered so far. When<br />
unchecked, LDW does not compute these ratios.<br />
7-18 Section 7 -- Using LDW 2: Assessing
! Identify Outliers — Highlights those ratios that differ<br />
most from the ratios computed by LDW based on<br />
the utilities displayed on the diagonal of the AHP<br />
matrix. When you select this option, LDW will ask<br />
you how many outliers to highlight and will<br />
redraw the matrix with that number of cells<br />
highlighted in red.<br />
Common Units Using Adjusted AHP<br />
The Analytic Hierarchy Process method for converting to<br />
common units has the property that the computed utilities for the<br />
alternatives sum to 1.0. This may pose a problem when<br />
combining the Analytic Hierarchy Process with other methods<br />
which range from 0.0 (worst) to 1.0 (best). To remedy this<br />
problem, LDW provides an alternate assessment method -- called<br />
Adjusted AHP -- which adjusts the computed AHP utilities so<br />
that they range from 0.0 (worst) to 1.0 (best). This adjustment is<br />
the only difference between the two approaches. The adjusted<br />
utilities appear on the assessment matrix diagonal during the<br />
assessment process, which is otherwise exactly the same as for the<br />
Analytic Hierarchy Process method.<br />
Common Units Using AHP SUFs<br />
The Analytic Hierarchy Process and Adjusted AHP approaches<br />
described above require that you include every alternative in the<br />
matrix. This makes the assessment requirements excessive for<br />
problems with more than a few alternatives. In addition, there is<br />
no link between the ratios assessed and the levels for the<br />
alternatives on the measure. For these reasons, LDW provides an<br />
alternate approach called "AHP SUFs." The AHP SUFs method<br />
lets you develop an AHP matrix for just some alternatives. LDW<br />
uses the utilities computed from the matrix as the basis for a<br />
single measure utility function. LDW can then use this SUF to<br />
rank all of the alternatives. Note that -- unlike the traditional<br />
Analytic Hierarchy Process method -- the AHP SUFs method<br />
requires you to define a level for each alternative on the active<br />
measure.<br />
When you select the "AHP SUF" method in the common units<br />
dialog box and click "Assess," LDW first asks you to select a set of<br />
alternatives to use in the matrix. Just click on the alternative<br />
names to select and highlight them. Only alternatives whose<br />
levels are within the range defined in the active measure's<br />
Section 7 -- Using LDW 2: Assessing 7-19
properties dialog box can be selected. Then you will see an AHP<br />
matrix like the one in Figure 7-8. LDW will include only the<br />
alternatives you selected in the matrix. Complete the matrix<br />
assessments as described in the section above on Analytic<br />
Hierarchy Process.<br />
Figure 7-8. AHP matrix for AHP SUF example.<br />
When you have completed the assessment, click the "Done"<br />
button and LDW will compute a SUF curve based on the matrix.<br />
If the alternatives selected do not cover the entire range for the<br />
measure, LDW will assign zero to the least preferred level, and<br />
one to the most preferred level. Then LDW will assign the<br />
utilities computed from the AHP matrix to the levels associated<br />
with the alternatives. LDW will connect these points with straight<br />
lines.<br />
If the alternatives in the matrix cover the entire range for the<br />
active measure, LDW will expand the range for the utilities in the<br />
matrix so that the highest utility is one and the lowest is zero.<br />
LDW will modify the other utilities accordingly. LDW will then<br />
use these adjusted utilities to define points on a SUF curve. LDW<br />
will connect the points with straight lines.<br />
As an example, assume that the range for the HD size measure in<br />
Figure 7-8 is 60 to 120 mb (measuring the hard disk size in a<br />
computer buying decision). Also assume that the alternatives<br />
have the following levels on the HD size measure:<br />
Alternative HD size<br />
Mail Order 1 20 MHZ 65 mb<br />
Local 1 25 MHZ 80 mb<br />
Regional 1 25 MHZ 100 mb<br />
Local 1 33 MHZ 110 mb<br />
The utilities on the diagonal of the matrix will be assigned to<br />
measure levels as follows:<br />
7-20 Section 7 -- Using LDW 2: Assessing
Alternative HD size Utility<br />
Mail Order 1 20 MHZ 65 mb 0.149<br />
Local 1 25 MHZ 80 mb 0.215<br />
Regional 1 25 MHZ 100 mb 0.272<br />
Local 1 33 MHZ 110 mb 0.364<br />
In addition the endpoints for the range of the measure will be<br />
assigned the following utilities:<br />
Least preferred level 60 mb 0.0<br />
Most preferred level 120 mb 1.0<br />
These assignments result in the SUF curve shown in Figure 7-9.<br />
Figure 7-9. Suf resulting from AHP SUF assessment example.<br />
Common Units Using Direct Entry<br />
The final method for converting to common units provided by<br />
LDW is direct entry. In this method, you directly specify the<br />
utility for each alternative. There is not necessarily any<br />
connection between the levels of the alternatives and their utility.<br />
For instance, you can assign different utilities to alternatives with<br />
Section 7 -- Using LDW 2: Assessing 7-21
the same level. LDW provides a graphical method for directly<br />
entering the utilities. When you select this method, LDW displays<br />
a screen like the one in Figure 7-10.<br />
Figure 7-10. Direct Entry assessment screen.<br />
In this screen, each alternative is represented by its name, its<br />
level, an edit box and a bar. The length of the bar is proportional<br />
to the utility in the edit box.<br />
To change the utility, you can either enter a utility directly in the<br />
edit box or use the mouse to adjust the length of the alternative's<br />
bar. To adjust the bar length with the mouse, drag the end of the<br />
bar.<br />
Click on the "Done" button when the utilities are correct to save<br />
them.<br />
Common Units for Measures With Labels<br />
Because labels provide a discrete rather than continuous scale for<br />
measure levels, some of the assessment methods described above<br />
are inappropriate. In particular, the SUF and AHP SUF<br />
assessment methods are not available for measures with labels.<br />
The three remaining methods are Direct Entry, the Analytic<br />
Hierarchy Process, and Adjusted AHP. Each of these methods is<br />
performed in the way described above except that the<br />
assessments are done on the list of labels rather than on the<br />
alternatives directly. The utility for each label is then applied to<br />
all the alternatives that have that label.<br />
7-22 Section 7 -- Using LDW 2: Assessing
Assessing Weights<br />
The weights in a preference set define the relative importances of<br />
the measures and goals in your analysis. Technically, they form<br />
the scaling constants for the Multi-measure Utility Functions<br />
(MUFs) that LDW uses to compute the utilities for the alternatives<br />
on the goals.<br />
The process for assessing weights in LDW consists of first<br />
identifying the goals that will have their own MUFs, selecting an<br />
assessment method and completing the assessment process for<br />
each goal.<br />
Selecting Goals With a MUF<br />
LDW lets you select which goals in the analysis will have their<br />
own utility function (MUF) and which will not. The only goal<br />
required to have a MUF is the "Overall" goal. If the "Overall" goal<br />
did not have a MUF it would not be possible to compute an<br />
overall ranking of the alternatives.<br />
If a goal does not have a MUF, LDW includes all of its members in<br />
the assessments for the next higher level goal. In the extreme<br />
case, only the "Overall" goal will have a MUF. Then, LDW will<br />
include all of the measures in the analysis in a common pool<br />
under the "Overall" goal when you assess weights.<br />
At the other extreme, each goal will have its own utility function.<br />
Then, only the measures and goals directly underneath each goal<br />
will appear in the weight assessment for the goal.<br />
This approach lets you "compartmentalize" and simplify the<br />
weight assessments by reducing the number of members that<br />
need to be considered at once. It also lets you use different<br />
weight assessment methods for different goals, and to compute<br />
interactions for different goals.<br />
The measures in an LDW analysis always appear in exactly one<br />
MUF.<br />
Usually the MUF is a weighted average of the utilities of the<br />
measures and sub-goals included in the MUF.<br />
You can see LDW which goals will have their own MUF in the<br />
properties dialog box for the active preference set. You can use<br />
Section 7 -- Using LDW 2: Assessing 7-23
options in the Hierarchy menu to add or remove a MUF for a<br />
goal. The Hierarchy menu appears when a Goals Hierarchy view<br />
is the active window.<br />
You add or remove a MUF for the active goal in the Goals<br />
hierarchy view, by toggling the Hierarchy::Has a MUF option.<br />
You can also change the goals with a MUF in the<br />
Assess::Weights dialog box. The dialog box has a mini-goals<br />
hierarchy. To add a MUF for a goal, select it and click the “Has a<br />
MUF’ radio button.<br />
You can delete the MUF for a goal in a similar manner by clicking<br />
the “No MUF” radio button.<br />
Preparing for Assessing Weights<br />
You prepare for and assess the weights for a goal using the<br />
Assess::Weights option. The assess weights dialog box lets you<br />
select the weight assessment method and do the assessments for<br />
the active goal. Each goal can have its own assessment method<br />
and will have its own assessment status.<br />
The Mini-goals Hierarchy. The “Goal” tab in the assess weights<br />
dialog box contains a mini-goals hierarchy that provides<br />
information about the status of the weight assessments.<br />
Each goal in the analysis is shown along with a symbol indicating<br />
its assessment status. A red X indicates that the goal has a MUF<br />
and that no weight assessment has been done. A Blue X indicates<br />
that the goal has a MUF and that some but not all of the weight<br />
assessments has been completed. A green check indicates that the<br />
goal has a MUF and that all needed assessments have been<br />
completed. A grey check indicates that the goal does not have a<br />
MUF.<br />
Assessing Weights. The weight assessment options are located<br />
under the “Weights” tab in the assess weights dialog box. You<br />
select the active goal's weight assessment method from the list<br />
labeled "Weight Assessment Method:". The following methods<br />
are available:<br />
! The "Smarter" method lets you define weights based on<br />
an ordering of the active members. The smarter<br />
7-24 Section 7 -- Using LDW 2: Assessing
method uses a geometric approach to find a<br />
reasonable set of weights based on your ordering.<br />
! The "Smart" method lets you define the relative<br />
importances of the active members using "swing<br />
weights."<br />
! The "Pairwise Weight Ratios" method is like the "Smart"<br />
method except that you enter the relative<br />
importances of pairs of active members directly.<br />
! The "Analytic Hierarchy Process (AHP)" is an extension<br />
of the "Pairwise Weight Ratios" method. Instead of<br />
entering ratios for selected pairs of members, you<br />
enter ratios for ALL possible pairs.<br />
! The "Tradeoff" method defines weights by having you<br />
compare simple alternatives that differ in two<br />
active members but that you prefer equally. LDW<br />
computes the weights that give these equally<br />
preferred pairs equal utilities for the active goal.<br />
! Finally, LDW lets you directly enter the weights for the<br />
active members.<br />
Each of these methods is discussed in detail in the following<br />
sections.<br />
You begin the weight assessment process by clicking the "Assess"<br />
button. What happens next depends on the method you have<br />
selected.<br />
You can restore the active goal's MUF to its initial default state by<br />
clicking the "Reset" button.<br />
The status line above the weight assessment method tells you<br />
how much of the assessment for the active goal you have<br />
completed. A status of "Defaults Used" shows that you haven't<br />
done any assessments for the active goal or that you have<br />
initialized its MUF. "Partial Assessment" shows that you have<br />
completed part of the weight assessment but not all. Finally,<br />
"Assessment Complete" shows that you have completed all of the<br />
needed assessments for the selected method.<br />
You can review or make changes by clicking the "Assess" button<br />
even if the status says "Assessment Complete".<br />
Section 7 -- Using LDW 2: Assessing 7-25
The check box labeled "Allow Representatives for Sub-Goals" lets<br />
you use a member of a sub-goal as its representative in the weight<br />
assessment. LDW infers the sub-goal's weight from the member's<br />
weight in the active goal's assessment and its weight in the subgoal's<br />
MUF. Not all assessment methods allow the use of<br />
representatives.<br />
Assessing Weights with Tradeoffs<br />
The "Tradeoff" method defines weights for a goal by having you<br />
identify pairs of simple alternatives that differ in two members<br />
but that you prefer equally. LDW identifies weights for the two<br />
members that give these equally preferred pairs an equal utility<br />
for the goal.<br />
Each tradeoff defines the ratio of the weights for the two members<br />
in the tradeoff. These ratios --plus the fact that the weights must<br />
sum to one -- let LDW compute the weights for all the goal’s<br />
members from the tradeoffs. This computation is more<br />
complicated if there are interactions between the members. The<br />
discussions on page 9-44 and in Appendix A describe how LDW<br />
computes weights using tradeoffs in more detail.<br />
You begin the tradeoff assessment process by clicking the "Assess"<br />
button in the “Weights” tab in the assess weights dialog box .<br />
When you do this you will see the tradeoffs dialog box shown in<br />
Figure 7-11.<br />
7-26 Section 7 -- Using LDW 2: Assessing
Figure 7-11. Assess tradeoffs dialog box.<br />
This dialog box lets you select pairs of members and assess a<br />
tradeoff for them. You select one member from the list labeled<br />
"First Member:". LDW will update the list of allowable second<br />
members based on the first member you select.<br />
Only"non-redundant" pairs are allowed. Non-redundant<br />
tradeoffs define a weight ratio that can't be computed based on<br />
the other tradeoffs.<br />
When you have selected two members to compare in a tradeoff,<br />
click the "Assess" button to begin the tradeoff process.<br />
Selecting Representatives. If you select a goal as a tradeoff<br />
member and you have selected the "Allow Representatives for<br />
Sub-Goals" option in the assess weights dialog box, LDW will next<br />
ask you to select a representative for the goal to use in the<br />
tradeoff. You can select the goal itself or any of the goals or<br />
measures under that goal as the representative.<br />
Section 7 -- Using LDW 2: Assessing 7-27
Next you will see a tradeoff assessment window like the one<br />
shown in Figure 7-12.<br />
Figure 7-12. Example tradeoff assessment screen.<br />
Here, the graph's axes are the ranges of the members. Each point<br />
on the graph represents a possible alternative with a particular<br />
level on each of the two members.<br />
You should assume that each possible alternative has the nominal<br />
level on the members not shown. LDW plots the actual<br />
alternatives' levels on the two members as crosses on the graph.<br />
LDW labels two particular alternatives on the graph. Alternative<br />
A has the most preferred level on the first member and the least<br />
preferred level on the second member. Alternative B has the<br />
opposite situation -- the most preferred level of the second<br />
member and the least preferred level of the first. LDW asks you<br />
to decide whether you prefer alternative A or B.<br />
You tell LDW which you prefer by clicking one of the buttons at<br />
the right of the tradeoff assessment window. If you click the<br />
"Equal" button, the two members will be weighted equally. If you<br />
click the "A" button, LDW will ask you to improve the B<br />
alternative by improving its level on the first member. If you click<br />
the "B" button, LDW will ask you improve the A alternative by<br />
7-28 Section 7 -- Using LDW 2: Assessing
improving its level on the second member. If you would like to<br />
revise the question, click the "Revise" button. You can then<br />
modify the graph with the options in the Tradeoff menu.<br />
If you click the "A", "B" or "Revise" button, you will begin the next<br />
part of the tradeoff assessment. Suppose A was less preferred.<br />
LDW will ask you to improve A until you prefer it equally to B.<br />
You do this by changing its level on the member where it had the<br />
lower utility -- "Price" in the example. There should be a point on<br />
the range of "Price" where you would prefer A and B equally.<br />
LDW highlights the line where you should improve A in green.<br />
You can use your mouse to change A’s level on price by dragging<br />
it along the line. LDW reflects your changes in the edit box at the<br />
bottom of the window. You can also enter a new level for "Price"<br />
directly in this edit box. When you confirm the new level by<br />
pressing Enter, LDW moves A to the correct location on the<br />
graph.<br />
When you have found a level for A that makes it equally<br />
preferred to B, click the "Equal" button to let LDW know.<br />
LDW will ask you to confirm that the tradeoff is OK. Before<br />
confirming, LDW redraws the tradeoff using the original ranges<br />
of the members. It connects the A and B alternatives with a line of<br />
equally preferred alternatives based on the SUFs for the<br />
measures. You should feel that you prefer any point along that<br />
line equally to A and B.<br />
If you select "OK", LDW will save the tradeoff and return to the<br />
tradeoff assessment dialog box. If you select "Delete" or "Cancel",<br />
LDW will discard the tradeoff before returning to the dialog box.<br />
If you select "Redo", LDW will return to the initial tradeoff<br />
assessment question.<br />
Options for revising the tradeoff. The Tradeoff menu provides<br />
two methods for adjusting the ranges for the members in the<br />
tradeoff.<br />
The Tradeoff::Revise Range option lets you directly enter revised<br />
ranges for the two members in the tradeoff. These new ranges<br />
will define the axes in the tradeoff graph but will not affect the<br />
ranges for the members elsewhere. When you select this option,<br />
LDW will let you enter the new ranges in a dialog box. LDW<br />
redraws the tradeoff question to reflect the new range and restarts<br />
the tradeoff assessment process.<br />
Section 7 -- Using LDW 2: Assessing 7-29
The Tradeoff::Use Alternatives to Set Range option lets you<br />
automatically revise the ranges for the current tradeoff based on<br />
the alternatives in the analysis. LDW reviews the alternatives to<br />
find the one that has the most preferred level on one of the two<br />
members in the tradeoff. Since that alternative may not have the<br />
least preferred level on the other measure, it may not be necessary<br />
to give up the entire range of one measure to achieve the most<br />
preferred level of the other. This option sets each measure's least<br />
preferred level as the best level achieved by an alternative having<br />
the most preferred level on the other measure.<br />
Example: Suppose measures 1 and 2 both range from 0 to 1, with<br />
1 preferred. If alternative A = (1,0), B = (1,0.5), C = (0.25,1) then<br />
alternatives A and B have the most preferred level for measure 1<br />
and C has the most preferred level for measure 2. LDW will<br />
compute measure 2's least preferred level as the best level<br />
attained on it by alternative A or B (since they have the most<br />
preferred level for measure 1). The best level for measure 2 is the<br />
0.5 attained by alternative B. The least preferred level for<br />
measure 1 is the level attained by alternative C, or 0.25. Thus the<br />
computed ranges for measures 1 and 2 are the ranges defined by<br />
alternatives B and C: 0.5 to 1.0 for measure 1 and 0.25 to 1.0 for<br />
measure 2.<br />
The Allow Free Float Option. Normally, LDW only lets you<br />
adjust one alternative and restricts it to the outside edge of the<br />
tradeoff assessment graph.<br />
The Tradeoff::Allow Free Float option lets you move both A and B<br />
around the tradeoff assessment graph without restriction.<br />
After you select the option, you can drag both alternatives with<br />
your mouse. You can move either alternative anywhere in the<br />
graph but you can't move an alternative outside the graph. You<br />
also can't move an alternative to a position where it is preferred to<br />
the other alternative on both members.<br />
As you move the alternatives LDW will update their levels in the<br />
four edit boxes at the bottom of the window. You can also use<br />
these edit boxes to directly enter levels on the two members for<br />
the two alternatives.<br />
The Directly Enter Tradeoff Option. The Tradeoff::Directly Enter<br />
Tradeoff option lets you directly enter the levels for the two<br />
alternatives that make up the tradeoff. When you select this<br />
option, LDW will display a dialog box where you can enter the<br />
7-30 Section 7 -- Using LDW 2: Assessing
levels for the two members in the tradeoff for the alternatives A<br />
and B. After you have entered the tradeoff, LDW will check to<br />
make sure it makes sense and can be used to compute the weights<br />
for the two members. Then LDW will redraw the tradeoff and<br />
ask you to confirm it just as it does for tradeoffs entered<br />
graphically.<br />
Other Options. The two other options in the Tradeoff menu --<br />
Tradeoff::Equal and Tradeoff::Cancel simply mimic the functions<br />
of the "Equal" and "Cancel" buttons in the tradeoff assessment<br />
window. The "Equal" button's function has already been<br />
described. The "Cancel" button returns you to the tradeoff<br />
assessment dialog box without saving the current tradeoff.<br />
Assessing Additional Tradeoffs. After you finish assessing a<br />
tradeoff, LDW will add it to the list titled "Previous Tradeoffs" in<br />
the tradeoff assessment dialog box.<br />
To complete the tradeoff assessments for the goal, you will need<br />
to assess as many tradeoffs as there are active members (less one).<br />
If the goal's MUF has three members, you will need to assess two<br />
tradeoffs.<br />
To assess more tradeoffs, just select two more members (one from<br />
each list) and click the "Assess" button to begin the assessment for<br />
the next tradeoff. Continue this process until you see "No new<br />
tradeoffs needed" in the "First Member:" list. Now you can click<br />
the "Done" button to return to the assess weights dialog box.<br />
Modifying Tradeoffs. You can modify a tradeoff you have<br />
already assessed by clicking its name in the list labeled "Previous<br />
Tradeoffs" in the tradeoff assessment dialog box and clicking the<br />
“review” button. LDW will redraw the tradeoff and will ask you<br />
if it is OK. If you click "OK" or "Cancel," LDW won't make any<br />
changes. If you click "Delete," LDW delete the tradeoff after you<br />
confirm. If you click "Redo", LDW will return you to the tradeoff<br />
assessment process for the tradeoff.<br />
Assessing Weights by Direct Entry<br />
LDW lets you directly enter the weights for a goal. You can do<br />
this by selecting the "direct entry" method and clicking the<br />
"Assess" button in the assess weights dialog box. When you do<br />
this you will see a weight entry screen like the one in Figure 7-13.<br />
Section 7 -- Using LDW 2: Assessing 7-31
Figure 7-13. Example of Direct Entry weight assessment screen.<br />
This screen has an edit box for each of the active members. (LDW<br />
does not let you use representatives with the direct entry<br />
method.)<br />
To enter the weights, just type each member’s weight in the<br />
proper edit box.<br />
LDW offers two options for the directly entered weights. In the<br />
default option, LDW will adjust the weights so that they sum to<br />
one. There are no restrictions on the range of the weights -- other<br />
than they be non-negative.<br />
In the second option, the weights you enter must be between zero<br />
and one and LDW will not adjust them. This allows your weights<br />
to define interactions between the active members. See the<br />
discussion on page 9-55 for more about interactions.<br />
You can select this option in the “Interactions” tab of the assess<br />
weights dialog box. Pick the "Interactions Computed Directly"<br />
option from the list titled "Interactions Assessment Method"<br />
When you have finished entering the weights, click the "Done"<br />
button. LDW will let you review the weights. If you click "OK,"<br />
LDW will save the weights. If you click "Cancel" LDW won't save<br />
the weights. In either case you will return to the assess weights<br />
7-32 Section 7 -- Using LDW 2: Assessing
dialog box. If you click "Redo", LDW will return to the weight<br />
entry screen.<br />
Assessing Weights with the "Smarter" Method<br />
The "Smarter" method lets you have LDW compute the weights<br />
for the active members by simply ordering their importance.<br />
Based on your ordering, LDW computes a reasonable set of<br />
weights for the members using a "centroid" approach.<br />
To use this method, select it from the list in the assess weights<br />
dialog box and click the "Assess" button. You will see a data entry<br />
screen like the one in Figure 7-14.<br />
Figure 7-14. Assessment screen for "Smarter" method.<br />
In this screen, you will see a line for each active member. (No<br />
representatives are allowed in this method.) Each line has the<br />
member’s current order, name, most and least preferred levels<br />
and units.<br />
Section 7 -- Using LDW 2: Assessing 7-33
You can think of the importance number as the order in which<br />
you would like to improve each member's level from its least<br />
preferred to most preferred level.<br />
Initially, all of the members are at their least preferred level. To<br />
indicate this, the members are shown in red with the most<br />
preferred level greyed out.<br />
To begin, identify the member you would most like to improve<br />
and click it in the spreadsheet. LDW will highlight it.<br />
The “Improve” button. To improve the selected member from its<br />
least preferred to its most preferred level, just click the “Improve”<br />
button. LDW moves the member to the top of the list and draws<br />
it in green with the least preferred level greyed out.<br />
Now decide which member you would next most like to improve,<br />
select it and click the “Improve” button again. LDW will move<br />
the new member to the number 2 spot on the list and redraw it in<br />
green also.<br />
Continue this process until you have improved all of the members<br />
and are happy with the ordering.<br />
When you are finished, you can click the “Done” button and LDW<br />
will compute the weights and show them in the left hand column<br />
of the spreadsheet.<br />
The other buttons in the window provide you with more<br />
flexibility in assessing the order of the members.<br />
The “Unimprove” button. Moves the selected member below the<br />
last improved member and redraws it in red with the most<br />
preferred level greyed to indicate that the member is now at its<br />
least preferred level.<br />
The “Zero Weight” button. Moves the member to the bottom of<br />
the list and assigns it an order of 0 to indicate it should get zero<br />
weight.<br />
The “Tie With Above” button. Ties the selected member with<br />
the one directly above it in the ordering.<br />
The “Start Over” button. Unimproves all members and returns<br />
them to their original ordering.<br />
7-34 Section 7 -- Using LDW 2: Assessing
The up and down arrow buttons. Move the selected member up<br />
or down one spot in the ordering. LDW will ask you to improve a<br />
member if you move it above one that is already improved and<br />
will ask you to unimprove an improved member if you move it<br />
below an unimproved member.<br />
Minimum weights. The smarter method tends to assign very<br />
low weights to members far down in the ordering. To prevent<br />
this, you can use the minimum weight line at the bottom of the<br />
spreadsheet to enter a minimum weight. LDW will assign the<br />
minimum weight to all members with an importance greater than<br />
zero. The minimum weight can have a value from zero to 1/n,<br />
where n is the number of members.<br />
Assessing Weights with the "Smart Method"<br />
The "Smart" method lets you define the relative importances of<br />
the active members using "swing weights." Swing weights are the<br />
relative importance of changing a member from its least<br />
preferred level to its most preferred level. You assign the most<br />
important member a swing weight of 100 and less important<br />
members swing weights between 0 and 100.<br />
LDW will compute the weights for the members by adjusting the<br />
swing weights so they sum to one.<br />
To use this method, select it from the list of weight assessment<br />
options in the assess weights dialog box and click the left "Assess"<br />
button. When you do this, you will see a data entry screen like<br />
the one in Figure 7-15.<br />
Section 7 -- Using LDW 2: Assessing 7-35
Figure 7-15. Assessment Screen for Smart Method.<br />
In this screen, you will see a line for each member.<br />
Representatives are allowed for sub-goals in this method. If you<br />
have checked the "Use Representatives for Sub-Goals" option in<br />
the assess weights dialog box, LDW will ask you to select a<br />
representative for each active sub-goal. These representatives<br />
appear instead of the goal they represent in the assessment<br />
window.<br />
Each member or representative has a line showing its most and<br />
least preferred level. At the left of each line is an edit box where<br />
you can enter each member's swing weight and a bar where you<br />
can adjust swing weights graphically.<br />
You can think of the swing weight as the relative importance of<br />
improving the member from its least preferred to most preferred<br />
level. One way to assess swing weights is to first think of an<br />
alternative with all members at their least preferred level. Then<br />
think of being allowed to improve just one member from its least<br />
preferred to its most preferred level.<br />
When you have decided which member you would most like to<br />
improve, assign it a swing weight of 100.<br />
7-36 Section 7 -- Using LDW 2: Assessing
Then identify the member you would next most like to improve,<br />
and assign it a swing weight that reflects your estimate of the<br />
relative importance of improving this member compared with<br />
improving the first member. For example, if you feel that<br />
improving the second member is 75 percent as important as<br />
improving the first member, give the second member a swing<br />
weight of 75.<br />
You can continue to assign swing weights by comparing the<br />
importance of improving each of the remaining members to the<br />
first member's importance.<br />
You can also enter swing weights by changing the lengths of the<br />
bars. To change a bar's length, drag its right hand edge.<br />
When you have finished assigning the swing weights, click the<br />
"Done" button. LDW will adjust the swing weights so they sum to<br />
one and will let you review the adjusted weights. If you click<br />
"OK," LDW will save the weights. If you click "Cancel" LDW<br />
won't save the weights. In either case you will return to the assess<br />
weights dialog box. If you click "Redo", LDW will return to the<br />
smart method assessment screen.<br />
Assessing Weights with Weight Ratios<br />
The weight ratios method for assessing weights is similar to the<br />
tradeoffs method. However, instead of defining tradeoffs<br />
between pairs of members, you directly define the ratio of the<br />
weights for the members in the pair.<br />
To begin the weight ratios assessment process, select the<br />
"pairwise weight ratios" assessment method and click the "Assess"<br />
button in the assess weights dialog box. When you do this will<br />
see the tradeoffs dialog box shown in Figure 7-11.<br />
This dialog box lets you define and assess the weight ratios that<br />
will define the weights for the active goal's members.<br />
You pick a weight ratio to assess by selecting two members to<br />
compare. First you select one member from the list labeled "First<br />
Member:". Then LDW updates the list of allowable second<br />
members based on the first member you select. Only pairs that<br />
are "non-redundant" are allowed. Non-redundant weight ratios<br />
can't be computed based on the other weight ratios.<br />
Section 7 -- Using LDW 2: Assessing 7-37
When you have selected two members you would like to<br />
compare, click the "Assess" button. You will see a dialog box that<br />
lets you directly enter the ratio of the weights for the two<br />
measures.<br />
If you selected a goal and you had previously selected the "Allow<br />
Representatives for Sub-Goals" option in the assess weights dialog<br />
box, LDW would next ask you to select a representative for the<br />
goal to use in the ratio.<br />
After you return to the tradeoff assessment dialog box from<br />
assessing a weight ratio, the ratio you assessed will be added to<br />
the list titled "Previous Tradeoffs." To complete the assessments<br />
for the goal, you will need to assess as many weight ratios as<br />
there are active members (less one).<br />
To assess more ratios, just select two more members (one from<br />
each list) and click the "Assess" button to begin the assessment for<br />
the next ratio. Continue this process until you see "No new<br />
tradeoffs needed" in the "First Member:" list. Now you can click<br />
the "Done" button to return to the assess weights dialog box.<br />
You can modify a weight ratio you have already assessed by<br />
clicking on its name in the list labeled "Previous Tradeoffs" in the<br />
tradeoff assessment dialog box and clicking the “Review” button.<br />
When you do this you will see the dialog box for assessing weight<br />
ratios with the previously entered ratio as the default.<br />
Assessing Weights with the Analytic Hierarchy Process<br />
The Analytic Hierarchy Process (AHP) is a variation on the<br />
pairwise weight ratios method for assessing weights. However,<br />
instead of selecting a minimum number of pairs of members to<br />
assess weight ratios for, you enter ratios for all possible pairs of<br />
members. Since you enter more ratios than are strictly needed,<br />
they are likely to be inconsistent. The AHP method then uses an<br />
approach based on linear algebra to compute a best fit set of<br />
weights based on the weight ratios you enter.<br />
The AHP method for assessing weights is like the AHP method<br />
for converting measure levels to common units. You will enter<br />
the weight ratios in the same matrix used for AHP common<br />
units.<br />
You begin the AHP weight assessment process by selecting the<br />
"Analytic Hierarchy Process" assessment method and clicking the<br />
"Assess" button in the assess weights dialog box.
Representatives are allowed for sub-goals in this method. If you<br />
have checked the "Use Representatives for Sub-Goals" option in<br />
the assess weights dialog box, LDW will ask you to select a<br />
representative for each sub-goal. These representatives will<br />
appear instead of the goal they represent in the AHP matrix.<br />
Next you will see an assessment matrix like that in Figure 7-16.<br />
Figure 7-16. Weight assessment screen for Analytic Hierarchy Process.<br />
In this matrix, the rows and columns both represent active<br />
members or their representatives. The cells in the matrix<br />
represent the ratio of the importance of the row member as<br />
compared to the column member. Since the ratio of a member to<br />
itself must be one, LDW does not show the ratios on the diagonal<br />
of the matrix. Instead, LDW uses the diagonal cells to show the<br />
current weight for each member. Initially, LDW assumes that all<br />
of the members have equal importance. This means that all the<br />
ratios equal one and all the weights are equal to 0.167 (for the<br />
example in Figure 7-16).<br />
To complete the assessment for the AHP method, you need to<br />
enter the weight ratio for each possible pair of members. This<br />
means you need to enter a ratio in each non-diagonal cell in the<br />
matrix. Since each pair appears twice in the matrix (once above<br />
the diagonal and once below it), you really only need to enter<br />
ratios for the cells above the diagonal. LDW automatically enters<br />
the proper ratio in the corresponding cell below the diagonal.<br />
You enter the ratios between alternatives by highlighting the cell<br />
you want to enter and typing in the ratio you think is appropriate.<br />
You can get help with this by double clicking on the cell. When<br />
you do this, you will see a dialog box like the one in Figure 7-7 on<br />
page 7-17.<br />
This dialog box helps you define the relative importance of the<br />
two members using terms created by the developers of the AHP<br />
approach. To set a weight ratio using the dialog box, first click on<br />
the radio button at the top of the dialog box that best describes the<br />
order of the members. Next click on the importance ratio<br />
Section 7 -- Using LDW 2: Assessing 7-39
("importance strength") that best describes the ratio of importance<br />
of the better performing member to the other member. You may<br />
find the descriptions associated with the odd numbered ratios<br />
helpful in doing this. Once you have selected an ordering and an<br />
importance ratio, click OK and LDW will enter the proper ratio in<br />
the active cell.<br />
After you have entered a weight ratio, LDW uses the AHP<br />
computation process to compute a new set of weights for the<br />
members. LDW shows the computed weights in the diagonal<br />
cells.<br />
If you have checked the AHP::Estimate Ratios option has been<br />
checked, LDW also estimates the weight ratios for cells you have<br />
not yet entered and displays them. LDW marks cells where you<br />
have entered weight ratios in blue. Your assessment will be<br />
complete when all the non-diagonal cells in the matrix are<br />
marked in blue. You can, however, leave the assessment process<br />
at any time. The weights for the members will be computed<br />
based on the ratios you have entered to that point. Just click the<br />
"Done" button when you have completed your assessments.<br />
The AHP process collects more preference judgments than are<br />
required to compute a set of weights. Thus, some judgments are<br />
likely to be inconsistent. LDW represents the degree of<br />
inconsistency by the numbers in the upper left corner of the<br />
matrix. The number labeled "C.I." is the "Consistency Index" for<br />
the matrix. It is an absolute measure of the consistency of the<br />
ratios in the matrix. The number labeled "C.R." is the consistency<br />
ratio and is a relative measure of consistency. The developers of<br />
the AHP approach suggest that C.R.s above 0.10 suggest that you<br />
should adjust the matrix to make it more consistent.<br />
AHP Method Options. When you are assessing weights using<br />
the AHP method, the AHP menu item appears in the main menu<br />
bar. The options in this menu item are described on page 7-18.<br />
Changing Assessment Methods<br />
A powerful feature of LDW is its ability to convert from one<br />
assessment method to another with little loss of preference data.<br />
Thus, you could first use the "Smarter" method to get a<br />
preliminary set of weights, change the assessment method to<br />
"Smart" and see an initial set of swing weights based on the<br />
smarter weights. Or, you could assess an AHP matrix and then<br />
switch to the tradeoff approach. LDW will compute a set of<br />
7-40 Section 7 -- Using LDW 2: Assessing
tradeoffs based on the AHP weights that will be available for your<br />
review.<br />
Defining Interactions<br />
You can define interactions between the active members with the<br />
options under the “Interactions” tab of the assess weights dialog<br />
box. These options parallel the options for assessing weights<br />
under the “Weights” tab. Since interactions are an advanced<br />
LDW feature, you should generally use the default of no<br />
interactions. When you select no interactions, the weights will<br />
sum to one and LDW will compute the utility for the active goal<br />
as a simple weighted average of the utilities for the active<br />
members. You don't need to do any interaction assessments if<br />
you use this default option. See the discussion on page 9-55 for<br />
more information on interactions.<br />
You select the method for assessing interactions for the active goal<br />
from the list labeled "Interactions Assessment Method:". The<br />
following methods are available:<br />
! "No Interactions" -- forces the MUF formula to be<br />
additive (this is the default).<br />
! "Second Tradeoff " -- defines the interactions by entering<br />
a second tradeoff for two of the active members.<br />
! "Probability Method" -- defines the interactions by<br />
identifying two equally preferred alternatives that<br />
involve uncertainties.<br />
! "Set a Small k" -- directly enter the scaling constant for<br />
an active member. (This along with the weights<br />
or tradeoffs will completely define the MUF<br />
formula.)<br />
! "Product of Utilities" -- computes a goal’s utility as the<br />
product of the utilities of its members<br />
Each of these methods is discussed in detail in the following<br />
sections.<br />
You begin the interactions assessment process for the selected<br />
method by clicking the "Assess" button. What happens next<br />
depends on the assessment method you have selected. You can<br />
delete any interactions information you have assessed by<br />
Section 7 -- Using LDW 2: Assessing 7-41
clicking on the "Initialize" button. LDW will ask you to confirm<br />
before it initializes the interactions.<br />
The status line above the interaction assessment method tells<br />
you how much of the assessment you have completed. A status<br />
of "Defaults Used" shows that you haven't done any interactions<br />
assessments for the active goal or that you have initialized the<br />
interactions for the goal. A status of "Assessment Complete"<br />
shows that you have completed all of the needed assessments for<br />
the selected method. You can still go back and review or make<br />
changes by clicking the "Assess" button even if the status says<br />
"Assessment Complete."<br />
No Interactions. The "No Interactions" method forces the active<br />
goal's MUF to be the weighted sum of the utilities of the active<br />
members.<br />
An Additional Tradeoff. The "Additional Tradeoff" method lets<br />
you define the MUF formula by assessing a second tradeoff for<br />
two active members.<br />
You begin this method by selecting it and clicking the "Assess"<br />
button. When you do this, LDW asks you to select two of the<br />
active members to use in the second tradeoff. If you are using<br />
the "tradeoff" or "pairwise weight ratios" weight assessment<br />
method LDW shows you a list of the tradeoffs for the active goal.<br />
LDW then shows you a tradeoff assessment screen like the one<br />
in the "tradeoff" weight assessment method described on page 7-<br />
26. Typically, the second tradeoff will include one hypothetical<br />
alternative with levels at the extremes of the measures' ranges<br />
and one with levels in the middle of the measures' ranges. LDW<br />
will let you move both members as in the Tradeoff::Allow Free<br />
Float option to do this.<br />
For example, suppose measures m1 and m2 both range from 0 to<br />
1 with straight line SUFs and an initial tradeoff of<br />
(m1 = 0, m2 = 1) equally preferred to (m1 = 1 and m2 = 0)<br />
that implies the measures have equal weights. If a second<br />
tradeoff of<br />
(m1 = 0, m2 = 1) equally preferred to (m1 = .5 and m2 = .5)<br />
7-42 Section 7 -- Using LDW 2: Assessing
is defined, an additive MUF formula is implied. If a second<br />
tradeoff of<br />
(m1 = 0, m2 = 1) equally preferred to (m1 = .3 and m2 = .3)<br />
is defined, destructive interaction, where a low utility on one<br />
measure leads to a low overall utility, is implied. If a second<br />
tradeoff of<br />
(m1 = 0, m2 = 1) equally preferred to (m1 = .7 and m2 = .7)<br />
is defined, constructive interaction, where a high utility on one<br />
measure leads to a high overall utility, is implied.<br />
Probability Method. The "Probability" method lets you define<br />
the MUF Formula for the active goal by answering a<br />
probabilistic question about two active members.<br />
When you select the method and click the "Assess" button, LDW<br />
asks you to select two of the active members to use in the<br />
probability method assessment. If you are using the "tradeoff" or<br />
"pairwise weight ratios" weight assessment method, LDW shows<br />
you a list of the tradeoffs defined for the active goal. Then LDW<br />
shows you two simplified alternatives involving the selected<br />
members. The first alternative is an equal chance of A) having<br />
the first member at its best level and the second member at its<br />
worst or B) having the first member at its worst level and the<br />
second member at its best.<br />
The second alternative is a probability of P of having both<br />
members at their best level and a probability (1 - P) of having<br />
both members at their worst level. See Figure 9-16 on page 9-61<br />
for an example of these alternatives. LDW asks you to identify<br />
the probability P that makes the two alternatives equally<br />
preferred.<br />
In the first alternative the members compensate for one another.<br />
The second is all or nothing. If the two members don't interact<br />
strongly, the alternatives should seem the same and P should be<br />
0.5. If the members interact destructively, where a low utility on<br />
one member makes an alternative undesirable, P will be between<br />
0.0 and 0.5.<br />
If the members interact constructively, where a high utility on<br />
only one member is needed to make an alternative desirable, P<br />
will be between 0.5 and 1.0.<br />
Section 7 -- Using LDW 2: Assessing 7-43
Set a Small k. The Enter Small k option lets you directly enter<br />
the Small k (scaling constant) for an active member. Defining<br />
one small k lets LDW compute the other small ks for the goal<br />
based on the weight assessments.<br />
When you select this option, LDW asks you to choose an active<br />
member and then to enter the small k for that member.<br />
If you enter a small k smaller than the one that would have been<br />
computed based on the weight assessments alone, LDW will<br />
define a MUF formula that shows destructive interaction.<br />
Entering a small k larger than the one that would have been<br />
computed based on the weight assessments alone will result in a<br />
MUF formula that shows constructive interaction.<br />
Product of Utilities. This option tells LDW to compute the active<br />
goal’s utility as the product of the utilities of its members. No<br />
further assessment is needed. In fact, no further weight<br />
assessment is needed either, since no scaling constants are<br />
needed when multiplying utilities. All the members will<br />
effectively have equal weights. Any weight assessments done<br />
for the goal will be ignored.<br />
Products of utilities are useful in situations where you want to<br />
treat the goal members like probabilities and the goal utility like<br />
the joint probability of all of the members.<br />
Products of utilities are also useful when you want to combine a<br />
“quality” measure with a “quantity” measure. An example<br />
might be measuring health care services by the number of<br />
people served and the quality of service. If the either number of<br />
people served is 0 or the quality of service is 0 then the overall<br />
health services score should also be 0. Multiplying the utilities<br />
achieves this result.<br />
Interactions When Directly Entering Weights<br />
The "Direct Entry" weight assessment method lets you directly<br />
enter the small k (scaling constant) for each active member. If<br />
you select the "Interactions Computed Directly" interactions<br />
assessment method, you can use the scaling constants you enter<br />
to directly define interactions.<br />
The small ks must to be between zero and one, but they do not<br />
have to sum to one. Small ks that sum to 1.0 imply an additive<br />
7-44 Section 7 -- Using LDW 2: Assessing
MUF formula, meaning that the active members will not interact.<br />
Small ks that do not sum to one, imply a multiplicative formula,<br />
meaning that there will be interactions between the active<br />
members. Small ks that sum to less than one show destructive<br />
interaction, while small ks that sum to more than one show<br />
constructive interaction.<br />
Printing Questionnaires<br />
The Assess::Print Questionnaire option lets you print a copy any<br />
of LDW's preference assessment screens. This lets you obtain a<br />
hard copy of the preference assessment question(s) currently<br />
being posed by LDW. You can then distribute the questionnaire<br />
to participants in the study who may not be available for direct<br />
questioning. When you select this option, LDW displays a copy<br />
of the of the currently displayed assessment screen. Any<br />
assessment edit boxes on the screen are replaced by underlines.<br />
Questionnaires for AHP assessment screens have all possible<br />
pairs in the matrix in a format that lets users graphically indicate<br />
relative importances.<br />
Consistency Checks<br />
The Assess::Consistency Checks option lets you compute the<br />
tradeoff implied between any two measures. You can also revise<br />
the existing tradeoffs if the computed tradeoff does not look<br />
reasonable. You can only make these adjustments if you have<br />
used the "tradeoffs" weight assessment method for all goals with<br />
a MUF.<br />
When you select this option, LDW asks you to select two<br />
measures. The program computes and displays a tradeoff<br />
between the two selected measures implied by the current MUF.<br />
LDW then asks you if you would like to adjust this tradeoff. If<br />
you say yes, you will use the assessment procedure from the<br />
Assess::Weights::Tradeoffs option to identify a new tradeoff<br />
between the selected measures. This procedure will result in<br />
two new simplified alternatives involving the two selected<br />
measures that you should prefer equally, but that have different<br />
utilities on the current MUF.<br />
To make the equally preferred alternatives in the new tradeoff<br />
have the same utility, you must modify an existing tradeoff. The<br />
program identifies all of the existing tradeoffs that could<br />
influence the new tradeoff and displays them. LDW asks you to<br />
Section 7 -- Using LDW 2: Assessing 7-45
select the tradeoff you would like to modify. In some situations,<br />
it is possible to replace the selected tradeoff with the new<br />
tradeoff just assessed. If it is possible, LDW asks you if you<br />
would like to replace the old tradeoff with the new.<br />
If you retain the old tradeoff, there are several ways LDW can<br />
make the adjustments. The simplest way is to adjust the original<br />
tradeoff and make no changes to the other tradeoffs. This has<br />
the desired result of making the new tradeoff hold, but may<br />
have side effects of changing the relative weights of other<br />
measures. More complex adjustments are possible, which<br />
preserve as many of the original weights as possible while still<br />
making the consistency tradeoff hold. Thus, when you get to<br />
this stage of the consistency check, LDW shows you the picture<br />
in Figure 7-17. In this figure, the measures have been grouped<br />
according to those whose relative weights must be adjusted<br />
simultaneously. The circles in this figure represent the relative<br />
weights of the measures in the different sets. The lines<br />
connecting the circles represent one or more tradeoffs. In<br />
particular, the line connecting sets B and C represents the single<br />
tradeoff being adjusted. The two consistency check measures<br />
will be in sets B and C respectively. LDW gives you three<br />
options for adjusting these sets.<br />
! Adjust Weights for All Sets. The tradeoff being<br />
adjusted is represented in the figure by the line<br />
connecting set B to set C. If only this tradeoff is<br />
changed, the weights of sets A and B will change<br />
in relation to sets C and D, but the relative<br />
weights of sets A and B and of sets C and D will<br />
not change. In terms of the picture, the size of the<br />
circles for sets A and B will become proportionally<br />
larger or smaller in relation to the circles for sets C<br />
and D.<br />
! Adjust Weights for Set B Only. In this option LDW<br />
holds the relative weights of sets A, C and D<br />
constant, while it changes the relative weight of<br />
set B. To do this, LDW must adjust the tradeoff(s)<br />
connecting sets A and B and the tradeoff<br />
connecting sets B and C. In terms of the figure,<br />
the relative size of the circles for sets A, C and D<br />
will remain constant, while the circle for set B will<br />
get larger or smaller.<br />
7-46 Section 7 -- Using LDW 2: Assessing
! Adjust Weights for Set C Only. This option is like the<br />
previous option, except that set C is the one that<br />
changes relative to the others.<br />
! Cancel. This option aborts the consistency check<br />
process without making any changes.<br />
Figure 7-17. Options for consistency check adjustments.<br />
When you select an option, the program begins adjusting<br />
tradeoffs. For each tradeoff that LDW modifies, it shows you a<br />
screen displaying the original tradeoff and the proposed<br />
adjustment. You can accept or reject any of the proposed<br />
adjustments. When the adjustments have been completed, LDW<br />
shows you a graph with the effects of the adjustments, like that<br />
in Figure 7-18. There, the "Adjust Weights for Set B Only" option<br />
has been selected, and the circle for Set B has gotten larger while<br />
the circles for the other three sets have gotten proportionally<br />
smaller.<br />
Section 7 -- Using LDW 2: Assessing 7-47
Figure 7-18. Effects of consistency check adjustments.<br />
7-48 Section 7 -- Using LDW 2: Assessing
S E C T I O N<br />
Using LDW 3: Displaying Results<br />
8
Using LDW 3: Reviewing Results<br />
Introduction<br />
This section describes the displays LDW can generate for you to<br />
review the results of your analysis. Typically you will look at<br />
these displays after you have finished structuring your problem<br />
and assessing preferences. Often, looking at these displays will<br />
motivate you to return to the structuring and preference<br />
assessment steps to make adjustments. This is a normal and<br />
important part of the decision analysis process.<br />
This section also describes how to print displays and how to save<br />
them or copy them to other Windows programs.<br />
It also includes information on how to modify your results<br />
displays. LDW provides options to change the colors and text<br />
fonts of your charts and tables as well as to add new text labels.<br />
Finally, this section describes the options under the File menu,<br />
where you open and close LDW data files and where there are<br />
options to import and export LDW data to and from other formats<br />
such as spreadsheets.<br />
Reviewing Your Preferences<br />
LDW lets you to generate several displays of the information in a<br />
preference set. The following displays are available:<br />
! Common Units Graphs<br />
! Computations of Utilities from Levels<br />
! Graphs of Single Tradeoffs<br />
! Tradeoff Bubble Diagrams<br />
! Tradeoffs Computed Against a Single Measure<br />
! Graphs of Pairs of Measures<br />
! A Summary of All Comments in the Analysis<br />
! Preference Assessment Summary<br />
! Percentage Weights<br />
! Scaling Constants<br />
! SUF Formulas<br />
! Weight Graph<br />
Section 8 -- Using LDW 3: Reviewing Results 8-1
Each of these displays can be selected with a Review menu item.<br />
Common Units (SUF) Graphs<br />
Single measure utility functions (SUFs) convert the level (or "raw<br />
score") of a measure into the common units of "utility." You can<br />
display the SUF for any measure by selecting the<br />
Review::Common Units option.<br />
The option duplicates the SUF assessment screen in the<br />
Assess::Common Units option in a form that lets you print it, or<br />
copy it to the clipboard.<br />
When you select the option, you first select a measure to display.<br />
LDW then displays the SUF for that measure for the active<br />
preference set.<br />
An example is shown in Figure 8-1.<br />
Figure 8-1. Example of Review::Common Units display.<br />
The horizontal axis (X-axis) of this display shows the nominal<br />
units and range for the measure. The vertical tics on that axis<br />
show the levels on the measure for the alternatives. The vertical<br />
axis (Y-axis) is in units of utility (usually scaled from zero to one).<br />
8-2 Section 8 -- Using LDW 3: Reviewing Results
The curve shows how the utility function converts any level in the<br />
measure's nominal units to a utility.<br />
For measures that use labels, LDW also lets you display the SUF<br />
as a histogram similar to that used in the direct assessment<br />
method. Just click “Yes” to the question LDW asks when you<br />
select this option.<br />
Computing Utilities From Measure Levels<br />
The Review::Compute Utilities option lets you compute utilities<br />
for a measure based on its SUF in the active preference set. You<br />
can also use the option to compute the measure level on the<br />
measure that would result in a particular utility.<br />
When you select this option you will see the dialog box in Figure<br />
8-2.<br />
Figure 8-2. Dialog box for Review::Compute Utilities option.<br />
To select the active measure, just choose it from the combo box at<br />
the top of the dialog box. To compute the utility for a level on the<br />
active measure, just enter a level in the edit box labeled "Level:".<br />
Section 8 -- Using LDW 3: Reviewing Results 8-3
After you press Enter, LDW will display the utility for that level<br />
in the edit box labeled "Utility:".<br />
To compute the level that would result in a particular utility, just<br />
enter a utility in the edit box labeled "Utility:". After you press<br />
Enter, LDW displays the level that would result in that utility in<br />
the edit box labeled "Level:".<br />
Graphs of Single Tradeoffs<br />
The Review::Single Tradeoffs option duplicates the tradeoff<br />
assessment screen in the Assess::Weights option in a form that lets<br />
you print, or copy it to the clipboard.<br />
LDW lets you select any pair of measures or goals to display. If<br />
you select a pair of measures that were not assessed directly in a<br />
tradeoff, LDW will compute a tradeoff for the pair. LDW will<br />
indicate this by printing "Tradeoff computed by <strong>Logical</strong><br />
<strong>Decisions</strong>" at the bottom of the tradeoff window.<br />
When you select the option, LDW shows you a dialog box with<br />
two lists of the currently defined measures and goals. Just select<br />
one member from each list and LDW will compute and display a<br />
tradeoff for the pair. An example is shown in Figure 8-3.<br />
Figure 8-3. Example of Review::Single Tradeoffs option.<br />
8-4 Section 8 -- Using LDW 3: Reviewing Results
The tradeoff graph has one measure (or goal) on the horizontal<br />
axis and one on the vertical axis. You can think of any point in<br />
this rectangle as a simplified alternative that has the indicated<br />
levels on the two measures and a nominal level on all of the other<br />
measures.<br />
For example, a point in the upper left corner of the rectangle<br />
represents a truck alternative with a price of $15,000 and 175<br />
horsepower. A point in the lower right corner represents a truck<br />
alternative with a price of $23,000 and 109 horsepower. A point in<br />
the very center of the rectangle would represent a truck<br />
alternative with a price of $18,500 and 142 horsepower. LDW<br />
marks actual alternatives with small crosses showing their levels<br />
on the two measures.<br />
The points labeled "A" and "B" on the graph represent a pair of<br />
simplified alternatives that you should prefer equally. Thus,<br />
above, you should prefer a truck alternative with a price of<br />
$15,000 and 109 horsepower and one with a price of $20,000 and<br />
175 horsepower equally. The line connecting the A and B points<br />
represents a set of potential price/horsepower combinations that<br />
you should prefer equally to A and B. LDW computes this line<br />
based on the single measure utility functions for the price and<br />
horsepower measures.<br />
The line at the bottom of the display shows the relative weights of<br />
the two measures. The relative weights are those necessary to<br />
allow points A and B to have the same overall utility given the<br />
ranges of the two measures and their single measure utility<br />
functions. In the display above, the price measure will have about<br />
sixty percent more weight than the horsepower measure. The<br />
absolute weights of these two measures will depend on the<br />
number of other measures in the analysis and their relative<br />
weights based on other tradeoffs. You can view the tradeoff<br />
relationships for all the measures with the Review::Tradeoff<br />
Summary Graph option.<br />
Tradeoffs by One Measure<br />
The Review::Tradeoffs by One Measure option lets you review the<br />
relative importance of the various measures by computing<br />
tradeoffs for all of them against one selected measure. For<br />
example, you could select this option to see how each of the<br />
measures in your analysis would be traded against price, even if<br />
another weight assessment method were used or not all tradeoffs<br />
Section 8 -- Using LDW 3: Reviewing Results 8-5
were done against price. When you select this option, LDW will<br />
ask you to select a measure to compute the tradeoffs against.<br />
Then, LDW will compute the tradeoffs and show them in a<br />
display like that in Figure 8-4. In the figure, each measure<br />
(besides the selected one) has a tradeoff, comprised of lines<br />
showing the levels for the measure and the selected measure for<br />
equally preferred alternatives A and B.<br />
Figure 8-4. Example of Review::Tradeoffs By One Measure option.<br />
Tradeoff Summary Graphs<br />
Tradeoff summary graphs show a network of lines and circles that<br />
show which measures you compared in tradeoffs and the relative<br />
weights that resulted from the tradeoffs.<br />
You can display a tradeoff "bubble diagram" for the active<br />
preference set by selecting the Review::Tradeoff Summary Graph<br />
option.<br />
8-6 Section 8 -- Using LDW 3: Reviewing Results
When you select the option, you are first shown the dialog box in<br />
Figure 8-5.<br />
Figure 8-5. Dialog box for Review::Tradeoff Summary Graph option.<br />
The measure selected from the list at the left of the dialog box<br />
determines which measure LDW will display in the upper left<br />
corner of the bubble diagram. The radio buttons at the right of<br />
the dialog box determine how the diagram will be colored. The<br />
"Don't Color Circles" button results in a diagram with black<br />
outlined circles with white interiors. The "Color by Goal" button<br />
results in the circle for each measure colored based on the goal the<br />
measure is directly below. The "Color by MUF" option results in<br />
the circle for each measure colored based on the MUF the<br />
measure belongs to. If you check the "Optimize Layout" button,<br />
LDW will attempt to reduce the area of the diagram by<br />
rearranging the locations of the circles in the diagram. Not<br />
checking the option will result in a longer but narrower diagram.<br />
An example of a tradeoff summary graph is shown in Figure 8-6<br />
Section 8 -- Using LDW 3: Reviewing Results 8-7
Figure 8-6. Example of Review::Tradeoff Summary Graph option.<br />
In the diagram, the measure "Price" was selected from the dialog<br />
box and appears in the upper left corner of the diagram. The<br />
"Price" measure was included in a tradeoff with the "Power"<br />
measure as shown by the line connecting the "Power" and "Price"<br />
circles. The relative size of the two circles shows that the weight<br />
for the "Power" measure is about half of the weight for the "Price"<br />
measure. The lines show that the "Fuel Economy" measure<br />
appears in only one tradeoff while the "Price" measure appears in<br />
all but one tradeoff.<br />
In the diagram, you can also see the relative weights for measures<br />
not directly compared in a tradeoff. For example LDW computes<br />
8-8 Section 8 -- Using LDW 3: Reviewing Results
the relative weights of the "Price" and "Fuel Economy" measures<br />
indirectly by comparisons with the "Price" and "Power" measures.<br />
The relative size of the circles shows that the "Fuel Economy"<br />
measure also has about half as much weight as the "Price"<br />
measure.<br />
The numbers in the circles represent the percentage weights for<br />
the measures computed by keeping the proper ratios between the<br />
weights of the measures and forcing the weights to sum to 100<br />
percent.<br />
Graph Pairs of Measures<br />
The graph pairs of measures display lets you view sets of equally<br />
preferred levels on two measures.<br />
You can view the graph pairs of measures display by selecting the<br />
Review::Graph Pairs of Measures option. When you select it,<br />
LDW will display the dialog box shown in Figure 8-7<br />
Figure 8-7. Dialog box for Results::Graph Pairs of Measures option.<br />
The dialog box has two lists of measures, one for the horizontal<br />
axis and one for the vertical axis. The edit box labeled "Number<br />
of Alts to Show" determines the number of alternatives to show as<br />
small crosses in the figure. LDW will display the alternatives<br />
Section 8 -- Using LDW 3: Reviewing Results 8-9
with the highest overall utility. The edit box labeled "Utility Lines<br />
to Show" determines how many "iso-utility" lines LDW will draw<br />
in the figure. The lines will be color coded, with red lines<br />
indicating lower utilities and green lines indicating higher<br />
utilities. You can select up to 250 lines. Selecting a large number<br />
of lines will result in the area of the graph being almost<br />
completely covered with varying shades of red and green. If you<br />
select only one line, you can enter the utility to show with the<br />
single line in the edit box labeled "Utility to Show". LDW will<br />
display 10 points along the line and will label them with their<br />
levels on the selected measures (see Figure 8-9).<br />
When you click "OK", LDW will display a graph like the one in<br />
Figure 8-8.<br />
Figure 8-8. Example of Review::Graph Pairs of Measures option.<br />
The graph is like the tradeoff graph from the Review::Single<br />
Tradeoffs option. It shows a rectangle with one measure on the<br />
horizontal axis and one on the vertical axis. You can think of any<br />
point in this rectangle as a simplified alternative that has the<br />
indicated levels on the two measures and a nominal level on all of<br />
the other measures. For example, a point in the upper left corner<br />
of the rectangle represents a computer alternative with a hard<br />
disk size of 120 mb and a hard disk access time of 15 ms (the best<br />
hard drive in the rectangle). A point in the lower right corner<br />
8-10 Section 8 -- Using LDW 3: Reviewing Results
epresents a computer alternative with a hard disk size of 60 mb<br />
and a hard disk access time of 28 ms. A point in the very center of<br />
the rectangle would represent a computer alternative with a hard<br />
disk size of 90 mb and a hard disk access time of 21.5 ms.<br />
The lines on the graph represent sets of simplified alternatives<br />
that you prefer equally. LDW labels each line with the utility that<br />
would be assigned to that line if the two measures were the only<br />
ones in the analysis and had their own Multi-Measure Utility<br />
Function (MUF) based in their relative weights and Single<br />
Measure Utility Functions. Crosses that appear on the graph<br />
represent the levels of actual alternatives on the two measures.<br />
Figure 8-9 shows an example of the option with a single utility<br />
line of u = 0.75 displayed. LDW draws 10 points along the line<br />
and labels them with their levels on the horizontal axis and<br />
vertical axis measures.<br />
Figure 8-9. Example of Review::Graph Pairs of Measures option with one<br />
utility line.<br />
Comments Summary<br />
The Results::Comments Summary option displays a table with the<br />
comments from each of the objects in the current analysis. When<br />
Section 8 -- Using LDW 3: Reviewing Results 8-11
you select this option, LDW will display a table similar to that<br />
shown in Figure 8-10<br />
Comment for entire Buying a Computer analysis<br />
This analysis is to select a computer system for small business use. The<br />
systems are based on technology circa 1989.<br />
Comments for Alternatives<br />
Regional 1 20 MHZ Alternative:<br />
This is a 20 MHZ machine from a regional company in the area of the<br />
decision maker but requiring about a 2 hr drive.<br />
Regional 1 25 MHZ Alternative:<br />
This is a 25 MHZ machine from a manufacturer in the area of the decision<br />
maker but requiring about a 2 hr. drive.<br />
Local 1 25 MHZ A Alternative:<br />
This is a 25 MHZ machine from a local manufacturer.<br />
Local 2 25 MHZ A Alternative:<br />
This is a 25 MHZ machine from a second local manufacturer.<br />
Figure 8-10. Example of Review::Comments Summary option.<br />
Clicking on the comment for any goal, measure, alternative or<br />
preference set will tell LDW to display its properties dialog box.<br />
You will be able to edit the comments, but not to make any other<br />
changes.<br />
Assessment Summary<br />
The Results::Assessment Summary option displays a table with a<br />
summary of the preference assessments done for the active<br />
preference set. When you select it, LDW will display a table like<br />
that shown in Figure 8-11.<br />
8-12 Section 8 -- Using LDW 3: Reviewing Results
Figure 8-11. Example of Review::Assessment Summary option.<br />
The information provided in the assessment summary varies<br />
depending on the assessment methods used. Separate sections<br />
are provided for conversion to common units and for weight<br />
assessment. Information about probabilistic levels is also<br />
included.<br />
Percentage Weights<br />
The Percentage Weights table lets you view the weights for the<br />
measures for the current preference set. You can view the<br />
percentage weights table by selecting the<br />
Review::Weights::Percentage Weights option. When you select it,<br />
LDW displays a table like the one in Figure 8-12.<br />
Section 8 -- Using LDW 3: Reviewing Results 8-13
Figure 8-12. Example of Review::Weights::Percentage Weights display.<br />
LDW displays the weights as percentages that sum to 100 percent.<br />
It includes all measures in the analysis, no matter which goal they<br />
belong to or whether individual goals have their own MUFs. The<br />
table does not include any effects from interactions.<br />
The first column, labeled "Percentage Weights," contains the<br />
weights that result from using the "nominal" ranges of the<br />
measures defined using the dialog box for each measure.<br />
The second column, labeled "Effective Weight" contains the<br />
weights that would result if the range for each measure specified<br />
in its properties dialog box corresponded to the range of the<br />
alternatives on that measure. If the alternatives vary over a wider<br />
range than the properties range for a measure, the effective<br />
weight will be higher than the percentage weight (assuming no<br />
changes in the other measure's ranges). Conversely, if the<br />
alternatives vary over a narrower range than the properties range,<br />
the effective weight will be lower than the percentage weight. In<br />
the extreme case where the alternatives all have the same level on<br />
a measure, the effective weight will be zero, since that measure<br />
does not help to distinguish between the alternatives. This may<br />
8-14 Section 8 -- Using LDW 3: Reviewing Results
e true even if the measure has a very high percentage weight.<br />
All of the other displays in LDW are based on the percentage<br />
weights rather than the effective weights.<br />
MUF Formulas<br />
The MUF Formulas display lets you view the scaling constants<br />
that define the Multi-measure Utility Functions (MUFs) for the<br />
current preference set.<br />
You can view the MUF Formulas table by selecting the<br />
Review::Weights::MUF Formulas option. When you select it,<br />
LDW displays a table like the one in Figure 8-13.<br />
Section 8 -- Using LDW 3: Reviewing Results 8-15
Figure 8-13.Example of Review::Weights::MUF Formulas display.<br />
In this table, each goal has a line that describes the method used<br />
to compute its MUF. The line also shows the "Big K" scaling<br />
constant that defines the degree of interaction between the<br />
members of that goal.<br />
The first goal displayed is the "Overall" goal, which always has a<br />
MUF. If a lower level goal does not have its own MUF, its line<br />
shows the MUF that includes its members. All of the measures in<br />
8-16 Section 8 -- Using LDW 3: Reviewing Results
an analysis are included in exactly one MUF, as are all of the goals<br />
that have their own MUF. Goals that do not have their own MUF<br />
do not appear explicitly in any other MUF.<br />
Under each goal is a line for each of the goal's members. The line<br />
for each member includes the "small k" scaling constant for that<br />
member in the MUF it belongs to. The Big K scaling constant for a<br />
goal plus the small k scaling constants for the lower level goals<br />
and measures in the goal's MUF uniquely define the formula for<br />
the MUF. See Section 9 and the Appendix for more information<br />
on how the scaling constants define a MUF.<br />
Goals that do not have their own MUF (such as the Quality goal in<br />
the figure) are not included explicitly in the MUF of the goal they<br />
belong to. The scaling constant on the line for that goal (0.2430 for<br />
the Quality goal) is simply the sum of the scaling constants of the<br />
goal's members (Company, FCC Certification, etc., for the Quality<br />
goal).<br />
SUF Formulas<br />
The SUF Formulas display lets you view the scaling constants that<br />
define the Single-measure Utility Functions (SUFs) for the<br />
measures for the active preference set.<br />
You can view the SUF Formulas table by selecting the<br />
Review::Weights::SUF Formulas option. When you select it, LDW<br />
displays a table like the one in Figure 8-14.<br />
Section 8 -- Using LDW 3: Reviewing Results 8-17
Figure 8-14. Example of Review::Weights::SUF Formulas display.<br />
In this table each measure's SUF has one or more lines. Each line<br />
represents the SUF formula for one sub-range of the measure’s<br />
utility function. SUFs in <strong>Logical</strong> Decision can have several subranges<br />
that cover the range of the measure specified in its<br />
properties dialog box.<br />
Each line in the table contains the following information. The<br />
Minimum column contains the minimum level for the sub-range.<br />
The Maximum column contains the maximum level. The Level<br />
column identifies the measure level for which a utility was<br />
assessed. The Utility column is the utility value assigned to the<br />
midpoint level. The last three columns define the SUF formula for<br />
the sub range. If the "c" column is zero, the formula for the subrange<br />
is U(x) = a + bx, while if the "c" column is non-zero, the<br />
-cx<br />
formula is U(x) = a + be .<br />
8-18 Section 8 -- Using LDW 3: Reviewing Results
Graph Weights<br />
The Graph Weights display lets you view a bar graph of the<br />
weights for the goals and measures for the active preference set.<br />
You can view the Graph Weights window by selecting the<br />
Review::Weights::Graph Weight option. When you select this<br />
option, LDW displays a graph like the one in Figure 8-14.<br />
Figure 8-15. Example of Review::Weights::Graph Weights display.<br />
In this graph each goal and measure has a bar proportional to its<br />
weight. Goals have green bars and measures have blue bars. The<br />
bar length for a goal is the sum of the bar lengths for all of the<br />
measures beneath it in the goals hierarchy.<br />
Viewing Your Results<br />
LDW lets you generate displays of ranking results based on the<br />
active preference set. The following displays are available:<br />
Section 8 -- Using LDW 3: Reviewing Results 8-19
! Rank Alternatives<br />
! Stacked Bar Ranking<br />
! Measure Equivalents Ranking<br />
! Uncertainty Summary<br />
! Dynamic Sensitivity<br />
! Sensitivity Graph<br />
! Sensitivity Table<br />
! Scatter Diagrams<br />
! Efficient Frontier<br />
! Ranking Results Graph<br />
! Ranking Results Matrix<br />
! Preference Set Summary<br />
! Cutoff Summary<br />
! Graph an Alternative<br />
! Alternative Uncertainty Graph<br />
! Compare Alternatives<br />
Each of these displays can be selected with a menu item in the<br />
Results menu.<br />
Rank Alternatives<br />
The rank alternatives display lets you show a ranking of the<br />
alternatives based on any of the goals or measures. The ranking is<br />
based on the active preference set.<br />
You can view the rank alternatives display by selecting the<br />
Results::Rank Alternatives option. When you select it, LDW<br />
displays the dialog box shown in Figure 8-16.<br />
8-20 Section 8 -- Using LDW 3: Reviewing Results
Figure 8-16. Results::Rank Alternatives dialog box.<br />
You select a goal or measure to rank on from the list at the top of<br />
the dialog box. If you check the "Show Uncertainties" button,<br />
LDW will add a bar showing the range of uncertainty for each<br />
alternative. When you click "OK", LDW will display a bar chart<br />
like the one in Figure 8-17.<br />
Section 8 -- Using LDW 3: Reviewing Results 8-21
Figure 8-17. Example of Results::Rank Alternatives display.<br />
Selecting the "Overall" goal gives you the overall ranking results<br />
for the analysis. If you select a measure rather than a goal, LDW<br />
also shows the measure level for each alternative. The black lines<br />
for the alternatives represent the range of uncertainty for each<br />
alternative. Alternatives failing one or more cutoffs are shown<br />
with red bars. All other alternatives are shown with green bars.<br />
Stacked Bar Ranking<br />
The Results::Stacked Bar Ranking option is similar to the<br />
Results::Rank Alternatives option but provides more detail on<br />
how the alternatives' utilities on the lower level goals and<br />
measures affect the utility on the selected goal.<br />
When you select it, LDW first displays the dialog box shown in<br />
Figure 8-18.<br />
8-22 Section 8 -- Using LDW 3: Reviewing Results
Figure 8-18. Dialog box for Results::Stacked Bar Ranking option.<br />
The list identifies the goal to rank the alternatives on.<br />
The three radio buttons at the upper right determine how the<br />
stacked bars are sorted -- by the weight of the member<br />
represented by each bar, by the member's name, or by the<br />
member's ID number.<br />
The two radio buttons at the lower right indicate which members<br />
will have bars. The "Show Goal Members" button causes LDW to<br />
display bars for the measures and goals directly below the<br />
selected goal in the hierarchy. The "Show Measures Under Goal"<br />
button causes LDW to display the measures below the selected<br />
goal.<br />
You can reduce the number of bars by reducing the number in the<br />
"Number of Bars to Stack" edit box. If you reduce the number,<br />
LDW will create an "Other" bar to show the effect of the members<br />
not shown explicitly. The members with the highest weight will<br />
be selected to have bars first.<br />
When you click "OK," LDW will display a graph similar to the one<br />
in Figure 8-19.<br />
Section 8 -- Using LDW 3: Reviewing Results 8-23
Figure 8-19. Example of Results::Stacked Bar Ranking option.<br />
In the figure, each alternative has a bar with length proportional<br />
to its utility on the selected goal. This bar is made up of other<br />
bars that show the influence of the various measures and goals on<br />
the utility result.<br />
If an alternative has a long bar for a member, it means that the<br />
member is important and that the alternative does well on it. If<br />
the bar for a member is short, it means that the member is<br />
relatively unimportant or that the alternative does relatively<br />
poorly on the member.<br />
Not all alternatives will have bars for all members, since some<br />
alternatives may have a utility of 0.0 (no contribution) for a<br />
member.<br />
Measure Equivalents Ranking<br />
The Results::Measure Equivalents Ranking option lets you display<br />
an overall ranking of the alternatives along with the levels on a<br />
particular measure that would result in the same overall utilities if<br />
all other measures had their most preferred levels.<br />
8-24 Section 8 -- Using LDW 3: Reviewing Results
You can use the measure equivalents ranking to compare<br />
alternatives using an indicator other than overall utility.<br />
Figure 8-20 shows an example of a measure equivalents ranking<br />
based on price. Each equivalent in the figure represents the price<br />
of an "equivalent" truck that you should prefer equally to the<br />
alternative if the "equivalent" truck had the most preferred level<br />
on all of the measures besides price.<br />
Thus you should equally prefer the "Mountain Lion" (with a price<br />
of $17,500) and a truck with the most preferred level on each<br />
measure except a price of $24,511.70, given the preferences set<br />
called Decision Maker.<br />
Figure 8-20. Example of Results::Measure Equivalents Ranking option.<br />
Uncertainty Summary<br />
The Results::Uncertainty Summary option lets you view a table<br />
summarizing the uncertainties for the alternatives with respect to<br />
a single measure or goal. When you select it, LDW will display<br />
the dialog box shown in Figure 8-21.<br />
Section 8 -- Using LDW 3: Reviewing Results 8-25
Figure 8-21. Dialog box for Results::Uncertainty Summary option.<br />
In the dialog box, The list at the top tells LDW which measure or<br />
goal to prepare the table for. If you select a measure, you can<br />
select to show either measure levels or utilities in the table by<br />
clicking one of the radio buttons at the bottom of the dialog box.<br />
When you click "OK," LDW will display a table like the one in<br />
Figure 8-22.<br />
Figure 8-22. Example of Results::Uncertainty Summary option.<br />
In the figure, each row represents an alternative and each column<br />
represents one aspect of the uncertainty for the alternative on the<br />
active goal or measure. The results are based on a Monte Carlo<br />
8-26 Section 8 -- Using LDW 3: Reviewing Results
simulation for each alternative using the simulation parameters<br />
set using the Preferences::Simulation Preferences option.<br />
All of the columns should be self explanatory except for the 5%P<br />
and 95%P columns. The 5%P column represents a utility which<br />
only five percent of the simulation trials were below, while the<br />
95%P column represents a utility which only five percent of the<br />
simulation trials were above.<br />
Dynamic Sensitivity<br />
The Results::Dynamic Sensitivity option lets you quickly see the<br />
effects of changes in the weights for the goals and measures.<br />
When you select the option, LDW draws a window with two<br />
panes as shown in Figure 8-23.<br />
Figure 8-23. Example of Results::Dynamic Sensitivity option.<br />
Section 8 -- Using LDW 3: Reviewing Results 8-27
In the window, the upper pane shows the current overall utilities<br />
for the alternatives. The lower pane shows the weights for the<br />
goals and measures. (The weights are adjusted to sum to 1.0 if<br />
there are interactions).<br />
Goals are shown in green at the top of the pane, and measures are<br />
shown in blue below the goals. You can temporarily adjust the<br />
weight for a measure or goal in the lower pane and see the effect<br />
on the alternatives' utilities in the upper pane.<br />
You adjust a weight for a measure or goal by changing the length<br />
of its bar. To change a bar's length, you drag its right hand edge.<br />
When finish dragging, LDW will redraw the bar and the weight<br />
for the member will be updated based on the bar’s proportional<br />
length.<br />
You can also directly enter a new weight by clicking on the<br />
current weight. An edit bor where you can enter the new weight<br />
will appear.<br />
After you adjust a weight, the weights for the other goals and<br />
measures will be increased or decreased to ensure that the<br />
weights sum to 1.0. LDW will then use these adjusted weights to<br />
recalculate the overall utilities for the alternatives. The upper<br />
pane will be adjusted to reflect the new utilities.<br />
The changes you make in the dynamic sensitivity graph are only<br />
temporary. When you close the window the weights and<br />
alternative utilities will revert to what they were before.<br />
Dynamic Sensitivity Options. The Sensitivity menu appears<br />
when you select the Results::Dynamic Sensitivity option. It has<br />
two options.<br />
The Sensitivity::Restore Weights option restores all of the weights<br />
(and bars) to the values they had when you first created the<br />
window.<br />
The Sensitivity::Save Weights option saves the current weights in<br />
a new preference set called “Sensitivity.” The other information,<br />
such as the single measure utility functions (SUFs), is copied from<br />
the active preference set with no change.<br />
8-28 Section 8 -- Using LDW 3: Reviewing Results
Sensitivity Graphs<br />
Sensitivity graphs let you display the effect of varying a measure<br />
or goal's weight from 0 to 100 percent.<br />
You can view a sensitivity graph by selecting the<br />
Results::Sensitivity Graph option. When you select the option,<br />
LDW shows you the dialog box shown in Figure 8-23.<br />
Figure 8-24. Dialog Box for Results::Sensitivity Graph option.<br />
At the left of the dialog box is a list of the goals and measures in<br />
the analysis. Select the member that will appear in the horizontal<br />
axis of the group from this list.<br />
The "Number of Bars" line at the upper right of the dialog box<br />
determines how many alternatives LDW should draw. LDW will<br />
draw the alternatives with the highest overall utilities.<br />
The buttons at the right of the dialog box tell LDW how to draw<br />
the key at the left of the sensitivity graph. The "Local Rank"<br />
button tells LDW to sort the alternative lines by their ranking on<br />
the selected measure. This will make them correspond to their<br />
order at the right of the graph. The "Overall Rank" button tells<br />
LDW to sort the alternative lines by their overall ranking. This<br />
will make them correspond to their order at the vertical line in the<br />
center of the graph. The “Name” button tells LDW to sort the<br />
alternatives by name.<br />
After you click "OK," LDW creates a graph like the one in Figure<br />
8-25.<br />
Section 8 -- Using LDW 3: Reviewing Results 8-29
Figure 8-25. Example of Results::Sensitivity Graph display.<br />
The graph has relative utilities as its vertical axis and the percent<br />
of total weight on the member as its horizontal axis.<br />
The left side of the graph represents no weight at all on the active<br />
member and the right side represents 100 percent of the weight<br />
on the member.<br />
The lines represent overall utilities for the alternatives at different<br />
weights. A vertical line shows the weight for the member in the<br />
active preference set.<br />
The highest line represents the most preferred alternative<br />
(overall) for a given weight on the active member. Thus, in the<br />
example above, the "Coyote" alternative is most preferred overall<br />
for most weights for the Price measure. It is not until the weight<br />
for Price goes below about 10 percent that another alternative<br />
(Tiger) becomes preferred.<br />
Sensitivity Table<br />
The sensitivity table option lets you view an overall ranking<br />
based on any percentage of weight on a goal or measure.<br />
8-30 Section 8 -- Using LDW 3: Reviewing Results
You can view a sensitivity table by selecting the<br />
Results::Sensitivity Table option. When you select the option,<br />
LDW shows you a dialog box with a list of the goals and measures<br />
in the analysis. After you select a member, LDW asks you enter<br />
the percent of the total weight to assign it, with the current<br />
percentage weight as a default. When you make your selection,<br />
LDW creates a table like the one in Figure 8-26.<br />
Figure 8-26. Example of Results::Sensitivity Table display.<br />
Scatter Diagrams<br />
The Results::Scatter Diagrams option lets you compare the<br />
performance of the alternatives on any two measures or goals.<br />
The comparison is a scatter diagram with one measure or goal on<br />
each axis and the alternatives represented by crosses.<br />
When you select this option, LDW first displays the dialog shown<br />
in Figure 8-27.<br />
Section 8 -- Using LDW 3: Reviewing Results 8-31
Figure 8-27. Dialog box for Results::Scatter Diagrams option.<br />
The two lists in the dialog box determine the members that will be<br />
shown on the axes of the scatter diagram.<br />
The "Number of Alts to Show" edit tells LDW how many of the<br />
top ranking alternatives to show with crosses.<br />
"The "Number of Alts to Label" edit tells LDW how many of the<br />
top ranked alternatives to draw in color and to label with the<br />
alternative name.<br />
The "utility Lines to Show" edit tells LDW how many utility lines<br />
to draw in light gray behind the alternative crosses. This edit may<br />
be disabled for pairs of members for which the pairwise utility<br />
cant be computed.<br />
Finally, the "Label Utility Lines" check box tells LDW whether it<br />
should label each line with its utility.<br />
When you click "OK," LDW creates a display like the one in<br />
Figure 8-28.<br />
8-32 Section 8 -- Using LDW 3: Reviewing Results
Figure 8-28. Example of Results::Scatter Diagram option.<br />
The ranges for the two axes are the nominal range defined in the<br />
measure dialog box for measures. For goals, LDW uses the<br />
nominal utility range (usually zero to one). LDW will expand<br />
these ranges to show high ranking alternatives falling outside<br />
either range.<br />
If you move your mouse over a point that is not labeled, the label<br />
will be shown temporarily. If you click a point the label will be<br />
shown permanently. If you click a label it will be hidden.<br />
Efficient Frontier<br />
The Results::Efficient Frontier option lets you identify and order<br />
the alternatives with the highest benefit to cost ratio. The<br />
alternatives are ordered on a cumulative “efficient frontier”<br />
where the alternative with the highest ratio is drawn first, the one<br />
with the second comparison is drawn second and so on.<br />
The cumulative costs and benefits of the alternatives drawn so far<br />
are plotted.<br />
When you select this option, LDW first displays the dialog shown<br />
in Figure 8-29.<br />
Section 8 -- Using LDW 3: Reviewing Results 8-33
Figure 8-29. Dialog box for Results::Scatter Diagrams option.<br />
The two lists in the dialog box determine the members that will be<br />
shown on the diagram’s axes. The cost member is shown on the<br />
horizontal axis in nominal units such as dollars. The benefit<br />
member is shown on the vertical axis in units of utility. The<br />
benefit member is often a goal that aggregates the various<br />
measures of benefit.<br />
The “Benefit/Cost Multiplier” edit lets you enter a constant to<br />
multiply the benefit cost ratios by, since cost numbers in dollars<br />
are usually much larger than benefit numbers in utility.<br />
When you click the "OK," LDW creates a display like the one in<br />
Figure 8-30.<br />
8-34 Section 8 -- Using LDW 3: Reviewing Results
Figure 8-30. Example of Results::Scatter Diagram option.<br />
The ranges for the two axes go from 0.0 to the sums of the costs<br />
and benefits for all the alternatives with positive benefits and<br />
non-negative costs. The alternatives are shown along a line that<br />
starts from the zero cost/zero benefit point in the lower left and<br />
adds alternatives along the line in order of decreasing cost<br />
benefit.<br />
If you move your mouse over a point, its label will be shown<br />
temporarily. The label has the alternative name and the<br />
benefit/cost ratio adjusted by the multiplier you entered in the<br />
dialog box. LDW also displays the alternative’s cost and benefit<br />
levels as well as the cumulative cost and benefit at the bottom of<br />
the graph.<br />
If you click on a point the label and details will be shown<br />
permanently. If you click on a label it and the details will be<br />
hidden.<br />
Interpreting the efficient frontier. If you are selecting multiple<br />
alternatives in your analysis, you can think of the efficient frontier<br />
as the order in which you should buy them so that you get the<br />
Section 8 -- Using LDW 3: Reviewing Results 8-35
most benefit for your costs. You should start at the lower left of<br />
the graph and select alternatives along the line. The first<br />
alternative in the line will have the highest benefit/cost ratio. The<br />
second the second highest and so on. You might think of the<br />
order of the alternatives as the order in which you would buy<br />
them as your budget increases.<br />
<strong>Logical</strong> <strong>Decisions</strong>® Portfolio. Many real world situations where<br />
you want to select multiple alternatives are much more<br />
complicated than this. There may be multiple costs you have to<br />
consider and additional constraints that make it inappropriate to<br />
select certain combinations of alternatives. For this type of<br />
problem, you need a more specialized tool.<br />
<strong>Logical</strong> <strong>Decisions</strong>® Portfolio is just such a tool. It is specifically<br />
designed to handle complex situations where you want to select<br />
sets of alternatives in the presence of budgetary and other<br />
constraints. For more information, visit the <strong>Logical</strong> <strong>Decisions</strong> web<br />
site at www.logicaldecisions.com.<br />
Ranking Results Graph<br />
The Results::Ranking Results Graph option lets you view a graph<br />
showing the performance of the alternatives on selected goals and<br />
measures. When you select this option, LDW will display a<br />
dialog box like the one in Figure 8-31.<br />
Figure 8-31. Dialog box for Ranking Results Graph.<br />
8-36 Section 8 -- Using LDW 3: Reviewing Results
In the dialog box, you are asked to select the goal to graph,<br />
meaning which goal's results will be displayed at the left of the<br />
graph and how that goals members will be sorted. Next you<br />
select whether to display the members of the goal (that is, the<br />
goals and measures directly underneath the selected goal in the<br />
goals hierarchy) or to display all of the measures somewhere<br />
under the selected goal in the goals hierarchy. Finally, you select<br />
the number of alternatives to display. LDW will display the top<br />
ranking alternatives under the selected goal.<br />
When you click OK, you will see a graph like the one in Figure 8-<br />
32.<br />
Figure 8-32. Example of Results::Ranking Results Graph option.<br />
In the figure, the vertical axis represents utility. The selected<br />
goals and measures are displayed along the horizontal axis.<br />
The goal you selected in the dialog box is at the left of the<br />
horizontal axis. The alternatives are displayed as horizontal lines.<br />
Each alternative's utility for a goal or measure is plotted above<br />
that goal or measure.<br />
There is no particular significance to the even spacing of the<br />
measures and goals. The lines connecting these points also do not<br />
Section 8 -- Using LDW 3: Reviewing Results 8-37
have significance, they just make it easy to track the performance<br />
of individual alternatives across different goals and measures.<br />
Ranking Results Matrix<br />
The Results::Ranking Results Matrix option lets you view a matrix<br />
of the utility results for all the alternatives on the measures and<br />
goals. When you select this option, LDW will display a matrix<br />
like the one in Figure 8-33.<br />
Figure 8-33. Example of Results::Ranking Results Matrix option.<br />
In the matrix, the goals and measures are shown at the top, with<br />
their weights in the row below them. The alternatives are shown<br />
on the left edge of the matrix. Each cell in the body of the matrix<br />
represents the utility for the alternative on the goal or measure.<br />
The matrix is initially sorted with the highest ranking alternatives<br />
towards the top and the most highly weighted goals and<br />
measures towards the left.<br />
You can view the dialog box for any goal, measure or alternative<br />
by clicking its cell.<br />
Preference Set Summary<br />
The Results::Preference Set Summary option lets you view a<br />
summary of the ranking results for all of the preference sets for a<br />
single goal or measure. When you select this option, LDW<br />
displays the dialog box shown in Figure 8-34.<br />
8-38 Section 8 -- Using LDW 3: Reviewing Results
Figure 8-34. Dialog box for Results::Preference Set Summary option.<br />
In the list at the left you select which preference sets to include in<br />
the summary. Just click a preference set to deselect it or reselect<br />
it. Select from the list at the right to tell LDW which member to<br />
prepare the summary for. When you click "Select", LDW will<br />
display a matrix like the one in Figure 8-35.<br />
Figure 8-35. Example of Results::Preference Set Summary option.<br />
In the figure, the rows represent alternatives and the columns<br />
represent preference sets. Each cell represents the utility for the<br />
row alternative on the selected measure or goal for the column<br />
preference set. The last two columns of the matrix represent the<br />
average utility for each alternative and the standard deviations of<br />
the utilities.<br />
Section 8 -- Using LDW 3: Reviewing Results 8-39
Cutoff Summary<br />
The Results::Cutoff Summary option lets you view a summary of<br />
the alternatives that fail one or more of the measure cutoffs.<br />
When you select this option, you will see a table like the one in<br />
Figure 8-36.<br />
Figure 8-36. Example of Results::Cutoff Summary option.<br />
8-40 Section 8 -- Using LDW 3: Reviewing Results
Graph an Alternative<br />
The graph an alternative option lets you display a bar graph or<br />
“Petal Diagram” showing the performance of a single alternative<br />
on the measures or goals. The graphs are unique in that the<br />
width of the bar for a measure or goal is proportional to its<br />
weight.<br />
You can view the graph alternatives display by selecting the<br />
Results::Graph an Alternative option. When you select it, LDW<br />
shows you the dialog box in Figure 8-37, which helps you<br />
customize your graph.<br />
Figure 8-37. Dialog box for Results::Graph Alternatives option.<br />
This dialog box presents you with a variety of options. The list<br />
box on the left contains the alternatives in the analysis. Click on<br />
the alternative you would like to display.<br />
The list box on the right contains the goals in the analysis. You<br />
can click on the "Overall" goal to display bars representing overall<br />
results, or click on another goal to display only bars related to that<br />
goal. The radio buttons on the upper left determine which bars<br />
Section 8 -- Using LDW 3: Reviewing Results 8-41
you will see. If you select the "Show Goal Members" button, LDW<br />
will only show the measures and goals directly under the selected<br />
goal. If you select the "Show Measures Under Goal" button, LDW<br />
will show all of the measures under the selected goal.<br />
LDW will only show the most important (highest weighted)<br />
measures or goals, up to the limit selected in the text box labeled<br />
"Number of Bars to Show." This box has an upper limit of 15 bars.<br />
If you choose a limit less than the number of bars implied by<br />
your goal and radio button selections, LDW will combine the<br />
"extra"measures and goals into a bar called "Other."<br />
The radio buttons on the lower left determine the type of graph to<br />
be displayed. If you select the “Draw Bar Graph” option a bar<br />
graph will be displayed. If you select the “Draw Petal Diagram”<br />
button a circular petal diagram will be displayed.<br />
The final pair of radio buttons (on the right) determine the order<br />
of the bars. You can sort the bars by relative weight (the most<br />
highly weighted -- and widest -- bars will go on the left) or you<br />
can show the bars in their original order. Finally, you can select<br />
whether the bars' widths will be proportional to their weight.<br />
If you find these options confusing, just experiment a little with<br />
different settings. Since nothing you do in the Results menu can<br />
change the analysis results, you can't get yourself in trouble.<br />
The example graph alternatives display shown in Figure 8-38 was<br />
created by selecting the "Coyote" alternative from the left list box,<br />
the "Buy the Best Truck" goal from the right list box, the "Show<br />
Measures Under Goal" button, the "Sort Measures By Weight"<br />
button, the "Bars Proportional to Weight" button, the “Draw Bar<br />
Graph” button and five as the number of bars to show. Figure 8-<br />
39 was created using the same options but with the “Draw Petal<br />
Diagram” option selected.<br />
8-42 Section 8 -- Using LDW 3: Reviewing Results
Figure 8-38. Example of Results::Graph Alternatives display.<br />
Figure 8-39. Graph an Alternative option with Petal Diagram selected.<br />
Section 8 -- Using LDW 3: Reviewing Results 8-43
LDW displays utilities greater than one or less than zero as one or<br />
zero respectively in the bar graph.<br />
Alternative Uncertainty Graph<br />
The Results::Alternative Uncertainty Graph option lets you view a<br />
graph of the uncertainty in a single alternative for a single<br />
measure or goal. When you select it, LDW will display the dialog<br />
box shown in Figure 8-40.<br />
Figure 8-40. Dialog box for Results::Alternative Uncertainty Graph<br />
option.<br />
In the dialog box, you select the alternative to graph from the list<br />
on the left and the measure or goal to graph the uncertainties for<br />
from the list on the right.<br />
The "Show Cumulative Probability" check box lets you select<br />
whether to show a line with the probability that a given<br />
simulation trial will be less than or equal to any given level or<br />
utility.<br />
The "Show Histogram" check box lets you select whether to show<br />
bars with the number of simulation trials that were within a given<br />
range.<br />
The "Number of Bars to Show" edit box lets you select how many<br />
histogram bars to display.<br />
8-44 Section 8 -- Using LDW 3: Reviewing Results
Finally, the two radio buttons on the right determine whether to<br />
draw the graph in terms of utilities or in terms of measure levels.<br />
The "Show Measure Levels" button is only enabled if you have<br />
selected a measure from the list above it. When you click "OK,"<br />
LDW will display a graph like the one shown in Figure 8-38.<br />
Figure 8-41. Example of Results::Alternative Uncertainty Graph option.<br />
In the figure, the X-axis represents the range of levels or utilities<br />
that were observed in the Monte Carlo simulation for the<br />
alternative on the active measure or goal. The scale at the left of<br />
the graph is probability and is associated with the blue line. each<br />
point on the line indicates the probability that a simulation trial<br />
will be less than or equal to the utility or level below the point.<br />
The scale on the right represents the number of simulation trials<br />
that were done. It is associated with the yellow bars at the bottom<br />
of the graph. The length of each bar is proportional to the number<br />
of simulation trials that resulted in a level or utility within the<br />
range spanned by the bar.<br />
Compare Alternatives<br />
The compare alternatives option lets you view a detailed<br />
comparison of the differences between two alternatives.<br />
Section 8 -- Using LDW 3: Reviewing Results 8-45
You can view an alternatives comparison by selecting the<br />
Results::Compare Alternatives option. When you select the<br />
option , LDW shows you the dialog box in Figure 8-42.<br />
Figure 8-42. Dialog box for Compare Alternatives option.<br />
In the dialog box, the two lists let you choose the alternatives to<br />
compare.<br />
The "Number of Detail Lines" edit box lets you select how many<br />
lines comparing the results on single measures to show. The<br />
measures not shown in detail lines will be combined in an "Other"<br />
line.<br />
The radio buttons on the left tell LDW what type of comparison to<br />
create, a graph or a table.<br />
The radio buttons on the right let you tell LDW how to order the<br />
detail lines. If you click "Order by Importance," LDW will draw<br />
the lines showing the most difference between the alternatives<br />
first. If you click "Order by Alternative," LDW will draw all the<br />
lines favoring one alternative first, followed by the lines favoring<br />
the other alternative.<br />
When you click "OK," LDW will create a table like the one in<br />
Figure 8-43 or a graph like the one in Figure 8-44..<br />
8-46 Section 8 -- Using LDW 3: Reviewing Results
Figure 8-43. Example of Results::Compare Alternatives Table display.<br />
In this table LDW compares the alternatives by the measures that<br />
make the greatest contribution to their difference in overall utility.<br />
Each line in the table represents the contribution of a single<br />
measure to the ranking results.<br />
Each line has the following information. The Alt1 Level is the<br />
level on the measure for the higher ranking alternative.<br />
The Alt2 Level is the level for the lower ranking measure.<br />
The % Contribution to Difference is the percentage of the total<br />
difference in overall utility between the two alternatives that is<br />
due to the measure. The percentages in this column sum to 100<br />
percent, although individual differences can be greater than 100<br />
percent and can also be negative.<br />
Negative contributions show that the lower ranked "Alt 2" is more<br />
preferred on this measure. LDW displays lines with negative<br />
contributions in red and those with positive contributions in blue.<br />
The Total Contribution is the absolute amount of the total<br />
difference in overall utility between the two alternatives that is<br />
due to the measure. The amounts in this column sum to the<br />
number in the difference line at the top of the table. Again,<br />
Section 8 -- Using LDW 3: Reviewing Results 8-47
individual contributions can be greater than the total difference<br />
and can also be negative. The lines favoring the higher ranked<br />
alternative are shown in blue, while the lines favoring the other<br />
alternative are shown in red.<br />
Figure 8-44. Example of Results::Compare Alternatives Graph display.<br />
In the graph, the bars represent measures that favor one<br />
alternative over the other. Longer bars indicate more influence<br />
on the overall ranking.<br />
Bars on the left of the graph favor the alternative with the lower<br />
overall ranking. LDW draws these bars in red. Bars on the right<br />
of the graph favor the alternative with the higher overall ranking.<br />
LDW draws these bars in green.<br />
The first bar always indicates the difference in overall ranking<br />
between the two alternatives. It is always on the right of the<br />
graph. Its length can give you an idea of the degree of influence<br />
of the various measures compared to the total difference between<br />
the alternatives in overall utility.<br />
8-48 Section 8 -- Using LDW 3: Reviewing Results
Printing and Saving Windows<br />
You can print any of the review or results displays, copy them to<br />
the clipboard or save them in various file formats. This section<br />
describes how to do this.<br />
Printing Graphics<br />
To print a graphic image you should first make sure that the<br />
graphic display window is the "active window" at the top of the<br />
pile on your screen.<br />
Next select the File::Print option. This begins the printing<br />
process.<br />
First, the setup dialog box for the currently selected printer will<br />
appear. This dialog box differs from printer to printer and lets<br />
you select the proper options for the picture you want to create.<br />
Next a small dialog box appears that says "Printing in Progress."<br />
If you click on the "Cancel" button on this dialog box before it<br />
disappears, LDW will cancel the print job. Otherwise, LDW sends<br />
the graphic image to the Windows Print Manager for printing.<br />
LDW always prints the full graphic image, despite whether it is<br />
completely visible on the screen. If the image fits on one page,<br />
LDW will locate it in the upper left of the page. If not, LDW will<br />
print multiple pages until it has printed the entire image.<br />
If you want the image to be a different size, you can use the<br />
Window::Zoom option. The size of the image will change<br />
according to the zoom percentage you specify.<br />
One hundred percent always returns the image to its original size.<br />
The Window::Zoom In and Window::Zoom Out option<br />
let you quickly zoom in or out by 20%.<br />
You can select the File::Printer Setup option to set the size and<br />
layout of the pages you would like to print.<br />
You can use the File::Print Preview option to review what your<br />
printed pages will look like.<br />
Section 8 -- Using LDW 3: Reviewing Results 8-49
Copying Graphics Images to the Clipboard<br />
The Windows clipboard lets you transfer graphic images between<br />
programs. You can copy any LDW image to the clipboard simply<br />
by making that window active (as described in the "Printing<br />
Graphics" section) and selecting the Edit::Copy option. You can<br />
check if LDW has properly copied the image by using the<br />
Windows Clipboard Viewer.<br />
Before you copy an image to the clipboard, you should make sure<br />
that no graphic objects in the image are selected. If individual<br />
objects are selected, LDW will copy them to the clipboard, rather<br />
than the entire image.<br />
An item is selected if it is "marked" by small black squares. To<br />
"unselect" objects, just click your mouse in an empty area of the<br />
window and any marks will disappear.<br />
Once you have copied a window to the clipboard, you can<br />
download the image into many other Windows programs. You<br />
can usually do this using the Edit::Paste option. LDW copies<br />
images as “enhanced metafiles” that you can paste directly into a<br />
word processor or presentation program for display in reports or<br />
slides. There you can manipulate the individual objects in the<br />
metafile image in many ways.<br />
Different programs treat clipboard images differently, so there is<br />
no guarantee that any particular program can display the image<br />
correctly.<br />
Saving Windows to a File<br />
You can save LDW windows to disk files in several different<br />
formats.<br />
To save a window, you should first make sure it is active (as<br />
described in the "Printing Graphics" section) and then select the<br />
File::Save Window option. You have three options in the submenu<br />
that appears – Save Graphic, Save Text, and Save<br />
Spreadsheet. The options available depend on the type of the<br />
active window. When you select an option, LDW shows you the<br />
standard Windows save file dialog box shown in Figure 8-54.<br />
8-50 Section 8 -- Using LDW 3: Reviewing Results
The dialog box will show you the file formats that are available<br />
for the option (graphic, text or spreadsheet) you’ve selected. The<br />
available file formats are:<br />
Graphics file formats: Bitmap (.bmp), JPEG (.jpg), GIF (.gif),<br />
PING (.png) and Enhanced Metafile (.emf).<br />
Text file formats: MS Word (.doc), ASCII Text (.txt).<br />
Spreadsheet file formats: Excel 97 (.xls).<br />
When saving a Rank Alternatives window as a text file, LDW<br />
gives you a choice of saving the rankings for all the measures or<br />
goals or just the active one to the text file.<br />
Modifying Graphics<br />
LDW has options that let you modify the graphics displays that it<br />
creates. These options work on any of the Preference or Results<br />
displays described above. While LDW is not a drawing program,<br />
these options should give you enough flexibility to use the LDW<br />
graphics displays directly in your reports and presentations.<br />
If LDW lacks a modification feature you need, you should use the<br />
clipboard or a metafile to copy the display into a drawing or<br />
tm tm<br />
presentation program such as Corel Draw or PowerPoint .<br />
Programs such as these provide you a wealth of tools to<br />
customize the displays to your needs.<br />
Changing the appearance of windows<br />
LDW has options that can change how all windows are displayed<br />
as well as options that let you change individual windows.<br />
The global options include methods to<br />
! Change the units of a measure,<br />
! Delete all of the alternatives,<br />
! Change the number of trials when doing Monte Carlo<br />
simulations,<br />
! Change the names of common LDW objects, and<br />
Section 8 -- Using LDW 3: Reviewing Results 8-51
! Change the display for the common units of utility.<br />
! Change the color scheme for window type,<br />
The options for individual windows include methods to<br />
! Sort a window’s rows and columns,<br />
! Add text labels, and<br />
! Change the size of the image in a window.<br />
The following paragraphs tell you how to make each of these<br />
changes.<br />
Changing Measure Units. The Edit::Change Measure Units<br />
option lets you change the units for an measure. For example,<br />
you could use this option to change a temperature measure from<br />
Fahrenheit to centigrade or a miles per gallon measure to<br />
kilometers per liter.<br />
The option is useful because it changes the units throughout<br />
LDW, not only in the Matrix display but also in the preference<br />
sets, where the units might be used in SUF assessments or in<br />
tradeoffs. When you select this option, LDW will display the<br />
dialog box shown in Figure 8-45.<br />
8-52 Section 8 -- Using LDW 3: Reviewing Results
Figure 8-45. Dialog box for Edit::Change Measure Units option.<br />
In the dialog box, you enter the new units name in the "New<br />
Units" edit. Next you tell LDW how convert from the old units to<br />
the new units. For example, to convert from Fahrenheit to<br />
centigrade, you would multiply by .562 and then add -17.98.<br />
Deleting all alternatives. The Edit::Delete All Alternatives<br />
option lets you delete all of the alternatives in the analysis. After<br />
you select the option and confirm, LDW deletes the alternatives<br />
and adds a single placeholder alternative (LDW requires there to<br />
always be at least one alternative).<br />
Changing Simulation Options. LDW uses Monte Carlo<br />
simulation to estimate the effect of uncertainties in measure levels<br />
on uncertainties in the ranking results.<br />
The Preferences::Simulation Preferences option, lets you set the<br />
number of simulation trials LDW should use and also lets you set<br />
the initial "seed" number for the simulation. When you select this<br />
option, LDW will display the dialog box shown in Figure 8-46.<br />
Figure 8-46. Dialog box for Preferences::Simulation Preferences option.<br />
Section 8 -- Using LDW 3: Reviewing Results 8-53
The "Number of Trials" edit box controls how many trials (or<br />
iterations) LDW conducts in each simulation run. The default is<br />
100, and the maximum is 2500.<br />
The "Random Number Seed" option controls the initial starting<br />
point for the simulation. Different seeds will lead to slightly<br />
different simulation results, but you will seldom have a need to<br />
change the default seed.<br />
Changing names. You can change the names of several<br />
important object types in LDW by selecting the<br />
Preferences::Name Preferences option. When you select this<br />
option, you will see the dialog box in Figure 8-47.<br />
Figure 8-47. Dialog box for Preferences::Name Preferences option.<br />
Each edit field in this dialog box displays the name for a common<br />
LDW object or idea, like "Measure" or "Utility." By changing the<br />
name for the object in this dialog box you change how LDW refers<br />
to it in windows and lists. You generally can't affect how these<br />
terms appear in error messages and menus, however.<br />
You can also change the way LDW refers to the objects in your<br />
analysis by selecting from the radio buttons at the lower left of the<br />
dialog box. The objects affected are alternatives, measures, goals<br />
and preference sets. The default "Name" button causes LDW to<br />
display only the name of the object in lists and graphic screens.<br />
The "ID Number" button causes LDW to display only the ID<br />
number. The "Both" button causes LDW to display the ID number<br />
followed by the name.<br />
8-54 Section 8 -- Using LDW 3: Reviewing Results
Changing the range for utility. You can change the range for the<br />
common units of utility with the Preferences::Utility Preferences<br />
option. When you select this option, LDW will display the dialog<br />
box shown in Figure 8-48.<br />
Figure 8-48. Dialog box for Preferences::Utility Preferences option.<br />
Just enter new values for the most preferred and least preferred<br />
utility in the edit boxes at the left of the dialog box. LDW will<br />
adjust the SUF and MUF formulas in your analysis to reflect this<br />
new range. It will adjust any assessment, review and results<br />
screens that refer to utilities.<br />
You can also tell LDW the number of decimal places to show<br />
when displaying utilities in the "Number of decimal places to<br />
show" edit box.<br />
Sorting. You can sort the rows and/or columns of many LDW<br />
displays by selecting the Preferences::Sort option. When you<br />
select this option, LDW will display one of two dialog boxes. If<br />
you can only sort rows or columns, LDW will display the dialog<br />
box shown in Figure 8-49.<br />
Section 8 -- Using LDW 3: Reviewing Results 8-55
Figure 8-49. Dialog box for Preferences::Sort option for one direction<br />
sort.<br />
The buttons on the left indicate the key to sort on, while the<br />
buttons on the right indicate whether the sort should be<br />
ascending or descending. The sort options should be self<br />
explanatory, except for the "Nominal" order option, which sorts<br />
the objects in the order they were entered. If both the rows and<br />
columns for a window can be sorted, LDW displays the dialog<br />
box shown in Figure 8-50.<br />
8-56 Section 8 -- Using LDW 3: Reviewing Results
Figure 8-50. Dialog box for Preferences::Sort option for two direction sort.<br />
This dialog box provides the same options as the one direction<br />
sort dialog, but allows you to apply them in two directions.<br />
Adding a Text Label. You can add a text label to a graphic<br />
window by selecting the Edit::Graphic Selection::Add Label...<br />
option. When you select this option, LDW asks you to enter the<br />
text you want in a text entry dialog box. When you have finished,<br />
the text you have entered will appear in the currently active<br />
graphics display. You will probably need to move the new label<br />
to a new position by dragging it as described in the next section.<br />
Note that any text labels you add are temporary and will be deleted when<br />
you close the active window.<br />
Changing the Size of an Image. You can change the size of a<br />
graphics image by selecting the Window::Zoom option. This<br />
option lets you set a "zoom percentage" that causes LDW to<br />
redraw the active window's image in a different size.<br />
The zoom percentage changes the area of the image in relation to<br />
its original area. A zoom percentage of 100 percent will cause<br />
LDW to display the image in its original size. A zoom percentage<br />
of less than 100 percent causes the image to be displayed smaller<br />
Section 8 -- Using LDW 3: Reviewing Results 8-57
than its original size. Zoom percentages greater than 100 percent<br />
cause the image to be displayed larger than its original size.<br />
All changes in zoom percentage are relative to the original size of<br />
the image. Thus, you can always go back to the original size by<br />
selecting a zoom percentage of 100 percent.<br />
When you select the Window::Zoom option, a text entry dialog<br />
box appears, allowing you to enter the desired zoom percentage.<br />
The zoom percentage affects the size of images you print using<br />
the File::Print... option, but does not affect the size of images<br />
copied to the clipboard or saved as windows metafiles.<br />
The Window::Zoom In and Window::Zoom Out options<br />
let you quickly change the size of an image by a fixed percentage.<br />
The Zoom In option increases the image' size by 20%, while the<br />
Zoom Out option decreases the image's size by 20%.<br />
Changing a window’s color scheme. You can change the color<br />
scheme for a window by selecting the Preferences::Color<br />
Preferences option. When you do this, you will see the dialog box<br />
shown in Figure 8-51<br />
Figure 8-51. Dialog box for the Preferences::Color Preferences option.<br />
In the dialog box you can select from a list of objects that are<br />
shown in the current window type. When you make a selection,<br />
8-58 Section 8 -- Using LDW 3: Reviewing Results
the current color for that type of object is shown at the bottom of<br />
the dialog box. If you click the “Edit” button, you can change the<br />
color in the color selection dialog box shown in Figure 8-52.<br />
Figure 8-52. Colors dialog box.<br />
This is a standard Windows dialog box. Just click on a Basic or<br />
Custom color, and then click OK. You can see how your changes<br />
will look by clicking the “Preview” button.<br />
The first two items in the list, Background and Text are the same<br />
for all windows in LDW. If you change them you are given the<br />
option to apply the changes to all LDW windows. The other<br />
items apply to all instances of the type of window that is currently<br />
active. For example, if you make a change to a Goals Hierarchy<br />
window, the change will apply to all other Goals Hierarchy<br />
windows that you create.<br />
Saving and Loading Color Preferences. LDW saves any color<br />
preference changes you have made along with the other data in a<br />
.ldw file. You can also save them in a stand alone file that you can<br />
load into different LDW analyses. The Preferences::Save<br />
Preferences option lets you save the preferences by showing you<br />
a standard file save dialog box.<br />
LDW Preferences are saved in a file with the extension .ldp.<br />
You load in preferences with the Preferences::Load Preferences<br />
option. You will overwrite any color changes you have made if<br />
you load a new .ldp file.<br />
Section 8 -- Using LDW 3: Reviewing Results 8-59
Modifying individual graphic objects<br />
LDW provides tools for you to select individual objects in a<br />
graphics window such as a text string or a bar in a graph. After<br />
you have selected one or more objects, you can move them, delete<br />
them or change their appearance in a variety of ways.<br />
In this section we will first describe how to select objects and then<br />
describe how you can modify them.<br />
Note that any changes you make to individual graphic objects are<br />
temporary and that they will be lost when you close the window.<br />
Selecting Objects to Modify<br />
LDW provides several standard tools that let you select objects to<br />
modify. The simplest way to select an object is to click on it with<br />
your mouse. LDW will mark the object you have selected with<br />
small black squares at the four corners of the object.<br />
You can also select objects by dragging a selecting rectangle<br />
around them.<br />
Modifying Selected Objects<br />
Once you have selected the object(s) you want to modify, there<br />
are many things you can do to them. You can:<br />
! Move them,<br />
! Delete them,<br />
! Copy them,<br />
! Change their color,<br />
! Change their text, or<br />
! Change their text font.<br />
The following paragraphs tell you how to make each of these<br />
changes.<br />
Moving Objects. You can move selected objects by simply<br />
positioning your mouse over them and dragging them. LDW will<br />
move the selected objects as a group.<br />
Deleting Objects. You can delete the objects you have selected by<br />
using the Edit::Cut option. When you select this option, LDW<br />
8-60 Section 8 -- Using LDW 3: Reviewing Results
copies the selected objects to the clipboard where you can retrieve<br />
them using the Edit::Paste option.<br />
Copying Objects. You can copy the objects you have selected<br />
using the Edit::Copy option. This option has the same effect as<br />
the Edit::Cut option, except that the original objects are not<br />
deleted from the window. You can retrieve a copy of the copied<br />
objects using the Edit::Paste option.<br />
Changing An Object's Color. Two options let you change the<br />
color of an object. You can also change the color of a text object by<br />
changing its text font as described below. You can change the<br />
color of the outline of an object (or the color of all of a text object)<br />
with the Edit::Graphic Selection::Change Pen Color option. When<br />
you select this option, LDW shows you the standard Windows<br />
color changing dialog box shown in Figure 8-52.<br />
You can change the interior of an object such as a bar in a bar<br />
graph using the Edit::Graphic Selection::Change Brush Color<br />
option. When you select this option, LDW again shows you the<br />
standard dialog box pictured above. When you select a color, the<br />
interiors of the selected objects will all change to that color. This<br />
option does not affect text or line objects.<br />
Changing Text. If you have selected a single text object, you can<br />
change its text with the Edit::Graphic Selection::Edit Text option.<br />
When you select the option you will be shown a data entry dialog<br />
box where you can make your changes.<br />
Changing Text Fonts. You can change the font of text objects<br />
you have selected using the Edit::Change Text Font option. When<br />
you select this option, the standard Windows font selection dialog<br />
box shown in Figure 8-53 appears.<br />
Section 8 -- Using LDW 3: Reviewing Results 8-61
Figure 8-53. Text font dialog box.<br />
This is a standard windows dialog box. Just set the font, style,<br />
size, effects, and color options you want and click on the "OK"<br />
button. The selected text will be redrawn using the font and<br />
options you have selected. Note that fonts you select may not<br />
reproduce exactly on the screen or your printer and that every<br />
system will likely have a different set of fonts available.<br />
Loading and Saving LDW Files<br />
The options in the File menu let you load and save your analyses<br />
in files called LDW files. LDW files contain all of the objects that<br />
make up your LDW analysis, including measures, alternatives,<br />
goals and preference sets. LDW files use a binary file format that<br />
is readable only by LDW. The file menu does, however, provide<br />
options to export information to and from other file formats. The<br />
remainder of this section describes the options in the File menu<br />
for loading and saving LDW analyses.<br />
Creating a New LDW analysis<br />
The Files::New option lets you create a new LDW analysis. When<br />
you select this option, LDW first allows you to save your current<br />
analysis if you have not done so. Then LDW replaces the current<br />
8-62 Section 8 -- Using LDW 3: Reviewing Results
analysis with the skeleton analysis that you see when you start<br />
LDW. .<br />
Saving an LDW Analysis<br />
LDW provides two options for saving your analysis to an LDW<br />
file. The File::Save and File::Save As are both standard<br />
options that appear in many Windows programs. The File::Save<br />
option saves your analysis in a file with the most recently used<br />
name.<br />
If you have selected “Keep a backup copy when saving” in the<br />
Preferences::Automatic Backup Preferences option, LDW will<br />
save the previous version of the file by changing its extenson to<br />
".BAK.”<br />
The File::Save As option lets you save an LDW analysis in a file<br />
with a new name. When you select this option, LDW will show<br />
you the standard file selection dialog box in Figure 8-54.<br />
Figure 8-54. Save File dialog box.<br />
Section 8 -- Using LDW 3: Reviewing Results 8-63
Loading an LDW Analysis<br />
You can load an LDW analysis by using the File::Open<br />
option. When you select this option, you will see the standard<br />
Windows file open dialog box.<br />
If you have made changes in your previous analysis without<br />
saving them, LDW will let you save them before you open the<br />
new file. LDW saves the analysis using the last file name used, as<br />
in the File::Save option.<br />
Importing Data Into LDW<br />
The File::Import option lets you load data on a set of alternatives<br />
from another file format. You can use the Import option to import<br />
alternatives data from dBASE III Plus (.DBF) files, Microsoft Excel<br />
worksheet (.XLS) files and from comma and tab delimited files.<br />
You can use the data to create a new LDW analysis or to update<br />
and/or append to the data currently loaded into LDW.<br />
When you select the Import option, you will see the dialog box in<br />
Figure 8-55.<br />
8-64 Section 8 -- Using LDW 3: Reviewing Results
Figure 8-55. Dialog box for File::Import Option.<br />
The radio buttons at the bottom of this dialog box allow you to<br />
select from the following options:<br />
! Create -- create a new LDW analysis.<br />
! Import Structure -- scan a file and create a new LDW<br />
analysis. Import the measures identified in the file,<br />
but don't import any alternatives.<br />
! Append -- add new alternatives to the data currently<br />
loaded into LDW<br />
! Update -- modify the measure levels of the current<br />
alternatives. The update option assumes that you<br />
have already created or loaded an existing data file<br />
into the program. LDW will match the data in the<br />
input file with the alternatives and measures in the<br />
existing analysis. The previous levels of some or<br />
all of the measures will be updated based on the<br />
data in the input file.<br />
Section 8 -- Using LDW 3: Reviewing Results 8-65
! Update and Append -- both modify the levels of existing<br />
alternatives and add new alternatives to the data<br />
currently loaded into LDW.<br />
The list of file formats at the top of the dialog box lets you tell<br />
LDW the format of the data you will be importing. Just click on<br />
the proper format.<br />
The following file formats are currently available:<br />
! dBASE -- a file in the dBASE III database file format.<br />
! Excel Spreadsheet-- a file in the Microsoft Excel<br />
worksheet (.XLS) format. Currently, LDW<br />
supports the XLS 7.0 format only. LDW will ask<br />
you to select a sheet from the workbook.<br />
The worksheet must have "Number of Alternatives<br />
=" in cell A1, the number of alternatives in cell B1,<br />
“Number of Measures =” in cell A2 and the<br />
number of measures in cell B2.<br />
Column A of the sheet must have alternative<br />
names. Row 3 of the sheet must have the measure<br />
names. Each cell in the matrix must be filled with<br />
a label, or a number. Formulas are not allowed.<br />
! Comma Delimited -- a file in a standard comma<br />
delimited format. The file must be a standard DOS<br />
text file in a format similar to that shown in Figure<br />
8-56. The first line has the word<br />
"ALTERNATIVES". The second line indicates the<br />
type of levels for each measure. each column has<br />
one of three possibilities:<br />
NAME - the column with the alternative names.<br />
NUMBER - the measure will have numeric levels.<br />
LABEL - the measure will have text labels as levels.<br />
The third line has the measure names. The first<br />
name must be "NAME". This shows that the first<br />
string in each following line will be the name of the<br />
alternative. The following strings are the names of<br />
8-66 Section 8 -- Using LDW 3: Reviewing Results
the other measures. The measure names must all<br />
be on one line, enclosed in quotes and separated by<br />
commas. Each line after the measure names line<br />
contains the data for a single alternative. First is<br />
the name of the alternative, enclosed in quotes,<br />
then come the measure levels for the alternative.<br />
The measure levels must correspond to the<br />
measure names defined in the second line of the<br />
file.<br />
"ALTERNATIVES"<br />
"NAME","NUMBER","NUMBER","LABEL","NUMBER","LABEL","NUMBER"<br />
"NAME","Price","Power","King Cab","Miles Per Gallon","Luxury","Reliability"<br />
"Jeep Comanche",9728,177,"No",17,"Medium",0.75<br />
"Chevy S-10",10073,160,"Yes",16,"Low",0<br />
"Mazda",9865,109,"Yes",20,"Low",0.75<br />
"Toyota",9561,120,"Yes",20,"Medium",1<br />
"Ford Ranger",11147,140,"Yes",18,"Medium",0.5<br />
"Mitsubishi",8480,109,"Yes",21,"Medium",0.8<br />
Figure 8-56. Example comma-delimited data input file.<br />
! Tab Delimited -- a file in a standard tab delimited<br />
format. The file must be a standard DOS text file in<br />
a format similar to that shown in Figure 8-57.<br />
The first line has the word ALTERNATIVES, with<br />
no quotes.<br />
The second line indicates the type of levels for each<br />
measure as described for comma delimited files.<br />
The third line has the measure names. The first<br />
name must be NAME. This shows that the first<br />
string in each following line will be the name of the<br />
alternative. The following strings are the names of<br />
the other measures. The measure names must all<br />
be on one line, separated by single tab characters,<br />
and not enclosed in quotes.<br />
Each line after the measure names line contains the<br />
data for a single alternative. First is the name of<br />
the alternative, not enclosed in quotes, then come<br />
the measure levels for the alternative, each<br />
separated by a single tab character. The measure<br />
levels must correspond to the measure names<br />
defined in the third line of the file.<br />
Section 8 -- Using LDW 3: Reviewing Results 8-67
When you have selected the correct format and import option,<br />
click "OK."<br />
ALTERNATIVES<br />
NAME NUMBER NUMBER LABEL NUMBER LABEL NUMBER<br />
NAME Price Power King Cab MPG Luxury Reliability<br />
Jeep Comanche 9728 177 No 17 High 0.75<br />
Chevy S-10 10073 160 Yes 16 Medium 0<br />
Mazda 9865 109 Yes 20 Low 0.75<br />
Toyota 9561 120 Yes 20 Low 1<br />
Ford Ranger 11147 140 No 18 Low 0.5<br />
Mitsubishi 8480 109 Yes 21 Low 0.8<br />
Figure 8-57. Example data import file in tab-delimited format.<br />
Next LDW will show you the standard Windows "File Open"<br />
dialog box. Select the file you want to import and double click it.<br />
If you have selected a ".DBF" file LDW will ask you to identify the<br />
character field that contains the names for the alternatives. If you<br />
have selected an Excel workbook with more than one sheet, it will<br />
ask you to select the sheet with the LDW data. LDW can find the<br />
names in the other file types without help.<br />
If you selected the Create option in the dialog box, LDW will<br />
automatically create a new analysis using as much data in the<br />
import file as possible. Each column in a worksheet or tab or<br />
comma delimited file or field in a ".DBF" file, becomes a new<br />
measure. Each row in a worksheet, or tab or comma delimited<br />
file, or record in a ".DBF" file, becomes a new alternative. LDW<br />
groups all of the new measures under the "Overall" goal. LDW<br />
assumes that the measures are all increasing (more preferred to<br />
less) and assigns them nominal ranges equal to their actual ranges<br />
for the alternatives in the import file.<br />
If you selected the Import Structure option, LDW will create a<br />
new analysis using the information in the input file as a template.<br />
LDW will create a new measure for each column of the data<br />
matrix except the alternative name column.<br />
LDW will also determine if each measure uses number or text<br />
labels.<br />
Then LDW will scan through the alternative rows to identify the<br />
range of each measure found in the alternatives. For numeric<br />
measures, LDW will save the lowest and highest numbers found<br />
as the measure's range. For measures with labels, LDW will save<br />
all the different labels it finds for the alternatives in the measure's<br />
list of allowable labels. LDW will not add any alternatives to the<br />
analysis.<br />
8-68 Section 8 -- Using LDW 3: Reviewing Results
The idea of the Import Structure option is that you will use it in<br />
combination with the Append option in a two pass approach. In<br />
the first pass you would select the Import Structure option to<br />
identify the measures and their ranges. Then you would massage<br />
that information in LDW, eliminating irrelevant measures,<br />
identifying measures where lower levels are preferred, modifying<br />
measure ranges, setting cutoffs, etc. At this time, you could also<br />
organize the measures into a goals hierarchy and do preference<br />
assessments.<br />
Next you would use the Append option to load in the<br />
alternatives. You can apply the ranking and cutoffs filters<br />
available there to load in only those alternatives that are most<br />
promising and that pass all the cutoffs.<br />
If you selected the Update option, LDW will use the data in the<br />
import file to selectively update the alternatives in your analysis.<br />
After you have selected the name of the import file, LDW asks<br />
you to select the measures in your analysis it should update and<br />
the fields from the import file that it should use as the source of<br />
the updates. You do this using the dialog box in Figure 8-58.<br />
Figure 8-58. Dialog box for selecting measures to update.<br />
In this dialog box, the list on the left contains the measures in<br />
your LDW analysis and the list on the right contains the fields in<br />
the update file that LDW could use to update the measures. To<br />
select a measure for updating, click its name in the left list and<br />
Section 8 -- Using LDW 3: Reviewing Results 8-69
then click the field to use to update it. LDW will mark both the<br />
measure and the field with an asterisk. LDW marks the measure<br />
to show it will be updated, while it marks the field to show it is<br />
being used for updating.<br />
Next LDW asks you how it should update the alternatives. LDW<br />
gives you four choices:<br />
! Select matches for all records -- LDW asks you to select<br />
which alternative to update for each record of the<br />
import file, no matter whether a match exists.<br />
! Select alternative when no match found -- Alternatives<br />
with exact name matches are updated<br />
automatically. If no match is found for a record in<br />
the import file, LDW asks you to select which<br />
alternative to update from a list.<br />
! Update exact alternative name matches only --<br />
Alternatives will be only updated if a record in the<br />
import file has the same name.<br />
After you have made your choice, the update proceeds<br />
automatically.<br />
The Append option in the import dialog box is similar to the<br />
Update option, except that new alternatives are added to the<br />
current database and LDW does not modify the existing<br />
alternatives. The option proceeds similarly to the Update option.<br />
First you select the file to use for importing. Next you mark<br />
which measures LDW should update from the import file.<br />
LDW gives you a choice of creating a new alternative from each<br />
record in the import file or of creating new alternatives only for<br />
records that don't match the name of an existing alternative.<br />
LDW will read measure levels for the selected measures from the<br />
import file for each appended alternative. LDW will assign the<br />
other measures their most preferred levels as defined in their<br />
properties dialog box.<br />
Next the program tries to match the measure names and import<br />
file field names. LDW asks you to match by hand by selecting<br />
from a list if it can't find an exact match.<br />
8-70 Section 8 -- Using LDW 3: Reviewing Results
Next, LDW asks you if it should append import file records that<br />
have the same name as an existing alternative. If you answer<br />
"Yes," LDW will create a new alternative for each record in the<br />
import file. Otherwise, the program will check for alternatives<br />
with the same name as the record being loaded, and LDW will not<br />
append a new alternative if a match is found.<br />
Finally, LDW asks two questions that determine which<br />
alternatives will be kept in the LDW analysis.<br />
First LDW asks if it should apply the measure cutoffs to the<br />
alternatives. If you say "Yes," LDW will not save any alternative<br />
that fails a cutoff defined for any of the measures. In addition,<br />
when you select this option, LDW will not append an alternative<br />
with a text label that is not on the current list for a measure.<br />
Next, LDW asks the maximum number of alternatives that should<br />
be read in. If you specify a number less than the number of<br />
alternatives in the import file, say 10, LDW will rank each<br />
alternative as it reads it and will only save the top 10 ranked<br />
alternatives (it bases its ranking on the active preference set).<br />
This ability -- when combined with the Import Structure option -provides<br />
a powerful way of quickly screening large data files for<br />
the most promising alternatives.<br />
The Update and Append option in the import dialog box is a<br />
combination of the Update and Append options. It lets you<br />
simultaneously update existing alternatives and append new<br />
records to an existing database using an import file.<br />
The option again proceeds similarly to the Update option. First<br />
you select a file for importing. Next you mark which measures<br />
LDW should update from the import file.<br />
LDW will read measure levels for the marked measures from the<br />
import file for each appended or updated alternative. LDW will<br />
assign the unmarked measures their most preferred levels for<br />
each appended alternative, but will not change their levels for<br />
updated alternatives.<br />
LDW will then ask whether it should screen to make sure the<br />
alternatives pass all cutoffs and the maximum number if<br />
alternatives it should save, as is done in the Append option.<br />
Section 8 -- Using LDW 3: Reviewing Results 8-71
The option then proceeds automatically. If an exact match is<br />
found between an alternative and an import file record, LDW<br />
updates the alternative. If no match is found, LDW appends a<br />
new alternative.<br />
Exporting Data From LDW<br />
The File::Export option lets you save data for the current<br />
alternatives to another file format. You can use the Export option<br />
to export alternatives data to Microsoft Excel worksheet files, to<br />
dBASE III Plus (.DBF) files, and to comma and tab delimited files.<br />
The exported data can be either the measure levels or the utilities<br />
for each measure and goal (for the active preference set) for each<br />
alternative. Note that LDW will export any probabilistic levels as<br />
their certainty equivalents. LDW will also export measure<br />
categories automatically.<br />
You can also export a working version of the utility functions in<br />
the active preference set to Excel.<br />
When you select the Export option, LDW shows you the dialog<br />
box in Figure 8-57.<br />
Figure 8-59. Dialog box for File::Export option.<br />
In this dialog box, the list at the top contains the export formats<br />
available. These are currently the same types described for the<br />
File::Import option above. The radio buttons at the bottom of the<br />
dialog box let you select either measure levels, utilities or the<br />
8-72 Section 8 -- Using LDW 3: Reviewing Results
Other Options<br />
utility function for export. You can only export the utility<br />
function to Excel.<br />
Next LDW shows you the standard Windows "Save As" dialog<br />
box to enter the name of the export file to be created. The default<br />
name is based on the current LDW file with an extension<br />
appropriate to the file type being created. If you enter the name<br />
of an existing file, LDW asks you to confirm that it should<br />
overwrite the file. After you have entered the name, LDW creates<br />
the export file automatically.<br />
The files created for the various formats match the requirements<br />
in the File::Import option, so you can modify files you have<br />
exported for later import into LDW.<br />
Exporting a Utility Function. The third export option is to export<br />
a utility function. This option lets you export a complete working<br />
utility function to an Excel spreadsheet. The utility function<br />
exported is the MUF from the active preference set, including all<br />
of the single measure utility functions for the measures and the<br />
multi-measure utility functions for the goals.<br />
LDW also exports a sample alternative for you to rank in the Excel<br />
spreadsheet.<br />
Several other options are available in LDW:<br />
! Exit the Program<br />
! Arrange for automatic file backups<br />
! Display the LDW "About Box"<br />
! Arrange the Program's Child Windows<br />
! Help<br />
Exiting the program. To exit the LDW program, select the<br />
File::Exit option.<br />
Automatic file backups. The Preferences::Automatic Backup<br />
Preferences option lets you arrange for timed backups and also to<br />
save the previous version of your analysis when you do a<br />
File::Save. When you select the option, LDW displays the dialog<br />
box shown in<br />
Section 8 -- Using LDW 3: Reviewing Results 8-73
Figure 8-60. Preferences::Automatic Backup Preferences option dialog box<br />
There are two options. You can keep a backup copy of the<br />
previous file when saving your analysis. The backup has the<br />
same name as the original file with the extension .BAK.<br />
You can also automatically backup your analysis after a specified<br />
number of minutes has passed. The backup files are saved with<br />
the current file name and the extension .LDS.<br />
Displaying the <strong>Logical</strong> <strong>Decisions</strong> About Box. To display the<br />
LDW about box, select the Help::About... option.<br />
Arranging Child Windows. Several options in the Window<br />
menu let you arrange the child windows you have created.<br />
The Window::Tile option lets you arrange the current child<br />
windows in a tiled pattern within the LDW main window.<br />
The Window::Cascade option lets you arrange the current child<br />
windows in a cascaded pattern within the LDW main window.<br />
The Window::Arrange Icons option lets you neatly arrange the<br />
icons for any minimized child windows within the LDW main<br />
window.<br />
The Window::Close All option closes all of the current child<br />
windows when selected.<br />
8-74 Section 8 -- Using LDW 3: Reviewing Results
In addition, the Window menu contains a list of all of the current<br />
child windows. You can click on a window in this list to make it<br />
the active window. LDW marks the active window with a check<br />
in the list.<br />
Getting Help. You can get to the LDW help system through the<br />
options in the Help menu:<br />
The Help Index option causes LDW to display the index for its<br />
help system. You can also select this option by pressing the F1<br />
key.<br />
The Using Help option lets you view standard windows help<br />
screens on how to use the help system.<br />
Section 8 -- Using LDW 3: Reviewing Results 8-75
S E C T I O N<br />
In Depth<br />
9
In Depth<br />
Introduction<br />
This section is a more detailed discussion of how you can use<br />
multi-objective decision analysis (MODA) to evaluate difficult<br />
real-life decisions. First, we will summarize the steps in the<br />
decision analysis approach. We then discuss each step in detail<br />
along with how to use <strong>Logical</strong> <strong>Decisions</strong> (LDW) to carry out the<br />
steps.<br />
LDW provides a sophisticated method for comparing and ranking<br />
alternatives. It lets you use the powerful tools of decision<br />
analysis to evaluate complicated alternatives involving<br />
uncertainties and seemingly incomparable characteristics. The<br />
more familiar you become with the principles of decision analysis<br />
and their use in LDW, the more insights you can gain into your<br />
decisions by using the software.<br />
Decision analysis was developed in the 1960s and 1970s at<br />
Stanford, MIT and other major universities (see Bibliography). It<br />
is generally considered a branch of the engineering discipline of<br />
Operations Research, but also has links to economics,<br />
mathematics and psychology. LDW makes it easy to use decision<br />
analysis for comparing alternatives.<br />
The essence of decision analysis is to break complicated decisions<br />
down into small pieces that you can deal with individually and<br />
then recombine logically.<br />
A key goal of decision analysis is to make a clear distinction<br />
between the choices that you can make (the alternatives), the<br />
characteristics of the alternatives (quantified by the measures)<br />
and the relative desirability of different sets of characteristics<br />
(preferences). These distinctions let you clearly separate the<br />
objective and subjective parts of your decision.<br />
The alternatives and the way they are described using the<br />
measures are relatively objective. Even if there are uncertainties<br />
in the levels of the measures, it is usually possible to come to an<br />
agreement about how to characterize them.<br />
Section 9 -- In Depth 9-1
On the other hand, the weights of the different measures, the<br />
interactions between them, and your attitudes towards risk are<br />
inherently subjective. Reasonable people can have disagreements<br />
on these subjects.<br />
You can't generally eliminate these subjective parts of a decision.<br />
LDW provides methods for logically dealing with both the<br />
objective and subjective parts of a decision while keeping them<br />
well separated.<br />
The types of decisions that you can address using LDW might<br />
best be described as “Choices.” A choice has the following<br />
characteristics:<br />
! You will select among a finite set of alternatives.<br />
! All of the choices are “feasible,” meaning that you could<br />
actually choose each one if you wanted.<br />
! No evaluation measures have levels that are<br />
unacceptable.<br />
! You need to consider at least two evaluation criteria<br />
simultaneously.<br />
! You will choose an entire alternative at a single time.<br />
That is, you won’t choose part of an alternative<br />
now and the rest of it later.<br />
Many decisions don’t meet one or more of these caveats, meaning<br />
that LDW may not be the best tool to analyze them.<br />
For example, optimization problems such as the best mix of<br />
products to produce at an oil refinery have a practically infinite<br />
number of possible product mixes (alternatives). These types of<br />
problems are often addressed by tools such as linear<br />
programming.<br />
Another example is multi-stage decisions, such as a new product<br />
introduction. In these problems you might want to make a<br />
preliminary decision to do test marketing and then decide later<br />
about a full product rollout based on the test results. These types<br />
of problems are often analyzed with tools such as decision trees<br />
and influence diagrams.<br />
9-2 Section 9 -- In Depth
A third example is a portfolio decision, where you will be<br />
selecting a set of alternatives subject to budgetary and other<br />
constraints. You can analyze these types of problems with LDW<br />
in conjunction with <strong>Logical</strong> <strong>Decisions</strong>® Portfolio.<br />
The decision analysis method for choices can be described by the<br />
following steps:<br />
1) Identify the alternatives to be ranked.<br />
2) Clarify the goals and objectives that should be met by<br />
choosing the top-ranking alternative.<br />
3) Identify measures to quantify how well the alternatives<br />
meet the goals and objectives.<br />
4) Quantify the level for each measure for each alternative.<br />
5) Quantify preferences about different levels of the<br />
measures.<br />
6) Rank the alternatives by combining information from<br />
steps (4) and (5).<br />
7) Do "sensitivity analysis" to see the effects on the results<br />
of changes in measure levels or preferences.<br />
LDW makes it easy to follow these steps and automates the<br />
tedious portions of the method. The following sections describe<br />
how to do each of the above steps using LDW. For more<br />
information about the details of using LDW, see sections 6<br />
through 8, Using LDW; sections 4 and 5, Tutorials; and section 11,<br />
Commands Reference. If you have not yet worked through the<br />
Tutorial, doing so after you read this section will be helpful.<br />
Identifying and Describing Alternatives<br />
Alternatives are the choices you are ranking in order to come to a<br />
decision. They can be any set of objects or courses of action you<br />
must choose between. They can be cars or trucks to buy, colleges<br />
to attend, employees to hire, or lifestyles to lead.<br />
Section 9 -- In Depth 9-3
Identifying Alternatives<br />
Alternatives are often clearly defined, such as when you have to<br />
choose between three different universities. In other cases it may<br />
be very difficult for you to identify the alternatives.<br />
If there are many possible alternatives -- such as makes and<br />
models of cars (not to mention options and colors) or houses to<br />
buy -- you may need to do a preliminary screening to identify a<br />
manageable set of alternatives to rank.<br />
In other cases you may need to be very creative to describe<br />
alternatives in sufficient detail to allow comparisons. For<br />
example, how would you describe a "live off the land" lifestyle in<br />
enough detail to let you compare it to "become a stockbroker" on<br />
an evaluation measure called "amount of leisure time"?<br />
Composite Alternatives<br />
A more subtle problem in defining alternatives occurs when<br />
alternatives are really groups of objects that could be chosen.<br />
For example, suppose you manage the R&D section of a large<br />
company and you have some research projects you could fund. If<br />
the projects don't interact too much (if selecting one project<br />
doesn't affect the desirability of the other projects), you could<br />
make each project an alternative. Then you could rank them<br />
using LDW and select the top ranking projects. If the projects do<br />
interact, it might better to make your alternatives groups of<br />
projects and rank the groups.<br />
Typically, there will be a lot more possible groups of projects than<br />
there are individual projects, and you will need to be careful<br />
when defining and evaluating ranking measures.<br />
LDW cannot directly process composite alternatives (by, for<br />
example, ranking all possible sets of research projects given data<br />
on each individual project). You must define each composite<br />
alternative separately. <strong>Logical</strong> <strong>Decisions</strong>® Portfolio is a tool that<br />
can help you analyze composite alternatives.<br />
Describing Alternatives<br />
In the decision analysis method, you quantitatively describe your<br />
alternatives in terms of variables called evaluation measures.<br />
9-4 Section 9 -- In Depth
Each alternative has a raw score (called a level) on each measure.<br />
The levels for the measures completely describe an alternative for<br />
the purposes of ranking. Thus, it is very important for you to<br />
carefully think about how you define the evaluation measures. If<br />
you use inappropriate or poorly thought-out measures your<br />
ranking results may be non-intuitive and hard to justify.<br />
Measures are discussed further on page 9-8.<br />
LDW relies on you to gather the measure levels for the<br />
alternatives. You should try to be consistent in how you evaluate<br />
the different alternatives, so that the same level on a measure<br />
always means the same thing. Careful definitions of your<br />
measure scales can help.<br />
If you gather data about your alternatives from different sources,<br />
you should try to make sure the sources all compute the measure<br />
in the same way. For example, if you're pricing washing<br />
machines from different stores, make sure the prices you're<br />
quoted are really comparable. Do they include sales taxes and<br />
delivery charges? Have the costs of the options you want been<br />
included? Your results will be incorrect if the prices are based on<br />
different assumptions.<br />
The "Analytic Hierarchy Process" provides a method of<br />
evaluating your alternatives without defining their measure levels<br />
at all. In this approach, you directly compare the alternatives’<br />
performance as part of the preference assessment process. No<br />
scale or units are explicitly defined for the measure. This means<br />
that when you are using the AHP approach for a measure, you do<br />
not need to define any levels for your alternatives on that<br />
measure. In fact, LDW will ignore any levels you have defined<br />
for the alternatives.<br />
Because the AHP method does not make use of explicit measure<br />
levels, it makes it hard to distinguish between the objective<br />
measure levels and the more subjective conversion to common<br />
units. In addition, you lose traceability between the level for an<br />
alternative on the measure and the utility (common units)<br />
assigned the alternative on the measure. For these reasons we<br />
recommend that you use the AHP approach infrequently. We feel<br />
you should only use it for measures that are very subjective and<br />
for which you cannot think of a reasonable quantitative or<br />
qualitative scale. The "Analytic Hierarchy Process" method is<br />
discussed on page 7-15.<br />
Section 9 -- In Depth 9-5
Identifying and Defining Alternatives in LDW<br />
Initially, an LDW alternative is just a name, limited to 255<br />
characters, and optionally an ID number or a comment. The real<br />
definition of an alternative is its levels on the evaluation<br />
measures.<br />
You define the levels in LDW's Matrix View. LDW options let<br />
you define measure levels with probabilities or with measure<br />
categories. If you have many alternatives you my find it easiest to<br />
define them outside LDW and to use the File::Import option to<br />
load them into LDW.<br />
You can read more about how to define alternatives on page 6-14.<br />
You can read about defining levels with probabilities on page 6-21<br />
and about defining levels with measure categories on page 6-30.<br />
The File::Import option is discussed on page 8-64.<br />
Identifying Goals and Objectives<br />
Goals and objectives are the qualitative considerations that<br />
influence the desirability of the alternatives. For example, in<br />
choosing a car the highest level goal might be "choose the best<br />
car." Underneath this broad goal might be dozens of subsidiary<br />
concerns, such as "minimize the price of the car," "maximize<br />
power," "maximize fuel economy," and "maximize rear seat<br />
legroom." Some of these concerns may overlap, some may be<br />
conflicting and some may be unimportant when compared to the<br />
other concerns. LDW uses a Goals Hierarchy to help you<br />
organize the goals and objectives for an analysis.<br />
Developing a Goals Hierarchy<br />
A goals hierarchy is like an organization chart. It starts with the<br />
most general goals at the top and breaks these general goals down<br />
into more specific sub-goals. In the truck example from the<br />
Tutorial, the general goal of "choose the best truck" might be<br />
expanded into "minimize cost," "maximize quality," and<br />
"maximize features." You might break the "maximize features"<br />
objective down further into "maximize performance" and<br />
"maximize comfort."<br />
Figure 9-1 shows how the top portion of a goals hierarchy for<br />
buying a truck might look. The process of dividing general goals<br />
9-6 Section 9 -- In Depth
into more specific goals continues until the objectives are specific<br />
enough to measure.<br />
In our example, "minimize cost" might be specific enough to<br />
measure although it is near the top of the hierarchy, while we<br />
would probably have to break "maximize performance" down<br />
further before we could develop meaningful measures. Measures<br />
are discussed further on page 9-8.<br />
Figure 9-1. Example goals hierarchy.<br />
Goals and Objectives in LDW<br />
LDW uses goals to organize the measures into a hierarchy.<br />
LDW's goals correspond to those in a goals hierarchy. The lowest<br />
level goals serve to aggregate related evaluation measures, while<br />
higher level goals can aggregate both measures and other goals.<br />
There is always a highest level goal (initially called "Overall")<br />
corresponding to the highest level in the goals hierarchy. Lower<br />
level goals can be added and revised using the View::Goals<br />
Hierarchy option. The measures and other goals that belong to a<br />
goal are called its members. LDW requires that the lowest level<br />
Section 9 -- In Depth 9-7
of the hierarchy be made up of evaluation measures only. This<br />
means that at least one goal must be made up of only measures.<br />
Since goals may be "measurable" at different levels of the<br />
hierarchy, LDW lets you have both measures and goals as<br />
members of a higher level goal. In the truck example, the "choose<br />
the best truck" goal might have three members, a measure called<br />
Price, a goal called Quality and another goal called Features.<br />
Each goal in LDW has a name, which can be up to 255 characters,<br />
an optional ID number, optional comments, and a nominal utility<br />
that LDW may use in the preference assessment process described<br />
on page 9-31. Each goal also has a set of members, which can be<br />
either measures or other goals. The View::Goals Hierarchy option<br />
is described on page 6-5.<br />
Defining Measures<br />
Evaluation measures are the variables used to describe the<br />
alternatives. They quantify the lowest level goals in the goals<br />
hierarchy described on page 9-6. The measures completely<br />
describe the alternatives for ranking purposes.<br />
Measures must be quantitative or textual and specific enough to<br />
let you assign a number, text description or probability<br />
distribution for each alternative. Other than that, LDW puts few<br />
restrictions on the form a measure may take. Measures can be<br />
natural, such as the cost of a car, or constructed, such as a<br />
five-point scale that describes a car's luxuriousness. Each<br />
measure consists of units and a range from least preferred to most<br />
preferred. The units may be continuous, such as horsepower, or<br />
discrete, and there is no requirement that the ranges or units for<br />
the different measures be comparable.<br />
Measures whose desirability increases as the level increases (such<br />
as miles per gallon, where 30 MPG is preferred to 20 MPG) are<br />
called increasing. Measures where desirability decreases as the<br />
level increases (such as Cost, where $30,000 is less preferred than<br />
$20,000) are called decreasing. The most preferred level of a<br />
measure is the highest level for increasing measures and the<br />
lowest level for decreasing measures.<br />
An ideal alternative is one with the most preferred level on all of<br />
the evaluation measures.<br />
9-8 Section 9 -- In Depth
Measures in LDW<br />
You define measures in LDW with the measure properties dialog<br />
box. Each measure consists of<br />
! A name, limited to 255 characters.<br />
! An ID Number, limited to 255 characters.<br />
! Units, limited to 255 characters.<br />
! A Goal Above, defining the goal the measure is a<br />
member of.<br />
! A least preferred level, in the measure's units.<br />
! A most preferred level in the same units, and<br />
! An upper cutoff level, above which is unacceptable, also<br />
in the same units.<br />
! A lower cutoff level, below which is unacceptable, also<br />
in the same units.<br />
! Labels, optional text strings that make up a set of<br />
discrete possible choices for the measure levels.<br />
! Comments, an optional text description of the measure.<br />
You can read more about how to define measures on page 6-17.<br />
Quantifying Measure Levels<br />
To let LDW rank the alternatives, you must quantify how well<br />
each meets your goals and objectives. You do this by defining the<br />
level on each measure for each alternative. You can define<br />
measure levels in four ways in LDW -- with point estimates,<br />
labels, probabilities, and measure categories. You can also<br />
evaluate alternatives without defining measure levels by using<br />
the "Analytic Hierarchy Process" or "Direct Entry" method for<br />
computing the common units for the measure.<br />
Point estimates are single numbers that are an alternative's level<br />
on a measure.<br />
If the measure levels fall into several natural categories, you can<br />
describe the categories with brief text descriptions called labels.<br />
You should use probabilistic levels when you don't know the<br />
level of an alternative for a measure with certainty but can<br />
describe it with a probability distribution.<br />
You can use measure categories to define a measure's levels as the<br />
weighted sum of several sub-measures called categories.<br />
Section 9 -- In Depth 9-9
The default is that measure levels are point estimates.<br />
Entering Measure Levels in LDW<br />
You enter or revise measure levels in LDW's Matrix view.<br />
When you add a new measure, LDW assigns a default level on<br />
that measure to each alternative in your analysis. Similarly, when<br />
you add a new alternative LDW assigns a default level on each<br />
measure in your analysis for the alternative. The default level for<br />
a measure is its least preferred level. LDW will not automatically<br />
adjust default levels if you later change the measure's range.<br />
There are no restrictions on the numbers you can enter as levels.<br />
In particular, there is no requirement that the number be within<br />
the range you define for a measure in its properties dialog box.<br />
However, if you are using labels, you must select one of the labels<br />
defined in the measure's properties dialog box.<br />
By default, the levels you enter in the Matrix view are numerical<br />
point estimates. To use labels, select the properties dialog box for<br />
the measure and check the "Use Labels" box. Then click the<br />
"Labels" tab to define the list of acceptable labels.<br />
To enter a probabilistic level, double click the cell for the level or<br />
select the Matrix::Define Probability option. You will then see the<br />
probabilities dialog box, where you can define a probability<br />
distribution for that level. You can define the level as any of a<br />
variety of probability distributions. The choices include Normal,<br />
Uniform, and Discrete distributions. If your measure uses labels,<br />
you can define a discrete probability distribution over the possible<br />
labels.<br />
You can find out more about defining point estimate, label, and<br />
probabilistic measure levels on page 6-21.<br />
Defining Levels With Measure Categories<br />
You can use measure categories to define the levels of a measure<br />
as weighted sums or averages of several sub-measures. The<br />
measure categories are simplified measures with two differences<br />
from regular measures. First, measure categories have no defined<br />
range. Second, LDW does not convert measure categories to<br />
common units. LDW combines the values from all of a measure’s<br />
categories using a weighted sum. LDW then converts he<br />
9-10 Section 9 -- In Depth
computed measure levels to common units using the measure’s<br />
SUF.<br />
There are two situations where it makes sense to use measure<br />
categories.<br />
In the first situation, you want to define a measure as a weighted<br />
average of several similar measures. For example, the EPA<br />
publishes two different estimates of the fuel economy for cars and<br />
trucks -- city mileage and highway mileage. Instead of defining<br />
two separate fuel economy measures, you might want to define a<br />
single fuel economy measure as the weighted average of the two<br />
EPA figures. You could define the multipliers for the categories<br />
as the fraction of your total driving that occurs in the city vs. on<br />
the highway. The units for the combined measure will still be<br />
miles per gallon.<br />
You should base the most preferred and least preferred levels on<br />
the range for the alternatives on the combined measure.<br />
The second situation where measure categories are useful is when<br />
you want to define a measure as a weighted sum of several submeasures.<br />
A good example is in facility siting studies, where<br />
several different types of land use may be affected depending on<br />
where you locate the facility.<br />
The reservoir siting analysis described on page 10-12 had a<br />
measure to describe the number and type of prehistoric sites that<br />
would be affected at different locations. The prehistoric sites<br />
measure used the following five categories:<br />
! "Residential Bases with Interpretive Value"<br />
! "Residential Bases"<br />
! "Processing Sites"<br />
! "Isolated Rock Art"<br />
! "Prehistoric Isolates"<br />
Each category level for a reservoir alternative was the number of<br />
sites of the category type found at the reservoir location.<br />
The multiplier for each category was based on the relative<br />
importance of affecting sites of that type. The "Residential Bases<br />
With Interpretive Value" category was selected as a "currency"<br />
category. It was assigned a multiplier of 1.0. The multipliers for<br />
the other categories were defined as the fraction of the impact of<br />
one currency site represented by affecting one of the other<br />
Section 9 -- In Depth 9-11
categories' sites. For example, the experts in the study said that<br />
affecting ten "Processing Sites" would have about the same impact<br />
as affecting just one "Residential Base with Interpretive Value."<br />
Thus each processing site represented about one tenth the impact<br />
of one site in the "currency" category and the "Processing Sites"<br />
category was assigned a multiplier of 0.1.<br />
To compute the measure level for each alternative, the number of<br />
sites in each category was multiplied by its category multiplier<br />
and summed.<br />
The resulting measure level for each alternative could be<br />
interpreted as the "equivalent" number of sites of the "currency"<br />
category affected at each reservoir location. The units for the<br />
prehistoric sites measure were thus defined as "equivalent<br />
residential base sites with interpretive value."<br />
The measure levels for particular alternatives were non-integer<br />
numbers of residential base sites. A level of 2.5 on the prehistoric<br />
sites measure means that the mix of sites in all the different<br />
categories represents an impact halfway between two and three<br />
residential base sites alone.<br />
The advantage of combining the different types of prehistoric<br />
sites in this way is that the preferences of higher level decision<br />
makers can be assessed on a single simple but specific prehistoric<br />
sites measure -- the number of residential base sites affected. In<br />
addition, the level for each alternative reflects all of the various<br />
types of prehistoric impact for that alternative.<br />
See page 6-30 for a discussion of how to define and enter measure<br />
category levels.<br />
Quantifying Preferences<br />
The most powerful and sophisticated parts of LDW are the<br />
methods used to quantify preferences. LDW allows you to select<br />
from several different methods to make the individual measures<br />
comparable and to identify the relative importances of the<br />
measures. These two steps are done separately and are discussed<br />
separately in this section. The third preference assessment step -defining<br />
multipliers for measure categories -- was discussed in the<br />
previous section.<br />
9-12 Section 9 -- In Depth
Converting the Measures to Common Units<br />
Since LDW allows so much flexibility in defining the scales and<br />
units for the measures, you cannot directly combine the measures<br />
into an overall score. For example, there is no direct way to<br />
combine the price of a car with its horsepower. To combine the<br />
measures, we must first convert them to a common scale.<br />
The common scale used in decision analysis is called utility,<br />
which has units called utils (generally pronounced "you-tills").<br />
Utility is a measure of desirability. The idea is that more utility is<br />
preferred to less and that each util represents the same amount of<br />
"increased desirability."<br />
The default utility scale for each measure has a range from zero to<br />
one, with one being the most preferred.<br />
LDW assigns a utility of zero to alternatives having the least preferred<br />
level for a measure. LDW assigns a utility of one to alternatives having<br />
the most preferred level.<br />
Alternatives having intermediate levels for a measure have a<br />
utility between zero and one on the measure's utility scale. LDW<br />
provides five methods for computing the common units for a<br />
measure:<br />
! Single Measure Utility Functions (SUFs),<br />
! The Analytic Hierarchy Process,<br />
! Adjusted AHP,<br />
! AHP SUFs, and<br />
! Direct Entry.<br />
Two of these methods -- SUFs and AHP SUFs -- use a continuous<br />
function to convert levels on a measure's nominal scale (say<br />
horsepower) to utility. The direct entry method associates utilities<br />
directly with labels or alternatives. The other two methods are<br />
based on the "Analytic Hierarchy Process." They define the utility<br />
for the alternatives by having you directly compare their<br />
performance on a measure without defining an explicit scale for<br />
the measure.<br />
The Analytic Hierarchy Process and adjusted AHP methods don't<br />
use explicit measure levels. Thus, they don't allow the distinction<br />
that the decision analysis method usually makes between the<br />
Section 9 -- In Depth 9-13
objective measure levels and the more subjective conversion to<br />
common units. We recommend that you use the AHP approach<br />
infrequently, and only for measures that are very subjective and<br />
for which you cannot think of a reasonable quantitative scale.<br />
Each method for computing common units is discussed further<br />
below.<br />
Single Measure Utility Functions<br />
Utility functions -- or more specifically single-measure utility<br />
functions, or SUFs -- are formulas that convert the levels for a<br />
measure to utils. You develop a SUF for a measure by<br />
interviewing (assessing) the person making the decision (who we<br />
will call the decision maker).<br />
There is no right or wrong SUF for any measure. The shape of the<br />
SUF should depend on the problem and on the decision maker's<br />
personal preferences.<br />
This is where the separation of objective and subjective elements<br />
in LDW comes in. Identifying the measure levels for an<br />
alternative is a relatively objective process, while converting<br />
levels to utility is inherently subjective.<br />
Straight line SUFs. The simplest type of SUF is a linear SUF. A<br />
linear SUF assigns a utility of zero to the least preferred level of a<br />
measure and one to the most preferred level. It assigns<br />
intermediate levels utilities that delineate a straight line between<br />
the two end levels. An example of a linear SUF is shown in<br />
Figure 9-2, for a measure of Power. Straight line SUFs are the<br />
most commonly used type of SUF and they are the default used<br />
by LDW.<br />
9-14 Section 9 -- In Depth
Figure 9-2. Example of linear (straight line) SUF.<br />
Non-Linear SUFs. Straight line SUFs can't describe many<br />
common preferences. For example, suppose that in our truck<br />
example you feel that you want a powerful truck, but that after a<br />
certain level the usefulness of additional horsepower begins to<br />
drop off.<br />
Suppose there is a range of from, say, 80 to 180 horsepower in the<br />
trucks you are comparing. You might feel that an increase from<br />
80 to 90 hp was much more important than an increase from 170<br />
to 180 even though the increase is 10 hp in both cases. To capture<br />
these preferences you must make the utility change from 80 to 90<br />
HP greater than the change from 170 to 180.<br />
The idea that the increase in desirability per unit decreases with<br />
increasing levels is related to the idea from economics of<br />
decreasing marginal returns, although here we are talking about<br />
decreasing returns of utils rather than dollars. The idea is also<br />
related to the decision analysis concept of risk aversion.<br />
Assessing SUFs. The process of establishing the proper shape for<br />
the SUF for each measure is called SUF assessment. Since there is<br />
Section 9 -- In Depth 9-15
no intrinsically correct shape for a SUF, the assessment process<br />
must be subjective. There are two commonly used methods for<br />
assessing a SUF -- mid-level splitting and assessments using<br />
probabilities. These approaches have different theoretical<br />
foundations that are mostly of academic interest. If you know the<br />
differences, you will know which technique you will want to use.<br />
If not, use the technique you feel most comfortable with.<br />
SUF Assessment using Mid-Level Splitting. The mid-level<br />
splitting procedure seeks to identify the level that is exactly midway<br />
(half-way) in preference between a low level and a high level<br />
for a measure. The SUF::Assess Value option implements the<br />
mid-level splitting procedure in LDW. Remember from the<br />
discussion on page 9-15 that this mid-preference level could well<br />
be different from the average of the two ends of the range.<br />
You define the mid-preference level by asking the decision maker<br />
questions about changes in the measure. Specifically the midpreference<br />
level (call it L) is where you prefer a change from the<br />
least preferred level (call it L0) to L and a change from L to the<br />
most preferred level (call it L1) equally. In other words, you want<br />
to find the level L that divides the range from L0 to L1 into two<br />
pieces, each representing an equal change in utility.<br />
In more mathematical terms, if U(x) represents the SUF for the<br />
measure, we want to find the point where<br />
U(L) - U(L0) = U(L1) - U(L).<br />
Remember that you should always prefer L to L0 and you should<br />
always prefer L1 to L. However, you still may feel that the change<br />
from L0 to L is more significant or important than the change from<br />
L to L1. You may feel this even though the result of the second<br />
change (L1) is the most preferred level overall.<br />
Assume when asking these questions about one measure that the<br />
levels of all of the other measures remain constant. You should<br />
think of the questions of in terms of simplified hypothetical<br />
alternatives, even if the levels in the questions are similar to those<br />
for the real alternatives.<br />
If the decision maker cannot answer the questions without<br />
knowing a specific level of another measure, there may be a<br />
preferential dependence between the two measures. Modeling<br />
preference dependencies is beyond the current abilities of LDW.<br />
9-16 Section 9 -- In Depth
For an example of the mid-level splitting approach, consider the<br />
truck example used in the Tutorial. Suppose that the range of<br />
available horsepowers in the different trucks being considered is<br />
80 to 160. To establish the mid-preference point you might ask<br />
the following series of questions (illustrated in Figure 9-3):<br />
Figure 9-3. Example of SUF assessment process<br />
Q1: The range on power is from 80 hp to 160 hp.<br />
Suppose you are thinking of buying a truck with<br />
the best levels on all of the other measures,<br />
including price, but with only 80 hp. Call this truck<br />
A. Now suppose I tell you that I have found<br />
another truck that has 120 hp but still has the same<br />
levels on the other measures, including cost. Call<br />
Section 9 -- In Depth 9-17
this truck B, and call the change from truck A to<br />
truck B change 1. Suppose in addition that<br />
tomorrow I find another truck that has 160 hp and<br />
the same levels on the other measures as trucks A<br />
and B. Call this truck C. Call the change from<br />
truck B to truck C change 2.<br />
Since all the other measures are equal, you should<br />
like truck C better than truck B better than truck A.<br />
But I want you to tell me which change is more<br />
important: change 1 where horsepower improves<br />
from 80 to 120 or change 2, where horsepower<br />
improves from 120 to 160?<br />
A: Well, 120 is halfway between 80 and 160, so I<br />
suppose I should feel that the changes are equally<br />
important, but I think that 120 hp is pretty<br />
adequate for the type of driving I do and that 80<br />
hp is just barely acceptable, so even though I'd<br />
like the 160 hp truck, I think that change 1 is the<br />
most important.<br />
Q2: OK, that makes sense. Now let me change the<br />
question a little bit. Lets change the horsepower on<br />
truck B from 120 to 100 while keeping everything<br />
else the same. This means that change 1 is from 80<br />
to 100 hp and change 2 is from 100 to 160. Now<br />
which change is more important?<br />
A: With truck B at 100 hp, its not that much better<br />
than truck A, so now I think that change 2, where<br />
I can improve all the way from 100 to 160 is more<br />
important.<br />
Q3: Good. You can see that I'm trying to find a<br />
horsepower for truck B that makes it so that change<br />
1 and change 2 are equally important. Now, how<br />
would you feel if I change truck B's hp to 105?<br />
A: I still think that change 2 is more important if<br />
the midpoint is 105, but if you made it 110 I'd<br />
have a hard time choosing.<br />
The decision maker has discovered that 110 hp represents her<br />
mid-preference level in the range from 80 to 160 hp.<br />
9-18 Section 9 -- In Depth
Since U(L0) = U(80) = 0 and U(L1) = U(160) = 1 by definition, we<br />
can use the equation above to see that U(L) = U(110) = 0.5. In<br />
other words, the mid-preference level is halfway in preferences<br />
between the most and least preferred levels. Thus it should get<br />
the utility that is half way in terms of utils between 0 and 1 -- 0.5.<br />
Defining a SUF from the Mid-preference Level. Once you have<br />
established the mid-preference level, you still need to define the<br />
SUF function for the evaluation measure. There are several ways<br />
to go. The simplest method is to draw a smooth curve that passes<br />
through the three points -- (level = 80 hp, Utility = 0.0), (110, 0.5)<br />
and (160, 1.0). LDW does this by estimating the parameters for an<br />
exponential curve of the form:<br />
U(x) = a + be (-cx)<br />
where a, b and c are scaling constants and e is the mathematical<br />
constant 2.718... whose natural logarithm is 1. The particular<br />
curve that would result from the example is<br />
U(x) = 1.543 - 4.384e (-0.01305x)<br />
Since LDW computes this curve automatically, understanding the<br />
details of the mathematics is not important. A graph of the<br />
resulting curve is shown in Figure 9-4.<br />
Section 9 -- In Depth 9-19
Figure 9-4. SUF curve resulting from a mid-preference level of 110 for<br />
a range of 80 to 160 hp.<br />
If you think that the smooth curve doesn't adequately model the<br />
decision maker's preferences, you can subdivide the range for the<br />
measure into multiple parts. For example, you could split the<br />
range at 110 hp and assess new midpoints for the range from 80 to<br />
110 and for the range from 110 to 160 hp. This allows you to<br />
define multiple smooth curves for different parts of the SUF, and<br />
can result in a complicated but more true-to-life SUF curve.<br />
9-20 Section 9 -- In Depth
Figure 9-5. Summary of SUF assessment process using mid-level<br />
splitting method.<br />
Section 9 -- In Depth 9-21
Figure 9-5 summarizes the process of SUF assessment using the<br />
mid-level splitting method. In box 1, the decision maker is asked<br />
which change is more preferred, one from 80 to 110 hp or one<br />
from 110 to 180 hp.<br />
In box 2, the decision maker answers that the changes are equally<br />
preferred. This implies that 110 is the mid-preference level for the<br />
range from 80 to 180 hp.<br />
In box 3, we assign utilities to the three levels. the least preferred<br />
level of 80 hp is assigned U = 0 by definition. The most preferred<br />
level 180 is assigned U = 1, also by definition. The mid-preference<br />
level of 110 is assigned the average of the two other utilities or U =<br />
0.5.<br />
In box 4, a graph of utility vs. horsepower is shown with a smooth<br />
curve fit between the three known points. This curve defines a<br />
SUF for horsepower for the range 80 to 160 hp.<br />
Note that technically a preference function assessed using the<br />
mid-level splitting technique should be called a measurable value<br />
function rather than a utility function.<br />
Disadvantages of the Mid-level Splitting Method. The midlevel<br />
splitting method is difficult to use if your measure scale is<br />
not continuous. For example, if a measure consists of, say, five<br />
specially defined scale points, it may not be the case that one<br />
point is the mid-preference level between two others. In addition,<br />
the requirement of using changes in levels rather than the levels<br />
directly is difficult for some decision makers. If either of these<br />
problems arises it may be easier to use the probability method<br />
described below.<br />
SUF Assessment Using Probabilities. The second approach for<br />
assessing SUFs involves asking questions that involve uncertain<br />
levels of the measure for some hypothetical alternatives. The<br />
probability assessment method is implemented in LDW as the<br />
SUF::Assess Utility option.<br />
The general idea is to find an alternative with a certain (point<br />
estimate) level on a measure that is equally preferred to an<br />
alternative with well-defined probabilities of having two different<br />
levels, each of whose utilities is known.<br />
As an example, we will use the resale value of the truck after<br />
three years (as a percentage of its purchase price). We could<br />
9-22 Section 9 -- In Depth
describe two alternatives: A, which is a truck with a single known<br />
resale value and B, which is a truck with a well-defined<br />
probability of getting one of two resale values.<br />
The dialogue for assessing the mid-preference level for resale<br />
value using the probability approach might go as follows<br />
(illustrated in Figure 9-6):<br />
Figure 9-6. Example of SUF assessment using probability approach<br />
Q1: The resale value range is from 40 to 70 percent<br />
of purchase price. Suppose you were thinking of<br />
buying a truck with the best levels on all of the<br />
Section 9 -- In Depth 9-23
other measures, including cost, and with 55<br />
percent. Call this truck A. Now suppose I offer<br />
you another truck, identical to A except for resale<br />
value. Truck B has a 50% chance of having a 40<br />
percent resale value and a 50% chance of having a<br />
70 percent resale value.<br />
Which of the two choices would you prefer, the<br />
sure thing A or the uncertain alternative B?<br />
A: Well, 55 percent is halfway between 40 and 70,<br />
so I suppose I should feel that the two choices are<br />
about equal, but I think that 55 percent is a pretty<br />
adequate return and that 40 percent is just barely<br />
acceptable, so even though I'd like the 70 percent<br />
resale, I wouldn't be willing to risk the chance of<br />
getting the 40 percent resale, so I'd pick A.<br />
Q2: OK, that makes sense. Now let me change the<br />
question a little bit. Lets change the resale value on<br />
truck A from 55 to 45 percent while keeping<br />
everything else the same. Now which choice<br />
would you prefer?<br />
A: With truck A at 45 percent resale value its not<br />
that much better than truck B with 40 percent<br />
resale value, so now I think that I might be<br />
willing to gamble on getting the 70 percent resale<br />
value. I guess this means I pick B.<br />
Q3: Good. You can see that I'm trying to find a<br />
resale value for truck A that makes it so choices A<br />
and B are equally desirable. How about if I change<br />
truck A's resale value to 50 percent?<br />
A: Well, I think I'd have a hard time choosing.<br />
Defining a SUF with the Probability Question. The rules of<br />
decision analysis tell us that if alternatives A and B are equally<br />
preferred, then the utility of alternative A is equal to the expected<br />
utility of alternative B. The expected utility of B is the sum of the<br />
utilities of the resale values multiplied by their probabilities<br />
(P U(RV ) + P U(RV )).<br />
1 1 2 2<br />
The decision maker has told us that she prefers 50 percent for sure<br />
and a lottery (the decision analysis term for this type of gamble)<br />
9-24 Section 9 -- In Depth
with equal chances of 40 and 70 percent equally. This means that<br />
U(50) should equal 0.5 since that is the expected utility of the<br />
lottery. You can compute the expected value of the lottery by<br />
remembering that U(40) = 0 and U(70) = 1 and by using the<br />
formula above that says that<br />
U(lottery) = (P1U(RV 1) + P2U(RV 2))<br />
= 0.5U(40) + 0.5U(70)<br />
= 0.5(0.0) + 0.5(1.0)<br />
= 0.5.<br />
If you have a measure with non-continuous scale points, you can<br />
use a variation of the probability method.<br />
In this variation, you keep the levels of the three alternatives<br />
constant and vary the probability of getting the most preferred<br />
alternative in the lottery. You adjust the probability until the<br />
lottery and certain alternative are equally preferred. Note again<br />
that you do not have to worry about the details of the arithmetic.<br />
LDW handles all of the calculations.<br />
Since the probability method results in a mid-preference level (the<br />
level of alternative A of 60 percent is the mid-preference level),<br />
you can use the probability method interchangeably with the midlevel<br />
splitting method.<br />
Risk Premiums and Risk Aversion. Two parameters are useful in<br />
understanding the utility assessment results.<br />
The first number, the risk premium indicates how much you<br />
would pay to avoid the uncertainty in the lottery. It is the<br />
difference in the expected value of the lottery B and the certain<br />
level L.<br />
If the risk premium is positive and higher levels of the measure<br />
are preferred, then you would be willing to accept less of the<br />
measure (in terms of expected value) in order to avoid<br />
uncertainty. This type of preference is called risk-averse.<br />
The converse is when the risk premium is negative and you<br />
would have to have a higher expected value in the certain<br />
alternative before it is equally preferred to the lottery. This type<br />
of preference is called risk-seeking.<br />
Section 9 -- In Depth 9-25
The second parameter, local risk aversion (r) is a somewhat less<br />
intuitive number. It is defined as the ratio r = -u''(x)/u'(x), where<br />
u'(x) is the first derivative and u'(x) is the second derivative of the<br />
utility function. In the case of the exponential utility functions<br />
used in LDW this complicated function has a simple result. It is<br />
-cx<br />
equal to the constant c in the exponential formula u(x) = a +be .<br />
If r is positive you are locally risk-averse (for measures where<br />
higher levels are preferred). If r is negative, you are locally riskseeking.<br />
Both of these parameters are displayed when you do an<br />
assessment in LDW with the SUF::Assess Utility option.<br />
Assessing SUFs with LDW. You assess SUFs in LDW with the<br />
Assess::Common Units option. You must define SUFs over the<br />
nominal utility range (usually from zero to one, with the least<br />
preferred level of the measure assigned the utility zero and the<br />
most preferred level assigned one).<br />
Each measure starts with a straight line (linear) SUF. LDW<br />
automatically returns a measure's SUF to a straight line if you<br />
change its range. If you want to keep the default straight line<br />
SUF, you can skip the SUF assessment process entirely for that<br />
measure.<br />
During the SUF assessment process, LDW lets you use the midlevel<br />
splitting method or probability method to assess a point or<br />
the SUF or one of its sub-ranges. You do this by selecting the<br />
SUF::Assess Value or SUF::Assess Utility option. These options<br />
will only be available when they are appropriate for the selected<br />
active point. When you complete your assessment using one of<br />
these options, LDW will update the current SUF to reflect the<br />
assessed point.<br />
Other options related to SUFs let you display SUF curves (the<br />
Review::Common Units option) and formulas (the<br />
Review::Weights::SUF Formulas option), and compute the utility<br />
corresponding to a given level, or the level corresponding to a<br />
given utility (the Review::Compute Utilities option). SUF<br />
assessment is discussed further on page 7-6.<br />
Computing Common Units With The Analytic Hierarchy<br />
Process<br />
The "Analytic Hierarchy Process" defines the utilities of a set of<br />
alternatives by having you directly compare their performance on<br />
an evaluation measure. You do this comparison intuitively,<br />
without defining an explicit scale for the measure.<br />
9-26 Section 9 -- In Depth
In the original formulation of the AHP method, the same<br />
procedure is used for computing the common units (utilities) for<br />
the alternatives on the measures and for computing the relative<br />
weights of the measures or goals. In the first case comparisons<br />
are done between pairs of alternatives and in the second case<br />
comparisons are done between pairs of measures or goals.<br />
In both cases the result is a number associated with each<br />
alternative or measure that you can interpret as a utility or as a<br />
weight, respectively.<br />
The AHP numbers are normalized to sum to one. This may be<br />
useful if the measure represents some quantity or function that is<br />
being divided up between the alternatives.<br />
Note that many decision analysts would object to using the term<br />
"utility" for the numbers that result from an AHP assessment. We<br />
will call them utilities here simply to avoid having to introduce a<br />
new term.<br />
LDW lets you use the AHP method for all or just part of your<br />
analysis. You can use it to assess utilities for only one or two<br />
measures and use the SUF method described above for other<br />
measures. You could also assess measure utilities using AHP and<br />
assess the weights for the measures using another method or vise<br />
versa.<br />
Several weight assessment methods expect utilities to range from<br />
zero to one instead of being normalized to sum to one as they do<br />
in the AHP method. Therefore, LDW has an option that lets you<br />
use the AHP assessment process to obtain utilities that range from<br />
zero to one. This is called the Adjusted AHP Option in LDW's<br />
Assess::Common Units option. The other option -- where the<br />
utilities for the alternatives sum to one -- is simply called the<br />
Analytic Hierarchy Process option.<br />
You should use the Analytic Hierarchy Process option if you want<br />
to follow the traditional AHP approach and use the AHP weight<br />
assessment method. You should use the Adjusted AHP method<br />
in combination with any other weight assessment method.<br />
When you assess utilities with the AHP approach, you will be<br />
making direct comparisons between the performances of two<br />
alternatives. To help you do this, LDW displays a matrix whose<br />
rows and columns both represent alternatives. That is, the matrix<br />
has one row and one column for each alternative in your analysis.<br />
Section 9 -- In Depth 9-27
Each cell in the matrix represents the ratio of the row alternative's<br />
performance on the measure to the column alternative's<br />
performance.<br />
You complete the AHP assessment process by entering<br />
performance ratios into the proper cells. You will be done when<br />
each cell has the correct performance ratio.<br />
Your task is not quite as bad as it seems. Since the cells on the<br />
diagonal of the matrix compare the performance of each<br />
alternative to itself, the performance ratios in those cells must all<br />
be one.<br />
You don't have to enter these obvious ratios. LDW uses the<br />
diagonal cells to show the computed utilities for the alternatives<br />
instead of the forced 1.0 ratios.<br />
In addition, the ratio of a row to a column alternative must be the<br />
inverse of the ratio of the column alternative to the row<br />
alternative. For example, suppose alternative A is in row and<br />
column 1 of the matrix and alternative B is in row and column 2.<br />
If A's performance on the measure is twice as good as B's then the<br />
cell for row 1 and column 2 should have the ratio 2.0. Similarly,<br />
the cell for row 2 and column 1 should have the ratio 0.5, since it<br />
is the ratio of B's performance to A's.<br />
These ratios are inextricably linked, so when you enter the ratio<br />
for one cell, LDW automatically enters its inverse in the<br />
corresponding cell on the other side of the matrix.<br />
This means you only have to enter as many ratios as there are<br />
cells above the diagonal row in the matrix to complete your<br />
assessment.<br />
Each time you enter a ratio, LDW marks the cell in blue and<br />
updates the level in the corresponding cell on the other side of the<br />
diagonal. LDW also marks this cell in blue. You will have<br />
completed your assessment when all the cells in the matrix are<br />
marked in blue.<br />
The developers of the AHP method have provided some cues to<br />
help you set the performance ratios. They have defined the<br />
following five terms along with a corresponding performance<br />
ratio:<br />
Ratio Term Explanation<br />
9-28 Section 9 -- In Depth
1 Equal Importance Two activities contribute<br />
equally to the objective.<br />
3 Moderate Importance Experience and judgment<br />
slightly favor one<br />
activity over another.<br />
5 Essential or Strong Experience and judgment<br />
Importance strongly favor one activity<br />
over another.<br />
7 Demonstrated Importance An activity is strongly<br />
favored and its dominance is<br />
demonstrated in practice.<br />
9 Extreme Importance The evidence favoring one<br />
activity over another is of the<br />
highest possible order of<br />
affirmation.<br />
In the traditional AHP approach, you can only enter one of these<br />
ratios or one of the intermediate ratios 2,4,6, or 8. LDW does not<br />
impose these restrictions. You can enter any ratio you want.<br />
However, if you use the AHP dialog box to select a ratio, you are<br />
restricted to one of these nine ratios.<br />
To compute the utilities for the alternatives from the ratios, the<br />
AHP method uses computations based on linear algebra. This<br />
method results in consistent utilities if you have entered<br />
completely consistent ratios and results in "best fit" utilities if your<br />
ratios are not completely consistent.<br />
The utility for each alternative is generally very close to the<br />
geometric mean of the ratios in its matrix row. The geometric<br />
mean is the nth root of the product of the ratios, where n is the<br />
number of alternatives. The utilities are computed for each row<br />
and the means are then normalized to sum to one.<br />
Instead of waiting till you have entered all the needed ratios,<br />
LDW computes the utilities for the alternatives each time you<br />
enter a new ratio. (You can turn off this computation by<br />
unchecking the AHP::Estimate Ratios option.) LDW uses all the<br />
ratios you have entered so far as the basis for its estimates.<br />
LDW uses a simple iterative procedure to estimate the ratios you<br />
haven't entered yet based on those you have. Thus, there is<br />
Section 9 -- In Depth 9-29
always a complete set of utilities available. If you don't want to<br />
enter all the ratios required by the AHP process (and sometimes<br />
quite a lot of ratios are required), you can stop any time the<br />
computed utilities seem reasonable.<br />
Estimates of Consistency in AHP<br />
The AHP process asks you to enter more performance ratios than<br />
are strictly necessary to compute a set of utilities for the<br />
alternatives. Because of this, your performance ratios are likely to<br />
be inconsistent.<br />
To provide guidance on how consistent you are, the developers of<br />
the AHP method suggest using a statistic called the "consistency<br />
ratio (CR)." The CI compares your matrix to a random matrix of<br />
the same size. The higher the CR, the more inconsistent you are.<br />
The developers of AHP suggest that if the CR for your matrix is<br />
greater than 0.1 you should adjust your ratios to make them more<br />
consistent.<br />
Two intermediate statistics are used to compute the CR. The first,<br />
called "ë max" is the principal eigenvalue of your AHP matrix. ë<br />
max is the matrix product of your AHP matrix and the vector of<br />
the (unadjusted) utilities for the alternatives. (Don't worry if this<br />
is unclear. You won't be tested on it.) The second intermediate<br />
statistic is called the "consistency index (CI)." The CI is an<br />
absolute measure of consistency. Its computed from ë max as<br />
CI = (ë max - n)/(n - 1),<br />
where n is the number of alternatives. The consistency ratio CR is<br />
computed by dividing the CI for your matrix by the CI for a<br />
"random" matrix of the same size.<br />
The discussion on page 7-15 tells you how to assess common units<br />
with the Analytic Hierarchy Process in LDW.<br />
Computing Common Units With AHP SUFs<br />
LDW lets you combine the AHP and SUF methods for computing<br />
common units in a method called AHP SUFs. In this method, you<br />
will still define a scale and range for your measure and levels for<br />
your alternatives on the measure. However, instead of using the<br />
normal SUF assessment process, you will use an AHP matrix to<br />
define a SUF for the measure.<br />
9-30 Section 9 -- In Depth
You begin the process by selecting a subset of your alternatives to<br />
use in the AHP matrix. These alternatives must have levels<br />
within the range for the measure defined in its measure dialog<br />
box.<br />
After you select your alternatives, you continue with the AHP<br />
assessment process as described above. When you are done, each<br />
alternative will have an associated utility as computed from the<br />
AHP matrix.<br />
Since the alternatives also have levels, we can compare the levels<br />
and utilities and use them to define a SUF. This is done in one of<br />
two ways depending on the alternatives you selected.<br />
If you selected alternatives that cover only part of the measure's<br />
range, LDW uses the unadjusted AHP utilities to define the utility<br />
for each alternative's level. LDW assigns the measure's least<br />
preferred level a utility of zero and its most preferred level a<br />
utility of one. These endpoints are connected to the utilities<br />
computed using AHP matrix with straight lines.<br />
If you selected alternatives that cover the measure's entire range,<br />
a slightly different process is used. The AHP utilities are first<br />
adjusted to range from zero to one (as in the Adjusted AHP<br />
Measure Levels method) and are then associated with the<br />
measure levels. The utilities are then connected with straight<br />
lines to form a complete SUF.<br />
Establishing the Importance of Each Measure<br />
After you have made the measures comparable by converting<br />
them to common units, the next step is to define how to combine<br />
the utilities for individual measures into utilities for the goals.<br />
LDW also quantifies an alternative's performance on a goal in<br />
units of utility.<br />
A goal's utility is computed using a function that combines the<br />
utilities of a goal's active members into a utility for the goal. The<br />
formula used to combine the utilities is a Multiple-measure<br />
Utility Function or MUF (pronounced "muff"). Higher level goals<br />
can have a MUF that combines utilities for not only measures but<br />
also utilities for lower level goals computed using their own<br />
MUFs.<br />
Section 9 -- In Depth 9-31
The utility of an alternative on the "Overall" goal is its overall<br />
utility. The alternative with the highest overall utility is the most<br />
preferred.<br />
Deciding which Goals Should Have a MUF<br />
LDW includes each measure in your analysis in the MUF for<br />
exactly one goal. In addition, LDW includes goals that have their<br />
own MUF in the MUF for exactly one higher level goal. LDW<br />
does not explicitly include goals that do not have their own MUF<br />
in any other MUF.<br />
LDW lets you decide which goals should have their own MUF. A<br />
goal that has its own MUF will combine the utilities for the<br />
measures and goals directly below it in the goals hierarchy into a<br />
utility for the goal.<br />
The exception is that the MUF for a goal will not include the<br />
utility for a goal directly below it that does not have its own MUF.<br />
Call the goal having the MUF the MUF-Goal and the goal below it<br />
without a MUF the NONMUF-Goal. LDW includes the utilities<br />
for each of the NONMUF-Goal's members in the MUF-Goal's<br />
MUF.<br />
If you request a ranking of the alternatives on the NONMUF-Goal<br />
LDW will compute a temporary MUF for it. The MUF will<br />
combine the utilities of the goal's members based on their weights<br />
in the MUF-Goal MUF. The only goal required to have its own<br />
MUF is the "Overall" goal.<br />
Figure 9-7 shows how you might combine the members and goals<br />
in a goals hierarchy into MUFs.<br />
9-32 Section 9 -- In Depth
Figure 9-7. Effects of goals with and without their own MUFs.<br />
In Figure 9-7, the "Overall" and "Performance" goals have their<br />
own MUFs while the "Features" goal does not. In this situation,<br />
the MUF for the "Performance" goal will combine the utilities of<br />
the "Power" and "Fuel Economy" measures. The MUF for the<br />
"Overall" goal will combine the utilities for the "Price" measure,<br />
the "Quality" measure ,and the "Performance" goal.<br />
The "Features" goal will not have its own MUF. If you request a<br />
ranking on the "Features" goal, LDW will compute a temporary<br />
MUF that combines the utilities for the "Quality" measure and the<br />
"Performance" goal.<br />
You can view which goals have MUFs in the LDW Goals<br />
Hierarchy view by selecting the Hierarchy::Show Assessment<br />
Status option.<br />
There are two general strategies for deciding which goals should<br />
have a MUF. The first strategy is to only have a MUF for the<br />
"Overall" goal and not for any of the sub-goals. Then, LDW will<br />
combine all of the measures in your analysis in a single overall<br />
MUF. The preference assessments will only involve measures<br />
and LDW will compute the utilities for sub-goals using temporary<br />
MUFs. This strategy is the default.<br />
The other strategy is to have a MUF for all of the goals in your<br />
analysis. This lets you do your preference assessments for only<br />
the members directly underneath each goal.<br />
Section 9 -- In Depth 9-33
Different preference assessment methods have different traditions<br />
for deciding which goals should have a MUF. The Smart and<br />
Smarter methods often use a single overall MUF. The AHP<br />
approach generally has a MUF for each goal. The tradeoff and<br />
pairwise weight ratio methods can use either approach.<br />
Interactions apply to all the members of a MUF. If you want to<br />
have only a few particular members interact, you must include<br />
them in their own MUF. You should include members that<br />
interact under their own goal and make sure that that goal has its<br />
own MUF.<br />
In the discussions below we will call the members of a goal's MUF<br />
the "active members" for the goal.<br />
Representatives for Goals With a MUF. LDW will include goals<br />
that have their own MUF in the MUF for a higher level goal.<br />
Often it is difficult to answer preference assessment questions<br />
involving a goal because it is hard to interpret the meaning of<br />
different levels of utility for a goal. It may also be hard to<br />
remember the measures and sub-goals that are its active members<br />
and their importances.<br />
Therefore LDW allows you to select a representative for the goal<br />
in several weight assessment methods. The representative can be<br />
any measure below the goal in the goals hierarchy. It can also be<br />
any sub-goal with its own MUF below the goal in the goals<br />
hierarchy.<br />
The representative replaces the goal in the preference assessment<br />
questions for the MUF the goal is a member of. LDW computes<br />
the goal's weight based on the representative's weight in the MUF<br />
for the goal and the representative's weight in the MUF the goal is<br />
a member of.<br />
Here is a simple example. In the tutorial example, a<br />
"Performance" goal includes "Power" and "Fuel Economy"<br />
measures. The "Performance" goal and a "Price" measure make<br />
up the "Overall" goal (we'll assume that the "Styling" measure has<br />
been deleted).<br />
Suppose "Power" and "Fuel Economy" are assessed equal weights<br />
of 0.5 in the "Performance" goal's MUF. Now suppose that<br />
"Power" is selected as the representative for the "Performance"<br />
goal in the "Overall" goal's preference assessment. Suppose the<br />
"Power" and "Price" measures are also assessed equal weights of<br />
9-34 Section 9 -- In Depth
0.5. Then the weight assigned to "Performance" will be 0.5<br />
divided by the weight for "Power" in its MUF, which is also 0.5.<br />
This means that in the "Overall" goal's MUF, "Price" will have a<br />
weight of 0.5 and "Performance" will have a weight of 1.0. After<br />
LDW has adjusted these weights to sum to one, "Price" will have a<br />
weight of 0.33 and "Performance" will have a weight of 0.67.<br />
Note that LDW does not include the representative in the MUF<br />
instead of the goal it represents. The representative is just a tool<br />
that helps you define the weight that LDW should assign to the<br />
goal in the MUF it is a member of.<br />
For LDW to compute a goal's utility when only its representative's<br />
level has been defined, it must make an assumption about the<br />
utilities of the goal's other members. Therefore, when you define<br />
a goal LDW asks you to specify a nominal utility. LDW<br />
temporarily assigns this nominal utility to all of the goal's<br />
members, except its representative, when doing tradeoffs.<br />
This allows LDW to estimate the goal's utility as follows:<br />
U g(X r = x) = krU r(x) + k1U nom + ... + knUnom where<br />
= krU r(x) + (1 - k r)Unom U g(X r = x) = goal g's utility when its<br />
representative r has level x and the<br />
other members have the nominal<br />
utility,<br />
k r<br />
= the small k for the representative<br />
measure,<br />
U r(x)<br />
= the utility of level x for the<br />
representative measure,<br />
U nom<br />
= the nominal utility assigned to<br />
other members of the goal.<br />
LDW applies this formula recursively if the goal's representative<br />
is a member of a goal below it in the hierarchy. The formula is<br />
Section 9 -- In Depth 9-35
similar but more complicated if the goal has a multiplicative MUF<br />
formula.<br />
You can use representatives in all the weight assessment methods<br />
except the smarter method and the direct entry method. The<br />
AHP method has a tradition of not using representatives, while<br />
representatives are often used in the tradeoff and pairwise weight<br />
ratios methods.<br />
Formulas for MUFs<br />
The simplest MUFs compute an alternative's utility for a goal<br />
using a weighted average. These are called additive MUFs, since<br />
the weighted utilities for each active member are added to obtain<br />
the goal utility. LDW allows you to define more complicated<br />
MUF formulas that allow interactions if necessary. MUFs with<br />
interactions will be discussed on page 9-55.<br />
Approaches for Assessing MUFs<br />
To define an additive MUF, you must define a scaling constant (or<br />
weight) for each measure. Four general approaches have been<br />
developed for doing this.<br />
The first approach is to have the decision maker directly provide<br />
the scaling constants.<br />
The second approach is to have the decision maker order the<br />
active members from most to least important.<br />
The third approach is to have the decision maker provide<br />
"importance ratios" that imply the ratios of the weights for two or<br />
more active members.<br />
The fourth approach is to compute the scaling constants using<br />
pairs of simplified alternatives that the decision maker prefers<br />
equally. Because the decision maker prefers the alternatives<br />
equally, they should have equal overall utilities. If you define<br />
enough pairs, LDW can identify a unique set of weights -- the<br />
weights that result in all the pairs having equal overall utilities.<br />
LDW provides five different assessment methods that let you<br />
carry out these approaches:<br />
! You can directly enter the scaling constants,<br />
9-36 Section 9 -- In Depth
! You can use the "Smarter Method" to have LDW<br />
compute weights based on your ordering of the<br />
importances of the active members,<br />
! You can use the "Smart Method" to have LDW compute<br />
the weights on "swing weights,"<br />
! You can define "Tradeoffs" between pairs of active<br />
members that LDW helps you select,<br />
! You can define the "Weight Ratios" between pairs of<br />
active members, or<br />
! You can use the "Analytic Hierarchy Process."<br />
The smarter method uses the importance ordering approach. The<br />
smart, weight ratios and analytic hierarchy process methods use<br />
the importance ratios approach. The tradeoff method uses the<br />
comparisons of alternatives approach.<br />
The direct entry method, of course, carries out the direct entry<br />
approach. However, you can also interpret the directly entered<br />
scaling constants as probabilities that partially define pairs of<br />
equally preferred alternatives. This interpretation is discussed<br />
further below.<br />
The importance ordering, importance ratios and alternative<br />
comparisons approaches are all discussed in more detail below.<br />
Assessing Weights Using Importance Orderings<br />
The "Smarter" method lets you define the weights for the active<br />
members using a simple ordering of their relative importances.<br />
The method is very easy for decision makers to use and results in<br />
a fairly robust set of weights. The Smarter method is often a good<br />
starting point before using a more sophisticated method.<br />
When using the smarter method, you can encourage the decision<br />
maker to think about the member's ranges by providing the<br />
following scenario:<br />
Suppose you had an alternative that had the least<br />
preferred level on all of the active members. And further<br />
suppose that you could improve just one active measure<br />
from its least preferred to its most preferred level. Which<br />
active member would you choose to improve.<br />
Section 9 -- In Depth 9-37
The first member to be improved is given an importance ordering<br />
of one. Then you repeat the question with the caveat that the<br />
decision maker must choose a member other than the first one.<br />
You can continue in this way until the decision maker has ordered<br />
all of the active members.<br />
LDW computes weights from the ordering using an average of<br />
the extremes of the possible weights. The following example with<br />
two members illustrates the approach:<br />
Suppose the "Performance" goal has two members --<br />
"Power" and "Fuel Economy," and suppose that the<br />
decision maker orders "Power" first and "Fuel Economy"<br />
second.<br />
If we put as much weight as possible on "Power," it will<br />
have a weight of 1.0 and "Fuel Economy" will have a<br />
weight of 0.0. If we put as much weight as possible on<br />
"Fuel Economy," it will have a weight of 0.5. "Power" will<br />
also have a weight of 0.5, since its weight must be greater<br />
than or equal to Fuel Economy's if Power is more<br />
important.<br />
These two possibilities define the extremes of the possible<br />
weights. If we average the weights assigned to the two<br />
members under the two scenarios we get the following:<br />
Scenario Power Weight Fuel Econ. Weight<br />
1 1.0 0.0<br />
2 0.5 0.5<br />
Average 0.75 0.25<br />
These weights -- 0.75 for "Power" and 0.25 for "Fuel<br />
Economy" are the weights assigned by LDW using the<br />
smarter method. Note that any case where two members<br />
are involved will result in the same weights. The<br />
extension to more members is easy. Each new member<br />
adds another extreme case. If a third member was added<br />
to the example a new extreme case of 1/3, 1/3, 1/3 would be<br />
added to the average.<br />
The weight for the member with the highest order number drops<br />
sharply as more members are added. Therefore, LDW lets you<br />
specify a minimum weight to assign to each member. LDW<br />
9-38 Section 9 -- In Depth
allocates this weight before computing the weights as above. This<br />
results in all of the members having weights at least slightly<br />
above the minimum weight.<br />
LDW also lets you have ties (members with the same order<br />
number) and lets you assign a zero to a member to show no<br />
importance at all.<br />
Because of the relatively crude approach the smarter method uses<br />
to compute the weights, LDW does not let you use representatives<br />
when using this method.<br />
Note that LDW does not adjust the ordering of the members if<br />
you modify a member's definition or range. Thus, if you make<br />
significant changes to a member you should remember to go back<br />
and review any importance orderings you have entered using the<br />
smarter method.<br />
Assessing Weights Using Importance Ratios<br />
LDW provides three methods to assess weights using importance<br />
ratios -- the "Smart" method, the pairwise weight ratios method,<br />
and the "Analytic Hierarchy Process." An importance ratio is a<br />
directly specified ratio between the weights for two or more<br />
members.<br />
The "Smart" method is a "global" method for assigning weight<br />
ratios. That is, you assign the ratios all at once instead of for pairs<br />
of members as in the other two ratio methods. The smart method<br />
is sometimes called the "swing weights" method.<br />
When using the smart method, you can encourage the decision<br />
maker to think about the members' ranges by providing the<br />
following scenario:<br />
Suppose you had an alternative that had the least<br />
preferred level on all of the active members. And further<br />
suppose that you could improve just one active member<br />
from its least preferred to most preferred level. Which<br />
active member would you improve?<br />
You should give the first member the decision maker asks to<br />
improve a "swing weight" of one hundred. Then, for each other<br />
active member, you ask the decision maker the relative<br />
importance of "swinging" it over its range compared with<br />
"swinging" the first member over its range. Thus you ask the<br />
Section 9 -- In Depth 9-39
decision maker to state importance as a percentage of the first<br />
member's one hundred point swing weight. If the decision maker<br />
thought that swinging a member was half as important as<br />
swinging the first member she would give it a swing weight of<br />
fifty.<br />
You can continue in this way until the decision maker has<br />
assigned a swing weight to all of the members.<br />
The idea of the relative importances of swinging members<br />
through their ranges is rather abstract. However, studies and<br />
experience have shown that decision makers are willing to<br />
provide this information and often feel very comfortable doing so.<br />
To compute the absolute weights for the members from their<br />
swing weights, LDW simply adjusts the swing weights so they<br />
sum to one.<br />
The other two importance ratio methods -- pairwise weight ratios<br />
and the analytic hierarchy process -- ask the decision maker to<br />
specify ratios between pairs of members.<br />
In the pairwise weight ratios method, LDW helps you identify<br />
pairs of members for which to define weight ratios. When you<br />
have entered enough ratios to define a complete set of weights,<br />
the process is complete.<br />
To compute a complete set of weights, you must define ratios that<br />
include each active member at least once. This means that if there<br />
are n active members, you need to enter n - 1 ratios. LDW uses<br />
this information and any information on interactions to compute<br />
the absolute weight for each active member.<br />
The Analytic Hierarchy Process is like the pairwise weight ratios<br />
method. However, instead of entering ratios for selected pairs of<br />
members, you enter ratios for all possible pairs. This means that if<br />
there are n active members, you need to enter n*(n - 1)/2<br />
importance ratios. Since this is more than the minimum needed<br />
to compute the weights (n - 1), there may be inconsistencies in<br />
your answers. See page 9-30 for a discussion of the consistency<br />
measures used in the AHP method.<br />
The weight for each active member is computed using a matrix<br />
algebra approach that is generally very close to the geometric<br />
mean of the ratios in its matrix row. The geometric mean is the<br />
9-40 Section 9 -- In Depth
nth root of the product of the ratios, where n is the number of<br />
alternatives.<br />
Instead of waiting till you have entered all the needed ratios,<br />
LDW computes the active member's weights each time you enter<br />
a new ratio. LDW uses all the ratios you have entered so far as<br />
the basis for its estimates. LDW uses a simple iterative procedure<br />
to estimate the ratios you haven't entered yet based on those you<br />
have. Thus, there is always a complete set of weights available. If<br />
you don't want to enter all the ratios required by the AHP<br />
process, you can stop any time the computed weights seem<br />
reasonable to you.<br />
Note that, if you want to use the "complete" AHP method, you<br />
should use the "Analytic Hierarchy Process" method when<br />
converting the measures to common units.<br />
Both pairwise weight assessment methods focus on the members'<br />
names rather than their ranges. Of course, it is possible to take<br />
the ranges into consideration when assigning weight ratios. For<br />
example, you could think of each ratio as a "mini-swing weight,"<br />
and think of the relative importance of changing each member<br />
from its most preferred to least preferred level. The "complete"<br />
AHP method compounds this problem by not even using explicit<br />
measure levels. Here you will need to think about the best and<br />
worst performances for the members for the alternatives in your<br />
analysis.<br />
You should be considering the ranges for the members when<br />
assigning weight ratios using the methods described above. If the<br />
ranges or definitions of the members change, their weight ratios<br />
should change. LDW does not automatically adjust any weight<br />
ratios if you change a member. Thus, when you make changes<br />
you should review any weight ratios you have assessed to see if<br />
you should make any changes.<br />
Assessing Weights by Comparing Pairs of Alternatives<br />
The tradeoff method in LDW takes an indirect approach to<br />
establishing the weights of the measures. This approach uses the<br />
idea that equally preferred alternatives should have equal utilities.<br />
LDW exploits this idea by having the decision maker identify<br />
pairs of equally preferred alternatives that differ on two of the<br />
active members. LDW uses these differences to identify the<br />
implied relative importance of the two measures.<br />
Section 9 -- In Depth 9-41
It should be easier for a decision maker to say when she prefers<br />
two alternatives equally (if their differences are easy enough to<br />
understand) than to consistently specify weights.<br />
Another advantage of the tradeoff approach is that the weight<br />
computation method automatically takes the ranges and SUF<br />
curves of the measures into account when LDW computes the<br />
weights. You don't have to consult the decision maker again if<br />
you change the ranges or SUFs for the measures. This idea of<br />
computing the relative importance of the measures using equally<br />
preferred alternatives is discussed further below.<br />
The key element of the tradeoff method is, not surprisingly, a<br />
tradeoff. A tradeoff is a pair of equally preferred simplified<br />
alternatives that differ in their levels on exactly two of the active<br />
members.<br />
9-42 Section 9 -- In Depth
Figure 9-8. Summary of estimating the relative importance of two<br />
measures from a tradeoff.<br />
Section 9 -- In Depth 9-43
Figure 9-8 shows how a tradeoff can be used to compute the<br />
relative importance of two measures. In box 1, the decision maker<br />
is asked to choose which alternative is preferred: a car having 110<br />
hp and costing $7,000 or a car having 180 hp and costing $12,000.<br />
In box 2, the decision maker replies that she prefers the two<br />
alternatives equally.<br />
Since she prefers the alternatives equally, they should have equal<br />
utilities. Since a MUF is (usually) a weighted average of the<br />
utilities of the active members, this means that the two weighted<br />
averages must be equal. When comparing the weighted average<br />
for the two simplified alternatives, we see that the terms for the<br />
members other than the ones in the tradeoff drop out. This is<br />
because the levels on all members not explicitly mentioned in the<br />
tradeoff are assumed to be equal.<br />
Thus, the weight for horsepower times the utility for horsepower<br />
plus the weight for cost times the utility for cost must be equal for<br />
the two alternatives in the tradeoff. This implies in turn that the<br />
change in utility for horsepower times the weight for horsepower<br />
must equal the change in utility for cost times the weight for cost.<br />
The two changes must just compensate for each other in order for<br />
the alternatives to have equal overall utilities. This is shown in<br />
box 3. In box 4, we use the previously assessed SUFs to identify<br />
the change in utility for horsepower and cost for the two<br />
alternatives.<br />
In box 5, we see that the change in utility for horsepower is only<br />
half the change for cost. Thus, the weight for horsepower must be<br />
twice the weight for cost. The mathematics of this process are<br />
described in the Appendix on page A-1.<br />
Establishing Tradeoffs. All of the computations needed to<br />
convert tradeoffs to relative weights are done automatically by<br />
LDW. The only thing the decision maker has to do is establish the<br />
tradeoff pairs of equally preferred alternatives.<br />
Typically, tradeoffs are assessed with the help of a graph that has<br />
one member on the horizontal axis and of the other on the vertical<br />
axis. Each point on the graph represents a possible alternative.<br />
These simplified alternatives are assumed to have identical levels<br />
on all of the other evaluation measures and goals.<br />
In the tradeoff assessment process, LDW highlights two points on<br />
the graph and asks the decision maker which she prefers. Based<br />
9-44 Section 9 -- In Depth
on the decision maker's response, LDW helps her modify one<br />
alternative until she prefers it equally to the other.<br />
LDW starts the process by showing one alternative having the<br />
most preferred level on the first member and the least preferred<br />
level on the other. The other alternative has the least preferred<br />
level on the first member and the most preferred level on the<br />
second. LDW represents these two alternatives by points at<br />
opposite corners of the graph.<br />
If the decision maker prefers the two alternatives equally, LDW<br />
will assign the two members equal weights. A decrease in the<br />
first member of its entire range just compensates for an increase in<br />
the second member over its range.<br />
If, however, the decision maker prefers the first alternative, the<br />
improvement in the second measure does not compensate for the<br />
change in the first. To make the second alternative more<br />
attractive, we improve its level on the first member.<br />
If we improved the first member all the way to its most preferred<br />
level, the decision maker would have to prefer the second<br />
alternative to the first. It would have the same level (the most<br />
preferred) on the first member and a better level on the second<br />
(the most preferred level vs. the least preferred level).<br />
This means that we can find a level for the first member on the<br />
second alternative that makes the second alternative equally<br />
preferred to the first. A series of questions posed to the decision<br />
maker will allow us to zero in on that level.<br />
For example, suppose that again we want to establish a tradeoff<br />
between Cost and Power for use in selecting trucks. We might do<br />
this by going through the following dialogue with the decision<br />
maker:<br />
Section 9 -- In Depth 9-45
Figure 9-9. Example graph for tradeoff assessment<br />
Q: Look at the graph in Figure 9-9. The two labeled<br />
points represent trucks that you might like to buy.<br />
Assume that all of the other measures are at their<br />
most preferred levels. Alternative A has cost at its<br />
best level of $7000 but only has 80 horsepower,<br />
while alternative B has a cost of $15,000 but has the<br />
best horsepower at 160. If you had to choose<br />
between A and B, which one would you pick?<br />
A: Well, I don't really like either of these<br />
alternatives too much, but I'm on a pretty tight<br />
budget, so if I had to choose I guess I'd choose A<br />
because it's so much cheaper.<br />
Q: That makes sense. If I want you to choose B, I'll<br />
have to make B look better. How about if I keep<br />
B's horsepower at 160 but make it so that it only<br />
costs $7100? I'll label this new alternative B' (see<br />
Figure 9-10).<br />
9-46 Section 9 -- In Depth
Figure 9-10. MUF assessment figure 2<br />
A: That's easy! I'd definitely take B' if I'd only<br />
have to pay $100 more to get all that extra<br />
horsepower.<br />
Q: OK, now I'll make it a little harder. Suppose I<br />
change B so that its cost is $10,000. I've marked<br />
this B''?<br />
A: Now its starting to get close, but I think $3000<br />
is too much to pay for more horsepower if<br />
everything else is the same, so I'd pick A.<br />
Q: How about if I make B's cost $8500, as in point<br />
B'''?<br />
A: In that case I'd pick B''', but if you increase B to<br />
$9000 I'd have a hard time choosing.<br />
Q: You mean that if the price for B was a little bit<br />
below $9000 you'd pick B but if it was a little bit<br />
above $9000 you'd pick A?<br />
A: That seems like you're trying to put too fine a<br />
point on it, but I guess that around $9000 is where<br />
I'd start switching between A and B.<br />
Section 9 -- In Depth 9-47
This dialogue let us establish a tradeoff between cost and power<br />
by identifying two alternatives that differ only in those measures<br />
and that the decision maker prefers equally. The two equally<br />
preferred alternatives are:<br />
Alternative A: cost = $7000, power = 80 hp, and<br />
Alternative B: cost = $9000, power = 160 hp.<br />
LDW can now compute the relative weight for the two measures<br />
(if the SUFs for the two measures have been assessed). LDW does<br />
this automatically. You and the decision maker don't have to do<br />
any computations. All you have to do is tell LDW when you<br />
prefer two simple alternatives equally.<br />
Assessing Tradeoffs with LDW. LDW simplifies the tradeoff<br />
assessment process by keeping track of which measures you have<br />
assessed. Initially LDW lets you select any two active members to<br />
trade against one another. Once you have done one or more<br />
tradeoffs, the program gives you a reduced range of choices. In<br />
this way LDW ensures that you don't assess any unneeded<br />
tradeoffs.<br />
To compute a complete set of weights for a MUF, you must have at least<br />
one tradeoff that includes each active member. If there are n members<br />
you must assess n-1 tradeoffs.<br />
Interpreting Directly Entered Weights<br />
You can interpret directly entered weights as defining a pair of<br />
equally preferred alternatives. In this interpretation, think of an<br />
alternative that has the least preferred level on each of the active<br />
members except one -- the member whose scaling constant you<br />
are assessing, which has the most preferred level. This is the first<br />
simplified alternative in the pair. Call it the "one member for<br />
sure" alternative.<br />
Next think of an alternative with well-defined uncertainties. This<br />
alternative has a probability P of having all of the active members<br />
at their most preferred levels (including the one you are<br />
assessing) and a probability of 1 - P of having all of the active<br />
members at their least preferred levels. This is the second<br />
simplified alternative (well, maybe its not so simple). Call it the<br />
"all or nothing" alternative.<br />
9-48 Section 9 -- In Depth
Now think of adjusting P so that the decision maker prefers the<br />
two alternatives equally. Then you can compute the scaling<br />
constant for the member being assessed as follows.<br />
The utility for the "one member for sure" alternative is 1.0 for the<br />
member being assessed and 0.0 for the other active members from<br />
the way we defined the alternative. Thus, its utility as computed<br />
by the MUF is the weight for the member being assessed times<br />
one plus the weights for the other active members times zero.<br />
Thus, the "one member for sure" alternative's utility for the active<br />
goal is equal to the weight for the member being assessed. Let's<br />
call this w.<br />
We can also compute the utility for the "all or nothing" alternative.<br />
We know that the utility in a MUF is 1.0 if all active members are<br />
at their most preferred level. We also know that, if all active<br />
members are at their least preferred levels, the utility is 0.0.<br />
Decision theory also tells us that the utility of an alternative with<br />
uncertainties is the expected utility for the alternative. The<br />
expected utility for the "all or nothing" alternative is P times 1.0<br />
and (1 - P) times 0.0. This is equal to P itself.<br />
Since the decision maker said she prefers the two simplified<br />
alternatives equally they must have equal utilities. Thus w must<br />
equal P.<br />
Thus, you can assess weights for direct entry by assessing the w<br />
for each active member by defining a "one member for sure"<br />
alternative where only it has its most preferred level and<br />
assessing the P for which the decision maker prefers it equally to<br />
the "all or nothing" alternative. W for each member is equal to the<br />
P that makes the two alternatives equal.<br />
Note that if you use this method, the ws won't generally sum to<br />
one. As described on page 9-55, ws that don't sum to one define a<br />
multiplicative MUF that includes interactions between the active<br />
members. This probabilistic method for assessing weights can<br />
also be used to simultaneously assess interactions.<br />
It is not clear how to compute weights using representatives when<br />
there are also interactions. Thus, LDW does not let you use<br />
representatives for sub-goals in the direct entry method.<br />
Section 9 -- In Depth 9-49
Changing Weight Assessment Methods<br />
LDW makes it easy to change the weight assessment method for a<br />
goal. Just select a new method from the list in the weight<br />
assessment dialog box. LDW will warn you that you might lose<br />
some preference information if you have already done<br />
assessments with the old method. When you change between<br />
methods, LDW tries to assign parameters in the new method that<br />
result in the same weights as in the old method. Thus, if you<br />
change from the "Smarter" to the "Smart" method, LDW computes<br />
and saves a set of swing weights that result in the same weights as<br />
the smarter importance ordering. If you then change to the<br />
tradeoff method, LDW computes and saves a set of tradeoffs<br />
(against the most important member) that result in the same<br />
weights as the swing weights. This lets you get an initial<br />
assessment using an "easy" method and still check your results<br />
using a more "difficult" method.<br />
The Relationship Between Measure Ranges and Weights<br />
One of the most misunderstood concepts in multi-objective<br />
decision analysis is the relationship between measure ranges and<br />
weights.<br />
The common misconception is that there is no relationship and<br />
that measure weights can be assessed based on the names of the<br />
measures alone. This is incorrect. There is a strong relationship<br />
between measure ranges and weights.<br />
! As the range for a measure gets wider, its<br />
weight should increase.<br />
Weights in LDW are computed based on the most and least<br />
preferred levels for each measure established in the measure’s<br />
properties dialog box. This range is also used in the conversion to<br />
common units step.<br />
Establishing a measure’s range. There are several approaches<br />
to establishing a measure’s range.<br />
One approach is the use the exact range of the alternatives. This<br />
may cause problems due to the more or less random numbers that<br />
will define the range. Also the range may have to be changed<br />
frequently as alternatives are added and deleted.<br />
9-50 Section 9 -- In Depth
Another approach is to use the range of the alternatives, but<br />
expand it somewhat to nearby round numbers. For example if the<br />
range for alternative trucks for horsepower is 109 hp to 177 hp,<br />
you might consider defining the range in LDW as 100 hp to 180<br />
hp or 100 hp to 200 hp. This will make the assessment questions<br />
easier to think about and will reduce the need for adjustments as<br />
alternatives are modified.<br />
This is the approach recommended for LDW.<br />
Two other approaches for establishing ranges are not<br />
recommended. The first is to establish the widest range possible,<br />
regardless of the alternatives, such as 75 hp to 350 hp for the truck<br />
example. This approach has several drawbacks, including having<br />
no well defined method for establishing the range and potentially<br />
forcing consideration of unacceptable measure levels when<br />
assessing weights.<br />
The final method, used in the Analytic Hierarchy Process is to not<br />
specify a range at all. This can lead to large disagreements in the<br />
weight assessments due to different implicit ranges. It also may<br />
force decision makers to consider unacceptable measure levels<br />
during the weight assessment. It also makes it impossible to<br />
meaningfully adjust the weights as alternatives are modified.<br />
Understanding the Relationship Between Ranges and<br />
Weights. To understand the relationship between ranges and<br />
weights intuitively, lets look at an extreme example. Figure 9-11<br />
shows two possible car buying scenarios.<br />
Section 9 -- In Depth 9-51
Figure 9-11. Extreme example of the relationship between range and<br />
weight.<br />
In Scenario A, the cars are very different, but the price difference<br />
is only $1. It seems reasonable to assume that in this scenario the<br />
price would be a very minor factor in the decision. If the range<br />
for price in LDW was the same as for the alternatives a very low<br />
weight for price would be appropriate.<br />
In Scenario B, the alternatives are the same, but the price<br />
difference is now $81,000. In this scenario, price is likely to be a<br />
major factor in the choice and thus should be assigned a relatively<br />
large weight in the analysis.<br />
Here is another more quantitative example. Figure 9-12 shows a<br />
situation where two cars differ on price and performance but are<br />
equally preferred.<br />
9-52 Section 9 -- In Depth
Figure 9-12. Quantitative range vs. weight example.<br />
The difference in cost between A and B is just matched by the<br />
improvement in performance from A to B. Based on this tradeoff,<br />
equal weights are assessed for the Cost and Performance<br />
measures. The resulting MUF results in equal utilities for A and B<br />
as they should have.<br />
Now suppose the range for Cost is increased from $100 to $300<br />
instead of $100 to $200. If there is no change in weights, the<br />
computed utility for B changes, because it is no longer at the least<br />
preferred level for Cost. The utilities for A and B are no longer<br />
equal, even though we still find them equally desirable.<br />
The way to bring things back into sync is to change the relative<br />
weights for Cost and Performance. In particular, since the range<br />
for Cost has doubled it should get twice as much weight as before.<br />
This means that Cost will have twice the weight of Performance.<br />
When we make the weights sum to 1.0, this means that Cost will<br />
have a weight of 0.67 and Performance will have a weight of 0.33.<br />
When we compute the utilities of A and B, we find that with the<br />
new weights they are once again have equal utilities.<br />
Section 9 -- In Depth 9-53
Thus, proportionally increasing the weight for Cost as we increase<br />
its range correctly compensates for the change and keeps equally<br />
preferred alternatives equally ranked.<br />
Top Down Vs. Bottom Up. An issue related to ranges and<br />
weights is whether preferences in a goals hierarchy should be<br />
assessed from the top down or the bottom up.<br />
The top down approach is to assess the relative weights of the<br />
highest level goal first and then to do lower level assessments to<br />
allocate each goal’s weight among its members. The bottom up<br />
approach is to first assess the relative weights of the lowest level<br />
measures within each lowest level goal and then to do higher<br />
level assessments to establish the relative weights of higher level<br />
goals.<br />
While both approaches are possible in LDW, the bottom up<br />
approach is preferred. This is because the top down approach<br />
makes it difficult to think about the measures below a goal when<br />
assessing its relative weight.<br />
When assessing the weight for a high level goal, it is tempting to<br />
think about the global significance of the goal’s name rather than<br />
the specific measures (and associated ranges) included under the<br />
goal. This can lead to too much weight assigned to a measure<br />
with a very narrow range or too little weight assigned to a<br />
measure with a wide range.<br />
In the bottom up approach, the decision makers will have thought<br />
about the measures under a goal before assessing the weight of<br />
the goal itself. This should lead to more reasonable weight<br />
assessments for the higher level goals.<br />
An even better approach is to use representatives (page 34) to<br />
assess each goal’s weight indirectly. Its easier to think about the<br />
range and importance of a single measure than to think about the<br />
whole set of measures represented by a goal.<br />
Ranges and Weights in LDW. The tradeoff method is the only<br />
weight assessment method in LDW that automatically<br />
compensates for changes in measure ranges. This is because the<br />
tradeoff method uses pairs of equally preferred alternatives and<br />
computes weights based on the measure ranges to make their<br />
utilities come out equal.<br />
9-54 Section 9 -- In Depth
If a measure’s range changes, LDW automatically recalculates the<br />
weights to compensate and keep the tradeoff pairs equal. The<br />
tradeoff computation is described in Appendix A. For the other<br />
methods, the weights should be manually adjusted or reassessed<br />
after a change is made in a measure range.<br />
Assessing Interactions Between Measures<br />
The discussion of MUFs so far has assumed that the active<br />
members don't interact with one another. Each active member<br />
makes its own contribution to the MUF formula as determined by<br />
its weight, and that contribution does not depend on the levels of<br />
the other active members.<br />
However, this may not be an adequate model of people's<br />
preferences. For example, a decision maker might want balanced<br />
performance in a truck. That could mean that a desirable truck<br />
should have both high horsepower and good gas mileage. Thus,<br />
she would prefer a truck with medium levels of these two<br />
measures to one with the best level on one measure and the worst<br />
level on the other.<br />
Or, she could feel exactly the opposite, that if either horsepower<br />
or gas mileage is outstanding, the level of the other measure<br />
doesn't really matter.<br />
LDW can model these types of preference interactions by using a<br />
multiplicative MUF formula. Like the additive MUF formula,<br />
each measure in a multiplicative MUF has an associated scaling<br />
constant (weight). However, the multiplicative formula requires<br />
an additional scaling constant, traditionally called "Big K." Big K<br />
defines the type and degree of interaction between the measures.<br />
The multiplicative MUF formula is written as follows:<br />
U(X) = ((1+Kk1U 1(X))x(1+Kk2U 2(X))x...x(1+KknU n(X))-<br />
1)/K<br />
where<br />
U(X) = the overall utility of alternative X,<br />
k i = the scaling constant small k for measure i,<br />
U i(X)<br />
= the SUF utility on member i for alternative X,<br />
K = the interaction scaling constant big K<br />
Section 9 -- In Depth 9-55
The level of big K can result in several types of interaction<br />
between evaluation measures:<br />
Value of big K Sum of small ki Type of interaction<br />
-1 < K < 0 > 1 constructive: high<br />
utility on one<br />
measure means high<br />
utility overall<br />
K = 0 = 1 neutral: use additive<br />
MUF formula<br />
K > 0 < 1 destructive: low<br />
utility on one<br />
measure means low<br />
utility overall<br />
Figure 9-13 is an example of the overall utilities that result from<br />
two measures having equal weights and neutral interactions. The<br />
two measures range from 0 to 1, and have straight line SUFs. You<br />
can see that the overall utility here is simply the average of the<br />
two individual SUF utilities.<br />
Figure 9-13. Overall utilities for a pair of measures with neutral<br />
interaction.<br />
9-56 Section 9 -- In Depth
Figure 9-14 is an example of the overall utilities that result from<br />
the same two measures but with destructive interaction. Both<br />
measures were assigned a small k of 0.1, resulting in a big K for<br />
the two measure MUF of 80, indicating strong destructive<br />
interaction.<br />
You can see that the overall utility curves have moved toward the<br />
upper right-hand corner of the graph. This shows that higher<br />
levels on the two measures are required to obtain a given overall<br />
utility than with neutral interaction. The concave shape of the<br />
curves shows that alternatives with balanced utilities on the two<br />
measures will get generally higher overall utilities than<br />
alternatives with more skewed utilities.<br />
For example, an alternative with a 0.5 level on both measures has<br />
an overall utility of about 0.3, while an alternative with 1.0 on one<br />
measure and 0.0 on the other has an overall utility less than 0.2.<br />
Figure 9-14. Overall utilities for a pair of measures with destructive<br />
interaction.<br />
Figure 9-15 is an example of the overall utilities that result from<br />
the same two measures with constructive interaction. Both<br />
measures were assigned a small k of 0.9, resulting in a big K for<br />
the two measure MUF of -0.987, indicating strong constructive<br />
interaction. The overall utility curves have now moved toward<br />
the lower left-hand corner of the graph, showing that much lower<br />
Section 9 -- In Depth 9-57
levels on the two measures are required to obtain a given overall<br />
utility than with neutral or destructive interaction. The convex<br />
shape of the curves shows that alternatives with balanced utilities<br />
on the two measures will now get lower overall utilities than<br />
alternatives with more skewed utilities.<br />
Figure 9-15. Overall utilities for a pair of measures with constructive<br />
interaction.<br />
An alternative with a 0.5 level on both measures now has an<br />
overall utility of about 0.7, while an alternative with 1.0 on one<br />
measure and 0.0 on the other has an overall utility greater than<br />
0.8.<br />
Note that interactions affect all of the active members in a MUF.<br />
In the examples above either of the members could pull the<br />
overall score up or down (depending on whether the interaction<br />
was constructive or destructive).<br />
If you only want one or two members to have this ability, you<br />
should simply give those members a high weight. Also, the<br />
interactions tend to work in one direction only. With constructive<br />
interaction, a single member can have a large effect in increasing<br />
the overall utility, but can only have a small effect in the other<br />
direction.<br />
9-58 Section 9 -- In Depth
Similarly, a single member can have a large effect in reducing the<br />
overall utility if there is destructive interaction, but can only have<br />
a small effect in increasing the overall utility.<br />
Defining Interactions Between Measures. Determining a<br />
multiplicative MUF formula requires one more piece of<br />
preference information than an additive MUF formula. The<br />
additional information lets LDW compute the multiplicative MUF<br />
formula's interaction scaling constant, big K.<br />
The additional piece of information can be:<br />
! a second tradeoff between two members that were<br />
already involved in a tradeoff,<br />
! a response to a probabilistic question that gives<br />
additional information about two members already<br />
involved in a tradeoff, or<br />
! defining the exact value of one scaling (weighting)<br />
constant.<br />
You usually define a second tradeoff between two active<br />
members by comparing an alternative where they are at extreme<br />
levels to one where they are at intermediate levels. It helps if the<br />
two members are nearly equally weighted.<br />
For example, suppose that we have done a tradeoff between<br />
power and fuel economy and found that the decision maker feels<br />
that they are equally important. Now we define a second tradeoff<br />
between the two measures with a dialogue that might go as<br />
follows:<br />
Q: We already talked about the tradeoff between<br />
power and fuel economy. Now I want to look at<br />
those measures again to define their interaction.<br />
Suppose a truck has 175 hp (the most preferred<br />
level) but only gets 16 mpg (the least preferred<br />
level). Call this alternative A. Now suppose a<br />
second truck is the same as the first but has 130 hp<br />
(already defined as the mid-preference level) and<br />
gets 20 mpg (also the mid-preference level). Call<br />
this alternative B. Which of these two alternatives<br />
would you prefer?<br />
Section 9 -- In Depth 9-59
A: I could see where some people might think<br />
these were equally desirable, especially given<br />
what I've said before about these two measures,<br />
but I really think a truck should have balanced<br />
performance. I don't think I'd like to give up so<br />
much fuel economy to get really good power. So,<br />
I'd pick the balanced alternative B.<br />
Q: Good, that's the type of interaction I'm trying to<br />
get at here. Suppose I make alternative B less<br />
desirable. If I define B' as having 110 hp and<br />
getting 18 mpg, would you still prefer it to<br />
alternative A?<br />
A: No, now I think I'd prefer alternative A. I<br />
think I'd have trouble deciding if alternative B<br />
had 125 hp and got 19 mpg.<br />
LDW can combine this second tradeoff between power and fuel<br />
economy with the first one and the tradeoffs for the other<br />
members to compute the scaling constants for a multiplicative<br />
MUF formula. The algebra is somewhat complicated and won't<br />
be described here. The computations are all done automatically<br />
by LDW.<br />
You can make some qualitative checks on the computations,<br />
however. Since alternative B had levels that were less than the<br />
mid-preference levels, this means that the decision maker felt that<br />
the low level on MPG for alternative A had a relatively large<br />
effect on the overall utility. This corresponds to the third case in<br />
the table above (destructive interaction), where big K is greater<br />
than 0 and the small k sum to less than 1.<br />
i<br />
The response to a probabilistic question can also define the degree<br />
of interaction between two measures. Here LDW asks the<br />
decision maker to choose between two uncertain outcomes. This<br />
is the most difficult type of preference question used in LDW.<br />
You might pose the question as follows:<br />
Q: We already talked about the tradeoff between<br />
power and fuel economy. Now I want to look at<br />
those measures again to see if they have any<br />
interaction. Suppose a truck has uncertainties for<br />
some reason -- maybe it has an option package the<br />
dealer doesn't have the details for. Anyway, if you<br />
can imagine it, suppose the truck has a 50 percent<br />
9-60 Section 9 -- In Depth
chance having 160 hp (the most preferred level)<br />
and 30 mpg (also the most preferred level) and a 50<br />
percent chance of having 80 hp and 16 mpg (the<br />
least preferred levels). In other words, it's an all or<br />
nothing gamble, either the most preferred level on<br />
both measures or the least preferred levels, both<br />
with an equal chance of occurring. Call this<br />
alternative A. Now suppose a second truck is the<br />
same as the first but has a 50 percent chance of<br />
having 160 hp and 16 mpg and a 50 percent chance<br />
of having 80 hp and 30 mpg. It's still uncertain.<br />
You're guaranteed to get either good horsepower<br />
or good gas mileage, but not both. Call this<br />
alternative B. I know these are complicated so I've<br />
drawn them in Figure 9-16. Which of A or B<br />
would you prefer?<br />
Figure 9-16. Example of assessment question for interactions<br />
Section 9 -- In Depth 9-61
A: Wow, that's pretty complicated. It's also hard<br />
to see where I'd really be presented with<br />
alternatives like this, but I guess I can imagine it.<br />
I don't like either of the choices in B very much<br />
because I really think a truck should have<br />
balanced performance. I don't think I would like<br />
to give up so much fuel economy to get really<br />
good power or vice versa. So, I'd pick alternative<br />
A, where at least I have a chance of getting<br />
everything I want.<br />
Q: Good, that's the type of interaction I'm trying to<br />
get at here. Suppose I make alternative A less<br />
desirable. I'll keep everything the same but change<br />
the probabilities for A. Suppose the probability of<br />
getting the most preferred levels on power and fuel<br />
economy was only 25 percent. Would you still<br />
prefer alternative A to alternative B?<br />
A: No, now I think I'd prefer alternative B in that<br />
case. I think I'd have trouble deciding if the<br />
probability of getting the most preferred levels<br />
was 40 percent.<br />
LDW can combine this probabilistic tradeoff between power and<br />
fuel economy with the original tradeoffs to compute the scaling<br />
constants for a multiplicative MUF formula. Again, the arithmetic<br />
is somewhat complicated and won't be described here.<br />
Qualitative checks can still be done. The overall utility of<br />
alternative A is equal to its expected utility. If there were only<br />
two measures, power and fuel economy, the top possibility, with<br />
the most preferred level on both measures, would have an overall<br />
utility of 1. The lower possibility would have a utility of 0.<br />
The expected utility of the lottery is<br />
(40 percent)x1 + (60 percent)x0 = 0.4. Both of the possibilities in<br />
alternative B would have overall utilities of 0.5 if the two<br />
measures were equally important (which we are assuming) and<br />
there were no interactions. This would make the overall utility of<br />
alternative B also equal to 0.5. However, since A and B were<br />
equally preferred, they must have the same overall utility, so<br />
interaction must make the overall utility of B less than 0.5.<br />
9-62 Section 9 -- In Depth
A probability of less than 0.5 for the more preferred possibility of<br />
alternative A corresponds to the third case in the table above,<br />
where big K is greater than 0 and the small k i sum to less than 1.<br />
Here, a low utility on any one measure leads to a low overall<br />
utility (destructive interaction).<br />
Defining Interactions in LDW. LDW lets you define interactions<br />
in several ways --<br />
! By using an additive MUF formula (no interactions).<br />
! By assessing a second tradeoff.<br />
! By assessing a probabilistic tradeoff.<br />
! By directly entering the small k for one measure.<br />
! By directly entering the small k for all measures.<br />
Generally, you define interactions after the weights have been<br />
assessed. If you define the MUF formula to have no interactions,<br />
you don't need to enter any additional information. This is the<br />
default.<br />
To assess a second tradeoff between two measures, LDW displays<br />
a list of the existing tradeoffs and asks you to select one. Then<br />
LDW asks you to directly define the second tradeoff using the<br />
"free float" tradeoff assessment option.<br />
If you have used a weight assessment method other than<br />
tradeoffs, LDW will let you select any two active members and<br />
define a tradeoff between them.<br />
To assess a probabilistic tradeoff, LDW again asks you to select an<br />
existing tradeoff. LDW then constructs a probabilistic tradeoff<br />
question for the members in the original tradeoff and asks you to<br />
enter the probability that makes the two alternatives equally<br />
preferred. Again for other assessment methods you can select<br />
any two active members to use in the question.<br />
Directly entering the small k for one active member lets LDW<br />
compute the complete MUF formula. Usually you will compute<br />
the small ks using an additive MUF formula first and then select<br />
an adjustment. If you enter a small k smaller than the one<br />
computed for the additive formula, you will have a big K greater<br />
than zero, indicating destructive interaction.<br />
Section 9 -- In Depth 9-63
If you enter a small k greater than the original one, LDW will<br />
compute a big K less then zero, showing constructive interaction.<br />
You must enter a small k between zero and one. Sometimes it is<br />
possible to enter a small k that is inconsistent with the assessed<br />
tradeoffs. Here, LDW will adjust the small k until it achieves<br />
consistency.<br />
Defining interactions with the direct entry method. Finally, if<br />
you are using the direct entry weight assessment method, you can<br />
define interactions when you define the weights for the active<br />
members. The small ks you enter must be between zero and one.<br />
The sum of the small ks defines the type of interaction:<br />
! Small ks that sum to one imply an additive MUF<br />
formula.<br />
! Small ks that sum to less than one imply a multiplicative<br />
MUF formula with destructive interaction.<br />
! Small ks that sum to more than one imply a<br />
multiplicative MUF formula with constructive<br />
interaction.<br />
Note that if you want to use the direct entry weight assessment<br />
method to define interactions, you must have the "Interactions<br />
Computed Directly" interaction assessment method selected.<br />
Ranking Alternatives<br />
An analysis done with LDW results in a ranking of the<br />
alternatives. A ranking of the alternatives can be done for any<br />
measure or goal. You get the overall ranking by doing a ranking<br />
for the Overall goal.<br />
You can do a ranking at any time. If you have not assessed a SUF<br />
for a measure, LDW assumes a linear (straight line) SUF. If you<br />
have not assessed any weights, LDW assumes that all measures<br />
are equally important (have equal weights).<br />
Figure 8-17 on page 8-22 shows an example of the ranking of<br />
alternatives.<br />
9-64 Section 9 -- In Depth
Interpreting the Ranking Results<br />
LDW's ranking results are presented in terms of utilities. You<br />
should be careful when interpreting these utilities.<br />
Most importantly, the absolute size of the utility numbers is not<br />
meaningful. Thus, an alternative with a utility of .98 in one<br />
analysis is not inherently better than an alternative with a utility<br />
of .75 in another analysis.<br />
You should only compare the utilities from a particular analysis<br />
with each other.<br />
It is easy to change the sizes of the utility numbers by changing<br />
the measures' ranges. However, these types of changes will not<br />
change the alternatives' rank ordering if you adjust the weights<br />
properly.<br />
Utilities can be adjusted by adding a constant to all of the utilities<br />
or by multiplying all of the utilities by a constant. In<br />
mathematical terms, utilities are unique up to a linear<br />
transformation. Scales like utility with this property are called<br />
interval scales.<br />
One type of comparison that is possible between alternatives is<br />
changes in utilities. If alternative A has a utility of 0.5, alternative<br />
B has a utility of 0.6 and alternative C has a utility of 0.8, not only<br />
can you say that alternative C is preferred to alternatives A and B,<br />
you can also say that the increase in desirability from B to C is<br />
greater than the increase from A to B.<br />
Although utilities generally range from zero to one, occasionally<br />
an alternative will have a ranking outside this range, either<br />
negative or greater than one. There is nothing wrong with this. It<br />
just means that the alternative has one or more levels outside the<br />
ranges of the measures, and that LDW has extrapolated the<br />
utilities for these measures.<br />
Section 9 -- In Depth 9-65
9-66 Section 9 -- In Depth
S E C T I O N<br />
Examples<br />
10
Examples<br />
Introduction<br />
This section provides three examples of how <strong>Logical</strong> <strong>Decisions</strong><br />
(LDW) has been used on real problems. The first example<br />
involves selecting a personal computer system -- a problem faced<br />
by small businesses. The second example involves buying a<br />
home. The final example is finding the best location for a<br />
reservoir -- a large engineering problem of the type faced by<br />
many public agencies. These examples are actual case studies that<br />
used the LDW software, although the details have been changed<br />
to protect clients' anonymity<br />
These examples should give you a better idea of how LDW you<br />
can use in practice and of the types of insights you can gain by<br />
using LDW. Each example has an associated LDW data file that is<br />
installed with the LDW software. These files will let you review<br />
the SUFs and tradeoffs developed for each analysis. You can gain<br />
an understanding of how to use the results displays by trying the<br />
different options with these example data sets.<br />
Buying a Computer<br />
The first example is a small business in the process of upgrading<br />
its personal computer system. The company wanted a powerful<br />
computer but naturally wanted to minimize its cost. In reviewing<br />
the advertisements and reviews in local and national publications,<br />
the decision maker found a myriad of systems with many<br />
available options and configurations. Each manufacturer used<br />
different components with differing performances. The different<br />
configurations all resulted in different prices and made it difficult<br />
to see which system represented the best value. Note that this<br />
analysis was done in 1990 and reflects the computer technology<br />
and prices of that time.<br />
After a careful review of the current advertisements the decision<br />
maker could narrow the manufacturers down to a preliminary list<br />
of six companies. For each company, the decision maker<br />
identified the computer system that seemed to best fit his needs.<br />
If more than one system seemed promising, they were both<br />
included as alternatives. This process was done informally, with<br />
Section 10 -- Examples 10-1
the idea that other manufactures and system alternatives could be<br />
added later if necessary. All of the candidate computers were<br />
IBM PC "Clones" with 80386 Intel CPUs, hard drives, two floppy<br />
disk drives, and VGA color monitors and graphics cards.<br />
After the decision maker had identified the preliminary<br />
alternatives, the next step was to refine the overall goal of "choose<br />
the best computer." The decision maker initially came up with<br />
five sub-goals under the overall goal. These were:<br />
! Minimize Price,<br />
! Maximize Quality,<br />
! Maximize Speed,<br />
! Maximize Hard Drive Performance, and<br />
! Maximize Video Quality.<br />
The decision maker then refined these sub-goals until he could<br />
quantify them. The price goal was straightforward and could be<br />
quantified directly as a measure -- the total price of the system<br />
(including any applicable taxes and shipping). Two of the goals --<br />
Speed and Hard Drive Performance could be measured using<br />
standard measures included in all of the ads. Speed was mainly a<br />
function of the CPU clock speed and the presence and size of a<br />
memory cache. The decision maker created measures to capture<br />
these two considerations. Similarly, the decision maker could<br />
characterize hard drive performance by the size of the drive (in<br />
megabytes) and the disk access time (measured in ms). Video<br />
performance was more difficult to measure, but could be divided<br />
into qualitative measures related to the monitor and the video<br />
card.<br />
The most difficult goal to measure was the quality goal. After<br />
some thought, the decision maker felt that quality should reflect<br />
the reputation (if any) of the manufacturer, and favorable reviews<br />
of the computer in national or local publications. In addition, the<br />
decision maker included two other more specific concerns under<br />
this goal -- the quality of the computer's keyboard and its FCC<br />
certification type.<br />
As the analysis progressed, the decision maker realized that he<br />
was worried about buying a mail order computer because of<br />
possible difficulties in obtaining service. A measure was added to<br />
reflect this concern.<br />
10-2 Section 10 -- Examples
Figure 10-1. Goals hierarchy for computer selection decision.<br />
Section 10 -- Examples 10-3
The completed goals hierarchy is shown in Figure 10-1.<br />
After the goals hierarchy had been completed, the next step was<br />
to complete the definitions of the measures. In particular, it was<br />
necessary to define the scale points in the constructed (nonnumeric)<br />
scales. It is not sufficient to use 1 - 10 or similar scales,<br />
since it is not clear what the different scale points mean. This<br />
makes it difficult to consistently rank the alternatives or to assess<br />
tradeoffs concerning the measure. Figure 10-2 shows some<br />
constructed scales for the computer selection example.<br />
Video Monitor Quality<br />
Best 1. A brand name multi-sync monitor comes with the system.<br />
2. An unknown brand multi-sync monitor comes with the system.<br />
3. A brand-name VGA monitor comes with the system.<br />
Worst 4. An unknown brand VGA monitor comes with the system.<br />
Video Card Quality<br />
Best 1. A brand-name 16 bit SVGA card comes with the system.<br />
2. An unknown brand 16 bit SVGA card comes with the system.<br />
3. An 8 bit SVGA card comes with the system.<br />
Worst 4. A VGA only card comes with the system.<br />
Company Quality<br />
Best 1. A first rate, well established company.<br />
2. A "second tier" but still well known company.<br />
Worst 3. A "no-name" clone maker.<br />
Reviews<br />
Best 1. Rated a "Best Buy" by a national computer magazine.<br />
2. Given a good review in a national or local publication.<br />
3. No reviews found.<br />
Worst 4. Given a poor review in a national or local publication.<br />
Figure 10-2. Constructed measure scales for computer selection<br />
decision.<br />
After the decision maker had defined the measures, he could<br />
enter the levels on the measures for each alternative. This step<br />
was straightforward, since most of the data was available through<br />
information in the ads and reviews of the various computers. The<br />
decision maker assigned one probabilistic level on the Local<br />
Service measure for a company that had just opened a local<br />
dealership. He assigned a probability of 20% that the dealership<br />
would close and that no local service would be available.<br />
10-4 Section 10 -- Examples
The next step was to assess preferences. Since the measures had<br />
few uncertainties, the mid-level splitting technique was used to<br />
assess the single measure utility functions. The tradeoffs were<br />
mostly assessed using price as a basis. Figure 10-3 is the bubble<br />
diagram for the tradeoffs for the computer selection decision.<br />
Figure 10-3. Tradeoff assessment "bubble diagram" for buying a<br />
computer example.<br />
After the preference assessment had been completed, the<br />
alternatives could be ranked.<br />
Section 10 -- Examples 10-5
Buying a House<br />
The ranking results are shown in Figure 10-4. These results show<br />
that the computers from local vendor one represented the best<br />
price performance combination based on the decision maker's<br />
preferences. The decision maker was also willing to pay the price<br />
to get the best available performance from that vendor. Insights<br />
gained from the analysis included the realization that the<br />
availability of local service was very important and overrode any<br />
perceived quality advantages from the national mail order<br />
vendors. The decision maker agreed with the results of the<br />
analysis and bought the highest ranked computer system.<br />
Figure 10-4. Ranking results for computer selection example.<br />
The computer selection example is included in the file<br />
COMPEX.LDW.<br />
The most important decision made by many families is buying a<br />
home. This example shows how you can use LDW to help<br />
evaluate the many factors that differentiate one house from<br />
another. The example is based on a family selecting a home from<br />
those available at a particular time in the Denver, Colorado area.<br />
The house selection example is included in the file<br />
HOUSEEX.LDW.<br />
10-6 Section 10 -- Examples
The first step was to identify a preliminary list of homes to<br />
evaluate. The family conducted an informal screening process<br />
with a Realtor's help to identify an initial set of homes in their<br />
price range.<br />
Next they developed a goals hierarchy to reflect their goals in<br />
selecting a home. No two families 'goals will be the same.<br />
Considerations that are very important to one family may not be<br />
important at all to another. Thus the goals hierarchy for a<br />
decision such as this will be a very personal reflection of the<br />
needs and desires of the decision makers.<br />
It is unlikely that another family could use this goals hierarchy as<br />
is, although some ideas in it could provide a valuable starting<br />
point.<br />
In developing the goals hierarchy, the family used their likes and<br />
dislikes about the homes they had looked at so far as a starting<br />
point for the hierarchy. The goals hierarchy has four first level<br />
sub-goals -- Maximize Quality, Minimize Costs, Maximize Size,<br />
and Maximize Location Quality. The family subdivided these<br />
goals into many measures and sub-goals. There is a lot to think<br />
about when buying a house! Many lowest level sub-goals simply<br />
show the presence of a particular item, such as a clothes dryer.<br />
Others represent very subjective considerations such as privacy<br />
and exterior appearance. The complete hierarchy is shown in<br />
Figure 10-5.<br />
Section 10 -- Examples 10-7
Figure 10-5. Goals hierarchy for buying a home example<br />
10-8 Section 10 -- Examples
The definition of measures continued as in the computer selection<br />
example, with much time spent on properly defining the<br />
constructed measures that evaluated the more subjective<br />
concerns. To aid in evaluating houses, the family developed a<br />
form they could fill out when they visited each house. This form<br />
included the definition of each measure, so they could evaluate<br />
each house consistently. Figures 10-6 and 10-7 present the two<br />
pages of this form.<br />
Section 10 -- Examples 10-9
Overall goal<br />
Quality goal<br />
Costs goal<br />
Size goal<br />
Quality goal<br />
Costs goal<br />
Size goal<br />
Location goal<br />
Amenities goal<br />
Appearance goal<br />
Construction Quality goal<br />
House Selection Checklist<br />
_____ Condition measure<br />
1) Brand new 2) Pristine Condition 3) A few minor flaws<br />
4) Run down 5) A real fixer upper<br />
Maintenance goal<br />
________ Purchase Price measure (thousands of dollars)<br />
________ Needed Repairs measure (thousands of dollars)<br />
________ Operating Costs measure (dollars per month)<br />
(electric, water, gas, sewage, association fees, taxes, regular maintenance)<br />
Overall Size goal<br />
_____ Garage Size measure (number of cars)<br />
_____ Lot Size measure (thousand sq. ft.)<br />
_____ Living Room Size measure (sq. ft.)<br />
_____ Storage Space measure<br />
1) Abundant storage space with at least one walk in closet<br />
2) Adequate storage space 3) Marginal storage space<br />
Location goal<br />
Amenities goal<br />
Appearance goal<br />
Surroundings goal<br />
Commute goal<br />
_____ Dog Area measure (yes/no)<br />
_____ Sauna measure (yes/no)<br />
_____ Hot Tub measure (yes/no)<br />
_____ Decks measure<br />
1) lots of decks 2) one or two decks (or a porch) 3) no decks or porch<br />
_____ Dishwasher measure (yes/no)<br />
_____ Clothes Washer measure (yes/no)<br />
_____ Clothes Dryer measure (yes/no)<br />
_____ Refrigerator measure<br />
1) large, fancy refrigerator 2) regular refrigerator 3) old refrigerator 4) no<br />
refrigerator<br />
_____ Trash Compactor measure (yes/no)<br />
_____ Central Air Condit. measure (yes/no)<br />
_____ TV measure<br />
1) satellite dish 2) cable TV hooked up or available (add hookup costs to required repairs)<br />
3) good reception 4) crummy reception<br />
_____ Fireplaces measure (number)<br />
Interior goal<br />
_____ Exterior Appearance measure<br />
1) Architecturally Striking 2) Contemporary 3) Tudor<br />
4) Mountain Contemporary or Modern Log 5) Ranch 6) Tract Home<br />
Figure 10-6. First page of house selection evaluation form.<br />
10-10 Section 10 -- Examples
Construction Quality goal<br />
House Selection Checklist (pg. 2)<br />
_____ Construction Matls. measure<br />
1) highest quality materials used throughout 2) good quality materials<br />
3) average quality materials 4) below average materials<br />
_____ Workmanship measure<br />
1) Above average professional workmanship with artistic detailing<br />
2) Above average professional workmanship<br />
3) Writer or equiv. 4) Average workmanship 5) Below average workmanship<br />
_____ Systems measure<br />
1) All major systems (electrical, plumbing, heating) built to highest current standards<br />
2) All systems built to adequate standards 3) One system in need of upgrading<br />
4) more than one system in need of upgrading<br />
Maintenance goal<br />
Overall Size goal<br />
Surroundings goal<br />
Commute goal<br />
Interior goal<br />
_____ Flat Roof measure (yes/no)<br />
_____ Lawn/Yard measure<br />
1) Extensive lawn/garden needing heavy maintenance 2) Lawn/garden needs some maintenance<br />
3) No maintenance natural yard<br />
_____ Well measure (yes/no)<br />
_____ Septic Tank measure (yes/no)<br />
_____ Upstairs Size measure (sq. ft.)<br />
_____ Finished Basement measure (sq. ft.)<br />
_____ Walkout Basement measure (yes/no)<br />
_____ Surroundings Qual. measure<br />
1) Sweeping unspoiled panorama 2) Pristine Creekside 3) Pristine forest<br />
4) Forest with some flaws/well kept city street 5) City street with some flaws<br />
6) Funky looking neighborhood 7) Tract houses<br />
_____ Privacy measure<br />
1) completely isolated 2) good privacy but some neighbors visible<br />
3) some neighbors close by, but well shielded by walls of house or other barriers<br />
4) some impingement by neighbors 5) located in a crowded residential/tract neighborhood<br />
_____ Traffic measure<br />
1) at the end of a dead end street 2) one side bordered by a lightly traveled road<br />
3) back and front both bordered by light to moderately traveled roads<br />
4) one or both sides bordered by a well traveled street<br />
_____ Neighborhood Amenity measure (paved roads -- yes/no)<br />
_____ Commute Distance measure (minutes drive to parking lot)<br />
_____ Shopping Distance measure (minutes drive to nearest supermarket)<br />
_____ Office Location measure<br />
1) Large, well lighted, comfortable office loca 2) OK office location 3) Cramped<br />
office location<br />
_____ Light and Space measure<br />
1) Bright, airy house with lots of windows 2) Average light and air 3) Below average light and air<br />
_____ Interior Layout measure<br />
1) Well thought out layout with conveniences and good use of space<br />
2) good layout with some problems (living room next to master bedroom)<br />
3) OK layout 4) below average layout<br />
_____ Ceilings measure<br />
1) Lots of vaults, beamed ceilings, above average ceiling height throughout<br />
2) Some vaults, beams, average ceiling height 3) Normal ceilings 4) normal ceilings with some<br />
below normal areas<br />
_____ Detailing Style measure<br />
1) Art Deco or Distinctive 40's/50's 2) Contemporary<br />
3) Victorian or Turn of the century or 20's<br />
4) Nondescript 5) Early American or "Country"<br />
_____ Kitchen measure<br />
1) Spacious with lots of counters, cabinets and high quality appliances (gas stove)<br />
2) Nice but not outstanding<br />
3) Deficient in at least one area (counter space, cabinets, appliance quality)<br />
4) Cramped and/or funky<br />
_____ Bathrooms measure<br />
1) Two or more with a well designed master bath<br />
2) Two or more with poorly designed master bath<br />
3) Two or more normal bathrooms<br />
4) Only one bathroom (probably unacceptable)<br />
Figure 10-7. Page 2 of house selection example evaluation form.<br />
Section 10 -- Examples 10-11
The preference assessments were done in the normal fashion<br />
using the mid-level splitting technique to assess the singlemeasure<br />
utility functions. All of the tradeoffs were assessed<br />
against purchase price.<br />
The family used the Compare Alternatives option extensively in<br />
gaining an understanding of the ranking results. For example,<br />
one house they looked at was an older custom built home with a<br />
Japanese motif and a spectacular view of the city of Denver.<br />
However, the house was rather small and needed extensive<br />
renovations. When compared to the highest ranking house it was<br />
found that the custom features could not make up for the small<br />
size and needed work, as shown in Figure 10-8.<br />
Figure 10-8. Alternatives comparison for two homes<br />
Reservoir Location Selection<br />
The final example is a planning decision faced by a large urban<br />
water district. They were planning a large new reservoir for<br />
backup and emergency water storage. Because of the reservoir's<br />
size, it would be costly and would also have significant<br />
environmental and social impacts. In addition, the location of the<br />
reservoir would affect how well it would fit into the district's<br />
existing operational system. A planning team was charged with<br />
10-12 Section 10 -- Examples
the task of evaluating potential reservoir locations and making a<br />
recommendation to the district's board of directors. The team<br />
used an initial screening process to identify a set of potential sites<br />
for evaluation. They used LDW to help develop a quantitative<br />
ranking in support of their more qualitative recommendations.<br />
The team included the ranking results as part of the alternatives<br />
analysis for the project's environmental impact assessment<br />
documents. The reservoir selection example is included in the file<br />
RESEX.LDW.<br />
The reservoir ranking differs from the previous examples in that<br />
the ranking represents the consensus of a team of experts, rather<br />
than the preferences of an individual. The project team used the<br />
LDW preference assessment process as a structured forum where<br />
they could discuss the relative importances of different aspects of<br />
the project. These discussions allowed the project team to arrive<br />
at a consensus preference set and thus a consensus overall<br />
ranking of the alternatives. This ranking also helped the project<br />
team formulate and organize their qualitative recommendations.<br />
The team used sensitivity analyses extensively to identify the<br />
effects of changes in the measures' relative importances.<br />
Six reservoir sites were selected for evaluation. Some alternatives<br />
were enlargements to existing reservoirs, while others were<br />
entirely new sites. Several sites could fit more than one size of<br />
reservoir, but with differing impacts and operational effects. The<br />
team developed multiple alternatives with differing reservoir<br />
sizes at these sites. The sites were ranked independently of size,<br />
with costs being measured on a dollars per acre foot basis. (An<br />
acre foot is a measure of water volume and thus reservoir<br />
capacity.) A separate analysis used the ranking results to select<br />
the recommended reservoir size.<br />
The team developed the goals hierarchy together with the<br />
technical experts and consultants working on the project. To<br />
identify the measures and lower level sub-goals for each major<br />
sub-goal, the team held a meeting with the experts in that area.<br />
These meetings helped ensure that the proper data was collected<br />
for each site and that the data was collected uniformly. Figure 10-<br />
9 shows the goals hierarchy for the reservoir selection process.<br />
Section 10 -- Examples 10-13
Figure 10-9. Goals hierarchy for reservoir siting example.<br />
10-14 Section 10 -- Examples
Many measures represented counts of the number of impacts in<br />
different categories. These category counts were converted to<br />
"equivalent" counts of the most significant category. Expert<br />
judgments were obtained of the count in each category<br />
representing an impact equivalent to one unit in the most<br />
significant category. These equivalent counts were then used<br />
when developing tradeoffs involving these measures. For<br />
example, the Prehistoric Sites measure counted the number of<br />
sites of different types that would be affected at each reservoir<br />
location. The experts categorized the types of prehistoric sites as<br />
shown in Figure 10-10. The most significant category of<br />
prehistoric sites was "residential base sites with interpretive<br />
value." The overall level for the prehistoric sites measure was<br />
reported in units of "equivalent number of residential base sites<br />
with interpretive value affected." Sites in the other categories<br />
were converted to those units by multiplying the number of sites<br />
by the number in the last column of Figure 10-10. For example, 20<br />
processing sites would be the equivalent of two residential bases<br />
with interpretive value. A site with 1 residential base with<br />
interpretive value and 20 processing sites would thus be assigned<br />
an overall level of 1 + (20*0.1) = 3 on the prehistoric sites measure.<br />
Sites to equal one Fraction of one<br />
Residential Base Residential Base<br />
Category With Interpretive Value With Interpretive Value<br />
Residential Base With 1.0 1.0<br />
Interpretive Value<br />
Residential Base 1.11 0.9<br />
Processing Site 10 0.1<br />
Isolated Rock Art 200 0.005<br />
Prehistoric Isolates 4000 0.00025<br />
Figure 10-10. Equivalences for Prehistoric Sites measure in reservoir<br />
example.<br />
The team used this approach on the following measures:<br />
! Prehistoric Sites,<br />
! Historic Sites,<br />
! Paleontological Impacts,<br />
! Biological Habitat,<br />
! Endangered Species,<br />
Section 10 -- Examples 10-15
! Noise,<br />
! Agricultural Impacts, and<br />
! Business Impacts.<br />
The preference assessments were done in a series of meetings<br />
with experts in the various disciplines. Tradeoffs involving the<br />
measures evaluated by the discipline were assessed. Then a final<br />
overall preference assessment meeting was held with<br />
representatives from the disciplines and from the water district.<br />
Tradeoffs involving the most important measures from each<br />
discipline were assessed. These tradeoffs were combined with the<br />
tradeoffs from the earlier meetings to obtain weights for the less<br />
important measures. Figure 10-11 shows the tradeoff "bubble<br />
diagram" for the study.<br />
10-16 Section 10 -- Examples
Figure 10-11. Tradeoff "Bubble Diagram" for reservoir siting example.<br />
Section 10 -- Examples 10-17
S E C T I O N<br />
Commands Summary<br />
11
Commands Summary<br />
AHP Menu<br />
This section summarizes the commands available in <strong>Logical</strong><br />
<strong>Decisions</strong> for Windows (LDW). The summaries are in<br />
alphabetical order by menu.<br />
The AHP menu appears whenever you are doing an assessment<br />
using the Analytic Hierarchy Process.<br />
AHP::Cancel Cancel the AHP assessment. LDW will return you<br />
to the dialog box where you started the assessment without<br />
saving.<br />
AHP::Done Finish the AHP assessment. LDW will save the<br />
results and return you to the dialog box where you started the<br />
assessment.<br />
AHP::Estimate Ratios When Checked, LDW will estimate a ratio<br />
for each cell in the matrix that has not been explicitly entered,<br />
based on the ratios entered so far.<br />
AHP::Identify Outliers Ask LDW to identify those cells whose<br />
entered ratios differ most from the ratio computed from the<br />
diagonal of the AHP matrix. When you select the option LDW<br />
will ask you how many cells to highlight.<br />
AHP::Hide All Statistics When checked, LDW will not display<br />
any of the three statistics in the cell at the upper left of the<br />
hierarchy -- lambda-max, the consistency ratio and the<br />
consistency index.<br />
AHP::Hide Weights When checked, LDW will not display the<br />
computed weights along the matrix diagonal.<br />
AHP::Show C.I. Only When checked, LDW will only display the<br />
Consistency Index statistic in the cell at the upper left of the<br />
hierarchy. The lambda max and consistency ratio will not be<br />
displayed.<br />
Section 11 -- Commands Summary 11-1
Assess Menu<br />
Edit Menu<br />
The Assess menu has options that let you to assess and review the<br />
preference information LDW needs to rank the alternatives. The<br />
options are:<br />
Assess::Category Multipliers Lets you enter the category<br />
multipliers for a measure.<br />
Assess::Common Units The Assess::Common Units option in<br />
the SUF Menu lets you define the conversion to common units for<br />
a measure. When you select this option, LDW displays the<br />
common units dialog box. See page 7-7 for how to use this dialog<br />
box.<br />
Assess::Consistency Checks Lets you review the tradeoff<br />
implied between two measures or goals and to revise the existing<br />
tradeoffs if the computed tradeoff does not look reasonable. See<br />
page 7-45 for the options you then have in adjusting the various<br />
tradeoffs.<br />
Assess::Evaluation Form Displays an evaluation form that you<br />
can print and use to tabulate the measure levels for an alternative.<br />
Assess::Questionnaire Displays a data entry form for the active<br />
preference assessment screen. When you select this option, LDW<br />
reproduces the assessment screen, but replaces any data entry<br />
edit boxes with underlines where respondents can enter their<br />
answers. Questionnaires for AHP assessment screens display all<br />
possible pairs in the AHP matrix in a format that lets users<br />
graphically indicate relative importances.<br />
Assess::Weights Displays the assess weights dialog box, where<br />
you define the weights and interactions for the measures and<br />
goals in your analysis. The options available in this dialog box<br />
are discussed starting on page 7-24.<br />
The Edit menu provides options to manipulate objects in LDW<br />
windows. Several of these options change functions depending<br />
on the type of object(s) you have selected.<br />
11-2 Section 11 -- Commands Summary
Edit::Add Lets you add a new object to your analysis. You can<br />
add a new alternative, goal, measure, measure category, or<br />
preference set. You have the option to copy from an existing item.<br />
Edit::Change Measure Units Lets you revise the units for a<br />
measure you select. You can change the name of the units and<br />
apply a linear transformation to the units scale. A linear<br />
transformation is multiplication by a constant and adding another<br />
constant. This option is discussed on page 8-52.<br />
Edit::Copy Lets you save selected objects for later pasting. These<br />
can either be graphics objects (such as lines or text labels) or<br />
analysis objects (such as alternatives or goals). Note that LDW<br />
saves the analysis objects you copy internally and not on the<br />
clipboard.<br />
Edit::Cut Lets you delete selected objects but save them for later<br />
pasting. The objects can either be graphics objects (such as lines<br />
or text labels) or analysis objects (such as alternatives or goals).<br />
Edit::Delete Lets you delete an alternative, goal, measure,<br />
measure category, or preference set. If you have selected one of<br />
these objects in the Goals Hierarchy or Matrix view, LDW will<br />
delete the selected object.<br />
Edit::Delete All Alternatives Delete all of the alternatives in the<br />
analysis. LDW will add a single alternative called “New<br />
Alternative” as a placeholder.<br />
Edit::Graphic Selection::Add Label Lets you add a new text<br />
label to the active window.<br />
Edit::Graphic Selection::Change Brush Color Change the fill<br />
color of the current graphic selection.<br />
Edit::Graphic Selection::Change Pen Color Change the line<br />
color of the current graphic selection<br />
Edit::Graphic Selection::Change Text Font Lets you change the<br />
font for text you have selected in the active window.<br />
Edit::Graphic Selection::Edit Text Lets you edit a text label you<br />
have selected in a graphics window.<br />
Section 11 -- Commands Summary 11-3
File Menu<br />
Edit::Insert Lets you add a new alternative, measure, measure<br />
category , or goal to your analysis. This option is only available in<br />
the Goals Hierarchy, Quick Entry and Matrix views.<br />
Edit::Modify Lets you view the properties dialog box for the<br />
object currently selected in the Goals Hierarchy or Matrix view. If<br />
one of these windows is not active, LDW will show you a list of<br />
the types of objects you can modify.<br />
Edit::Paste Lets you retrieve an object that you have previously<br />
saved with the Edit::Cut or Edit::Copy option.<br />
Edit::Undo Undo the last action taken.<br />
The File Menu lets you load and save LDW and other types of<br />
files and to print the active window.<br />
File::Exit End your LDW session. If you have not saved your<br />
analysis, LDW gives you the option to save it before the session<br />
ends.<br />
File::Export Save information in an LDW database to other file<br />
formats. The exported data can be the alternatives' measure<br />
levels or the utility for each measure and goal. Utilities will be<br />
based on the active preference set. You can also export a working<br />
utility function to Excel. The various export options are discussed<br />
starting on page 8-72.<br />
File::Import Load data on a set of alternatives from another file<br />
format. You can use the data to create a new LDW database or to<br />
update and/or append to the data currently loaded into LDW.<br />
The various import options are discussed starting on page 8-64.<br />
File::New Reload the "mini-analysis" shown when you start the<br />
program. If you have not saved your current analysis, LDW gives<br />
you a chance to save it before it is overwritten.<br />
File::Open The File::Open option lets you retrieve a previously<br />
saved analysis from the disk.<br />
File::Print Print the active window.<br />
File::Print Preview Create a view that will show how the active<br />
window will look when printed.<br />
11-4 Section 11 -- Commands Summary
Help Menu<br />
File::Printer Setup View the dialog box for the active printer.<br />
File::Save Save your analysis in an LDW File using the most<br />
recent file name.<br />
File::Save As Save your analysis using a new name.<br />
File::Save Window::Save as Graphic Save the active window<br />
as a picture file. The available formats are Enhanced Metafile,<br />
bitmap, JPEG, GIF, and PING. You select the format you want in<br />
the select file name dialog box.<br />
File::Save Window::Save as Spreadsheet Save the active<br />
window as a Microsoft Excel Worksheet. The window is saved in<br />
the Excel 7.0 format.<br />
File::Save Window::Save as Text Save the active window as a<br />
text file. The available formats are MS Word 2003 and ASCII Text.<br />
The help menu lets you reach the LDW help system. The options<br />
are:<br />
Help::About The Help::About option displays the LDW "about<br />
box."<br />
Help::Index Opens the LDW help system and displays its index<br />
screen. You can get help on many different aspects of LDW<br />
starting from that screen.<br />
Help::Using Help Opens the LDW help system and displays<br />
general information on how to use it.<br />
Hierarchy Menu<br />
The hierarchy menu has options related to the Goals Hierarchy<br />
view. It only appears when a Goals Hierarchy view is the active<br />
window.<br />
Hierarchy::Add a Utility Function Add a utility function for the<br />
active goal if it does not already have one. Changes to “Has a<br />
Section 11 -- Commands Summary 11-5
utility function” if the active goal already has its own utility<br />
function.<br />
Hierarchy::Collapse Hide any objects beneath the active goal or<br />
measure in the hierarchy. Changes to “Expand” if the active<br />
member is already collapsed.<br />
Hierarchy::Demote to measure Demote the active goal to a<br />
measure and demote any measures underneath it to measure<br />
categories. Any sub-goals are deleted, but the measures under<br />
them are also demoted to measure categories. Any categories<br />
under demoted measures are deleted.<br />
Hierarchy::Description::Global Weights Display the weight of<br />
each object as a fraction of the total overall weight of 1.0 under its<br />
name.<br />
Hierarchy::Description::ID Number Display the ID number of<br />
each object under its name.<br />
Hierarchy::Description::Local Weights Display the weight of<br />
each object in the utility function (MUF) it belongs to under its<br />
name.<br />
Hierarchy::Description::No Description Don’t display anything<br />
under each object’s name.<br />
Hierarchy::Description::Type of Object Display the type of<br />
each object in the hierarchy under its name.<br />
Hierarchy::Description::Units Display the scale units for each<br />
object in the hierarchy under its name.<br />
Hierarchy::Expand Display the objects directly beneath the<br />
active goal or measure in the hierarchy. Changes to “Collapse” if<br />
the active item is already expanded.<br />
Hierarchy::Has a utility function Delete the utility function for<br />
the active goal. Changes to “Add a utility function” if the active<br />
goal does not have one.<br />
Hierarchy::Horizontal Display Redraw the goals hierarchy with<br />
a horizontal orientation, where the Overall goal is centered at the<br />
top of the hierarchy and the goals and measures are arranged in<br />
layers below it.<br />
11-6 Section 11 -- Commands Summary
Main Menu<br />
Hierarchy::Show Assessment Status Color the hierarchy based<br />
on whether preferences have been assessed for each object in the<br />
hierarchy. Measures and goals that have not been assessed will<br />
be colored red. Measures and goals that have been assessed will<br />
be colored blue. Goals that don't have their own MUF will be<br />
colored gray.<br />
Hierarchy::Show Shadows Redraw the goals hierarchy with<br />
black shadow boxes behind each object in the hierarchy. This is a<br />
toggle. Selecting the option again will cause the shadows to<br />
disappear. Showing the shadows is the default.<br />
Hierarchy::Vertical Display Redraw the goals hierarchy with a<br />
vertical orientation, where the Overall goal is at the upper left of<br />
the picture and the goals and measures are arranged in columns<br />
to the right of it. Vertical Display is the default.<br />
The Main Menu for LDW appears when you start the program. It<br />
has these options:<br />
! File -- load and save LDW and other files, and print the<br />
active window.<br />
! Edit -- add, delete or modify selected objects.<br />
! View -- create windows where you can structure the<br />
goals, measures, alternatives, and measure levels in<br />
your analysis.<br />
! Assess -- structure and do the preference assessments<br />
needed to rank your alternatives.<br />
! Review -- review the results of the preference<br />
assessments.<br />
! Results -- rank the alternatives, graph alternatives, do<br />
sensitivity analysis and generate other results<br />
displays.<br />
! AHP -- options related to the Analytic Hierarchy<br />
Process. Only appears when an AHP assessment is<br />
in progress.<br />
Section 11 -- Commands Summary 11-7
Matrix Menu<br />
! Hierarchy -- options related to the goals hierarchy view.<br />
Only appears when a goals hierarchy view is the<br />
active window.<br />
! Matrix -- options related to the matrix view. Only<br />
appears when a matrix view is the active window.<br />
! SUF -- options related to SUF assessment. Only appears<br />
when a SUF assessment is in progress.<br />
! Tradeoff -- options related to tradeoff assessment. Only<br />
appears when a tradeoff assessment is in progress.<br />
! Preferences -- change the names and appearance of<br />
selected objects.<br />
! Window -- select or rearrange the child windows in the<br />
LDW main window.<br />
The matrix menu appears when a Matrix view is the active<br />
window. It has the following options:<br />
Matrix::Define Probability Define a probabilistic level for the<br />
currently selected cell. When you select this option, LDW will<br />
display a dialog box that will let you define the probability<br />
distribution in several different ways. Probabilistic levels are<br />
discussed on page 6-21.<br />
Matrix::Show Measure Categories View the matrix columns for<br />
the categories associated with the active measure. This option is<br />
only available if the active measure has at least one category. This<br />
is a toggle option. Selecting it again will hide the category<br />
columns.<br />
Preferences Menu<br />
The Preferences menu lets you change the appearance of selected<br />
graphics objects and windows and lets you change the names of<br />
various objects in an LDW analysis.<br />
11-8 Section 11 -- Commands Summary
Results Menu<br />
Preferences::Color Preferences Change the colors of various<br />
objects in the active window type. When you select the option,<br />
LDW displays a dialog box where you can change the colors of<br />
various objects in the active window.<br />
Preferences::Load Preferences Load a file with the preferences<br />
that you have previously saved with the Preferences::Save<br />
Preferences option.<br />
Preferences::Name Preferences Change the names of various<br />
objects in an LDW analysis. When you select the option, LDW<br />
displays a dialog box with the current names of various LDW<br />
objects. See page 8-54 for a list of the names you can change with<br />
this option.<br />
Preferences::Save Preferences Save a file with the current<br />
preferences.<br />
Preferences::Simulation Preferences Set the parameters that<br />
control the Monte Carlo simulations. These simulations provide<br />
estimates of how uncertainties in measure levels affect the utilities<br />
for the alternatives. The parameters you can set with this option<br />
are the number of simulation trials and the seed that controls the<br />
random numbers that will be selected.<br />
Preferences::Sort Tell LDW how to sort the objects in the active<br />
window. See page 8-55 for details on sorting.<br />
Preferences::Utility Preferences Set the parameters that<br />
determine the range for the overall scoring units of utility. With<br />
this option you can set the least preferred and most preferred<br />
levels for utility and also how many decimal places are displayed<br />
when utility numbers are shown.<br />
The Results Menu lets you see the analysis results.<br />
Results::Compare Alternatives Display a table or graph<br />
showing the reasons for the difference in overall utility for two<br />
alternatives.<br />
Results::Cutoff Summary Display a table showing which<br />
alternatives failed one or more cutoffs. The table lists only those<br />
alternatives that fail at least one cutoff.<br />
Section 11 -- Commands Summary 11-9
Results::Dynamic Sensitivity See the effect of interactive<br />
changes in weights on the alternatives ranking. When you select<br />
this option, LDW will display a bar graph showing the overall<br />
ranking of the alternatives. Below that in a separate window,<br />
LDW displays a bar graph of the weights for the measures and<br />
goals. You can use your mouse to change one or more weights<br />
and can instantly see the effect of this on the alternatives' overall<br />
utilities. This option is discussed in more detail on page 8-27.<br />
Results::Efficient Frontier Display a cumulative graph showing<br />
the alternatives in order of benefit cost ratio.<br />
Results::Graph Alternatives Display a bar graph or petal<br />
diagram showing the performance of a single alternative by<br />
measures or goals. When you select this option, LDW displays a<br />
dialog box giving you options to customize the alternative graph.<br />
See page 8-41 for a discussion of these options and of how to<br />
interpret the alternatives graphs.<br />
Results::Measure Equivalents Ranking Display an overall<br />
ranking of the alternatives along with the levels on a particular<br />
measure that would result in the same overall utilities if all other<br />
measures had their most preferred levels.<br />
Results::Preference Set Summary Display a matrix with the<br />
ranking of each alternative on a selected goal or measure for each<br />
preference set. This option is discussed in more detail on page 8-<br />
39.<br />
Results::Rank Alternatives Display a ranking of the alternatives<br />
on any goal or measure.<br />
Results::Ranking Results Graph Display a graph showing the<br />
performance of the alternatives on selected goals and measures.<br />
Results::Ranking Results Matrix Display a matrix with the<br />
utility for each alternative on each goal and measure. This option<br />
is discussed in more detail on page 8-38.<br />
Results::Scatter Diagrams Display a graph showing the<br />
alternative's performance on two measures or goals.<br />
Results::Sensitivity Graph Display a sensitivity graph that<br />
shows the effects on the overall ranking of changing a measure or<br />
goal's weight.<br />
11-10 Section 11 -- Commands Summary
Review Menu<br />
The graph shows relative utilities on the vertical axis, and the<br />
percent of total weight on the measure (or goal) on the horizontal<br />
axis. The left side of the graph represents no weight at all on the<br />
member and the right side represents 100 percent of the weight<br />
on the member. The lines represent overall utilities for the<br />
alternatives at different weights. A vertical line shows the<br />
member's nominal weight.<br />
Results::Sensitivity Table See the effect of changing the weight<br />
of a measure or goal.<br />
When you select this option, LDW asks you to select a measure or<br />
goal. Then LDW asks you to enter a new percentage weight for<br />
the selected member. LDW then computes and displays an<br />
overall ranking of the alternatives based on that weight.<br />
Results::Stacked Bar Ranking Rank the alternatives using a<br />
stacked bar chart. The display is similar to the Results::Rank<br />
Alternatives option, except that each bar of the chart is made up<br />
of several colored sub-bars indicating the contribution to the<br />
alternative's ranking.<br />
Results::Uncertainty Summary Display a table summarizing<br />
the uncertainty in the alternatives for a measure or goal. The<br />
table has a line for each alternative and provides statistics such as<br />
the mean and standard deviation for the probability distribution<br />
for the alternative's utility or level for the selected measure or<br />
goal. The uncertainty summary table is discussed in more detail<br />
on page 8-26.<br />
The review menu lets you generate displays that help you review<br />
the results of your preference assessments.<br />
Review::Assessment Summary Display a summary of the<br />
preference assessments done for the active preference set. The<br />
information displayed varies depending on the assessment<br />
methods used.<br />
Review::Comments Summary Display a listing of the<br />
comments for all the objects in the analysis.<br />
Review::Common Units Display a graph of a measure's single<br />
measure utility function (SUF).<br />
Section 11 -- Commands Summary 11-11
Review::Compute Utilities Compute the utility of a particular<br />
levels on a measure. You can also use this option to compute the<br />
level on a measure that would result in particular utilities.<br />
When you select this option, LDW displays the compute utilities<br />
dialog box. See page 8-3 for a description of this dialog box.<br />
Review::Graph Pairs of Measures Display a graph showing sets<br />
of equally preferred levels on two measures.<br />
When you select this option, LDW asks you to select two<br />
measures. LDW then displays a graph with one measure on the<br />
horizontal axis, and the other on the vertical. LDW shows a user<br />
specified number of curves, representing sets of points that would<br />
get equal utilities on a utility function consisting of just the two<br />
selected measures.<br />
Review::Single Tradeoffs Display a graph of a tradeoff between<br />
two measures or goals.<br />
Review::Tradeoff Summary Graph Display a "bubble diagram"<br />
showing the results of the tradeoffs assessed so far, similar to one<br />
on page 8-8.<br />
Review::Tradeoffs by One Measure Have LDW compute and<br />
display a set of tradeoffs that compare each measure to a single<br />
selected measure. See page 8-6 for more details on this option.<br />
Review::Weights::Graph Weights Display a bar graph of the<br />
weights for the measures and goals.<br />
Review::Weights::Percentage Weights Display the measure's<br />
weights as percentages. The table shows two different types of<br />
weights – 1) the percentage weights for the measures based on<br />
their nominal ranges as defined in the measures' properties dialog<br />
boxes and 2) adjusted weights that would result if the nominal<br />
ranges equaled the actual ranges for the alternatives.<br />
Review::Weights::MUF Formulas Display the MUF formulas<br />
for the goals. When you select this option, LDW displays a table<br />
for each goal showing the scaling constants for the scaling<br />
constants its active members. The table for each goal also shows<br />
its big K and the methods used for assessing weights and<br />
interactions.<br />
11-12 Section 11 -- Commands Summary
SUF Menu<br />
Review::Weights::SUF Formulas Display the formulas used to<br />
convert the measure levels to common units.<br />
When you select this option, LDW displays each measure's SUF<br />
Formula in a table.<br />
LDW displays the SUF Assessment Options Menu when you are<br />
using the SUF method in the Assess::Common Units option. It<br />
provides options that let you shape the SUF curve for the active<br />
measure.<br />
SUF::Assess Utility Assess the active point's utility by asking an<br />
assessment question based on a lottery (uncertain outcome). See<br />
page 7-12 for more details on this option.<br />
SUF::Assess Value Assess the active point's utility by asking an<br />
assessment question based on the mid-level splitting method. See<br />
page 7-13 for more details on this option.<br />
SUF::Cancel Duplicates the "Cancel" button in the SUF<br />
assessment window.<br />
SUF::Delete Split Point Delete the active split point. A split<br />
point separates two sub-ranges of the active measure's SUF.<br />
When you select the option, LDW combines the two sub-ranges.<br />
LDW uses the split point as the mid-preference point of the<br />
combined sub-range.<br />
SUF::Done Duplicates the "Done" button in the SUF assessment<br />
window.<br />
SUF::Reset Range Restore the curve for a sub-range to a straight<br />
line.<br />
SUF::Split Range Split the active sub-range for the active<br />
measure's SUF into two parts. The mid-preference point for the<br />
old sub-range is the point that separates the two new sub-ranges.<br />
Section 11 -- Commands Summary 11-13
Tradeoff Menu<br />
View Menu<br />
LDW displays the Tradeoff Menu when you are using the tradeoff<br />
method in the Assess::Weights option. It provides options that let<br />
you revise the current tradeoff question.<br />
Tradeoff::Allow Free Float Lets you move the two simplified<br />
alternatives in a tradeoff assessment graph freely around the<br />
edges and interior of the graph.<br />
Tradeoff::Cancel Duplicates the "Cancel" button in the tradeoff<br />
assessment window.<br />
Tradeoff::Directly Enter Tradeoff Lets you directly enter the<br />
equally preferred levels for the current tradeoff.<br />
Tradeoff::Equal Duplicates the "Equal" button in the tradeoff<br />
assessment window.<br />
Tradeoff::Revise Range Lets you enter revised ranges for the<br />
two members in the current tradeoff. These ranges will define the<br />
axes in the tradeoff question graph.<br />
Tradeoff::Use Alternatives to Set Range Lets you ask LDW to<br />
automatically revise the range for the current tradeoff question.<br />
The alternative that has the most preferred level on one of the<br />
tradeoff's members may not have the least preferred level on the<br />
other member. Thus, you may not have to give up one member's<br />
entire range to achieve the other's most preferred level. This<br />
option has LDW recompute the ranges for the tradeoff members<br />
by setting the least each member's least preferred level to that<br />
member's most preferred level for an alternative that achieves the<br />
other member's most preferred level.<br />
The view menu lets you create windows where you can structure<br />
your analysis.<br />
View::Goals Hierarchy Create a new goals hierarchy window<br />
that shows the relationships between the goals and measures in<br />
11-14 Section 11 -- Commands Summary
Window Menu<br />
your analysis. The many possibilities available with this option<br />
are discussed starting on page 6-5.<br />
View::Matrix Create a new matrix view where you can review<br />
the alternatives, measures and their associated levels in a<br />
spreadsheet. The possibilities available with this option are<br />
discussed starting on page 6-10.<br />
View::Quick Entry Create a new quick entry window, where<br />
you can quickly add, delete and arrange goals, measures, measure<br />
categories and alternatives. The qiock entry view is discussed on<br />
page 6-13.<br />
View::Summary View the summary dialog box is discussed on<br />
page 6-5.<br />
The Window menu is a standard menu that controls the child<br />
windows created in the LDW main window.<br />
Window::Arrange Icons Neatly arranges the currently iconized<br />
child windows in the LDW main window.<br />
Window::Cascade Arranges the child windows in the LDW<br />
main window in a cascade.<br />
Window::Close All Closes all of the child windows in the LDW<br />
main window.<br />
Window::Tile Arranges the child windows in the LDW main<br />
window in a tiled pattern.<br />
Window::Zoom Lets you resize the picture in the active child<br />
window. When you select this option, LDW asks you to enter a<br />
zoom amount as a percentage of the picture's original size.<br />
Window::Zoom In Increase the size the picture in the active<br />
child window by 20 percent.<br />
Window::Zoom Out Reduce the size the picture in the active<br />
child window by 20 percent.<br />
Section 11 -- Commands Summary 11-15
S E C T I O N<br />
Glossary<br />
12
Glossary<br />
Active<br />
Member<br />
Alternative<br />
Analytic<br />
Hierarchy<br />
Process<br />
Big K<br />
The references at the end of each term refer to commands defined in<br />
the Commands Summary section (page 11-1) (underlined) and to<br />
other terms in this Glossary (not underlined).<br />
A goal's active members are the goals or measures that are included<br />
in its MUF. The active members can be the members directly below<br />
the goal in the goals hierarchy or members of a lower level goal that<br />
does not have its own MUF,<br />
See also: Goal, Goals Hierarchy, Measure, Member, MUF.<br />
Alternatives are the choices to be ranked by the analysis. There is no<br />
limit on how many alternatives you can define, provided sufficient<br />
memory is available. Alternatives consist of a name and a level for<br />
each measure. Levels may be point estimates (single numbers), text<br />
labels or probabilistic.<br />
See also: Level, Measure, Point Estimate, Probabilistic Level.<br />
A process for computing the relative importances of a set of<br />
alternatives or goal members. The decision maker is asked to provide<br />
the ratios of the performances (or importances) of all the possible<br />
pairs of objects in the set. A method based on linear algebra is used<br />
to compute the relative utilities or weights for the objects in the set.<br />
See also: Alternative, Measure, Utility, Weight.<br />
One of the scaling constants in a MUF formula. Big K defines the<br />
degree of interaction between the members of a goal. When big K<br />
equals 0.0, an additive MUF formula is used and big K does not<br />
appear in the formula. The small ks must sum to 1.0 when big K is<br />
0.0. If big K is greater than 0.0, the active members of the goal<br />
interact destructively, so that a low utility for one member can result<br />
in a low utility for the goal. When big K is greater than 0.0 the<br />
members of the goal interact constructively, so that the sum of the<br />
small ks is less than 1.0. If big K is less than 0.0 a high utility for one<br />
member can result in a high utility for the goal. In this case, the small<br />
ks sum to more than 1.0.<br />
See also: Constructive Interaction, Destructive Interaction, Goal,<br />
Member, MUF, MUF Formula, Small k, Utility.<br />
Section 12 -- Glossary 12-1
Common<br />
Units<br />
Certainty<br />
Equivalent<br />
Constructive A type of interaction between a goal's active members where a high<br />
Interaction utility for one member leads to a high overall utility for the goal.<br />
Constructive interaction is modeled by a multiplicative MUF formula<br />
where the sum of the weights (small ks) is more than 1.0, and the<br />
interaction scaling constant big K is less than 0.0.<br />
Default<br />
See Utility.<br />
The certainty equivalent of a probabilistic level of a measure for an<br />
alternative is the level for that measure that is equally preferred to the<br />
uncertain outcome defined by the probability distribution.<br />
LDW computes the certainty equivalent by finding the expected<br />
utility (defined by summing (integrating) prob(x)U(x) for all levels x<br />
whose probability is greater than 0) for the probability distribution.<br />
The certainty equivalent is the level y such that U(y) equals the<br />
expected utility for the probability distribution.<br />
See also: Alternative, Level, Measure, Probabilistic Level, Utility.<br />
See also: Big K, Destructive Interaction, Goal, Member, MUF, MUF<br />
Formula, Small k, utility, Weight.<br />
A default is a value for a variable assigned by LDW in the absence of<br />
a specification from the user. Defaults include<br />
! Measure Levels for Alternatives -- set to the most preferred<br />
level for the measure.<br />
! SUF curves -- set to straight lines over the measure's entire<br />
range.<br />
! Level types -- assumed to be point estimates rather than<br />
probabilistic<br />
! MUF scaling constants -- assumed that all active members of<br />
a goal have equal weights (equal small ks in an<br />
additive MUF)<br />
See also: Initialize.<br />
12-2 Section 12 -- Glossary
Destructive<br />
Interaction<br />
Efficient<br />
Frontier<br />
Goal<br />
Goals<br />
Hierarchy<br />
Initialize<br />
Label<br />
A type of interaction between a goal's active members where a low<br />
utility for one member leads to a low overall utility for the goal.<br />
Destructive interaction is modeled by a multiplicative MUF formula<br />
where the sum of the weights (small ks) is less than 1.0 and the<br />
interaction scaling constant big K is greater than 0.0.<br />
See also: Big K, Goal, Member, MUF, MUF Formula, Small k, Utility,<br />
Weight.<br />
A cumulative graph showing the alternatives ordered by decreasing<br />
benefit/cost ratio. In the absence of other constraints, the efficient<br />
frontier shows the order in which you would select multiple<br />
alternatives if you wanted to maximize their benefits subject to a<br />
budget constraint.<br />
A set of measures (and possibly other goals) treated as a unit for<br />
ranking purposes. The goals form a hierarchy ranging from most to<br />
least general. Each analysis is required to have at least one goal,<br />
called Overall. If no other goals have been defined, all of the<br />
measures are members of the Overall goal. A measure or goal can be<br />
a member of only one goal.<br />
See also: Measure, Member.<br />
An representation like an organization chart of a set of goals and<br />
measures that organizes them from most to least general. Goals and<br />
measures can be members of another higher (or more general goal)<br />
and in turn goals can have members which are lower (more specific)<br />
goals or ranking measures.<br />
See also: Goal, Measure, Member.<br />
When a variable is initialized it is returned to its default value. When<br />
SUFs are initialized, they become straight lines. When tradeoffs are<br />
initialized, they are simply deleted.<br />
See also: Default.<br />
A label is a type of measure level that is a text string rather than a<br />
number. Measures must use either text labels or numbers, and the<br />
two types can't be mixed in a single measure. You specify if text<br />
labels are to be used in a measure's dialog box. Each alternative is<br />
Section 12 -- Glossary 12-3
LDW File<br />
Level<br />
Lottery<br />
Measure<br />
assigned one of a limited number of possible text labels for each<br />
measure that uses labels.<br />
See also: Level, Measure.<br />
LDW files are used to save the information from a LDW session.<br />
LDW files contain the following information:<br />
! Measure definitions,<br />
! Alternative data, including the levels of the measures and<br />
probability distributions,<br />
! Goal data, and<br />
! Preference Set data including SUFs, MUF type and tradeoffs<br />
for each set.<br />
See also: Alternative, Goal, Level, Measure, MUF, Preference Set,<br />
SUF, Tradeoff.<br />
An alternative's level on a measure is the number on the measure's<br />
scale (having the proper units) that indicates how the alternative<br />
performs on that measure. Levels can also be probabilistic, so that<br />
the level is defined by a probability distribution instead of a single<br />
number. Levels can be text labels, where each alternative is assigned<br />
one of a limited number of text descriptors. Levels can also be<br />
defined as the weighted sum of a group of measure categories.<br />
Levels should not have a value or preference content. Levels are just<br />
data. The preference information is added when the levels are<br />
converted to utility.<br />
See also: Alternative, Label, Measure, Measure Category,<br />
Probabilistic Levels, Utility.<br />
A lottery is a standardized gamble used when assessing utilities. A<br />
lottery generally has two possible outcomes, each with a well defined<br />
probability. Lotteries are often compared to a level that occurs with<br />
certainty.<br />
See also: Assess Utility option, Certainty Equivalent, Level, Utility.<br />
Evaluation measures are the variables that are used to rank the<br />
alternatives. The decision analysis literature uses many aliases for<br />
measures, including "attributes", "criteria", and "scales".<br />
12-4 Section 12 -- Glossary
Measure<br />
Category<br />
Member<br />
Monte Carlo<br />
Simulation<br />
A measure consists of a name, a three letter abbreviation, units and<br />
most and least preferred levels. LDW puts no restrictions on the most<br />
and least preferred levels. The most preferred level can be greater or<br />
less than the least preferred level. There is also no requirement that<br />
the ranges on different measures be comparable. The ranges are<br />
made comparable when levels on the measures are converted to<br />
utility using the SUF for each measure.<br />
See also: Alternative, Level, Range, SUF, Utility.<br />
A sub-measure associated with a measure. You can define measures<br />
so that their levels are the weighted sum of several measure category<br />
levels. Measure category levels are not converted to common units<br />
before they are summed, but otherwise they are exactly like measure<br />
levels.<br />
See also: Common Units, Level, Measure, Measure Level.<br />
A member of a goal is either a measure or another goal that is<br />
included under the first goal in a goals hierarchy. Note: At least one<br />
of the goals in an analysis must only have measures as members.<br />
See also: Goal, Goals Hierarchy, Measure, MUF, Preference Set,<br />
Utility.<br />
A method for estimating the uncertainty of a number that is a<br />
complex function of one or more probability distributions. It can be<br />
very difficult to compute analytically a probability distribution that is<br />
the result of combining other distributions. This is the case for<br />
estimating a probability distribution over utility from the probability<br />
distributions over measure levels, particularly when complex SUFs<br />
and MUFs are involved. Monte Carlo simulation avoids this problem<br />
by using random numbers to provide an estimate of the distribution.<br />
Monte Carlo simulation uses a random number generator to produce<br />
random samples from the probabilistic levels. each set of samples is<br />
used to compute the utility of one possible outcome of the measure<br />
level uncertainties. Each computed utility is called a trial. Many<br />
trials are done and the results for each trial are saved. The sorted<br />
trials can be used as an estimate of the cumulative probability<br />
distribution of the desired utility.<br />
Section 12 -- Glossary 12-5
MUF<br />
MUF<br />
Formula<br />
See also: Alternative Uncertainty Graph option, Level, Measure,<br />
MUF, Probabilistic Level, Sample, Simulation Options option, SUF,<br />
Trial, Uncertainty Summary option, Utility.<br />
A Multi-measure Utility Function (MUF) is the formula that combines<br />
the utilities for the individual measures computed by the SUFs into<br />
the utility for a goal.<br />
A MUF consists of two parts: a SUF for each measure and a set of<br />
scaling constants (called small ks) that determine the relative<br />
importance of the measures. (For goals with other goals as members,<br />
MUFs for the member goals may replace SUFs. The scaling constants<br />
are similar in both cases.)<br />
LDW uses two types of MUF Formulas to combine the measures -- an<br />
additive form where the small ks can be interpreted as weights and a<br />
multiplicative formula that includes an additional scaling constant<br />
called big K. Big K can be interpreted as the degree of interaction<br />
between the measures.<br />
See also: Alternative, Big K, Define Interactions option, Measure,<br />
MUF Formula, Small k, SUF, Tradeoff, Utility, Weight.<br />
LDW uses two formulas for MUFs. The additive formula is:<br />
U g(X) = k1U 1(X) + k2U 2(X) + ... + knU n(X),<br />
where<br />
U g(X)=<br />
is the utility of alternative X for the goal g,<br />
U i(X)=<br />
the utility of alternative X for the ith member of g, and<br />
k = the scaling constant small k for the ith member of g.<br />
i<br />
The additive formula requires that the small ks sum to 1.0 and that<br />
big K = 0.0. The additive formula is used as the default formula,<br />
when the Additive MUF option is selected and when big K is<br />
computed to equal 0.0.<br />
The second MUF formula is the multiplicative formula:<br />
U g(X) = ((1 + Kk1U 1(X))(1 + Kk2U 2(X))...(1 + KknU n(X))<br />
- 1)/K,<br />
where<br />
g<br />
U (X) = the utility of alternative X for goal g,<br />
K= the scaling constant big K for g,<br />
12-6 Section 12 -- Glossary
Nominal<br />
Utility<br />
Point<br />
Estimate<br />
k i=<br />
the scaling constant small k for member i of g, and<br />
U (X)= the utility of alternative X for member i<br />
i<br />
The multiplicative MUF formula is used when a non-additive option<br />
is selected in Define Interactions. The formula has three interesting<br />
limits -- If big K equals 0.0, the formula reduces to the additive<br />
formula. If big K equals -1.0, the formula reduces to<br />
U g(X) = (1 - U 1(X))(1 - U 2(X))...(1 - U n(X))<br />
+ 1,<br />
which equals 1.0 if U i(X)<br />
= 1.0 for any i. As big K gets very large, the<br />
formula becomes<br />
U g(X) = U 1(X)U 2(X)...U n(X),<br />
which equals 0.0 if U i(X)<br />
equals 0.0 for any i. Intermediate values of<br />
big K have intermediate degrees of interaction. Big Ks less than 0.0<br />
mean that a high utility on an individual member can result in a high<br />
overall utility (constructive interaction), while big K greater than 0.0<br />
indicates that a low utility on an individual member can result in a<br />
low overall utility (destructive interaction).<br />
See also: Additive MUF, Alternative, Big K, Define Interactions, Goal,<br />
Member, MUF, Small k, Utility.<br />
A nominal utility is assigned to all members of a goal when the utility<br />
is not directly specified. The nominal utility is assigned when the<br />
goal is defined and is generally set to 1.0, so that all members of the<br />
goal are assumed to have their most preferred levels if their level is<br />
not directly specified. This situation occurs while assessing tradeoffs,<br />
when a single measure is used to represent a goal in a tradeoff.<br />
When the tradeoff questions are displayed, the decision maker is<br />
asked to assume that the representative measure has a certain utility<br />
and that all other members of the goal have the nominal utility.<br />
See also: Goal, Measure, Member, Tradeoff, Utility.<br />
A point estimate for a measure level is a single number that will be<br />
the measure's level with certainty. This is in contrast to a<br />
probabilistic level, where a measure's level is not known with<br />
certainty and must be described with a probability distribution.<br />
See also: Level, Measure, Probabilistic Level.<br />
Section 12 -- Glossary 12-7
Preference<br />
Set<br />
Probabilistic<br />
Level<br />
Range<br />
Risk<br />
Aversion<br />
Risk<br />
Premium<br />
A Preference Set is a set of SUFs and tradeoffs for the measures and<br />
goals defined in the current analysis. A preference set includes a<br />
name, a set of category multipliers if needed, a SUF for each measure,<br />
and a set of weight assessment data that will allow a MUF for each<br />
goal to be computed.<br />
See also: Goal, Measure, MUF, SUF.<br />
A probabilistic level is a probability distribution that describes the<br />
level on a measure for an alternative when that level is not known<br />
with certainty. This is in contrast to a point estimate, where a<br />
measure's level is known with certainty and can be described with a<br />
single number or text label.<br />
See also: Label, Level, Measure, Point Estimate.<br />
The range of a measure is determined by the most preferred and least<br />
preferred levels of the measure as defined in the measure's dialog<br />
box.<br />
A measure is said to be Increasing if the most preferred level is greater<br />
than the least preferred level. Otherwise it is said to be Decreasing.<br />
The least preferred level always has a utility of 0.0 on the measure's<br />
SUF, while the most preferred level has a utility of 1.0.<br />
See also: Level, Measure, SUF, Utility.<br />
The local risk aversion (r) is defined as the ratio r = -u''(x)/u'(x),<br />
where u'(x) is the first derivative and u"(x) is the second derivative of<br />
the utility function. In the case of the exponential utility functions<br />
used in LDW this complicated function has a simple result. It is equal<br />
-cx<br />
to the constant c in the exponential formula u(x) = a +be . If r is<br />
positive you are locally risk-averse (for measures where higher levels<br />
are preferred). If r is negative, you are locally risk-seeking. Both of<br />
these parameters are displayed when you do an assessment in LDW<br />
with the SUF::Assess Utility option.<br />
See also: Assess Utility option, SUF, Utility.<br />
The risk premium indicates how much you would pay to avoid the<br />
uncertainty in a lottery. It is the difference in the expected value of<br />
the lottery B and the certain level L. If the risk premium is positive<br />
and higher levels of the measure are preferred, then you would be<br />
12-8 Section 12 -- Glossary
Sample<br />
Small k<br />
SUF<br />
willing to accept less of the measure (in terms of expected value) in<br />
order to avoid uncertainty. This type of preference is called riskaverse.<br />
The converse is when the risk premium is negative and you<br />
would have to have a higher expected value in the certain alternative<br />
before it is equally preferred to the lottery. This type of preference is<br />
called risk-seeking.<br />
See also: Level, Lottery, Measure.<br />
A sample is a single number selected from a probability distribution<br />
on the basis of a random number. The random number is used as<br />
input to an inverse probability distribution that tells the level<br />
associated with a given number between 0 and 1.<br />
See also: Level, Monte Carlo Simulation, Trial.<br />
Small k is the name for the weight (or scaling constant) associated<br />
with the SUF for a member of a goal in the goal's MUF Formula.<br />
When the MUF for the goal has an additive MUF formula, the small<br />
ks can be interpreted as weights. When a multiplicative MUF<br />
formula is used, the small ks do not sum to 1.0 and the interpretation<br />
as weights becomes less useful.<br />
See also: Goal, Member, MUF, MUF Formula, SUF, Weight.<br />
A Single-measure Utility Function (SUF) is a mathematical function<br />
that converts an alternative's level for a measure into utility. LDW<br />
uses two types of SUF Formulas, linear and exponential. Linear SUFs<br />
are straight lines and exponential SUFs are smooth curves.<br />
SUFs can consist of up to 10 sub-ranges, each of which can have a<br />
linear or exponential SUF formula. Exponential sub-ranges can be<br />
either concave or convex. Each sub-range is defined by minimum,<br />
maximum and mid-preference pairs of levels and utilities. The<br />
mid-preference pair is the level that gets a utility equal to the average<br />
of the minimum and maximum utilities for the sub-range.<br />
See also: Level, Measure, SUF Formula, Range, Utility.<br />
SUF Formula LDW uses two formulas for SUFs -- the linear formula and the<br />
exponential formula. Either of these formulas can be used for any<br />
sub-range for the measure, and they may be intermixed freely. The<br />
Section 12 -- Glossary 12-9
Tradeoff<br />
Trial<br />
program decides which formula to use based on your input in the<br />
Assess SUFs option.<br />
The linear SUF formula is just the formula that gives a straight line<br />
from the utility of the least preferred level of the sub-range to the<br />
utility of the most preferred level of the sub-range. The formula for a<br />
linear SUF is:<br />
U(X) = a + bX,<br />
where a and b are computed scaling constants and X is a level<br />
for the measure.<br />
The exponential SUF formula is used to fit a smooth curve to three<br />
points -- the least preferred level of the sub-range, the most preferred<br />
level of the sub-range and the mid-preference level of the sub range.<br />
The formula is<br />
(-cX)<br />
U(X) = a + (be ),<br />
where a, b, and c are computed scaling constants and e is the<br />
mathematical constant 2.718...<br />
See also: Assess SUFs option, Level, Measure, SUF, Utility.<br />
A tradeoff is a pair of equally preferred hypothetical alternatives that<br />
differ on only two measures. Alternative B has a more preferred<br />
level on measure 1 and a less preferred level on measure 2 while<br />
alternative A has a less preferred level on measure 1 and a more<br />
preferred level for measure 2. The levels of the measures are set so<br />
that a change in measure 1 just compensates for a corresponding<br />
change in measure 2. Equally preferred alternatives should have<br />
equal overall utilities, and since alternatives A and B differ only in<br />
measures 1 and 2, these compensating changes can be used to<br />
compute the relative weights for measures 1 and 2.<br />
See also: Alternative, Level, Measure, Utility, Weight.<br />
A trial is a single iteration in a Monte Carlo simulation. In LDW a<br />
trial results in the evaluation of the utility of an alternative based on<br />
a possible resolution of its uncertainties. In the trial, each<br />
probabilistic level is replaced by a deterministic sample from its<br />
probability distribution. The samples are generated using a random<br />
12-10 Section 12 -- Glossary
Utility<br />
Weight<br />
number generator and the inverse probability distribution for the<br />
probabilistic level. Once all the probabilistic levels have been<br />
replaced, LDW computes and saves the requested utility. After many<br />
trials have been computed, the cumulative probability distribution on<br />
the alternative's utility can be estimated.<br />
See also: Alternative, Monte Carlo Simulation, Probabilistic Level,<br />
Sample, Utility.<br />
Utility is a standardized measure of the relative desirability of a given<br />
level or set of levels for an alternative. Utilities are the output of a<br />
Multi-measure Utility Function (MUF) or Single-measure Utility<br />
Function (SUF). They are used to convert the levels for measures,<br />
which are based on scales with potentially very different units, into a<br />
comparable scale with a range defined to go from 0.0 to 1.0. Utility<br />
functions generally assign a utility of 0.0 to the least preferred level<br />
for a measure, and assign 1.0 to the most preferable level for a<br />
measure. Alternatives with utilities closer to 1.0 are preferred.<br />
See also: Alternative, Level, Measure, MUF, SUF.<br />
Weights are a casual term for the scaling constants (small ks)<br />
associated with the members of a goal in the MUF for a goal.<br />
Weights have no intrinsic importance, but do provide an indication of<br />
the relative importance of the measures given the ranges found for a<br />
set of alternatives.<br />
The weights in a MUF are determined by the tradeoffs that define the<br />
MUF. The tradeoffs define a unique set of weights that will allow all<br />
of the equally preferred alternatives in the tradeoffs to get the same<br />
overall utility.<br />
See also: Alternative, Goal, Measure, MUF, Range, Small k, Tradeoff,<br />
Utility.<br />
Section 12 -- Glossary 12-11
Bibliography<br />
B
Bibliography<br />
This brief bibliography provides an introduction to the literature<br />
of decision analysis. The methods described in these books are<br />
the basis of the algorithms used in <strong>Logical</strong> Decision. The<br />
underlying assumptions, mathematics and philosophy of the<br />
approach are discussed in much more detail than is possible in<br />
this manual. These books also contain detailed bibliographies<br />
that can guide you to the other information sources available. A<br />
more extensive bibliography is available on the <strong>Logical</strong> <strong>Decisions</strong><br />
web site at www.logicaldecisions.com.<br />
Bell, D., Raiffa, H, and Tversky, A. (1988) Decision Making:<br />
Descriptive, normative, and Prescriptive Interactions. Cambridge<br />
University Press.<br />
A collection of papers that discuss the differences between<br />
the the use of decision analysis to describe how people<br />
make decisions, how people should make decisions and<br />
how people can be helped in making decisions.<br />
Clemen, Robert T. (1990) Making Hard <strong>Decisions</strong>: An Introduction to<br />
Decision Analysis. PWS-Kent Publishing Company, Boston.<br />
An excellent introductory textbook in decision analysis.<br />
French, S. (1986) Decision Theory: An Introduction to the Mathematics<br />
of Rationality. John Wiley and Sons.<br />
An excellent overview of the field of decision analysis,<br />
with discussions of single and multiple measure utility<br />
theory and of competing methods for comparing<br />
alternatives.<br />
Keeney, R. L. (1980) Siting Energy Facilities. Academic Press.<br />
A more accessible presentation of the ideas developed in<br />
Keeney and Raiffa, with an application to the specific<br />
problem of siting power plants.<br />
Keeney, R. L. and Raiffa, H. (1976) <strong>Decisions</strong> with Multiple<br />
Objectives: Preferences and Value Tradeoffs. John Wiley.<br />
Bibliography B-1
The classic reference on multiple measure utility theory.<br />
Required reading for those with a strong mathematical<br />
background. Others will find it tough going but may still<br />
find some interesting information.<br />
Kirkwood, C. (1997) Strategic Decision Making: Multiobjective<br />
Decision Analysis With Spreadsheets. Duxbury Press<br />
A recent introduction to multi-measure decision analysis<br />
with good sections on problem structuring. The<br />
quantitative sections provide examples using<br />
spreadsheets.<br />
Raiffa, H. (1968) Decision Analysis. Addison Wesley.<br />
One of the first books to define the field of decision<br />
analysis as such. Concentrates on single measure<br />
problems. This would be useful for an in depth<br />
understanding of SUFs and how to assess them.<br />
Saaty, T. (1980) The Analytic Hierarchy Process. McGraw-Hill.<br />
A description of the Analytic Hierarchy Process by its<br />
creator.<br />
Von Neumann, J. and Morgenstern, O. (1947) Theory of Games and<br />
Economic Behavior. 2nd edition. Princeton University<br />
Press.<br />
The first attempt at a formal approach to decision making<br />
and to quantifying preferences. Primarily of historical<br />
interest now.<br />
Von Winterfeldt, D. and Edwards, W. (1986) Decision Analysis and<br />
Behaviorial Research. Cambridge University Press.<br />
A guide to decision analysis with emphasis on the<br />
behaviorial aspects of human decision making.<br />
Watson, S., and Buede, D. (1987) Decision Synthesis:The Principles<br />
and Practice of Decision Analysis. Cambridge University Press.<br />
An overview of decision analysis with emphasis on its<br />
practical application.<br />
B-2 Bibliography
Appendix<br />
A
Appendix<br />
This appendix describes the mathematics of computing the<br />
relative weights of two measures based on a tradeoff between<br />
them. The process is illustrated with a simple example.<br />
Computing Relative Weights from a Tradeoff<br />
The overall utility of any alternative X is assumed to be the<br />
weighted average of its SUF utilities as follows:<br />
U(X) = k1U 1(X) + k2U 2(X) + ... + knU n(X),<br />
where U(X) = the overall utility for alternative X<br />
k i = the weight for measure i; also called the scaling<br />
constant small k for measure i.<br />
U i(X)<br />
= the SUF utility on measure i for alternative<br />
X.<br />
Call the two alternatives in the tradeoff A and B and suppose they<br />
differ only in measures 1 and 2. Then the overall utility for the<br />
alternatives is<br />
U(A) = k1U 1(a 1) + k2U 2(a 2) + ... + knU n(a n),<br />
U(B) = k U (b ) + k U (b ) + ... + k U (b ).<br />
1 1 1 2 2 2 n n n<br />
Since the alternatives in the tradeoff are equally preferred, they<br />
must have equal overall utilities. This means<br />
so that<br />
U(A) = U(B)<br />
k1U 1(a 1) + k2U 2(a 2) + ... + knU n(a n))<br />
=<br />
k U (b ) + k U (b ) + ... + k U (b ).<br />
1 1 1 2 2 2 n n n<br />
but, since alternatives A and B only differ on measures 1 and 2,<br />
we have<br />
U i(a i) = U i(b i)<br />
Appendix A-1
for all measures i except 1 and 2. Thus all of these terms cancel<br />
out of the equation above leaving us with<br />
kU(a) 1 1 1 + kU(a) 2 2 2 = kU(b) 1 1 1 + kU(b).<br />
2 2 2<br />
since we are looking for the weights k 1 and k 2,<br />
we can rearrange<br />
this to give k in terms of k :<br />
so that<br />
2 1<br />
k 2(U 2(a 2) - U 2(b 2)) = k 1(U 1(b 1) - U 1(a 1))<br />
k 2/k 1 = (U 1(b 1) - U 1(a 1))/(U 2(a 2) - U 2(b 2)).<br />
If we know the individual SUFs, we can compute all of the terms<br />
in the right hand side of the equation and thus we can find the<br />
ratio of the weights for measures 1 and 2. If we establish a<br />
tradeoff involving each of the measures and add the restriction<br />
that the weights must sum to 1 we can solve for the exact values<br />
of all the weights and thus completely define an additive MUF.<br />
Example of Relative Weight Computation<br />
Suppose we have two trucks, A and B that are identical except for<br />
their price and horsepower. A costs $10,000 and has 120 hp and B<br />
costs $12,000 and has 150 hp. Suppose also that we know that A<br />
and B are equally preferred and that the SUFs for cost and<br />
horsepower are known to give following SUF utilities:<br />
U cost($10,000)<br />
= 0.5<br />
U ($12,000) = 0.4<br />
cost<br />
U hp(120)<br />
= 0.2<br />
U (160) = 1.0.<br />
hp<br />
This means that a change in the utility of cost of 0.5 - 0.4 = 0.1 is<br />
just compensated for by a change in the utility of horsepower of<br />
1.0 - 0.2 = 0.8. Thus the ratio of the weights for cost and<br />
horsepower must be<br />
k hp/k cost = (U cost(b cost) - U cost(a cost))/(U hp(a hp)<br />
-<br />
U hp(b hp))<br />
= (0.4 - 0.5)/(0.2 - 1.0)<br />
= (-0.1)/(-0.8)<br />
A-2 Appendix
= .125<br />
Thus the weight for cost is eight times the weight for horsepower,<br />
given the ranges and preferences of the example. If these were<br />
the only measures in the example, their weights would have to<br />
sum to 1. This would mean that k cost = 0.8888... and k hp = 0.1111...<br />
since then we would have both k hp/k cost = 0.125 and k cost + k hp = 1.0.<br />
As a check we can confirm that U(A) = U(B):<br />
U(A) = kcostU cost(a cost) + khpU hp(a hp)<br />
= .8888U cost($10,000) + .1111U hp(120)<br />
= .8888x0.5 + .1111x0.2<br />
= .4444 + .0222<br />
= .4666<br />
U(B) = kcostU cost(b cost) + khpU hp(b hp)<br />
= .8888U cost($12,000) + .1111U hp(160)<br />
= .8888x0.4 + .1111x1.0<br />
= .3555 + .1111<br />
= .4666<br />
Thus these weights meet our requirement that equally preferred<br />
alternative receive equal overall utilities. Note that since the SUF<br />
utilities are used in computing the weights, changes in the range<br />
or SUF for either measure are automatically compensated for<br />
when the weights are computed.<br />
Appendix A-3
Index<br />
I
Index<br />
adjusted AHP ................7 - 19<br />
AHP measure levels . . . . . . 7 - 7, 7 - 15,<br />
9 - 9, 9 - 26<br />
AHP menu ...................7 - 18<br />
AHP SUF .............. 7 - 19, 9 - 30<br />
alternative ....................3 - 1<br />
adding...................6 - 15<br />
compare .................8 - 46<br />
composite .................9 - 4<br />
defining ..................9 - 6<br />
deleting..................6 - 15<br />
describing.................9 - 4<br />
dialog box................6 - 14<br />
graph....................8 - 41<br />
identifying ................9 - 4<br />
ranking ..................8 - 20<br />
simplified ................7 - 28<br />
structuring . . . . . . . . . . 6 - 14, 9 - 3<br />
analytic hierarchy process . . . . . . 7 - 7,<br />
7 - 25, 7 - 38, 9 - 5, 9 - 26,<br />
9 - 39, 9 - 40<br />
consistency ratio . . . . 7 - 18, 7 - 40,<br />
9 - 30<br />
dialog box................7 - 17<br />
matrix ...................7 - 16<br />
scale.....................9 - 28<br />
big K ........................9 - 55<br />
bubble diagram ................8 - 6<br />
certainty equivalent . . . . . . . . . . . 6 - 22<br />
child windows<br />
arranging ................8 - 74<br />
clipboard ....................8 - 50<br />
colors<br />
black and white . . . . . . . . . . . 8 - 58<br />
changing.................8 - 61<br />
comma delimited files . . . . . . . . . 8 - 72<br />
common units . . . . . . 3 - 4, 7 - 6, 9 - 13<br />
direct entry ..............7 - 21<br />
consistency checks . . . . . . . . . . . . 7 - 45<br />
copying<br />
graphics .................8 - 50<br />
cutoff level ...................6 - 18<br />
dBASE III files . . . . . . . . . . . 8 - 66, 8 - 72<br />
decision analysis . . . . . . . . . . . . . . . . 9 - 1<br />
decreasing marginal returns . . . . . 9 - 15<br />
direct entry method . . . . . . . . . . . . 7 - 31<br />
discrete distribution . . . . . . . . . . . . 6 - 23<br />
edit menu......................6 - 1<br />
expected utility ................6 - 22<br />
exporting data .................8 - 72<br />
file<br />
graphics ..................8 - 50<br />
goal<br />
adding ...................6 - 17<br />
deleting ..................6 - 17<br />
dialog box ................6 - 16<br />
structuring . . . . . . . . . . . 6 - 16, 9 - 6<br />
with a MUF . . . . 7 - 3, 7 - 23, 9 - 32<br />
goals hierarchy .................9 - 6<br />
analysis mode ..............6 - 9<br />
dialog box .................6 - 6<br />
global weight...............6 - 8<br />
horizontal display . . . . . . . . . . . 6 - 7<br />
local weight ................6 - 8<br />
show assessment status . . . . . . 6 - 8<br />
show drop shadows . . . . . . . . . 6 - 8<br />
vertical display . . . . . . . . . . . . . 6 - 7<br />
goals hierarchy view . 3 - 2, 6 - 5, 6 - 16,<br />
6 - 17<br />
graphics<br />
changing..................8 - 51<br />
Hierarchy Menu ................6 - 8<br />
importing data ................8 - 64<br />
interactions . . . . . . . . 3 - 6, 7 - 41, 9 - 55<br />
additional tradeoff method . . 7 - 42<br />
constructive and destructive<br />
................9 - 56<br />
enter small k method . . . . . . . 7 - 44<br />
no interactions . . . . . . . . . . . . . 7 - 42<br />
probability method . . . . . . . . . 7 - 43<br />
with direct entry method . . 7 - 32,<br />
7 - 44<br />
interval scale ..................9 - 65<br />
labels.........................6 - 29<br />
common units .............7 - 22<br />
defining ..................6 - 19<br />
Index I-1
probabilistic ..............6 - 29<br />
LDW file .....................8 - 62<br />
level ................ 3 - 3, 9 - 4, 9 - 9<br />
modifying................6 - 11<br />
most and least preferred . . . 6 - 18<br />
point estimate . . . . . . . . . . . . 6 - 20<br />
probabilistic . . . . . . . . 6 - 11, 6 - 21<br />
structuring ...............6 - 20<br />
types ....................6 - 20<br />
matrix menu..................6 - 12<br />
matrix view . 3 - 2, 6 - 10, 6 - 14, 6 - 17,<br />
6 - 20, 9 - 6, 9 - 10<br />
measure ......................9 - 4<br />
adding...................6 - 19<br />
cutoff level ...............6 - 18<br />
dialog box................6 - 17<br />
increasing and decreasing . . . 9 - 8<br />
labels .............. 6 - 19, 6 - 29<br />
range ....................6 - 18<br />
structuring . . . . . . . . . . 6 - 17, 9 - 8<br />
measure categories . . . . . . 6 - 30, 9 - 10<br />
adding...................6 - 31<br />
changing.................6 - 31<br />
deleting..................6 - 31<br />
multipliers . . . . . . . . . . 7 - 5, 9 - 11<br />
measure categories view . . . . . . 6 - 17,<br />
6 - 30<br />
member.......................9 - 7<br />
mid-level splitting . . . . . . . . . . . . . 9 - 16<br />
mid-preference level . . . . . . . . . . . 9 - 16<br />
Monte Carlo simulation . . . . . . . . 6 - 27<br />
MUF .......7 - 23, 8 - 11, 9 - 31, 12 - 2<br />
additive..................9 - 36<br />
assessing.................9 - 36<br />
formula ............ 8 - 15, 9 - 36<br />
multiplicative . . . . . . . . . . . . . 9 - 55<br />
nominal utility ................6 - 16<br />
normal distribution . . . . . . . . . . . . 6 - 25<br />
pairwise weight ratios . . 7 - 37, 9 - 39,<br />
9 - 40<br />
piecewise linear cumulative . . . . 6 - 24<br />
point estimate . . . . . 6 - 20, 6 - 22, 9 - 9<br />
preference set..................7 - 1<br />
adding....................7 - 3<br />
changing...................7 - 3<br />
deleting....................7 - 3<br />
dialog box..................7 - 3<br />
preferences<br />
assessing............. 7 - 5, 9 - 12<br />
printing<br />
graphics ..................8 - 49<br />
probabilistic level . . . 6 - 11, 6 - 21, 9 - 9<br />
dialog box.................6 - 21<br />
range .........................6 - 18<br />
representatives . . . . 7 - 26, 7 - 27, 7 - 38,<br />
9 - 34<br />
results menu ..................8 - 19<br />
review menu ...................8 - 2<br />
risk aversion . . . . . . 7 - 13, 9 - 15, 9 - 25<br />
risk premium............ 7 - 12, 9 - 25<br />
sample........................6 - 28<br />
smart method . . . . . 7 - 25, 7 - 35, 9 - 39<br />
smarter method . . . . 7 - 24, 7 - 33, 9 - 37<br />
sorting........................8 - 55<br />
status.............. 7 - 4, 7 - 25, 7 - 42<br />
SUF ................ 3 - 4, 7 - 6, 9 - 14<br />
assessing............. 7 - 8, 9 - 15<br />
assessing with probabilities<br />
................9 - 22<br />
formulas ............ 8 - 17, 8 - 19<br />
initialize ...................7 - 8<br />
non-linear.................9 - 15<br />
reviewing ..................8 - 2<br />
sub-range ..................7 - 9<br />
Summary Dialog Box . . . . . . . . . . . . 6 - 4<br />
swing weights .................9 - 39<br />
tab delimited files . . . . . . . . 8 - 67, 8 - 72<br />
three point estimate . . . . . . . . . . . . 6 - 26<br />
tradeoff ........... 7 - 26, 9 - 42, 12 - 1<br />
assessing..................9 - 45<br />
consistency checks . . . . . . . . . 7 - 45<br />
graph.....................7 - 28<br />
reviewing ..................8 - 4<br />
tradeoff method . . . 7 - 25, 7 - 45, 9 - 41<br />
assessing..................7 - 26<br />
reviewing ..................8 - 6<br />
uniform distribution . . . . . . . . . . . . 6 - 23<br />
utility............... 3 - 4, 3 - 5, 9 - 13<br />
I-2 Index
computing ................8 - 3<br />
interpreting ..............9 - 65<br />
nominal .................9 - 35<br />
overall...................9 - 32<br />
range ....................8 - 54<br />
view menu ....................6 - 3<br />
weights ......................12 - 1<br />
assessing............ 3 - 5, 7 - 23<br />
percentage ...............8 - 13<br />
scaling constants . . . . . . . . . . 8 - 15<br />
zooming .....................8 - 57<br />
Index I-3