Montageanleitung Assembly instructions ... - Villeroy & Boch
Montageanleitung Assembly instructions ... - Villeroy & Boch
Montageanleitung Assembly instructions ... - Villeroy & Boch

Create successful ePaper yourself
Turn your PDF publications into a flip-book with our unique Google optimized e-Paper software.
SX-line<br />
3. <strong>Assembly</strong><br />
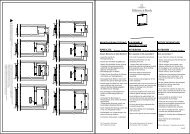
3.13. External finishing tasks<br />
. The outer planking of the front wall and side wall<br />
is configured to order, depending on the height<br />
of the room or cabin.<br />
With room-high planking<br />
1. Let the double strip lay loosely in position.<br />
2. Fit the external planking, leaving a gap of 8 mm<br />
between it and the room ceiling.<br />
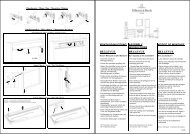
Start of external planking<br />
1. Screw the twin-grooved plank into place at a<br />
distance of 5 mm from the upright wooden door<br />
frame.<br />
2. Continue fitting the grooved and tongued planks<br />
to the outer wall around the door, working to the<br />
left and right.<br />
3. Install the planking right up to the door frame.<br />
4. Fix the planks above the door frame, working<br />
from the left and right and towards the centre of<br />
thedoor(16x30).<br />
5. Finish by sliding in the last tongue from below,<br />
and secure with a nail (16 x 30).<br />
6. Now cut the door-surround strips to length (up<br />
to the bottom edge of the wall element).<br />
7. Apply dots of adhesive to the rear of the strip<br />
and the facing wooden surface.<br />
8. Locate the strip at the corners of the groove and<br />
tap in carefully from top to bottom.<br />
. The strip must lie flush all along the fitted external<br />
planks.<br />
5000149/10.05<br />
Double spruce strip<br />
Groove for door-surround strip<br />
Fig. 29<br />
Fig. 30<br />
Fig. 31<br />
PAGE 47