Montageanleitung Assembly instructions ... - Villeroy & Boch
Montageanleitung Assembly instructions ... - Villeroy & Boch
Montageanleitung Assembly instructions ... - Villeroy & Boch

Create successful ePaper yourself
Turn your PDF publications into a flip-book with our unique Google optimized e-Paper software.
3. <strong>Assembly</strong><br />
3.8. Sauna benches<br />
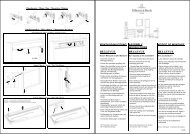
Fit facing section<br />
1. Screw the facing section to the lower long<br />
bench, working from the back (6 x 100) (fig. 20).<br />
Assembling the backrest<br />
6 x 100<br />
SX-line<br />
Fig. 20<br />
K0389<br />
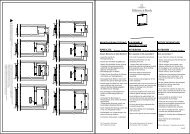
1. The backrest should be placed centrally on the<br />
cabin wall.<br />
2. The fixing height for the rings on the backrest is<br />
390 mm above the bench.<br />
3. Measure the distance between the two rings on<br />
the backrest. Mark this distance on the rear wall.<br />
4. Make fixing holes with a 2.5 mm drill at the<br />
points marked. Insert the Spax screws (4.5 x 25)<br />
into the wall elements.<br />
5. Hang the backrest in place. Fig. 21<br />
3.9. Sauna instruments<br />
Do not install any instrument near the stove safety grille.<br />
1. Fit the thermometer or hygrometer to the rear wall<br />
of the sauna cabin.<br />
. The instruments should be visible from outside,<br />
via the sauna door.<br />
2. The distance between the ceiling of the sauna<br />
and the centre of the instruments should be<br />
approximately 150 mm.<br />
3. Fit the hourglass next to the sauna door at a<br />
height of approx. 1200 mm above the floor.<br />
PAGE 42 5000149/10.05