Montageanleitung Assembly instructions ... - Villeroy & Boch
Montageanleitung Assembly instructions ... - Villeroy & Boch
Montageanleitung Assembly instructions ... - Villeroy & Boch

You also want an ePaper? Increase the reach of your titles
YUMPU automatically turns print PDFs into web optimized ePapers that Google loves.
3. <strong>Assembly</strong><br />
3.7. Secure the door<br />
1. Once the last wall element has been assembled<br />
and fixed in place, check the sauna door again to<br />
ensure that it can open and close correctly.<br />
2. Use four evenly-spaced screws on the left and<br />
right of the door frame to secure it in place.<br />
. On doors without a jamb, the jamb frame is also<br />
screwed to the floor frame (Spax 5 x 80 with<br />
hole for insertion of plastic cap) (fig. 15).<br />
. Check the door panel to ensure correct alignment<br />
with the frame and correct as required.<br />
3. Seal the floor joint with silicon.<br />
3.8. Sauna benches<br />
Assembling the sauna benches<br />
1. The bench is installed as shown in the layout<br />
plan.<br />
2. The plan indicates the position and height of the<br />
bench.<br />
3. Drill all mounting strips with ∅ 5.5 mm holes<br />
before screwing to the wooden frame sections.<br />
d 25 mm to the left and right of each wall joint<br />
d In the case of 600, 800 or 1000 mm-wide wall<br />
elements, each one in the two centre boards<br />
d In the case of 500, 700 or 900 mm-wide wall<br />
elements, each one to the left and right of the<br />
centre board.<br />
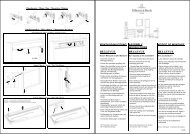
4. If a glass element is fitted near the glass pane,<br />
screw a cover section to the mounting strip<br />
(4.5 x 40) (fig. 15).<br />
Cover panel<br />
. The screw should be slightly countersunk. Bench<br />
SX-line<br />
Fig. 15<br />
PAGE 40 5000149/10.05<br />
220<br />
904<br />
579<br />
4,5 x 40<br />
Fig. 16<br />
Fig. 17