Montageanleitung Assembly instructions ... - Villeroy & Boch
Montageanleitung Assembly instructions ... - Villeroy & Boch
Montageanleitung Assembly instructions ... - Villeroy & Boch

Create successful ePaper yourself
Turn your PDF publications into a flip-book with our unique Google optimized e-Paper software.
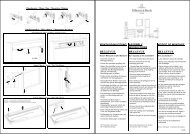
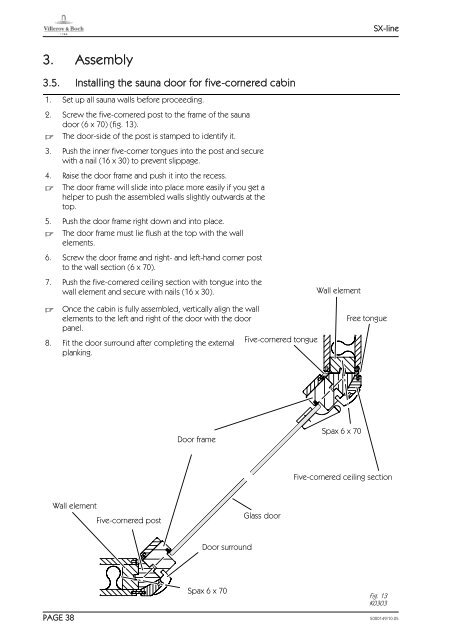
3. <strong>Assembly</strong><br />
3.5. Installing the sauna door for five-cornered cabin<br />
1. Set up all sauna walls before proceeding.<br />
2. Screw the five-cornered post to the frame of the sauna<br />
door (6 x 70) (fig. 13).<br />
. The door-side of the post is stamped to identify it.<br />
3. Push the inner five-corner tongues into the post and secure<br />
with a nail (16 x 30) to prevent slippage.<br />
4. Raise the door frame and push it into the recess.<br />
. The door frame will slide into place more easily if you get a<br />
helper to push the assembled walls slightly outwards at the<br />
top.<br />
5. Push the door frame right down and into place.<br />
. The door frame must lie flush at the top with the wall<br />
elements.<br />
6. Screw the door frame and right- and left-hand corner post<br />
to the wall section (6 x 70).<br />
7. Push the five-cornered ceiling section with tongue into the<br />
wall element and secure with nails (16 x 30).<br />
. Once the cabin is fully assembled, vertically align the wall<br />
elements to the left and right of the door with the door<br />
panel.<br />
8. Fit the door surround after completing the external<br />
planking.<br />
Wall element<br />
Five-cornered post<br />
Door frame<br />
Door surround<br />
Spax 6 x 70<br />
Five-cornered tongue<br />
Glass door<br />
Wall element<br />
Spax 6 x 70<br />
SX-line<br />
Free tongue<br />
Five-cornered ceiling section<br />
Fig. 13<br />
K0303<br />
PAGE 38 5000149/10.05