JCDA - Canadian Dental Association
JCDA - Canadian Dental Association
JCDA - Canadian Dental Association

Create successful ePaper yourself
Turn your PDF publications into a flip-book with our unique Google optimized e-Paper software.
Figure 9: The labial veneer of the<br />
acrylic denture tooth has been luted<br />
intraorally to the temporary cylinder; it<br />
is then removed for completion of the<br />
anatomic form.<br />
Figure 12: The provisional restoration<br />
is checked 1 week after insertion.<br />
–––– Clinical Showcase ––––<br />
Figure 10: Labial view of the contoured,<br />
finished and polished provisional<br />
restoration.<br />
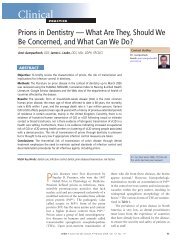
Figure 13: Appearance of the final restoration<br />
6 weeks after insertion.<br />
At this stage, the health and esthetic appearance<br />
of the peri-implant tissues, the anatomy and<br />
form of the provisional restoration and occlusal<br />
issues are of great importance; the shade of the<br />
provisional is of lesser concern.<br />
8) Insert the implant-supported provisional restoration<br />
and tighten the screw (Fig. 11). Then,<br />
cover the abutment screw with cotton pellets and<br />
seal the screw access hole with an easily removable<br />
temporary filling material.<br />
9) One week later, verify the screw-retained<br />
provisional restoration for esthetics, form and<br />
function and the peri-implant tissues for health<br />
and contour, making adjustments if necessary<br />
(Fig. 12).<br />
10) Upon optimal development of the peri-implant<br />
tissues, several weeks after insertion of the<br />
provisional restoration, take an impression for<br />
fabrication of the final restoration. A customized<br />
impression coping may be used to capture<br />
Figure 11: Lingual view of the provisional<br />
restoration affixed to the implant fixture<br />
with an abutment screw.<br />
Figure 14: Appearance of the final restoration<br />
1 year after insertion.<br />
the contour of the subgingival peri-implant soft<br />
tissues. A diagnostic model of the provisional,<br />
secured to the fixture, is prepared and articulated<br />
with the counter-model. Photographs<br />
of the provisional, both in the patient’s<br />
mouth and on the laboratory bench, are taken<br />
and sent with the models to the laboratory<br />
for fabrication of the final restoration. The<br />
diagnostic model and photographs will help<br />
the dental technologist in reproducing the<br />
form of the carefully crafted provisional restoration<br />
in the final crown. This technique<br />
should minimize the chairside adjustments required<br />
to the final restoration. Upon completion<br />
of the screw-retained crown, place it in the<br />
patient’s mouth and follow the usual protocol for<br />
torqueing and sealing. Check the restoration for<br />
tissue health, occlusion and integration, and recheck<br />
at regular intervals (Figs. 13 and 14).<br />
<strong>JCDA</strong> • www.cda-adc.ca/jcda • September 2008, Vol. 74, No. 7 • 611