Wireless G Router - Belkin
Wireless G Router - Belkin
Wireless G Router - Belkin

You also want an ePaper? Increase the reach of your titles
YUMPU automatically turns print PDFs into web optimized ePapers that Google loves.
section<br />
1<br />
2<br />
3<br />
4<br />
5<br />
6<br />
7<br />
8<br />
9<br />
10<br />
11<br />
Using the Web-Based Advanced User Interface<br />
5. From a computer already connected to your <strong>Router</strong>, access<br />
the Advanced Setup Utility by opening your browser. In<br />
the address bar, type in “192.168.2.1”. Do not type in<br />
“www” or “http://” before the number. Note: If you have<br />
changed your <strong>Router</strong>’s IP address, use that IP address.<br />
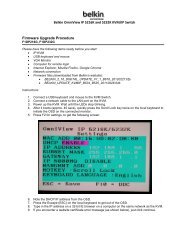
6. You will see the <strong>Router</strong>’s user interface in the browser<br />
window. Click “<strong>Wireless</strong> Bridge” (2) on the left-hand side<br />
of the screen. You will see the following screen.<br />
(1)<br />
(2)<br />
(3)<br />
7. Check the box that says “Enable ONLY specific<br />
Access Points to connect” (1).<br />
8. In the field named AP1 (3), type in the MAC address<br />
of your secondary Access Point. When you have<br />
typed in the address, click “Apply Changes”.<br />
9. Bridging is now set up.<br />
66