

TRITON Extreme Operation Guide - Platinum Audiolab
TRITON Extreme Operation Guide - Platinum Audiolab
TRITON Extreme Operation Guide - Platinum Audiolab

You also want an ePaper? Increase the reach of your titles
YUMPU automatically turns print PDFs into web optimized ePapers that Google loves.
78<br />
The Create button has the same function as the Create<br />
button in P0: Recording (“Creating multisample<br />
indexes and sampling” ☞p.69).<br />
Modifying the settings of an index<br />
1 Make the settings described in steps 1–3 of “Editing<br />
the indexes.”<br />
2 Set parameters for the selected index.<br />
(☞PG p.135)<br />
• Changing the “Top Key” will change the upper limit<br />
of the zone. Simultaneously, the lower limit of the<br />
next-numbered index will also change.<br />
• If you check “Constant Pitch,” all notes in the index<br />
zone will sound the sample at its original pitch.<br />
• “Pitch” adjusts the sample pitch for each index. You<br />
can use the “Pitch BPM Adjust” page menu command<br />
to set the loop interval to a desired BPM value (☞PG<br />
p.136).<br />
Converting a multisample to a program<br />
In pages P0: Recording–P4: Controller Setup, you can<br />
select and execute the “Convert MS To Program” page<br />
menu command. When you execute this command, the<br />
settings of the currently selected multisample will be converted<br />
into a program. In Program mode you can make filter,<br />
amp and effect settings etc., and play the sample as a<br />
program. The resulting program can be used in a combination<br />
or song.<br />
For details on the “Convert MS To Program” page menu<br />
command (☞PG p.110).<br />
● Using samples in a drum kit<br />
A sample you created in Sampling mode can be used as<br />
one of the instruments in a drum kit. In the Global P5:<br />
Drum Kit, Sample Setup page and Low Sample page, set<br />
“Drumsample Bank” to RAM, and use “Drumsample” to<br />
select the sample that you created.<br />
Using Time Slice to divide a sample, and<br />
playing it in Sequencer mode<br />
Time Slice is a function that detects the attack of the kick<br />
or snare etc. in a rhythm loop sample (a sample consisting<br />
of a looped pattern of drums etc.), and automatically<br />
divides it into separate instrumental sounds. Each of the<br />
divided instrumental sounds is made into a sample of its<br />
own, and then automatically expanded into a multisample<br />
and program. Pattern playback data for the Sequencer<br />
mode using the divided samples is also created automatically.<br />
The time-slices sample can be used in the following ways<br />
by the song of Sequencer mode.<br />
• Multiple rhythm loop samples of differing tempo can<br />
be matched to the same tempo without changing their<br />
pitch.<br />
• You can change the tempo in realtime without<br />
affecting the pitch.<br />
As an example, we will describe how a rhythm loop sample<br />
can be time-sliced in Sampling mode, and then how<br />
the rhythm loop sample can be played in Sequencer<br />
mode.<br />
You will need to provide rhythm loop samples of drums<br />
etc. You can either record these on the <strong>TRITON</strong> <strong>Extreme</strong>,<br />
or load them in Media mode. Initially, you should try this<br />
using a one-measure pattern in 4/4 time with a fairly simple<br />
beat, and record the pattern as a mono rhythm loop<br />
sample.<br />
For this example, we will use a 120 BPM rhythm loop<br />
sample.<br />
1 Select “Sample Select” 120 BPM rhythm loop sample.<br />
Play back the sample, and verify that the beats that<br />
you want to loop are played cleanly. If they are not<br />
played cleanly, make the appropriate settings for the<br />
start address “Start” and end address “End,” and execute<br />
the page menu command “Truncate” (☞p.74,<br />
76).<br />
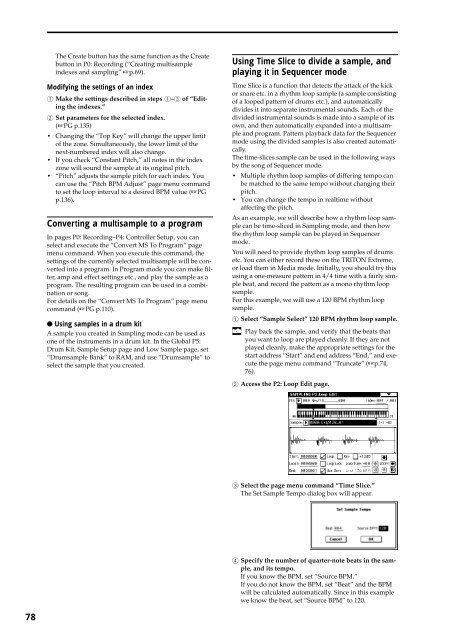
2 Access the P2: Loop Edit page.<br />
3 Select the page menu command “Time Slice.”<br />
The Set Sample Tempo dialog box will appear.<br />
4 Specify the number of quarter-note beats in the sample,<br />
and its tempo.<br />
If you know the BPM, set “Source BPM.”<br />
If you do not know the BPM, set “Beat” and the BPM<br />
will be calculated automatically. Since in this example<br />
we know the beat, set “Source BPM” to 120.


