


TRITON Extreme Operation Guide - Platinum Audiolab
TRITON Extreme Operation Guide - Platinum Audiolab
TRITON Extreme Operation Guide - Platinum Audiolab

You also want an ePaper? Increase the reach of your titles
YUMPU automatically turns print PDFs into web optimized ePapers that Google loves.
108<br />
About dynamic modulation (Dmod)<br />
Dynamic modulation (Dmod) is a function that lets you<br />
use MIDI messages or the <strong>TRITON</strong> <strong>Extreme</strong>’s controllers<br />
to control specific effect parameters in realtime.<br />
BPM/MIDI Sync is another function that controls effect<br />
parameters, and is used to synchronize the LFO speed of<br />
modulation-type effects or the delay time etc. of delaytype<br />
effects to the tempo of the arpeggiator or an external<br />
sequencer.<br />
For details on each of these functions, refer to PG p.276,<br />
278.<br />
Setting example:<br />
We will show how you can use dynamic modulation to<br />
control an effect parameter in realtime.<br />
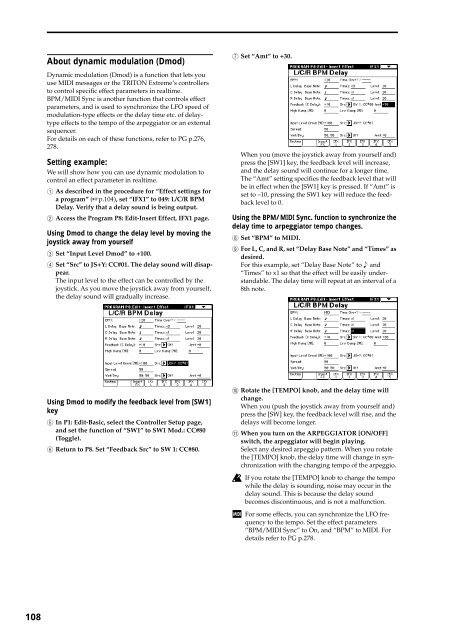
1 As described in the procedure for “Effect settings for<br />
a program” (☞p.104), set “IFX1” to 049: L/C/R BPM<br />
Delay. Verify that a delay sound is being output.<br />
2 Access the Program P8: Edit-Insert Effect, IFX1 page.<br />
Using Dmod to change the delay level by moving the<br />
joystick away from yourself<br />
3 Set “Input Level Dmod” to +100.<br />
4 Set “Src” to JS+Y: CC#01. The delay sound will disappear.<br />
The input level to the effect can be controlled by the<br />
joystick. As you move the joystick away from yourself,<br />
the delay sound will gradually increase.<br />
Using Dmod to modify the feedback level from [SW1]<br />
key<br />
5 In P1: Edit-Basic, select the Controller Setup page,<br />
and set the function of “SW1” to SW1 Mod.: CC#80<br />
(Toggle).<br />
6 Return to P8. Set “Feedback Src” to SW 1: CC#80.<br />
7 Set “Amt” to +30.<br />
When you (move the joystick away from yourself and)<br />
press the [SW1] key, the feedback level will increase,<br />
and the delay sound will continue for a longer time.<br />
The “Amt” setting specifies the feedback level that will<br />
be in effect when the [SW1] key is pressed. If “Amt” is<br />
set to –10, pressing the SW1 key will reduce the feedback<br />
level to 0.<br />
Using the BPM/MIDI Sync. function to synchronize the<br />
delay time to arpeggiator tempo changes.<br />
8 Set “BPM” to MIDI.<br />
9 For L, C, and R, set “Delay Base Note” and “Times” as<br />
desired.<br />
For this example, set “Delay Base Note” to and<br />
“Times” to x1 so that the effect will be easily understandable.<br />
The delay time will repeat at an interval of a<br />
8th note.<br />
0 Rotate the [TEMPO] knob, and the delay time will<br />
change.<br />
When you (push the joystick away from yourself and)<br />
press the [SW] key, the feedback level will rise, and the<br />
delays will become longer.<br />
A When you turn on the ARPEGGIATOR [ON/OFF]<br />
switch, the arpeggiator will begin playing.<br />
Select any desired arpeggio pattern. When you rotate<br />
the [TEMPO] knob, the delay time will change in synchronization<br />
with the changing tempo of the arpeggio.<br />
If you rotate the [TEMPO] knob to change the tempo<br />
while the delay is sounding, noise may occur in the<br />
delay sound. This is because the delay sound<br />
becomes discontinuous, and is not a malfunction.<br />
For some effects, you can synchronize the LFO frequency<br />
to the tempo. Set the effect parameters<br />
“BPM/MIDI Sync” to On, and “BPM” to MIDI. For<br />
details refer to PG p.278.


