

TRITON Extreme Operation Guide - Platinum Audiolab
TRITON Extreme Operation Guide - Platinum Audiolab
TRITON Extreme Operation Guide - Platinum Audiolab

You also want an ePaper? Increase the reach of your titles
YUMPU automatically turns print PDFs into web optimized ePapers that Google loves.
100<br />
7 Set “Step No.” to 07, and press the [0] key.<br />
Set “Pitch Offset” to +00.<br />
8 Set “Step No.” to 08, and press the [0] key.<br />
Set “Pitch Offset” to –02.<br />
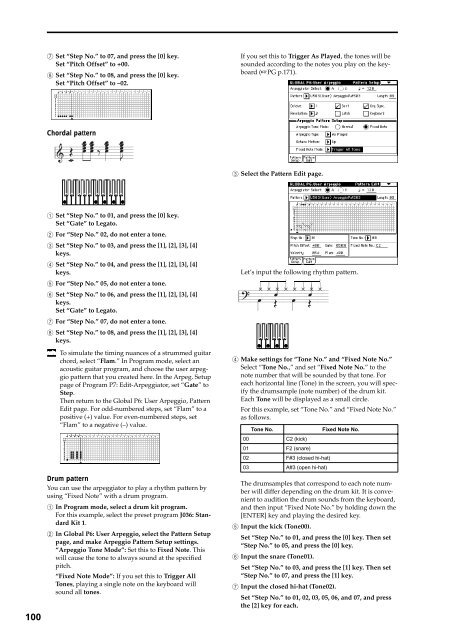
Chordal pattern<br />
1 Set “Step No.” to 01, and press the [0] key.<br />
Set “Gate” to Legato.<br />
2 For “Step No.” 02, do not enter a tone.<br />
3 Set “Step No.” to 03, and press the [1], [2], [3], [4]<br />
keys.<br />
4 Set “Step No.” to 04, and press the [1], [2], [3], [4]<br />
keys.<br />
5 For “Step No.” 05, do not enter a tone.<br />
6 Set “Step No.” to 06, and press the [1], [2], [3], [4]<br />
keys.<br />
Set “Gate” to Legato.<br />
7 For “Step No.” 07, do not enter a tone.<br />
8 Set “Step No.” to 08, and press the [1], [2], [3], [4]<br />
keys.<br />
To simulate the timing nuances of a strummed guitar<br />
chord, select “Flam.” In Program mode, select an<br />
acoustic guitar program, and choose the user arpeggio<br />
pattern that you created here. In the Arpeg. Setup<br />
page of Program P7: Edit-Arpeggiator, set “Gate” to<br />
Step.<br />
Then return to the Global P6: User Arpeggio, Pattern<br />
Edit page. For odd-numbered steps, set “Flam” to a<br />
positive (+) value. For even-numbered steps, set<br />
“Flam” to a negative (–) value.<br />
Drum pattern<br />
You can use the arpeggiator to play a rhythm pattern by<br />
using “Fixed Note” with a drum program.<br />
1 In Program mode, select a drum kit program.<br />
For this example, select the preset program J036: Standard<br />
Kit 1.<br />
2 In Global P6: User Arpeggio, select the Pattern Setup<br />
page, and make Arpeggio Pattern Setup settings.<br />
“Arpeggio Tone Mode”: Set this to Fixed Note. This<br />
will cause the tone to always sound at the specified<br />
pitch.<br />
“Fixed Note Mode”: If you set this to Trigger All<br />
Tones, playing a single note on the keyboard will<br />
sound all tones.<br />
If you set this to Trigger As Played, the tones will be<br />
sounded according to the notes you play on the keyboard<br />
(☞PG p.171).<br />
3 Select the Pattern Edit page.<br />
Let’s input the following rhythm pattern.<br />
4 Make settings for “Tone No.” and “Fixed Note No.”<br />
Select “Tone No.,” and set “Fixed Note No.” to the<br />
note number that will be sounded by that tone. For<br />
each horizontal line (Tone) in the screen, you will specify<br />
the drumsample (note number) of the drum kit.<br />
Each Tone will be displayed as a small circle.<br />
For this example, set “Tone No.” and “Fixed Note No.”<br />
as follows.<br />
Tone No. Fixed Note No.<br />
00 C2 (kick)<br />
01 F2 (snare)<br />
02 F#3 (closed hi-hat)<br />
03 A#3 (open hi-hat)<br />
The drumsamples that correspond to each note number<br />
will differ depending on the drum kit. It is convenient<br />
to audition the drum sounds from the keyboard,<br />
and then input “Fixed Note No.” by holding down the<br />
[ENTER] key and playing the desired key.<br />
5 Input the kick (Tone00).<br />
Set “Step No.” to 01, and press the [0] key. Then set<br />
“Step No.” to 05, and press the [0] key.<br />
6 Input the snare (Tone01).<br />
Set “Step No.” to 03, and press the [1] key. Then set<br />
“Step No.” to 07, and press the [1] key.<br />
7 Input the closed hi-hat (Tone02).<br />
Set “Step No.” to 01, 02, 03, 05, 06, and 07, and press<br />
the [2] key for each.


