

PSR-E333/YPT-330 Owner's Manual - Yamaha Downloads
PSR-E333/YPT-330 Owner's Manual - Yamaha Downloads
PSR-E333/YPT-330 Owner's Manual - Yamaha Downloads

You also want an ePaper? Increase the reach of your titles
YUMPU automatically turns print PDFs into web optimized ePapers that Google loves.
38<br />
Record Your Own Performance<br />
Selecting a specific track for recording<br />
1<br />
2<br />
3<br />
4<br />
Turn ACMP (auto accompaniment) on or off, depending on what<br />
you want to record.<br />
If you want to record Style playback, turn ACMP on. If you want to record only<br />
your own keyboard performance, turn ACMP off.<br />
Specify the track you want to record.<br />
Specify Track 2 when you want to record the Style.<br />
When you want to record your own keyboard performance, you can specify<br />
either track.<br />
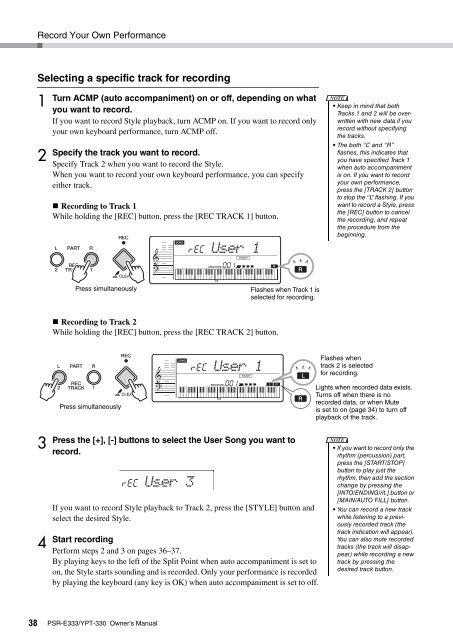
Recording to Track 1<br />
While holding the [REC] button, press the [REC TRACK 1] button.<br />
Recording to Track 2<br />
While holding the [REC] button, press the [REC TRACK 2] button.<br />
Press the [+], [-] buttons to select the User Song you want to<br />
record.<br />
If you want to record Style playback to Track 2, press the [STYLE] button and<br />
select the desired Style.<br />
Start recording<br />
Perform steps 2 and 3 on pages 36–37.<br />
By playing keys to the left of the Split Point when auto accompaniment is set to<br />
on, the Style starts sounding and is recorded. Only your performance is recorded<br />
by playing the keyboard (any key is OK) when auto accompaniment is set to off.<br />
<strong>PSR</strong>-<strong>E333</strong>/<strong>YPT</strong>-<strong>330</strong> Owner’s <strong>Manual</strong><br />
rEC<br />
User 1<br />
001<br />
Press simultaneously Flashes when Track 1 is<br />
selected for recording.<br />
Press simultaneously<br />
rEC<br />
User 3<br />
rEC<br />
User 1<br />
001<br />
NOTE<br />
• Keep in mind that both<br />
Tracks 1 and 2 will be overwritten<br />
with new data if you<br />
record without specifying<br />
the tracks.<br />
• The both “L” and “R”<br />
flashes, this indicates that<br />
you have specified Track 1<br />
when auto accompaniment<br />
is on. If you want to record<br />
your own performance,<br />
press the [TRACK 2] button<br />
to stop the “L” flashing. If you<br />
want to record a Style, press<br />
the [REC] button to cancel<br />
the recording, and repeat<br />
the procedure from the<br />
beginning.<br />
Flashes when<br />
track 2 is selected<br />
for recording.<br />
Lights when recorded data exists.<br />
Turns off when there is no<br />
recorded data, or when Mute<br />
is set to on (page 34) to turn off<br />
playback of the track.<br />
NOTE<br />
• If you want to record only the<br />
rhythm (percussion) part,<br />
press the [START/STOP]<br />
button to play just the<br />
rhythm, then add the section<br />
change by pressing the<br />
[INTO/ENDING/rit.] button or<br />
[MAIN/AUTO FILL] button.<br />
• You can record a new track<br />
while listening to a previously<br />
recorded track (the<br />
track indication will appear).<br />
You can also mute recorded<br />
tracks (the track will disappear)<br />
while recording a new<br />
track by pressing the<br />
desired track button.


