
You also want an ePaper? Increase the reach of your titles
YUMPU automatically turns print PDFs into web optimized ePapers that Google loves.
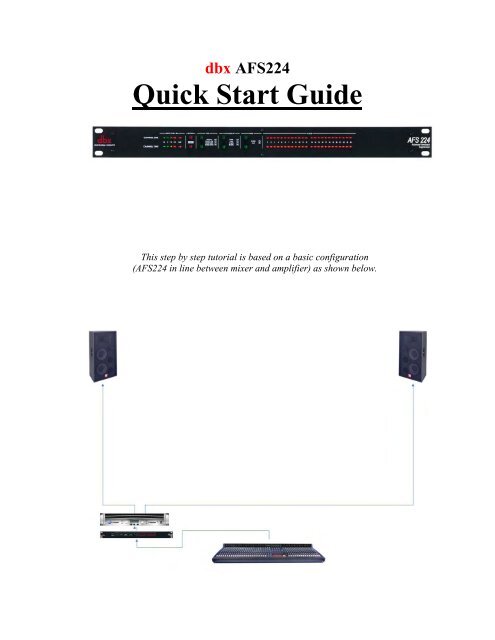
dbx <strong>AFS</strong><strong>224</strong><br />
<strong>Quick</strong> <strong>Start</strong> <strong>Guide</strong><br />
This step by step tutorial is based on a basic configuration<br />
(<strong>AFS</strong><strong>224</strong> in line between mixer and amplifier) as shown below.
1. Go into the Setup mode by pressing and holding the channel 1 MODE button.<br />
2. Hold this MODE button until the filter LEDs flash all the way across.<br />
3. The Mode buttons should be lit a yellow or amber color. If they are not press each<br />
MODE button until they are both yellow. The filter LEDs will indicate how many<br />
total filters will be active.
4. Select how many total filters that you want active. The default of 24 is a good<br />
place to start. However, if you want to change the total # of filters, press the<br />
LIVE FILTER LIFT button to increase the # of total filters for each channel or<br />
the TYPE button to decrease the total # of filters for each channel.<br />
5. Press the Mode buttons. They should now be lit green. The filter LEDS will<br />
indicate how many of these total filters will be allocated as “Fixed” filters.<br />
Press the LIVE FILTER LIFT buttons to increase the # of “Fixed” filters for each<br />
channel. Press the TYPE buttons to decrease the # of “Fixed” filters for each channel.<br />
The default of 12 Fixed and 12 Live is a good place to start.<br />
Note: The difference between total filters (step 4) and fixed filters (this step) will<br />
indicate how many “Live” filters are available.
6. To exit the setup mode, press and hold the channel 1 MODE button. Hold this<br />
button until the filter LEDs flash all the way across.<br />
7. Press the BYPASS buttons so that they are both lit red (bypassed).<br />
8. Press and hold the channel 1 TYPE button to select between dual mono or stereo<br />
mode.<br />
Note: You can tell which mode you are in by pressing any of the buttons. If the other<br />
channel changes as well, the two channels are working in conjunction (stereo mode).<br />
If not, the unit is in dual mono mode.
9. Set the “Live Filter Lift” to 10 minutes (yellow).<br />
10. Set the “Type” to Music Medium (yellow).
11. Perform a sound check on all of the microphones that will be active. Get them as<br />
close to the performance level as possible without feedback. You should get a<br />
reading that is close to “0” dBu on the input meters of the <strong>AFS</strong><strong>224</strong> when<br />
performing this sound check. When done ask all performers to be very quiet (and<br />
possibly plug their ears) or walk off the stage (and plug their ears).
12. Pull the master faders on the mixer all the way down (no signal).<br />
13. Check the Mode buttons. If they are not lit green, press the buttons until they are<br />
lit green. None of the filter LEDs should be lit at this point. If they are, press and<br />
hold the BYPASS buttons until the filter LEDs flash, then release. All filters<br />
should now be cleared.
14. Disengage the Bypass buttons (LEDs off).<br />
15. Slowly raise the master faders on the mixer. As feedback occurs, Fixed filters<br />
will be set. You may want to push the faders a little past the unity gain point (or<br />
performance level). This way the system will not be right on the verge of<br />
feedback when set to performance level. If you run out of Fixed filters (this will<br />
be indicated by the Mode buttons flashing green) you can go back into the Setup<br />
mode and allocate more filters as “Fixed” (steps 1-5). You can then resume from<br />
where you left off.
16. When you have reached the desired performance level, press the MODE buttons<br />
until they are both lit red. You are now in “Live” mode.<br />
17. For a faster reaction time with the Live filters, try setting the filter TYPE to<br />
“Music Low” (green) or “Speech” (off).<br />
Note: A wider notch filter (such as “Speech”) will catch the feedback faster, but may<br />
be more audible. A more narrow notch filter (such as “Music High”) will not catch<br />
the filter as fast, but will be less audible once the filter is set. You will need to use<br />
your discretion when setting the “Type” parameter.
18. If you find that the feedback reoccurs when the Live filters are lifted, try setting a<br />
longer Live Filter Lift time or try setting it to “None” (LED off).<br />
The<br />
<strong>AFS</strong> process is now complete. If, for whatever reason, you would like to restart the<br />
process, you can do so by clearing the filters and restarting with step 1. To clear all of the<br />
filters: Press and hold the BYPASS buttons until all lit filter LEDs begin to flash,<br />
now<br />
release. The filters are now cleared.
19. If you would like to lock the front panel (to prevent tampering), press and hold<br />
the channel 1 LIVE FILTER LIFT button. Hold this button until the filter LEDs<br />
flash all the way across (from the outside inward).<br />
To unlock the front panel press and hold the channel 1 LIVE FILTER LIFT button until<br />
the filter LEDs flash all the way across (from the inside outwards).<br />
A little practice and experimentation will make you an <strong>AFS</strong> expert in no time.