5.1 DigiRack Plug-Ins Guide - Digidesign Support Archives
5.1 DigiRack Plug-Ins Guide - Digidesign Support Archives
5.1 DigiRack Plug-Ins Guide - Digidesign Support Archives

Create successful ePaper yourself
Turn your PDF publications into a flip-book with our unique Google optimized e-Paper software.
30<br />
Release Controls how long it takes for the Limiter<br />
to be fully deactivated after the input signal<br />
drops below the threshold level. In general, if<br />
you use heavy limiting, you should use proportionally<br />
longer release times in order to avoid<br />
pumping which may occur when the Limiter is<br />
forced to jump back and forth between limited<br />
and unlimited signal levels. Lengthening the release<br />
time will help smooth these changes in<br />
level by introducing a lag in the ramp-up/down<br />
time of attenuation. Use shorter release times on<br />
material with fewer peaks which do not occur in<br />
close proximity to each other.<br />
Graph Displays the response curve set by the<br />
Limiter’s Threshold setting. As you adjust these<br />
parameters, refer to the graph to see how the<br />
shape of this curve changes. This will allow you<br />
to see the effect of your settings.<br />
External Key Enables and disables side chain<br />
processing. Side chain processing allows the<br />
Limiter to listen to the varying amplitude of a<br />
separate reference track and use it to trigger limiting.<br />
See “Using a Key Input for Side Chain Processing”<br />
on page 34.<br />
Key Listen When enabled, this allows you to listen<br />
to the reference track controlling the side<br />
chain input. This is often useful for fine tuning<br />
the Limiter’s settings to the key input. Key Listen<br />
auditions the right audio channel on TDM<br />
and RTAS versions of the Limiter.<br />
<strong>DigiRack</strong> <strong>Plug</strong>-<strong>Ins</strong> <strong>Guide</strong><br />
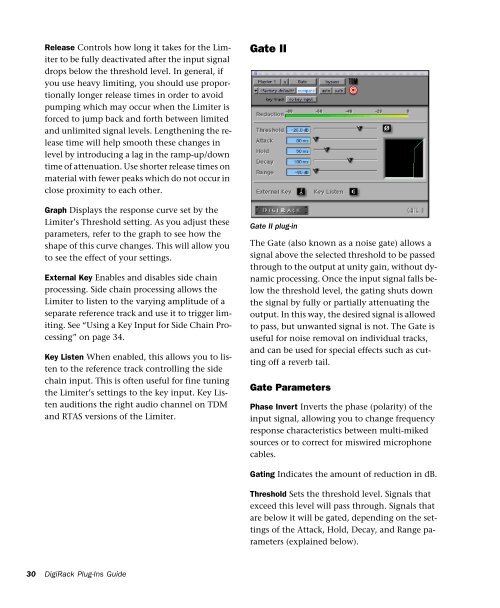
Gate II<br />
Gate II plug-in<br />
The Gate (also known as a noise gate) allows a<br />
signal above the selected threshold to be passed<br />
through to the output at unity gain, without dynamic<br />
processing. Once the input signal falls below<br />
the threshold level, the gating shuts down<br />
the signal by fully or partially attenuating the<br />
output. In this way, the desired signal is allowed<br />
to pass, but unwanted signal is not. The Gate is<br />
useful for noise removal on individual tracks,<br />
and can be used for special effects such as cutting<br />
off a reverb tail.<br />
Gate Parameters<br />
Phase Invert Inverts the phase (polarity) of the<br />
input signal, allowing you to change frequency<br />
response characteristics between multi-miked<br />
sources or to correct for miswired microphone<br />
cables.<br />
Gating Indicates the amount of reduction in dB.<br />
Threshold Sets the threshold level. Signals that<br />
exceed this level will pass through. Signals that<br />
are below it will be gated, depending on the settings<br />
of the Attack, Hold, Decay, and Range parameters<br />
(explained below).