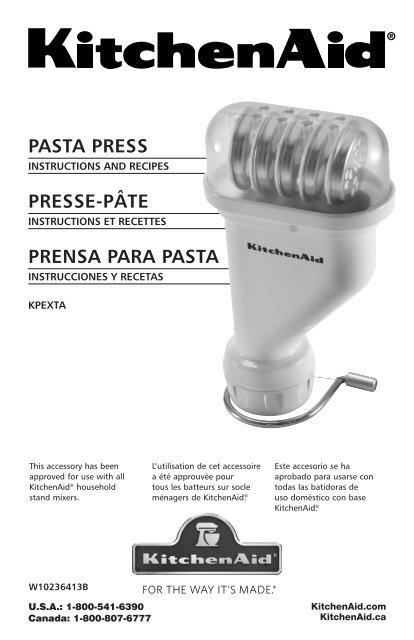
PASTA PRESS PRESSE-PÂTE PRENSA PARA PASTA - KitchenAid
PASTA PRESS PRESSE-PÂTE PRENSA PARA PASTA - KitchenAid
PASTA PRESS PRESSE-PÂTE PRENSA PARA PASTA - KitchenAid

Create successful ePaper yourself
Turn your PDF publications into a flip-book with our unique Google optimized e-Paper software.
<strong>PASTA</strong> <strong>PRESS</strong><br />
INSTRUCTIONS AND RECIPES<br />
<strong>PRESS</strong>E-<strong>PÂTE</strong><br />
INSTRUCTIONS ET RECETTES<br />
<strong>PRENSA</strong> <strong>PARA</strong> <strong>PASTA</strong><br />
INSTRUCCIONES Y RECETAS<br />
KPEXTA<br />
This accessory has been<br />
approved for use with all<br />
<strong>KitchenAid</strong> ® household<br />
stand mixers.<br />
W10236413B<br />
U.S.A.: 1-800-541-6390<br />
Canada: 1-800-807-6777<br />
L’utilisation de cet accessoire<br />
a été approuvée pour<br />
tous les batteurs sur socle<br />
ménagers de <strong>KitchenAid</strong> ® .<br />
Este accesorio se ha<br />
aprobado para usarse con<br />
todas las batidoras de<br />
uso doméstico con base<br />
<strong>KitchenAid</strong> ® .
Always keep a copy of the sales receipt<br />
showing the date of purchase of your Stand<br />
Mixer Accessory. Proof of purchase will<br />
assure you of in-warranty service.<br />
Proof of Purchase<br />
Please complete the following for your<br />
personal records:<br />
Model Number __________________________________________________________________<br />
Date Purchased __________________________________________________________________<br />
Store Name and Location __________________________________________________________<br />
Veuillez conserver une copie du coupon de<br />
caisse indiquant la date d’achat de votre<br />
Accessoires Du Batteur Sur Socle. La preuve<br />
d’achat vous assure du service après-vente<br />
sous garantie.<br />
Preuve d’achat<br />
Veuillez remplir ce qui suit pour votre<br />
dossier personnel :<br />
Numéro de modèle __________________________________________________________<br />
Date d’achat ________________________________________________________________<br />
Nom du magasin et emplacement ______________________________________________<br />
Siempre conserve una copia del recibo de<br />
ventas que especifique la fecha de compra de<br />
sus aditamentos para la batidora con base.<br />
El comprobante de compra le asegurará el<br />
servicio técnico bajo garantía.<br />
Comprobante de compra<br />
Complete lo siguiente para su<br />
registro personal:<br />
Número del modelo __________________________________________________________<br />
Fecha de compra ____________________________________________________________<br />
Nombre de la tienda y dirección ________________________________________________
Table of Contents<br />
INTRODUCTION<br />
Proof of Purchase ................................................................................. Inside Front Cover<br />
Stand Mixer Accessory Safety ..........................................................................................2<br />
Important Safeguards .....................................................................................................2<br />
FEATURES AND OPERATION<br />
To Assemble Pasta Press Accessory ..................................................................................3<br />
Pasta Plates .....................................................................................................................5<br />
To Attach Pasta Press Accessory ......................................................................................6<br />
To Use Pasta Press Accessory ...........................................................................................6<br />
To Change the Pasta Plates .............................................................................................7<br />
To Loosen the Pasta Ring ................................................................................................7<br />
Care and Cleaning ..........................................................................................................8<br />
Pasta Making Tips ...........................................................................................................9<br />
Cooking Pasta ...............................................................................................................10<br />
RECIPES<br />
Basic Egg Noodle Pasta .................................................................................................10<br />
Light Wheat Pasta .........................................................................................................11<br />
Whole Wheat Pasta ......................................................................................................11<br />
Spinach Pasta ...............................................................................................................11<br />
Deluxe Macaroni and Cheese ........................................................................................12<br />
Classic Minestrone ........................................................................................................13<br />
Pasta with Roasted Fresh Vegetable Sauce ....................................................................14<br />
Asparagus, Tomato and Fusilli Salad .............................................................................15<br />
Bolognese Pasta Sauce ..................................................................................................16<br />
Seafood Cream Sauce ...................................................................................................17<br />
Rustic Baked Rigatoni ....................................................................................................18<br />
Chinese Peanut Noodles ................................................................................................19<br />
WARRANTY AND SERVICE INFORMATION<br />
<strong>KitchenAid</strong> ® Stand Mixer Accessory Warranty ..............................................................20<br />
Hassle-Free Replacement Warranty – 50 United States and District of Columbia ..........21<br />
Hassle-Free Replacement Warranty – Canada ...............................................................21<br />
How to Arrange for Warranty Service in Puerto Rico ....................................................21<br />
How to Arrange for Service after the Warranty Expires – All Locations .........................22<br />
How to Arrange for Service Outside these Locations ....................................................22<br />
How to Order Accessories and Replacement Parts ........................................................22<br />
1<br />
ENGLISH
ENGLISH<br />
Stand Mixer Accessory Safety<br />
Your safety and the safety of others are very important.<br />
We have provided many important safety messages in this manual and on your<br />
appliance. Always read and obey all safety messages.<br />
This is the safety alert symbol.<br />
This symbol alerts you to potential hazards that can kill or hurt you<br />
and others.<br />
All safety messages will follow the safety alert symbol and either<br />
the word “DANGER” or “WARNING.” These words mean:<br />
You can be killed or seriously injured<br />
DANGER if you don’t immediately follow<br />
instructions.<br />
You can be killed or seriously injured<br />
if you don’t follow instructions.<br />
WARNING<br />
All safety messages will tell you what the potential hazard is, tell you how to<br />
reduce the chance of injury, and tell you what can happen if the instructions are<br />
not followed.<br />
IMPORTANT SAFEGUARDS<br />
When using electrical appliances, basic safety precautions should always be followed<br />
including the following:<br />
1. Read all instructions.<br />
2. To avoid risk of electrical shock, do not put mixer in water or other liquid.<br />
3. Close supervision is necessary when any appliance is used by or near children.<br />
4. Unplug the mixer from outlet when not in use, before putting on or taking off<br />
parts, and before cleaning.<br />
5. Avoid contacting moving parts. Keep fingers out of feed and discharge openings.<br />
6. Do not feed dough by hand. Always use the combo tool to push food.<br />
7. Do not operate the mixer with a damaged cord or plug or after the mixer<br />
malfunctions, or is dropped or damaged in any manner. Return the mixer to the<br />
nearest Authorized Service Center for examination, repair or electrical or mechanical<br />
adjustment.<br />
8. The use of accessories not recommended or sold by <strong>KitchenAid</strong> may cause fire,<br />
electric shock or injury.<br />
9. Do not use the mixer outdoors.<br />
10. Do not let the cord hang over the edge of table or counter.<br />
11. Do not let cord contact hot surface, including the stove.<br />
12. This product is designed for household use only.<br />
13. Also see Important Safeguards included in the mixer Instructions and Recipes<br />
booklet.<br />
SAVE THESE INSTRUCTIONS<br />
2
A<br />
B<br />
A - Housing<br />
B - Cutter<br />
C - Auger<br />
D - Pasta Ring<br />
E - Storage Case<br />
To Assemble Pasta Press Accessory<br />
1. Place the press upside down on a<br />
counter or table, and insert the end<br />
of the auger with the cross-shaped<br />
peg (C) into the press housing (A),<br />
aligning the cross-shaped peg with the<br />
matching indentation inside. When<br />
correctly positioned, the top of the<br />
auger will be flush with the opening.<br />
C<br />
D<br />
E<br />
3<br />
SPAGHETTI<br />
BUCATINI<br />
RIGATONI<br />
F - Spaghetti Plate<br />
G - Bucatini Plate<br />
H - Rigatoni Plate<br />
I - Fusilli Plate<br />
J - Large Macaroni Plate<br />
F<br />
G<br />
H<br />
I<br />
J<br />
FUSILLI<br />
LARGE<br />
MACARONI<br />
K<br />
SMALL MACARONI<br />
K - Small Macaroni Plate<br />
L - Combo Tool<br />
M - Cleaning Brush<br />
2. Place one of the pasta plates (F, G, H,<br />
I, J or K) over the opening, aligning its<br />
center with the auger, matching the<br />
tabs of the plate with the notches in<br />
the press housing.<br />
RIGATONI<br />
L<br />
M<br />
ENGLISH
ENGLISH<br />
3. Place the pasta ring (D) over the plate<br />
and gently turn by hand until finger<br />
tight but not over tightened.<br />
4. Insert the cutter (B) into the socket,<br />
aligning the flange with the left side of<br />
the slot as shown. Push in until locked<br />
into place and turn cutter to the right.<br />
The pasta press is now ready to attach<br />
to the stand mixer.<br />
FLANGE<br />
To Assemble Pasta Press Accessory<br />
RIGATONI<br />
TURN AFTER<br />
INSERTING<br />
INTO SOCKET<br />
RIGATONI<br />
4<br />
A multipurpose combo tool (L) with a<br />
hook and wrench is provided. The flat end<br />
may be used to help push dough into the<br />
press. The wrench may be used to loosen<br />
the pasta ring from the press body. The<br />
hook may be used to pry the auger out of<br />
the casing.<br />
A storage case (E) is provided to store<br />
pasta plates (F, G, H, I, J and K).<br />
NOTE: Do not use combo tool to<br />
tighten pasta ring.
SPAGHETTI<br />
BUCATINI<br />
RIGATONI<br />
WARNING<br />
Food Poisoning Hazard<br />
Do not let foods that contain<br />
perishable ingredients such as<br />
eggs, dairy products, and<br />
meats remain unrefrigerated for<br />
more than one hour.<br />
Doing so can result in food<br />
poisoning or sickness.<br />
SPAGHETTI (PLATE F)<br />
Recommended Stand<br />
Mixer Speed: 10<br />
Extrusion Length -<br />
Approximately 9½" (24.0 cm).<br />
BUCATINI (PLATE G)<br />
Recommended Stand<br />
Mixer Speed: 10<br />
Extrusion Length -<br />
Approximately 9½" (24.0 cm).<br />
RIGATONI (PLATE H)<br />
Recommended Stand<br />
Mixer Speed: 6<br />
Extrusion Length -<br />
Approximately 1½" (4.0 cm).<br />
Pasta Plates<br />
5<br />
FUSILLI (PLATE I)<br />
Recommended Stand<br />
Mixer Speed: 2-4<br />
Extrusion Length -<br />
Traditional (Long): 9½"<br />
(24.0 cm); Short: 1½"<br />
(4.0 cm).<br />
LARGE MACARONI (PLATE J)<br />
Recommended Stand<br />
Mixer Speed: 6<br />
Extrusion Length - Up to 2"<br />
(5.0 cm).<br />
SMALL MACARONI (PLATE K)<br />
Recommended Stand<br />
Mixer Speed: 6<br />
Extrusion Length - Up to<br />
1½" (4.0 cm).<br />
Separating Fresh Pasta<br />
Separate pasta after extrusion. Pasta<br />
may be cooked immediately. If drying<br />
instead of cooking, place long noodles on<br />
<strong>KitchenAid</strong> ® FUSILLI<br />
SMALL MACARONI<br />
Drying Rack (KPDR), or dry in<br />
a single layer on a towel placed on a flat<br />
surface. Short pasta should be dried on a<br />
flat surface.<br />
Storing Fresh Pasta<br />
To store fresh pasta, air dry for 1 hour,<br />
then wrap in an airtight plastic bag and<br />
refrigerate for up to 5 days. Long<br />
noodles (except fusilli) may be formed into<br />
a “nest” before drying.<br />
LARGE<br />
MACARONI<br />
ENGLISH
ENGLISH<br />
To Attach Pasta Press Accessory<br />
Before Attaching Pasta Press<br />
Accessory<br />
Remove “Do not immerse in water” label,<br />
and detach the storage case from the<br />
accessory housing top.<br />
To Attach:<br />
1. Turn stand mixer speed control to OFF.<br />
2. Unplug the stand mixer.<br />
3. Loosen the accessory knob (P) by<br />
turning it counterclockwise.<br />
4. Remove the accessory hub cover or flip<br />
up hub cover.<br />
5. Insert the accessory shaft housing (N)<br />
into the accessory hub (O) making<br />
certain that accessory power shaft fits<br />
into square hub socket.<br />
6<br />
6. It may be necessary to rotate the<br />
accessory back and forth. When the<br />
accessory is in proper position, the pin<br />
on the accessory housing will fit into<br />
the notch on the hub rim.<br />
7. Tighten the accessory knob by turning<br />
it clockwise until the accessory is<br />
completely secured to stand mixer.<br />
To Use Pasta Press Accessory<br />
WARNING<br />
Rotating Blade Hazard<br />
Always use food pusher.<br />
Keep fingers out of openings.<br />
Keep away from children.<br />
Failure to do so can result in<br />
amputations or cuts.<br />
1. Set the stand mixer speed between<br />
6 and 10, according to pasta type<br />
and personal preference. For best<br />
results, Fusilli should be extruded at a<br />
maximum speed of 6. Slower speeds<br />
are also recommended for very short<br />
pasta. Longer pasta, such as Spaghetti<br />
may be extruded at higher speeds.<br />
N<br />
O<br />
2. Slowly feed walnut-size pieces of<br />
dough into the hopper; dough should<br />
self-feed. The auger should be visible<br />
before adding the next piece of dough.<br />
3. Use combo tool to push dough only if<br />
dough becomes caught in hopper and<br />
no longer self feeds.<br />
P
To Use Pasta Press Accessory<br />
4. Use the swing-arm wire dough cutter<br />
to cut pasta at desired length as it<br />
exits the press. See “Pasta Plates” for<br />
recommended lengths.<br />
5. Separate pasta as described in “Pasta<br />
Plates“ section.<br />
To Change the Pasta Plates:<br />
1. Turn stand mixer speed control to OFF.<br />
2. Unplug the stand mixer.<br />
3. Remove the pasta press accessory from<br />
the stand mixer.<br />
4. Remove the cutter, pasta ring, auger<br />
and clean the dough out of the press<br />
housing.<br />
5. Then reassemble the accessory as<br />
stated in “To Assemble Pasta Press<br />
Accessory“ section.<br />
7<br />
To Loosen the Pasta Ring:<br />
1. If pasta ring is too tight to remove<br />
by hand, slip the wrench over the<br />
grooves.<br />
2. Turn pasta ring in direction indicated<br />
by the arrow to OPEN.<br />
OPEN OPEN CLOSE<br />
NOTE: Do not use wrench to attach ring<br />
to press housing. Damage to the accessory<br />
may result.<br />
ENGLISH
ENGLISH<br />
To Clean:<br />
1. Turn stand mixer speed control to OFF.<br />
2. Unplug the stand mixer.<br />
3. Completely disassemble pasta press.<br />
4. Use the wrench end of combo tool to<br />
loosen pasta ring. Use the hook to pry<br />
out the auger from press housing.<br />
Care and Cleaning<br />
8<br />
5. Allow remaining dough on pasta plates<br />
to dry overnight before separating.<br />
Remove completely dried dough with<br />
the Cleaning Brush. Use a wooden<br />
skewer or toothpick to pick out any<br />
remaining dough. Do not use metal<br />
objects or put pasta plates in the<br />
dishwasher to clean.<br />
6. Auger, pasta ring, combo tool and<br />
storage case are dishwasher safe.<br />
NOTE: Do not wash press housing in<br />
dishwasher or immerse in water or other<br />
liquids. The cutter and pasta plates should<br />
be hand washed in warm sudsy water and<br />
dried thoroughly.<br />
NOTE: These accessories are designed to<br />
be used with pasta dough only. To avoid<br />
damaging your pasta press, do not insert<br />
anything other than pasta dough.
NOTE: Mixer must rest at least 1 hour<br />
after extruding 2 consecutive pasta<br />
dough recipes.<br />
Dough<br />
• Learning to make homemade pasta<br />
is simply a matter of practice. If you<br />
have not made pasta, you may have to<br />
prepare several batches of dough before<br />
you feel comfortable. We recommend<br />
experimenting with the Basic Egg<br />
Noodle Pasta Recipe.<br />
• The ratio of liquid to flour is small,<br />
making the pasta dough firm and<br />
leathery, but still pliable. It is extremely<br />
important to have the correct proportion<br />
of ingredients for proper dough<br />
consistency, as dough that is too moist<br />
or too dry will be difficult to work<br />
with. To help you achieve consistent<br />
results, the pasta recipes in this booklet<br />
specify sifted flour. To sift flour, follow<br />
this procedure: Place dry ingredient<br />
measuring cup on a large piece of waxed<br />
paper and hold sifter directly above and<br />
close to cup. Scoop flour into sifter and<br />
sift until flour exceeds top of cup. Using<br />
the flat edge of a spatula, remove excess<br />
flour from measuring cup.<br />
• Occasionally, there may be unmixed<br />
pieces of dough in the bowl after initial<br />
mixing with the flat beater. These pieces<br />
will be sufficiently incorporated by<br />
stand mixer kneading followed by hand<br />
kneading which firms and smoothes the<br />
texture of the dough.<br />
• Many factors, such as humidity, brand<br />
of flour used, and size of eggs, can<br />
affect dough consistency. To compensate<br />
for humid conditions, start the initial<br />
mixing process with only the sifted<br />
flour and eggs. Check the dough for<br />
proper consistency by pinching a small<br />
amount of dough together after mixing<br />
with the flat beater. The dough should<br />
stay together without sticking to your<br />
fingers. It may be necessary to add a<br />
small amount of water or flour to reach<br />
correct dough consistency.<br />
Pasta Making Tips<br />
9<br />
• If the prepared dough is too moist or<br />
sticky to extrude, simply dust with flour<br />
or pat some flour into the dough before<br />
placing in the extruder.<br />
Using Your Pasta Press and<br />
<strong>KitchenAid</strong> ® Stand Mixer<br />
• Long noodles and macaroni tend to curl<br />
in different directions as they extrude<br />
through the plate. The first 10"<br />
(25.0 cm) of curled noodles may be<br />
pulled off and returned to the hopper<br />
to be extruded again. Pasta will extrude<br />
slowly at first, then faster as more<br />
dough is extruded.<br />
WARNING<br />
Food Poisoning Hazard<br />
Do not let foods that contain<br />
perishable ingredients such as<br />
eggs, dairy products, and<br />
meats remain unrefrigerated for<br />
more than one hour.<br />
Doing so can result in food<br />
poisoning or sickness.<br />
• Separate pasta immediately after extrusion.<br />
Lay a group of noodles on a towel placed<br />
on a flat surface and pull apart from drier<br />
ends of strands. Dry in a single layer. Long<br />
strands of pasta may be placed on a<br />
<strong>KitchenAid</strong> ® Drying Rack (KPDR).<br />
• Homemade pasta behaves differently<br />
than store-purchased pasta. Because<br />
long noodles bend as they dry and<br />
are more fragile, they require gentle<br />
handling before cooking.<br />
Storing Your Pasta<br />
• Store dried pasta in an airtight glass or<br />
plastic container almost indefinitely in a<br />
cool, dark place. However, do not store<br />
dried whole-wheat pasta for more than<br />
1 month, as it may turn rancid.<br />
• To store fresh pasta, air dry for 1 hour,<br />
then wrap in an airtight plastic bag and<br />
refrigerate for up to 5 days. To freeze,<br />
double wrap the pasta and keep frozen<br />
for up to 4 months. To use frozen<br />
fresh pasta, do not thaw – it should go<br />
directly from freezer into boiling water.<br />
ENGLISH
ENGLISH<br />
Add 2 tsp (10 mL) salt and<br />
1 tbs (15 mL) oil (optional) to<br />
6 qt (5.7 L) boiling water. Gradually add<br />
pasta and continue to cook at a boil until<br />
pasta is “al dente” or slightly firm to<br />
4 large eggs<br />
3½ cups (830 mL) sifted<br />
all-purpose flour<br />
1 tbs (15 mL) water<br />
1 tsp (2 mL) salt<br />
Cooking Pasta<br />
WARNING<br />
Food Poisoning Hazard<br />
Do not let foods that contain perishable<br />
ingredients such as eggs, dairy products, and<br />
meats remain unrefrigerated for more than<br />
one hour.<br />
Doing so can result in food poisoning<br />
or sickness.<br />
Basic Egg Noodle Pasta<br />
10<br />
the bite. Pasta floats to the top of the<br />
water while cooking, so stir occasionally to<br />
keep it cooking evenly. Drain in a colander.<br />
• Dry pasta – 7 minutes<br />
• Fresh pasta – 2–5 minutes depending on<br />
thickness of noodles<br />
Break eggs into a glass measuring cup. Check to see that<br />
eggs measure 7 /8 cup (207 mL). If less than 7 /8 cup<br />
(207 mL), add water, 1 tsp (2 mL) at a time, until<br />
measurement is reached.<br />
Place flour and salt in stand mixer bowl. Attach bowl<br />
and flat beater. Turn to Speed 2 and gradually add eggs<br />
and 1 tbs (15 ML) water. Mix for 30 seconds. Stop mixer<br />
and exchange flat beater for dough hook. Turn to Speed<br />
2 and knead for 2 minutes.<br />
Remove mixture from bowl and place on clean surface.<br />
Dough may appear crumbly. Hand knead for 30 seconds<br />
to 1 minute or until dough is smooth, pliable and holds<br />
together in a ball.<br />
Form walnut-sized pieces and extrude pasta into desired<br />
shape. Separate and dry as desired, then follow cooking<br />
instructions above.<br />
Yield: About 1 ¼ pounds (579 g) dough
2 1 /2 cups (590 mL) sifted<br />
whole wheat flour<br />
1 cup (235 mL)<br />
sifted bread or<br />
unbleached flour<br />
4 large eggs<br />
( 7 /8 cup [208 mL]<br />
eggs)<br />
2 tbs (30 mL) water<br />
1 /2 tsp (2 mL) salt<br />
4 large eggs<br />
( 7 /8 cup [208 mL]<br />
eggs)<br />
2 tbs (30 mL) water<br />
3 1 /2 cups (830 mL)<br />
whole wheat flour<br />
1 /2 tsp (2 mL) salt<br />
1 package 10 oz<br />
(285 g) frozen<br />
chopped spinach,<br />
thawed<br />
1 tbs (15 mL) water<br />
4 large eggs<br />
( 7 /8 cup [208 mL]<br />
eggs)<br />
4 cups (945 mL) sifted<br />
all-purpose flour<br />
Light Wheat Pasta<br />
Place whole wheat flour, bread flour, eggs, water, and salt<br />
in stand mixer bowl. Attach bowl and flat beater. Turn to<br />
Speed 2 and mix 30 seconds.<br />
Exchange flat beater for dough hook. Turn to Speed 2 and<br />
knead 2 minutes. Remove dough from bowl and hand<br />
knead for 1 to 2 minutes.<br />
Form walnut-sized pieces of dough and extrude pasta into<br />
desired shape. Separate and dry as desired, then follow<br />
the “Cooking Pasta“ instructions.<br />
Yield: 11 /4 lbs (565 g) dough.<br />
Whole Wheat Pasta<br />
Place eggs, water, whole wheat flour, and salt in stand<br />
mixer bowl. Attach bowl and flat beater. Turn to Speed 2<br />
and mix 30 seconds.<br />
Exchange flat beater for dough hook. Turn to Speed 2 and<br />
knead 2 minutes. Remove dough from bowl and hand<br />
knead for 2 minutes.<br />
Form walnut-sized pieces of dough and extrude pasta into<br />
desired shape. Separate and dry as desired, then follow<br />
the “Cooking Pasta“ instructions.<br />
Yield: 11 /4 lbs (565 g) dough.<br />
Spinach Pasta<br />
Place spinach in a towel and wring out all water until<br />
spinach feels very dry. Finely chop spinach using a food<br />
grinder accessory, food processor or blender.<br />
Place chopped spinach, water, eggs, and flour in stand<br />
mixer bowl. Attach bowl and flat beater. Turn to Speed 2<br />
and mix 30 seconds.<br />
Exchange flat beater for dough hook. Turn to Speed 2 and<br />
knead 2 minutes. Remove dough from bowl and hand<br />
knead for 1 to 2 minutes.<br />
Form walnut-sized pieces of dough and extrude pasta into<br />
desired shape. Separate and dry as desired, then follow<br />
the “Cooking Pasta“ instructions.<br />
Yield: 11 /2 lbs (680 g) dough.<br />
11<br />
ENGLISH
ENGLISH<br />
3 tbs (45 mL) butter<br />
2 tbs (30 mL) finely<br />
minced onion<br />
2 tbs (30 mL) flour<br />
3 cups (780 mL) milk<br />
4 oz (120 mL) extra<br />
sharp Cheddar<br />
cheese, shredded<br />
4 oz (120 mL) Fontina<br />
cheese, shredded<br />
1 tsp (5 mL)<br />
Worcestershire sauce<br />
¼ tsp (1 mL)<br />
garlic salt<br />
1 /8 tsp (0.5 mL) pepper<br />
1 /8 tsp (0.5 mL) paprika<br />
1 recipe basic egg<br />
noodle pasta<br />
extruded into<br />
short-cut large<br />
macaroni, cooked<br />
and drained<br />
Deluxe Macaroni and Cheese<br />
Melt butter in a large saucepan over medium heat. Add<br />
onion and cook, stirring occasionally, for 4 to 5 minutes<br />
or until translucent. Add flour and cook an additional<br />
minute. Whisk in milk, and continue cooking over medium<br />
heat until mixture comes to a boil and thickens slightly.<br />
Reduce to low heat and stir in Cheddar and Fontina<br />
cheeses, mixing until melted and well incorporated. Add<br />
Worcestershire sauce, garlic salt, pepper, and paprika,<br />
stirring well to combine. Remove from heat and set aside.<br />
Place cheese mixture and cooked macaroni in large bowl,<br />
mixing well to combine. Transfer mixture to a greased 9" x<br />
13" x 2" (23 cm x 33 cm x 5 cm) baking pan. Cover tightly<br />
with foil and bake at 350°F (180°C) for 25 to 30 minutes.<br />
Remove foil and bake an additional 10 minutes to brown<br />
and crisp top. Serve immediately.<br />
Yield: 10 servings.<br />
Per Serving: About 214 cal., 11 g protein, 16 g carb,<br />
12 g total fat, 56 mg cholesterol, 258 mg sodium.<br />
12
3 tbs (45 mL) olive oil<br />
2 stalks celery, trimmed<br />
and cut into ¼"<br />
(0.65 cm) slices<br />
3 carrots, peeled<br />
and cut into ¼"<br />
(0.65 cm) slices<br />
2 small zucchini,<br />
trimmed and<br />
cut into ¼"<br />
(0.65 cm) slices<br />
1 small onion, chopped<br />
1 shallot, finely<br />
chopped<br />
1 package (32 oz)<br />
(946 mL) chicken<br />
broth<br />
2 cans (14.5 oz<br />
[429 mL] each) petite<br />
diced tomatoes with<br />
juice<br />
1 tsp (5 mL) dried<br />
oregano<br />
1 tsp (5 mL) dried basil<br />
¼ tsp (1 mL) pepper<br />
½ recipe basic egg<br />
noodle pasta<br />
extruded into<br />
short-cut small<br />
macaroni, uncooked<br />
1 can (15.8 oz<br />
[467 mL]) white<br />
beans, rinsed and<br />
drained<br />
Classic Minestrone<br />
Heat olive oil in large pot over medium high heat. Add<br />
celery, carrots, zucchini, onion, and shallot. Cook and stir<br />
for 4 to 5 minutes, or until vegetables are softened.<br />
Add chicken broth, tomatoes, oregano, basil, and pepper.<br />
Increase heat to high and bring mixture to a boil. Add<br />
pasta, and continue to boil until pasta has reached al<br />
dente stage, about 4 to 5 minutes. Reduce heat to low<br />
and stir in beans. Simmer an additional 5 minutes or until<br />
beans are heated through. Serve immediately.<br />
Yield: 10 servings.<br />
Per Serving: About 97 cal., 4 g protein, 16 g carb, 2 g fat,<br />
9 mg cholesterol, 466 mg sodium.<br />
13<br />
ENGLISH
ENGLISH<br />
Pasta with Roasted Fresh Vegetable Sauce<br />
4 tbs (60 mL) olive oil,<br />
divided<br />
1 small zucchini,<br />
trimmed and cut into<br />
¼" (0.65 cm) slices<br />
1 small yellow squash,<br />
trimmed and cut into<br />
¼" (0.65 cm) slices<br />
1 small onion, chopped<br />
3 cloves garlic, minced<br />
1 package (8 oz)<br />
(235 mL) sliced<br />
button or baby Bella<br />
mushrooms<br />
8 large ripe Roma<br />
tomatoes, peeled and<br />
seeded if desired,<br />
and cut into ½"<br />
(1.25 cm) slices<br />
1 tsp (5 mL) salt<br />
1 /8 tsp (0.5 mL) pepper<br />
½ cup (120 mL) chicken<br />
or vegetable broth (if<br />
desired)<br />
½ recipe basic egg<br />
noodle pasta<br />
extruded into<br />
short-cut large<br />
macaroni, cooked<br />
and drained<br />
2 tbs (30 mL) coarsely<br />
chopped basil leaves<br />
2 tbs (30 mL) coarsely<br />
chopped flat leaf<br />
Italian parsley<br />
½ cup (235 mL)<br />
Parmesan cheese<br />
Coat bottom and sides of a large glass or ceramic baking<br />
pan with 1 tbs (15 mL) olive oil. Place zucchini, yellow<br />
squash, onion, garlic, mushrooms, tomatoes, salt, and<br />
pepper in baking pan. Drizzle with remaining oil and<br />
mix well. Bake at 425°F (220°C) for 1 hour, stirring<br />
mixture every 20 minutes, until vegetables are tender and<br />
caramelized.<br />
Remove from oven and add broth, if desired, to loosen<br />
browned bits from bottom of pan and add additional<br />
moisture. Let stand 10 minutes. Add hot cooked pasta,<br />
basil, parsley, and Parmesan cheese. Mix well to combine<br />
and serve immediately.<br />
Yield: 8 servings.<br />
Per Serving: About 149 cal., 6 g protein, 12 g carb, 9 g<br />
fat, 17 mg cholesterol, 476 mg sodium.<br />
14
Asparagus, Tomato and Fusilli Salad<br />
1 lb (455 g) asparagus,<br />
trimmed and cut into<br />
1" (2.5 cm) pieces<br />
1 medium yellow bell<br />
pepper, seeded and<br />
diced<br />
1 package (1 pint)<br />
(550 mL) grape<br />
tomatoes, halved<br />
2 green onions,<br />
trimmed and thinly<br />
sliced<br />
4 ounces (120 mL)<br />
smoked provolone<br />
cheese, diced<br />
¼ cup (60 mL) chopped<br />
parsley<br />
½ cup (120 mL) olive oil<br />
2 tbs (30 mL) balsamic<br />
vinegar<br />
3 tbs (45 mL) red wine<br />
vinegar<br />
2 cloves garlic, finely<br />
minced<br />
½ tsp (2 mL) salt<br />
1 /8 tsp (0.5 mL) pepper<br />
½ recipe basic egg<br />
noodle pasta<br />
extruded into<br />
short-cut fusilli,<br />
cooked, rinsed and<br />
cooled<br />
Bring medium saucepan with 2 cups (475 ml) water to<br />
boil over high heat. Add asparagus, cover, and continue<br />
to boil for 2 to 3 minutes, or until tender crisp. Remove<br />
asparagus from pan and immediately submerse in cold<br />
water. Rinse well and place in large bowl. Add yellow<br />
pepper, tomatoes, green onions, provolone cheese, and<br />
parsley. Mix well and set aside.<br />
In small bowl, whisk together oil, vinegars, garlic, salt, and<br />
pepper. Pour mixture over vegetables and let stand<br />
15 minutes. Add cooked pasta and mix well to combine.<br />
Cover and refrigerate one hour or until well chilled.<br />
Serve cold.<br />
Yield: 8 servings.<br />
Per Serving: About 226 cal., 6 g protein, 11 g carb, 18 g<br />
fat, 21 mg cholesterol, 297 mg sodium.<br />
15<br />
ENGLISH
ENGLISH<br />
Serve with Spaghetti<br />
or Bucatini Pasta<br />
1 lb (455 g) lean<br />
ground beef<br />
1 lb (455 g) ground<br />
pork<br />
2 carrots, peeled and<br />
finely chopped<br />
2 stalks celery, finely<br />
chopped<br />
1 medium onion, finely<br />
chopped<br />
4 cloves garlic, minced<br />
½ cup (120 mL) dry red<br />
wine<br />
2 cans (28 oz<br />
[828 mL] each)<br />
crushed tomatoes<br />
2 cans (6 oz<br />
[177 mL] each)<br />
tomato paste<br />
1 can (14 ½ oz<br />
[428 mL]) chicken or<br />
beef broth<br />
2 tsp (10 mL) dried<br />
basil<br />
2 tsp (10 mL) dried<br />
oregano<br />
2 fresh bay leaves<br />
½ tsp (2 mL) crushed<br />
red pepper flakes<br />
2 tsp (10 mL) sugar<br />
Salt and pepper to<br />
taste<br />
Bolognese Pasta Sauce<br />
In large pot or Dutch oven over medium-high heat, cook<br />
and crumble ground beef and pork, about 5 minutes. Add<br />
carrots, celery, onion, and garlic to pot and continue to<br />
cook and finely crumble mixture until meat is thoroughly<br />
cooked, about 8 to 9 minutes. Remove from heat and<br />
drain all excess fat. Return pot to medium heat and<br />
add red wine. Cook and stir 3 minutes. Add remaining<br />
ingredients, reduce heat and simmer for 1 hour, stirring<br />
occasionally. Remove bay leaves and serve over hot pasta.<br />
Yield: 10 servings.<br />
Per Serving: About 268 cal., 21 g protein, 22 g carb, 11 g<br />
fat, 57 mg cholesterol, 820 mg sodium.<br />
16
Serve with Large<br />
Macaroni or Fusilli<br />
Pasta<br />
8 oz (235 mL) shrimp,<br />
peeled and deveined<br />
8 oz (235 mL) bay<br />
scallops<br />
2 tbs (30 mL) butter<br />
1 small shallot, finely<br />
chopped<br />
¼ cup (60 mL) dry white<br />
wine<br />
1 cup (235 mL) half<br />
and half<br />
1 cup (235 mL) grated<br />
Parmesan cheese<br />
¼ tsp (1 mL) salt<br />
1 /8 tsp (0.5 mL) pepper<br />
Dash nutmeg<br />
Seafood Cream Sauce<br />
Place shrimp and scallops between layers of paper towels<br />
to remove excess moisture; set aside. Melt butter in large<br />
skillet over medium heat. Add shallot and sauté for 2 to<br />
3 minutes, stirring occasionally. Add shrimp and scallops<br />
to skillet and cook, stirring occasionally, for 3 to<br />
4 minutes, or just until seafood turns opaque. Stir in<br />
white wine and simmer mixture 1 to 2 minutes. Add half<br />
and half, Parmesan cheese, salt, pepper, and nutmeg.<br />
Continue to cook, stirring occasionally, until mixture just<br />
begins to simmer and cheese is melted. Do not boil.<br />
Sauce will be thin. Remove from heat immediately and<br />
toss with hot pasta.<br />
Yield: 6 servings.<br />
Per Serving: About 248 cal., 22 g protein, 5 g carb,<br />
14 g fat, 109 mg cholesterol, 608 mg sodium.<br />
17<br />
ENGLISH
ENGLISH<br />
1 tbs (15 mL) olive oil<br />
2 boneless skinless<br />
chicken breasts, sliced<br />
into ¼" (0.65 cm)<br />
pieces<br />
2 Italian sausage links,<br />
sliced diagonally into<br />
¼" (0.65 cm) pieces<br />
1 small onion, sliced<br />
1 small green pepper,<br />
seeded and sliced<br />
2 large cloves garlic,<br />
minced<br />
1 tsp (5 mL) chopped<br />
fresh rosemary<br />
1 /8 tsp (0.5 mL) cayenne<br />
pepper<br />
1 can (14.5 oz<br />
[428 mL]) petite diced<br />
tomatoes with juice<br />
¾ cup (175 mL) half<br />
and half<br />
½ recipe basic egg<br />
noodle pasta<br />
extruded into<br />
short-cut rigatoni,<br />
cooked and drained<br />
½ cup (120 mL)<br />
shredded Mozzarella<br />
cheese<br />
¼ cup (60 mL) grated<br />
Romano cheese<br />
Rustic Baked Rigatoni<br />
Heat oil in large skillet over medium heat. Add chicken<br />
and sausage links and cook, stirring occasionally, for 5 to<br />
6 minutes. Add onion, green pepper, and garlic. Continue<br />
cooking and stirring until meat is completely cooked<br />
through and vegetables are tender, about 6 to 7 minutes.<br />
Add rosemary, cayenne pepper, and tomatoes. Stir well to<br />
combine and bring mixture to a simmer. Stir in half and<br />
half and remove mixture from heat. Add cooked pasta<br />
and stir well to combine. Transfer mixture to a greased<br />
2½ -qt (2.3 L) baking dish. Sprinkle with mozzarella and<br />
Romano cheeses. Bake at 350°F (180°C) for 15 to<br />
20 minutes, or until heated through. Serve immediately.<br />
Yield: 8 servings.<br />
Per Serving: About 369 cal., 24 g protein, 15 g carb, 24 g<br />
fat, 94 mg cholesterol, 587 mg sodium.<br />
18
1 cup (235 mL) natural<br />
peanut butter<br />
4 tbs (60 mL) olive oil<br />
6 tbs (90 mL) fresh lime<br />
juice<br />
2 /3 cup (160 mL) light<br />
soy sauce<br />
2 tsp (30 mL) sugar<br />
2 cloves garlic, finely<br />
minced<br />
¼ tsp (1 mL) cayenne<br />
pepper<br />
¼ tsp (1 mL) cumin<br />
1 recipe basic egg<br />
noodle pasta<br />
extruded into<br />
spaghetti, cooked,<br />
drained and cooled<br />
1½ cups (355 mL) fine<br />
julienne carrot strips<br />
3 green onions,<br />
trimmed and thinly<br />
sliced<br />
3 tbs (45 mL) chopped<br />
fresh parsley<br />
Chinese Peanut Noodles<br />
Combine peanut butter, olive oil, lime juice, soy sauce,<br />
sugar, garlic, cayenne pepper, and cumin in small bowl.<br />
Whisk together until smooth. Set aside for 15 minutes to<br />
blend flavors.<br />
Place pasta, carrots, green onions, and parsley in large<br />
bowl. Pour reserved sauce over mixture and toss to<br />
combine. Cover and refrigerate one hour or until well<br />
chilled. Serve cold.<br />
Yield: 10 servings.<br />
Per Serving: About 272 cal., 9 g protein, 19 g carb, 19 g<br />
fat, 19 mg cholesterol, 818 mg sodium.<br />
19<br />
ENGLISH
ENGLISH<br />
Length of<br />
Warranty:<br />
50 United States, the<br />
District of Columbia,<br />
Canada, and Puerto<br />
Rico: One-year limited<br />
warranty from date of<br />
purchase.<br />
<strong>KitchenAid</strong> ® Stand Mixer<br />
Accessory Warranty<br />
<strong>KitchenAid</strong><br />
Will Pay For:<br />
50 United States, the<br />
District of Columbia<br />
and Canada: Hassle-free<br />
replacement of your pasta<br />
press accessory. See the<br />
following page for details<br />
on how to arrange for<br />
replacement.<br />
OR<br />
In Puerto Rico:<br />
The replacement parts<br />
and repair labor costs to<br />
correct defects in materials<br />
and workmanship. Service<br />
must be provided by an<br />
Authorized <strong>KitchenAid</strong><br />
Service Center. To arrange<br />
for service, see the<br />
following pages.<br />
20<br />
<strong>KitchenAid</strong><br />
Will Not Pay For:<br />
A. Repairs when pasta<br />
press accessory is used<br />
in other than normal<br />
single family home<br />
use.<br />
B. Damage resulting from<br />
accident, alteration,<br />
misuse or abuse or<br />
use with products<br />
not approved by<br />
<strong>KitchenAid</strong>.<br />
C. Replacement parts or<br />
repair labor costs for<br />
pasta press accessory<br />
when operated<br />
outside the country<br />
of purchase.<br />
DISCLAIMER OF IMPLIED WARRANTIES; LIMITATION OF REMEDIES IMPLIED<br />
WARRANTIES, INCLUDING TO THE EXTENT APPLICABLE WARRANTIES OF<br />
MERCHANTABILITY OR FITNESS FOR A PARTICULAR PURPOSE, ARE EXCLUDED TO THE<br />
EXTENT LEGALLY PERMISSIBLE. ANY IMPLIED WARRANTIES THAT MAY BE IMPOSED BY<br />
LAW ARE LIMITED TO ONE YEAR, OR THE SHORTEST PERIOD ALLOWED BY LAW. SOME<br />
STATES AND PROVINCES DO NOT ALLOW LIMITATIONS OR EXCLUSIONS ON HOW LONG<br />
AN IMPLIED WARRANTY OF MERCHANTABILITY OR FITNESS LASTS, SO THE ABOVE<br />
LIMITATIONS OR EXCLUSIONS MAY NOT APPLY TO YOU.<br />
IF THIS PRODUCT FAILS TO WORK AS WARRANTED, CUSTOMER’S SOLE AND EXCLUSIVE<br />
REMEDY SHALL BE REPAIR OR REPLACEMENT ACCORDING TO THE TERMS OF THIS<br />
LIMITED WARRANTY. KITCHENAID AND KITCHENAID CANADA DO NOT ASSUME ANY<br />
RESPONSIBILITY FOR INCIDENTAL OR CONSEQUENTIAL DAMAGES. This warranty gives<br />
you specific legal rights and you may also have other rights which vary from state to<br />
state or province to province.
Hassle-Free Replacement Warranty –<br />
50 United States and District of Columbia<br />
We’re so confident the quality of our<br />
products meets the exacting standards of<br />
<strong>KitchenAid</strong> that, if your pasta press accessory<br />
should fail within the first year of ownership,<br />
<strong>KitchenAid</strong> will arrange to deliver an identical<br />
or comparable replacement to your door free<br />
of charge and arrange to have your original<br />
pasta press accessory returned to us. Your<br />
replacement unit will also be covered by our<br />
one year limited warranty. Please follow these<br />
instructions to receive this quality service.<br />
21<br />
If your pasta press accessory should fail<br />
within the first year of ownership, simply call<br />
our toll-free Customer Satisfaction Center at<br />
1-800-541-6390 Monday through Friday,<br />
8 a.m. to 8 p.m. (Eastern Time), or Saturday,<br />
10 a.m. to 5 p.m. Give the consultant your<br />
complete shipping address. (No P.O. Box<br />
numbers, please.)<br />
When you receive your replacement pasta<br />
press accessory, use the carton and packing<br />
materials to pack up your original pasta<br />
press accessory. In the carton, include your<br />
name and address on a sheet of paper along<br />
with a copy of the proof of purchase (register<br />
receipt, credit card slip, etc.).<br />
Hassle-Free Replacement Warranty – Canada<br />
We’re so confident the quality of our<br />
products meets the exacting standards of<br />
the <strong>KitchenAid</strong> brand that, if your pasta<br />
press accessory should fail within the first<br />
year of ownership, <strong>KitchenAid</strong> Canada will<br />
replace your pasta press accessory with an<br />
identical or comparable replacement. Your<br />
replacement unit will also be covered by<br />
our one year limited warranty. Please follow<br />
these instructions to receive this quality<br />
service.<br />
If your pasta press accessory should fail<br />
within the first year of ownership, take<br />
the pasta press accessory or ship collect to<br />
an Authorized <strong>KitchenAid</strong> Canada Service<br />
Centre. In the carton include your name<br />
and complete shipping address along<br />
with a copy of the proof of purchase<br />
(register receipt, credit card slip, etc.). Your<br />
replacement pasta press accessory will<br />
be returned prepaid and insured. If you<br />
are unable to obtain satisfactory service<br />
in this manner call our toll-free Customer<br />
eXperience Centre at 1-800-807-6777. Or<br />
write to us at:<br />
Customer eXperience Centre<br />
<strong>KitchenAid</strong> Canada<br />
1901 Minnesota Court<br />
Mississauga, ON L5N 3A7<br />
How To Arrange for Warranty Service<br />
in Puerto Rico<br />
Your pasta press accessory is covered by<br />
a one-year limited warranty from the<br />
date of purchase. <strong>KitchenAid</strong> will pay for<br />
replacement parts and labor costs to correct<br />
defects in materials and workmanship.<br />
Service must be provided by an Authorized<br />
<strong>KitchenAid</strong> Service Center.<br />
Take the pasta press accessory or ship<br />
prepaid and insured to an Authorized<br />
<strong>KitchenAid</strong> Service Center. Your repaired<br />
pasta press accessory will be returned<br />
prepaid and insured. If you are unable to<br />
obtain satisfactory service in this manner,<br />
call toll-free 1-800-541-6390 to learn the<br />
location of a Service Center near you.<br />
ENGLISH
ENGLISH<br />
How To Arrange for Service<br />
after the Warranty Expires – All Locations<br />
For service information in the 50<br />
United States, District of Columbia,<br />
and Puerto Rico,<br />
call toll-free 1-800-541-6390.<br />
Or write to:<br />
Customer Satisfaction Center<br />
<strong>KitchenAid</strong> Portable Appliances<br />
P.O. Box 218<br />
St. Joseph, MI 49085-0218<br />
Or contact an Authorized Service Center<br />
near you.<br />
22<br />
For service information in Canada,<br />
call toll-free 1-800-807-6777.<br />
Or write to:<br />
Customer eXperience Centre<br />
<strong>KitchenAid</strong> Canada<br />
1901 Minnesota Court<br />
Mississauga, ON L5N 3A7<br />
How To Arrange for Service<br />
Outside these Locations<br />
Consult your local <strong>KitchenAid</strong> dealer or<br />
the store where you purchased the pasta<br />
press accessory for information on how to<br />
obtain service.<br />
For service information in Mexico,<br />
call toll-free<br />
01-800-024-17-17<br />
(JV Distribuciones)<br />
Or<br />
01-800-902-31-00<br />
(Industrias Birtman)<br />
How To Order Accessories<br />
and Replacement Parts<br />
To order accessories or replacement<br />
parts for your pasta press accessory<br />
in the 50 United States, District of<br />
Columbia, and Puerto Rico,<br />
call toll-free 1-800-541-6390 Monday<br />
through Friday, 8 a.m. to 8 p.m. (Eastern<br />
Time), or Saturday, 10 a.m. to 5 p.m.<br />
Or write to:<br />
Customer Satisfaction Center<br />
<strong>KitchenAid</strong> Portable Appliances<br />
P.O. Box 218<br />
St. Joseph, MI 49085-0218<br />
To order accessories or replacement<br />
parts for your pasta press accessory in<br />
Canada, call toll-free 1-800-807-6777.<br />
Or write to:<br />
Customer eXperience Centre<br />
<strong>KitchenAid</strong> Canada<br />
1901 Minnesota Court<br />
Mississauga, ON L5N 3A7<br />
To order accessories or replacement<br />
parts for your pasta press accessory<br />
in Mexico,<br />
call toll-free<br />
01-800-024-17-17<br />
(JV Distribuciones)<br />
Or<br />
01-800-902-31-00<br />
(Industrias Birtman)