installation instructions creative wall „Typ 2“
installation instructions creative wall „Typ 2“
installation instructions creative wall „Typ 2“

You also want an ePaper? Increase the reach of your titles
YUMPU automatically turns print PDFs into web optimized ePapers that Google loves.
<strong>installation</strong> <strong>instructions</strong> <strong>creative</strong> <strong>wall</strong> <strong>„Typ</strong> <strong>2“</strong><br />
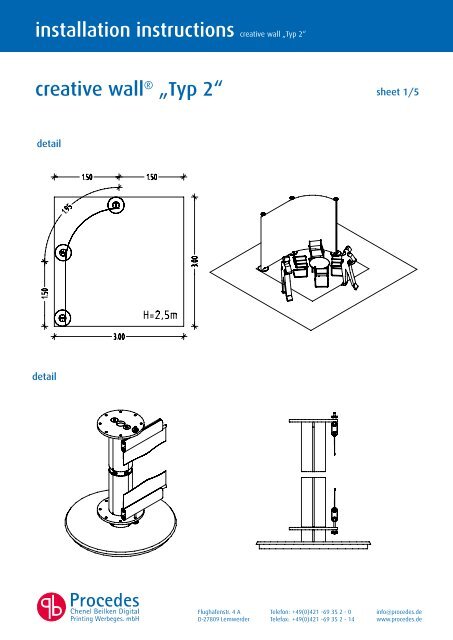
<strong>creative</strong> <strong>wall</strong> ® <strong>„Typ</strong> <strong>2“</strong> sheet 1/5<br />
detail<br />
detail<br />
Flughafenstr. 4 A<br />
D-27809 Lemwerder<br />
Telefon: +49(0)421 -69 35 2 - 0<br />
Telefax: +49(0)421 -69 35 2 - 14<br />
info@procedes.de<br />
www.procedes.de
<strong>installation</strong> <strong>instructions</strong> <strong>creative</strong> <strong>wall</strong> <strong>„Typ</strong> <strong>2“</strong><br />
<strong>installation</strong> <strong>instructions</strong> for <strong>creative</strong> <strong>wall</strong> ®<br />
1) Screw the footplate 380 (and weighting plate 360 if necessary) or foorplate 200 to the column.<br />
Flughafenstr. 4 A<br />
D-27809 Lemwerder<br />
Telefon: +49(0)421 -69 35 2 - 0<br />
Telefax: +49(0)421 -69 35 2 - 14<br />
sheet 2/5<br />
2) In teh case of multi-part section rails, connect hanging rails with a tube insert to from a continuous<br />
upper and lower rail.<br />
3) Arrange upper section rail on the floor in the same position as the <strong>creative</strong> <strong>wall</strong> ® is to later<br />
stand in the room.<br />
Place columns in the required position along the laid out rail (if the fabric <strong>wall</strong> is not freestanding,<br />
now secure column to floor with Spax - footplate 200 (see Fig. 1)).<br />
4) Preassemble tensioning bolts: Screw M5 threaded stud with hexagonsocket head facing<br />
upwards (!) into sliding block.<br />
5) Raise upper section rail, fit preassembled thread studs at upper column flange and firmly secure<br />
the upper rail to the column with the M5 knurled nut.<br />
6) Stand the roll of fabric on its end with the print subject facing forward. Carefully insert the upper<br />
hollow hem with the hose insert in the upper section rail already suspenden while slowly<br />
unrolling the fabric.<br />
7) Slide lower section rail with prepared threaded studs with sliding block onto lower fabric hem.<br />
Now firmly secure lower section rail at lower column flange with the prepared threaded studs to<br />
the column with M5 knurled nut.<br />
8) Align upper section rail exactly straight. Pull fabric taut in the upper/lower section rail and secure<br />
at both ends with the final retention screw.<br />
9) Pull the complete fabric taut with the lower tensioning bolts.<br />
10) Fit end caps on ends of rails.<br />
11) Preassemble hammer head screw with flat knurled nut in hanging rail: Turn screw 90° and<br />
secure with the flat knurled nut.<br />
Fit lamp on hanging rail with preassembled hammer screw and tighten with knurled nut.<br />
Connect 230 V power calble and if necessary interconnect extension/distributor block .<br />
info@procedes.de<br />
www.procedes.de
<strong>installation</strong> <strong>instructions</strong> <strong>creative</strong> <strong>wall</strong> <strong>„Typ</strong> <strong>2“</strong><br />
1<br />
2<br />
alternative<br />
Flughafenstr. 4 A<br />
D-27809 Lemwerder<br />
3<br />
Telefon: +49(0)421 -69 35 2 - 0<br />
Telefax: +49(0)421 -69 35 2 - 14<br />
sheet 3/5<br />
alternative<br />
wood<br />
screw<br />
info@procedes.de<br />
www.procedes.de
<strong>installation</strong> <strong>instructions</strong> <strong>creative</strong> <strong>wall</strong> <strong>„Typ</strong> <strong>2“</strong><br />
4<br />
6<br />
Flughafenstr. 4 A<br />
D-27809 Lemwerder<br />
7<br />
M5/8<br />
5<br />
Telefon: +49(0)421 -69 35 2 - 0<br />
Telefax: +49(0)421 -69 35 2 - 14<br />
sheet 4/5<br />
M5/8<br />
info@procedes.de<br />
www.procedes.de
<strong>installation</strong> <strong>instructions</strong> <strong>creative</strong> <strong>wall</strong> <strong>„Typ</strong> <strong>2“</strong><br />
9<br />
11<br />
5.<br />
3.<br />
2.<br />
1.<br />
knurled screw<br />
4.<br />
T-headed screw<br />
Flughafenstr. 4 A<br />
D-27809 Lemwerder<br />
10<br />
Telefon: +49(0)421 -69 35 2 - 0<br />
Telefax: +49(0)421 -69 35 2 - 14<br />
sheet 5/5<br />
info@procedes.de<br />
www.procedes.de