Beginning Microsoft SQL Server 2008 ... - S3 Tech Training
Beginning Microsoft SQL Server 2008 ... - S3 Tech Training Beginning Microsoft SQL Server 2008 ... - S3 Tech Training
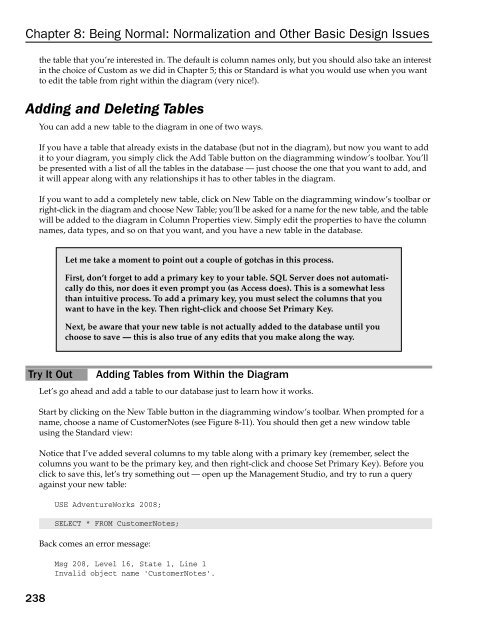
Chapter 8: Being Normal: Normalization and Other Basic Design Issues the table that you’re interested in. The default is column names only, but you should also take an interest in the choice of Custom as we did in Chapter 5; this or Standard is what you would use when you want to edit the table from right within the diagram (very nice!). Adding and Deleting Tables You can add a new table to the diagram in one of two ways. If you have a table that already exists in the database (but not in the diagram), but now you want to add it to your diagram, you simply click the Add Table button on the diagramming window’s toolbar. You’ll be presented with a list of all the tables in the database — just choose the one that you want to add, and it will appear along with any relationships it has to other tables in the diagram. If you want to add a completely new table, click on New Table on the diagramming window’s toolbar or right-click in the diagram and choose New Table; you’ll be asked for a name for the new table, and the table will be added to the diagram in Column Properties view. Simply edit the properties to have the column names, data types, and so on that you want, and you have a new table in the database. Try It Out Adding Tables from Within the Diagram 238 Let me take a moment to point out a couple of gotchas in this process. First, don’t forget to add a primary key to your table. SQL Server does not automatically do this, nor does it even prompt you (as Access does). This is a somewhat less than intuitive process. To add a primary key, you must select the columns that you want to have in the key. Then right-click and choose Set Primary Key. Next, be aware that your new table is not actually added to the database until you choose to save — this is also true of any edits that you make along the way. Let’s go ahead and add a table to our database just to learn how it works. Start by clicking on the New Table button in the diagramming window’s toolbar. When prompted for a name, choose a name of CustomerNotes (see Figure 8-11). You should then get a new window table using the Standard view: Notice that I’ve added several columns to my table along with a primary key (remember, select the columns you want to be the primary key, and then right-click and choose Set Primary Key). Before you click to save this, let’s try something out — open up the Management Studio, and try to run a query against your new table: USE AdventureWorks 2008; SELECT * FROM CustomerNotes; Back comes an error message: Msg 208, Level 16, State 1, Line 1 Invalid object name ‘CustomerNotes’.
Chapter 8: Being Normal: Normalization and Other Basic Design Issues Figure 8-11 That’s because our table exists only as an edited item on the diagram — it won’t be added until we actually save our changes. If you look at the CustomerNotes table in the diagram window at this point, you should see a * to the right of the name — that’s there to tell you that there are unsaved changes in that table. Now, switch back to the Management Studio. There are two save options: ❑ Save: This saves the changes to both the diagram and to the database (this is the little disk icon on the toolbar). ❑ Generate Change Script: This saves the changes to a script so it can be run at a later time. (This is found in the Table Designer menu or as an icon on the Table Designer toolbar. The Table Designer toolbar contains several smart icons that provide quick access to many frequently used table design features. Unfortunately, it does not come up by default in the designer under the RTM version of SQL Server 2008. You can add it by right-clicking open space in the toolbar and selecting the Table Designer toolbar. Go ahead and just choose Save, and you’ll be prompted for the name of your diagram and confirmation (after all, you’re about to alter your database — there’s no “undo” for this). Confirm the changes, and try running that query again against your CustomerNotes table. You should not receive an error this time because the table has now been created. (You won’t get any rows back, but the query should still run.) How It Works When we create a diagram, SQL Server creates script behind the scenes that looks basically just as our scripts did back in Chapter 6 when we were scripting our own changes. However, these scripts are not actually generated and run until we choose to save the diagram. 239
- Page 225 and 226: 7 Adding More to Our Queries When I
- Page 227 and 228: Building a Nested Subquery A nested
- Page 229 and 230: While this works just fine, queries
- Page 231 and 232: We’ll go back to the AdventureWor
- Page 233 and 234: ❑ Aliases are used in both querie
- Page 235 and 236: Now let’s see this at work in our
- Page 237 and 238: So let’s take this now and apply
- Page 239 and 240: This join-based syntax, for example
- Page 241 and 242: IF NOT EXISTS (SELECT ‘True’ FR
- Page 243 and 244: The conversions can actually get a
- Page 245 and 246: there are no other roll up records
- Page 247 and 248: GROUP BY soh.OrderDate, sod.Product
- Page 249 and 250: OUTPUT $action, inserted.Year, inse
- Page 251 and 252: The long-standing, traditional view
- Page 253 and 254: 8 Being Normal: Normalization and O
- Page 255 and 256: Chapter 8: Being Normal: Normalizat
- Page 257 and 258: Chapter 8: Being Normal: Normalizat
- Page 259 and 260: Chapter 8: Being Normal: Normalizat
- Page 261 and 262: Chapter 8: Being Normal: Normalizat
- Page 263 and 264: Chapter 8: Being Normal: Normalizat
- Page 265 and 266: Chapter 8: Being Normal: Normalizat
- Page 267 and 268: Chapter 8: Being Normal: Normalizat
- Page 269 and 270: Chapter 8: Being Normal: Normalizat
- Page 271 and 272: Chapter 8: Being Normal: Normalizat
- Page 273 and 274: Chapter 8: Being Normal: Normalizat
- Page 275: Chapter 8: Being Normal: Normalizat
- Page 279 and 280: Chapter 8: Being Normal: Normalizat
- Page 281 and 282: Chapter 8: Being Normal: Normalizat
- Page 283 and 284: Chapter 8: Being Normal: Normalizat
- Page 285 and 286: Chapter 8: Being Normal: Normalizat
- Page 287 and 288: Chapter 8: Being Normal: Normalizat
- Page 289 and 290: Chapter 8: Being Normal: Normalizat
- Page 291 and 292: Chapter 8: Being Normal: Normalizat
- Page 293 and 294: Chapter 8: Being Normal: Normalizat
- Page 295 and 296: Chapter 8: Being Normal: Normalizat
- Page 297 and 298: Chapter 8: Being Normal: Normalizat
- Page 299 and 300: 9 SQL Ser ver Storage and Index Str
- Page 301 and 302: Page Splits When a page becomes ful
- Page 303 and 304: The point here is that what happens
- Page 305 and 306: Page Splits — A First Look All of
- Page 307 and 308: You may hear lots of bad things abo
- Page 309 and 310: Navigating the Tree Figure 9-4 As I
- Page 311 and 312: there was no link between the data.
- Page 313 and 314: Root Non-Leaf Level Leaf Level Figu
- Page 315 and 316: The CREATE INDEX Statement The CREA
- Page 317 and 318: FILLFACTOR When SQL Server first cr
- Page 319 and 320: works only if tempdb is on a separa
- Page 321 and 322: Secondary XML Indexes Chapter 9: SQ
- Page 323 and 324: occur, and that one or more non-lea
- Page 325 and 326: isn’t room on the page, SQL Serve
Chapter 8: Being Normal: Normalization and Other Basic Design Issues<br />
the table that you’re interested in. The default is column names only, but you should also take an interest<br />
in the choice of Custom as we did in Chapter 5; this or Standard is what you would use when you want<br />
to edit the table from right within the diagram (very nice!).<br />
Adding and Deleting Tables<br />
You can add a new table to the diagram in one of two ways.<br />
If you have a table that already exists in the database (but not in the diagram), but now you want to add<br />
it to your diagram, you simply click the Add Table button on the diagramming window’s toolbar. You’ll<br />
be presented with a list of all the tables in the database — just choose the one that you want to add, and<br />
it will appear along with any relationships it has to other tables in the diagram.<br />
If you want to add a completely new table, click on New Table on the diagramming window’s toolbar or<br />
right-click in the diagram and choose New Table; you’ll be asked for a name for the new table, and the table<br />
will be added to the diagram in Column Properties view. Simply edit the properties to have the column<br />
names, data types, and so on that you want, and you have a new table in the database.<br />
Try It Out Adding Tables from Within the Diagram<br />
238<br />
Let me take a moment to point out a couple of gotchas in this process.<br />
First, don’t forget to add a primary key to your table. <strong>SQL</strong> <strong>Server</strong> does not automatically<br />
do this, nor does it even prompt you (as Access does). This is a somewhat less<br />
than intuitive process. To add a primary key, you must select the columns that you<br />
want to have in the key. Then right-click and choose Set Primary Key.<br />
Next, be aware that your new table is not actually added to the database until you<br />
choose to save — this is also true of any edits that you make along the way.<br />
Let’s go ahead and add a table to our database just to learn how it works.<br />
Start by clicking on the New Table button in the diagramming window’s toolbar. When prompted for a<br />
name, choose a name of CustomerNotes (see Figure 8-11). You should then get a new window table<br />
using the Standard view:<br />
Notice that I’ve added several columns to my table along with a primary key (remember, select the<br />
columns you want to be the primary key, and then right-click and choose Set Primary Key). Before you<br />
click to save this, let’s try something out — open up the Management Studio, and try to run a query<br />
against your new table:<br />
USE AdventureWorks <strong>2008</strong>;<br />
SELECT * FROM CustomerNotes;<br />
Back comes an error message:<br />
Msg 208, Level 16, State 1, Line 1<br />
Invalid object name ‘CustomerNotes’.


