Two-Dimensional Electrophoresis with Immobilized pH Gradients for ...
Two-Dimensional Electrophoresis with Immobilized pH Gradients for ...
Two-Dimensional Electrophoresis with Immobilized pH Gradients for ...

Create successful ePaper yourself
Turn your PDF publications into a flip-book with our unique Google optimized e-Paper software.
<strong>Two</strong>-<strong>Dimensional</strong> <strong>Electrophoresis</strong> <strong>with</strong> <strong>Immobilized</strong><br />
<strong>pH</strong> <strong>Gradients</strong> <strong>for</strong> Proteome Analysis<br />
by<br />
Angelika Görg<br />
Andreas Klaus, Carsten Lück, Florian Weiland<br />
and Walter Weiss<br />
Technische Universität München<br />
A LABORATORY MANUAL<br />
http://www.wzw.tum.de/proteomik
-ii -<br />
Copyright © 2007 By Angelika Görg Technical University of Munich<br />
Correspondence Prof. Dr. Angelika Görg<br />
Technische Universität München<br />
Proteomik<br />
D-85350 Freising-Weihenstephan, Germany<br />
http://www.wzw.tum.de/proteomik/
-iii -<br />
Preface<br />
The current laboratory manual of two-dimensional electrophoresis <strong>with</strong> immobilized <strong>pH</strong><br />
gradients (IPG-Dalt) was originally prepared <strong>for</strong> our own use and <strong>for</strong> the use by those who<br />
came to our laboratory to learn the technique we originally described in <strong>Electrophoresis</strong><br />
1988, 9, 531-546 and updated in <strong>Electrophoresis</strong> 2000, 21, 1037-1053 and Proteomics<br />
2004, 4, 3665-3685.<br />
Moreover, this manual became the standard protocol of our one-week courses (GDCh<br />
1990-2006, FEBS 1997, etc.), where the participants not only run their own experiments<br />
but also their own samples.<br />
Special thanks to Walter Weiss, Günther Boguth, Burghardt Scheibe, Robert Wildgruber,<br />
Oliver Drews, and Carsten Lück <strong>for</strong> contributing current practice not only to the manual but<br />
also to all the courses and work shops we run together all over the world.<br />
September 14th, 2007 Prof. Dr. Angelika Görg
-iv -<br />
Table of Contents<br />
1 INTRODUCTION ............................................................................................................................. 1<br />
1.1 <strong>Two</strong>-dimensional electrophoresis <strong>with</strong> IPGs (IPG-Dalt) ........................................................ 2<br />
1.2 The IPG-Dalt protocol: Principle ............................................................................................... 2<br />
2 SAMPLE PREPARATION .............................................................................................................. 6<br />
2.1 Sample preparation and protein solubilization ....................................................................... 6<br />
2.2 Sample prefractionation procedures ..................................................................................... 11<br />
PROTOCOLS ............................................................................................................................. 14<br />
I. Extraction and solubilization of cell and tissue samples .......................................................... 14<br />
II. Sample prefractionation using Sephadex IEF ........................................................................ 19<br />
3 2-D ELECTROPHORESIS WITH IMMOBILIZED <strong>pH</strong> GRADIENTS (IPG-DALT) ........................ 23<br />
3.1 First dimension: IEF <strong>with</strong> immobilized <strong>pH</strong> gradients (IPGs) ............................................... 24<br />
3.1.1 IPG gel casting. Procedure and recipes ........................................................................ 24<br />
PROTOCOL ................................................................................................................................ 25<br />
IPG gel casting ............................................................................................................................ 25<br />
3.1.2 IPG strip rehydration and sample application .............................................................. 29<br />
PROTOCOLS ............................................................................................................................. 31<br />
I. Rehydration of IPG DryStrips <strong>with</strong> sample solution ................................................................. 32<br />
II. Rehydration of IPG DryStrips <strong>for</strong> sample cup-loading ............................................................ 33<br />
3.1.3 IEF using IPG strips from <strong>pH</strong> 2.5 to 12. General aspects and guidelines .................. 35<br />
PROTOCOLS ............................................................................................................................. 40<br />
I. IEF on the Multiphor apparatus. Running conditions <strong>for</strong> different IPGs .................................. 40<br />
II. IEF using the IPGphor unit. Running conditions <strong>for</strong> different IPGs ........................................ 45<br />
3.2 IPG strip equilibration <strong>for</strong> proper protein transfer and pattern quality .............................. 50<br />
PROTOCOL ................................................................................................................................ 51<br />
IPG strip equilibration .................................................................................................................. 51<br />
3.3 Second dimension: SDS-PAGE on horizontal or vertical systems ..................................... 53<br />
3.3.1 SDS gel casting ................................................................................................................ 54<br />
PROTOCOLS ............................................................................................................................. 54<br />
I. Casting of horizontal SDS gels on plastic backing .................................................................. 56<br />
II. Casting of vertical SDS gels <strong>for</strong> multiple runs ......................................................................... 57<br />
3.3.2 Running SDS gels ............................................................................................................ 60
-v -<br />
PROTOCOLS ............................................................................................................................. 61<br />
I. SDS electrophoresis of horizontal gels on plastic backing ...................................................... 61<br />
Ia. SDS-PAGE on laboratory-made gels .................................................................................. 61<br />
Ib. SDS-PAGE on ready-made Excel gels ................................................................................ 63<br />
II. Multiple vertical SDS electrophoresis ..................................................................................... 64<br />
IIa. SDS-PAGE using the Ettan Dalt II vertical electrophoresis unit ......................................... 64<br />
IIb. SDS-PAGE using the Hoefer Dalt electrophoresis unit ...................................................... 65<br />
4 PROTEIN DETECTION AND QUANTITATION ........................................................................... 67<br />
4.1 Universal protein detection and quantitation methods ....................................................... 68<br />
4.2 Analysis of post-translational modifications (PTMs) ........................................................... 71<br />
4.3 Difference gel electrophoresis (DIGE) <strong>for</strong> differential display and quantitation ............... 74<br />
PROTOCOLS ............................................................................................................................. 76<br />
I. Coomassie Brilliant Blue (CBB) staining .................................................................................. 77<br />
II. Silver staining .......................................................................................................................... 78<br />
III: SYPRO Ruby fluorescent stain .............................................................................................. 80<br />
IV: Pro-Q Diamond phosphoprotein stain ................................................................................... 81<br />
V: Pro-Q Emerald glycoprotein stain ........................................................................................... 82<br />
VI: Fluorescent Difference Gel <strong>Electrophoresis</strong> (DIGE) ............................................................. 83<br />
VII: Blotting .................................................................................................................................. 87<br />
5 COMPUTERIZED 2-D IMAGE ANALYSIS AND DATABASE CONSTRUCTION ...................... 91<br />
5.1 Computer-assisted 2-D image analysis ................................................................................. 92<br />
5.2 <strong>Two</strong>-dimensional electrophoresis databases ....................................................................... 92<br />
6 PROTEIN IDENTIFICATION FROM 2-D GEL SPOTS ................................................................ 93<br />
PROTOCOL ................................................................................................................................ 94<br />
Protein Identification by MALDI-ToF-MS .................................................................................... 95<br />
7 PITFALLS ..................................................................................................................................... 96<br />
8 SUMMARIZED PROTOCOL OF IPG-DALT ................................................................................ 97<br />
APPENDIX I: Trouble shooting ..................................................................................................... 98<br />
APPENDIX II: Sample preparation <strong>for</strong> 2D gel electrophoresis ................................................ 107<br />
APPENDIX III: Detection of proteins on 2-D gels ...................................................................... 122<br />
APPENDIX IV: Image analysis of 2D protein patterns ............................................................. 137<br />
REFERENCES ............................................................................................................................... 149
1 INTRODUCTION<br />
High-resolution two-dimensional electrophoresis (2-D PAGE) <strong>for</strong> the separation of<br />
complex protein mixtures was introduced by O’Farrell in 1975 by combining isoelectric<br />
focusing (IEF) in the first dimension in presence of urea, detergents and DTT, <strong>with</strong><br />
sodium dodecyl sulfate polyacrylamide gel electrophoresis (SDS-PAGE) in the second<br />
dimension. Proteins are separated according to isoelectric point (pI) and molecular mass<br />
(Mr), and quantified according to relative abundance. Depending on the gel size and <strong>pH</strong><br />
gradient used, 2-D PAGE can resolve more than 5,000 proteins simultaneously (~2,000<br />
proteins routinely), and can detect
- 2 -<br />
1.1 <strong>Two</strong>-dimensional electrophoresis <strong>with</strong> IPGs (IPG-Dalt)<br />
The preparation of IPG Strips, as well as the protocol <strong>for</strong> horizontal and vertical twodimensional<br />
electrophoresis <strong>with</strong> IPGs in the first dimension (IPG-Dalt) was established in<br />
1988 (Görg et al. 1988). Since that time, the protocol has been constantly refined.<br />
Compared to classical 2-D electrophoresis <strong>with</strong> carrier ampholytes (O’Farrell 1975), the<br />
employment of IPG-Dalt has produced significant improvements in 2-D electrophoretic<br />
separation, permitting higher resolution, especially <strong>with</strong> narrow-range IPGs, and<br />
reproducibility of 2-D patterns both <strong>with</strong>in a laboratory and, more important, between<br />
laboratories (Corbett et al. 1994; Blomberg et al. 1995). Moreover, basic proteins (pI >7.5)<br />
normally lost by the cathodic drift of carrier ampholyte focusing or separated by NEPHGE<br />
(O’Farrell et al. 1977) <strong>with</strong> limited reproducibility, were perfectly separated under<br />
equilibrium conditions using IPGs 4-9, 4-10, and 6-10 <strong>for</strong> the separation of highly diverse<br />
samples such as plant, yeast, mouse liver, human heart, or myeloblast proteins (Görg et<br />
al. 1988, 1991, 1993). Recently, very alkaline IPGs up to <strong>pH</strong> 12 were successfully<br />
generated <strong>for</strong> the 2-D electrophoresis of ribosomal proteins and histones (Görg et al.<br />
1997, 1998, 1999; Wildgruber et al., 2002; Drews et al., 2004).<br />
Due to these features, together <strong>with</strong> the high loading capacity of IPG-Dalt <strong>for</strong> micropreparative<br />
runs (up to 10 mg of a crude sample preparation can be applied onto a single<br />
2-D gel) (Hanash et al. 1991; Bjellqvist et al. 1993; Posch et al. 1994), IPG-Dalt combined<br />
<strong>with</strong> protein identification by mass spectrometry (MS) (Aebersold & Mann, 2003) has<br />
become the work horse <strong>for</strong> proteomics. In spite of promising alternative/ complementary<br />
technologies (e.g., MudPIT, stable isotope labelling, protein arrays) that have emerged<br />
recently, 2-D PAGE is currently the only technique that can be routinely applied <strong>for</strong><br />
parallel quantitative expression profiling of large sets of complex protein mixtures such as<br />
whole cell lysates.<br />
1.2 The IPG-Dalt protocol: Principle<br />
The major steps of the 2-D electrophoresis-MS workflow include: (i) Sample preparation<br />
and protein solubilization; (ii) Protein separation by 2-D PAGE; (iii) Protein detection and<br />
quantitation; (iv) Computer assisted analysis of 2-D patterns; (v) Protein identification and<br />
characterization; and (vi) 2-D protein database construction.<br />
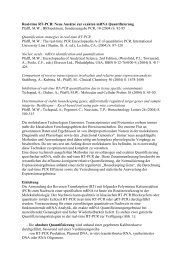
The basic protocol of IPG-Dalt is summarized in Figure 1. The first dimension, isoelectric<br />
focusing (IEF), is per<strong>for</strong>med in individual IPG gel strips, 3 mm wide and cast on GelBond<br />
PAGfilm (either ready-made Immobiline DryStrips R or laboratory-made, obtained from<br />
washed and dried immobiline gels cast by the gradient casting technique of Görg et al.<br />
(1980, 1986). Prior to IEF, IPG dry strips are rehydrated to their original thickness of 0.5<br />
mm <strong>with</strong> a solution containing 8 M urea, 0.5-2% (non-ionic or zwitterionic) detergent, a
- 3 -<br />
reductant (typically 0.2-0.5% dithiothreitol (DTT)) and 0.5% carrier ampholytes. The<br />
rehydrated IPG strips are then placed onto the cooling plate of an electrofocusing<br />
chamber and sample cups are placed onto the surface of the gel strips. Sample entry is<br />
critical, and best results are obtained using diluted samples dissolved in 9.5 M urea, 2-4%<br />
non-ionic or zwitterionic detergent, 1% DTT, and 2% carrier ampholyte (O’Farrell 1975),<br />
or -in the case of more hydrophobic proteins- by a mixture of 2 M thiourea and 7 M urea<br />
instead of 9.5 M urea and/or other detergents (Rabilloud et al. 1997). For better sample<br />
entry, a low voltage gradient is applied across the gel <strong>for</strong> the first hour. Voltage is then<br />
increased to 3500 V (Multiphor) (Görg et al. 1988), or even up to 8000 V (IPGphor) until<br />
the steady state <strong>with</strong> constant focusing patterns is obtained. As an alternative to cuploading,<br />
samples can also be applied by in-gel rehydration (Rabilloud et al. 1994). The<br />
latter procedure may be advantageous <strong>for</strong> high sample loads such as <strong>for</strong><br />
micropreparative 2D-PAGE. An exciting development <strong>for</strong> simplification of IPG-IEF is the<br />
introduction of an integrated system (IPGphor) where in-gel rehydration and IEF are<br />
per<strong>for</strong>med in one step overnight, <strong>with</strong>out personal assistance (Islam et al. 1998).<br />
Whatever system is used <strong>for</strong> isoelectric focusing, after IEF to the steady state, the IPG<br />
strips are equilibrated in presence of SDS, DTT, urea, glycerol and iodoacetamide (IAA)<br />
(Görg et al., 1987), and then placed onto the surface of a horizontal or on top of a vertical<br />
SDS gel (Görg et al., 1988).<br />
For horizontal set-ups, the laboratory-made or ready-made SDS-PAGE gel (ExcelGel<br />
SDS), cast on plastic backing, is placed onto the cooling plate of a horizontal electrophoresis<br />
system, and the equilibrated IPG gel strip is transferred gel-side-down onto the<br />
surface of the the SDS gel alongside the cathodic electrode wick or buffer strip. For<br />
vertical setups, the equilibrated IPG gel strips are loaded on top of vertical SDS polyacrylamide<br />
gels, <strong>with</strong> or <strong>with</strong>out embedding in agarose. Vertical setups are especially<br />
useful <strong>for</strong> multiple runs (up to 20 at a time) (Anderson & Anderson, 1978).<br />
Upon completion of electrophoresis, the polypeptides are either stained <strong>with</strong> silver nitrate<br />
or Coomassie Brilliant Blue, or detected by fluorescence staining or autoradiography. For<br />
quantitation of differentially regulated proteins, DIGE technology is the method of choice.<br />
For specific detection of PTMs such as glycosylation, phosphorylation etc. multiplexed<br />
stainings in a singe 2D gel can be used. Alternatively, proteins are transferred („blotted“)<br />
onto an immobilizing membrane and detected <strong>with</strong> specific reagents such as antibodies<br />
or lectins.<br />
For spot identification, the spots are excised from the gel (or the blotting membrane) and<br />
subjected directly or after enzymatic or chemical cleavage to mass spectrometric analysis<br />
(MALDI-ToF-MS or ESI-MS).
Legend to Figure 1<br />
- 4 -<br />
(A) Assembly of the polymerisation cassette <strong>for</strong> the preparation of IPG and SDS gels<br />
on plastic backings (Glass plates, GelBond PAGfilm and 0.5 mm thick U-frame)<br />
(B) Casting of IPG- and/or pore gradient gels<br />
(C) Cutting of washed and dried IPG slab gels (or Immobiline DryPlates) into individual IPG<br />
strips<br />
(D) Rehydration of individual IPG strips in a vertical rehydration cassette,<br />
(E) in the reswelling tray, or<br />
(F) in the IPG strip holder (IPGphor)<br />
(G) IEF in individual IPG gel strips directly on the cooling plate of the IEF chamber,<br />
(H) in the DryStrip kit, or<br />
(I) on the IPGphor<br />
(K) Storage of IPG strips after IEF<br />
(L) Equilibration of IPG strips prior to SDS-PAGE<br />
(M) Transfer of the equilibrated IPG strip onto the surface of the laboratory-made<br />
horizontal SDS gel along the cathodic electrode wick, or<br />
(N) onto the surface of a ready-made horizontal SDS gel along the cathodic buffer strip<br />
(O) Loading of the equilibrated IPG gel strip onto the surface of a vertical SDS gel
- 5 -<br />
Figure 1 Procedure of IPG-Dalt based on the protocol of Görg et al. (1988, 2000)
2 SAMPLE PREPARATION<br />
- 6 -<br />
2.1 Sample preparation and protein solubilization<br />
To take advantage of the high resolution of 2-DE, proteins of the sample have to be<br />
denatured, disaggregated, reduced and solubilized to achieve complete disruption of<br />
molecular interactions and to ensure that each spot represents an individual polypeptide.<br />
The major problems concerning the visualization of proteins from total cell or tissue<br />
extract lie in the high dynamic range of expression, and the diversity of proteins <strong>with</strong><br />
respect to molecular weight, isoelectric point and solubility. Although a one-step<br />
procedure <strong>for</strong> protein extraction would be highly desirable <strong>with</strong> regard to simplicity and<br />
reproducibility, there is no single method of sample preparation that can be universally<br />
applied to all kinds of samples analyzed by 2-D PAGE. Although a large number of<br />
„standard“ protocols has been published, these protocols have to be adapted and further<br />
optimized <strong>for</strong> the type of sample (e.g. microbial cells or mammalian tissue) to be<br />
analyzed, as well as <strong>for</strong> the proteins of interest (e.g. „soluble“ cytosolic or highly<br />
„insoluble“ membrane proteins, respectively). Some general recommendations, however,<br />
can be made: (i) Sample preparation should be as simple as possible to increase<br />
reproducibility, and (ii) protein modifications during sample preparation must be<br />
minimized since they might result in artifactual spots on 2-D gels. In particular, samples<br />
containing urea must not be heated in order to avoid charge heterogeneities due to<br />
carbamylation of the proteins by isocyanate <strong>for</strong>med in the decomposition of urea.<br />
The fundamental steps in sample preparation are (i) cell disruption, (ii) inactivation or<br />
removal of interfering substances and (iii) subsequent solubilization of the proteins.<br />
Briefly, cell disruption can be achieved using osmotic lysis, freeze-thaw cycling,<br />
detergent lysis, enzymatic lysis of the cell wall, sonication, grinding <strong>with</strong> (or <strong>with</strong>out) liquid<br />
nitrogen <strong>with</strong> mortar and pestle, high pressure (e.g. French press), homogenization <strong>with</strong><br />
glass beads and a bead beater, or a rotating blade homogenizator. These methods can<br />
be used individually or in combination. All these procedures have their pros and cons,<br />
and the choice will primarily depend upon the type of sample. Typically, microbial cells or<br />
plant tissues require rather harsh conditions <strong>for</strong> the cell lysis due to the robustness of<br />
their cell walls, whereas more gentle methods can be applied <strong>for</strong> mammalian tissues.<br />
Gentle cell disruption procedures (e.g., enzymatic lysis) are also required <strong>for</strong> the<br />
preparation of intact organelles (e.g., mitochondriae) <strong>for</strong> subsequent sub-proteome<br />
analysis.<br />
During (or after) cell lysis, interfering compounds (e.g., proteolytic enzymes, salts,<br />
lipids, polysaccarides, nucleic acids and/or plant phenols) have to be inactivated and/or<br />
removed. The two most important parameters are salt and proteolysis.<br />
Proteases must be inactivated to prevent protein degradation that otherwise may result in<br />
artifactual spots and loss of high Mr proteins. To accomplish this goal, protease inhibitors
- 7 -<br />
are usually added, but they may modify proteins and cause charge artifacts. Other<br />
remedies are boiling the sample in SDS-buffer (<strong>with</strong>out urea!), or inactivating proteases<br />
by low <strong>pH</strong> (e.g., precipitating <strong>with</strong> ice-cold trichloroacetic acid (TCA)). However, it should<br />
be kept in mind that it may be rather difficult to completely inactivate all proteases.<br />
TCA/acetone precipitation is very useful <strong>for</strong> (i) minimizing protein degradation, <strong>for</strong> (ii)<br />
removing interfering compounds, such as salt, or polyphenols, and (iii) <strong>for</strong> the enrichment<br />
of very alkaline proteins such as ribosomal proteins from total cell lysates (Görg et al.<br />
1999). Attention has to be paid, however, to protein losses due to incomplete precipitation<br />
and/or resolubilization of proteins. Moreover, a completely different set of proteins may be<br />
obtained by extraction <strong>with</strong> lysis buffer depending on whether or not there was a<br />
preceding TCA precipitation step. On the other hand, this effect can be used <strong>for</strong> the<br />
enrichment of very alkaline proteins (such as ribosomal or nuclear proteins) from total cell<br />
lysates (Görg et al. 1999, 2000).<br />
Salt ions may interfere <strong>with</strong> electrophoretic separation and should be removed if their<br />
concentration is too high (>100 mM); otherwise proteins may precipitate at the site of<br />
sample application, giving rise to horizontal and/or vertical streaks. Salt also increases<br />
the conductivity of the IEF gel, thereby prolonging the time required to reach the steadystate.<br />
In extreme cases, IEF may virtually stop due to salt fronts. Salt removal can be<br />
achieved by (spin)dialysis, or precipitation of proteins <strong>with</strong> TCA or organic solvents (e.g.,<br />
cold acetone). One alternative is the use of 2-D clean-up kits (e.g., GE Healthcare<br />
Lifesciences). Another is dilution of the sample below a critical salt concentration followed<br />
by application of a larger sample volume onto the IPG gel. The sample is “desalted” in the<br />
gel by applying low voltages (100 V) at the beginning of the run <strong>for</strong> up to several hours<br />
and replacing the filter paper pads beneath the electrodes (where the salt ions have<br />
collected) several times (Görg et al., 2000)<br />
High amounts of lipids may interact <strong>with</strong> membrane proteins and “consume“ detergents.<br />
Delipidation of lipid-rich biological material (e.g., brain tissues) can be accomplished by<br />
extraction <strong>with</strong> organic solvents (e.g., cold ethanol or acetone). However, severe losses in<br />
proteins may be experienced, either because certain proteins are soluble in organic<br />
solvent, or because the precipitated proteins do not always resolubilize. Alternatively,<br />
high-speed centrifugation and subsequent removal of the lipid-layer has been<br />
recommended.<br />
Polysaccarides (especially the charged ones) and nucleic acids can interact <strong>with</strong> carrier<br />
ampholytes and proteins, and give rise to streaky 2-D patterns. Moreover, these<br />
macromolecules may also increase the viscosity of the solutions and clog the pores of the<br />
polyacrylamide gels. Unless present at low concentrations, polysaccharides and nucleic<br />
acids have to be removed. A common method is precipitation of proteins <strong>with</strong><br />
TCA/acetone, but losses in proteins may be experienced due to unsufficient<br />
resolubilization of proteins. Other recommendations <strong>for</strong> the removal of nucleic acids are
- 8 -<br />
digestion by a mixture of protease-free (!) RNAses and DNAses, or by ultra-centrifugation<br />
and addition of a basic polyamine (e.g., spermine) (Rabilloud 1999).<br />
Phenols present in plant material (in particular in plant leaves) may interact <strong>with</strong> proteins<br />
and lead to horizontal streaks in 2-D gel patterns. It has been recommended to remove<br />
polyphenolic compounds either by binding to (insoluble) polyvinylpolypyrrolidone (PVPP),<br />
or by protein precipitation <strong>with</strong> TCA and subsequent extraction <strong>with</strong> ice-cold acetone<br />
(Granier, 1988; Flengsrud, 1989; Mechin et al., 2003).<br />
Sometimes, highly abundant proteins present a problem since they impair separation and<br />
detection of lower abundance proteins by limiting the amount of these proteins to be<br />
loaded onto the 2-D gel and/or by masking them on the 2-D pattern. Albumin, in<br />
particular, which constitutes up to 60 % bulk protein in plasma, is a major problem. There<br />
are several albumin removel kits on the market, but due to non-specific binding, one has<br />
to be aware that most of these kits remove proteins other than albumin, too (reviewed by<br />
Simpson, 2004).<br />
Protein solubilization<br />
After cell disruption and/or removal of interfering compounds, the individual polypeptides<br />
must be denatured and reduced to disrupt intra- and intermolecular interactions, and<br />
solubilized while maintaining the inherent charge properties. Sample solubilization is<br />
usually carried out in in a buffer containing chaotropes (e.g., urea and/or thiourea),<br />
nonionic and/or zwitterionic detergents (e.g., Triton X-100 or CHAPS), reducing agents,<br />
carrier ampholytes and, depending on the type of sample, protease inhibitors. The most<br />
popular sample solubilization buffer is based on O’Farrell’s lysis buffer and modifications<br />
thereof (9 M urea, 2–4% CHAPS, 1% dithiothreitol, and 2% (v/v) carrier ampholytes)<br />
(O’Farrell, 1975). Un<strong>for</strong>tunately, urea lysis buffer is not ideal <strong>for</strong> the solubilization of all<br />
protein classes, particularly <strong>for</strong> membrane or other highly hydrophobic proteins.<br />
Improvement in the solubilization of hydrophobic proteins has come <strong>with</strong> the use of<br />
thiourea (Rabilloud, 1998) and new zwitterionic detergents such as sulfobetaines<br />
(Chevallet et al., 1998).<br />
Chaotropes<br />
Urea is quite efficient in disrupting hydrogen bonds, leading to protein unfolding and and<br />
denaturation. In contrast, thiourea, which has been introduced by Rabilloud (1998), is<br />
better suited <strong>for</strong> breaking hydrophobic interactions, but its usefulness is somewhat limited<br />
due to its poor solubility in water. However, it is better soluble in concentrated urea<br />
solutions. Currently the best solution <strong>for</strong> solubilization of hydrophobic proteins is a<br />
combination of 5-7 M urea and 2 M thiourea, in conjunction <strong>with</strong> appropriate detergents.<br />
The major problem associated <strong>with</strong> urea in aqueous solutions is that urea exists in
- 9 -<br />
equilibrium <strong>with</strong> ammonium (iso)cyanate, which can react <strong>with</strong> the α-amino groups of the<br />
N-terminus and the ε-amino groups of lysine residues, thereby <strong>for</strong>ming artefacts such as<br />
blocking the N-terminus and introducing charge heterogeneities (altered pIs). To prevent<br />
this carbamylation reaction, temperatures above 37°C have to be avoided under all<br />
circumstances, and carrier ampholytes (2% v/v), which act as cyanate scavengers,<br />
should be included in the urea solution. Given that these precautions have been complied<br />
<strong>with</strong>, it has been demonstrated that protein carbamylation is negligible <strong>for</strong> a period at<br />
least 24 hours, which is sufficiently long <strong>for</strong> most protein extraction and solubilization<br />
protocols (Thoenes et al., 2003). Similar experiments have shown that carbamylation is<br />
not a problem during electrophoresis in the presence of urea, even <strong>with</strong> prolonged runtimes,<br />
since the urea break-down products are electrophoretically removed (McCarthy et<br />
al., 2003).<br />
Detergents (surfactants)<br />
Detergents are utilized to prevent hydrophobic interactions between the hydrophobic<br />
protein domains to avoid loss of proteins due to aggregation and precipitation. Since the<br />
anionic detergent SDS is one of the most efficient surfactants, solubilization of proteins in<br />
(boiling) SDS solution has been recommended <strong>for</strong> protein solubilization (<strong>for</strong> details see<br />
Boucherie et al., 1995; Harder et al., 1999). However, horizontal streaks in the 2-D<br />
pattern are observed if samples initially solubilized in 1% SDS are not diluted <strong>with</strong> at least<br />
four-fold excess of (thiourea/urea) lysis buffer, to displace the anionic detergent SDS from<br />
the proteins and to replace it <strong>with</strong> a non-ionic or zwitterionic detergent to decrease the<br />
amount of SDS below a critical concentration (0.2%). Additionally, obtaining sufficient<br />
dilution may constitute a major problem when micropreparative protein loads in 2-DE are<br />
employed, since the amount of sample volume that can be applied onto an IPG strip is<br />
limited. There<strong>for</strong>e, non-ionic or zwitterionic detergents are currently favoured <strong>for</strong> protein<br />
solubilization. The most popular non-ionic detergents are NP-40, Triton X-100 and<br />
dodecyl maltoside. Regrettably, NP-40 and Triton X-100 are not very effective in<br />
solubilizing very hydrophobic membrane proteins. In contrast, zwitterionic detergents<br />
such as CHAPS, and sulfobetaines (e.g., SB 3-10 or ASB 14) per<strong>for</strong>m better, and have<br />
been shown to solubilize -in combination <strong>with</strong> urea and thiourea chaotropes- at least<br />
several integral membrane proteins (Santoni et al., 2000; Molloy, 2000). More detailed<br />
investigations revealed that the efficiency of zwitterionic detergents <strong>for</strong> solubilizing<br />
hydrophobic proteins not only depends on the nature of the protein itself, but also on the<br />
presence and nature of other compounds, in particular on the lipid content of the sample<br />
(Santoni et al., 1999). Besides these chaotropes and detergents, organic solvents have<br />
also been successfully applied <strong>for</strong> solubilization and IEF of very hydophobic proteins<br />
(Molloy et al., 2003; Deshusses et al., 2003).<br />
Regardless all recent advances, these studies demonstrated that there does not exist a<br />
single solution <strong>for</strong> the complex solubility problem of membrane proteins. Most membrane
- 10 -<br />
proteins cannot be solubilized adequately <strong>with</strong> a single non-ionic or zwitterionic<br />
detergent, and empirically testing and optimizing the composition of sample solubilization<br />
buffer to improve the solubility of of membrane proteins still remains important (Luche et<br />
al., 2003).<br />
Reducing agents<br />
Reduction and prevention of re-oxidation of disulfide bonds is also a critical step of the<br />
sample preparation procedure. Reducing agents are necessary <strong>for</strong> cleavage of intra- and<br />
intermolecular disulfide bonds to achieve complete protein unfolding. The most commonly<br />
used reductants are dithiothreitol (DTT) or dithioerythritol (DTE) which are applied in<br />
excess, i.e., in concentrations up to 100 mM. Un<strong>for</strong>tunately, these agents are weak acids<br />
<strong>with</strong> pK values between 8.5 and 9, which means that they will ionize at basic <strong>pH</strong>, and<br />
there<strong>for</strong>e, run short in the alkaline gel area due to migration to the anode during IEF.<br />
Moreover, DTT and DTE are not well suited <strong>for</strong> the reduction and solubilization of proteins<br />
which contain a high cysteine content, such as wool keratins. Herbert et al. (1998) have<br />
proposed tributylphosphine (TBP) as an alternative to DTT. TPB is applied in quite low<br />
concentrations (2 mM) due to its stoichiometric reaction. However, this reagent has also<br />
several disadvantages, the major of which are its low solubility in water and its short halflife.<br />
Moreover, TBP (and its solvent dimethyl-<strong>for</strong>mamide, respectively) is toxic, volatile,<br />
and has a rather irritating odor. Alternatively, tris(2-carboxyethyl)phosphine (TCEP) is<br />
used in the saturation labelling procedure in fluorescent difference gel electrophoresis<br />
(DIGE). In conclusion, in certain cases TBP and TCEP have several advantages over<br />
DTT and DTE, but the choice of reductant is predominantly sample specific. For<br />
additional in<strong>for</strong>mation see also the section on 2-D PAGE of alkaline proteins.<br />
Protein concentration<br />
Protein extracts should not be too diluted to avoid loss of protein due to adsorption to the<br />
wall of the vessel (glass or plastic). The optimal protein concentration is 5-10 mg/ml,<br />
whereas the minimum protein concentration should not fall short 0.1 mg/ml. If samples<br />
are rather diluted and contain relatively high concentrations of salts which can interfere<br />
<strong>with</strong> IEF, samples may be desalted (see above). Alternatively, proteins can be<br />
precipitated <strong>with</strong> ice-cold TCA / acetone to remove salts. Diluted samples <strong>with</strong> a low salt<br />
concentration may also be applied directly <strong>with</strong>out further treatment, if the dried IPG strips<br />
are reswollen in sample solution. In this case, solid urea, CHAPS and DTT are added to<br />
the sample until the desired concentation is obtained (Rabilloud et al. 1994).<br />
Short-time storage (several hours to overnight) of extracts is often possible in the<br />
refrigerator (4°C). For a longer time, storage in a freezer at -70°C, on dry-ice (-78°C) or in<br />
liquid nitrogen (-196°C) is mandatory. Repeated freezing and thawing of the sample must<br />
be avoided. Make small aliquots (100–200 µl) and thaw only once!
- 11 -<br />
2.2 Sample prefractionation procedures<br />
Since there is no amplification step <strong>for</strong> proteins analogous to the polymerase chain<br />
reaction method <strong>for</strong> amplifying nucleic acids, and due to the high dynamic range and<br />
diversity of expressed proteins, particularly in eukaryotic tissues, it is often preferable to<br />
carry out a prefractionation step to reduce the complexity of the sample, to enrich <strong>for</strong><br />
certain proteins such as low-copy number proteins or alkaline proteins, and to get some<br />
in<strong>for</strong>mation on the topology of the proteins. This can be accomplished by:<br />
• Isolation of specific cell types from a tissue, e.g., fluorescence activated cell<br />
sorting (FACS), or laser capture micro dissection (LCM)<br />
• Isolation of cell compartments and/or organelles, e.g., by sucrose gradient<br />
centrifugation, or free flow electrophoresis<br />
• Selective precipitation of certain protein classes (e.g., TCA/acetone precipitation<br />
<strong>for</strong> ribosomal proteins)<br />
• Sequential extraction procedures <strong>with</strong> increasingly powerful solubilizing buffers,<br />
<strong>for</strong> example, aqueous buffers, organic solvents (e.g., ethanol or chloro<strong>for</strong>m/<br />
methanol), and detergent-based extraction solutions<br />
• chromatographic or electrokinetic separation methods, such as column<br />
chromatography, affinity purification, electrophoresis in the liquid phase and/or IEF<br />
in granulated gels.<br />
The major problem <strong>with</strong> diseased (e.g., cancerous) mammalian tissues is their<br />
heterogenous nature. It is, there<strong>for</strong>e, of utmost importance to obtain targeted populations<br />
(e.g., tumor cells) from tissue specimens (Hanash, 2000). Hence, several microdissection<br />
techniques are applied to enrich <strong>for</strong> targeted cell populations, such as laser capture<br />
microdissection (LCM) technology that allows the isolation of pure cell populations.<br />
Craven & Banks (2001) have demonstrated that samples which had been enrichend <strong>with</strong><br />
LCM can be analyzed <strong>with</strong> 2-DE. The drawback of this technology, however, is that it is<br />
rather time-consuming because a large number of cells must be dissected to obtain<br />
sufficient protein <strong>for</strong> 2-DE analysis. Another possibility <strong>for</strong> recovering specific<br />
subpopulations of cells from clinical samples is fluorescence-activated cell sorting (FACS)<br />
of antibody-bound cells (reviewed by Orfao et al., 1996). However, it is not clear to what<br />
extent stress is exerted on the cells by this kind of treatment, and whether their protein<br />
expression profiles are affected.<br />
Sub-fractionation of cell components, e.g., organelles such as mitochondria by<br />
centrifugation in a sucrose density gradient is the most effective method <strong>for</strong> organelle<br />
isolation (reviewed by Huber et al., 2003). Other, although less common techniques, are
- 12 -<br />
free flow electrophoresis (FFE) (Hannig et al., 1974; Völkl et al., 1997) or immunoaffinity<br />
binding methods. Whereas these procedures can be applied <strong>for</strong> mammalian cells <strong>with</strong><br />
relative ease since they do not possess a cell wall, access to organelles is complicated<br />
<strong>for</strong> most microorganisms because in this case a lysis method is required which is both<br />
efficient in disrupting the cell wall and gentle enough to guarantee that organelles remain<br />
intact. For example, spheroblasts are prepared <strong>for</strong> the isolation of intact organelles from<br />
yeast by digesting the cell wall <strong>with</strong> polysaccharide-cleaving enzymes prior to liberating<br />
the cell content by “gentle“ lysis conditions such as hypotonic solutions and/or mechanical<br />
treatment (Zinser & Daum, 1995). The quality of these prepartions is not always sufficient<br />
<strong>for</strong> proteome analysis, but Pfanner and co-workers have established an improved<br />
purification protocol <strong>for</strong> yeast cell mitochondriae (Meisinger et al., 2000) which has been<br />
successfully applied <strong>for</strong> 2-DE/MS analysis of the yeast mitochondrial proteome.<br />
Due to the limitations in sample loading capacity on the first dimension IEF gel, a whole<br />
cell lysate may not yield sufficient quantities of lower abundance proteins to be displayed<br />
on a 2-DE gel. Precipitation procedures allow increased loading of particular proteins<br />
while keeping the total protein load constant. In particular, TCA/acetone precipitation has<br />
been found very valuable <strong>for</strong> the enrichment of alkaline proteins such as ribosomal<br />
proteins from total cell lysates (Görg et al., 2000). Additional benefits of TCA/acetone<br />
precipitation are inactivation of proteases to minimize protein degradation, and removal of<br />
interfering compounds. However, attention has to be paid to protein losses due to<br />
incomplete precipitation and/or resolubilization of proteins.<br />
Sequential extraction of proteins from cells or tissues on the basis of their solubility<br />
properties is another possibility to enrich <strong>for</strong> certain protein classes, and to simplify the 2-<br />
D pattern <strong>for</strong> subsequent image analysis and protein identification by MS. E.g., plant<br />
proteins from barley and wheat seeds were extracted sequentially <strong>with</strong> Tris-HCl buffer,<br />
aqueous alcohols and urea/NP-40/DTT lysis buffer and then analyzed by 2-D PAGE<br />
(Weiss et al., 1992, 1993). In a similar manner, Tris-base was used to solubilize cytosolic<br />
E. coli proteins (Molloy et al, 1998). The resultant pellet was then subjected to<br />
conventional solubilizing solutions (urea/CHAPS/DTT), and, finally, the membrane protein<br />
rich pellet was partially solubilized using a combination of urea, thiourea, and zwitterionic<br />
surfactants. Eleven membrane proteins from this pellet could be identified, including two<br />
outer membrane proteins that had previously been known only as an open reading frame<br />
in E. coli. One approach <strong>for</strong> improved solubilization of membrane proteins is to treat<br />
isolated membrane preparations (e.g., obtained by ultracentrifugation) <strong>with</strong> sodium<br />
carbonate at alkaline <strong>pH</strong> or chaotropic salts (e.g., potassium bromide) to remove carry<br />
over cytoplasmic proteins and only loosely attached peripheral membrane proteins<br />
(“membrane washing“, “membrane stipping“). Other procedures to enrich <strong>for</strong> hydrophobic<br />
proteins are based on the differential extraction of membrane proteins by organic<br />
solvents, e.g., chloro<strong>for</strong>m/methanol mixtures (Ferro, 2000). The major limitation of these<br />
procedures is cross-contamination between the individual fractions.
- 13 -<br />
Several different chromatographic procedures have been used successfully to enrich <strong>for</strong><br />
low-abundance proteins, including hydrophobic interaction chromatography,<br />
hydroxyapatite and heparin chromatography and chromatofocusing (Fountoulakis et al.,<br />
1999).<br />
Other approaches are based on electrophoretic prefractionation according to isoelectric<br />
point in the liquid phase, such as preparative isoelectric focusing (Hochstrasser et al.,<br />
1991), IEF in a rotating, multi-chamber device (Egen et al., 1988), FFE, or the use of a<br />
multifunctional electrokinetic membrane apparatus (Locke et al., 2002) in which samples<br />
are separated by charge and/or size. A multicompartment electrolyzer <strong>with</strong> isoelectric<br />
membranes has been developed by Herbert & Righetti (2000). Zuo & Speicher (2001,<br />
2002) have simplified this device <strong>for</strong> prefractionation of various kinds of samples. These<br />
procedures are particularly useful if the prefractionated proteins are then applied onto<br />
narrow-range IPG gels (‚zoom gels’). It has been reported that this type of<br />
prefractionation allows higher protein load (6 to 30 fold) on narrow IPG gels <strong>with</strong>out<br />
protein precipitation and allows detection of low abundance proteins because major<br />
interfering proteins such as albumin have been removed. The major drawbacks of most<br />
chromatographic and electrophoretic prefractionation procedures in the liquid phase are<br />
that (1) sophisticated instrumentation is required, (2) the sample is usually diluted during<br />
or after the separation process, and (3) protein precipitation cannot always be avoided.<br />
Recently, a simple, cheap, and fast prefractionation procedure based on flat-bed IEF in<br />
granulated gels has been devised by Görg et al. (2002). Flatbed IEF in granulated gels<br />
<strong>for</strong> the separation of enzymes was described by Radola as early as 1973. Görg et al.<br />
have adapted this method <strong>for</strong> sample prefractionation be<strong>for</strong>e loading on 2-D gels <strong>with</strong><br />
narrow <strong>pH</strong> ranges. Complex sample mixtures, e.g., mouse liver proteins, were<br />
prefractionated in flat-bed Sephadex gels containing urea, thiourea, zwitterionic<br />
detergents, DTT, and carrier ampholytes. After IEF, up to ten Sephadex fractions<br />
alongside the <strong>pH</strong> gradient can be removed <strong>with</strong> a spatula and directly applied onto the<br />
surface of the corresponding narrow-range IPG strips <strong>for</strong> the first dimension of 2-D-<br />
PAGE. Proteins in the Sephadex gel fraction are transported electrophoretically into the<br />
IPG gel <strong>with</strong> high efficiency and <strong>with</strong>out any sample dilution.<br />
In conclusion, prefractionation procedures have many advantages in terms of protein<br />
enrichment, and visualization of low-abundance proteins. The major disadvantage of<br />
most prefractionation procedures lies in cross-contamination between individual fractions<br />
and in the fact that they are either time consuming, complicated to handle, require<br />
concentration steps due to elution/dilution precedures, and/or do not allow to process<br />
more than a few samples in parallel.
PROTOCOLS<br />
- 14 -<br />
I. Extraction and solubilization of cell and tissue samples<br />
The following section provides a brief description of procedures <strong>for</strong> the extraction and<br />
solubilization of microorganisms, plant seeds and leaves, and mammalian tissue<br />
samples. In general, cells or tissues are disrupted (singly, or in combination) by<br />
techniques such as grinding in a liquid nitrogen-cooled mortar, shearing, or homogenization.<br />
During -or immediately after- cell lysis, interfering substances must to be<br />
inactivated or removed. Proteins are then solubilized <strong>with</strong> sonication in urea lysis buffer,<br />
thiourea lysis buffer, or SDS sample buffer. Recommended final protein concentration is<br />
between 5 and 10 mg/ml. E.g., myeloblasts (5x10 8 cells) or human or animal tissue such<br />
as liver or heart (50 mg) are typically homogenized under cooling <strong>with</strong> liquid nitrogen. The<br />
resulting powder is then solubilized in 1.0 ml Lysis buffer. For enrichment of alkaline<br />
proteins, e.g. from mouse liver, a tissue specimen is ground in a liquid nitrogen-cooled<br />
mortar, suspended in ice-cold TCA in acetone, and kept at -20°C overnight <strong>for</strong> protein<br />
precipitation. Following centrifugation, the supernatant is discarded and the protein pellet<br />
washed in ice-cold acetone containing 0.2% DTT, dried under vacuum and then<br />
solubilized in lysis buffer (Görg et al., 1999).<br />
After protein solubilization, extracts containing urea should be centrifuged at 40,000g <strong>for</strong><br />
one hour to remove any insoluble material (cell debris) at 15°C (to prevent urea<br />
crystallization at low (4°C) temperatures or protein carbamylation at higher (37°C)<br />
temperatures, respectively). SDS extracts may be centrifuged at any temperature<br />
between 4°C and 37°C. Prior to IEF, SDS extracts must diluted <strong>with</strong> at least a 3- to 5-fold<br />
excess of urea lysis buffer or thiourea lysis buffer.<br />
Protein extracts can be used immediately, or stored at – 70°C <strong>for</strong> several months. For<br />
analytical runs, typically twenty µl of sample solution are applied onto a single IPG gel<br />
strip, whereas <strong>for</strong> micropreparative runs up to several hundred microliters can be applied,<br />
portion by portion. The amount of protein to be loaded onto a single IPG gel strip<br />
(separation distance: 180 mm) varies between 50-100 µg <strong>for</strong> analytical, and 0.5-10 mg <strong>for</strong><br />
micro-preparative runs, respectively. Alternatively, the sample can be applied directly by<br />
in-gel rehydration (Rabilloud et al., 1994, Sanchez et al., 1997).<br />
MATERIALS<br />
Note: Not all of the materials listed below are required <strong>for</strong> all samples.<br />
Chemicals<br />
CHAPS (Roche), Pharmalyte (<strong>pH</strong> 3-10) (GE Healthcare Lifesciences), dithiothreitol (DTT)<br />
(Sigma-Aldrich), Serdolit MB-1 (Serva), urea, Pefabloc ® (VWR), Thiourea (Fluka).
Reagents<br />
- 15 -<br />
• Urea lysis buffer [9.5 M urea, 1% (w/v) dithiothreitol (DTT), 2% (w/v) CHAPS, 2% (v/v)<br />
carrier ampholytes (<strong>pH</strong> 3–10) and 10 mM Pefabloc ® proteinase inhibitor].<br />
To prepare 50 ml of urea lysis buffer, dissolve 30.0 g of urea (GE Healthcare<br />
Lifesciences) in deionized H2O and adjust the volume to 50 ml. Add 0.5 g of Serdolit<br />
MB-1, stir <strong>for</strong> 10 minutes, and filter. Add 1.0 g CHAPS, 0.5 g DTT and 1.0 ml of<br />
Pharmalyte <strong>pH</strong> range 3–10 to 48 ml of the filtered urea solution. If necessary, add 50 mg<br />
Pefabloc ® proteinase inhibitor (VWR) immediately be<strong>for</strong>e use.<br />
• Thiourea/urea lysis buffer [2 M thiourea, 7 M urea, 4% (w/v) CHAPS, 1% (w/v) DTT, 2%<br />
(v/v) carrier ampholytes (<strong>pH</strong> 3–10) and 10 mM Pefabloc ® proteinase inhibitor]<br />
To prepare 50 ml of thiourea/urea lysis buffer, dissolve 22.0 g of urea (GE Healthcare<br />
Lifesciences) in deionized H2O, add 8.0 g of thiourea (Fluka) and adjust the volume to<br />
50 ml <strong>with</strong> deionized H2O. Add 0.5 g of Serdolit MB-1 mixed bed ion exchange resin<br />
(Serva), stir <strong>for</strong> 10 minutes and filter. To 48 ml of the urea solution add 2.0 g CHAPS,<br />
1.0 ml of Pharmalyte (<strong>pH</strong> 3–10), 0.5 g DTT and, immediately be<strong>for</strong>e use, 50 mg<br />
Pefabloc ® proteinase inhibitor (VWR).<br />
• SDS sample solubilization buffer [1% (w/v) SDS, 100 mM Tris-HCl (<strong>pH</strong> 9.5)]<br />
To prepare 50 ml of SDS sample buffer, dissolve 0.5 g of SDS and 0.6 g of Tris base in<br />
about 40 ml of deionized H2O. Titrate to <strong>pH</strong> 9.5 <strong>with</strong> 4 N HCl, filter, and adjust the<br />
volume to 50 ml <strong>with</strong> deionized H2O.<br />
• 20% Trichloroacetic acid + 0.2% dithiothreitol in ice-cold acetone (–20°C)<br />
• 0.2% dithiothreitol in ice-cold acetone (–20°C)<br />
• Phosphate-buffered saline (PBS) [0.9% (w/v) sodium chloride in phosphate buffer (10<br />
mM), <strong>pH</strong> 7.4; is also available commercially]<br />
Important notes: (1) Lysis buffer should be freshly prepared. Alternatively, make 1-ml<br />
aliquots and store at –70°C (<strong>for</strong> up to several months, at least). Lysis buffer that has been<br />
thawed once should not be refrozen! (2) Never heat urea solutions above 37°C to avoid<br />
protein carbamylation!<br />
Equipment<br />
Aluminum foil; centrifuge (capable of 40,000 g), filter paper; hammer; liquid nitrogen;<br />
mortar and pestle, agate stone, plastic spatula; scalpel; stainless steel centrifuge tube;<br />
stainless steel sieve, 0.2 mm; ultrasonic homogenizer (e.g., Bandelin Sonoplus HD 60).
METHODS<br />
- 16 -<br />
Microorganisms<br />
The growth conditions of microbial cell cultures such as bacteria or yeast need to be<br />
optimized and standardized. Since the growth phase has an enormous impact on the<br />
biochemical state of the cells, the time of sample collection also must be predetermined<br />
and standardized. Because the cells may excrete proteases and other extracellular<br />
enzymes into the growth medium, and because compounds in the medium can interfere<br />
<strong>with</strong> extraction, the cultures first need to be washed <strong>with</strong> an isotonic buffer such as<br />
phosphate-buffered saline (PBS) or sucrose. To avoid stress induction, these wash<br />
buffers should be at the same temperature and <strong>pH</strong> as the culture (Drews et al., 2002).<br />
This wash step also ensures that cell conditions are defined be<strong>for</strong>e harvesting.<br />
For cells surrounded by a cell wall, such as yeast, osmotic shock is insufficient <strong>for</strong> protein<br />
extraction. Extensive disruption of these cells is required, either by vigorously shaking the<br />
cells in the presence of glass beads, sonicating on ice in (urea/thiourea) lysis buffer, or by<br />
heating the sample in the presence of SDS. If necessary, protease-free DNAse and<br />
RNAse can be added to digest nucleic acids.<br />
Solubilization of bacterial cell proteins<br />
1. Harvest the cells in a predetermined growth phase after growing under defined<br />
conditions. Chemically defined media are preferable if available. At high optical<br />
densities, it should be kept in mind that more nonviable cells will contribute to the<br />
analyzed proteome. There<strong>for</strong>e, the early logarithmic growth phase is widely preferred<br />
<strong>for</strong> harvesting.<br />
2. Centrifuge the cells at 10,000g <strong>for</strong> 3 minutes. These conditions are sufficient <strong>for</strong> most<br />
types of bacteria. Start <strong>with</strong> a defined volume, e.g., 10 ml of the culture <strong>with</strong> an optical<br />
density of about 0.5. The pellet should be visible after spinning. Resuspend it in an<br />
equal volume of pre-warmed PBS and centrifuge again. Several repetitions might be<br />
necessary at this step to get rid of interfering substances (e.g., extracellular enzymes,<br />
growth media compounds, etc.<br />
Notes: If the resulting 2-D gel pattern is not satisfying, e.g., if proteolyis of proteins<br />
happened due to incomplete removal of extracellular proteolytic enzymes, the high<br />
molecular mass proteins are missing on the 2-D gel; horizontal streaks and/or protein<br />
precipitates on the 2-D gel are often caused by high salt concentrations.<br />
3. Suspend the pellet in 0.2 ml of SDS sample solubilization buffer and transfer it to a<br />
1.5-ml microfuge tube. The SDS buffer should be ice-cold, but boiling at 95°C might<br />
be necessary if highly active proteases are present.<br />
Note: The 0.2-ml volume is adapted to a 4-mm diameter sonification tip.<br />
4. Sonicate the sample <strong>with</strong> an ultrasonic homogenizer (2 x 30 pulses, interval: 1 Hz,<br />
pulse duration: 0.3 seconds, 20 kHz homogeneous sound, power output: 60 W).
- 17 -<br />
5. Centrifuge the disrupted cells in an Eppendorf microfuge at maximum speed<br />
(14,000g) <strong>for</strong> 30 minutes, preferably at 4°C<br />
6. Carefully collect the supernatant and freeze it in aliquots of 50 µl at –70°C. The<br />
extract, if not thawed and refrozen, is stable <strong>for</strong> up to one year.<br />
7. Dilute the aliquot be<strong>for</strong>e IEF <strong>with</strong> 150 µl of thiourea/urea lysis buffer to displace the<br />
SDS from the proteins.<br />
Mammalian tissue samples<br />
Collect mammalian tissue samples (e.g., mouse liver; biopsy samples) as rapid as<br />
possible and freeze immediately in liquid nitrogen at –196°C. Disrupt the samples while<br />
still deep-frozen. Small tissue specimens (e.g., biopsy samples) can be wrapped in<br />
aluminium foil, immediately frozen in liquid nitrogen, and crushed <strong>with</strong> a hammer,<br />
whereas larger tissue pieces should be ground under liquid nitrogen using a mortar and<br />
pestle and then solubilized in lysis buffer.<br />
Solubilization of mouse liver proteins<br />
1. Precool a mortar <strong>with</strong> liquid nitrogen. Grind the deep-frozen mouse liver in the mortar<br />
under liquid nitrogen in the presence of traces of Pefabloc ® proteinase inhibitor<br />
powder.<br />
2. Immediately after grinding, transfer 60 mg of the ground liver to a microfuge tube<br />
containing 1.0 ml of urea (or thiourea/urea) lysis buffer.<br />
3. For improved cell lysis, sonicate the sample on ice five times <strong>for</strong> 2 seconds each <strong>with</strong><br />
a 10-second pause between sonication intervals to prevent overheating. Incubate the<br />
sample <strong>for</strong> 30 minutes at room temperature and centrifuge at 40,000g <strong>for</strong> 60 minutes<br />
at 15°C.<br />
4. Store the supernatant at –70°C. The protein concentration of the extract should be ~5<br />
- 10 mg/ml.<br />
Enrichment of alkaline mouse liver proteins by TCA/acetone precipitation<br />
1. Grind deep-frozen mouse liver <strong>with</strong> a mortar and pestle in the presence of liquid<br />
nitrogen.<br />
2. Suspend the ground mouse liver (typically 100 mg) in a precooled (–20°C) stainless<br />
steel 50 ml centrifuge tube containing 25 ml of 20% (w/v) TCA and 0.2% (w/v)<br />
dithiothreitol (DTT) in ice-cold (–20°C) acetone.<br />
3. Keep the centrifuge tube at –20°C overnight to ensure complete protein precipitation.<br />
Centrifuge at 40,000g <strong>for</strong> 60 minutes at -10°C. Discard the supernatant and<br />
resuspend the pellet in 20 ml of ice-cold acetone containing 0.2% DTT.
- 18 -<br />
4. Centrifuge the sample again and dry the pellet under vacuum. Solubilize the sample<br />
by repeated vortexing and/or sonication on ice in an appropriate volume (2-3 ml) of<br />
lysis buffer. The resultant protein concentration should be approximately 5-10 mg/ml.<br />
Store the supernatants in small aliquots at -70°C.<br />
Notes: (1) The protein pellet may also be solubilized directly in lysis buffer <strong>with</strong>out<br />
vaccum-drying. (2) This procedure can be simplified by using GE Healthcare<br />
Lifesciences’ 2D sample clean up kit.<br />
Plant samples<br />
Dry plant seeds, in which proteases are usually not active, are simply smashed <strong>with</strong> a<br />
hammer and ground <strong>with</strong> a mortar and pestle, <strong>with</strong> or <strong>with</strong>out cooling by liquid nitrogen.<br />
The plant tissue is then solubilized in lysis buffer, centrifuged, and aliquoted.<br />
Note: It is also possible to extract specific protein fractions, such as H2O-soluble proteins<br />
(albumins) or alcohol-soluble proteins (gliadins) or be<strong>for</strong>e IEF (<strong>for</strong> more details see Weiss<br />
et al., 1992, 1993).<br />
Plant leaves not only contain proteases, but also high concentrations of phenols which<br />
can adsorb proteins and cause streaks on 2-D gels. To avoid the deleterious effects of<br />
these substances, disrupt the cells <strong>with</strong> a mortar and pestle in the presence of liquid<br />
nitrogen. Then precipitate the proteins <strong>with</strong> 20% TCA in pre-chilled acetone (–20°C)<br />
essentially as described <strong>for</strong> enrichment of alkaline mouse liver proteins (see Section II).<br />
Rinse the pellet twice <strong>with</strong> cold acetone (–20°C) to remove plant phenols, dry the pellet in<br />
vacuo, and solubilize the proteins in lysis buffer.<br />
Solubilization of wheat (Triticum aestivum) grain proteins<br />
1. Remove the husks <strong>with</strong> a scalpel if necessary. If necessary, wash the grains briefly<br />
<strong>with</strong> deionized H2O to remove any adhering impurities and then remove any adhering<br />
liquid <strong>with</strong> filter paper.<br />
2. Transfer the grains into a small bag made from glossy paper (e.g., from an HPLC<br />
recorder) and smash them <strong>with</strong> a hammer.<br />
3. Transfer the smashed grains into an agate stone mortar and grind them into a fine<br />
powder that passes through a 200 µm wide stainless steel sieve. For uni<strong>for</strong>m<br />
extraction, it is important to obtain particles of similar size. Particles that do not pass<br />
through the sieve should be transferred back into the mortar and ground again.<br />
4. Transfer 100 mg of the meal into a centrifuge tube, add 150 µl of deionized H2O and<br />
350 µl of urea lysis buffer. Gently mix <strong>with</strong> a plastic spatula and sonicate on ice five<br />
times <strong>for</strong> 2 seconds each <strong>with</strong> a 10-second pause between sonication intervals to<br />
prevent overheating. Leave the sample <strong>for</strong> 1 hour at room temperature, sonify again,<br />
and centrifuge at 40,000g <strong>for</strong> 1 hour at 15°C. Remove the supernatant <strong>with</strong> a pipette<br />
and store it at –70°C.
- 19 -<br />
II. Sample prefractionation using Sephadex-IEF<br />
Complex sample mixtures can be prefractionated in flat-bed (granulated) Sephadex gels<br />
containing urea, thiourea, zwitterionic detergents, dithiothreitol (DTT), and carrier<br />
ampholytes. After IEF, up to ten Sephadex fractions alongside the <strong>pH</strong> gradient are<br />
removed <strong>with</strong> a spatula and directly applied onto the surface of the corresponding narrowrange<br />
IPG strips <strong>for</strong> the first dimension of 2D-PAGE. Proteins in the Sephadex gel<br />
fraction are transported electrophoretically into the IPG gel <strong>with</strong> high efficiency and<br />
<strong>with</strong>out any sample dilution. This technology has been successfully used <strong>for</strong> the<br />
prefractionation of mouse liver proteins (Görg et al., 2002).<br />
Note: If the slope of the carrier ampholyte-generated <strong>pH</strong> gradient is unknown, there are<br />
several ways to determine where to “cut” and remove individual Sephadex fractions to fit<br />
<strong>with</strong>in the corresponding narrow <strong>pH</strong> range IPG strips. For example, after completion of<br />
the separation, it is possible to measure the <strong>pH</strong> of the fractions <strong>with</strong> a <strong>pH</strong> electrode or <strong>pH</strong><br />
indicator paper. Alternatively, as a preliminary test, small portions of the Sephadex IEF<br />
gel fractions can be applied onto an IPG 3–10 strip <strong>for</strong> the first dimension of 2D-PAGE<br />
(cf. Görg et al., 2002). The simplest method is to use coloured pI markers which do not<br />
interefere <strong>with</strong> subsequent 2D-PAGE (cf. Görg et al., 2007).<br />
MATERIALS<br />
Reagents<br />
• Reswelling buffer [8 M urea, 200 mM hydroxyethyldisulfide (HED), 1% (w/v) CHAPS,<br />
2.5% Pharmalyte (<strong>pH</strong> 3–10)]<br />
To prepare 50 ml of reswelling buffer, dissolve 25.0 g of urea (Merck) in deionized H2O<br />
and adjust the volume to 50 ml. Add 0.5 g of Serdolit MB-1 mixed bed ion exchange<br />
resin (Serva), stir <strong>for</strong> 10 minutes and filter. Add 0.5 g CHAPS, 1.2 ml HED (Sigma), and<br />
1.25 ml of Pharmalyte <strong>pH</strong> range 3–10 to 48 ml of the urea solution.<br />
• Colored low molecular mass isoelectric point (pI) markers (gift from Dr. Karel Slais,<br />
Institute of Analytical Chemistry, Brno, Czech Republic). A saturated solution of<br />
individual pI markers was prepared and stored at 4°C.<br />
• DeStreak ® reagent; Sephadex G-100SF; silicone oil (GE Healthcare)<br />
Equipment<br />
IPGphor; IPGphor cup-loading strip holder; Multiphor II horizontal electrophoresis<br />
apparatus <strong>with</strong> power supply and thermostatic circulator; IPG DryStrip Kit; Immobiline<br />
DryStrips; IEF electrode paper strips, 1 mm thick ; (GE Healthcare); magnetic strirrer; <strong>pH</strong><br />
electrode or <strong>pH</strong> indicator paper; spatula; template made of plastic (customized); plastics<br />
sheet <strong>for</strong> freezing Sephadex fractions and IPG gel strips.
Protein Sample<br />
- 20 -<br />
Mouse liver proteins, solubilized in lysis buffer; protein concentration ~5-10 mg/ml<br />
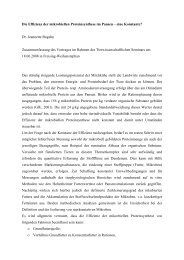
Figure 2 Sample prefractionation by Sephadex IEF (Görg et al., 2002 & 2007)<br />
METHOD<br />
1. Prepare a Sephadex slurry by gently mixing <strong>with</strong> a spatula: 210 mg of Sephadex G-<br />
100 SF <strong>with</strong> 3 ml of reswelling buffer or DeStreak. [For prefractionation of the more<br />
hydrophobic proteins, use a mixture of 6 M urea and 2 M thiourea, 0.4% (w/v)<br />
dithiothreitol, 1% (w/v) CHAPS, and 2.5% (v/v) Pharmalyte (<strong>pH</strong> range 3–10)].<br />
2. Let the Sephadex gel reswell <strong>for</strong> approximately 24-48 hours at 20°C (Fig. 2A). Avoid<br />
trapping air bubbles.<br />
3. Insert the customized, tight fitting template made e.g. from methacrylate or polycarbonate<br />
into the tray of the IPG DryStrip kit and position on the cooling plate of the<br />
Multiphor electrophoresis apparatus (Fig. 2B and Fig 3).).<br />
4. Add 1.5 ml of sample solution and 5 µl of each colored pI marker solution to 3.0 ml of<br />
Sephadex gel slurry by gently mixing <strong>with</strong> a spatula.<br />
5. Pipette this mixture into the trough from Step 3. Apply 4.5 ml of Sephadex–sample<br />
slurry into each individual lane of the template to <strong>for</strong>m an 100 x 20 mm wide and<br />
approximately 2 thick gel layer. If the high viscosity of the Sephadex slurry prevents it<br />
from spreading evenly, gently tap the tray on the cooling plate until the surface of the<br />
slurry is flat and devoid of air bubbles. Note: Templates of different shapes and sizes<br />
(up to 250 x 100 mm) may be used.
- 21 -<br />
Figure 3 Customized polycarbonate template insetred into the IPG DryStrip kit and<br />
placed onto the cooling plate of the Multiphor II unit (Görg et al., 2007)<br />
6. Soak two layers of 1-mm thick IEF electrode paper strips in 10 mM sulfuric acid<br />
(anode) and 10 mM sodium hydroxide (cathode) (or simply in deionized H2O) and<br />
insert them in the notch (Fig. 2B) at the anodic and cathodic ends of the trough,<br />
respectively. Cut off protruding parts so that the strips fit into the template.<br />
7. Apply platinum electrodes on the short side of the trough, so that the proteins are<br />
separated along the long axis.<br />
8. Cover the Sephadex gel <strong>with</strong> a thin layer of silicone oil (1 ml <strong>for</strong> 20 cm 2 of gel surface)<br />
to prevent evaporation or desiccation during the IEF step.<br />
9. Per<strong>for</strong>m IEF at 20°C. Typically, initial voltages of 10 V/cm and terminal voltages of<br />
100 V/cm are applied. For example, <strong>for</strong> a <strong>pH</strong> gradient 3–10 and a separation distance<br />
of 10 cm, IEF is run <strong>with</strong> an initial voltage of 100 V <strong>for</strong> 30 minutes, followed by 300 V<br />
<strong>for</strong> 30 minutes, 600 V <strong>for</strong> 1 hour, and 1000 V <strong>for</strong> 2 hours until the proteins have<br />
focused.<br />
10. After IEF, up to ten fractions can be collected by slicing the gel <strong>with</strong> the help of a<br />
fractionation grid or by simply scraping off the gel <strong>with</strong> a spatula (Fig. 2C). The<br />
Sephadex fractions are either applied immediately onto reswollen narrow <strong>pH</strong> range<br />
IPG strips (see Chapter 3), or sealed in plastic sheets and stored at –70°C until<br />
further use. Because of problem of instability of carrier ampholyte generated <strong>pH</strong><br />
gradients, it is important to determine precisely the slope of the <strong>pH</strong> gradient and to<br />
define the exact position where to “cut” and remove the individual Sephadex fractions<br />
to fit to the corresponding narrow <strong>pH</strong> range IPG strips. The most convenient and<br />
reliable method is to incorporate synthetic, differentially colored low molecular mass
- 22 -<br />
pI markers (Stastna et al., 2005) (which do not interefere <strong>with</strong> subsequent 2D-PAGE)<br />
in the Sephadex-sample slurry (see Step 4).<br />
11. Rehydrate narrow-range IPG strips <strong>with</strong> 8 M urea (or 6M urea + 2M thiourea), 1%<br />
(w/v) CHAPS, 0.4% dithiothreitol (DTT) (or 200 mM HED) and 0.5% (v/v) Pharmalytes<br />
(see Chapter 3). Alternatively, use DeStreak ® as rehydration solution. Place the<br />
rehydrated strips in IPGphor strip holders.<br />
12. Transfer the fractionated proteins from Step 9 into the IPG gel by spreading the<br />
Sephadex fractions onto the surface (near the anode) of the corresponding narrowrange<br />
IPG gel strips (Fig. 2D). Add a layer of silicone oil, as in Step 8.<br />
No protein elution from Sephadex fraction prior to IEF is per<strong>for</strong>med and, there<strong>for</strong>e, no<br />
dilution of the fractionated sample happens.<br />
13. Per<strong>for</strong>m IPG–IEF to the steady state using the IPGphor instrument. Running<br />
conditions <strong>for</strong> IEF using the IPGphor are identical to those described in Chapter 3. For<br />
better per<strong>for</strong>mance, insert moist filter papers (size: 4 x 4 mm 2 ) between the electrodes<br />
and the IPG strip during IEF<br />
14. After termination of IEF, freeze the IPG gel strips at –70°C between two sheets of<br />
plastic film. Most of the Sephadex slurry sticks to the plastic film, whereas the other<br />
components of the strips are rinsed off during the IPG strip equilibration step. Per<strong>for</strong>m<br />
the second dimension (SDS-PAGE) as described in Chapter 3.3. An example of<br />
results (comparison of unfractionated and prefractionated samples) is presented in<br />
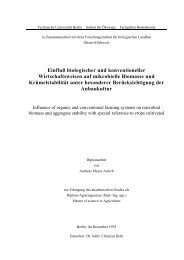
Fig. 4.<br />
Figure 4 Effect of sample prefractionation <strong>for</strong> high protein loads applied to 2-DE gels.<br />
First dimension: IEF in a narrow <strong>pH</strong> range IPG 6-7. Second dimension: SDS-PAGE<br />
(13%T). Sample: mouse liver proteins. (A) unfractionated sample, protein load 250 µg;<br />
silver stain. (B) sample prefractionated <strong>with</strong> Sephadex-IEF; protein load 250 µg; silver<br />
stain. (C) Sample prefractionated <strong>with</strong> Sephadex-IEF. Protein load 1000 µg. Coomassie<br />
Blue stain (Görg et al., 2002).
- 23 -<br />
3 TWO-DIMENSIONAL ELECTROPHORESIS WITH IMMOBILIZED<br />
<strong>pH</strong> GRADIENTS (IPG-DALT)<br />
The challenge <strong>for</strong> proteome analysis is to separate proteins from complex biological<br />
samples <strong>with</strong> high reproducibly and high resolution. Despite all merits of O’Farrell’s<br />
(1975) carrier-ampholyte based 2-DE technology, setting a world-wide standard <strong>for</strong> the<br />
separation of complex protein samples by adding urea and detergents <strong>for</strong> protein<br />
solublization and IEF under denaturing conditions -in contrast to Scheele’s (1975) native<br />
IEF/SDS-PAGE and Kloses’s (1975) native IEF/PAGE approach (based on Stegemann’s<br />
method (Macko & Stegemann, 1969)) <strong>for</strong> water-soluble proteins- it is, however, often<br />
difficult to obtain reproducible results even <strong>with</strong>in a single laboratory, let alone between<br />
different laboratories. The problem of limited reproducibility is largely due to the synthetic<br />
carrier ampholytes (CA) used to generate the <strong>pH</strong> gradient required <strong>for</strong> IEF, <strong>for</strong> reasons<br />
such as <strong>pH</strong> gradient instability over time, cathodic drift, and batch-to-batch variability of<br />
CAs (Righetti & Drysdale 1973; Chrambach et al., 1973). In practice, carrier ampholytegenerated<br />
<strong>pH</strong> gradients rarely extend beyond <strong>pH</strong> 7.5, <strong>with</strong> resultant loss of alkaline<br />
proteins. For the separation of these alkaline proteins, O’Farrell et al. (1977) developed<br />
an alternative procedure, known as non-equilibrium <strong>pH</strong> gradient electrophoresis<br />
(NEPHGE), however at the expense of reproducibility, since this procedure is extremely<br />
difficult to control and to standardize.<br />
The above mentioned difficulties of 2-DE have been largely overcome by the<br />
development of immobilized <strong>pH</strong> gradients (IPG) (Bjellqvist et al., 1982), based on the use<br />
of the bifunctional Immobiline ® reagents, a series of ten chemically well defined<br />
acrylamide derivatives <strong>with</strong> the general structure CH2=CH-CO-NH-R, where R contains<br />
either a carboxyl or a (tertiary) amino group. These <strong>for</strong>m a series of buffers <strong>with</strong> different<br />
pK values between pK 1 and 13. Since the reactive end is co-polymerized <strong>with</strong> the<br />
acrylamide matrix, extremely stable <strong>pH</strong> gradients are generated, allowing true steadystate<br />
IEF <strong>with</strong> increased reproducibility, as has been demonstrated in several interlaboratory<br />
comparisons (Corbett et al., 1994; Blomberg et al., 1995). Other advantages of<br />
IPGs are increased resolution by the ability to generate (ultra)narrow <strong>pH</strong> gradients ( ∆ pI =<br />
0.001) (Görg et al., 1985, 1988; Wildgruber et al., 2000), reproducible separation of<br />
alkaline proteins (Görg 1991; Görg et al., 1997-2000; Wildgruber et al., 2002; Drews et<br />
al., 2004) and increased loading capacity (Bjellqvist et al., 1993). Consequently, IEF <strong>with</strong><br />
IPGs is the current method of choice <strong>for</strong> the first dimension of<br />
2-D PAGE <strong>for</strong> most proteomic applications.<br />
The original protocol of 2-DE <strong>with</strong> immobilized <strong>pH</strong> gradients (IPG-Dalt) was described by<br />
Görg et al. (1988; updated in 2000 and 2004), summarizing the critical parameters<br />
inherent to isoelectric focusing <strong>with</strong> IPGs and a number of experimental conditions. The<br />
first dimension of IPG-Dalt, IEF, is per<strong>for</strong>med in individual, 3-mm wide and up to 24 cm<br />
long IPG gel strips cast on GelBond PAGfilm (laboratory-made or commercial Immobiline
- 24 -<br />
Dry-Strips). Samples can be applied either by cup-loading or by in-gel rehydration. IPG-<br />
IEF has been simplified by use of an integrated system such as the IPGphor (Islam et al.,<br />
1998; Görg et al., 1999) where rehydration <strong>with</strong> sample solution and IEF can be<br />
per<strong>for</strong>med in a one-step automated procedure. After IEF, the IPG strips are equilibrated<br />
<strong>with</strong> SDS buffer in the presence of urea, glycerol, DTT and iodoacetamide, and applied<br />
onto horizontal or vertical SDS gels in the second dimension. After electrophoresis, the<br />
separated proteins are visualized by staining <strong>with</strong> silver staining, organic or fluorescent<br />
dyes, or autoradiography (or phosphor-imaging) of radiolabelled samples.<br />
Limitations (not only of 2-DE, but of almost all current proteome analysis technologies)<br />
remain in the field of the analysis of very hydrophobic and/or membrane proteins, as well<br />
as in the lack of highly sensitive and reliable techniques <strong>for</strong> detection and quantitation of<br />
low abundant proteins. Yet, the recent introduction of more powerful chaotropes and<br />
detergents such as thiourea and sulfobetaines, as well as the advent of sensitive<br />
fluorescent dyes, in particular of dual label techniques <strong>for</strong> the visualization of differentially<br />
expressed proteins (Ünlü et al., 1997) have improved the situation.<br />
3.1 First dimension: IEF <strong>with</strong> immobilized <strong>pH</strong> gradients (IPGs)<br />
3.1.1 IPG gel casting. Procedure and recipes<br />
Linear or non-linear wide <strong>pH</strong> range (e.g., IPG 3-12), medium (e.g., IPG 4-7), narrow (e.g.,<br />
IPG 4.5-5.5), and/or ultra-narrow (e.g., IPG 4.9-5.3) IPGs can be cast in different <strong>pH</strong><br />
ranges between <strong>pH</strong> 2.5 and <strong>pH</strong> 12, as well as in different lenghts, usually from 7-24 cm<br />
(however, IPG strips up to 54 cm long have been applied (Poland et al., 2003). Besides<br />
laboratory-made IPG gels, a variety of commercial IPG dry strips can now be purchased<br />
from different suppliers. Ready-made IPG dry strips are increasingly popular due to<br />
easier handling, better comparability of results and exchange of data, and have<br />
significantly contributed to the widespread application of 2-DE in proteomics.<br />
Whereas narrow (one <strong>pH</strong> unit) and ultra-narrow (< 1 <strong>pH</strong> unit) linear immobilized <strong>pH</strong><br />
gradients can be calculated <strong>with</strong> the help of the Henderson-Hasselbalch equation <strong>with</strong><br />
relative ease, or by using nomograms (Righetti 1990), computer assisted programs<br />
(Altland, 1990; Righetti & Tonani 1991) are mandatory <strong>for</strong> wider (> 1 <strong>pH</strong> unit) and/or more<br />
complex (e.g., non-linear) IPGs. IPG slab gels <strong>with</strong> linear gradients such as <strong>pH</strong> 4-7, 4-9,<br />
6-10, 6-12, 3-12 and 4-12 are <strong>for</strong>med by mixing two immobiline starter solutions in a<br />
gradient mixer according to the gradient casting technique <strong>for</strong> ultrathin gels described by<br />
Görg et al. (1980) <strong>with</strong> the recipes of Righetti (1990) and Görg et al. (1998, 1999). IPG<br />
gels are IPG gels are 0.5 mm thick and cast on GelBond PAGfilm. The gel casting mold,<br />
which is typically loaded in a vertical position from the top, consists of two glass plates,<br />
one covered <strong>with</strong> the GelBond PAGfilm, whereas the second one bears a 0.5 mm thick<br />
’U-frame’ as spacer. Besides Immobiline R chemicals, the gel casting solutions contain an
- 25 -<br />
acrylamide/bisacrylamide mixture (typically 4%T / 3%C). For narrow-range alkaline IPG<br />
gels (e.g., IPG 9-12), acrylamide may be substituted by N,N-dimethyl-acrylamide <strong>for</strong><br />
improved stability of the gel matrix (Görg et al., 1997). After poly-merization (50°C), the<br />
IPG gel is washed <strong>with</strong> deionized water, impregnated in 2% (w/v) glycerol, and dried. The<br />
surface of the dry IPG gel is protected <strong>with</strong> a sheet of plastic film be<strong>for</strong>e it is stored in a<br />
sealed plastic bag at -20°C. Prior to use, the dried gel is cut into 3 mm wide IPG dry strips<br />
<strong>with</strong> a paper cutter. For detailed in<strong>for</strong>mation on IPG gel casting see Görg & Weiss (2000).<br />
PROTOCOL: IPG gel casting<br />
MATERIALS<br />
Chemicals<br />
Immobiline II chemicals, repel silane, acrylamide, bisacrylamide, ammonium persulfate,<br />
tetramethylethylenediamine (TEMED) (GE Healthcare Lifesciences), Serdolit MB-1 mixed<br />
bed ion exchanger resin (Serva)<br />
Reagents<br />
• Acrylamide/Bisacrylamide solution (30% T, 3% C)<br />
29.1% (w/v) acrylamide and 0.9% (w/v) N, N'-methylenebisacrylamide. To make 100 ml<br />
of the solution dissolve 29.1 g of acrylamide and 0.9 g of bisacrylamide in deionized<br />
water and fill up to 100 ml. Add 1 g of Serdolit MB-1, stir <strong>for</strong> 10 min and filter. This<br />
solution can be stored <strong>for</strong> one week at 4°C. However, <strong>for</strong> optimal results it is better to<br />
prepare it fresh the day you use it.<br />
• Ammonium persulfate solution (40% (w/v) in deionized water).<br />
To prepare 1 ml of the solution, dissolve 100 mg of ammonium persulfate in 250 µl of<br />
deionized water. This solution should be prepared just be<strong>for</strong>e use.<br />
• Solutions <strong>for</strong> casting Immobiline gels<br />
To prepare 15 ml each of acidic and basic solutions mix chemicals and reagent<br />
solutions as described in Table 1. For improved polymerization, the acidic and basic<br />
solutions are titrated to <strong>pH</strong> 7 (<strong>with</strong> sodium hydroxide and acetic acid) prior to gel casting.<br />
A huge selection of recipes <strong>for</strong> many types of narrow or broad-range <strong>pH</strong> gradients has<br />
been calculated (Righetti 1990). Table 1 contains recipes <strong>for</strong> those IPGs which are<br />
preferred <strong>for</strong> 2-D electrophoresis in our lab. IPG solutions should be prepared fresh just<br />
be<strong>for</strong>e use.
- 26 -
Equipment<br />
- 27 -<br />
Gradient mixer (2 x 15 ml), glass plates <strong>with</strong> a 0.5 mm thick U-frame (200 x 260 mm 2 ),<br />
plain glass plates (size 200 x 260 mm 2 ), clamps, GelBond PAGfilm (200 x 260 mm 2 ),<br />
repel silane, roller (GE Healthcare Lifesciences), heating cabinet (Heraeus, Germany),<br />
laboratory shaker (rocking plat<strong>for</strong>m) (GFL, Germany) and Milli-Q System (Millipore)<br />
METHOD<br />
<strong>Two</strong> immobiline starter solutions (an acidic one and a basic one) are prepared as<br />
described in Table 1. The acidic solution, which additionally contains 25% glycerol to<br />
<strong>for</strong>m a density gradient which stabilizes the <strong>pH</strong> gradient during the gel casting procedure,<br />
is pipetted into the mixing chamber, and then the basic, „light“ (i.e., <strong>with</strong>out glycerol)<br />
solution into the reservoir of the gradient mixer. If a <strong>pH</strong> plateau (typically 2 cm wide) <strong>for</strong><br />
the sample application area is desired, an extra portion of the dense solution is pipetted<br />
into the precooled (refrigerator) cassette prior to pouring the gradient. After pouring, the<br />
cassette is kept at room temperature <strong>for</strong> 10-15 min to allow adequate levelling of the<br />
density gradient. After polymerization (60 min, 50°C), the IPG gel is removed from the gel<br />
cassette, extensively washed <strong>with</strong> deionized water, impregnated <strong>with</strong> 2% glycerol, and<br />
air-dried. The surface of the dried IPG gel is covered <strong>with</strong> a sheet of plastic film. The dried<br />
IPG gels can be stored frozen at -20°C. <strong>for</strong> at least one year.<br />
1. Wash the glass plates <strong>with</strong> a mild detergent, then rinse them <strong>with</strong> deionized water and<br />
let them air-dry in a dust-free cabinet. If brand new glass plates are used, pipette (in an<br />
extractor hood!) 1-2 ml of repel silane on the glass plate that bears the U-shaped<br />
spacer and distribute it evenly on the surface <strong>with</strong> a lint-free filter paper (Kimwipe). Let<br />
the solvent evaporate (1-2 minutes), clean the glass plate <strong>with</strong> a mild detergent, rinse<br />
<strong>with</strong> deionized water, water and let it air-dry. Repeat this procedure every 2-3 months<br />
in order to prevent the IPG gels from sticking to the glass plate.<br />
Note: The detergent used <strong>for</strong> cleaning of the glass plates should not contain any<br />
proteins (enzymes)<br />
2. To assemble the polymerisation cassette, wet the plain glass plate (size 260 x 200<br />
mm 2 ) <strong>with</strong> a few drops of water. Place the Gelbond PAGfilm, hydrophilic side upwards,<br />
on the wetted surface of the plain glass plate. The GelBond PAGfilm should overlap<br />
the upper edge of the glass plate <strong>for</strong> 1-2 mm to facilitate filling of the cassette. Expel<br />
excess water <strong>with</strong> a roller (Fig. 5). Place the glass plate which bears the U-frame (0.5<br />
mm thick) on top of the GelBond PAGfilm and fix the cassette <strong>with</strong> clamps. Put it in the<br />
refrigerator <strong>for</strong> 30 min.
- 28 -<br />
Figure 5 Assembly of the gel casting cassette<br />
(Left): Assembly of the polymerisation cassette <strong>for</strong> IPG and SDS gel casting on plastic backing<br />
(Glass plates; GelBond PAGfilm; Spacer (U-frame), thickness 0.5 mm)<br />
(Right): Application of the GelBondPAGfilm onto the glass plate<br />
3. To cast the IPG gel, pipette 12.5 ml of the acidic, dense solution into the mixing<br />
chamber of the gradient mixer (Fig. 6). Outlet and valve connecting the mixing<br />
chamber and reservoir have to be closed! Add 7.5 µl of TEMED and 12 µl of<br />
ammonium persulfate and mix. Open the connecting valve between the chambers <strong>for</strong><br />
a second to release any air bubbles.<br />
Note: In order to ensure the reproducibility of the IPG gradient, the volume of the<br />
cassette should be not vary. There<strong>for</strong>e, we recommend to check the volume of the<br />
cassette from time to time since it may diminish on ageing of the U-frame.<br />
4. Pipette 12.5 ml of the basic, light solution into the reservoir of the gradient mixer. Add<br />
7.5 µl of TEMED and 12 µl of ammonium persulfate and mix <strong>with</strong> a spatula.<br />
5. Switch on the magnetic stirrer at a reproducible and rapid rate (approximately 600<br />
rpm). Avoid excessive vortex! Remove the polymerisation cassette from the<br />
refrigerator and put it underneath the outlet of the gradient mixer. Open the valve (1)<br />
connecting the chambers and, immediately afterwards, the pinchcock (2) on the outlet<br />
tubing so that the gradient mixture is applied slowly, but steadily into the cassette from<br />
a height of about 5 cm just by gravity flow. Take care that the level in both chambers<br />
drops equally fast. Formation of the gradient is completed in 2-3 min.<br />
Note: If one of the chambers is emptying faster than the other, the resulting <strong>pH</strong><br />
gradient will not be linear. Check if there is an air bubble in the connecting line or<br />
whether the speed of the magnetic stirrer is unappropriate!
- 29 -<br />
Figure 6 IPG gel casting (1) Gradient mixer and connecting valve; (2) outlet tubing<br />
valve; (3) gel casting cassette<br />
6. Keep the mold at room temperature <strong>for</strong> 15 min to allow adequate levelling of the<br />
density gradient. Then polymerize the gel <strong>for</strong> 1 h at 50°C in a heating-cabinet.<br />
7. After polymerization at 50°C, the cassette is allowed to cool down to room temperature<br />
(at least 15 min). Then insert a spatula between the glass plates and the gel, pry<br />
apart the glass plates and carefully remove the gel from the cassette. Wash the IPG<br />
gel <strong>for</strong> 1 h <strong>with</strong> 10-min changes of deionized water (500 ml each) in a glass tray on a<br />
rocking plat<strong>for</strong>m. Equilibrate the gel in 2% (w/v) glycerol <strong>for</strong> 30 min and dry it overnight<br />
at room temperature, using a fan, in a dust-free cabinet. Afterwards, protect the<br />
surface of the dry gel <strong>with</strong> a sheet of plastic film. The dried IPG gel can be stored in a<br />
sealed plastic bag at -20°C <strong>for</strong> at least several months <strong>with</strong>out loss of quality. Dried<br />
IPG gels in several <strong>pH</strong> ranges are also commercially available (Immobiline DryPlate).<br />
3.1.2 IPG strip rehydration and sample application<br />
Prior to IEF, the IPG dry strips must be rehydrated (usually overnight) to their original<br />
thickness of 0.5 mm <strong>with</strong> a rehydration buffer containing 8M urea (or, alternatively, 2M<br />
thiourea and 6M urea), 1- 2% non-ioninc or zwitterionic detergents (e.g., 2% CHAPS), a<br />
reductant (typically 0.4% DTT) and 0.5% (v/v) carrier ampholytes (e.g., IPG buffer or<br />
Pharmalyte 3-10). Rehydration buffer should be prepared fresh be<strong>for</strong>e use, or stored<br />
frozen in aliquots at –70°C. It is important to deionize the urea <strong>with</strong> an ion exchange resin<br />
prior to adding the other components, because urea in aqueous solution exists in<br />
equilibrium <strong>with</strong> ammonium cyanate which can react <strong>with</strong> protein amino groups and<br />
introduce charge artifacts, giving rise to additional spots on the IEF gel. Carrier<br />
ampholytes are added <strong>for</strong> improved protein solubility, but also as a cyanate scavenger.
- 30 -<br />
IPG dry strips are either rehydrated <strong>with</strong> sample already dissolved in rehydration buffer<br />
(“sample in-gel rehydration“), or <strong>with</strong> rehydration buffer <strong>with</strong>out sample, followed by<br />
sample application by “cup-loading“. Rehydrated IPG strips can be stored at –70°C <strong>for</strong><br />
instantaneous use (Görg et al., in preparation).<br />
For sample in-gel rehydration (Schupbach et al., 1991; Rabilloud et al., 1994; Sanchez et<br />
al., 1997), the extract (1-10 mg protein/ml) is directly solubilized in a defined volume of<br />
rehydration buffer. For 240 mm long and 3 mm wide IPG dry strips, 450 µl of this solution<br />
is pipetted into the grooves of the reswelling tray or into the IPGphor strip holder (GE<br />
Healthcare Lifesciences). For shorter IPG strips, rehydration volume has to be adjusted<br />
accordingly (e.g., 350 µl or 180 mm long IPG strips). The IPG strips are applied, gel side<br />
down, into the grooves <strong>with</strong>out trapping air bubbles. The IPG strip, which must still be<br />
moveable and not stick to the tray, is then covered <strong>with</strong> silicone oil or DryStrip cover fluid<br />
and rehydrated overnight at approximately 20°C. Higher temperatures (>37°C) hold the<br />
risk of protein carbamylation, whereas lower temperatures (< 10°C) should be avoided to<br />
prevent urea crystallization on the IPG gel. Improved entry of higher molecular weight<br />
proteins (Mr > 100 kDa) into the IPG gel matrix is facilitated by ’active’ rehydration, i.e., by<br />
applying low voltages (30-50 V) during reswelling (Görg et al., 1999, 2000).<br />
Sample in-gel rehydration is not recommended <strong>for</strong> samples containing very high<br />
molecular weight, very alkaline and/or very hydrophobic proteins, since these are taken<br />
up into the gel only <strong>with</strong> difficulty, e.g., due to hydrophobic interactions between proteins<br />
and the wall of the tray, or because of size-exclusion effects of the gel matrix. The latter<br />
phenomenon is particularly pronounced if the sample volume significantly exceeds the<br />
calculated volume of the IPG strip after reswelling, since higher Mr proteins preferably<br />
remain in the excess reswelling solution instead of entering the IEF gel matrix. Cross<br />
contamination is another problem; hence the reswelling tray must be thoroughly cleaned<br />
between different experiments. In conclusion, sample-in-gel rehydration is less reliable<br />
than cup-loading, in particular <strong>for</strong> quantitative analyses.<br />
For cup-loading, IPG drystrips are reswollen in rehydration buffer, either in a reswelling<br />
cassette or, more convenient, in a reswelling-tray, however <strong>with</strong>out sample. After IPG<br />
strip reydration, samples (20-100 µl) dissolved in lysis buffer are applied into disposable<br />
plastic or silicone rubber cups placed onto the surface of the IPG strip. Best results are<br />
obtained when the samples are applied at the <strong>pH</strong> extremes, i.e., either near the anode or<br />
cathode. Sample application near the anode proved to be superior to cathodic application<br />
in most cases. When using basic <strong>pH</strong> gradients such as IPGs 6-12 or 9-12, anodic<br />
application is mandatory <strong>for</strong> all kinds of samples investigated (Görg et al., 2000).
- 31 -<br />
PROTOCOL: IPG drystrip rehydration<br />
The dried IPG gels (or ready-made Immobiline DryPlates) are cut into individual 3 mm<br />
wide strips <strong>with</strong> the help of a paper cutter (Fig. 7). Alternatively, ready-made IPG strips<br />
(Immobiline DryStrip) are used. IPG drystrips are reyhdrated to their original thickness of<br />
5 mm, either in a reswelling cassette (Fig. 8A), or in a reswelling tray (Fig. 8B), or in a<br />
IPGphor strip holder (Fig. 8C). The correct IPG gel thickness is achieved by rehydrating<br />
the IPG drystrips <strong>with</strong> the proper amount of rehydration buffer (B,C), or by using an<br />
appropriate spacer (A).<br />
Figure 7 IPG strip cutting Figure 8 Rehydration of IPG Drystrips<br />
(A) Reswelling cassette; (B) Reswelling tray;<br />
(C) IPGphor strip holder<br />
MATERIALS<br />
Chemicals<br />
Pharmalyte (<strong>pH</strong> range 3-10), IPG buffers, repel silane, IPG cover fluid, DeStreak ® reagent<br />
(GE Healthcare Lifesciences), Serdolit MB-1 mixed bed ion exchanger resin,<br />
hydroxyethyldisulfide (HED) (Sigma); silicone oil (Serva), CHAPS (Roche), urea (Merck),<br />
thiourea (Fluka).<br />
Reagents<br />
• IPG drystrip rehydration buffer (8 M urea, 1% CHAPS, 0.4% DTT and 0.5% carrier<br />
ampholyte). To prepare 50 ml of the solution, dissolve 25.0 g of urea in deionized<br />
water and complete to 50 ml. Add 0.5 g of Serdolit MB-1, stir <strong>for</strong> 10 min and filter. To<br />
48 ml of this solution add 500 mg CHAPS, 200 mg DTT, and 0.25 ml IPG buffers<br />
(alternatively: Pharmalyte <strong>pH</strong> 3-10) and complete to 50 ml <strong>with</strong> deionized water.<br />
Rehydration solution should be prepared freshly the day you use it or stored frozen in<br />
small portions at –70°C until use.
- 32 -<br />
Notes: (1) For hydrophobic proteins, 6 M urea and 2 M thiourea instead of 8 M urea is<br />
recommeded. (2) For alkaline IPGs (e.g., IPG 6-12), DTT should be substituted by 100<br />
mM hydroxyethyldisulfide; alternatively, use DeStreak ® reagent. (3) Do not heat urea<br />
solutions > 37°C to avoid protein carbamylation!<br />
Equipment<br />
IPGphor, IPGphor strip holders, reswelling tray, reswelling cassette (125 x 260 mm 2 ),<br />
Immobiline DryPlates, Immobiline DryStrips (GE Healthcare Lifesciences), paper cutter<br />
(Dahle, Germany), Parafilm (roll, 50 cm x 15 m) (ANC, USA), Milli-Q System (Millipore).<br />
METHODS<br />
PROTOCOL I: Rehydration of IPG DryStrips <strong>with</strong> sample solution<br />
Particularly <strong>for</strong> micropreparative purposes, samples are applied by in-gel rehydration.<br />
However, one has to be aware that high Mr proteins, very basic proteins, and/or<br />
membrane proteins do not always enter the gel matrix properly! For improved entry of<br />
high Mr proteins, IPGphor strip holders, which facilitate ‚active“ rehydration by applying<br />
low voltage 30-50 V during rehydration, are superior to the reswelling tray that allows<br />
„passive“ rehydration only (Görg et al., 1999, 2000).<br />
Rehydration of IPG strips in the reswelling tray<br />
1. Dilute the extract (approximate protein concentration ≈ 10 mg/ml) <strong>with</strong> IPG dry strip<br />
rehydration buffer. Recommended dilution is 1+1 or 1+2 <strong>for</strong> micropreparative IEF, and<br />
1+9 or 1+19 <strong>for</strong> analytical IEF (depending on the <strong>pH</strong> gadient; the narrower the <strong>pH</strong><br />
gradient, the higher the protein load) to a final volume of 350 µl <strong>for</strong> 180 mm long IPG<br />
strips (or 450 µl <strong>for</strong> 240 mm long IPG strips, respectively).<br />
2. Pipette 350 µl (or 450 µl, respectively) of sample-containing rehydration buffer into the<br />
grooves of the reswelling tray (Fig. 8B). Peel off the protective cover sheets from the<br />
IPG strips and insert the IPG strips (gel side-down) into the grooves. Avoid trapping<br />
air-bubbles. The IPG strip must still be moveable and not stick to the tray. Cover the<br />
IPG strips <strong>with</strong> 1-2 ml of silicone oil (or IPG DryStrip cover fluid), close the lid and<br />
rehydrate the IPG DryStrips overnight at approximately 20°C.<br />
3. After the IPG strips have been rehydrated, briefly rinse them <strong>with</strong> deionized water and<br />
place them, gel side up, on a sheet of water saturated filter paper. Wet a second sheet<br />
of filter paper <strong>with</strong> deionized water, blot it slightly to remove excess water and put it<br />
onto the surface of the IPG gel strips. Blot them gently <strong>for</strong> a few seconds to remove<br />
excess rehydration solution to prevent urea crystallization on the surface of the gel<br />
during IEF.
- 33 -<br />
Rehydration of IPG strips in the IPGphor strip holder<br />
1. Dilute the extract (approximate protein concentration ≈ 10 mg/ml) <strong>with</strong> sample IPG dry<br />
strip rehydration buffer. Recommended dilution is 1+1 or 1+2 <strong>for</strong> micropreparative IEF,<br />
and 1+9 or 1+19 <strong>for</strong> analytical IEF (depending on the <strong>pH</strong> gadient; the narrower the <strong>pH</strong><br />
gradient, the higher the protein load) to a final volume of 350 µl <strong>for</strong> 180 mm long IPG<br />
strips (or 450 µl <strong>for</strong> 240 mm long IPG strips, respectively).<br />
2. Apply the required number of strip holders (Fig. 8C) onto the cooling plate / electrode<br />
contact area of the IPGphor (Fig. 9).<br />
Figure 9 IPGphor <strong>for</strong> IPG-IEF<br />
3. Pipette 350 µl of sample-containing rehydration buffer (<strong>for</strong> 180 mm long IPG strips) into<br />
the strip holder base. For longer (e.g., 240 mm) IPG strips in longer strip holders use<br />
proportionately more liquid. Peel off the protective cover sheets from the IPG strip and<br />
slowly lower the IPG strip (gel side-down) onto the rehydration buffer. Avoid trapping<br />
air-bubbles. The IPG strip must still be moveable and not stick to the tray. Cover the<br />
IPG strips <strong>with</strong> 1-2 ml of IPG DryStrip cover fluid and apply the plastic cover. Pressure<br />
blocks on the underside of the cover assure that the IPG strip keeps in good contact<br />
<strong>with</strong> the electrodes as the gel swells. Apply low voltage (30-50V) during rehydration <strong>for</strong><br />
improved entry of high Mr proteins (Görg et al., 1999, 2000).<br />
PROTOCOL II: Rehydration of IPG DryStrips <strong>for</strong> sample cup-loading<br />
Up to 30 IPG drystrips can be rehydrated simultaneously in a reswelling cassette (Fig.<br />
8A), whereas in the reswelling tray (Fig. 8B) this number is restricted to 12 IPG strips.<br />
The correct IPG gel thickness (5 mm) after reswelling is achieved by means of a Ushaped<br />
spacer (cassette), or by rehydrating <strong>with</strong> the proper amount of rehydration buffer<br />
(tray).
- 34 -<br />
IPG strip rehydration in a resewelling cassette<br />
1. To rehydrate the IPG gel strips to their original thickness (0.5 mm) in a reswelling<br />
cassette (GE Healthcare Lifesciences), cut a U-frame from two layers of Parafilm of<br />
the same shape and size as the the glass plate's U-frame. Thus, after assembly of the<br />
rehydration cassette, a 0.7 mm thick U-frame (0.5 mm original thickness plus two<br />
layers of Parafilm, 0.1 mm each) is <strong>for</strong>med that to compensates <strong>for</strong> the 0.2 mm wide<br />
GelBond PAGfilm on which the IPG gel is polymerized.<br />
Note: If sample volumes > 100 µl will be applied on the rehydrated IPG strip, it is<br />
better to use one layer of parafilm only.<br />
2. Take an appropriate number of IPG dry strips and pull off their protective covers. Level<br />
the lower glass plate (i.e., that one that does not carry the U-shaped spacer)<br />
horizontally, and pipette approximately 25 µl deionized water as small droplets over<br />
the entire length of the glass plate. Lower the first IPG drystrip, gel side up (!), onto the<br />
water droplets and slide the it back and <strong>for</strong>th to remove any air bubbles under the<br />
strip. Repeate this procedure <strong>with</strong> the remaining IPG drystrips. Leave 1-2 mm space<br />
between them, and at least 5 mm distance to the edges of the glass plate.<br />
3. Clamp the cassette together, put it in an inclined (or vertical) position and carefully fill<br />
in IPG drystrip rehydration buffer (approximately 25 ml) from the bottom <strong>with</strong> a syringe<br />
(Fig. 6A). Make sure that the cassette does not leak. Allow the strips to rehydrate<br />
overnight (16-18 h) at approximately 20°C. Higher temperatures (> 37°C) hold the risk<br />
of protein carbamylation, whereas lower temperatures (< 15°C) should be avoided to<br />
prevent urea from crystallization on the IPG gel.<br />
4. After the IPG gel strips have been rehydrated, pour the rehydration solution out of the<br />
reswelling cassette, remove the clamps and open the cassette <strong>with</strong> the help of a<br />
spatula. Using clean <strong>for</strong>ceps, briefly rinse the rehydrated IPG gel strips <strong>with</strong> deionized<br />
water and place them, gel side up, on a sheet of water saturated filter paper. Wet a<br />
second sheet of filter paper <strong>with</strong> deionized water, blot it to remove excess water and<br />
put it onto the surface of the IPG gel strips. Blot them gently <strong>for</strong> a few seconds to<br />
remove excess rehydration solution in order to prevent urea crystallization on the<br />
surface of the gel during focusing.<br />
IPG strip rehydration in the reswelling tray<br />
1. Pipette 350 µl of rehydration solution (<strong>for</strong> 180 mm long IPG strips) into the grooves of<br />
the reswelling tray (GE Healthcare Lifesciences) (Fig. 6B). Peel off the protective cover<br />
sheets from the IPG strips and insert the IPG strips (gel side-down) into the grooves. To<br />
help coat the entire IPG drystrip, gently lift and lower the strip and slide it back and <strong>for</strong>th<br />
along the surface of the solution. The IPG strip must be moveable and not stick to the<br />
tray. Avoid trapping air-bubbles under the strip. Then Cover the IPG strips <strong>with</strong> 1-2 ml of
- 35 -<br />
silicone oil (or IPG DryStrip cover fluid) which prevents evaporation during reswelling,<br />
close the lid and let the strips rehydrate overnight at room temperature.<br />
2. After the IPG gel strips have been rehydrated, briefly rinse them <strong>with</strong> deionized water<br />
and place them, gel side up, on a sheet of water saturated filter paper. Wet a second<br />
sheet of filter paper <strong>with</strong> deionized water, blot it slightly to remove excess water and put it<br />
onto the surface of the IPG gel strips. Blot them gently <strong>for</strong> a few seconds to remove<br />
excess rehydration solution in order to prevent urea crystallization on the surface of the<br />
gel during IEF.<br />
3.1.3. IEF using IPGs from <strong>pH</strong> 2.5 to 12. General aspects and guidelines<br />
The first dimension of IPG-Dalt, isoelectric focusing in immobilized <strong>pH</strong> gradients, is<br />
per<strong>for</strong>med as originally described by Görg et al. (1988) in individual 3-mm wide IPG gel<br />
strips cast on GelBond PAGfilm. The original IPG-IEF procedure of running IPG strips on<br />
a flat-bed isoelectric focusing unit has been simplified by the introduction of an integrated<br />
system, the IPGphor. This instrument features ceramic strip holders that facilitate<br />
rehydration of individual IPG strips <strong>with</strong> or <strong>with</strong>out sample, optional sample cup loading,<br />
and subsequent IEF, all <strong>with</strong>out handling the strip after it is placed in the holder. Other<br />
important features are precise temperature control and an 8000 V power supply, allowing<br />
shorter running times and concomitant better per<strong>for</strong>mance of alkaline IPGs.<br />
General guidelines <strong>for</strong> IEF <strong>with</strong> IPGs<br />
The amount of protein which which can be loaded onto a single IPG gel strip <strong>for</strong><br />
optimum resolution, maximum spot numbers and minimum streaking/background<br />
smearing depends on parameters such as <strong>pH</strong> gradient used (wide or narrow), separation<br />
distance, and protein complexity of the sample. For analytical purposes, typically 100 µg<br />
of protein can be loaded on an 18 cm long, wide <strong>pH</strong> range gradient, and 500 µg on<br />
narrow range IPGs. For micropreparative purposes, five to ten times more protein can be<br />
applied. For micro-preparative 2-DE, in-gel rehydration is often preferred, but up to<br />
several mg of protein may also be applied by (repeated) cup-loading. lf the protein<br />
concentration of the sample is unknown, one can do a rough, but quick estimation by<br />
making a dilution series of both the sample and a known standard (e.g. BSA) by spotting<br />
them on a nitrocellulose membrane and staining it <strong>with</strong> Amido Black or Coomassie blue.<br />
The optimum sample volume <strong>for</strong> cup loading is 20 µl – 100 µl, whereas volumes less<br />
than 20 µl (IPGphor: 50 µl) are not recommended because of the increased risk of protein<br />
aggregation and precipitation at the point of sample application, resulting in loss of<br />
proteins and/or horizontal or vertical streaking. For the same reason, the protein<br />
concentration of the sample solution should not exceed 10 mg/ml.<br />
Samples can be applied to the IPG strip either by cup-loading or by in-gel rehydration. In<br />
case of cup-loading, samples are typically applied at the <strong>pH</strong> extremes, i.e. either near the
- 36 -<br />
anode or cathode. In our experience, sample application near the anode proved to be<br />
superior to cathodic application in most cases, <strong>with</strong> some exceptions. E.g. human cardiac<br />
proteins were preferably applied at the cathode, whereas not only most kinds of plant<br />
proteins but also mouse liver, yeast cell proteins etc. yielded best results when applied at<br />
the anode. For basic <strong>pH</strong> gradients such as IPGs 6-10, 7-10 or 6-12, anodic application<br />
was mandatory <strong>for</strong> all kinds of samples investigated.<br />
Settings are usually limited to 50 µA per IPG strip and 150 V to avoid Joule heating,<br />
because the conductivity is initially high due to salts. As the run proceeds, the salt ions<br />
migrate to the electrodes, resulting in decreased conductivity and allowing high voltages<br />
to be applied. Samples <strong>with</strong> high salt concentrations can be desalted directly in the IPG<br />
gel by restricting the voltage to 50 -100 V during the first 4-5 hours <strong>with</strong> several changes<br />
of the electrode filter paper strips (Görg et al., 1995, 2000). Likewise, voltage should be<br />
limited to 100 V overnight <strong>for</strong> improved sample entry in case of large sample volumes<br />
(micropreparative runs and/or narrow IPGs) prior to continuing IEF at higher voltages (><br />
3500 V). Final settings up to 8000 V are particularly useful <strong>for</strong> zoom-in gels and alkaline<br />
<strong>pH</strong> gradients (see below). The longer the IPG strip and the narrower the <strong>pH</strong> gradient, the<br />
more volt-hours are required to achieve steady state separation <strong>for</strong> high reproducibility. If<br />
the second dimension cannot be per<strong>for</strong>med directly after IEF, the IPG strips should be<br />
immediately frozen and stored at –70 °C between two plastic sheets.<br />
Too short focusing times will result in horizontal streaking, but severe over-focusing<br />
should also be avoided. Although in contrast to the classical O’Farrell (1975) method,<br />
over-focusing does not result in migration of proteins towards the cathode (cathodic drift),<br />
but will result in excess water exudation at the surface of the IPG gel due to active water<br />
transport (reverse electroendosmotic flow). This leads to distorted protein patterns,<br />
horizontal streaks at the basic end of the gel, and loss of proteins. The optimum focusing<br />
time must be established empirically <strong>for</strong> each combination of protein sample, protein<br />
loading and the particular <strong>pH</strong> range and length of IPG gel strip used. Detailed protocols<br />
including optimum focusing parameters <strong>for</strong> a number of different wide and narrow <strong>pH</strong><br />
range IPGs have been published by Görg et al. (2000, 2004).<br />
Temperature during IEF has an important effect on the resulting 2-DE patterns, since<br />
spot positions vary along the <strong>pH</strong> axis <strong>with</strong> different applied temperatures. For enhanced<br />
reproducibility it is extremely important to run the separations under precise temperature<br />
control, where 20 °C proved to provide the optimal conditions (Görg et al., 1991).<br />
Narrow overlapping IPGs (’zoom-in’ gels) and extended separation distances<br />
The choice of <strong>pH</strong> gradient primarily depends on the sample’s protein complexity. Wide<br />
or medium range IPGs, such as IPGs 3–12, 4–9, or 4–7, are typically used to analyze<br />
simple proteomes (small genome, organelle, or other subfraction), or to get an overview<br />
of a more complex proteome, respectively. Although at first glance the resolution of 2-D
- 37 -<br />
PAGE seems impressive, it is, however, still not sufficient compared to the enormous<br />
diversity of proteins from higher eukaryotic proteomes, where extensive co-and posttranslational<br />
modifications of proteins and differential gene splicing lead to expression of<br />
more proteins than the total number of genes in their genomes. With samples such as<br />
total lysates of eukaryotic cells or tissues, 2-D PAGE on a single wide-range <strong>pH</strong> gradient<br />
reveals only a small percentage of the whole proteome. The best remedy, preferably in<br />
combination <strong>with</strong> prefractionation procedures, is to use multiple narrow overlapping<br />
IPGs (“zoom-in” gels, e.g., IPG 4–5, IPG 4.5–5.5, or 5.0-6.0) and/or extended separation<br />
distances (up to 24 cm, or even longer) to achieve an optimal resolution to avoid multiple<br />
proteins in a single spot <strong>for</strong> unambiguous protein identification and to facilitate the<br />
application of higher protein amounts <strong>for</strong> the detection of minor components Wildgruber et<br />
al. (2000) have demonstrated the improved separation and visualization of the S.<br />
cerevisiae proteome by using narrow overlapping IPGs. Combining IPGs 4-5, 4.5-5.5, 5-<br />
6, 5.5-6.7 and 6-9 and excluding the overlap, so that every protein was counted only<br />
once, it was possible to detect three times more protein spots than in the IPG 3-10.<br />
Interestingly, not only did spots become further apart, but several single spots divided into<br />
two or more protein spots. This observation is in perfect agreement <strong>with</strong> the detection by<br />
mass spectrometry of different proteins in a single spot in about 10-40% of all spots<br />
detected on broader <strong>pH</strong> range IPG gels. Similarly, Westbrook et al. (2001) demonstrated<br />
not only improved resolution and higher spot numbers by using narrow-range IPGs, but<br />
also the identification by mass spectrometry of additional protein species and iso<strong>for</strong>ms of<br />
proteins from apparent single spots, or unresolved spot clusters, on broader-range IPGs.<br />
“Zoom“ gels in the acidic and neutral <strong>pH</strong> range between <strong>pH</strong> 4 and 7 (e.g., IPG 4-5, IPG<br />
4.5 - 5.5, IPG 5-6) work <strong>with</strong> in-gel rehydration or cup-loading. These gels are typically<br />
used <strong>for</strong> micropreparative purposes <strong>with</strong> sample loads up to several milligrams. In order<br />
to avoid protein precipitation and horizontal streaking, low voltages (approximately 50-100<br />
V) should be applied during the initial stage of IEF, in particular when samples are applied<br />
by cup-loading. Because of the high number of volthours (> 100,000) and concomitant<br />
long focusing time (up to 24h) required <strong>for</strong> focusing to the steady-state, the surface of the<br />
IPG strips has to be protected by a layer of silicone oil to prevent them from drying out.<br />
The paper strips beneath the electrodes should be removed after several hours and<br />
replaced by fresh ones. This is of particular importance when the sample contains high<br />
amounts of salt, but also to remove proteins <strong>with</strong> pIs outside the chosen <strong>pH</strong> interval (Görg<br />
et al., 2000). Much better results, however, are obtained when prefractionated samples<br />
are separated on “zoom“ gels (Zuo & Speicher 2001, 2002; Görg et al., 2002).<br />
Very long separation distances (> 30 cm) <strong>for</strong> maximum resolution of complex protein<br />
patterns have been described (Levenson et al., 1990). However, size, stability, and<br />
handling of the fragile tube gels used in carrier-ampholyte 2-DE is often a problem. This is<br />
in contrast to IPG gel strips, which are cast on plastic backings so that they can neither
- 38 -<br />
stretch nor shrink, which contributes significantly to improved reproducibility. Meanwhile,<br />
24 cm long IPG gel strips (Görg et al., 1999) are routine. Recently, 54 cm long IPG strips<br />
were successfully applied (Poland et al., 2003).<br />
IEF of very alkaline proteins<br />
Theoretical 2-D maps calculated from sequenced genomes indicate that approximately<br />
30% of all proteins possess alkaline pIs up to <strong>pH</strong> 12. Wide range IPGs 3-12 and 4-12<br />
(Görg et al., 1998, 1999) are ideally suited to provide an overview of the proteome of a<br />
cell or tissue. In particular, the IPG 4-12 which is flattened between <strong>pH</strong> 9-12, proved to be<br />
a most useful gradient <strong>for</strong> the separation of very alkaline proteins. Prefractionation<br />
procedures such as TCA/acetone precipitation of proteins are recommended <strong>for</strong><br />
enrichment and visualization of basic proteins exceeding pI 10, since these are usually<br />
not included in lysis buffer extracts of eukaryotic organisms (Görg et al., 2000).<br />
Strongly alkaline proteins such as ribosomal and nuclear proteins <strong>with</strong> closely related pIs<br />
between 10.5 and 11.8 were focused to the steady state by using IPGs 3-12, 6-12 and 9–<br />
12 (Görg et al., 1997; Wildgruber et al., 2002; Drews et al., 2004). For highly resolved 2-D<br />
patterns, different optimization steps <strong>with</strong> respect to <strong>pH</strong> engineering and gel composition<br />
were necessary, such as the substitution of dimethylacrylamide <strong>for</strong> acrylamide, the<br />
addition near the cathode of a paper strip soaked <strong>with</strong> DTT providing a continuous influx<br />
of DTT to compensate <strong>for</strong> the loss of DTT (which is a weak acid and migrates out of the<br />
basic part of the gel) (Görg et al., 1995; Altland et al., 1990), and the addition of<br />
isopropanol to the IPG rehydration solution in order to suppress the reverse<br />
electroendosmotic flow which causes highly streaky 2-D patterns in narrow <strong>pH</strong> range<br />
IPGs 9-12 and 10-12 (Görg et al., 1997). With the advent of the IPGphor, the procedure<br />
was greatly simplified by applying high voltages (8000 V) to shorten run times<br />
considerably, which permits ro run these IPGs under “standard“ conditions <strong>with</strong>out<br />
isopropanol, at least <strong>with</strong> analytical sample amounts (Wildgruber et al., 2002; Drews et<br />
al., 2004) (see Fig. 10).<br />
For optimized separation, cup-loading at the anode is mandatory, and the use of high<br />
voltages (final settings up to 8000 V) is strongly recommended (Görg et al., 2000;<br />
Wildgruber et al., 2002; Drews et al., 2004). With IPGs above <strong>pH</strong> 7, horizontal streaking<br />
due to DTT depletion can occur at the basic end. To avoid streaking, the cysteines should<br />
be stabilized as mixed disulfides by using hydroxyethyl-disulfide (HED) reagent<br />
(DeStreak TM GE Healthcare Lifesciences) in the IPG strip rehydration solution instead of<br />
a reductant. Besides the elimination of streaking, the use of HED results in a simplified<br />
spot pattern and improved reproducibility (Olsson et al., 2002).<br />
Analysis of very hydrophobic membrane proteins<br />
Analysis of very hydrophobic proteins such as integral membrane proteins remains a<br />
challenge <strong>for</strong> both 2-DE and LC-based proteomic approaches. Besides their low
- 39 -<br />
Figure 10A Steady-stade IEF of very alkaline proteins. Running conditions see Table 4.<br />
Figure 10B 2D database of very alkaline Lactococcus lactis proteins<br />
(http://www.wzw.tum.de/proteomik/lactis)
- 40 -<br />
solubility and their tendeny to aggregate and precipitate in aqueous media, many<br />
membrane proteins possess basic pIs and/or expressed in low copy numbers. Certain<br />
“loss“ of membrane proteins on 2-D gels may be attributed to the fact that these proteins,<br />
once solubilized, may in fact enter the IPG strips and also focus properly, but do not elute<br />
during the transfer step from first to second dimension. Nevertheless, some progress has<br />
been made towards improving solubilization and separation of membrane proteins, e.g.,<br />
by the introduction of thiourea and novel zwitterionic detergents which made it possible to<br />
display at least some membrane proteins on 2-DE gels.<br />
PROTOCOL: IPG-IEF<br />
Equipment<br />
IPGphor unit; IPGphor strip holders and cup loading strip holders; Multiphor II horizontal<br />
electrofocusing unit; power supply (3500 V); Multitemp II thermostatic circulator; IPG<br />
DryStrip Kit; sample cups; IEF sample applicator strip (GE Healthcare Lifesciences)<br />
I. IEF on the Multiphor unit. Running conditions <strong>for</strong> different IPGs<br />
Ia. Sample application by cup loading<br />
For analytical purposes, typically 50-100 µg of protein are applied onto a single, 180 mm<br />
long IPG gel strip, whereas <strong>for</strong> micropreparative purposes up to several mg of protein can<br />
be applied in case that GE Healthcare Lifesciences‘ Immobiline DryStrip Kit <strong>with</strong> sample<br />
cups is used. When IEF is per<strong>for</strong>med using the DryStrip Kit, the IPG gel strips can be<br />
covered by a layer of silicone oil (or Drystrip cover fluid) which is mandatory when running<br />
very basic <strong>pH</strong> gradients (e.g. IPG 10-12) (Görg et al., 1997) or narrow <strong>pH</strong> gradients <strong>with</strong><br />
long focusing times <strong>for</strong> micropreparative IPG-Dalt (Bjellqvist et al., 1993).<br />
Analytical IEF <strong>for</strong> multiple runs<br />
1. Cover the flat-bed cooling block <strong>with</strong> 2-3 ml of kerosene and place the rehydrated (see<br />
section 3.1.2) IPG gel strips (up to 40!) side by side, 1-2 mm apart, on it (Fig. 11). The<br />
acidic end of the IPG gel strips must face towards the anode!<br />
2. Cut two IEF electrode strips or paper strips prepared from 2 mm thick filter paper (e.g.<br />
MN 440, Macherey & Nagel, Germany) to a length corresponding to the width of all<br />
IPG gel strips lying on the cooling plate. Soak the electrode strips <strong>with</strong> deionized water<br />
(however not Milli-Q quality!) and remove excessive moisture by blotting <strong>with</strong> filter<br />
paper.<br />
3. Place the IEF electrode strips on top of the aligned IPG gel strips at the cathodic and<br />
anodic ends.
- 41 -<br />
Figure 11 IEF in individual IPG strips Figure 12 Storage of IPG strips after IEF<br />
4. When running basic IPGs (e.g. IPG 6-10 or IPG 10-12), an extra paper strip soaked<br />
<strong>with</strong> 20 mM DTT should be placed onto the IPG gel surface near the cathodic<br />
electrode strip. Alternatively, include the DeStreak TM reagent (GE Healthcare<br />
Lifesciences) instead of DTT in the IPG drystrip rehydration buffer (cf. Section 3.1.2).<br />
5. Apply silicone rubber frames (2 x 5 mm 2 internal diameter) onto the IPG gel surface, 5<br />
mm apart from anode or cathode, <strong>for</strong> sample application.<br />
6. Pipette the samples (not less than 20 µl, preferably dissolved in Lysis buffer) into the<br />
silicone frames. Protein concentration should not exceed 5-10 mg/ml. Otherwise,<br />
protein precipitation at the sample application area may occur. To avoid this, it is<br />
advantageous to dilute the sample <strong>with</strong> Lysis buffer and apply larger volumes instead<br />
(see below; Dry strip kit).<br />
7. Position the electrodes and press them gently down on top of the IEF electrode strips.<br />
8. Place the lid on the electrofocusing chamber, connect the cables to the power supply<br />
and start IEF. Running conditions depend on the <strong>pH</strong> gradient and the length of the IPG<br />
gel strips used. An appropriate time schedule <strong>for</strong> orientation is given in Table 2 (Görg<br />
et al., 2000). For improved sample entry, voltage is limited to 150 V (30-60 min), 300 V<br />
(30-60 min) and 600 V (30-60 min) at the beginning. Then continue <strong>with</strong> maximum<br />
settings of 3500 V to the steady state. Optimum focusing temperature is 20°C (Görg et<br />
al., 1991).<br />
9. After IEF, store those IPG gel strips which are not used immediately <strong>for</strong> second<br />
dimension run (and/or are kept <strong>for</strong> further reference) between two sheets of plastic film<br />
at -78 °C <strong>for</strong> up to several months (see Fig. 12).
- 42 -<br />
Table 2 Running conditions using the Multiphor II IEF unit (Görg et al., 2000)<br />
IPG strip length 180 mm<br />
Temperature 20°C<br />
Current max. 0.05 mA per IPG strip<br />
Power max. 0.2 W per IPG strip<br />
Voltage max. 3500 V<br />
I ANALYTICAL IEF<br />
Initial IEF:<br />
Cup loading (20-50 µL) In-gel rehydration (350 µL)<br />
150 V, 1-3 h* 150 V, 1-3h*<br />
300 V, 1-3 h* 300 V, 1-3 h*<br />
600 V, 1 h<br />
IEF to the steady state at 3500 V:<br />
1-1.5 <strong>pH</strong> units<br />
e.g. IPG 5-6 ..<br />
e.g. IPG 4-5.5<br />
3 <strong>pH</strong> units<br />
IPG 4-7 ..........<br />
IPG 6-9 ..........<br />
24 h<br />
20 h<br />
12 h<br />
12 h<br />
4 <strong>pH</strong> units<br />
IPG 4-8 .........<br />
IPG 6-10 .......<br />
5-6 <strong>pH</strong> units<br />
IPG 4-9 ........<br />
IPG 6-12 ......<br />
II EXTENDED SEPARATION DISTANCES (240 mm)<br />
IEF to the steady-state at 3500 V:<br />
IPG 3-12 ..... 8 h<br />
IPG 4-12 ..... 12 h<br />
IPG 5-6 ....... 40 h<br />
III MICROPREPARATIVE IEF<br />
Initial IEF:<br />
10 h<br />
10 h<br />
8 h<br />
8 h<br />
7 <strong>pH</strong> units<br />
IPG 3-10 L ....<br />
IPG 3-10 NL<br />
8-9 <strong>pH</strong> units<br />
IPG 3-12 ......<br />
IPG 4-12 .......<br />
Cup loading (100 µL) In-gel rehydration (350 µL)<br />
50 V, 12-16 h 50 V, 12-16 h<br />
300 V, 1 h 300 V, 1h<br />
IEF to the steady state at 3500 V:<br />
Focusing time of analytical IEF plus approximately 50%<br />
* Time required <strong>for</strong> initial IEF (sample entry) depends on salt concentration of the sample.<br />
The more salt, the longer.<br />
6 h<br />
6 h<br />
6 h<br />
8 h
- 43 -<br />
Analytical and micropreparative IEF using the DryStrip Kit<br />
The application of higher sample volumes (> 20 µl) is facilitated when the sample cups of<br />
the Immobiline DryStrip Kit are used (Fig. 13). A sample volume of 100 µl can be applied<br />
at a time, and it is possible to apply a total of up to 200 µl, portion by portion, onto a<br />
single IPG gel strip. Typical sample load is 50-100 µg protein/strip <strong>for</strong> silver stained 2-D<br />
patterns, whereas <strong>for</strong> preparative purposes up to 10 mg of protein from a cell lysate can<br />
be loaded onto a single IPG gel strip.<br />
For IEF in very basic (<strong>pH</strong> > 10), or <strong>for</strong> micropreparative runs in narrow <strong>pH</strong> gradients (<strong>pH</strong>range<br />
- 44 -<br />
4. Place the Immobiline strip aligner into the tray on top of the oil.<br />
5. Transfer the rehydrated IPG gel strips (gel-side up and acidic end towards the anode)<br />
into adjacent grooves of the aligner in the tray. Align the strips such that the anodic gel<br />
edges are lined up (Fig. 13).<br />
6. Cut two IEF electrode strips or paper strips prepared from 2 mm thick filter paper (e.g.<br />
MN 440, Macherey & Nagel, Germany) to a length corresponding to the width of all<br />
IPG gel strips lying in the tray. Soak the electrode strips <strong>with</strong> deionized water, remove<br />
excessive moisture by blotting <strong>with</strong> filter paper and place the moistened IEF electrode<br />
strips on top of the aligned strips near the cathode and anode.<br />
7. Position the electrodes and press them gently down on top of the IEF electrode strips.<br />
8. Put the sample cups on the sample cup bar. Place the cups high enough on the bar to<br />
avoid touching the gel surface. Put the sample cup bar in position so that there is a<br />
distance of a few millimeters between the sample cups and the anode (or cathode, in<br />
case of cathodic sample application).<br />
9. Move the sample cups into position, one sample cup above each IPG gel strip, and<br />
finally press down the sample cups to ensure good contact <strong>with</strong> each strip.<br />
10. Once the sample cups are properly positioned, pour about 80 ml of silicone oil (or<br />
Drystrip cover fluid) into the tray so that the IPG gel strips are completely covered. If<br />
the oil leaks into the sample cups, suck the oil out, re-adjust the sample cups and<br />
check <strong>for</strong> leakage again. Fill up each sample cup <strong>with</strong> a few drows of silicone oil.<br />
Note: In case of IEF using wide <strong>pH</strong> gradients in the range between <strong>pH</strong> 3 and 10, the<br />
oil-step can be omitted!<br />
11. Pipette the samples into the cups by underlaying. Watch again <strong>for</strong> leakage!<br />
12. Close the lid of the Multiphor II electrophoresis chamber and start the run according<br />
to the parameters given in Table 2. For improved sample entry, voltage is limited to<br />
low voltage <strong>for</strong> the first few hours. Then continue <strong>with</strong> maximum settings of 3500 V to<br />
the steady state. Optimum focusing temperature is 20°C (Görg et al., 1991).<br />
13. If sample volumes exceeding 100 µl are to be applied, pipette in 100 µl, run IEF <strong>with</strong><br />
limited voltage until the sample has migrated out of the cup. Then apply another 100 µl<br />
and repeat the procedure until the whole sample has been applied.<br />
14. When the IEF run is completed, remove the electrodes, sample cup bar and IEF<br />
electrode strips from the tray. Use clean <strong>for</strong>ceps and remove the IPG gel strips from<br />
the tray. Those IPG gel strips which are not used immediately <strong>for</strong> second dimension<br />
run and/or are kept <strong>for</strong> further reference are stored between two sheets of plastic film<br />
at -70°C up to several months (Fig. 12).
Ib. IEF of in-gel rehydrated samples<br />
- 45 -<br />
1. Cover the flat-bed cooling block of the horizontal IEF apparatus <strong>with</strong> 2-3 ml of<br />
kerosene and place the IPG gel strips which had been rehydrated <strong>with</strong> sample (cf.<br />
Section 3.1.2) on it. Line them up side by side and 1-2 mm apart. The acidic end of the<br />
IPG gel strips must face towards the anode! If IEF is per<strong>for</strong>med under a protective layer<br />
of silicone oil, use the DryStrip kit instead, however <strong>with</strong>out sample cups.<br />
2. Cut two IEF electrode strips to a length corresponding to the width of all IPG gel strips<br />
(and spaces between them) lying on the cooling plate. Soak the electrode strips <strong>with</strong><br />
deionized water and remove excessive moisture by blotting <strong>with</strong> filter paper.<br />
3. Place the IEF electrode strips on top of the aligned IPG gel strips at the cathodic and<br />
anodic gel ends. When running basic IPGs (e.g., IPG 6-10 or 8-12), put an extra paper<br />
strip soaked <strong>with</strong> 20 mM DTT on the surface of the IPG strips next to the cathode.<br />
Alternatively, include the DeStreak TM reagent (GE Healthcare Lifesciences) instead of<br />
DTT in the rehydration buffer.<br />
4. Position the electrodes and press them gently down on top of the IEF electrode strips.<br />
5. Place the lid on the electrofocusing chamber, connect the cables to the power supply<br />
and start IEF. Running conditions depend on the <strong>pH</strong> gradient and the length of the IPG<br />
gel strips. An appropriate time schedule <strong>for</strong> orientation is given in Table 2.<br />
For improved sample entry, voltage is limited to 150 V, 300 V and 600 V <strong>for</strong> 1 h each,<br />
followed by 3500 V to the steady state. Current is limited to 0.05 mA/IPG strip. Optimum<br />
focusing temperature is 20°C (Görg et al., 1991).<br />
6. After IEF, IPG gel strips which are not used immediately <strong>for</strong> second dimension run are<br />
stored between two sheets of plastic film at -70°C up to several months (Fig. 12).<br />
II. IEF using the IPGphor unit. Running conditions <strong>for</strong> different IPGs<br />
IPG-IEF <strong>for</strong> 2D electrophoresis can be simplified by the use of an integrated instrument,<br />
the IPGphor (Fig. 9) (Isalm et al., 1998). The IPGphor includes a Peltier element <strong>for</strong><br />
precise temperature control (between 19.5°C and 20.5°C) and a programmable power<br />
supply. The central part of this instrument are so-called strip holders made from an<br />
aluminium oxide ceramic, in which IPG strip rehydration <strong>with</strong> sample solution and IEF are<br />
per<strong>for</strong>med <strong>with</strong>out further handling after the strip is placed into the strip holder (Fig. 9).<br />
The IPGphor can handle up to 12 strip holders of different lengths (7, 11, 13, 18 or 24<br />
cm). Alternatively, the IPGphor can also be used <strong>with</strong> a cup loading procedure using cuploading<br />
strip holders or a multiple cup-loading strip holder (’Manifold’), which allow(s) the<br />
application of quantities up to 100 µl. The strip holder plat<strong>for</strong>m regulates temperature and
- 46 -<br />
serves as the electrical connector <strong>for</strong> the strip holders. Besides easier handling, a second<br />
advantage of the IPGphor is shorter focusing time, since IEF can be per<strong>for</strong>med at rather<br />
high voltage (up to 8000 V).<br />
The IPGphor is programmable and can store nine different programs. A delayed start is<br />
also possible, which allows the user to load the strip holders <strong>with</strong> sample dissolved in<br />
rehydration buffer in the afternoon, then automatically start IEF during the night so that<br />
IEF is finished the next morning.<br />
Typical running conditions <strong>for</strong> IEF using the IPGphor are given in Tables 3 & 4. As<br />
indicated earlier, low voltage (30-50 V) is applied during the rehydration step <strong>for</strong> improved<br />
sample entry of high Mr proteins into the polyacrylamide gel which otherwise can be a<br />
problem <strong>with</strong> sample in-gel rehydration. Then voltage is stepwise increased up to 8000 V<br />
(when IPG strips <strong>with</strong> separation distances < 11 cm are used, voltage should be limited to<br />
5000 V only). For optimum results <strong>for</strong> samples <strong>with</strong> high salt concentrations, or when<br />
narrow <strong>pH</strong> intervals are used, it is beneficial to insert moist filter paper pads (size: 4 x 4<br />
mm 2 ) between the electrodes and the IPG strip prior to raising voltage to 8000 V. After<br />
termination of IEF, the IPG strips are stored as described above (Fig. 12).<br />
IIa. IEF of in-gel rehydrated samples<br />
1. Apply the required number of strip holders onto the cooling plate / electrode contact<br />
area of the IPGphor (Fig. 9). Pipette the appropriate amount of sample-containing<br />
rehydration solution into the strip holders, lower the IPG dry strips gel-side down into<br />
the rehydration solution and overly <strong>with</strong> cover fluid (see section 3.1.2)<br />
2. Program the instrument (desired rehydration time, volthours, voltage gradient).<br />
3. After the IPG gel strips have been rehydrated (which requires six hours at least, but<br />
typically overnight), IEF starts according to the programmed parameters listed in Table<br />
4.<br />
4. After completion of IEF, store those IPG gel strips which are not used immediately <strong>for</strong><br />
second dimension run between two sheets of plastic film at -70°C (Fig. 12).<br />
IIb. IEF after sample cup loading<br />
When protein separation is per<strong>for</strong>med in alkaline <strong>pH</strong> ranges (> <strong>pH</strong> 10), much better<br />
separations are obtained by applying sample via cup loading on separately rehydrated<br />
IPG strips than by sample in-gel rehydration. Sampe cup loading is accomplished <strong>with</strong><br />
special cup-loading („universal“) IPGphor strip holders, or <strong>with</strong> a multiple cup-loading strip<br />
holder (’Manifold’) (Fig. 14).
- 47 -<br />
Figure 14 Individual cup loading strip holder (top) and multiple cup-loading strip holder<br />
(„Manifold“) (bottom)<br />
1. Rehydrate IPG drystrips <strong>with</strong> rehydration buffer, however <strong>with</strong>out sample, in a<br />
reswelling tray or cassette. After the IPG strips have been rehydrated, use clean<br />
<strong>for</strong>eceps to remove the reswollen IPG strips from the reswelling tray or reswelling<br />
cassette. Rinse them <strong>with</strong> deionized water and blot <strong>for</strong> a few seconds between two<br />
sheets of moist filter paper to remove excess liquid in order to prevent urea<br />
crystallization on the surface of the gel during IEF as described in section 3.1.2.<br />
2. Apply the required number of the cup-loading (or „universal“) IPGphor strip holders<br />
onto the cooling plate / electrode contact area of the IPGphor instrument, and make<br />
sure that the pointed (anodic) ends contact the anodic electrode area.<br />
Note: Instead of individual strip holders, the Manifold device may be used.<br />
3. Apply the rehydrated IPG gel strips into the cup-loading strip holders, gel side upwards<br />
and pointed (acidic) ends facing toward the anode. Make sure that the cathodic end of<br />
the IPG strip is approximately 1.5 cm from the end of the channel and in electrical<br />
contact <strong>with</strong> the elecrode rails via the electrode clips.
- 48 -<br />
4. Moisten two filter paper electrode pads (size: 4 x 10 mm 2 ) <strong>with</strong> deionzed water,<br />
remove excess liquid by blotting <strong>with</strong> a filter paper, and apply the moistended filter<br />
paper pads on the surface IPG gel at the anodic and cathodic ends of the IPG strip<br />
between the IPG gel and the electrodes.<br />
5. Position the the movable electrodes above the electrode filter paper pads. Clip the<br />
electrodes firmly onto the electrode paper pads.<br />
6. Position the movable sample cup either near the anode or cathode, and gently press<br />
the sample cup onto the surface of the IPG gel strip. The sample cup should <strong>for</strong>m a<br />
good seal <strong>with</strong> the IPG strip but not damage its surface.<br />
8. To confirm that the sample cup does not leak, pipette 100 µl of IPG cover fluid into the<br />
cup. If a leak is detected, remove the fluid and use a tissue paper to remove the cover<br />
fluid and reposition the sample cup. Check again <strong>for</strong> leakage. Remove the cover fluid<br />
be<strong>for</strong>e loading the sample.<br />
9. Overlay each IPG strip <strong>with</strong> 2-4 ml of cover fluid. If the fluid leaks into the sample cup,<br />
rearrange the cup and use tissue paper to remove the cover fluid from the cup. Check<br />
again <strong>for</strong> leakage, and pipette (50-100 µl) sample solution (Note: Do NOT apply less<br />
than 50 µl in the sample cup; do NOT use silicone oil or kerosene instead of IPG strip<br />
cover fluid!)<br />
10.Program the instrument (desired volthours, voltage gradient, temperature etc.) and<br />
run IEF according to the recommended settings in Tables 3 & 4.<br />
Note: Omit the low-voltage rehydration step recommended in Table 3 <strong>for</strong> sample ingel<br />
rehydration.<br />
11.After IEF is complete, procedded <strong>with</strong> equilibration (Section 3.2) and second<br />
dimension IEF (SDS-PAGE) (Section 3.3), or store the IPG strips, <strong>for</strong> up to several<br />
months, between two plastic sheets at –70°C.<br />
Notes / experimental tips:<br />
(1) When IPG strips <strong>with</strong> separation distances ≤ 110 mm are used, voltage should be<br />
limited to 5000 V.<br />
(2) Theoretically, no further intervention is required after the start of IEF until IEF has<br />
been completed. In practice, however, superior results are obtained if the<br />
electrode filter pads are replaced by new ones after the sample has entered the<br />
IPG strip. This is particularly important <strong>for</strong> samples that contain high amounts of<br />
salts and/or protein, or when very alkaline IPGs (e.g., IPG 6-12 or IPG 9-12) are<br />
used. In these cases, the filter paper pads should be replaced every 2 hours.
- 49 -<br />
Table 3 IPGphor running conditions (<strong>for</strong> sample cup-loading or in-gel rehydration)<br />
Gel length 180 mm<br />
Temperature 20°C<br />
Current max. 0.05 mA per IPG strip<br />
Voltage max. 8000 V<br />
I ANALYTICAL IEF<br />
Reswelling*: • 30 V, 12 - 16 h*<br />
Initial IEF:<br />
IEF to the steady-state:<br />
1-1.5 <strong>pH</strong> units<br />
e.g. IPG 5-6 ..<br />
e.g. IPG 4-5.5<br />
3 <strong>pH</strong> units<br />
IPG 4-7 ..........<br />
8 h<br />
8 h<br />
4 h<br />
II MICROPREPARATIVE IEF<br />
• 200 V, 1 h, 500 V, 1h, 1000 V, 1h<br />
• Gradient from 1000 V to 8000 V <strong>with</strong>in 30 min<br />
• 8000 V to the steady-state, depending on the <strong>pH</strong><br />
used used:<br />
4 <strong>pH</strong> units<br />
IPG 4-8 ............<br />
5-6 <strong>pH</strong> units<br />
IPG 4-9 ............<br />
4 h<br />
4 h<br />
Reswelling*: • 30 V, 12-16 h*<br />
IEF to the steady state: • Focusing time of analytical IEF<br />
+ additional 50% (approx.)<br />
7 <strong>pH</strong> units<br />
IPG 3-10 L .....<br />
IPG 3-10 NL ..<br />
8-9 <strong>pH</strong> units<br />
IPG 3-12 .......<br />
IPG 4-12 .......<br />
* Omit the low-voltage reswelling step in case of sample cup-loading<br />
Table 4 IPGphor running conditions <strong>for</strong> very alkaline IPGs (sample cup loading)<br />
Gel length 180 mm<br />
Temperature 20°C<br />
Current max. 0.07 mA per IPG strip<br />
Voltage max. 8000 V<br />
IPGs 6-12, 9-12, 10-12<br />
Sample application anodic<br />
Initial IEF:<br />
IEF to the steady-state:<br />
Total volthours: • 32,000 Vh<br />
• 150 V, 1 h<br />
• 300 V, 1h<br />
• 600 V, 1h<br />
• Gradient from 600 V to 8000 V <strong>with</strong>in 30 min<br />
• 8000 V to the steady-state<br />
3 h<br />
3 h<br />
3 h<br />
3 h
- 50 -<br />
3.2 IPG strip equilibration <strong>for</strong> proper protein transfer and pattern<br />
quality<br />
Prior to the second-dimension separation (SDS-PAGE), it is essential that the IPG strips<br />
are equilibrated to allow the separated proteins to fully interact <strong>with</strong> SDS. Due to the<br />
observation that the focused proteins bind more strongly to the fixed charged groups of<br />
the IPG gel matrix than to carrier ampholyte gels, relatively long equilibration times (10–<br />
15 minutes), as well as urea and glycerol to reduce electroendosmotic effects are<br />
required to improve protein transfer from the first to the second dimension (Görg et al.,<br />
1988). Thiourea is sometimes recommended <strong>for</strong> more efficient transfer of hydrophobic<br />
proteins (Pasquali et al., 1997), but may cause vertical streaks in the 2-DE pattern. The<br />
by far most popular protocol is to incubate the IPG strips <strong>for</strong> 10–15 minutes in the buffer<br />
originally described by Görg et al. (1987) [50 mM Tris-HCl (<strong>pH</strong> 8.8), containing 2% (w/v)<br />
SDS, 1% (w/v) dithiothreitol (DTT), 6 M urea and 30% (w/v) glycerol]. This is followed by<br />
a further 10–15 minute equilibration in the same solution containing 4% (w/v) iodoacetamide<br />
instead of DTT (Fig. 15). The latter step is used to alkylate any free DTT, as<br />
otherwise it migrates through the second-dimension SDS-PAGE gel, resulting in an<br />
artifact known as point-streaking that can be observed after silver staining. More<br />
importantly, iodoacetamide alkylates sulfhydryl groups and prevents their reoxidation.<br />
This two-step reduction/alkylation procedure is highly recommended, since it considerably<br />
simplifies downstream sample preparation (protein in-gel digestion) <strong>for</strong> spot identification<br />
by mass spectrometry. After equilibration, the IPG strips are applied onto the surface of<br />
the second-dimension horizontal or vertical SDS-PAGE gels.<br />
Figure 15 Reduction-Alkylation of proteins (Görg et al., 1987, 1988)<br />
Loss of proteins during the equilibration step and subsequent transfer from the first to the<br />
second dimension has been reported and is primarily due to (i) proteins which remain in
- 51 -<br />
the IPG strip because of adsorption to the IPG gel matrix and/or insufficient equilibration<br />
times, and (ii) wash-off effects. Experiments <strong>with</strong> radioalabelled proteins have shown that<br />
up to 20% of the proteins get lost during equilibration (Zuo 2000). The majority of these<br />
proteins (most probably, those located near the surface of the IPG strip) is lost during the<br />
very first minutes of equilibration and is quite reproducible <strong>for</strong> a given sample, whereas<br />
protein losses in the second equilibration step are only marginal.<br />
PROTOCOL: IPG strip equilibration<br />
MATERIALS<br />
Chemicals<br />
Sodium dodecyl sulfate (SDS) (Serva), iodoacetamide, D,L-dithiothreitol (DTT)<br />
tris(hydroxymethyl)aminomethane (Tris) (Sigma), bromophenol blue, glycerol, urea,<br />
sodium azide (Merck)<br />
Reagents<br />
• Bromophenol blue solution [0.25% (w/v) of bromophenol blue in Tris-HCl buffer]<br />
To make 20 ml, dissolve 50 mg of bromophenol blue in 20 ml of Tris-HCl buffer. Store<br />
at 4°C.<br />
• Equilibration buffer [6 M urea, 30% (w/v) glycerol, 2% (w/v) SDS in 0.05 M Tris-HCl<br />
buffer, (<strong>pH</strong> 8.8)]. To make 500 ml, combine 180 g of urea, 150 g of glycerol, 10 g of<br />
SDS and 16.7 ml of Tris-HCl buffer. Dissolve in deionized H2O and adjust the volume<br />
to 500 ml. This buffer can be stored at room temperature up to 2 weeks.<br />
• Tris-HCl buffer [1.5 M Tris-HCl (<strong>pH</strong> 8.8), 0.4% (w/v) SDS]. To make 25 ml, dissolve<br />
4.55 g of Tris base (GE Healthcare Lifesciences) and 0.1 g of SDS in about 20 ml of<br />
deionized H2O. Adjust the <strong>pH</strong> of the solution <strong>with</strong> 4 N HCl and adjust the volume to 25<br />
ml <strong>with</strong> deionized H2O. Add 2.5 mg of sodium azide, and filter. The buffer can be<br />
stored at 4°C up to 2 weeks<br />
Equipment<br />
Glass test tubes <strong>for</strong> equilibration (200–250 mm long; 20 mm internal diameter); laboratory<br />
shaker; parafilm<br />
METHOD<br />
1. Dissolve 100 mg of DTT in 10 ml of equilibration buffer to make equilibration buffer<br />
A. Make 10 ml per IPG strip. Place the focused IPG strips into individual test<br />
tubes (Fig. 16). Add 10 ml of equilibration buffer A and 50 µl of bromophenol blue<br />
solution to each tube. Seal the tubes <strong>with</strong> Parafilm, rock them <strong>for</strong> 15 minutes on a<br />
shaker, and pour off the equilibration buffer.
- 52 -<br />
Figure 16 Equilibration of IPG strips prior to SDS-PAGE<br />
2. Dissolve 0.4 g of iodoacetamide in 10 ml of equilibration buffer to make equilibration<br />
buffer B. Make 10 ml per sample. Add this buffer and 50 µl of bromophenol blue<br />
solution to each tube, and equilibrate <strong>for</strong> another 15 minutes <strong>with</strong> gentle agitation.<br />
Note: Shorter equilibration times (10 min) may be applied, however at the risk that some<br />
proteins may not migrate out of the IPG gel strip during sample entry into the SDS gel.<br />
3. Pour off equilibration buffer B, and proceed to SDS-PAGE (see section 3.3). If SDS-<br />
PAGE is per<strong>for</strong>med on a horizontal electrophoresis unit (e.g., Multiphor II), briefly rinse<br />
the IPG gel strip <strong>with</strong> deionized water and place it on a piece of filter paper at one<br />
edge <strong>for</strong> a few minutes to drain off excess equilibration buffer. If SDS-PAGE is<br />
per<strong>for</strong>med on a vertical electrophoresis unit (e.g., Ettan Dalt), briefly rinse the<br />
equilibrated IPG strip <strong>with</strong> electrode buffer.<br />
Table 5 IPG strip equilibration protocol (Görg et al., 1987, 1988)<br />
Reagent Purpose<br />
50 mM Tris-Hcl <strong>pH</strong> 8.8<br />
+ 2% SDS Improved protein transfer from IPG strip into SDS gel<br />
+ 6 M urea Improved protein transfer from IPG strip into SDS gel<br />
+ 30% glycerol Improved protein transfer from IPG strip into SDS gel<br />
+ 1% dithiothreitol Complete reduction of disulfide bonds<br />
Removal of excell DTT (no point streaking)<br />
+ 4% iodoacetamide Alkylation of SH-groups<br />
Simplifies sample preparation <strong>for</strong> mass spectrometry<br />
Dithiothreitol Iodoacetamide<br />
1 st step, 15 min + -<br />
2 nd step, 15 min - +
- 53 -<br />
3.3 Second Dimension: SDS-PAGE on horizontal and vertical systems<br />
SDS-PAGE can be per<strong>for</strong>med on horizontal or vertical systems (Görg et al., 1995).<br />
Horizontal setups (Görg & Weiss, 1999) are ideally suited <strong>for</strong> ready-made gels (e.g.,<br />
ExcelGel SDS; GE Healthcare Lifesciences), whereas vertical systems are preferred <strong>for</strong><br />
multiple runs in parallel, in particular <strong>for</strong> large-scale proteome analysis which usually<br />
requires simultaneous electrophoresis of batches of second-dimension SDS-PAGE gels<br />
<strong>for</strong> higher through-put and maximal reproducibility (Anderson & Anderson 1978). The<br />
most commonly used buffers <strong>for</strong> the second dimension of 2-DE are the discontinuous<br />
buffer system of Laemmli (1970) and modifications thereof, although <strong>for</strong> special purposes<br />
other buffer systems are employed, such as borate buffers <strong>for</strong> the separation of highly<br />
glycosylated proteins (Patton et al., 1991). Typically, gel sizes of 20 x 25 cm 2 and a gel<br />
thickness of 1.0 mm are employed. In contrast to horizontal SDS-PAGE systems, it is not<br />
necessary to use stacking gels <strong>with</strong> vertical setups, as the protein zones <strong>with</strong>in the IPG<br />
strips are already concentrated and the nonrestrictive, low polyacrylamide concentration<br />
IEF gel acts as a stacking gel (Dunn, 1993).<br />
The analysis of low Mr (< 15 kDa) and high Mr (> 150 kDa) proteins is somewhat intricate<br />
since there is no “standard“ 2-DE system which effectively allows separation of proteins<br />
over the entire Mr range between 5 kDa and 500 kDa. A common approach is to combine<br />
several gels optimized <strong>for</strong> the approximate Mr ranges 5-30 kDa, 15-200 kDa, and > 150<br />
kDa instead of using a single “standard“ 2-DE system, or to use polyacrylamide „pore“<br />
gradient gels. Conventional Tris-glycine gels do not allow efficient separation of proteins<br />
below 15 kDa. Hence, Schägger & von Jagow (1987) have described a Tris-Tricine buffer<br />
systems <strong>for</strong> the separation of low Mr (3-30 kDa) polypeptides. Fountoulakis et al. (1998)<br />
have improved this gel system, which permits efficient and reproducible separation of<br />
proteins <strong>with</strong> Mrs between 5 kDa and 20 kDa.<br />
The major problem associated <strong>with</strong> high Mr proteins is that a significant proportion of<br />
these proteins is rather hydrophobic, and, consequently, will not readily dissolve in<br />
“standard“ urea lysis and/or rehydration solutions used <strong>for</strong> sample solubilization and IEF.<br />
Even though these proteins were solubilized, they will not always enter the IEF gel matrix,<br />
or are not transferred from the first to the second dimension. Several strategies have<br />
been proposed to overcome at least some of these obstacles. For example, it has been<br />
demonstrated that sample application of high Mr proteins to IPG gels via cup-loading is<br />
more efficient than “passive“ sample application by sample in-gel rehydration If samples<br />
are applied by in-gel rehydration, “active“ reswelling by applying low voltage (30 - 50V)<br />
during the rehydration step is superior to “passive“ loading and improves the entry of high<br />
Mr proteins into the polyacrylamide matrix (Görg et al., 2000). The transfer of high Mr<br />
proteins from the IPG strip onto the SDS gel is enhanced by sufficiently long equilibration<br />
steps (2 x 15 min; see Section 3.2). The same holds true <strong>for</strong> application of low voltages
- 54 -<br />
during the transfer step, i.e., 50 V <strong>for</strong> vertical SDS gels, and 100 V <strong>for</strong> horizontal SDS-<br />
PAGE systems, respectively (Görg et al., 2000).<br />
3.3.1 SDS Gel casting<br />
Due to simplified handling and higher reproducibility, in most cases, SDS gels of a<br />
homogeneous polyacrylamide concentration are preferred, but polyacrylamide<br />
concentration (“pore”) gradients, which extend the range over which proteins of different<br />
molecular mass can be effectively separated, are also used. The following protocol<br />
describes the procedure <strong>for</strong> casting horizontal SDS pore gradient gels on plastic backing<br />
according to Görg et al. (1980), and multiple SDS slab gel casting according to Anderson<br />
and Anderson (1978). Our preferred gel thickness is 0.5 mm <strong>for</strong> horizontal, and 1.0 mm<br />
<strong>for</strong> vertical SDS gels. Typical polyacrylamide concentrations are 10% -15%, which allows<br />
effective separation of proteins <strong>with</strong> Mrs between 10 kDa and 150 kDa.<br />
PROTOCOL: SDS gel casting<br />
MATERIAL<br />
Note: Not all of the materials listed below are required <strong>for</strong> all types of gels.<br />
Chemicals<br />
Repel silane, ammonium persulfate, acrylamide, methylene bisacrylamide, tetramethylethylenediamine<br />
(TEMED) (GE Healthcare Lifesciences); Serdolit MB-1 mixed bed ion<br />
exchanger resin, sodium dodecyl sulfate (SDS) (Serva), tris(hydroxymethyl)<br />
aminomethane (Tris) (Sigma), glycerol, sodium azide (Merck).<br />
Reagents <strong>for</strong> horizontal SDS gels on plastic backing<br />
• Acrylamide/Bisacrylamide solution (30% T, 3% C): 29.1% (w/v) acrylamide and 0.9%<br />
(w/v) methylenebisacrylamide in deionized water.<br />
To make 100 ml, dissolve 29.1 g of acrylamide and 0.9 g of methylenebisacrylamide in<br />
deionized water and fill up to 100 ml. Add 0.5 g of Serdolit MB-1, stir <strong>for</strong> 10 min and<br />
filter. The solution can be stored up to 2 weeks in a refrigerator.<br />
• Stacking gel buffer stock: 0.5 M Tris-HCl, <strong>pH</strong> 6.8 and 0.4 % (w/v) SDS.<br />
To make 100 ml, dissolve 6.05 g of Trizma base and 0.4 g of SDS in about 80 ml of<br />
deionized water. Adjust to <strong>pH</strong> 6.8 <strong>with</strong> 4N HCl and fill up to 100 ml <strong>with</strong> deionized<br />
water. Add 10 mg of sodium azide and filter. The buffer can be stored at 4°C <strong>for</strong> two<br />
weeks.
- 55 -<br />
Note: In most cases, stacking gel buffer can be replaced by resolving gel buffer<br />
<strong>with</strong>out any loss of resolution.<br />
• Resolving gel buffer stock: 1.5 M Tris-HCl, <strong>pH</strong> 8.8 and 0.4% (w/v) SDS<br />
To make 100 ml , dissolve 18.15 g of Trizma base and 0.4 g of SDS in about 80 ml of<br />
deionized water. Adjust to <strong>pH</strong> 8.8 <strong>with</strong> 4N HCl and fill up to 100 ml <strong>with</strong> deionized<br />
water. Add 10 mg of sodium azide and filter. The buffer can be stored at 4°C up to two<br />
weeks.<br />
• Ammonium persulfate solution: 40% (w/v) of ammonium persulfate in deionized water.<br />
To prepare 1 ml of the solution, dissolve 0.4 g of ammonium persulfate in 1 ml of<br />
deionized water. This solution should be prepared fresh be<strong>for</strong>e use.<br />
Reagents <strong>for</strong> multiple vertical SDS gels<br />
• Acrylamide/Bisacrylamide solution (30.8% T, 2.6% C): 30% (w/v) acrylamide and 0.8%<br />
(w/v) methylenebisacrylamide in deionized water.<br />
To make 1000 ml, dissolve 300.0 g of acrylamide and 8.0 g of methylenebisacrylamide<br />
in deionized water and fill up to 1000 ml. Add 1 g of Serdolit MB-1, stir<br />
<strong>for</strong> 10 min and filter. The solution can be stored up to 2 weeks in a refrigerator.<br />
• Resolving gel buffer: 1.5 M Tris-HCl, <strong>pH</strong> 8.6 and 0.4% (w/v) SDS (Laemmli 1970).<br />
To make 500 ml, dissolve 90.85 g of Trizma base and 2 g of SDS in about 400 ml of<br />
deionized water. Adjust to <strong>pH</strong> 8.6 <strong>with</strong> 4 N HCl and fill up to 500 ml <strong>with</strong> deionized<br />
water. Add 50 mg of sodium azide and filter. The buffer can be stored at 4°C up to 2<br />
weeks.<br />
• Ammonium persulfate solution: 10% (w/v) of ammonium persulfate in deionized water.<br />
To prepare 10 ml of the solution, dissolve 1.0 g of ammonium persulfate in 10 ml of<br />
deionized water. This solution should be prepared just be<strong>for</strong>e use.<br />
• Overlay buffer: Buffer-saturated 2-butanol. To make 30 ml, mix 20 ml of resolving gel<br />
buffer (see above) <strong>with</strong> 30 ml of 2-butanol, wait <strong>for</strong> a few minutes and pipette off the<br />
butanol layer.<br />
• Displacing-solution: 50% (v/v) glycerol in deionized water and 0.01% (w/v) bromophenol<br />
blue. To make 500 ml, mix 250 ml of glycerol (100%) <strong>with</strong> 250 ml of deionized<br />
water, add 50 mg of bromophenol blue and stir <strong>for</strong> a few minutes.<br />
Equipment<br />
Gradient mixer (2 x 15 ml), glass plates <strong>with</strong> a 0.5 mm thick U-framed spacer (200 x 260<br />
mm 2 ), plain glass plates (size 200 x 260 mm 2 ), spacers (1 mm thick), clamps, GelBond<br />
PAGfilm (200 x 260 mm 2 ), roller (GE Healthcare Lifesciences), heating cabinet (Heraeus,<br />
Germany), Milli-Q System (Millipore)
METHOD<br />
- 56 -<br />
I. Casting of horizontal SDS gels on plastic backing<br />
1. Assemble the polymerisation cassette consisting of two glass plates, one covered <strong>with</strong><br />
GelBond PAGfilm, the other bearing the U-frame (0.5 mm thick) as described in<br />
Section 3.1.1 <strong>for</strong> casting IPG gels (see Fig. 13). GelBond PAGfilms should be washed<br />
6 x 10 min <strong>with</strong> deionized water prior to use to avoid spot streaking upon<br />
silverstaining.<br />
2. Immediately be<strong>for</strong>e casting add 5 µl of TEMED and 10 µl of ammonium persulfate to<br />
the SDS gel solutions (Table 6). For casting an SDS gel (size 250 x 190 x 0.5 mm 3 )<br />
<strong>with</strong> a stacking gel length of 50 mm, pipette 6.0 ml of stacking gel solution into the<br />
precooled (4°C) cassette. Then cast the pore gradient on top of the stacking gel by<br />
mixing 9.0 ml of the dense (9% or 12% T, 25% glycerol) and 9.0 ml of the light (15% or<br />
18% T, no glycerol) solution <strong>with</strong> the help of a gradient mixer in the same way as<br />
described in section 3.1.1 <strong>for</strong> casting IPG gels. The high glycerol concentration of the<br />
stacking gel solution allows overlaying of the pore gradient mixture <strong>with</strong>out an<br />
intermediate polymerization step (Fig. 17 A).<br />
Note: Pore gradient gels as well as SDS gels <strong>with</strong> an identical polyacrylamide<br />
concentration in the resolving gel („homogeneous gels“) may be used <strong>for</strong> the second<br />
dimension. For casting homogeneous SDS gels, the stacking gel solution is simply<br />
overlayed <strong>with</strong> resolving gel solution <strong>with</strong> the help of a pipette (Fig. 17 B).<br />
3. After pouring, leave the cassette <strong>for</strong> 15 min at room temperature to allow adequate<br />
levelling of the density gradient. Then place it in a heating cabinet at 50°C <strong>for</strong> 30 min<br />
<strong>for</strong> polymerization. The polymerized gel can be stored in a refrigerator overnight.<br />
A B<br />
Figure 17 (A) Casting of horizontal SDS pore gradient gels and (B) homogeneous SDS<br />
gels on plastic backing
- 57 -<br />
Gel composition: stacking gel (50 mm long): 6% T, 3% C, 0.1% SDS,<br />
125 mM Tris/HCl <strong>pH</strong> 6.8<br />
Gel size: 190 x 250 x 0.5 mm 3<br />
(alternatively: 375 mM Tris/HCl <strong>pH</strong> 8.8; 0.1 % SDS<br />
resolving gel (140 mm long): 9-18 % T or 12-15% T,<br />
3% C, 0.1% SDS, 375 mM Tris/HCl <strong>pH</strong> 8.8<br />
Table 6 Recipes <strong>for</strong> casting SDS pore gradient gels (9-18%T or 12-15%T, 3%C)<br />
Stacking gel Resolving gel Resolving gel<br />
dense light dense light<br />
solution solution solution solution<br />
6% T 9% T 18% T 12% T 15% T<br />
Glycerol (100%) 3.75 g 2.5 g _ 2.5 g _<br />
Stacking gel buffer* 2.5 ml _ _ _ _<br />
Resolving gel buffer _ 2.5 ml 2.5 ml 2.5 ml 2.5 ml<br />
Acrylamide/Bisacrylamide<br />
2.0 ml 3.0 ml 6.0 ml 4.0 ml 5.0 ml<br />
Deionized water 2.5 ml 2.5 ml 1.5 ml 1.5 ml 2.5 ml<br />
TEMED (100%) 5 µl 5 µl 5 µl 5 µl 5 µl<br />
Ammonium<br />
persulfate (40%)<br />
10µl 10µl 10µl 10µl 10µl<br />
Final volume 10 ml 10 ml 10 ml 10 ml 10 ml<br />
Notes: (1) Stacking gel buffer can be substituted by resolving gel buffer; (2) TEMED and<br />
ammonium persulfate are added to the solutions immediately be<strong>for</strong>e gel casting<br />
II. Casting of vertical SDS gels <strong>for</strong> multiple runs<br />
Vertical SDS-PAGE is usually per<strong>for</strong>med in the DALT apparatus originally described by<br />
Anderson & Anderson (1978), or in the Ettan Dalt II vertical electrophoresis unit. These<br />
systems allow 12 (Ettan Dalt II) or even 20 (Dalt apparatus) SDS slab gels to be run<br />
simultaneously under identical conditions. A stacking gel is usually not necessary <strong>with</strong><br />
these instruments. Ready-made gels on plastic backing (GE Healthcare Lifesciences) <strong>for</strong><br />
the Ettan Dalt II electrophoresis unit are also available.
- 58 -<br />
1. The gel casting cassettes (200 x 250 mm 2 ) are made in the shape of books consisting<br />
of two glass plates connected by a hinge strip, and two 1.0 mm thick spacers in<br />
between them. Stack 22 cassettes (Dalt apparatus) or 14 cassettes (Ettan Dalt II)<br />
vertically into the gel casting box <strong>with</strong> the hinge strips to the right, interspersed <strong>with</strong><br />
plastic sheets (e.g., 0.05 mm thick polyester sheets). The stack is firmly held in<br />
position <strong>with</strong> a 10 mm thick polyurethane sheet on both ends.<br />
2. Put the front plate of the casting box in place and screw on the nuts (hand tight).<br />
3. Connect a polyethylene tube (i.d. 5 mm) to a funnel held in a ring-stand at a level of<br />
about 30 cm above the top of the casting box. The other end of the tube is placed in<br />
the grommet in the casting box side chamber (Fig. 18).<br />
4. Fill the side chamber <strong>with</strong> heavy displacing solution.<br />
5. Immediately be<strong>for</strong>e gel casting, add TEMED and ammonium persulfate solutions to<br />
the gel solution (Table 8). To cast the gels, the gel solution (1400 ml in case of the<br />
Dalt chamber, and 950 ml in case of the Ettan II unit) is poured into the funnel. Avoid<br />
introduction of any air bubbles into the tube!<br />
Notes: (1) Do not fill the cassettes <strong>with</strong> acrylamide solution completely, as some<br />
space at the top (~10 mm) is needed to fix the IPG strip to the SDS gel <strong>with</strong> hot<br />
agarose. (2) It is also possible to cast polyacrylamide contentration gradient SDS gels<br />
–<strong>with</strong> the help of a gradient maker- as described <strong>for</strong> horizontal SDS pore gradient gels.<br />
6. When pouring is complete, the tube is removed from the side chamber grommet so<br />
that the level of the displacing solution in the side chamber falls.<br />
7. Very carefully pipette about 1 ml of overlay buffer onto the top of each gel in order to<br />
obtain a smooth, flat gel top surface.<br />
8. Allow the gels to polymerize <strong>for</strong> at least three hours at room temperature, but<br />
preferably over night <strong>for</strong> higher reproducibility.<br />
9. After gel polymerization, remove the front of the casting box and carefully unload the<br />
gel cassettes from the box, using a blade to separate the cassettes. Remove the<br />
polyester sheets which had been placed between the individual cassettes.<br />
10.Wash each cassette <strong>with</strong> water to remove any acrylamide adhered to the outer<br />
surface and drain excess liquid off the top surface. Discard unsatisfactory gels, in<br />
particular gels <strong>with</strong> uneven thickness, i.e., usually those at the outer edges of the gel<br />
casting cassette.<br />
11.Gels that are not needed immediately can be wrapped in plastic wrap and stored in a<br />
refrigerator (4 °C) <strong>for</strong> up to two days.
- 59 -<br />
Gel composition: no stacking gel<br />
Gel size: 200 x 250 x 1 mm 3<br />
Figure 18 Multiple vertical SDS gel casting<br />
resolving gel: 10%T, 12.5%T or 15%T homogeneous,<br />
2.6%C, 375 mM Tris/HCl <strong>pH</strong> 8.8, 0.1% SDS<br />
Table 7 Recipes <strong>for</strong> casting homogeneous vertical SDS gels (10%, 12.5%, or 15% T)<br />
Resolving gel 10% T, 12.5% T, 15% T,<br />
2.6% C 2.6% C 2.6% C<br />
Acrylamide/Bisacrylamide (30.8%T, 2.6%C) 455 ml 568 ml 682 ml<br />
Gel Buffer 350 ml 350 ml 350 ml<br />
Glycerol (100 %) 70.0 g 70.0 g 70.0 g<br />
Deionized water 532 ml 419 ml 305 ml<br />
TEMED (100%) 66 µl 66 µl 66 µl<br />
Ammonium persulfate (10%) 7.0 ml 7.0 ml 7.0 ml<br />
Final volume 1400 ml 1400 ml 1400 ml
3.3.2 Running SDS gels<br />
- 60 -<br />
The second dimension can be per<strong>for</strong>med on horizontal or vertical electrophoresis<br />
systems (Görg et al. 1988, 1995). Horizontal setups are ideally suited <strong>for</strong> ready-made<br />
gels on film supports (e.g., ExcelGel SDS), whereas vertical systems (e.g., the Ettan-<br />
DALT multiple slab gel unit) are preferred <strong>for</strong> multiple runs in parallel. However, readymade<br />
SDS gels are also available <strong>for</strong> vertical systems.<br />
For horizontal setups, laboratory-made or ready-made SDS polyacrylamide gels (0.5 mm<br />
thick on GelBond PAGfilm) are placed on the cooling plate of the horizontal electrophoresis<br />
unit. Electrode wicks or buffer strips made from polyacrylamide are then applied.<br />
The equilibrated IPG strip(s) is (are) simply placed gel side down onto the surface<br />
alongside the cathodic electrode wick or polyacrylamide buffer strip <strong>with</strong>out any<br />
embedding procedure. In the vertical setup, the equilibrated IPG gel strips are placed on<br />
top of the vertical SDS gels and embedded in hot agarose.<br />
PROTOCOLS<br />
MATERIAL<br />
Chemicals<br />
Sodium dodecyl sulfate (SDS) (Serva), agarose (low-melting, low electro-endosmosis),<br />
tris(hydroxymethyl)aminomethane (Tris) (Sigma), Bromophenol blue, glycerol, glycine,<br />
sodium azide (Merck), Mr marker proteins (BioRad)<br />
Ready-made polyacrylamide gels<br />
ExcelGel SDS 12-14 and buffer strips; ready-made DALT gel 12.5 (optional) (GE<br />
Healthcare Lifesciences).<br />
Reagents <strong>for</strong> horizontal SDS gels<br />
• Electrode buffer<br />
To make 1000 ml of a 10x solution add: 30.3 g of Trizma base, 144 g of glycine, 10.0<br />
g of SDS and 100 mg of sodium azide. Dissolve in deionized water, fill up to 1000 ml<br />
and filter. Electrode buffer stock solution can be kept at room temperature <strong>for</strong> up to<br />
one week. Be<strong>for</strong>e use, mix 100 ml of the buffer <strong>with</strong> 900 ml of deionized water.<br />
Reagents <strong>for</strong> vertical SDS gels<br />
• Electrode buffer stock solution (96 mM Tris, 800 mM Glycine, 0.4% SDS)<br />
To make 4x electrode buffer concentrate, dissolve 58.0 g of Trizma base, 299.6 g of<br />
glycine and 20.0 g of SDS in deionized water Adjust the volume to 5.0 liters.<br />
• Agarose solution (0.5%)
- 61 -<br />
Suspend 1.0g of agarose in 90 ml of electrode buffer stock solution + 100 ml of<br />
deionized water and melt it in a boiling water bath or in a microwave oven. Then add<br />
10 ml of bromophenol blue solution (50 mg of bromophenol blue dissolved in 10 ml of<br />
electrode buffer stock solution).<br />
Equipment<br />
Multiphor II horizontal electrophoresis apparatus, power supply, Multitemp II thermostatic<br />
circulator, DALT or Ettan Dalt II vertical electrophoresis system, cassette rack (GE<br />
Healthcare Lifesciences), electrode wicks (200 x 250 mm 2 , Ultra pure), Milli-Q System<br />
(Millipore)<br />
Note: A cassette rack is recommended <strong>for</strong> storing Dalt cassettes in an upright position to<br />
facilitate the application of the IPG strips.<br />
METHOD<br />
I. SDS electrophoresis of horizontal gels on plastic backing<br />
Ia. SDS-PAGE <strong>with</strong> laboratory-made gels<br />
1. Fill the buffer tanks of the electrophoresis unit <strong>with</strong> electrode buffer (Laemmli (1970)<br />
buffer system). Soak two sheets of filter paper (size 250 x 200 mm 2 ) in electrode buffer<br />
and put them on the cooling block (15°C). Soak the electrode wicks (size 250 x 100<br />
mm 2 ) in electrode buffer. Place them at the edges of the buffer-soaked filter papers<br />
and per<strong>for</strong>m a pre-run (600 V, 30 mA) <strong>for</strong> 3 h to remove impurities from the electrode<br />
wicks. Then remove the filter papers and discard them whereas the purified electrode<br />
wicks remain in the electrode buffer tanks and are used repeatedly.<br />
2. During the equilibration step of the IPG gel strips (see Section 3.2), open the gel<br />
polymerization cassette, pipette a few ml of kerosene on the cooling block (20°C) of<br />
the electrophoresis unit and place the SDS gel (gel side up!) onto it. Apply the<br />
electrode wicks on the surface of the SDS gel so that they overlap the cathodic and<br />
anodic edges of the gel by about 10 mm.<br />
3. Place the blotted IPG gel strip(s) gel side down (!) onto the SDS gel surface adjacent<br />
to the cathodic wick, 5 mm apart (Fig. 19A). No embedding of the IPG gel strip is<br />
necessary. If it is desired to co-electrophorese molecular weight (Mr) marker proteins,<br />
put a silicone rubber frame onto the SDS gel surface alongside the IPG gel strip and<br />
pipette 5 µl of Mr marker proteins dissolved in SDS-buffer into the frame.<br />
4. Place the lid on the electrophoresis unit and start SDS-PAGE <strong>with</strong> 100 V <strong>for</strong> about 75<br />
min <strong>with</strong> a limit of 20 mA. When the Bromophenol Blue tracking dye has completely<br />
moved out of the IPG gel strip, interrupt the run, remove the IPG gel strip and move<br />
the cathodic electrode wick <strong>for</strong>ward <strong>for</strong> 4-5 mm so that it now overlaps the <strong>for</strong>mer<br />
sample application area (Fig. 20). Then continue the run at 600 V <strong>with</strong> a limit of 30 mA
- 62 -<br />
until the tracking dye has migrated into the anodic electrode wick. Total running time is<br />
approximately 6 h (separation distance: 180-200 mm) (Table 8). The gel is then fixed<br />
in 40% alcohol and 10% acetic acid <strong>for</strong> at least one hour and stained <strong>with</strong> either silver<br />
nitrate or Coomassie Blue. Alternatively, it can be removed from its plastic backing<br />
<strong>with</strong> the help of a film remover (GE Healthcare Lifesciences) and used <strong>for</strong> blotting.<br />
A B<br />
Figure 19 Horizontal SDS-PAGE on (A) laboratory-made and (B) ready-made gels<br />
Transfer of the equilibrated IPG gel strip onto the surface of horizontal SDS gesl alongside the<br />
cathodic paper wick (A) or polyacrylamide buffer strip (B)<br />
Figure 20 Removal of IPG strips after protein transfer from first to second dimension<br />
Table 8 Running conditions <strong>for</strong> laboratory-made SDS-pore gradient gels (12-15% T, 3%<br />
C, size 250 x 190 x 0.5 mm 3 )<br />
time voltage current power temperature<br />
75 min 100 V 20 mA 30 W 20°C<br />
remove the IPG gel strip and move <strong>for</strong>ward the cathodic electrode<br />
wick so that it overlaps the <strong>for</strong>mer IPG strip application area<br />
5 h 600 V 30 mA 30 W 20°C
- 63 -<br />
Ib. SDS-PAGE <strong>with</strong> ready-made Excel gels<br />
1. Equilibrate the IPG strips as described above (see Section 3.2).<br />
2. During the equilibration is in progress, assemble the SDS ExcelGel <strong>for</strong> the second<br />
dimension: Remove the ExcelGel from its foil package. Pipette 2-3 ml of kerosene on<br />
the cooling plate of the horizontal electrophoresis unit (20°C). Remove the protective<br />
cover from the top of the ExcelGel and place the gel on the cooling plate, cut-off edge<br />
towards the anode. Avoid trapping air bubbles between the gel and the cooling plate.<br />
3. Peel back the plastic foil of the cathodic SDS buffer strip. Wet your gloves <strong>with</strong> a few<br />
drops of deionized water and place the buffer strip on the cathodic end of the gel.<br />
Avoid trapping air bubbles between gel surface and buffer strip.<br />
Note: Use nitrile or vinyl gloves. Latex gloves are not recommended, as the<br />
polyacrylamide gel and buffer strips tend to stick to the latex.<br />
4. Repeat this procedure <strong>with</strong> the anodic buffer stril.<br />
5. Place the equilibrated and slightly blotted IPG strips (see Section 3.2) gel side down<br />
on the surface of the ExcelGel, 5 mm apart from the cathodic buffer strip (Fig. 19 B).<br />
6. Press gently on top of the IPG gel strips <strong>with</strong> <strong>for</strong>ceps to remove any trapped air<br />
bubbles.<br />
7. Align the electrodes <strong>with</strong> the buffer strips and lower the electrode holder carefully onto<br />
the buffer strips.<br />
8. Start SDS-PAGE at 150 V <strong>for</strong> about 45 min <strong>with</strong> a limit of 20 mA. When the<br />
Bromophenol Blue tracking dye has moved 4-5 mm from the IPG gel strip, interrupt the<br />
run, remove the IPG gel strip and move the cathodic buffer strip <strong>for</strong>ward so that it just<br />
covers the <strong>for</strong>mer contact area of the IPG gel strip (cf. Fig. 20). Re-adjust the<br />
electrodes and continue electrophoresis at 800 V and 40 mA <strong>for</strong> about 160 min until<br />
the Bromophenol Blue dye front has reached the anodic buffer strip. (Table 9) and<br />
proceed <strong>with</strong> protein staining or <strong>with</strong> blotting.<br />
Table 9 Running conditions of ExcelGel SDS Gradient 12-14 (12-14% T, 3% C, size<br />
250 x 180 x 0.5 mm 3 )<br />
time voltage current power temperature<br />
45 min 100V 20 mA 50 W 20°C<br />
remove the IPG gel strip and move <strong>for</strong>ward the cathodic buffer<br />
strip so that it overlaps the <strong>for</strong>mer IPG strip application area<br />
160 min 800 V 40 mA 50 W 20°C
II. Multiple vertical SDS-PAGE<br />
- 64 -<br />
IIa. SDS-PAGE using the Ettan Dalt II vertical electrophoresis unit<br />
1. Add 1875 ml of electrode buffer stock solution and 5625 ml of deionized H2O to the<br />
lower electrophoresis buffer tank of the Ettan DALT II unit. Mix, and turn on cooling<br />
(25°C).<br />
2. Support the DALT gel cassettes (containing the SDS gels) in a vertical position on the<br />
cassette rack to facilitate the application of the IPG gel strips.<br />
3. Briefly rinse the equlibrated IPG strip <strong>with</strong> electrode buffer (diluted 1:1 <strong>with</strong> H2O) and<br />
place the IPG strip on top of the DALT gel cassette. Use a thin spatula or a ruler to<br />
push against the plastic backing of the IPG strip and slide it into the gap between the<br />
two glass plates (Fig. 21). Add 2 ml of hot (75°C) agarose solution, and continue to<br />
slide the strip down onto the surface of the SDS gel until good contact is achieved.<br />
Avoid trapping air bubbles between the IPG strip and the SDS gel surface.<br />
Note: For co-electrophoresis of molecular weight marker proteins, soak a filter paper<br />
pad (2x4 mm 2 ) <strong>with</strong> 5 µl of SDS marker proteins dissolved in electrophoresis buffer, let<br />
it dry, and apply it to the left or right of the IPG strip. Dried filter paper pads soaked<br />
<strong>with</strong> molecular weight marker proteins can be stored in microfuge tubes at –70°C.<br />
4. Allow the agarose to solidify <strong>for</strong> at least 5 minutes be<strong>for</strong>e placing the slab gel into the<br />
electrophoresis apparatus (see Step 5). Repeat this procedure <strong>for</strong> the remaining IPG<br />
strips.<br />
Note: Embedding in agarose is not absolutely necessary, but it ensures much better<br />
contact between the IPG gel strip and the top of the SDS gel.<br />
5. Wet the outside of the gel cassettes by dipping them into electrode buffer to make<br />
them fit more easily into the electrophoresis unit. Insert them in the electrophoresis<br />
apparatus. If necessary, push blank cassette inserts into any unoccupied slots. Seat<br />
the upper buffer chamber over the gels and fill it <strong>with</strong> 2.5 liters of electrode buffer<br />
(1250 ml of buffer stock solution + 1250 ml of deionized H2O).<br />
6. Place the safety lid on the electrophoresis unit and start SDS-PAGE <strong>with</strong> 5 mA per<br />
SDS gel (100 V maximum setting) <strong>for</strong> ~2 hours. Continue <strong>with</strong> 15 mA per SDS gel (200<br />
V maximum setting) <strong>for</strong> ~16 hours overnight or higher current <strong>for</strong> faster runs (see<br />
Table 11)<br />
7. Terminate the run when the bromophenol blue tracking dye has migrated off the lower<br />
end of the gel.<br />
8. After electrophoresis, carefully open the cassettes <strong>with</strong> a plastic spatula. Use the<br />
spatula to separate the agarose overlay from the polyacrylamide gel. Carefully peel the<br />
gel from the glass plate, lifting the gel by its lower edge and place it in a box of fixing or<br />
staining solution (see Chapter 4 on Protein Visualization).
- 65 -<br />
Figure 21 Loading the equilibrated IPG gel strips onto vertical SDS gels<br />
Table 10 Running conditions <strong>for</strong> 12 vertical SDS gels (12.5% T, 2.6% C) using the<br />
Ettan-DALT II vertical electrophoresis unit<br />
Fast run Slow run (overnight)<br />
time current temp. time current temp.<br />
2 h 50 mA 25°C 2 h 50 mA 25°C<br />
8 h 340 mA 25°C 16 h 180 mA 25°C<br />
IIb. SDS-PAGE using the Dalt electrophoresis unit<br />
In contrast to most vertical electrophoresis systems, the Dalt electrophoresis unit<br />
developed by Anderson & Anderson (1978) consits of a single buffer tank <strong>for</strong> simplified<br />
handling and improved reproducibility.<br />
1. Fill the electrophoresis tank <strong>with</strong> 15.0 l deionized water and 5.0 l of electrode buffer<br />
stock solution, and and turn on cooling (25°C).<br />
2. Support the SDS gel cassettes in a vertical position on the cassette rack to facilitate<br />
the application of the first dimension IPG strips.<br />
3. Equilibrate the IPG gel strips as described above (see Section 3.2) and immerse them<br />
briefly in electrode buffer.<br />
4. Place the IPG gel strip on top of an SDS gel and overlay it <strong>with</strong> 2 ml of hot agarose<br />
solution (75°C). Carefully press the IPG strip <strong>with</strong> a spatula onto the surface of the
- 66 -<br />
SDS gel to achieve complete contact (Fig. 21). Allow the agarose to solidify <strong>for</strong> at least<br />
5 min. Repeat this procedure <strong>for</strong> the remaining IPG strips.<br />
5. Insert the gel cassettes in the electrophoresis apparatus and start electrophoresis. In<br />
contrast to the procedure of horizontal SDS-PAGE it is not necessary to remove the<br />
IPG gel strips from the surface of the vertical SDS gel once the proteins have migrated<br />
out of the IPG gel strip.<br />
6. Run the SDS-PAGE gels according to the settings in Table 11.<br />
7. Terminate the run when the Bromophenol Blue tracking dye has migrated off the lower<br />
end of the gel.<br />
8. Open the cassettes carefully <strong>with</strong> a plastic spatula. Use a spatula to remove the<br />
agarose overlay from the polyacrylamide gel.<br />
9. Peel the gel off the glass plate carefully, lifting it by the lower edge and place it in a tray<br />
containing fixing solution or transfer buffer, respectively. Then continue <strong>with</strong> fixing,<br />
protein staining or blotting.<br />
Table 11 Running conditions <strong>for</strong> 10 vertical SDS gels (13% T homogeneous, 2.6% C,<br />
size 250 x 200 x 1 mm 3 ) using the Hoefer DALT tank<br />
time voltage current power temperature<br />
18 h 150 V 150 mA 50 W 25°C<br />
Protein fixation<br />
After termination of the second dimension run (SDS-PAGE), fixing is necessary to<br />
immobilize the separated proteins in the gel and to remove any non-protein components<br />
which might interfere <strong>with</strong> subsequent staining. Depending on gel thickness, the gel is<br />
submersed in the fixative <strong>for</strong> one hour at least, but usually overnight, <strong>with</strong> gentle shaking.<br />
Widely used fixatives are either 20% (w/v) trichloroacetic acid (TCA), or methanolic (or<br />
ethanolic) solutions of acetic acid (e.g. methanol / distilled water / acetic acid 45/45/10). A<br />
disadvantage of the latter procedure is that low molecular weight polypeptides may not be<br />
adequately fixed. When using fluorography, fixing may be carried out in 30% isopropyl<br />
alkohol / 10% acetic acid, as methanol can interfere <strong>with</strong> detection. Several authors also<br />
recommend aqueous solutions of glutardialdehyde <strong>for</strong> covalently cross-linking proteins to<br />
the gel matrix (e.g. <strong>for</strong> diamin silver staining). However, in this case subsequent protein<br />
identification, e.g., by mass spectrometry, is impractical.
- 67 -<br />
4 PROTEIN DETECTION AND QUANTITATION<br />
After 2-D PAGE, the separated proteins have to be visualized, either by “universal” or by<br />
"specific" staining methods. Since the concentrations of individual proteins in a single cell<br />
differ between six or seven orders of magnitude, ranging from several millions of<br />
copies/cell <strong>for</strong> some highly abundant proteins (such as glycolytic enzymes) to a few<br />
copies/cell <strong>for</strong> very low abundant proteins, these enormous variations in protein<br />
concentrations are a major challenge <strong>for</strong> almost all currently available protein detection<br />
methods. The most important properties of protein visualization methods are high<br />
sensitivity (low detection limit), high linear dynamic range (<strong>for</strong> quantitative accuracy),<br />
reproducibility, and compatibility <strong>with</strong> post-electrophoretic protein identification<br />
procedures, such as mass spectrometry. Un<strong>for</strong>tunately, currently no staining method <strong>for</strong><br />
2-D gels meets all requirements <strong>for</strong> proteome analysis.<br />
Universal detection methods of proteins on 2-D gels include staining <strong>with</strong> anionic dyes<br />
(e.g., Coomassie Blue), negative staining <strong>with</strong> metal cations (e.g., zinc imidazole), silver<br />
staining, fluorescence staining or labelling, and radioactive isotopes, using<br />
autoradiography, fluorography, or Phosphor-imaging (see Fig. 22). For most of these<br />
staining procedures, the resolved polypeptides have to be fixed in solutions such as in<br />
ethanol/acetic acid/ H2O <strong>for</strong> at least several hours (but usually overnight) be<strong>for</strong>e staining<br />
to remove any compounds (e.g., carrier ampholytes, detergents) that might interfere <strong>with</strong><br />
detection. Specific staining methods <strong>for</strong> detection of post-translational modifications<br />
(glycosylation, phosphorylation etc.) are employed either directly in the 2DE gel, or after<br />
transfer (blotting) onto an immobilizing membrane (Towbin et al., 1979; Kyhse-Andersen,<br />
1984). The blotted proteins can be probed <strong>with</strong> specific antibodies (e.g., against<br />
phosphotyrosine residues) or <strong>with</strong> lectins (agains carbohydrate moieties). The pros and<br />
cons of most protein detection and quantitation methods applied in proteome analysis<br />
have recently been reviewed by Patton (2002) and Rabilloud (2002).<br />
Gels must be dried be<strong>for</strong>e autoradiography or <strong>for</strong> permanent storage. To dry<br />
Coomassie- or silver stained gels, they are first soaked <strong>for</strong> 30-60 min in glycerol, sorbitol,<br />
or other polyols. Horizontal, 0.5 mm thin SDS gels on plastic backing are usually<br />
impregnated in 30% glycerol <strong>for</strong> 30 min, air-dried <strong>for</strong> 2-3 hours and sealed in a plastic<br />
bag. Alternatively, they are soaked in 2-3% glycerol <strong>for</strong> 30 min, covered <strong>with</strong> a cellophane<br />
sheet and air-dried overnight. Problems <strong>with</strong> gel swelling or shrinking during fixing,<br />
staining and drying are usually encountered <strong>with</strong> gels not polymerized onto plastic<br />
backing. Hence, vertical slab gels <strong>with</strong>out plastic backing must first be „shrunk“ to their<br />
original size in 10% glycerol + 30% ethanol <strong>for</strong> 20 min. Then they are air-dired between<br />
two sheets of cellophane (soaked <strong>with</strong> the glycerol/ethanol mixture) in a special frame<br />
(GE Healthcare Lifesciences). Gels that are exposed to X-ray films (<strong>for</strong> autoradiography)<br />
or phoshor storage screens are placed on filter paper, covered <strong>with</strong> a sheet of cellophane<br />
and dried using a vacuum gel dryer <strong>for</strong> several hours at 50-60°C.
- 68 -<br />
4.1 Universal protein detection and quantitation methods<br />
Coomassie Brilliant Blue (CBB) staining methods have found widespread use <strong>for</strong> the<br />
detection of proteins on 2-D gels, last not least because of their low price, ease of use<br />
and compatibility <strong>with</strong> most subsequent protein analysis and characterization methods<br />
such as MS. However, in terms of the requirements <strong>for</strong> proteome analysis, the principal<br />
limitation of CBB stains lies in their insufficient sensitivity, which does not permit the<br />
detection of low abundance proteins (the detection limit of CBB stains is in the range of<br />
200-500 ng protein per spot). Hence, typically no more than a few hundred protein spots<br />
can be visualized on a 2-D gel, even if milligram amounts of protein had been loaded onto<br />
the gel. CBB in colloidal dispersions according to Neuhoff et al. (1988) have been<br />
reported to be more sensitive than the “classical” CBB stain, but are still less sensitive<br />
than the majority of chemical stains employed in 2-D PAGE <strong>for</strong> proteomics.<br />
Reverse staining exploits the fact that protein-bound metal cations (e.g., potassium,<br />
copper or zinc) are usually less reactive than the free salt in the gel. Thus, the speed of<br />
precipitation of free or only weakly bound ions to <strong>for</strong>m an insoluble salt is slower on the<br />
sites occupied by proteins than in the protein-free background. This generates<br />
transparent protein zones or spots, while the gel background becomes opaque due to the<br />
precipitated, unsoluble salt. Compared to the other reverse staining methods, but also<br />
CBB, the zinc stain offers some distinct advantages as it can be completed in 15 min <strong>for</strong><br />
most applications, and is more sensitive than CBB, KCl or copper stains. Hence, zinc or<br />
imidazole-zinc stains (Castellanos-Serra et al., 1999) are currently the most sensitive<br />
reverse (or „negative“) staining methods applied in 2-DE. Zinc-imidazole staining is rapid,<br />
simple, and sensitive, and has a detection limit of roughly 20-50 ng of protein per spot.<br />
Moreover, it is compatible <strong>with</strong> subsequent protein identification by mass spectrometry,<br />
making the stain quite popular <strong>for</strong> detection of proteins separated on micropreparative 2-<br />
DE gels. The major disadvantage of zinc-staining is its rather restricted linear dynamic<br />
range, which makes this staining procedure unsuitable <strong>for</strong> detecting quantitative<br />
differences on 2-DE gels.<br />
Silver staining methods (Merril et al., 1981; Oakley et al., 1980) are far more sensitive<br />
than CBB or imidazole-zinc stains (detection limit is as low as 0.1 ng protein/spot). They<br />
provide a linear response <strong>with</strong> over a 10-40 fold range in protein concentration, which is<br />
slightly worse than <strong>with</strong> CBB staining. However, silver staining methods are far from<br />
stoichiometric, and are much less reproducible than CBB stains due to the subjective<br />
end-point of the staining procedure which makes them less suitable <strong>for</strong> quantitative<br />
analysis. Silver staining methods are quite laborious and complex, although some<br />
progress <strong>with</strong> respect to automation has been made (Sinha et al., 2001). Silver staining<br />
methods using aldehyde-based fixatives/sensitizers are the most sensitive ones, but<br />
prevent subsequent protein analysis (e.g., by MS) due to protein cross-linkage. If<br />
aldehydes are omitted in the fixative and in the subsequent gel impregnating buffers
- 69 -<br />
(except in the developer), microchemical characterization by peptide mass fingerprinting<br />
(PMF) is possible, (Shevshenko et al., 1996; Mortz et al., 2001), however at the expense<br />
of sensitivity.<br />
Better and more confident results in terms of sensitivity and linear dynamic range of<br />
detection are obtained by protein detection methods relying on fluorescent compounds,<br />
or by radiolabeling of proteins combined <strong>with</strong> highly sensitive electronic detection<br />
methods.<br />
Prior to the advent of highly sensitive silver staining methods, detection of proteins<br />
labelled <strong>with</strong> radioisotopes was the only way of sensitive detection <strong>for</strong> proteins<br />
separated on 2-DE gels. Radiolabelling can be accomplished by incorporating radioactive<br />
isotopes (e.g., 3 H, 14 C, 32 P, 33 P, 35 S, 125 I, or 131 I into proteins. In vivo metabolic<br />
radiolabelling of samples by the incorporation of radioactive amino acids (such as 35 Smethionine,<br />
14 C-leucine, and/or 32 P-phosphotyrosine) has been extensively used <strong>for</strong><br />
proteome analysis of microorganisms and cell culture systems, e.g., <strong>for</strong> studying the<br />
stress response of organisms by „pulse labelling“. In vitro radiolabelling, e.g., of human<br />
tissue proteins, is also possible by using iodination <strong>with</strong> 131 I or 125 I, however at the risk of<br />
<strong>for</strong>mation of artifacts. The radiolabelled 2-D separated proteins can be detected by<br />
autoradiography or fluorography using X-ray films which are exposed to the dried gels<br />
and which can be quantified by densitometry (Link, 1999). However, these film-based<br />
techniques require long exposure times (up to several weeks) if high sensitivity is desired.<br />
Moreover, due to the limited dynamic range of the X-ray film, multiple film exposures<br />
combined <strong>with</strong> computer-aided image processing are required to quantitate high as well<br />
as low abundant proteins present in a sample. Nonetheless, even <strong>with</strong> multiple film<br />
detection only a limited dynamic range (
- 70 -<br />
Another method <strong>for</strong> the detection of radiolabelled proteins, initially described <strong>for</strong> detection<br />
of radiolabelled DNA (Broude et al., 1999) is multi photon detection (MPD). Although<br />
MPD technology has several advantages over conventional autoradiography such as a<br />
very high linear dynamic range (up to 7-8 orders of magnitude), high sensitivity, and the<br />
possibility of dual isotope detection <strong>for</strong> multiplexed differential display (provided that the<br />
two radiation energies are sufficiently different, which is the case <strong>for</strong> 125 I and 131 I labelled<br />
proteins). However, the technology suffers from several shortcomings, such as low<br />
resolution, low throughput (image capture of a single high resolution 2-DE gel takes up to<br />
several days), and high costs of equipment, which have to be solved be<strong>for</strong>e MPD<br />
technology can be routinely applied in proteome analysis.<br />
Due to the shortcomings of organic dyes, silver staining or radiolabelling <strong>for</strong> visualization<br />
and quantitation of proteins, fluorescent detection of proteins has increasingly gained<br />
popularity <strong>for</strong> proteome analysis. <strong>Two</strong> major approaches <strong>for</strong> the fluorescent detection of<br />
proteins on 2-DE gels are currently practiced. These are: (i) covalent derivatization of<br />
proteins <strong>with</strong> fluorophores prior to IEF, and (ii) post-electrophoretic protein staining by<br />
intercalation of fluorophores into the SDS micelles coating the proteins, or by direct<br />
electrostatic interaction <strong>with</strong> the proteins (Patton, 2000). „Mid-labelling“, i.e., fluorescently<br />
labelling the focused proteins while still present in the IEF gel, prior to transfer to the<br />
second-dimensional SDS gel (Jackson et al., 1988), is also possible, but this method<br />
seems to be applied only rarely. The best known examples <strong>for</strong> pre-electrophoretic<br />
fluorescent labels are monobromobimane (Urwin & Jackson, 1993) and the cyaninebased<br />
dyes (Ünlü et al., 1997) that react <strong>with</strong> cysteinyl residues and lysyl residues,<br />
respectively. The latter dyes are commercially available as CyDyes (GE Healthcare<br />
Lifesciences), and their properties will be discussed in more detail in Section 4.3 on<br />
fluorescent difference gel electrophoresis (DIGE). The major problem of preelectrophoretic<br />
labelling is the occurence of protein size and/or protein charge<br />
modifications which may result in altered protein mobilities alongside the Mr and/or pI<br />
axis. Alternatively, proteins can be stained <strong>with</strong> a fluorescent dye molecule after the<br />
electrophoretic separation has been completed. The most prominent example is the<br />
ruthenium-based dye SYPRO Ruby (Berggren et al., 2002). Staining is accomplished<br />
<strong>with</strong>in a few hours in a single step procedure which may be easily adapted <strong>for</strong> use <strong>with</strong><br />
automated instrumentation. The detection limit is approximately 1-2 ng protein/spot, and<br />
the linear dynamic range of quantitation is about three orders of magnitude. A cost<br />
efficient alternative to SYPRO Ruby staining, which is based on ruthenium II tris<br />
(bathophenanthroline disulfonate), has been developed by Rabilloud et al. (2001).<br />
Recently, the staining protocol has been considerably improved <strong>with</strong> respect to sensitivity<br />
by optimizing reagent concentration, <strong>pH</strong> and solvent composition (Lamanda et al., 2004).<br />
In conclusion, protein detection and quantitation methods based on fluorescent staining<br />
and/or labelling are rather promising. They have a comparatively wide linear dynamic
- 71 -<br />
range (>10 3 ) and are relatively easy to use. Furthermore, most fluorescent staining<br />
procedures are compatible <strong>with</strong> subsequent protein identification methods such as mass<br />
spectrometry. The major limitation of most fluorescent staining methods is their lower<br />
sensitivity compared to electronic detection methods of radiolabelled proteins. Typically,<br />
only proteins expressed at greater than 10 3 copies/cell can be detected on „standard“ 2-<br />
DE gels by using fluorescent dye technologies, whereas –at least in theory- less than a<br />
dozen copies of a protein/cell can be visualized <strong>with</strong> the most sensitive electronic<br />
detection methods <strong>for</strong> radiolabelled proteins.<br />
4.2 Analysis of protein post-translational modifications (PTMs)<br />
Through genome sequencing no in<strong>for</strong>mation can be gained on post-translational<br />
modifications (PTMs) of proteins. Protein phosphorylation is a key post-translational<br />
modification, crucial in the control of numerous regulatory pathways, enzyme activities,<br />
and degradation of proteins, whereas glycosylation is associated <strong>with</strong> biochemical<br />
alterations, developmental changes and pathogenesis, e.g., tumorgenesis. Hence,<br />
detection and characterization of post-translational modifications are a major task in<br />
proteomics. One of the strenghts of 2-DE is its capability to readily locate post<br />
translationally modified proteins, as they frequently appear as distinct rows of spots in the<br />
horizontal and /or vertical axis of the 2-DE gel. Up to now, several hundred of PTMs,<br />
including phosphorylation, glycosylation, acetylation, lipidation, sulfation, ubiquination, or<br />
limited proteolysis have been reported. Various methods <strong>for</strong> the analysis of PTMs have<br />
been reviewed recently (Mann & Jensen, 2003; Yan et al., 1998). The analysis of the<br />
most important PTMs -phosphorylation and glycosylation- is briefly summarized below.<br />
Phosphoproteins can be detected on 2-DE gels by autoradiography or phosphorimaging<br />
after in-vivo incorporation of 32 P or 33 P orthophosphate into proteins. However,<br />
this method is restricted to cell cultures, and cannot be applied <strong>for</strong> clinical samples<br />
obtained from patients. There are other shortcomings of this method: E.g., radioactive<br />
phosphate is incorporated not only in proteins, but also in DNA and RNA, and can result<br />
in severe background staining. Another drawback is that rapid events, such as protein<br />
phosphorylation after application of external stress, cannot always be visualized due to<br />
the fact that phosporylation happens in the first minutes after the onset of stress, whereas<br />
the time-frame of incorporation of 32 P or 33 P orthophosphate is much longer in order to<br />
achieve sufficient uptake of radioactive phosphate in the cells (Bendt et al., 2003). To<br />
avoid dephosphorylation during sample preparation, phosphatase inhibitors should be<br />
added.<br />
An alternative method <strong>for</strong> phosphoprotein detection is immunostaining <strong>with</strong><br />
phosphoamino acid-specific poly- or monoclonal antibodies after transfer (blotting) of the<br />
2-DE separated proteins onto an immobilizing membrane. Anti phospho-tyrosine specific
- 72 -<br />
antibodies, which are also commercially available, are quite specific, whereas antibodies<br />
directed against phosphoseryl and phosphothreonyl residues are more problematic, and<br />
often sensitive to the context of a larger epitope (Kaufmann et al., 2001).<br />
A technique that is particularly useful <strong>for</strong> the characterization of phosphorylation sites is<br />
mass spectrometry of 2-D separated proteins, preferably in combination <strong>with</strong> alkaline or<br />
enzymatic hydrolysis of the phosphate esters, after phosphoprotein detection by<br />
autoradiography of radiolabelled phosphoproteins, or after immunodetection (reviewed by<br />
Mann & Jensen, 2003).<br />
Recently, a fluorescent detection method <strong>for</strong> gel-separated phosphoproteins using Pro-Q<br />
Diamond phosphoprotein dye (available from Molecular Probes) has been introduced.<br />
(Steinberg et al., 2003). The method is simple and rapid. However, the specificity of the<br />
stain, in particular <strong>with</strong> complex protein samples such as in 2-DE applications, has<br />
sometimes been questioned, since highly abundant, non-phosporylated proteins may also<br />
be stained, albeit less intense than the phosphorylated ones.<br />
Glycoproteins separated by 2-DE are usually detected after blotting onto an immobilizing<br />
membrane, although several (though less sensitive) methods can also be applied directly<br />
in the electrophoresis gel (reviewed by Packer, 1999). Besides detection <strong>with</strong><br />
autoradiography after incorporation of 14 C labelled sugar -a method that is applied only<br />
rarely- two major principles prevail: One is detection of glycoproteins after periodate<br />
oxidation of vicinal hydroxyls, by coupling a carbonyl reactive group (usually a subsituted<br />
hydrazine) to the aldehyde groups generated in the carbohydrate part of the<br />
glycoproteins. Visualization of the glycoproteins depends on the kind of reporter group<br />
attached to the hydrazine, and is achieved by UV illumination in case of fluorescent<br />
molecules (e.g., dansyl hydrazine), or through the reaction product (insoluble colour,<br />
chemiluminescence etc.) in case of hydrazine-conjugated enzymes. Recently, the<br />
glycoprotein stain Pro-Q Emerald has been introduced that reacts <strong>with</strong> periodic acid<br />
oxidized carbohydrate groups, and which generates a green fluorescent signal on<br />
glycoproteins. The stain permits detection of approximately 1-20 ng of glycoprotein per<br />
band/spot, depending upon the nature and the degree of protein glycosylation (Hart et al.,<br />
2003).<br />
The second principle <strong>for</strong> glycoprotein detection is based on sugar binding proteins, socalled<br />
lectins. A wide range of lectins <strong>with</strong> different carbohydrate specificities is<br />
commercially available, either unlabelled, or labelled <strong>with</strong> a appropriate reporter groups<br />
such as enzymes (peroxidase, phosphatase etc.), fluorescent dye molecules (e.g., FITC),<br />
or colloidal gold. Whereas it is not possible to discriminate between different carbohyrate<br />
moieties of glycoproteins when detection methods based on periodate oxidation have<br />
been employed, lectins permit a certain degree of differentiation, depending on the<br />
specificity of the lectin. However, <strong>for</strong> the detailed analysis of the saccharide composition<br />
of glycoproteins, HPLC- or MS-based methods are usually preferred.
- 73 -<br />
Figure 22: Visualization of total proteins, phosphoproteins, glycoproteins in 2-DE gels,<br />
and differentially expressed proteins in DIGE gels, respectively. Gels were stained <strong>with</strong><br />
either (A) Coomassie Brilliant Blue (CBB, ’classical stain’), (B) Colloidal Coomassie<br />
Brilliant Blue, (C) silver nitrate, or (D) SYPRO Ruby <strong>for</strong> total protein, or <strong>with</strong> (E) Pro-Q<br />
Diamond phosphoprotein stain or (F) Pro-Q Emerald 488 glycoprotein stain. Proteins<br />
from two different cell lines were labelled in vitro <strong>with</strong> two Cyanine dyes (Cy3 and Cy5,<br />
respectively) <strong>for</strong> DIGE analysis. The amount of protein loaded onto the 2-DE gels (size<br />
200x250x1 mm 3 ) was 500 µg <strong>for</strong> Coomassie Blue staining, 150 µg <strong>for</strong> glyco- and<br />
phosphoprotein, and 100 µg <strong>for</strong> all other protein detection methods (Weiss, W. Weiland,<br />
F., Görg, A., Meth. Mol. Biol., in press).
- 74 -<br />
4.3 Difference gel electrophoresis (DIGE) <strong>for</strong> differential display and<br />
quantitation<br />
A bottleneck <strong>for</strong> high throughput proteomic studies is image analysis. In conventional 2-<br />
DE methodology, protein samples are separated on individual gels, stained, and<br />
quantified, followed by image comparison <strong>with</strong> computer-aided image analysis programs.<br />
Because multi-step 2-DE technology often prohibits different images from being perfectly<br />
superimposable, image analysis is frequently very time consuming. To shorten this<br />
laborious procedure, Ünlü et al. (1997) have developed a method called fluorescent<br />
difference gel electrophoresis (DIGE), in which two samples are labeled in vitro using two<br />
different fluorescent cyanine minimal dyes (CyDyes, GE Healthcare Lifesciences)<br />
differing in their excitation and emission wave-lengths, then mixed be<strong>for</strong>e IEF and<br />
separated on a single 2-D gel. After consecutive excitation <strong>with</strong> both wavelengths, the<br />
images are overlaid and ’subtracted’ (normalized), whereby only differences (e.g., up- or<br />
downregulated, and/or post-translationally modified proteins) between the two samples<br />
are visualized (Fig. 23). Due to the comigration of both samples, methodological<br />
variations in spot positions and protein abundance are excluded, and, consequently,<br />
image analysis is facilitated considerably.<br />
A third cyanine dye is now available, which makes it possible to include an internal<br />
standard, which is run on all gels <strong>with</strong>in a series of experiments. This internal standard,<br />
typically a pooled mixture of all the samples in the experiment labelled <strong>with</strong> this dye, is<br />
used <strong>for</strong> normalization of data between gels thereby minimizing experimental variation<br />
and increasing the confidence in matching and quantitation of different gels in complex<br />
experimental designs (Alban et al., 2003). Nevertheless, even this approach is still<br />
dependent on accurate matching and comparison of large sets of 2-DE gels in order to<br />
generate meaningful data on differential protein expression between sets of samples<br />
(Dowsey et al., 2003). Applications that profit from the DIGE system include the<br />
investigation of differential protein expression of samples generated under various<br />
prespecified conditions, the comparison of extracts, and the analysis of biological<br />
variance. In short, all analyses in which 2-D gels need to be compared are simplified and<br />
accelerated by this method.<br />
The pIs of the cyanine dye labelled proteins remain unaffected, because the cyanine dyes<br />
compensate <strong>for</strong> the loss of the positive charge of the lysyl residues. However, the Mr<br />
increases by 434-464 Da (depending on the dye molecule) per labelled lysyl residue.<br />
Consequently, labelling of more than one lysine residue per protein molecule must be<br />
avoided; otherwise labelling <strong>with</strong> CyDyes would result in multiple spots in the vertical axis<br />
of the 2-DE gel. In practice, approximately only 3-5% of protein is labelled (hence, this<br />
procedure is also referred to as “minimal labelling”). Since the bulk of the protein remains<br />
unlabelled, the slight increase in Mr, sometimes presents a problem <strong>for</strong> spot excision <strong>for</strong><br />
MS analysis, particularly <strong>with</strong> lower Mr proteins (Shaw et al., 2003). This off-set has to be
- 75 -<br />
taken into accout when automatic spot pickers are used. One alternative is to stain the<br />
separated proteins additionally <strong>with</strong> SYPRO Ruby or CBB prior to spot picking from<br />
micropreparative gels. Another is so-called “saturation labelling” <strong>with</strong> similar cyanine dyes<br />
which label, cysteine (instead of lysine) residues to saturation. An additional advantage of<br />
saturation labelling is the greater sensitivity of the stain (detection limit is approximately<br />
0.1 ng of protein, compared to 1 ng <strong>with</strong> minimal labelling. However, saturation labelling<br />
has also several drawbacks: (i) the labelling reaction must be carried out at a defined<br />
protein/dye ratio to obtain an optimal 2-DE spot pattern <strong>with</strong> a minimal number of spot<br />
trains in the vertical (i.e., Mr) dimension; (ii) the dye ratio must be assessed <strong>for</strong> different<br />
types of samples, depending on the percentage of cysteines, which is a time-consuming<br />
and laborious procedure; (iii) care must be taken to avoid side-rections, such as lysine<br />
labelling; (iv) moreover, currently only two different dyes are available, which excludes the<br />
use of an internal standard; (v) up to 25% of the protein material may precipitate during<br />
the labelling reaction due to the introduction of the hydrophobic dye molecule, and (iv) the<br />
2-DE spot pattern is significantly altered compared to that of unlabelled or minimallabelled<br />
proteins (Shaw et al., 2003).<br />
Figure 23 Detection of high-pressure stress induced proteins <strong>with</strong> fluorescent difference<br />
gel electrophoresis (DIGE) (Drews et al., 2004)
Protocols<br />
EQUIPMENT<br />
- 76 -<br />
Staining trays: Trays made of glass, plastic or stainless steel may be used, depending<br />
on the type of application. Plastics must be used <strong>for</strong> fluorescent stains as glass interferes<br />
<strong>with</strong> the staining procedure, whereas glass trays are best suited <strong>for</strong> Coomassie Brilliant<br />
Blue (CBB) and silver staining. For glass, we prefer Pyrex® (http://www.arc-internationalcookware.com/en_Home.html)<br />
glass ovenware roasters, whereas <strong>for</strong> plastics we<br />
recommend polypropylene food boxes. The trays must be thoroughly clean and it is best<br />
to rinse <strong>with</strong> ethanol prior to use. Staining must be per<strong>for</strong>med <strong>with</strong> trays that have never<br />
been in contact <strong>with</strong> BSA, nonfat dry milk, or any other protein blocking agent to prevent<br />
carryover contamination. The bottom of all trays must be flat and at least 20% larger than<br />
the area of the gels to be stained, i.e., 25x30 cm 2 <strong>for</strong> ’standard’ (i.e., 20 x 25 cm 2 ) 2-DE<br />
gels.<br />
Laboratory shaker: Either a slow speed (30-60 rpm, adjustable) orbital shaker (i.e., the<br />
plat<strong>for</strong>m operates on a horizontal plane in a circular motion), or a slow speed (30-100<br />
strokes per minute, adjustable) reciprokal shaker (i.e., the shaker plat<strong>for</strong>m operates on a<br />
horizontal plane in a <strong>for</strong>wards and backwards motion) may be used. The shaker (e.g.,<br />
GFL 3016) (GFL, Burgwedel, Germany) should be robust and sufficiently large (45x45<br />
cm 2 ) to accomodate at least two piles of staining trays, and ensure a smooth working<br />
motion.<br />
Scanner/Densitometer: For digitizing Coomassie Brilliant Blue and/or silver stained gels,<br />
we recommend a high resolution flatbed scanner (e.g., Epson Express 1680 Pro, Epson<br />
Europe, Amsterdam). For digitizing gels stained/labelled <strong>with</strong> fluorescent compounds, a<br />
fluorescent imager equipped <strong>with</strong> either a cooled CCD camera, or a multicolor confocal<br />
laser scanner (e.g., Typhoon 9400 from GE Healthcare Life Sciences, Freiburg,<br />
Germany; Fuji-FLA-5100, Fujifilm Europe, Düsseldorf, Germany; or Bio-Rad Molecular<br />
Imager FX, Bio-Rad, Richmond, CA, USA), as well as appropriate software <strong>for</strong> image<br />
analysis are required. For DIGE analysis, low-fluorescence glass plates (3 mm thick), as<br />
well as image analysis software such as DeCyder Differential Analysis Software (GE<br />
Healthcare Life Sciences), which is specifically designed <strong>for</strong> analysis of multiplexed<br />
fluorescent images is required.<br />
Always use powder-free non-latex (e.g., nitril or vinyl) gloves when handling gels, as<br />
keratin and latex proteins are potential sources of contamination.<br />
Reagent solutions: All solutions should be prepared in water having a resisitivity of 18<br />
MΩ cm -1 . This standard is referred to as „deionized water“ or „Milli Q water“ in this text. All<br />
chemicals <strong>for</strong> buffers or reagent solutions should be of analytical or biochemical grade.
METHODS<br />
- 77 -<br />
I. Coomassie Brilliant Blue (CBB) staining<br />
’Classical’ Coomassie Brilliant Blue R-250 stain (Fazekas de St. Groth et al., 1963)<br />
Reagent solutions<br />
1. CBB R-250 destaining solution: 40% (v/v) ethanol and 10% (v/v) acetic acid. To<br />
prepare 1000 mL, mix 500 mL of deionized water, 400 mL ethanol (Merck,<br />
Darmstadt, Germany) and 100 mL glacial acetic acid (Merck).<br />
2. CBB R-250 staining solution: 0.1% (w/v) Coomassie Brilliant Blue (CBB) R-250<br />
dye in 40% ethanol and 10% acetic acid. To prepare 500 mL (which is sufficient <strong>for</strong><br />
staining one 20x25x0.1 cm 3 2-DE gel) dissolve 500 mg CBB R-250 (e.g., GE<br />
Healthcare, Bio-Rad, or Serva, Heidelberg, Germany) in 200 mL ethanol (96%;<br />
Merck) and stir <strong>for</strong> approximately 60 min. Then add 250 mL deionized water, and 50<br />
mL glacial acetic acid (Merck) under stirring, and filter.<br />
Method<br />
1. Place the gel into a staining dish on a laboratory shaker and fix the proteins <strong>for</strong> >30<br />
min in 250 mL trichloroacetic acid (TCA, 20% (w/v)) <strong>with</strong> gentle shaking.<br />
2. Decant the fixing solution and rinse the gel briefly (1-2 min) <strong>with</strong> CBB R-250<br />
destaining solution (40% ethanol and 10% acetic acid) to remove excess TCA.<br />
3. Immerse the gel in 500 mL CBB R-250 staining solution and incubate at room<br />
temperature on the laboratory shaker <strong>for</strong> at least three hours. Staining can continue<br />
overnight if more convenient.<br />
4. Discard the CBB stain and briefly rinse the gel <strong>with</strong> deionized water.<br />
5. Destain the gel (however not completely) 2 x 30 min <strong>with</strong> CBB R-250 destaining<br />
solution <strong>with</strong> shaking until the background is no longer stained dark blue.<br />
6. For higher sensitivity and decreased background staining, immerse the gel in 500<br />
mL of 1% (v/v) acetic acid <strong>for</strong> up to 24 hours <strong>with</strong> gentle shaking.<br />
Colloidal Coomassie Brilliant Blue G-250 stain (Candiano et al., 2004)<br />
Reagent solutions<br />
1. Fixing solution: 40% (v/v) ethanol and 10% (v/v) acetic acid. To prepare 500 mL,<br />
mix 250 mL of deionized water, 200 mL ethanol (Merck, Darmstadt, Germany) and<br />
50 mL glacial acetic acid (Merck).<br />
2. CBB G-250 staining solution: 0.12% (w/v) Coomassie Brilliant Blue (CBB) G-250<br />
dye, 10% ammonium sulfate, 10% phosphoric acid, and 20% methanol. To prepare<br />
500 mL of the solution, which is sufficient <strong>for</strong> staining one 2-DE gel (20x25x0.1
- 78 -<br />
cm 3 ), dilute 50 mL phosphoric acid (85%) (Merck) in 100 mL of deionized water.<br />
Add 50 g of ammonium sulfate (Merck) and stir until the ammonium sulfate has<br />
dissolved. Add 600 mg CBB G-250 (e.g., GE Healthcare, Bio-Rad, or Serva) and<br />
stir <strong>for</strong> approximately 30 min. Then complete to 400 mL <strong>with</strong> deionized water, and<br />
add 100 mL methanol (Merck) under stirring. This dye suspension is stable at room<br />
temperature <strong>for</strong> up to six months. Stir be<strong>for</strong>e use, but do not filter the dye<br />
suspension.<br />
3. CBB-G-250 destaining solution: 5% (w/v) ammonium sulfate and 10% (v/v)<br />
methanol. To prepare 1000 mL of the solution, dissolve 50 g of ammonium sulfate<br />
(Merck) in 800 mL deinized water and stir until the ammonium sulfate has<br />
dissolved. Then add 100 mL methanol and complete to 1000 mL <strong>with</strong> deionized<br />
water.<br />
Method<br />
1. Place the gel into a staining dish on a laboratory shaker and incubate <strong>for</strong> > 3 hours<br />
in 500 mL fixing solution (40% (w/v) ethanol and 10% (w/v) acetic acid).<br />
2. Wash the gel briefly (2 x 30 sec.) <strong>with</strong> deionized water.<br />
3. Immerse the gel in 500 mL colloidal CBB G-250 staining solution and incubate at<br />
room temperature <strong>with</strong> gentle shaking <strong>for</strong> at least 3-4 hours. Staining can continue<br />
overnight if more convenient.<br />
4. Decant the staining solution and rinse the gel briefly (2x30 sec) <strong>with</strong> deionized<br />
water. Then incubate the gel on the laboratory shaker <strong>with</strong> 500 mL of CBB-G-250<br />
destaining solution (5% ammonium sulfate and 10% (v/v) methanol) <strong>for</strong> 20 min,<br />
followd by a further 20 min incubation in 250 mL CBB G-250 destaining solution<br />
diluted <strong>with</strong> 250 mL deionized water. Note: Colloidal Coomassie Brilliant Blue<br />
staining kits based on the protocol of Neuhoff et al. (1988) are available from<br />
different manufacturers, e.g., from Carl Roth (Karlsruhe, Germany). Roti ®- Blue<br />
staining is quick (2-3 h), and destaining is usually not required.<br />
II. Silver staining (Blum et al., 1987; Chevallet et al., 2006)<br />
Reagent solutions<br />
1. Fixing solution: 40% (w/v) ethanol and 10% (w/v) acetic acid. To prepare 1000 mL,<br />
mix 500 mL of deionized water, 400 mL ethanol (Merck) and 100 mL glacial acetic<br />
acid (Merck).<br />
2. Sensitizer: 0.02% sodium thiosulfate-pentahydrate. To prepare 500 mL, dissolve<br />
100 mg of sodium thiosulfate-pentahydrate in 500 mL deionized water. The solution<br />
must be prepared the day of use.
- 79 -<br />
3. Silver nitrate solution: 0.2% silver nitrate and 0.02% <strong>for</strong>maldehyde (37%). To<br />
prepare 500 mL, dissolve 1.0 g of silver nitrate (Merck) in 500 mL deionized water<br />
and add 0.1 mL <strong>for</strong>maldehyde solution (37%) (Merck). The solution should be<br />
prepared just be<strong>for</strong>e use. Caution: Formaldehyde is toxic and should be handled<br />
<strong>with</strong> care. Note: Because <strong>for</strong>maldehyde polymerizes in the cold, the <strong>for</strong>maldehyde<br />
solution (37%) should be stored at room temperature and not used longer than six<br />
months as the amount of active <strong>for</strong>maldehyde will gradually decrease.<br />
4. Developer: 3% sodium carbonate, 0.05% <strong>for</strong>maldehyde (37%) and 0.0005%<br />
sodium thiosulfate pentahydrate. To prepare 1000 mL, dissolve 30 g of sodium<br />
carbonate (Merck) and 5 mg of sodium thiosulfate pentahydrate in 1000 mL<br />
deionized water, and add 0.5 mL of <strong>for</strong>maldehyde solution (37%) (Merck). Developer<br />
should be prepared immediately be<strong>for</strong>e use.<br />
4. Stop solution: 0.5% glycine. To prepare 500 mL, dissolve 2.5 g of glycine (Merck)<br />
in 500 mL deionized water.<br />
Note: Silver staining kits are available from different suppliers.<br />
Method<br />
1. Place the gel(s) into a glass tray on a laboratory shaker and fix the proteins in 500<br />
mL 40% ethanol, and 10% acetic acid at least <strong>for</strong> 3 hours. Up to four gels per tray<br />
may be fixed simultaneously. In this case, 1000 mL of solution are required.<br />
Replacement of the fixing solution after 1 h is recommended. Note: To remove<br />
carrier ampholytes, SDS and other detergents, which otherwise produce a strong<br />
background („clouds“) in the lower Mr region, the gel should be fixed <strong>for</strong> three hours<br />
at least, but preferably over night. Fixation can be prolonged <strong>for</strong> up to 72h.<br />
2. Wash the gel in 500 mL 30% ethanol <strong>for</strong> 20 min <strong>with</strong> gentle shaking, followed by two<br />
consecutive washes (20 min each) <strong>with</strong> 15% ethanol and Milli Q water, respectively.<br />
3. Sensitize <strong>with</strong> 500 mL sodium thiosulfate solution <strong>for</strong> 1 min <strong>with</strong> gentle shaking.<br />
4. Discard the sensitizer solution and rinse the gel in Milli Q water <strong>for</strong> 3 x 20 s while<br />
manually shaking. Note: To ensure even staining, proper and constant agitation by<br />
means of a laboratory shaker is required <strong>for</strong> all incubations lasting longer than one<br />
minute. For shorter steps, manual agitation is more convenient.<br />
5. Add 500 mL of silver nitrate solution and gently agitate <strong>for</strong> approximately 30 min.<br />
Protect the tray from bright light.<br />
6. Decant the silver nitrate solution and rinse the gel in Milli Q water <strong>for</strong> 3 x 20 s while<br />
manually shaking.<br />
7. Quickly add 500 mL of developing solution (3% sodium carbonate, 250 µL 37%<br />
<strong>for</strong>maldehyde). Sometimes a grey or brown precipitate may <strong>for</strong>m which normally<br />
dissolves <strong>with</strong>in a few seconds by vigorous shaking. The developer may be replaced
- 80 -<br />
after one minute <strong>for</strong> less background staining. Note: Optimal temperature of the<br />
silver nitrate staining reagent solutions is 20-25°C.<br />
8. Develop until protein spots are clearly visible (5-15 min). The most intense spots will<br />
appear <strong>with</strong>in 2-3 minutes.<br />
9. Stop development as soon as an adequate degree of staining has been achieved to<br />
avoid excessive background <strong>for</strong>mation. Discard the develope, rinse the gel briefly in<br />
deionized water, and immerse it in 500 mL stop solution (0.5% glyine, or,<br />
alternatively, 4% Tris and 2% acetic acid) <strong>for</strong> 20 min <strong>with</strong> gentle shaking. Then wash<br />
the gel (3 x 10 min) <strong>with</strong> Milli Q water be<strong>for</strong>e further processing.<br />
III. SYPRO ® Ruby fluorescent stain (Berggren et al. 2002)<br />
Reagent solutions<br />
1. Fixing solution: 50% (v/v) methanol and 7% (v/v) acetic acid. To prepare 1000 mL,<br />
mix 430 mL of deionized water, 500 mL methanol (Merck) and 70 mL glacial acetic<br />
acid (Merck).<br />
2. SYPRO Ruby staining solution: Ready-to-use solution (Molecular Probes,<br />
Eugene, OR, USA).<br />
3. Destaining solution: 10% (v/v) ethanol and 7% (v/v) acetic acid. To prepare 1000<br />
mL, mix 830 mL of deionized water, 100 mL ethanol (Merck) and 70 mL glacial<br />
acetic acid (Merck).<br />
Method<br />
1. After completion of electrophoresis, place the gel into a high density polypropylene<br />
tray (e.g., a food box). Do not use a glass vessel! Fix the proteins in 500 mL 40%<br />
ethanol, and 10% acetic acid <strong>for</strong> at least 3 hours at room temperature on a reciprocal<br />
or orbital shaker.<br />
2. Discard the fixing solution and add 500 mL SYPRO Ruby staining solution <strong>for</strong> a<br />
’standard’ 2-DE gel <strong>with</strong> the dimensions 25x20x0.1 cm 3 . Up to three gels may be<br />
simultaneously stained in one polypropylene box.<br />
3. Cover the box <strong>with</strong> a tight-fitting lid and <strong>with</strong> aluminium foil to protect the reagent from<br />
bright light. (SYPRO Ruby dye is light-sensitive and thus gel staining must be carried<br />
out in an opaque container or in the dark).<br />
4. Shake the box gently, preferably <strong>with</strong> a circular action on an orbital shaker, at least 3<br />
h at room temperature, or overnight.<br />
5. Pour off the excess stain solution and discard. Wash the gel (3 x 10 min) in deionized<br />
water or, preferably, <strong>with</strong> 10% ethanol and 7% acetic acid to reduce speckling which<br />
is sometimes a problem. Note: When using gels that have been cast on a plastic
- 81 -<br />
backing, the plastic sheet should be removed prior to scanning (e.g., <strong>with</strong> the help of<br />
a film remover available from GE Healthcare). Alternatively, use gels cast on lowfluorescence<br />
plastic backings.<br />
6. Capture and save the image using an appropriate fluorescence imager. Use the filter<br />
sets that match the excitation (maximum: 450 nm) and emission (maximum: 610 nm)<br />
wavelength <strong>for</strong> SYPRO Ruby. Images may also be obtained by using a simple UV<br />
transilluminator, but high sensitivity will only be obtained <strong>with</strong> dedicated fluorescence<br />
imagers, e.g., Molecular Dynamics Fluorimager (Sunnyvale, CA, USA), Molecular<br />
Imager FX from Bio-Rad, FLA-5100 image analyzer (Fuji), or similar devices.<br />
IV. Pro-Q Diamond ® phosphoprotein stain (Steinberg et al., 2003)<br />
Reagent solutions<br />
1. Fixing solution: 40% (v/v) ethanol and 10% (v/v) acetic acid. To prepare 1000 mL,<br />
mix 500 mL of deionized water, 400 mL ethanol (Merck) and 100 mL glacial acetic<br />
acid (Merck).<br />
2. Pro-Q Diamond phosphoprotein stain: Ready-to-use solution (Molecular Probes,<br />
Eugene, OR, USA).<br />
4. Pro-Q Diamond phosphoprotein destaining solution: 25% acetonitrile and 50<br />
mM sodium acetate/acetic acid, <strong>pH</strong> 4.0. To prepare 1000 mL, dissolve 4.1 g sodium<br />
acetate (Merck) in approximately 700 mL deionized water and titrate to <strong>pH</strong> 4.0 <strong>with</strong><br />
glacial acetic acid (Merck). Add 250 mL of acetonitrile (Merck) and complete to 1000<br />
mL <strong>with</strong> deionized water. Caution: Acetonitrile is toxic and should be handled <strong>with</strong><br />
care.<br />
Method<br />
1. After completion of electrophoresis, place the gel into a high density polypropylene<br />
tray (e.g., food box). Do neither use a glass vessel, nor a staining container that has<br />
previously been used <strong>for</strong> SYPRO ® Ruby protein gel stain, as residual SYPRO ® Ruby<br />
stain may interfere <strong>with</strong> Pro-Q ® Diamond phosphoprotein gel staining.<br />
2. Fix the proteins in 500 mL 40% ethanol and 10% acetic acid (or, alternatively, 50%<br />
methanol and 10% acetic acid) overnight at room temperature while rotating the tray<br />
on an orbital shaker. Replacement of the fixing solution after one hour is highly<br />
recommended. Fixation is critical to achieving specific staining as incomplete<br />
removal of SDS would otherwise result in very poor or no staining of<br />
phosphoproteins.<br />
3. Discard the solution and wash the gel <strong>with</strong> gentle agitation <strong>with</strong> Milli Q water (500<br />
mL, three changes, 20 min per wash)
- 82 -<br />
4. Incubate the gel <strong>with</strong> 500 mL Pro-Q Diamond phosphoprotein stain (supplied as a<br />
ready-to-use solution) <strong>for</strong> 2-3 h (however, not overnight). Cover the box <strong>with</strong> tightfitting<br />
lid and <strong>with</strong> aluminium foil to protect the reagent from light.<br />
5. Discard the staining solution and destain in the dark <strong>with</strong> 500 mL destaining solution<br />
(25% acetonitrile and 50 mM sodium acetate/acetic acid, <strong>pH</strong> 4.0; three changes, 30<br />
min per wash).<br />
6. Wash the gel 2 x 5 min <strong>with</strong> Milli Q water<br />
7. Continue <strong>with</strong> image acquisition. Pro-Q ® Diamond stain has excitation/emission<br />
maxima of ~555/580 nm and can be detected <strong>with</strong> an appropriate imager. Note:<br />
Subsequent staining <strong>with</strong> SYPRO ® Ruby is recommended, as determining the ratio<br />
of Pro-Q ® Diamond dye to SYPRO ® Ruby dye signal intensities <strong>for</strong> each spot<br />
provides a measure of the phosphorylation level normalized to the total amount of<br />
protein.<br />
V. Pro-Q Emerald ® 488 glycoprotein stain (Hart et al., 2003)<br />
Reagent solutions<br />
1. Fixing solution: 40% (w/v) ethanol and 5% (w/v) acetic acid. To prepare 1000 mL,<br />
mix 550 mL of deionized water, 400 mL ethanol (Merck) and 50 mL glacial acetic<br />
acid (Merck).<br />
2. Wash solution: 3% (v/v) acetic acid. To prepare 1000 mL, mix 970 mL of deionized<br />
water and 30 mL glacial acetic acid (Merck).<br />
3. Oxidizer: Periodic acid in wash solution. To prepare 500 mL, add 250 ml wash<br />
solution to the bottle containing the periodic acid (‚Component C’; Molecular Probes)<br />
and mix until completely dissolved. Add another 250 mL wash solution be<strong>for</strong>e use.<br />
5. Pro-Q Emerald glyoprotein staining solution: Add 0.5 mL of dimethylsulfoxide<br />
(DMSO, Merck) per vial of Pro-Q Emerald 488 reagent (Molecular Probes), mix<br />
thoroughly and add to 25 mL of staining buffer (Molecular Probes) just be<strong>for</strong>e use.<br />
250 mL of the staining solution is sufficient <strong>for</strong> staining one 2-DE gel (20x25x0.1<br />
cm 3 ).<br />
Method<br />
1. After completion of electrophoresis, place the gel into a high density polypropylene<br />
tray (e.g., food box). Do not use a glass vessel! Fix the proteins in 1000 mL 40%<br />
ethanol, and 10% acetic acid (or, alternatively, 50% methanol and 10% acetic acid)<br />
at room temperature while rotating the tray on an orbital rotator. Replace the fixing<br />
solution after one hour and continue <strong>with</strong> fixing over night.
- 83 -<br />
2. Discard the solution and wash the gel <strong>with</strong> gentle agitation <strong>with</strong> Milli Q water (1000<br />
mL, two changes, 20 min per wash).<br />
3. Incubate the gel in 500 mL oxidizing solution in the dark <strong>for</strong> 1 h <strong>with</strong> gentle agitation.<br />
4. Wash the gel <strong>with</strong> Milli Q water (1000 mL, six changes, 15-20 min per wash).<br />
5. Incubate the gel <strong>with</strong> gentle agitation in 250 mL Pro-Q Emerald 488 staining solution<br />
<strong>for</strong> ~3 h (or overnight). Cover the box <strong>with</strong> tight-fitting lid and <strong>with</strong> aluminium foil to<br />
protect the reagent from light.<br />
6. Incubate the gel <strong>with</strong> 1000 mL of wash solution (three changes, 30-45 min per<br />
wash).<br />
7. Visualize the glycoproteins by e.g., utilizing 488 nm laser excitation and 530 nm<br />
bandpass emission filter (the Pro-Q Emerald 488 stain has an excitation maximum<br />
at ~510 nm and an emission maximum at ~520 nm).<br />
VI. Fluorescent Difference Gel <strong>Electrophoresis</strong> (DIGE) (Ünlü et al., 1997)<br />
Whatever the intention of the fluorescent difference gel electrophoresis (DIGE)<br />
experiment, the work flow is the same:<br />
• Protein extraction and solubilization<br />
• Protein labeling<br />
• Mixing of the labeled samples<br />
• 2-D electrophoresis of the samples in a single gel<br />
• Image acquisition and image comparison<br />
In the following protocol, the proteins are labelled only to a low extent (“minimal<br />
labelling”). This ensures that the dyes do not label more than ~3% of the available protein<br />
molecules, and that only a single lysine per protein molecule is labelled. In this way,<br />
unlabelled protein can subsequently be analyzed by mass spectrometry. The pI of the<br />
proteins is not altered, but the covalently linked, fluorescent dye causes a size increase of<br />
~500 Daltons. Because the CyDye label may have altered the spot position of the<br />
proteins, particularly of low molecular weight proteins, additional staining of all proteins<br />
(e.g., <strong>with</strong> Sypro Ruby) may be required be<strong>for</strong>e spot picking. After labelling, identical<br />
protein amounts of each extract are mixed and loaded on a 2-DE gel. Approximately the<br />
same amount of fluorescence-labeled proteins should be loaded as would be needed <strong>for</strong><br />
silver staining. The common urea lysis buffer is not compatible <strong>with</strong> the labeling reaction<br />
because the reactive group of the CyDyes is an N-hydroxy succinimidyl (NHS) ester,<br />
which covalently attaches to the epsilon amino group of lysyl residues. Primary amines<br />
such as carrier ampholytes, as well as reducing agents such as dithiothreitol diminish the<br />
labeling efficiency and should be added after labeling. For a comprehensive list of<br />
partially or completely incompatible compounds (e.g., mercapto-ethanol, EDTA, Pefabloc<br />
proteinase inhibitor), please see the CyDye manual (GE Healthcare Lifesciences).
- 84 -<br />
For sample solublization, SDS buffer can be used, but it must be diluted to 0.2% SDS<br />
be<strong>for</strong>e the labeling reaction <strong>with</strong> thiourea/urea/CHAPS buffer (see PROTOCOL <strong>for</strong><br />
extraction of bacterial proteins in Section 2 of this manual). Direct extraction <strong>with</strong><br />
urea/CHAPS buffer is simpler, because most proteins are usually unaffected by omitting<br />
dithiothreitol (DTT) and carrier ampholytes. Proteins <strong>with</strong> a high cystine content, however,<br />
might be less soluble in urea/CHAPS buffer and tend to precipitate or aggregate if not<br />
reduced. For these proteins, the SDS solubilization procedure should be applied. In any<br />
case, it is mandatory to ensure that the <strong>pH</strong> of the sample is <strong>pH</strong> 8.5 (± 0.1), as this is the<br />
optimum <strong>pH</strong> <strong>for</strong> the labeling reaction. The final buffer concentration be<strong>for</strong>e isoelectric<br />
focusing should not exceed 30 mM Tris.<br />
MATERIALS<br />
Reagents<br />
• 2DQuant kit (GE Healthcare Lifesciences)<br />
• CyDye DIGE Fluor, Cy2, Cy3 and/or Cy5 minimal dye (GE Healthcare Lifesciences)<br />
• Dimethyl<strong>for</strong>mamide, 99.8% anhydrous (Sigma-Aldrich)<br />
Note: The DMF should be fresh (less than three months old after first opening),<br />
because it degrades to amine compounds, which interfere <strong>with</strong> the labeling reaction.<br />
• Dithiothreitol solution, 50% (w/v). To prepare 100 µl, dissolve 50 mg of dithiothreitol in<br />
70 µl of deionized H2O. Prepare fresh be<strong>for</strong>e use!<br />
• <strong>pH</strong> indicator strips (<strong>pH</strong> 4.5–10.0)<br />
• Pharmalyte (<strong>pH</strong> 3-10<br />
• SDS sample buffer [1% w/v SDS, 100 mM Tris-Hcl (<strong>pH</strong> 8.5)]<br />
To prepare 50 ml of SDS sample buffer, dissolve 0.5 g of SDS and 0.6 g of Tris base<br />
(Sigma) in ~40 ml of deionized H2O. Titrate to <strong>pH</strong> 8.5 <strong>with</strong> 4 N HCl, filter and adjust the<br />
final volume to 50 ml <strong>with</strong> deionized H2O.<br />
• Stop solution (10 mM lysine)<br />
To prepare 10 ml of stop solution, dissolve 14.6 mg of lysine in 10 ml deionized H2O.<br />
• Thiourea/urea/CHAPS buffer A [2 M thiourea, 7 M urea, 4% (w/v) CHAPS, 30 mM Tris<br />
HCl <strong>pH</strong> 8.5]<br />
To prepare 50 ml of buffer, dissolve 22.0 g of urea and 8.0 g of thiourea (Fluka) in ~25<br />
ml of deionized H2O. Add 0.5 g of Serdolit MB-1 ion exchange resin (Serva), stir <strong>for</strong> 10<br />
minutes, and filter. Add 2.0 g CHAPS to the filtrate, and 180 mg Tris base to the<br />
filtrate. Titrate to <strong>pH</strong> 8.5 <strong>with</strong> 4 N HCl, and adjust the final volume to 50 ml <strong>with</strong><br />
deionized H2O.<br />
• Thiourea/urea/CHAPS buffer B [2 M thiourea, 7 M urea, 4% (w/v) CHAPS]
- 85 -<br />
To prepare 50 ml of buffer, dissolve 22.0 g of urea and 8.0 g of thiourea (Fluka) in ~25<br />
ml of deionized H2O. Add 0.5 g of Serdolit MB-1 ion exchange resin (Serva), stir <strong>for</strong> 10<br />
minutes, and filter. Add 2.0 g CHAPS and adjust the final volume to 50 ml <strong>with</strong><br />
deionized H2O.<br />
Equipment<br />
• Image analysis software such as DeCyder Differential Analysis Software, which is<br />
specially designed <strong>for</strong> analysis of multiplexed fluorescent images (GE Healthcare<br />
Lifesciences)<br />
• Low-fluorescence glass plate, 3mm thick<br />
• Multicolor confocal laser scanner, e.g., Typhoon 9400<br />
• Software <strong>for</strong> image overlay & editing, e.g., ImageQuant Solution<br />
Additional Materials<br />
This protocol requires additional materials (e.g., acrylamide solution, gel buffers etc) used<br />
in Protocols described in Chapters 2-4.<br />
METHOD<br />
Labeling the protein samples<br />
1. Extract proteins <strong>with</strong> SDS-buffer, as described in Chapter 2. Determine the protein<br />
concentration of the sample <strong>with</strong> the 2DQuant kit. Dilute the SDS extract <strong>with</strong> a<br />
fourfold excess of thiourea/urea/CHAPS buffer B (final SDS concentration ≤ 0.2%).<br />
The protein concentration should be ≥ 1 mg/ml and ≤ 20 mg/ml. Best results are<br />
obtained <strong>with</strong> final protein concentrations between 5 and 10 mg/ml.<br />
Note: Instead of using SDS buffer, proteins may be extracted directly in<br />
thiourea/urea/CHAPS buffer A.<br />
2. Reconstitute the CyDyes in DMF to a stock solution of 1 mM (see the CyDyes manual<br />
<strong>for</strong> a detailed protocol). The reconstituted dyes are stable at –20°C <strong>for</strong> ~6 months.<br />
3. Directly be<strong>for</strong>e labeling, dilute the CyDye stock solution to a final concentration of 0.4<br />
mM (400 pmol/µl), e.g., mix 3 µl of DMF <strong>with</strong> 2 µl of reconstituted CyDye.<br />
4. Prepare an aliquot of 50 µg of the protein sample, and add 400 pmol (1 µl) of the<br />
CyDye. Cool on ice.<br />
Important: (1) Make sure the <strong>pH</strong> is 8.5 by checking <strong>with</strong> a <strong>pH</strong> indicator strip. Adjust<br />
the <strong>pH</strong> if necessary. (2) Keep the dyes and the samples in the dark and on ice!<br />
5. Vortex and centrifuge the mixture in a microfuge at 10,000g <strong>for</strong> 5 seconds.<br />
6. Incubate the sample in the dark <strong>for</strong> 30 minutes on ice.<br />
7. Add 1 µl of 10 mM lysine to stop the labeling reaction.
- 86 -<br />
8. Mix, centrifuge briefly, and incubate in the dark <strong>for</strong> 10 minutes on ice.<br />
9. Add 1 µl of DTT solution and 1 µl of Pharmalyte per 50 µl of sample solution.<br />
10. Pool the protein samples that are going to be separated on the same first- and<br />
second-dimension gel, and immediately apply the mixture to the IPG strip <strong>for</strong> IEF.<br />
Alternatively, labeled sample can be stored <strong>for</strong> at least three months at –70°C.<br />
11. Run IEF and SDS-PAGE according to the Protocols described in Chapter 3. Protect<br />
the IPGphor during the IEF and the buffer tank during SDS-PAGE from light to<br />
minimize photobleaching of the fluorescence dyes.<br />
Image Acquisition and Analysis<br />
For best results during image acquisition, use low-fluorescence glass plates. Directly<br />
scan the gels in the glass cassettes after the second dimension to ensure that all gels<br />
have the same dimensions; doing so simplifies spot matching of different gels. The<br />
exterior of the glass plates must be carefully cleaned <strong>with</strong> deionized H2O and dried <strong>with</strong> a<br />
lint-free laboratory wipe be<strong>for</strong>e the gel cassette is positioned on the scanner. Each<br />
fluorescent dye should be consecutively excited to avoid fluorescence crosstalk and<br />
scanned at a resolution of at least 200 µm <strong>with</strong> a proper filter (Table 16).<br />
After the scan, software such as ImageQuant Solution easily provides an initial image<br />
overlay of the scanned channels of one gel, thus giving a quick overview of differences<br />
between the labeled extracts is given. It should be kept in mind that the protein patterns<br />
of one gel might differ slightly in protein concentration and background. Although the<br />
DIGE system is highly reliable in terms of quantitation, especially when an internal<br />
standard is included in the experimental design, biological variances or variances during<br />
the protein extraction might affect samples. There<strong>for</strong>e, at least three gels of three<br />
individual protein extracts per experimental condition (e.g., control, stress etc.) should be<br />
run, normalized, and compared be<strong>for</strong>e qualitative and quantitative changes can be<br />
considered significant.<br />
Table 16 Selection guide <strong>for</strong> proper excitation and filter set during the scan of CyDyes<br />
Dye Absorption<br />
maximum<br />
Fluorescence<br />
maximum<br />
Laserlight<br />
Wavelength<br />
Emission Filter<br />
Cy2 491 nm 509 nm 488 nm 520 nm, band pass 40<br />
Cy3 553 nm 569 nm 532 nm 580 nm, band pass 40<br />
Cy5 645 nm 664 nm 633 nm 670 nm, band pass 40
VII. Blotting<br />
- 87 -<br />
Electrophoretically separated polypeptides can be visualized by "universal" stains like<br />
Coomassie Blue or silver staining, or by "specific" stains such as glycoprotein staining or<br />
by immunochemical detection methods (Fig. 24). Whereas Coomassie or silver staining<br />
are per<strong>for</strong>med in the electrophoresis gel directly, immunochemical detection methods are<br />
usually carried out after electrophoretic transfer of the separated polypeptides from the<br />
electrophoresis gel onto an immobilizing membrane. This transfer technique is called<br />
"blotting" (Towbin et al., 1979; Kyhse-Andersen 1984). The immobilized proteins cannot<br />
diffuse or be washed out, and they are readily accessible to reagents or high-molecular<br />
weight ligands such as antibodies or lectins (several examples are shown in Figs. 25 &<br />
26). In this manual, the electrophoretic transfer and protein visualization <strong>with</strong> Coomassie<br />
Blue and the more sensitive Indian Ink staining method are described. It is also possible<br />
to gain N-terminal or internal amino acid sequence in<strong>for</strong>mation of proteins blotted onto<br />
PVDF membranes. Coomassie Blue stained spots are excised from the immobilizing<br />
PVDF membrane and directly applied into an automated protein sequencer.<br />
Figure 24 Protein detection methods after blotting
- 88 -<br />
Figure 25 Wheat seed proteins separated by 2DE and electroblotted onto an<br />
immobilizing PVDF membrane. Left hand side: Total protein staining <strong>with</strong> Indian Ink.<br />
Right hand side: Immunostaining <strong>with</strong> a pooled serum of patients suffering from baker’s<br />
asthma (first antibody), and alkaline phosphatase labelled anti-human IgE as secondary<br />
antibody. Major IgE-binding proteins are labelled <strong>with</strong> arrows (Posch et al., 1995)<br />
Figure 26 Detection of glycoproteins by lectin-affinity binding after tranfer onto PVDF<br />
membrane. Left hand side: Total protein stain <strong>with</strong> Amido Black 10B dye. Center and<br />
right-hand side: Glycoprotein detection <strong>with</strong> the the lectins GNA and SNA, respectively.<br />
(Weiland, F. & Görg, A., unpublished results)<br />
PROTOCOL<br />
Reagents<br />
• Tris-glycine transfer buffer: 25 mM Tris, 190 mM glycine, 0.1% SDS, 20% methanol,<br />
<strong>pH</strong> 8.5. To make 1000 ml, dissolve 14.4 g of glycine, 3.0 g of Trizma base, and 1.0 g<br />
of SDS in 800 ml of deionized water. Add 200 ml of methanol, stir and degas <strong>for</strong> 20<br />
min. This buffer should be prepared fresh.<br />
• Tris-borate transfer buffer: 50 mM "Tris", 50 mM boric acid, 10% methanol, <strong>pH</strong> 8.5<br />
To make 1000 ml, dissolve 6.0 g of Trizma base and 3.1 g of boric acid in 900 ml of<br />
deionized water, adjust to <strong>pH</strong> 8.5, add 100 ml of methanol, stir and degas <strong>for</strong> 20 min.<br />
This buffer should be prepared fresh.<br />
• Sodium chloride solution: 0.9% sodium chloride in deionized water. To prepare 1000<br />
ml, dissolve 9.0 g of sodium chloride in 1000 ml of deionized water.
METHOD<br />
- 89 -<br />
Electrophoretic transfer („Blotting“)<br />
For easier handling, horizontal and/or vertical SDS gels are polymerized onto a plastic<br />
backing (GelBond PAGfilm). Be<strong>for</strong>e blotting, this plastic film has to be removed from the<br />
gel in order to facilitate the electrophoretic transfer of the proteins out of the gel onto an<br />
immobilizing membrane. This step needs not to be per<strong>for</strong>med <strong>for</strong> those vertical SDS gels<br />
which are not cast on GelBond PAGfilm.<br />
Tris-glycine buffers are most commonly employed. Borate buffers are recommeded if the<br />
blotted proteins are sequenced by Edman degradation, since this buffer does not contain<br />
amino acids such as glycine which may interfere <strong>with</strong> Edman microsequencing.<br />
1. Briefly wet the PVDF membrane in 100% methanol. Then wash the blotting membrane<br />
two times (five min each) in deionized water and soak it in transfer buffer.<br />
Nitrocellulose membranes are directly soaked <strong>with</strong> transfer buffer <strong>with</strong>out pre-wetting<br />
in methanol.<br />
2. The removal of the plastic backing from the horizontal SDS gel is facilitated by means<br />
of a so-called film remover (GE Healthcare Lifesciences). Place the gel onto the<br />
cylindrical surface of the film-remover, gel side up, and tighten it <strong>with</strong> the help of a<br />
clamp. Then pull the stainless-steel wire, beginning at one end of the gel, between the<br />
gel and GelBond PAGfilm towards your body so that the gel is released from its plastic<br />
backing (Fig. 27).<br />
Figure 27 Film remover<br />
3. Transfer the gel into the semi-dry blotting apparatus which has already been prepared<br />
<strong>for</strong> blotting: The lower, anodic graphite electrode is soaked <strong>with</strong> water and covered<br />
<strong>with</strong> six layers of filter paper soaked in transfer buffer and a nitrocellulose or<br />
polyvinylidene difluoride (PVDF) sheet also soaked in transfer buffer.<br />
4. Carefully lower the gel onto the immunoblotting membrane and cover it <strong>with</strong> another<br />
six layers of filter paper soaked in transfer buffer. Squeeze out caught-in air bubbles<br />
<strong>with</strong> the help of a roller or a wetted glass pipette, and cover the blotting "sandwich"<br />
<strong>with</strong> the water-saturated cathodic graphite electrode.
- 90 -<br />
5. Electrophoretic transfer is per<strong>for</strong>med <strong>for</strong> about one hour at 0.8 mA per cm 2 gel surface<br />
(typical settings <strong>for</strong> a 200 x 180 mm 2 SDS gel: 20 V, 300 mA).<br />
6. When the electrophoretic transfer has been terminated, dismantle the blotting<br />
apparatus.Wash the membrane <strong>with</strong> 0.9 % sodium chloride (3 x 5 min) and let it dry at<br />
room temperature. The dried blotting membrane can be stored in a sealed plastic bag<br />
at 4°C <strong>for</strong> at least several weeks. Proteins bound to the blotting membrane are either<br />
stained <strong>with</strong> unspecific protein stains such as Coomassie Brilliant Blue or India Ink, or<br />
specifically <strong>with</strong> antibodies or lectins.<br />
Visualization of the blotted proteins by Coomassie Blue staining<br />
Reagents<br />
• Staining solution: 0.1% Coomassie Blue R-250 in water/methanol/acetic acid (45/45/10).<br />
To prepare 500 ml, dissolve 500 mg Coomassie Brilliant Blue R-250 (or Serva Blue R)<br />
in 225 ml of ethanol, stir <strong>for</strong> 30-60 min, add 225 ml of deionized water and 50 ml acetic<br />
acid, stir again and filter.<br />
• Destaining solution: 45% ethanol, 45% deionized water and 10% acetic acid. To<br />
prepare 1000 ml, mix 450 ml water, 450 ml ethanol and 100 ml of glacial acetic acid.<br />
METHOD<br />
1. Wet the PVDF membrane <strong>with</strong> methanol (10 sec) and wash <strong>with</strong> water (2x2 min).<br />
2. Incubate the PVDF membrane in staining solution <strong>for</strong> 2 minutes on a rocking plat<strong>for</strong>m.<br />
3. Destain the PVDF membrane <strong>with</strong> destaining solution (2 x 5 min)<br />
4. Rinse the membrane in deionized water (3 x 5 min) and air-dry <strong>for</strong> longer storage.<br />
Protein visualization <strong>with</strong> India Ink (Hancock & Tsang, 1983)<br />
• Staining solution: Dilute 0.5 ml Indian Ink solution (Pelikan, Germany) in 500 ml TBS,<br />
add 0.2 ml of Tween 20 and 5 ml of acetic acid, stir <strong>for</strong> 60 min, and filter.<br />
METHOD<br />
1. Wet the PVDF membrane <strong>with</strong> methanol and wash <strong>with</strong> water (2 x 2 min)<br />
2. Place the membrane into an glas or plastic vessel add Indian Ink staining solution<br />
3. Shake the box gently <strong>for</strong> 2-3 h at room temperature<br />
4. Pour off the excess stain solution and destain several minutes <strong>with</strong> PBS.
- 91 -<br />
5 COMPUTERIZED 2-D IMAGE ANALYSIS AND DATABASE<br />
CONSTRUCTION<br />
One of the key objectives of proteomics is to identify the differential expression between<br />
control and experimental samples run on a series of 2-D gels. That is, the protein spots<br />
that have been inhibited (disappeared), induced (appeared) or have changed abundance<br />
(increased or decreased in size and intensity). Once these gel features have been found,<br />
the proteins of interest can be identified using MS. This goal is usually accomplished <strong>with</strong><br />
the help of computerized image analysis systems (Dowsey et al., 2003; Dunn 1992 &<br />
1993; Garrels 1989).<br />
The first step in computerized image analysis of 2-DE protein patterns is capture of the<br />
gel images in a digital <strong>for</strong>mat. A range of devices, including modified document scanners,<br />
laser densitometers, charge-coupled device (CCD) cameras, and fluorescent and<br />
phosphor imagers, are available <strong>for</strong> the acquisition of 2-D gel images. The saved images<br />
are then subjected to computer assisted image analysis. The traditional workflow <strong>for</strong> a 2-<br />
DE software package is:<br />
• pre-processing of the gel images, i.e., image normalization, cropping and<br />
background subtraction<br />
• spot segmentation, detection and expression quantification<br />
• landmarking, i.e., an initial user guided pairing of a few spots between the<br />
reference and sample gels. The sample gel is then warped to align the landmarks<br />
• matching, i.e., automatic pairing of the rest of the spots<br />
• identification of differentially expressed spots<br />
• data presentation and interpretation<br />
• creation of 2-D gel databases<br />
Currently, several 2-D image analysis software packages are commercially available.<br />
These programs have been continuously improved and enhanced over the years in terms<br />
of faster matching algorithms <strong>with</strong> lesser manual intervention, and <strong>with</strong> focus on<br />
automation and better integration of data from various sources. New 2-D software<br />
packages have also emerged which offer completely new approaches to image analysis<br />
and novel algorithms <strong>for</strong> more reliable spot detection, quantitation and matching. Several<br />
programs include options such as control of a spot cutting robot, automated import of<br />
protein identification results from mass spectrometry, superior annotation flexibility (e.g.,<br />
protein identity, mass spectrum, intensity/ quantity, links to the Internet), and/or<br />
multichannel image merging of different images to independent color channels <strong>for</strong> fast<br />
image comparison. However, despite these improvements, it is still a long way towards<br />
fully automated image analysis systems that do not require user intervention (Dunn,<br />
1993; Fievet et al., 2004).
- 92 -<br />
5.1 Computer assisted 2-D image analysis<br />
Briefly, the digitized image is first subjected to several “clean-up” steps to reduce<br />
background smear and to remove horizontal and/or vertical streaks. This procedure is<br />
usually quite fast and does not require much user interaction. The individual spots on the<br />
2-D pattern are then detected and quantified. This step is also per<strong>for</strong>med automatically.<br />
Regrettably, most image analysis programs do not identify all spots correctly, particularly<br />
when the overall quality of the electrophoretic separation is low (e.g., when crowded<br />
areas and overlapping spots due to improper sample preparation or insufficient spatial<br />
resolution are present on the gel). Hence, manual spot editing <strong>with</strong> reference to the<br />
original stained 2-DE gel (or image) is usually necessary. Depending upon the number of<br />
spots, the quality of the 2-DE separation and the algorithms used <strong>for</strong> spot detection, this<br />
process may be quite laborious and time-consuming. After spot editing, each spot on one<br />
2-DE gel must be matched to its counterpart on the other gels, usually by means of a<br />
reference (“master”) gel. For this, in most computer aided 2-D image analysis programs,<br />
several “landmark” spots (which should be evenly distributed over the entire gel area)<br />
must be manually identified on each gel by the operator. Starting from these landmark<br />
spots, the program proceeds to match the other spots automatically. Again, mismatches<br />
must be carefully checked and edited manually. Typically, at least two 2-D gel patterns<br />
are matched (e.g., a diseased versus a control) and then compared to each other <strong>with</strong><br />
respect to qualitative and/or quantitative differences between the 2-D patterns (e.g.,<br />
induced or repressed proteins). In most cases, however, many gels from different<br />
experiments have to be compared, usually by establishing a hierarchical 2-D pattern<br />
database (Dunn, 1992).<br />
5.2 <strong>Two</strong>-dimensional electrophoresis databases<br />
Once the 2-D gel database has been established, in<strong>for</strong>mation stored in it can be exploited<br />
by addressing questions such as “Can particular proteins be identified that are associated<br />
<strong>with</strong> a certain disease or disease state (e.g., disease markers)?”, or “What is the function<br />
of a particular protein?” Currently, enormous ef<strong>for</strong>ts are being undertaken to display and<br />
analyze <strong>with</strong> 2-DE the proteomes from a large number of organisms, ranging from<br />
organelles such as mitochondriae, nuclei or ribosomes to simple prokaroytes including<br />
Escherichia coli, Bacillus subtilis, Haemophilus influenzae, Mycobacterium tuberculosis<br />
and Helicobacter pylori, to single-celled eukaryotes such as the yeast Saccharomyces<br />
cerevisiae, to multicellular organisms, e.g., Caenorhabditis elegans, plants such as<br />
rice (Oryza sativa) or Arabidopsis thaliana, and mammalian cells and tissues including<br />
rat and human heart, mouse and human liver, mouse and human brain, different cancer<br />
cell lines, HeLa cells, human fibroplasts, human keratinocytes, rat and human serum etc.<br />
Most of these and many other studies in progress are summarized at<br />
www.expasy.org/ch2D/2d-index.html (“WORLD-2DPAGE Index to 2D PAGE databases“).<br />
The Proteomics Standards Initiative (PSI) aims to define community standards <strong>for</strong> data
- 93 -<br />
representation in proteomics to facilitate data comparison, exchange and verification<br />
(http://psidev.source<strong>for</strong>ge.net).<br />
6 PROTEIN IDENTIFICATION FROM 2-D GEL SPOTS<br />
Mass spectrometry has become the technique of choice <strong>for</strong> identification of proteins from<br />
excised 2-D gel spots as these methods are very sensitive, require small amounts of<br />
sample (femtomols to attomols) and have the capacity <strong>for</strong> high sample throughput.<br />
Recent advances in mass spectrometry also allow the investigation of post translational<br />
modifications including phosphorylation and glycosylation. Peptide mass fingerprinting<br />
(PMF) is typically the primary tool <strong>for</strong> protein identification. This technique, which is userfriendly<br />
and quite fast, is based on the finding that a set of peptide masses obtained by<br />
MS analysis of a protein digest (usually trypsin) provides a characteristic mass fingerprint<br />
of that protein. The protein is then identified by comparison of the experimental mass<br />
fingerprint <strong>with</strong> theoretical peptide masses generated in silico using protein and<br />
nucleotide sequence databases. This approach proves very effective when trying to<br />
identify proteins from species whose genomes are relatively small, completely<br />
sequenced, and well annotated, but is not so reliable <strong>for</strong> organisms whose genomes have<br />
not been completed. A second problem is to identify proteins that are extensively<br />
postranslationally modified, since the peptides generated from these proteins may not<br />
match <strong>with</strong> the unmodified protein in the database. A third problem is that PMF does not<br />
work very well if several different proteins are present in the same spot. Although search<br />
engines such as ProFound (Zhang & Chait, 2000) have been developed that enable<br />
identification of the correct protein(s) even when the data quality is relatively low or when<br />
the sample consists of a simple mixture of proteins, it may prove impossible to identify a<br />
protein based on PMF alone. In these cases it is then essential to obtain amino acid<br />
sequence in<strong>for</strong>mation. This is most readily accomplished using either MALDI-MS <strong>with</strong><br />
post-source decay (PSD) or chemical assisted fragmentation (CAF), or by tandem mass<br />
spectrometry (MS/MS). MS/MS takes advantage of two-stage MS instruments, MALDI-<br />
TOF-TOF-MS/MS or ESI-MS/MS triple-quadropole, ion-trap, or Q-TOF machines to<br />
induce fragmentation of peptide bonds. One approach is to generate a short partial<br />
sequence or ‘tag’ which is used in combination <strong>with</strong> the mass of the intact parent peptide<br />
ion to provide significant additional in<strong>for</strong>mation <strong>for</strong> the homology search. A second<br />
approach uses a database searching algorithm SEQUEST to match uninterpreted<br />
experimental MS/MS spectra <strong>with</strong> predicted fragment patterns generated in silico from<br />
sequences in protein and nucleotide databases. The major drawback of MS/MS based<br />
protein identification methods is that the process cannot be readily automated, and that<br />
considerable time and expertise are required <strong>for</strong> interpreting the MS/MS spectra.
- 94 -<br />
PROTOCOL: Protein identification by MALDI-MS<br />
Spot picking, excision of gel spots and storage of gels and gel spots<br />
Intact gels are stored in 1% HAc at 4ºC <strong>for</strong> up to several weeks until spots are excised.<br />
Spot detection and spot excision are either carried automatically using a spot picking<br />
robot and appropriate software. The protein spots are placed in 96 well plates <strong>for</strong><br />
digestion. Alternatively are protein spots excised manually using a clean scalpel and<br />
tweezers. Excised gel spots are removed <strong>with</strong> an Eppendorf pipette, put into a 0.5 ml<br />
Eppendorf tube, and stored in the freezer until digestion.<br />
Protein digestion<br />
Coomassie and silver stained proteins are digested in 96-well plates. Briefly, the gel spots<br />
are destained <strong>with</strong> 50 mM NH4HCO3/ acetonitrile (1:1) followed by dehydration <strong>with</strong><br />
acetonitrile. The proteins are reduced in 10 mM dithiotreitol (DTT)/ 50 mM NH4HCO3 <strong>for</strong> 1<br />
hour at 56 o C, and alkylated in 55 mM iodoacetamide/50 mM NH4HCO3 <strong>for</strong> 1 hour at room<br />
temp. The gel pieces are washed several times in 50 mM NH4HCO3 followed by<br />
dehydration <strong>with</strong> acetonitrile. The proteins are digested overnight <strong>with</strong> trypsin at 37 o C and<br />
the resulting peptide mixtures are analyzed by mass spectrometry.<br />
MALDI MS<br />
MALDI MS data are acquired on a MALDI instrument. An appropriate matrix surface is αcyano-4-hydroxy-cinnamic<br />
acid dissolved in acetonitrile/H2O (1:1) + 1% trifluoroacetic<br />
acid (TFA) to a concentration of 10 g/l. Aliquots of sample are mixed <strong>with</strong> the matrix, dried<br />
and washed twice <strong>with</strong> 0.1% TFA, crystallized <strong>with</strong> matrix by the seed layer method and<br />
then applied to the MALDI instrument.<br />
METHOD<br />
In gel digestion<br />
1. Excise protein spots from a silver- or Coomassie blue stained 2D gel. Cut a "control"<br />
piece of gel from a blank region of the gel and process in parallel <strong>with</strong> the sample. Put<br />
the gel pieces in 0.5 ml Eppendorf tubes.<br />
2. (A) Destain the excised, Coomassie stained gel pieces <strong>with</strong> 50 mM NH4HCO3 /<br />
acetonitrile (1:1);<br />
(B) Destain the excised silver stained gel pieces <strong>with</strong> 1% H2O2 and briefly wash <strong>with</strong><br />
water after 30 min.<br />
3. Add a volume of 10 mM dithiotreitol (DTT) sufficient to cover the gel pieces, and<br />
reduce the proteins <strong>for</strong> 1 h at 56°C.
- 95 -<br />
4. After cooling to room temperature, replace the DTT solution <strong>with</strong> the same volume of<br />
55 mM iodoacetamide.<br />
5. After 45 min incubation at room temperature in the dark <strong>with</strong> occasional vortexing,<br />
wash the gel pieces <strong>with</strong> 50-100 µl of 50 mM NH4HCO3 <strong>for</strong> 10 min.<br />
Note: If the reduction/alkylation step during IPG strip equilibration (see Section 3.2)<br />
according to Görg et al. (1988) has been per<strong>for</strong>med, steps 3-5 can be omitted!<br />
6. Dehydrate by addition of acetonitrile twice and bring to complete dryness.<br />
7. Remove the liquid phase.<br />
8. Reswell the gel pieces in 10 µl of a digestion buffer containing 50 mM NH4HCO3, and<br />
12.5 mg/l of trypsin (Promega, sequencing grade) in an ice-cold bath.<br />
9. After 45 min, remove the supernatant and replace <strong>with</strong> 5-10 µl of the same buffer, but<br />
<strong>with</strong>out trypsin, to keep the gel pieces wet during enzymic cleavage (37°C, overnight).<br />
10. Extract the peptides by one change of 20 mM NH4HCO3 and three changes of 5%<br />
<strong>for</strong>mic acid in 50% acetonitrile (20 min <strong>for</strong> each change) at room temperature and dry<br />
down.<br />
Note: The extraction of the peptides is not necessary <strong>for</strong> routine analysis.<br />
Sample preparation <strong>for</strong> MALDI-MS analysis<br />
1. Dissolve the matrix material (α-cyano-4-hydroxy-cinnamic acid) in acetonitrile to a<br />
concentration of 1.0 mg/ml.<br />
2. Deposit approximately 0.3 µl of the matrix solution on a stainless steel sample stage.<br />
And let it dry to <strong>for</strong>m initial crystals of matrix on the target.<br />
3. Dissolve the matrix material (α-cyano-4-hydroxy-cinnamic acid) in acetonitrile/50 mM<br />
NH4HCO3 + 2% TFA (1:1) to a concentration of 10 mg/ml.<br />
4. Deposit 0.3 µl of the matrix solution on the prepared seed layer of crystals.<br />
5. Depostit aliquots of 0.5 µl of analyte solution into this matrix solution; allow the solvent<br />
to evaporate at room temperature.<br />
6. Acquire the MALDI-MS spectra.
7 Pitfalls<br />
- 96 -<br />
1 Blot the rehydrated IPG gel strips to remove excess rehydration solution (not<br />
necessary <strong>for</strong> the IPGphor after sample-in gel rehydration); otherwise urea<br />
crystallization on the surface of the IPG gel strips might occur which will disturb IEF<br />
patterns.<br />
2 Make sure that the orientation of the IPG gel strips on the cooling block of the IEF<br />
chamber is correct (acidic end towards anode). Check the temperature of the<br />
cooling block (usually 20°C).<br />
3 Sample solution should not be too concentrated (max. 10 mg protein/ml) to avoid<br />
protein precipitation at the sample application point. If you are in doubt, better dilute<br />
the sample <strong>with</strong> Lysis buffer and apply a larger volume instead.<br />
4 When sample is applied in cups, do not apply less than 20 µl (Multiphor unit) or 50 µl<br />
(IPGphor unit, respectively) of sample solution.<br />
5 For better sample entry, start IEF at low voltage (150 V <strong>for</strong> 30 min, followed by 300 V<br />
<strong>for</strong> 60 min). For micropreparative runs (cup loading) <strong>with</strong> high sample volume (100 µl)<br />
start IEF at low voltage <strong>for</strong> several hours (200 V <strong>for</strong> 5-6 hours), followed by 1500 V<br />
overnight be<strong>for</strong>e voltage is raised to 3500 V or 8000 V (IPGphor), respectively.<br />
6 When using the reswelling tray <strong>for</strong> in-gel rehydration of samples, the sample volume<br />
has to be limited to the size of the IPG strip so that no superfluos sample solution is<br />
left in the tray. For a 180 mm long and 3 mm wide IPG strip, the correct sample<br />
volume is about 350 µl. When the reswelling tray is used <strong>for</strong> sample application, it<br />
should also be checked, whether the high molecular weight proteins have entered<br />
the IPG gel matrix properly.<br />
7 Remove the IPG gel strip from the surface of the horizontal SDS PAGE gel as soon<br />
as the Bromophenol Blue dye front has migrated 4-5 mm off the IPG gel strip. Then<br />
move the cathodic electrode wick (or buffer strip) <strong>for</strong>ward so that it overlaps the<br />
area the IPG gel strip once covered.
- 97 -<br />
8 Summarized Protocol of IPG-Dalt<br />
(Görg et al., <strong>Electrophoresis</strong> 9, 531-546, 1988)<br />
FIRST DIMENSION - IPG gel strips - on GelBond PAGFilm<br />
- 0.5 x 3 mm<br />
- length 4, 7, 11, 18 cm etc.<br />
- Rehydration - to the original thickness<br />
(gel: 0.5 mm -> U-frame 0.7 mm)<br />
- over night<br />
- 8 M urea, 0.5% CHAPS, 0.2% CA,<br />
10 mM DTT<br />
- avoid urea crystals on the surface<br />
- prolonges focusing time<br />
- creates „empty“ lanes in the 2D map<br />
remedy: remove excess reswelling solution <strong>with</strong><br />
wet filter paper (immediately)<br />
- Sample - Solution - Lysis buffer <strong>with</strong> 0.8% CA<br />
- Volume - 20 µl analytical, 100 µl micropreparative<br />
- Entry - low field strength <strong>for</strong> 1-2h (10-20 V/cm)<br />
- no prefocusing<br />
- IEF - to the steady state<br />
- at 20°C<br />
- Storage - at -80°C between plastic sheets<br />
EQUILIBRATION - Prolonged - 2 x 15 min<br />
-50 mM Tris-HCl <strong>pH</strong> 8.8,<br />
2% SDS, 1% DTT +<br />
6 M urea + 30% glycerol - reduces electroendosmotic effects<br />
60 mM iodoacetamide - in the second equilibration solution<br />
eliminates point streaking<br />
SECOND DIMENSION - vertical - embedding <strong>with</strong> agarose<br />
- horizontal - no embedding<br />
- low field strength <strong>for</strong> 1 h (< 10V/cm)<br />
- removal of the IPG gel strip after protein<br />
transfer from first to second dimension
- 98 -<br />
Appendix I: Trouble shooting<br />
1 General aspects<br />
• Quality of chemicals should be at least of analytical grade (p.a.)<br />
• Double-distilled or deionized (Millipore) water (conductivity < 2 µS) should be used<br />
• Urea and acrylamide/bisacrylamide solutions should be prepared freshly<br />
• Deionize urea prior to use<br />
• Do not heat urea-containing buffers > 37°C; otherwise protein carbamylation may occur<br />
• Filter all solutions. Use clean and dust-free vessels<br />
2 Sample preparation<br />
• Sample extraction buffer (Lysis buffer) has to be prepared freshly. Alternatively, make<br />
small portions (1 ml) and store frozen in Eppendorf vials at -70°C. Lysis buffer thawn<br />
once should not be refrozen again!<br />
• Add protease inhibitors during cell lysis if necessary. Note: several protease inhibitors are<br />
inactivated by DTT and/or mercaptoethanol!<br />
• To remove insoluble material, the protein extract should be spun <strong>for</strong> 1 h at 40,000 g<br />
3 Gel casting<br />
• Ammonium persulfate solution should be prepared freshly. A 40% solution of ammonium<br />
persulfate may be used <strong>for</strong> 2-3 days if stored in a refrigerator, whereas less concentrated<br />
solutions should be prepared the day you use them<br />
• TEMED should be stored under nitrogen and replaced every six months<br />
• The glass plate which bears the U-shaped frame should be treated <strong>with</strong> RepelSilane to<br />
avoid sticking of the gel to the glass plate after polymerization<br />
• Glycerol (37.5%) is incorporated into the stacking gel of horizontal SDS gels in order to<br />
diminish electroendosmotic effects<br />
• If SDS gels are cast onto GelBond PAGfilm, GelBondPAGfilm should be washed 6 x 10<br />
min prior to use to avoid "spot streaking" upon silver-staining<br />
• For proper polymerization, acidic as well as basic Immobiline starter solutions should be<br />
titrated to <strong>pH</strong> 7 <strong>with</strong> NaOH and HCl, respectively, prior to IPG gel casting<br />
• After polymerization, IPG gels have to be washed thoroughly (6 x 10 min) <strong>with</strong> deionized<br />
water to remove buffer ions and any unpolymerized material<br />
• Washed IPG gels are impregnated <strong>with</strong> glycerol (2%) <strong>for</strong> 30 minutes and dried overnight<br />
at room temperature in a dust-free cabinet <strong>with</strong> the help of a fan<br />
• The surface of the dried IPG gels has to be covered <strong>with</strong> a sheet of plastic film prior to<br />
storage at -20°C
Observed problems:<br />
- 99 -<br />
Gel did not polymerize properly<br />
Probable reasons Remedies<br />
• TEMED or ammonium persulfate too old Replace TEMED and persulfate<br />
• IPG gels: Immobiline starter solutions have Titrate to <strong>pH</strong> 7 <strong>with</strong> NaOH and<br />
not been titrated to <strong>pH</strong> 7 HCl, respectively.<br />
• SDS gel: Tris-buffer has not been titrated Titrate stacking or resolving gel<br />
<strong>with</strong> HCl buffer <strong>with</strong> HCl (<strong>pH</strong> 6.8 or 8.8)<br />
Gel is released from the plastic support when the gel casting cassette is opened<br />
Probable reasons Remedies<br />
• Gel has been polymerized onto the hydro- Gel has to be polymerized onto the<br />
phobic side of the GelBond PAGfilm hydrophilic side of the gel support<br />
• Wrong support matrix (e.g. <strong>for</strong> agarose gels) Use support matrices designed <strong>for</strong><br />
polyacrylamide gels exclusively<br />
• GelBondPAGfilm too old Do not use GelBondPAGfilms which<br />
are older than 12 months<br />
When the gel casting cassette is opened, the gel sticks to the glass plate<br />
Probable reasons Remedies<br />
• Glass plate is not hydrophobic Treat glass plate <strong>with</strong> RepelSilane<br />
prior to the assembly of the gel<br />
casting cassette<br />
4 Reswelling of IPG strips<br />
• Prior to IEF, IPG dry gels have to be cut into individual IPG strips <strong>with</strong> the help of a<br />
paper cutter. During cutting, the surface of the IPG strips has to be protected by a sheet<br />
of plastic film to avoid damage of the gel surface<br />
• IPG strips have to be rehydrated to their original thickness of 0.5 mm<br />
• IPG gel reswelling time depends on the composition of the rehydration buffer. If the<br />
rehydration solution contains high concentrations of urea (> 8 M) and detergents (>1%),<br />
rehydration should be per<strong>for</strong>med <strong>for</strong> 6 hr at least or, better, overnight<br />
• Rinse and blot the rehydrated IPG gel strips to remove excess rehydration solution (not to<br />
be done <strong>with</strong> the IPGphor); otherwise urea crystallization on the surface of the IPG gel<br />
strips might occur and disturb IEF patterns<br />
• If IPG strips are rehydrated in the IPG reswelling tray or in IPGphor strip holders, avoid<br />
trapping air bubbles between the IPG strip and the bottom of the tray or the strip holder<br />
Distribute the sample solution evenly beneath the IPG gel strip. Cover the IPG strips <strong>with</strong><br />
a layer of silicone oil during reswelling to prevent evaporation of the reswelling buffer
- 100 -<br />
5 First dimension (IEF-IPG)<br />
5.1 Application of rehydrated IPG strips onto the cooling plate of the electrophoresis<br />
chamber<br />
• Use kerosene exclusively to facilitate contact between IPG strips and cooling block<br />
• Use distilled water as electrode solution exclusively<br />
• Make sure that the orientation of the IPG gel strips on the cooling block of the IEF<br />
chamber is correct (acidic end facing towards anode)<br />
5.2 Sample application<br />
• Sample may be applied by in-gel rehydration or by cup-loading<br />
5.2.1 Sample application by cup-loading<br />
• When sample is applied into cups, do not apply less than 20 µl (50µl) of sample solution<br />
• Samples may be applied near anode or cathode. In the case of unknown samples it<br />
should be checked which sample application area provides better results<br />
• Sample solution should not be too concentrated (max. 10 mg protein/ml) to avoid<br />
protein precipitation at the sample application point. If you are in doubt, better dilute<br />
the sample <strong>with</strong> Lysis buffer and apply a larger volume instead<br />
• Sample solution shoud not contain too high concentrations of salt. Either desalt, or<br />
dilute <strong>with</strong> lysis buffer and apply a larger volume instead. Apply low voltage <strong>for</strong> slow<br />
sample entry.<br />
5.2.2 Sample application by in-gel rehydration<br />
• When using the reswelling tray <strong>for</strong> in-gel rehydration, the sample volume has to be<br />
limited to the size of the IPG strip so that no superfluous sample solution is left in the<br />
tray. For a 180 mm long and 3 mm wide IPG strip, the correct sample volume is about<br />
350 µl. When the reswelling tray is used <strong>for</strong> sample application, one should be aware that<br />
high molecular weight, alkaline and/or membrane proteins may not enter the IPG gel<br />
matrix properly<br />
5.3 Isoelectric focusing<br />
• Never pre-focus IPG strips; otherwise poor sample entry occurs due to the very low<br />
conductivity of the gels<br />
• Electrode strips should be humid, but not too wet. Remove superfluous liquid by blotting<br />
<strong>with</strong> filter paper<br />
• Keep temperature of the cooling block at 20°C<br />
- For better sample entry, start IEF <strong>with</strong> a low voltage gradient (150 V <strong>for</strong> 30 min, followed<br />
by 300 V <strong>for</strong> 60 min). For micropreparative runs (cup loading) <strong>with</strong> a high sample<br />
volume (100 µl) start IEF at low voltage <strong>for</strong> several hours (200 V <strong>for</strong> 5-6 hours), followed<br />
by 1500 V overnight, be<strong>for</strong>e voltage is raised to 3500 V<br />
• IPGphor: For improved sampe entry apply low voltage (30 V) during rehydration. Then<br />
raise voltage gradually (200 V, 500 V, 1000 V <strong>for</strong> 1 h each) and continue <strong>with</strong> max. 8000 V up<br />
to the steady state
- 101 -<br />
• Focusing time depends on gel length, <strong>pH</strong>-gradient and gel additives (carrier ampholytes<br />
etc.). Focusing time is shorter when separation distance is shorter, or when wide-range<br />
<strong>pH</strong>-gradients are used, or when carrier ampholytes are added to the reswelling solution<br />
• When running very basic and/or narrow-range IPGs, cover the IPG strips <strong>with</strong> a layer of<br />
degassed silicone oil flushed <strong>with</strong> argon<br />
• After completion of IEF, IPG strips should be stored frozen at -78°C (unless immediately<br />
used <strong>for</strong> the second dimension)<br />
Observed problems:<br />
IPG gel strips "burn" near the electrode (strips)<br />
Probable reasons Remedies<br />
• Gel strips have dried out at the anodic or Add 10% glycerol to the reswelling<br />
cathodic ends due to electroendosmotic flow buffer<br />
• " Wrong" electrode solutions Use deionized water only<br />
Zero or low voltage; voltage readings rapidly change<br />
Probable reasons Remedies<br />
• No or bad contact between electrodes (or<br />
electrode strips) and the IPG gel<br />
Check contact<br />
• Lid not properly connected <strong>with</strong> power supply Check connection or electrodes<br />
• Malfunction of electrodes, lid or power supply Check accordingly<br />
Current does not drop during initial stage of IEF<br />
Probable reasons Remedies<br />
• Wrong orientation of IPG strips (acidic end<br />
facing towards cathode)<br />
Check orientation<br />
• Wrong electrode solutions Use deionized water<br />
• High salt concentration in the sample Desalt or dilute sample; replace<br />
electrode strips after 1-2 h of IEF<br />
Water condensating on the gel surface or on the lower side the glass plate which carries<br />
the electrodes<br />
Probable reasons Remedies<br />
• High salt concentration in the sample Desalt or dilute sample; add carrier<br />
ampholytes; reduce initial current<br />
• Humidity too high Cover IPG strips <strong>with</strong> a layer of<br />
silicone oil. If IEF is per<strong>for</strong>med in the<br />
Multiphor apparatus, seal the holes<br />
in the lid <strong>with</strong> adhesive tape<br />
• Power or current too high Max. 0.05 mA / IPG strip; max. 5 W
- 102 -<br />
Water exudation near the sample application area<br />
Probable reason Remedies<br />
• High salt concentration in the sample Desalt or dilute sample; add carrier<br />
ampholytes; limit voltage (100V)<br />
during sample entry; prolong sample<br />
entry time<br />
Formation of urea crystals on the IPG gel surface<br />
Probable reasons Remedies<br />
• Temperature of cooling plate too low Temperature optimum 20°C<br />
• Very low humidity resulting in evaporation Add glycerol or sorbitol to the of<br />
water from the gel reswelling buffer; seal the Multiphor<br />
apparatus; put wet filter paper into<br />
the IEF chamber<br />
• Excess reswelling buffer sticking to the Rinse IPG strips <strong>with</strong> deionized water<br />
IPG strips <strong>for</strong> a second after rehydration and<br />
blot them <strong>with</strong> wet filter paper<br />
Protein precipitation near the sample application zone<br />
Probable reasons Remedies<br />
• Sample too concentrated Dilute sample <strong>with</strong> Lysis buffer<br />
• Initial field strength too high Start <strong>with</strong> low field strength (10V/cm)<br />
• Proteins poorly soluble Add high amounts of urea (> 8M)<br />
and/or proper detergent (> 1%)<br />
• Very low initial conductivity Never pre-focus IPG gels<br />
6 IPG strip equilibration and second dimension (SDS-PAGE)<br />
• Equilibration time should be sufficiently long (2 x 10 min at least)<br />
• Equilibration buffer contains Tris-HCl buffer (<strong>pH</strong> 8.8), SDS (1%), high amounts of urea<br />
(6 M) and glycerol (30%) <strong>for</strong> improved protein solubility and to suppress electroendosmotic<br />
effects. In the first equilibration step, DTT (1%) is added to the equilibration<br />
buffer <strong>for</strong> proper unfolding of proteins, and iodoacetamide (4%) during the second step<br />
to remove excess DTT held responsible <strong>for</strong> "point streaking" during silver staining<br />
• For very hydrophobic and/or S-S containing proteins, tributylphosphine may be<br />
advantageous compared to DTT and iodoacetamide<br />
• Horizontal SDS-PAGE: High amounts of glycerol (37%) are incorporated into the<br />
stacking gel to suppress electroendosmotic effects<br />
• Horizontal SDS-PAGE: Stacking gel length should at least exceed 25 mm<br />
• Protein transfer from the first dimension (IPG-Strip) to the second (SDS-gel) should be<br />
per<strong>for</strong>med rather slowly (field strength: < 10 V/cm) in order to avoid streaking and to<br />
minimize loss of high Mr proteins<br />
• Horizontal SDS-PAGE: Remove IPG gel strips from the surface of the SDS gel as soon as<br />
the Bromophenol Blue dye front has migrated 4-5 mm off the IPG gel strip. Then move
- 103 -<br />
the cathodic electrode wick (or buffer strip) <strong>for</strong>ward so that it overlaps the area the IPG<br />
gel strip once covered<br />
Observed problems:<br />
Horizontal streaks on SDS gel<br />
Probable reasons Remedies<br />
• Focusing time too short (especially <strong>for</strong> high Per<strong>for</strong>m time-course to find out<br />
Mr proteins) or too long (proteins are not<br />
stable <strong>for</strong> an unlimited period of time)<br />
optimum focusing time<br />
• Concentration of detergent too low; Check concentration of detergent;<br />
or inappropriate detergent used test different detergents<br />
• Urea concentration too low Urea concentration in IPG reswelling<br />
solution: > 8 M<br />
• IPG strip has not been reswollen to its Reswell IPG strip to a thickness of<br />
original thickness 0.5 mm<br />
• Insufficient amount of DTT in the sample Add 1% DTT to the sample buffer and<br />
solubilization buffer or in the IPG strip<br />
reswelling buffer<br />
0.25% DTT to the reswelling solution<br />
• Different oxidation <strong>for</strong>ms of a single protein Add sufficient amount of DTT;<br />
per<strong>for</strong>m IEF under a protective layer<br />
of degassed silicone oil (flushed <strong>with</strong><br />
argon or nitrogen)<br />
• Depletion of DTT in IPGs exceeding <strong>pH</strong> 10 Add an "extra paper strip" soaked<br />
due to migration of DTT towards the anode <strong>with</strong> 20 mM DTT near the cathode<br />
• Wrong sample application area Check whether anodic or cathodic<br />
sample application gives better<br />
results.<br />
Alternatively apply sample by in-gel<br />
rehydration<br />
• Artifacts due to endogenous proteolytic Inactivate proteases by TCA- acetone<br />
activity in the sample treatment, boiling <strong>with</strong> SDS and/or<br />
adding protease inhibitors<br />
• Interference of atmospheric carbon dioxide Per<strong>for</strong>m IEF under a layer of silicone<br />
oil flushed <strong>with</strong> argon; add paper<br />
strips soaked <strong>with</strong> NaOH into the<br />
electrophoresis chamber to remove<br />
CO2; seal the chamber air-tight<br />
• Mr 68 and/or 55 kDa streaks: possible Use clean glassware only; filter all<br />
contamination due to keratin and/or buffers (membrane filter!). Keep the<br />
albumin, or caused by mercaptoethanol lab dust-free. Use DTT instead of<br />
mercaptoethanol.<br />
• Precipitation at the IPG strip application area S tart IEF at low field strength<br />
( 6 hr (or overnight)
- 104 -<br />
• Protein extraxt contains insoluble material Thoroughly centrifuge the extract<br />
which slowly re-dissolves during IEF (40,000 g; 1 hr)<br />
Vertical streaks on the SDS gel<br />
Probable reasons Remedies<br />
• Horizontal SDS-PAGE: stacking gel length<br />
too short<br />
Effective stacking gel length >25 mm<br />
• Proteins insufficiently loaded <strong>with</strong> SDS SDS-concentration in equilibration<br />
buffer > 1%; Equilibrate 2 x 15 min<br />
• Glycoproteins Use borate buffer instead of Tris<br />
buffer in SDS gel; use steep pore<br />
gradient; deglycosylate proteins<br />
• Partial re-oxidation of free SH-groups Add sufficient amount of DTT to<br />
leads to disulfide bonded aggregates equilibration buffer, alkylate proteins;<br />
use tributylphosphine instead of DTT<br />
and iodoacetamide<br />
• Carbamylation trains Never heat urea containing solutions<br />
> 37°C; deionize urea prior to use<br />
• Endogeneous proteolytic enzymes have not Try to inactivate proteases by TCAbeen<br />
inactivated during sample preparation acetone treatment, boiling <strong>with</strong> SDS<br />
and/or adding protease inhibitors<br />
• GelBond PAGfilm had not been washed Wash GelBond PAGfilm prior to<br />
and causes "spot streaking" SDS gel casting<br />
• "Point steaking" caused by dust particles Filter all buffers (membrane filter);<br />
or excess DTT add iodoacetamide to the second<br />
equilibration step to remove excess<br />
DTT<br />
Patterns partially distorted<br />
Probable reasons Remedies<br />
• NP-40 or Triton X-100 concentration in the If possible, reduce amount of NP-40/<br />
IPG strip too high Triton or width of the IPG strip; use<br />
CHAPS instead of Triton / NP-40<br />
• IPG strip has not been removed from the Remove IPG strip after protein<br />
surface of the horizontal SDS gel after protein transfer from the IPG strip onto the<br />
transfer from the IPG strip onto the SDS gel SDS gel<br />
• Electrode wick (or buffer strip) has not been Cover <strong>for</strong>mer IPG strip application<br />
moved <strong>for</strong>ward to cover the <strong>for</strong>mer IPG strip area <strong>with</strong> electrode wick after the<br />
application area IPG strip has been removed from<br />
the surface of the horizontal SDS gel
- 105 -<br />
Uneven migration of bromophenol blue front<br />
Probable reasons Remedies<br />
• Horizontal SDS-PAGE: large air bubbles Check <strong>for</strong> and remove air bubbles<br />
trapped between GelBond PAGfilm and cooling<br />
plate; air bubbles trapped in cooling plate<br />
• Horizontal SDS-PAGE: improper contact<br />
between electrode wicks (or buffer strips)<br />
and surface of the SDS gel<br />
Check electrode contact<br />
• SDS pore gradient gel: gel casting device<br />
had not been levelled horizontally during<br />
gel casting and polymerization<br />
Level gel casting device<br />
7 Silver staining<br />
• Use pure chemicals (analytical grade) exclusively<br />
• Use highly purified deionized or distilled water (conductivity < 2 µS)<br />
• Use thorougly cleaned and dust-free vessels only<br />
• Always wear gloves or use <strong>for</strong>ceps. Never touch the gel <strong>with</strong> your fingers!<br />
Observed problems:<br />
No, or only few, proteins visible on the SDS gel<br />
Probable reasons Remedies<br />
• Inappropriate sample extraction procedure Per<strong>for</strong>m protein assay (or SDS-PAGE)<br />
(low protein concentration) to estimate the protein concentration<br />
of the sample<br />
• Insufficient sample entry into IPG strip Start IEF <strong>with</strong> low field strength<br />
• Acidic end of IPG strip facing towards Make sure that the orientation of the<br />
the cathode; anode connected <strong>with</strong> IPG gel strips on the cooling block of<br />
the cathodic outlet of the power supply the IEF chamber is correct. Check<br />
proper connection of the electrodes<br />
<strong>with</strong> the power supply<br />
• 2nd dimension: Large air bubbles between Squeeze out air bubbles by pressing<br />
IPG gel strip and surface of SDS gel on the upside the IPG strip <strong>with</strong> <strong>for</strong>ceps<br />
• 2nd dimension: Poor protein transfer from Per<strong>for</strong>m protein transfer at low field<br />
IPG strip onto SDS gel strength (< 10 V/cm); use detergents<br />
other than NP-40, Triton or CHAPS,<br />
or use tributylphosphine (TBP) <strong>for</strong><br />
improved protein solubilization<br />
• 2nd dimension: IPG strip applied <strong>with</strong> The surface of the IPG strip must be<br />
GelBond side onto the SDS gel in contact <strong>with</strong> the surface of SDS gel<br />
• Erreaneous silver staining protocol Check protocol<br />
• Formaldehyde oxidized Use fresh <strong>for</strong>maldehyde<br />
• Improper <strong>pH</strong> of developing solution Check <strong>pH</strong> of developer
- 106 -<br />
• Insufficient volume of buffer solutions SDS gel has to be completely<br />
covered <strong>with</strong> buffer solutions during<br />
the silver staining procedure<br />
Low or high Mr proteins missing on the SDS gel<br />
Probable reasons Remedies<br />
• Low Mr proteins not adequately fixed Use 20% TCA or glutardialdehyde as<br />
after SDS-PAGE fixative instead of 40% alcohol and<br />
10% acetic acid<br />
• High Mr proteins missing due to proteolytic Inactivate endogenous proteases in<br />
degradation the sample<br />
• Poor transfer of high Mr proteins from IPG Per<strong>for</strong>m protein transfer at low field<br />
strip onto SDS gel strength (< 10 V/cm)<br />
Diffuse background smear<br />
Probable reasons Remedies<br />
• Endogenous proteases in the sample had Inactivate proteases during sample<br />
not been inactivated preparation procedure<br />
• Insufficient washing steps during silver Per<strong>for</strong>m sufficient number of washing<br />
staining procedure steps<br />
• Complex <strong>for</strong>med between carrier ampholytes Fix the gel >3h or overnight and wash<br />
and SDS and/or other detergents it intensively to remove SDS-carrier<br />
ampholyte complexes<br />
• Poor quality of chemicals Use analytical grade (or better)<br />
• Poor water quality Conductivity < 2 µS<br />
• Reswelling tray or IPGphor strip holder Clean reswelling tray and strip holders<br />
may be contaminated <strong>with</strong> proteins thoroughly after use<br />
Negatively stained spots<br />
Probable reasons Remedies<br />
• Inappropriate silver staining procedure Change silver staining method<br />
• Protein concentration too high Reduce amount of protein to be<br />
loaded onto the gel or pre-stain <strong>with</strong><br />
Coomassie blue
- 107 -<br />
Appendix II: Sample Preparation <strong>for</strong> 2D <strong>Electrophoresis</strong>
- 108 -
- 109 -
- 110 -
- 111 -
- 112 -
- 113 -
- 114 -
- 115 -
- 116 -
- 117 -
- 118 -
- 119 -
- 120 -
- 121 -
- 122 -<br />
Appendix III: Detection of Proteins on 2-DE Gels
- 123 -
- 124 -
- 125 -
- 126 -
- 127 -
- 128 -
- 129 -
- 130 -
- 131 -
- 132 -
- 133 -
- 134 -
- 135 -
- 136 -
- 137 -<br />
Appendix IV: Image Anaysis of 2D Protein Patterns
- 138 -
- 139 -
- 140 -
- 141 -
- 142 -
- 143 -
- 144 -
- 145 -
- 146 -
- 147 -
- 148 -
REFERENCES<br />
- 149 -<br />
Aebersold R., Mann, M.: Mass spectrometry-based proteomics. Nature 2003, 422, 198-<br />
207 (Review)<br />
Alban, A., David, S.O., Bjorkesten, L., Andersson, C., Sloge, E., Lewis, S., Currie, I.: A<br />
novel experimental design <strong>for</strong> comparative two-dimensional gel analysis: two-dimensional<br />
difference gel electrophoresis incorporating a pooled internal standard. Proteomics, 2003,<br />
3, 36-44<br />
Altland, K., Becher, P., Rossmann, U., Bjellqvist, B.: Isoelectric focusing of basic proteins:<br />
the problem of oxidation of cysteines. <strong>Electrophoresis</strong> 1988, 9, 474-485<br />
Anderson NG, Anderson NL: Analytical techniques <strong>for</strong> cell fractions: <strong>Two</strong>-dimensional<br />
analysis of serum and tissue proteins. Anal Biochem. 1978, 85, 331-354<br />
Altland, K.: IPGMAKER: a program <strong>for</strong> IBM-compatible personal computers to create and<br />
test recipes <strong>for</strong> immobilized <strong>pH</strong> gradients. <strong>Electrophoresis</strong> 1990, 11, 140-147<br />
Bendt, A.K., Burkovski, A., Schaffer, S., Bott, M., Farwick, M., Hermann, T.: Towards a<br />
phosphoproteome map of C. glutamicum. Proteomics 2003, 3, 1637-1646<br />
Berggren, K.N., Schulenberg, B., Lopez, M.F., Steinberg, T.H., Bogdanova, A., Smejkal,<br />
G., Wang, A., Patton, W.F.: An improved <strong>for</strong>mulation of SYPRO Ruby protein gel stain:<br />
comparison <strong>with</strong> the original <strong>for</strong>mulation and <strong>with</strong> a ruthenium II tris (bathophenanthroline<br />
disulfonate) <strong>for</strong>mulation. Proteomics 2002, 2, 486-498<br />
Bjellqvist B, Ek K, Righetti PG, Gianazza E, Görg A, Westermeier R, Postel, W:<br />
Isoelectric focusing in immobilized <strong>pH</strong> gradients: Principle, methodology and some<br />
applications. J Biochem Biophys Methods 1982, 6, 317-339<br />
Bjellqvist, B., Sanchez, J.C., Pasquali, C., Ravier, F., Paquet, N., Frutiger, S., Hughes,<br />
G.J., Hochstrasser, D.F.: A nonlinear wide-range immobilised <strong>pH</strong> gradient <strong>for</strong> twodimensional<br />
electrophoresis and its definition in a relevant <strong>pH</strong> scale. <strong>Electrophoresis</strong><br />
1993, 14, 1357-1365<br />
Bjellqvist B, Sanchez JC, Pasquali C, Ravier F, Paquet N, Frutiger S, Hughes GJ, Hochstrasser<br />
DF: Micropreparative two-dimensional electrophoresis allowing the separation of<br />
samples containing milligram amounts of proteins. <strong>Electrophoresis</strong> 1993, 14, 1375-1378<br />
Blomberg A, Blomberg L, Fey SJ, Larsen PM, Roepstorff P, Degand P, Boutry M, Posch<br />
A, Görg A: Interlaboratory reproducibility of yeast protein patterns analyzed by<br />
immobilized <strong>pH</strong> gradient two-dimensional gel electrophoresis. <strong>Electrophoresis</strong> 1995, 16,<br />
1935-1945<br />
Boucherie, H., Dujardin, G., Kermorgant, M., Monribot, C., Slonimski P., Perrot, M.: <strong>Two</strong>dimensional<br />
protein map of Saccharomyces cerevisiae: construction of a gene-protein<br />
index. Yeast 1995, 11, 601-613
- 150 -<br />
Castellanos-Serra, L., Proenza, W., Huerta, V., Moritz, R.L., Simpson, R.L.: Proteome<br />
analysis of polyacrylamide gel-separated proteins visualized by reversible negative<br />
staining using imidazole-zinc salts. <strong>Electrophoresis</strong> 1999, 20, 732-737<br />
Broude, N.E., Demidov, V.V., Kuhn, H., Gorenstein, J., Pulyaeva, H., Volkovitsky, Drukier,<br />
A.K., Frank-Kamenetskii, M.D.: PNA openers as a tool <strong>for</strong> direct quantitation of specific<br />
targets in duplex DNA. Biomol. Struct Dyn. 1999, 17, 237-244<br />
Candiano, G., Bruschi, M., Musante, L., Santucci, L., Ghiggeri, G.M., Carnemolla, B.,<br />
Orecchia, P., Zardi, L., Righetti, P.G.: Blue silver: a very sensitive colloidal Coomassie G-<br />
250 staining <strong>for</strong> proteome analysis. <strong>Electrophoresis</strong> 2004, 25, 1327-1333<br />
Chevallet, M., Santoni, V., Poinas, A., Rouquie, D., Fuchs, A., Kieffer, S., Rossignol, M.,<br />
Lunardi, J., Garin J., Rabilloud, T.: New zwitterionic detergents improve the analysis of<br />
membrane proteins by two-dimensional electrophoresis. <strong>Electrophoresis</strong> 1998, 19, 1901-<br />
1909<br />
Chevallet, M., Luche, S., Rabilloud, T.: Silver staining of proteins in polyacrylamide gels.<br />
Nat. Protoc. 2006, 1, 1852-1858<br />
Chrambach, A., Doerr, P., Finlayson, G.R., Miles, L.E.M., Sherins, R., Rodbard, D.: Ann.<br />
N. Y. Acad. Sci. 1973, 209, 44-69<br />
Corbett J, Dunn MJ, Posch A, Görg A: Positional reproducibility of protein spots in twodimensional<br />
polyacrylamide gel electrophoresis using immobilized <strong>pH</strong> gradient iso-electric<br />
focusing in the first dimension: An interlaboratory comparison. <strong>Electrophoresis</strong> 1994, 15,<br />
1205-1211<br />
Corthals GL, Molloy, MP, Herbert BR, Williams KL, Gooley AA: Prefractionation of protein<br />
samples prior to two-dimensional electrophoresis. <strong>Electrophoresis</strong> 1997, 18, 317-323<br />
Corthals, G.L., Wasinger, V.C., Hochstrasser, D.F., Sanchez, J.C.: The dynamic range of<br />
protein expression: A challenge <strong>for</strong> proteomic research. <strong>Electrophoresis</strong> 2000, 21, 1104-<br />
1115<br />
Craven R.A., Banks, R.E.: Laser capture microdissection and proteomics. Possibilities<br />
and limitation. Proteomics 2001, 1, 1200-1004<br />
Csordas A, Pedrini M, Grunicke H: Suitability of staining techniques <strong>for</strong> the detection and<br />
quantitation of nonhistone high mobility group proteins. <strong>Electrophoresis</strong> 1990, 11, 118-<br />
123<br />
Damerval C: <strong>Two</strong>-dimensional electrophoresis in plant biology. Advances in<br />
<strong>Electrophoresis</strong> 1988, 2, 263-340<br />
Deshusses, J.M., Burgess, J.A., Scherl, A., Wenger, Y., Walter, N., Converset, V.,<br />
Paesano, S., Corthals, G.L., Hochstrasser, D.F., Sanchez, J.C.: Exploitation of specific
- 151 -<br />
properties of trifluoroethanol <strong>for</strong> extraction ans separation of membrane proteins.<br />
Proteomics 2003, 3, 1418-1424<br />
Dowsey, A.W., Dunn, M.J., Yang, G.Z.: The role of bioin<strong>for</strong>matics in two-dimensional gel<br />
electrophoresis. Proteomics, 2003, 3, 1567-1596<br />
Drews O, Weiss W, Reil G, Parlar H, Wait R, Görg A: High pressure effects step-wise<br />
altered protein expression in Lactobacillus sanfranciscensis. Proteomics 2002, 2, 765-774<br />
Drews, O., Reil, G., Parlar, H., Görg, A.: Setting up standards and a reference map <strong>for</strong><br />
the alkaline proteome of the Gram-positive bacterium Lactococcus lactis. Proteomics,<br />
2004, 4, 1293-1304<br />
Dunn, MJ: Advances in <strong>Electrophoresis</strong> 1987, 1, 1-109<br />
Dunn MJ: The analysis of two-dimensional polyacrylamide gels <strong>for</strong> the construction of<br />
protein databases. In: Microcomputers in Biochemistry: A Practical Approach (Ed. Bryce<br />
CFA). IRL Press, 1992, pp. 215-242<br />
Dunn MJ: Gel electrophoresis of proteins. BIOS Scientific Publishers Ltd. Alden Press,<br />
1993<br />
Dunn MJ, Görg A: <strong>Two</strong>-dimensional polyacrylamide gel electrophoresis <strong>for</strong> proteome<br />
analysis. In: Proteomics (Pennington S, Dunn MJ, eds.). BIOS Scientific Publishers,<br />
2000, pp 43-63<br />
Egen, N.B., Bliss, M., Mayersohn, M., Owens, S.M., Arnold, L., Bier M.: Isolation of<br />
monoclonal antibodies to phencyclidine from ascites fluid by preparative isoelectric<br />
focusing in the Roto<strong>for</strong>. Anal. Biochem. 1988, 172, 488-494<br />
Fazekas de St.Groth, S., Webster, R. G., Datyner, A.: <strong>Two</strong> new staining procedures <strong>for</strong><br />
quantitative estimation of proteins on electrophoresis strips. Biochim. Biophys. Acta 1963,<br />
71, 377-391<br />
Fievet, J., Dillmann, C., lagniel, G., Davanture, M., Negroni, L., Labarre, J., De Vienne, D:<br />
Assessing factors <strong>for</strong> reliable quantitative proteomics based on 2-DE. Proteomics 2004,<br />
4, 1939-1949<br />
Ferro, M., Seigneurin-Berny, D., Rolland, N., Chapel, A., Salvi, D., Garin, J., Joyard, J.:<br />
Organic solvent extraction as a versatile procedure to identify hydrophobic chloroplast<br />
membrane proteins. <strong>Electrophoresis</strong> 2000, 21, 3517-3526<br />
Flengsrud, R., Kobro, G.: A method <strong>for</strong> 2-DE of proteins from green plant tissues. Anal.<br />
Biochem. 1989, 177, 33-36<br />
Fountoulakis, M., Juranville, J.F., Roder, D., Evers, S., Berndt P., Langen, H.: Reference<br />
map of the low molecular mass proteins of Haemophilus influenzae. <strong>Electrophoresis</strong><br />
1998, 19, 1819-1827
- 152 -<br />
Fountoulakis, M., Takacs M.F., Takacs, B.: Enrichment of low-copy-number gene<br />
products by hydrophobic interaction chromatography. J Chromatogr A 1999, 833, 157-<br />
168<br />
Fujiki, Y., Hubbard, A.L., Fowler S., Lazarow, P.B.: Isolation of intracellular membranes<br />
by means of sodium carbonate treatment: application to endoplasmic reticulum. J. Cell<br />
Biol. 1982, 93, 97-102<br />
Garrels JI: The QUEST system <strong>for</strong> quantitative analysis of two-dimensional gels. J. Biol.<br />
Chem. 1989, 264, 5269-82<br />
Godovac-Zimmermann, J., Brown, L. R.: Perspectives <strong>for</strong> mass spectrometry and<br />
functional proteomics. Mass Spectrometry Reviews 2001, 10, 1-57 (Review)<br />
Görg A, Postel W, Westermeier R, Gianazza E, Righetti PG: Gel gradient electrophoresis,<br />
isoelectric focusing, and two-dimensional techniques in horizontal ultrathin<br />
polyacrylamide layers. J Biochem Biophys Methods 1980, 3, 273-284<br />
Görg, A., Postel, W., Weser, J., Patutschnick J., W., Cleve, H.: Improved resolution of pi<br />
(alpha I-antitrypsin) phenotypes by a large scale immobilized <strong>pH</strong> gradient. Am. J. Hum.<br />
Genet. 1985, 37, 922-930<br />
Görg A, Postel W, Günther S, Weser J: Electrophoretic methods in horizontal systems. In:<br />
Dunn MJ (ed) <strong>Electrophoresis</strong> '86 VCH Weinheim, 1986, pp 435-449<br />
Görg A, Postel W, Weser J, Günther S, Strahler SR, Hanash SM, Somerlot L: Elimination<br />
of point streaking on silver stained two-dimensional gels by addition of iodoacetamide to<br />
the equilibration buffer. <strong>Electrophoresis</strong> 1987, 8, 122-124<br />
Görg A, Postel W, Günther S: The current state of two-dimensional electrophoresis <strong>with</strong><br />
immobilized <strong>pH</strong> gradients. <strong>Electrophoresis</strong> 1988, 9, 531-546<br />
Görg A: <strong>Two</strong>-dimensional electrophoresis. Nature 1991, 349, 545-546<br />
Görg A, Postel W, Friedrich C, Kuick R, Strahler JR., Hanash SM: Temperaturedependent<br />
spot positional variability in two-dimensional polypeptide patterns. <strong>Electrophoresis</strong><br />
1991, 12, 653-658<br />
Görg A: <strong>Two</strong>-dimensional electrophoresis <strong>with</strong> immobilized <strong>pH</strong> gradients: current state.<br />
Biochemical Society Transactions 1993, 21, 130-132<br />
Görg A, Boguth G, Obermaier C, Posch A, Weiss W: <strong>Two</strong>-dimensional polyacryl-amide<br />
gel electrophoresis <strong>with</strong> immobilized <strong>pH</strong> gradients in the first dimension (IPG-Dalt): The<br />
state of the art and the controversy of vertical versus horizontal systems. Electro-phoresis<br />
1995, 16, 1079-1086<br />
Görg A, Obermaier C, Boguth G, Csordas A, Diaz JJ, Madjar JJ: Very alkaline<br />
immobilized <strong>pH</strong> gradients <strong>for</strong> two-dimensional electrophoresis of ribosomal and nuclear<br />
proteins. <strong>Electrophoresis</strong> 1997, 18, 328-337
- 153 -<br />
Görg A, Boguth G, Obermaier C, Weiss W: <strong>Two</strong>-dimensional electrophoresis of proteins<br />
in an immobilized <strong>pH</strong> 4-12 gradient. <strong>Electrophoresis</strong> 1998, 19, 1516-1519<br />
Görg A, Weiss W: High-resolution two-dimensional electrophoresis of proteins using<br />
immobilized <strong>pH</strong> gradients. In: Celis J (ed) Cell Biology. A Laboratory Handbook.<br />
Academic Press NY, 1998, pp 386-397<br />
Görg A, Weiss W: Analytical IPG-Dalt. Methods in Molecular Biology, 1999, 112, 189-195<br />
Görg, A: IPG-Dalt of very alkaline proteins. Methods in Molecular Biology, 1999, 112,<br />
197-209<br />
Görg, A., Weiss, W.: Horizontal SDS-PAGE <strong>for</strong> IPG-Dalt. Meth. Mol. Biol. 1999, 112, 235-<br />
244<br />
Görg A, Obermaier C, Boguth G, Harder A: 2-D electrophoresis <strong>with</strong> immobilized <strong>pH</strong><br />
gradients using the IPGphor. Life Science News 1999, 1, 4-6<br />
Görg A, Obermaier C, Boguth G, Weiss W: Recent developments in 2-D gel<br />
electrophoresis <strong>with</strong> immobilized <strong>pH</strong> gradients: Wide <strong>pH</strong> gradients up to <strong>pH</strong> 12, longer<br />
separation distances and simplified procedures. <strong>Electrophoresis</strong> 1999, 20, 712-717<br />
Görg A, Weiss W: 2D electrophoresis <strong>with</strong> immobilized <strong>pH</strong> gradients. In: Proteome<br />
Research: <strong>Two</strong>-<strong>Dimensional</strong> <strong>Electrophoresis</strong> and Identification Methods (Ed: Rabilloud<br />
T), Springer, 2000, pp. 57-106<br />
Görg A, Obermaier C, Boguth G, Harder A, Scheibe B, Wildgruber R, Weiss W: The<br />
current state of two-dimensional electrophoresis <strong>with</strong> immobilized <strong>pH</strong> gradients.<br />
<strong>Electrophoresis</strong> 2000, 21, 1037-1053<br />
Görg A: Advances in 2D gel techniques. Proteomics: A Trends Guide. Elsevier, 2000, pp.<br />
3-6<br />
Görg, A., Boguth, G., Köpf, A., Reil, G., Parlar, H., Weiss, W.: Sample prefractionation<br />
<strong>with</strong> Sephadex isoelectric focusing prior to narrow <strong>pH</strong> range two-dimensional gels.<br />
Proteomics 2002, 2, 1652-1657<br />
Görg, A., Drews, O., Weiss, W.: Separation of proteins using two-dimensional gel<br />
electrophoresis. in: Simpson, R.J. (Ed.), Purifying Proteins <strong>for</strong> Proteomics, Cold Spring<br />
Harbor Laboratory Press, New York, 2004, pp. 391-430<br />
Görg, A., Weiss, W.: Proteome profile comparisons of microorganisms, cells & tissues<br />
using 2-D gels. In: Proteome Analysis: Interpreting the genome (D.W. Speicher, Ed.).<br />
Elsevier, 2004, pp. 19-73<br />
Görg, A., Weiss, W.: High resolution <strong>Two</strong>-dimensional <strong>Electrophoresis</strong> <strong>with</strong> <strong>Immobilized</strong><br />
<strong>pH</strong> gradients. In: Cell Biology. A Laboratory Manual, 3 rd edition ;Vol. IV , Ch. 23 (J.E.<br />
Celis, Ed.), Elsevier Science & Academic Press, 2006, pp. 175-188
- 154 -<br />
Görg, A., Weiss, W., Dunn, MJ.: <strong>Two</strong>-dimensional gel electrophoresis. In: M.J.Dunn (Ed.),<br />
Encyclopaedia of Genomics, Proteomics and Bioin<strong>for</strong>matics. Vol. 5. Wiley & Sons, 2005,<br />
pp. 1903-1915<br />
Görg, A., Weiss, W., Dunn, MJ.: Current two-dimensional electrophoresis technology <strong>for</strong><br />
proteomics. Proteomics 2004, 4, 3665-3685 (Review)<br />
Görg, A., Lück, C., Weiss, W.: Sample prefractionation in granulated Sephadex-IEF gels.<br />
Meth. Mol. Biol., 2007, 424 (Vol. 1), 277-286<br />
Granier F., de Vienne, D.: Silver staining of proteins: standardized procedure <strong>for</strong> twodimensional<br />
gels bound to polyester sheets. Anal. Biochem. 1986, 155, 45-50<br />
Granier, F.: Extraction of plant proteins <strong>for</strong> two-dimensional electrophoresis.<br />
<strong>Electrophoresis</strong> 1988, 9, 712-718<br />
Graves, P.R., Haystead, T.A.: Molecular biologist's guide to proteomics. Microbiol Mol<br />
Biol Rev. 2002, 66, 39-63 (Review)<br />
Hanash SM, Strahler JR, Neel JV, Hailat N, Melham R, Keim D, Zhu XX., Wagner D,<br />
Gage DA, Watson, JT: Highly resolving two-dimensional gels <strong>for</strong> protein sequencing.<br />
Proc Natl Acad Sci USA 1991, 88, 5709-5713<br />
Hancock, K., Tsang, VCW.: India ink staining of proteins on nitrocellulose paper. Anal.<br />
Biochem. 1983, 133, 157-163<br />
Hannig, K, Heidrich, H.G.: The use of continuous preparative free-flow electrophoresis <strong>for</strong><br />
dissociating cell fractions and isolation of membranous components. Methods Enzymol.<br />
1974, 31, 746-761<br />
Harder A, Wildgruber R, Nawrocki A, Fey SJ, Larsen, PM, Görg A: Comparison of yeast<br />
cell protein solubilization procedures <strong>for</strong> two-dimensional electrophoresis. <strong>Electrophoresis</strong><br />
1999, 20, 826-829<br />
Hart, C., Schulenberg, B., Steinberg, T.H., Leung, W.Y., Patton, W.F.: Detection of<br />
glycoproteins in polyacrylamide gels and on electroblots using Pro-Q Emerald 488 dye, a<br />
fluorescent periodate Schiff-base stain. <strong>Electrophoresis</strong> 2003, 24, 588-598<br />
Herbert B et al.: Improved protein solubilization in 2-D electrophoresis using tri butyl<br />
phosphine as reducing agent. <strong>Electrophoresis</strong> 1998, 19, 845-851<br />
Heukeshoven J, Dernick, R: Improved silver staining procedure <strong>for</strong> fast staining in<br />
PhastSystem Development Unit. I. Staining of sodium dodecyl sulfate gels. <strong>Electrophoresis</strong><br />
1988, 9, 28-32<br />
Herbert BR, Sanchez, JC, Bini L: <strong>Two</strong>-dimensional electrophoresis: The state of the art<br />
and future directions In: Wilkins MR, Williams KL, Appel RD, Hochstrasser DF (eds)<br />
Proteome Research: New Frontiers in Functional Genomics. Springer Berlin Heidelberg<br />
New York, 1997, pp 13-33
- 155 -<br />
Herbert, B.R., Molloy, M.P., Gooley, A.A., Walsh, B.J., Bryson W.G., Williams, K.L.:<br />
Improved protein solubility in two-dimensional electrophoresis using tributyl phosphine as<br />
reducing agent. <strong>Electrophoresis</strong> 1998, 19, 845-851<br />
Herbert, B., Righetti, P.G.: A turning point in proteome analysis: sample prefractionation<br />
via multicompartment electrolyzers <strong>with</strong> isoelectric membranes. <strong>Electrophoresis</strong> 2000, 21,<br />
3639-3648<br />
Hochstrasser, A.C., James, R.W., Pometta, D., Hochstrasser D.F.: Preparative isoelectrofocusing<br />
and high resolution 2-dimensional gel electrophoresis <strong>for</strong> concentration and<br />
purification of proteins. Appl. Theor. Electrophor. 1991, 1, 333-337<br />
Huber, L.A., Pfaller, K., Vietor I.: Organelle proteomics: implications <strong>for</strong> subcellular<br />
fractionation in proteomics. Circ Res. 2003, 92, 962-968 (Review)<br />
Islam R, Ko C, Landers T: A new approach to rapid immobilised <strong>pH</strong> gradient IEF <strong>for</strong> 2-D<br />
electrophoresis. Science Tools 1998, 3, 14-15<br />
Jackson, P., Urwin, V.E., Mackay, C.D.: Rapid imaging, using a cooled CCD, of<br />
fluorescent 2-D-PAGE gels produced by labelling proteins in the 1st-dimensional IEF gel<br />
<strong>with</strong> the fluorophore MDPF. <strong>Electrophoresis</strong> 1988, 9, 330-339<br />
Jackson P, Herick K: Protein pattern visualization. In: Proteome Analysis Group Europe:<br />
Saccaromyces cerevisiae (PAGES). Laboratory manual 2000, pp. 70-90<br />
Johnston RF, Pickett SC, Barker, DL: Autoradiography using storage phosphor<br />
technology. <strong>Electrophoresis</strong> 1990, 11, 355-360<br />
Kaufmann, H., Bailey, J.E., Fussenegger, M.: Use of antibodies <strong>for</strong> detection of<br />
phosphorylated proteins separated by two-dimensional gel electrophoresis. Proteomics<br />
2001, 1, 194-199<br />
Kyhse-Andersen J: Electroblotting from multiple gels: A simple apparatus <strong>with</strong>out buffer<br />
tank <strong>for</strong> rapid transfer of proteins to nitrocellulose membrans. J Biochem Biophys<br />
Methods 1984, 10, 203-209<br />
Laemmli UK: Cleavage of structural proteins during the assembly of the head of<br />
bacteriophage T4. Nature 1970, 227, 680-685<br />
Lamanda, A., Zahn, A., Roder, D., Langen, H.: Improved Ruthenium II tris staining and<br />
destaining protocol <strong>for</strong> a better signal-to-background ration and improved baseline<br />
separation. Proteomics 2004, 4, 599-608<br />
Larsen, M.R., Sorensen, G.L., Fey, S.J., Larsen, P.M., Roepstorff, P.: Phosphoproteomics:<br />
evaluation of the use of enzymatic de-phosphorylation and differential mass<br />
spectrometric peptide mass mapping <strong>for</strong> site specific phosphorylation assignment in<br />
proteins separated by gel electrophoresis. Proteomics 2001, 1, 223-238
- 156 -<br />
Levenson, R.M., Anderson, G.M., Cohn, J.A., Blackshear, P.J.: Giant 2-DE:<br />
methodological update and comparison <strong>with</strong> intermediate-<strong>for</strong>mat gel systems.<br />
<strong>Electrophoresis</strong> 1990, 3, 269-279<br />
Lilley, K.S.., Razzaq , A., Dupree, P.: <strong>Two</strong>-dimensional gel electrophoresis: recent<br />
advances in sample preparation, detection and quantitation. Curr. Opin. Chem. Biol.<br />
2002, 6, 46-50<br />
Lilley, K.S., Friedman, D.B.: All about DIGE: quantification technology <strong>for</strong> differentialdisplay<br />
2D-gel proteomics. Expert Rev Proteomics 2004, 1, 401-409<br />
Link, A.J.: Autoradiography of 2-D gels. Methods Mol. Biol. 1999, 112, 285-290<br />
Locke, V.L., Gibson, T.S., Thomas, T.M., Corthals, G.L., Rylatt D.B.: Gradiflow as a<br />
prefractionation tool <strong>for</strong> two-dimensional electrophoresis. Proteomics 2002, 2, 1254-1260<br />
Luche, S., Santoni, V, Rabilloud, T.: Evaluation of nonionic and zwitterionic detergents as<br />
membrane protein solubilizers in two-dimensional electrophoresis. Proteomics, 2003, 3,<br />
249-253<br />
Macko V, Stegemann H.: Mapping of potato proteins by combined electrofocusing and<br />
electrophoresis identification of varieties. Hoppe Seylers Z Physiol Chem. 1969, 350,<br />
917-919<br />
Madjar JJ: Preparation of ribosomes and ribosomal proteins from cultured cells. In: J.E.<br />
Celis (Ed.). Cell Biology. A Laboratory Handbook Vol 1. Academic Press, New York,<br />
1994, pp. 657-661<br />
Mann, M., Jensen, O.N.: Proteomic analysis of post-translational modifications. Nat<br />
Biotechnol, 2003, 21, 255-261 (Review)<br />
McCarthy, J., Hopwood, F., Oxley, D., Laver, M., Castagna, A., Righetti, P.G., Williams,<br />
K., Herbert, B.: Carbamylation of proteins in 2-DE – myth or reality? J. Proteome Res.<br />
2003, 2, 239-242<br />
Mechin, V., Consoli, L., Le Guilloux, M., Damerval, C.: An efficient solubilization buffer <strong>for</strong><br />
plant proteins focused in IPGs. Proteomics 2003, 3, 1299-1302<br />
Meisinger, C., Sommer, T., Pfanner, N.: Purification of S. cerevisiae mitochondria devoid<br />
of microsomal and cytosolic contaminants. Anal. Biochem. 2000, 287, 339-342<br />
Merril CR, Goldman D, Sedman S, Ebert H: Ultrasensitive stain <strong>for</strong> proteins in polyacrylamide<br />
gels show regional variation in cerebrospinal fluid proteins. Science 1981,<br />
211, 1437-1438<br />
Merril CR: Detection of proteins separated by electrophoresis. Adv. <strong>Electrophoresis</strong> 1988,<br />
1, 111-139<br />
Miller, I., Craw<strong>for</strong>d, J., Gianazza, E.: Protein stains <strong>for</strong> proteomic applications: which,<br />
when, why? Proteomics 2006, 6, 5385-5408 (Review)
- 157 -<br />
Molloy, M.P., Herbert, B.R., Walsh, B.J., Tyler, M.I., Traini, M., Sanchez, J.C.,<br />
Hochstrasser, D.F., Williams, K.L., Gooley, A.A.: Extraction of membrane proteins by<br />
differential solubilization <strong>for</strong> separation using two-dimensional gel electrophoresis.<br />
<strong>Electrophoresis</strong> 1998, 19, 837-844<br />
Molloy, M.P.: <strong>Two</strong>-dimensional electrophoresis of membrane proteins using immobilized<br />
<strong>pH</strong> gradients. Anal. Biochem. 2000, 280, 1-10<br />
Mortz, E., Krogh, T.N., Vorum, H., Görg, A.: Improved silver staining protocols <strong>for</strong> high<br />
sensitivity protein identification using matrix-assisted laser desorption/ionization-time of<br />
flight analysis. Proteomics 2001, 1, 359-363<br />
Neuhoff V, Arold N, Taube D Ehrhardt W: Improved staining of proteins in polyacrylamide<br />
gels at nanogram sensitivity using Coomassie Brilliant Blue G-250 and R-250.<br />
<strong>Electrophoresis</strong> 1988, 9, 255-262<br />
Oakley BR, Kirsch DR, Morris NR: A simplified ultrasensitive silver stain <strong>for</strong> detecting<br />
proteins in polyacrylamide gels. Anal Biochem 1980, 105, 361-363<br />
O' Farrell PH: High resolution two-dimensional electrophoresis of proteins. J Biol Chem<br />
1975, 250, 4007-4021<br />
O'Farrell PZ, Goodman HM, O'Farrell PH: High resolution two-dimensional electrophoresis<br />
of basic as well as acidic proteins. Cell 1977, 12, 1133-1142<br />
Olsson, I., Larsson, K., Palmgren, R., Bjellqvist, B.: Organic disulfides as a means to<br />
generate streak-free two-dimensional maps <strong>with</strong> narrow range basic immobilized <strong>pH</strong><br />
gradient strips as first dimension. Proteomics 2002, 2, 1630-1632<br />
Orfao, A., Ruiz-Arguelles, A.: General concepts about cell sorting techniques. Clin.<br />
Biochem. 1996, 29, 5-9<br />
Ortiz ML, Calero M, Fernandez-Patron C, Castellanos L, Mendez E: Imidazole-SDS-Zn<br />
reverse staining of proteins in gels containing or not SDS and microsequence of<br />
individual unmodified electroblotted proteins. FEBS Lett. 1992, 296, 300-304<br />
Packer, N.H., Ball, M.S., Devine, P.L.: Glycoprotein detection of 2-D separated proteins.<br />
Methods Mol. Biol. 1999, 112, 341-352<br />
Pasquali, C., Fialka, I., Huber, L.A.: Preparative two-dimensional gel electrophoresis of<br />
membrane proteins. <strong>Electrophoresis</strong> 1997, 18, 2573-2581<br />
Pasquali, C., Fialka, I., Huber, L.A.: Subcellular fractionation, electromigration analysis<br />
and mapping of organelles. J. Chromatogr. B. Biomed. Sci. Appl. 1999, 722, 89-102<br />
Patterson S.D., Latter G.I.: Evaluation of storage phosphor imaging <strong>for</strong> quantitative<br />
analysis of 2-D gels using the Quest II system. Biotechniques 1993, 15, 1076-1083<br />
Patton, W.F., Chung-Welch, N., Lopez, M.F., Cambria, R.P., Utterback, B.L., Skea, W.M.:<br />
Tris-tricine and Tris-borate buffer systems provide better estimates of human mesothelial
- 158 -<br />
cell intermediate filament protein molecular weights than the standard Tris-glycine<br />
system. Analytical Biochemistry, 1991, 197, 25-33<br />
Patton WF: A thousand points of light: The application of fluorescence detection<br />
technologies to two-dimensional gel electrophoresis and proteomics (Review).<br />
<strong>Electrophoresis</strong> 2000, 21, 1123-1144<br />
Patton, W.F.: Detection technologies in proteome analysis. J Chromatogr B, 2002, 771, 3-<br />
31 (Review)<br />
Pieper, R., Su, Q., Gatlin, C.L., Huang, S.T., Anderson, N.L., Steiner, S.: Multi-component<br />
immunoaffinity subtraction chromatography: an innovative step towards a comprehensive<br />
survey of the human plasma proteome. Proteomics 2003, 3, 422-432<br />
Poland, J., Cahill, M.A., Sinha, P.: Isoelectric focusing in long immobilized <strong>pH</strong> gradient<br />
gels to improve protein separation in proteomic analysis. <strong>Electrophoresis</strong> 2003, 24, 1271-<br />
1275<br />
Posch A, Weiss W, Wheeler C, Dunn MJ, Görg A: Sequence analysis of wheat grain<br />
allergens separated by two-dimensional electrophoresis <strong>with</strong> immobilized <strong>pH</strong> gradients.<br />
<strong>Electrophoresis</strong> 1995, 16, 1115-1119<br />
Rabilloud T, Valette C, Lawrence JJ: Sample application by in-gel rehydration improves<br />
the resolution of two-dimensional electrophoresis <strong>with</strong> immobilized <strong>pH</strong>-gradients in the<br />
first dimension. <strong>Electrophoresis</strong> 1994, 15, 1552-1558<br />
Rabilloud T: Solubilization of proteins <strong>for</strong> electrophoretic analysis. <strong>Electrophoresis</strong> 1996,<br />
17, 813-829<br />
Rabilloud T, Adessi, C, Giraudel A, Lunardi J: Improvement of the solubilization of<br />
proteins in two-dimensional electrophoresis <strong>with</strong> immobilized <strong>pH</strong> gradients. <strong>Electrophoresis</strong><br />
1997, 18, 307-316<br />
Rabilloud, T.: Use of thiourea to increase the solubility of membrane proteins in twodimensional<br />
electrophoresis. <strong>Electrophoresis</strong> 1998, 19, 758-760<br />
Rabilloud, T.: Solubilization of proteins in 2-D electrophoresis. An outline. Methods Mol.<br />
Biol. 1999, 112, 9-19<br />
Rabilloud, T, Chevallet M: Solubilization of proteins in 2D electrophoresis. In: Proteome<br />
Research: <strong>Two</strong>-<strong>Dimensional</strong> Gel Techniques and Identification Methods. (T. Rabilloud,<br />
Ed.), Springer 2000, pp. 9-29<br />
Rabilloud ,T., Charmont, S.: Detection of proteins on two-dimensional gels. In: Proteome<br />
Research: <strong>Two</strong>-dimensional Gel <strong>Electrophoresis</strong> and Identification Methods (T. Rabilloud,<br />
Ed.), Springer 2000, pp. 107-126
- 159 -<br />
Rabilloud, T., Strub, J.M., Luche, S., van Dorsselaer, A., Lunardi, J.: A comparison<br />
between Sypro Ruby and ruthenium II tri (bathophenanthroline disulfonate) as fluorescent<br />
stains <strong>for</strong> protein detection in gels. Proteomics 2001, 1, 699-704<br />
Righetti, P.G., Drysdale, J.W.: Ann. N.Y. Acad. Sci. 1973, 209, 163-186<br />
Righetti PG : <strong>Immobilized</strong> <strong>pH</strong> gradients. Theory and methodology. Elsevier 1990<br />
Righetti, P.G., Tonani, C.: <strong>Immobilized</strong> <strong>pH</strong> gradients (IPG) simulator - an additional step<br />
in <strong>pH</strong> gradient engineering: II. Nonlinear <strong>pH</strong> gradients. <strong>Electrophoresis</strong> 1991, 12, 1021-<br />
1027<br />
Sanchez JC, Rouge V, Pisteur M, Ravier F, Tonella L, Moosmayer M, Wilkins MR, Hochstrasser<br />
D: Improved and simplified in-gel sample application using reswelling of dry<br />
immobilized <strong>pH</strong> gradients. <strong>Electrophoresis</strong> 1997, 18, 324-327<br />
Santoni, V., Rabilloud, T., Doumas, P., Rouqui, D., Mansion, M., Kieffer, S., Garin, J.,<br />
Rossignol, M.: Towards the recovery of hydrophobic proteins on two-dimensional<br />
electrophoresis gels. <strong>Electrophoresis</strong> 1999, 20, 705-711<br />
Santoni, V., Molloy, M., Rabilloud, T.: Membrane proteins and proteomics: Un amour<br />
impossible? Elelctrophoresis 2000, 21, 1054-1070<br />
Schägger, H., von Jagow, G.: Tricine-sodium dodecyl sulfate-polyacrylamide gel<br />
electrophoresis <strong>for</strong> the separation of proteins in the range from 1 to 100 kDa. Anal.<br />
Biochem. 1987, 166, 368-379<br />
Scheele, G.A.: <strong>Two</strong>-dimensional gel analysis of soluble proteins. Charaterization of<br />
guinea pig exocrine pancreatic proteins. J. Biol. Chem. 1975, 250, 5375-5385<br />
Schupbach, J., Ammann, R.W., Freiburghaus, A.U.: A universal method <strong>for</strong> 2-D-PAGE of<br />
membrane proteins using IEF on IPGs in the first dimension. Anal. Biochem. 1991, 196,<br />
337-343<br />
Shaw, J., Rowlinson, R., Nickson, J., Stone, T., Sweet, A., Williams, K., Tonge, R.:<br />
Evaluation of saturation labelling 2-D DIGE fluorescent dyes. Proteomics 2003, 3, 1181-<br />
1195<br />
Shaw, M.M., Riederer, B.M.: Sample preparation <strong>for</strong> 2-DE. Proteomics 2003, 3, 1408-<br />
1417<br />
Shevchenko A, Wilm M, Vorm O, Mann M.: Mass spectrometric sequencing of proteins<br />
from silver-stained polyacrylamide gels. Anal. Chem 1996, 68, 850-858<br />
Simpson RJ, Tsugita A, Celis JE, Garrels JI, Mewes HW: Workshop on two-dimensional<br />
gel protein databases. <strong>Electrophoresis</strong> 1992, 12, 1055-61<br />
Simpson, R.J.: International proteomics initiatives: technological challenges. European<br />
Pharmaceutical Review 2004, 1, 25-36
- 160 -<br />
Sinha, P., Poland, J., Schnölzer, M., Rabilloud, T.: A new silver staining apparatus and<br />
procedure <strong>for</strong> matrix-assisted laser desorption/ionization-time of flight analysis of proteins<br />
after two-dimensional electrophoresis. Proteomics 2001, 1, 835-840<br />
Stastna, M., Travnicek, M, Slais, K.: New azo dyes as colored isoelectric point markers<br />
<strong>for</strong> isoelectric focusing in acidic <strong>pH</strong> region. <strong>Electrophoresis</strong> 2005, 26, 53-59<br />
Steinberg, T.H., Agnew, B.J., Gee, K.R., Leung, W.Y., Goodman, T., Schulenberg, B.,<br />
Hendrickson, J., Beechem, J.M., Haugland, R.P., Patton, W.: Global quantitative<br />
phosphoprotein analysis using Multiplexed proteomics technology. Proteomics 2003, 3,<br />
1128-1144<br />
Thoenes, L., Drews, O., Görg, A., Weiss, W.: Protein carbamylation: actually a problem in<br />
2-D electrophoresis? in: Görg, A. (Ed.), Proteomic Forum 03, PSP, Freising, 2003, p.93<br />
also available at http://www.wzw.tum.de/proteomik/<strong>for</strong>um2003/Index.htm (Poster No. 9)<br />
Towbin H, Staehelin T, Gordon J: Electrophoretic transfer of proteins from polyacrylamide<br />
gels to nitrocellulose sheets. Procedure and some applications. Proc Natl<br />
Acad Sci USA 1979, 76, 4350-4354<br />
Unlü M., Morgan EM, Minden JS: Difference gel electrophoresis: a single gel method <strong>for</strong><br />
detecting changes in protein extracts. <strong>Electrophoresis</strong> 1997, 18, 2071-2077<br />
Urwin VE, Jackson P: <strong>Two</strong>-dimensional PAGE of proteins labelled <strong>with</strong> the fluorophore<br />
monobromobimane prior to 1st-dimensional IEF. Anal. Biochem. 1993, 209, 57-62<br />
Van den Bergh, G., Arckens, L.: Fluorescent 2-D DIGE unveils the potential of gel-based<br />
proteomics. Current Opinion in Biotechnology, 2004, 15, 1-6<br />
Völkl, A., Mohr, H., Weber, G., Fahimi, H.D.: Isolation of rat hepatic peroxisomes by<br />
means of immune free flow electrophoresis. <strong>Electrophoresis</strong> 1997, 18, 774-780<br />
Weiss W, Postel W, Görg A: Application of sequential extraction procedures and<br />
glycoprotein blotting <strong>for</strong> the characterization of the 2-D polypeptide patterns of barley<br />
seed proteins. <strong>Electrophoresis</strong> 1992, 13, 770-773<br />
Weiss W, Vogelmeier C, Görg A: Electrophoretic characterization of wheat grain<br />
allergens from different cultivars involved in bakers’s asthma. <strong>Electrophoresis</strong> 1993, 14,<br />
805-816<br />
Weiss, W., Görg, A: <strong>Two</strong> dimensional electrophoresis <strong>for</strong> plant proteomics. Meth. Mol.<br />
Biol., 2006, 355, 121-144<br />
Weiss, W., Görg, A.: Sample solubilization buffers <strong>for</strong> two-dimensional electrophoresis.<br />
Meth. Mol. Biol., 2007, 424 (Vol. 1), 35-42<br />
Weiss, W., Weiland, F., Görg, A.: Protein detection and quantitation technologies <strong>for</strong> gelbased<br />
proteome analysis. Meth. Mol. Biol. (in press)
- 161 -<br />
Westbrook, J.A., Yan, J.X., Wait, R., Welson, S.Y., Dunn, M.J.: Zooming-in on the<br />
proteome: very narrow-range immobilised <strong>pH</strong> gradients reveal more protein species and<br />
iso<strong>for</strong>ms. <strong>Electrophoresis</strong> 2001, 22, 2865-2871<br />
Westermeier, R., Görg, A.: <strong>Two</strong>-<strong>Dimensional</strong> <strong>Electrophoresis</strong> in Proteomics. In: Janson,<br />
J.C. (Ed.), Protein Purification, Third Edition, John Wiley and Sons: New York, 2006 (in<br />
press)<br />
Wildgruber R, Harder A, Obermaier C, Boguth G, Weiss W, Larsen PM, Fey S, Görg A:<br />
Towards higher resolution: <strong>Two</strong>-dimensional <strong>Electrophoresis</strong> of Saccaromyces cerevisiae<br />
proteins using overlapping narrow immobilized <strong>pH</strong> gradients. <strong>Electrophoresis</strong> 2000, 21,<br />
2610-2616<br />
Wildgruber R, Reil G, Drews O, Parlar H, Görg A: Web-based two-dimensional database<br />
of Saccharomyces cerevisiae proteins using immobilized <strong>pH</strong> gradients from <strong>pH</strong> 6 to <strong>pH</strong><br />
12 and matrix-assisted laser desorption/ionization-time of flight mass spectrometry.<br />
Proteomics 2002, 2, 727-732<br />
Wilkins, M.R., Gasteiger, E., Sanchez, J.C., Bairoch A., Hochstrasser, D.F.: <strong>Two</strong>dimensional<br />
gel electrophoresis <strong>for</strong> proteome projects: the effect of protein hydrophobicity<br />
and copy number. <strong>Electrophoresis</strong> 1998, 19, 1501-1505<br />
Wilm M, Shevchenko A, Houthave T, Breit, S, Schweigerer L, Fotsis T, Mann M:<br />
Femtomole sequencing of proteins from polyacrylamide gels by nano electrospray mass<br />
spectrometry. Nature 1996, 379, 466-469<br />
Yan, J.X., Packer, N.H., Gooley, A.A., Williams, K.L.: Protein phosphorylation:<br />
technologies <strong>for</strong> the identification of phosphoamino acids. J. Chromatogr. A, 1998, 808,<br />
23-41<br />
Zhang, W., Chait, B.T.: ProFound: an expert system <strong>for</strong> protein identification using mass<br />
spectrometric peptide mapping in<strong>for</strong>mation. Anal. Chem. 2000, 72, 2482-2489<br />
Zinser, E., Daum, G.: Isolation and biochemical characterization of organelles from the<br />
yeast Saccharomyces cerevisiae. Yeast 1995, 11, 493-536<br />
Zuo, X., Speicher, D.W.: Quantitative evaluation of protein recoveries in two-dimensional<br />
electrophoresis <strong>with</strong> immobilized <strong>pH</strong> gradients. <strong>Electrophoresis</strong> 2000, 21, 3035-3047<br />
Zuo, X., Echan, X.L. Hembach, P., Tang, H.Y., Speicher, K.D., Santoli, D., Speicher<br />
D.W.: Towards global analysis of mammalian proteomes using sample prefractionation<br />
Prior to narrow <strong>pH</strong> range two-dimensional gels and using one-dimensional gels <strong>for</strong><br />
insoluble and large proteins. <strong>Electrophoresis</strong> 2001, 22, 1603-1615<br />
Zuo, X., Speicher, D.W.: Comprehensive analysis of complex proteomes using<br />
microscale solution isoelectrofocusing prior to narrow <strong>pH</strong> range two-dimensional<br />
electrophoresis. Proteomics 2002, 2, 58-68