Flow and intake frame with motorised louvers Aermec GLL10M ...
Flow and intake frame with motorised louvers Aermec GLL10M ...
Flow and intake frame with motorised louvers Aermec GLL10M ...

Create successful ePaper yourself
Turn your PDF publications into a flip-book with our unique Google optimized e-Paper software.
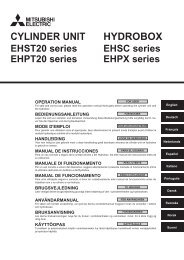
MANUALE D’INSTALLAZIONE<br />
I N S TA L L AT I O N B O O K L E T<br />
MANUEL D’INSTALLATION<br />
INSTALLATIONSANLEITUNG<br />
MANUAL DE INSTALACIÓN<br />
CORNICE DI MANDATA E D’ASPIRAZIONE CON ALETTE MOTORIZZATE<br />
FLOW AND INTAKE FRAME WITH MOTORISED LOUVERS<br />
CADRE DE SOUFFLAGE ET D'ASPIRATION AVEC AILETTES MOTORISEES<br />
LUFTAUSTRITTS- UND ANSAUGRAHMEN MIT ELEKTRISCHEN KLAPPEN<br />
MARCO DE IMPULSIÓN Y ASPIRACIÓN CON ALETAS MOTORIZADAS<br />
<strong>GLL10M</strong><br />
AGLLMIJ 1007 - 4528565_02<br />
Sostituisce il • Replace • Remplace le n° • Ersetzt • Sustituye a: 4528565_00 / 0903
TRASPORTO • CARRIAGE • TRANSPORT • TRANSPORT • TRANSPORTE<br />
14<br />
>25Kg<br />
NON bagnare. Tenere al riparo<br />
dalla pioggia<br />
Do NOT wet<br />
CRAINT l’humidité<br />
Vor Nässe schützen<br />
NO mojar<br />
Sovrapponibilità: controllare sull’imballo per conoscere il numero di macchine impilabili<br />
Stacking: control the packing to know the number of machines that can be stacked<br />
Empilement: vérifier sur l’emballage pour connaître le nombre d’appareils pouvant être empilés<br />
Stapelung: Die Anzahl der stapelbaren Geräte, wird durch die Symbole auf den Verpackungen ermittelt<br />
Apilamiento: observe en el embalaje para saber cuántos equipos pueden apilarse<br />
NON lasciare gli imballi sciolti durante il trasporto - Non rovesciare<br />
Do NOT leave loose packages during transport<br />
ATTACHER les emballages pendant le transport<br />
Die Verpackungen nicht ungesichert transportieren<br />
NO lleve las cajas sueltas durante el transporte<br />
NON trasportare la macchina da soli se il suo peso supera i 25 Kg<br />
DO NOT h<strong>and</strong>le the machine alone if its weight is over 25 Kg<br />
NE PAS transporter tout seul l’appareil si son poids dépasse 25 Kg<br />
Das Gerät NICHT alleine tragen, wenn sein Gewicht 25 Kg überschreitet<br />
NO maneje los equipos en solitario si pesan más de 25 kg<br />
Fragile, maneggiare con cura<br />
Fragile, h<strong>and</strong>le <strong>with</strong> care<br />
Fragile, manipuler avec soin<br />
Zerbrechlich, mit Sorgfalt beh<strong>and</strong>eln<br />
Frágil, manejar con cuidado<br />
SIMBOLI DI SICUREZZA • SAFETY SYMBOL • SIMBOLES DE SECURITE<br />
SICHERHEITSSYMBOLE • SÍMBOLOS DE SEGURIDAD<br />
NON calpestare<br />
Do NOT step<br />
NE PAS marcher sur cet emballage<br />
Nicht betreten<br />
NO pisar<br />
Freccia: alto<br />
Arrow: high<br />
flèche: haut<br />
Pfeil: hoch<br />
Flecha: alto<br />
Pericolo: Pericolo: Pericolo!!!<br />
Tensione Organi in movimento<br />
Danger: Danger: Danger!!!<br />
Power supply Movings parts<br />
Danger: Danger: Danger!!!<br />
Tension Organes en mouvement<br />
Gefahr ! Gefahr ! Gefahr!!!<br />
Spannung Rotierende Teile<br />
Peligro: Peligro: Peligro!!!<br />
Tensión Elementos en movimiento<br />
3
INDICE • CONTENTS • INDEX • INHALTSVERZEICHN • INDICE<br />
Osservazioni 4<br />
Installazione 5<br />
Manutenzione • Uso e funzionamento 6<br />
Dip Switch 7<br />
Dati dimensionali 20<br />
Installazione e sostituzione del filtro aria 25<br />
Remarks 4<br />
Unit installation 8<br />
Maintenance information • Operation 9<br />
Dip Switch 10<br />
Dimensions 20<br />
Installation <strong>and</strong> replacement of the air filter 25<br />
Observation 4<br />
Installation de l’unité 11<br />
Maintenance • Fonctionnement 12<br />
Dip Switch 13<br />
Dimensions 20<br />
Installation et remplacement du filtre a air 25<br />
Remarks 4<br />
Installation des Gerätes 14<br />
Wartung • Betrieb 15<br />
Dip Switch 16<br />
Abmessungen 20<br />
Installation und austauch des luftfilters 25<br />
Observations 4<br />
Installación de la unidad 17<br />
Mantenimiento • Funcionamiento 18<br />
Dip Switch 19<br />
Dimensiones 20<br />
Instalación y sustitución del filtro de aire 25<br />
4
OSSERVAZIONI<br />
Conservare i manuali in luogo asciutto, per evitare il deterioramento,<br />
per almeno 10 anni per eventuali riferimenti futuri.<br />
Leggere attentamente e completamente tutte le informazioni<br />
contenute in questo manuale. Prestare particolarmente attenzione<br />
alle norme d’uso accompagnate dalle scritte “PERICOLO” o<br />
“ATTENZIONE” in quanto, se non osservate, possono causare danno<br />
alla macchina e/o a persone e cose.<br />
ATTENZIONE: i collegamenti elettrici, l'installazione dei ventilconvettori<br />
e dei loro accessori devono essere eseguiti solo da soggetti in<br />
possesso dei requisiti tecnico-professionali di abilitazione all'installazione,<br />
alla trasformazione, all'ampliamento e alla manutenzione<br />
degli impianti ed in grado di verificare gli stessi ai fini della sicurezza<br />
OBSERVATIONS<br />
Keep the manuals in a dry place, in order to prevent deterioration,<br />
for at least 10 years for any further reference.<br />
Read all of the information contained in this manual carefully<br />
<strong>and</strong> completely. Pay particular attention to the user regulations<br />
accompanied by “DANGER” or “ATTENTION” in so much as, if<br />
they are not complied <strong>with</strong>, the machine or objects may be damaged<br />
<strong>and</strong>/or persons injured.<br />
ATTENTION: the electrical connections, installation of the fan<br />
coils <strong>and</strong> their accessories must only be performed by persons<br />
<strong>with</strong> technical-professional requisites regarding installation, transformation,<br />
extension <strong>and</strong> maintenance of plants <strong>and</strong> who can<br />
check the same regarding safety <strong>and</strong> functionality (in this manual<br />
REMARQUES<br />
Pour éviter leur détérioration, conserver les manuels dans un lieu<br />
sec, pendant au moins 10 ans, pour d’éventuelles références futures.<br />
Lire attentivement et complètement toutes les informations contenues<br />
dans ce manuel. Faire particulièrement attention aux normes<br />
d’utilisation accompagnées des inscriptions “DANGER” ou<br />
“ATTENTION ” car, si elles ne sont pas respectées, elles peuvent<br />
provoquer un dommage à la machine et/ou aux personnes et aux<br />
choses.<br />
ATTENTION: les connexions électriques, l'installation des ventiloconvecteurs<br />
et de leurs accessoires ne doivent être effectuées que<br />
par du personnel en possession de conditions technico-professionnelles<br />
requises d'habilitation à l'installation, la transformation,<br />
l'ampliation et la maintenance des installations et en mesure d'en<br />
BEMERKUNGEN<br />
Die H<strong>and</strong>bücher mindestens 10 Jahre lang zum eventuellen<br />
Nachschlagen an einem trockenen Ort aufbewahren, um ihre<br />
Beschädigung zu vermeiden.<br />
Alle in diesem H<strong>and</strong>buch enthaltenen Informationen aufmerksam und<br />
vollständig lesen. Dabei besonders auf die Benutzungsvorschriften<br />
achten, bei denen „GEFAHR“ oder „ACHTUNG“ geschrieben ist, da<br />
ihre Nichtbeachtung Schäden an der Maschine und/oder an Personen<br />
und Sachen verursachen können.<br />
ACHTUNG: Die elektrischen Anschlüsse und die Installation der<br />
Gebläsekonvektoren und ihres Zubehörs dürfen nur durch Personen<br />
ausgeführt werden, die im Besitz der fachtechnischen Zulassungen<br />
zur Installation, Umw<strong>and</strong>lung, Erweiterung und Wartung der<br />
Anlagen und in der Lage sind, dieselben hinsichtlich Sicherheit und<br />
OBSERVACIONES<br />
Conservar los manuales en un lugar seco, a fin de evitar que se<br />
deterioren, durante, por lo menos, 10 años para eventuales consultas<br />
futuras.<br />
Leer atenta y completamente todas las informaciones que contiene el<br />
presente manual. Prestar especial atención a las normas de utilización<br />
que están acompañadas del mensaje “PELIGRO” o bien “ATENCIÓN”,<br />
ya que, en el caso que no se respetasen, pueden causar daños a la<br />
máquina y / o a las personas y cosas.<br />
ATENCIÓN: solamente las personas que poseen los requisitos<br />
técnico – profesionales de la habilitación para la instalación, la<br />
transformación, las ampliaciones y el mantenimiento de las instalaciones<br />
puede llevar a cabo las conexiones eléctricas, la instalación<br />
de los ventilconvectores y de sus accesorios; deben ser capaces<br />
también de verificar los mismos a los fines de la seguridad y de<br />
e della funzionalità (in questo manuale saranno indicati con il termine<br />
generico “personale provvisto di specifica competenza tecnica”).<br />
In particolare per i collegamenti elettrici si richiedono le verifiche<br />
relative a :<br />
- Misura della resistenza di isolamento dell'impianto elettrico.<br />
- Prova della continuità dei conduttori di protezione.<br />
Per anomalie non contemplate da questo manuale, interpellare tempestivamente<br />
il Servizio Assistenza di zona.<br />
AERMEC S.p.A. declina ogni responsabilità per qualsiasi danno<br />
dovuto ad un uso improprio della macchina, ad una lettura parziale<br />
o superficiale delle informazioni contenute in questo manuale.<br />
Il numero di pagine di questo manuale è: 28<br />
they will be identified <strong>with</strong> the general term "staff <strong>with</strong> specific<br />
technical skills").<br />
In particular, checks relative to the following are requested for<br />
the electric connections:<br />
- Measurement of the electric plant isolation resistance.<br />
- Continuity test of the protection wires.<br />
For the anomalies not contemplated by this manual, contact the<br />
Area After-Sales Service as soon as possible.<br />
AERMEC S.p.A. declines all responsibility for any damage due to<br />
improper use of the machine, partial or hasty reading of the information<br />
contained in this manual.<br />
The number of pages in this manual: 28.<br />
vérifier les conditions de sécurité et de fonctionnement (dans ce<br />
manuel, ils seront désignés par le terme générique de "personnel<br />
doté de compétences techniques spécifiques").<br />
En particulier, les connexions électriques requièrent les vérifications<br />
suivantes:<br />
- Mesure de la résistance d'isolement de l'installation électrique.<br />
- Test de continuité des conducteurs de protection.<br />
Pour toute anomalie qui n'est pas prévue dans ce manuel, s’adresser<br />
en temps utile au Service d’Assistance local.<br />
AERMEC S.p.A. décline toute responsabilité pour tout dommage dérivant<br />
d’une utilisation impropre de la machine, d’une lecture partielle<br />
ou superficielle des informations contenues dans ce manuel.<br />
Le nombre de pages de ce manuel est de: 28<br />
Funktion zu testen (in dieser Anleitung werden sie mit dem allgemeinen<br />
Begriff "Personal mit technischer Fachkenntnis" bezeichnet).<br />
Insbesondere für die elektrischen Anschlüsse sind die folgenden<br />
Prüfungen erforderlich:<br />
- Messung des Isolationswiderst<strong>and</strong>s der elektrischen Anlage.<br />
- Durchgängigkeitsprüfung der Schutzleiter.<br />
Bei Störungen, die in diesem H<strong>and</strong>buch nicht berücksichtigt sind,<br />
wenden Sie sich bitte sofort an Gebietskundendienst.<br />
AERMEC S.p.A. lehnt jede Haftung für jegliche Schäden aufgrund<br />
missbräuchlicher Verwendung des Geräts und nur teilweisen oder<br />
oberflächlichen Lesens der in diesem H<strong>and</strong>buch enthaltenen<br />
Informationen ab.<br />
Anzahl der Seiten dieses H<strong>and</strong>buchs: 28<br />
la funcionalidad (en este manual serán indicados con el término<br />
general “personal con competencia técnica específica”).<br />
En particular, para las conexiones eléctricas se requieren controles<br />
relativos a:<br />
- Medición de la resistencia de aislamiento de la instalación eléctrica.<br />
- Prueba de la continuidad de los conductores de protección.<br />
Para las anomalías que no se contemplan en este manual, hay que<br />
ponerse en contacto inmediatamente con el Servicio de Asistencia<br />
de la zona.<br />
AERMEC S.p.A. declina toda responsabilidad por daños debidos a<br />
una utilización impropia de la máquina, como así también a una<br />
lectura parcial o superficial de las informaciones que contiene este<br />
manual.<br />
El número de páginas de este manual es: 28<br />
5
GLL 10 M<br />
INSTALLATION OF THE (MANDATORY) FLOW AND INTAKE FRAME ACCESSORY WITH I.R.<br />
RECEIVER, REMOTE CONTROL AND ELECTRIC BOX WITH ELECTRONIC THERMOSTAT FOR<br />
FCL<br />
- Open the packaging of the m<strong>and</strong>atory GLA10M accessories,<br />
flow <strong>frame</strong> <strong>and</strong> <strong>intake</strong> grid unit, remove the grid<br />
from the packaging <strong>and</strong> check that it has not been damaged<br />
during transport.<br />
- Remove the <strong>intake</strong> grid by acting on the 2 ratchets by ¼<br />
of a turn.<br />
- Open the cover of the terminal board on the electric box.<br />
Use a tool to release the pressurised hooks.<br />
- Connect the power supply cables to the terminal board as<br />
indicated in the wiring diagram.<br />
- Fix all cables using the cable gl<strong>and</strong>.<br />
- Close the cover of the electric terminal board.<br />
- Check <strong>and</strong>, if necessary, reset the Dip-Switches on the<br />
electric box according to desired functions. (See settings<br />
table)<br />
- Insert the electric box into the FCL unit guide <strong>and</strong> make<br />
sure that the connectors are well attached.<br />
- The electric box must be fixed to the FCL unit using two<br />
screws. The screw on the attachment side is also used to<br />
fix the supplied safety cable.<br />
WARNING: the safety cable must always be mounted to<br />
the unit <strong>and</strong> then attached to the grid <strong>frame</strong>.<br />
- Mount the air temperature probe (SA). Connect the probe<br />
to the electric box. Position the probe in the centre of the<br />
<strong>intake</strong> grid <strong>and</strong> fix it using the straps. Wind the excess<br />
cable <strong>and</strong> place it inside the fairlead grooves made in the<br />
polystyrene.<br />
- To make fixing of the <strong>frame</strong> to the fan coil easier, insert<br />
two support hooks to the relevant pegs on the conveyor.<br />
- Connect the connection cable connectors to the two<br />
electric motors in the <strong>frame</strong>.<br />
- Hang the <strong>frame</strong> on the two support hooks, pay attention<br />
to the assembly position, the corner of the <strong>frame</strong> <strong>with</strong> the<br />
AERMEC logo holder must coincide <strong>with</strong> the corner of<br />
the FCL unit electric box.<br />
- WARNING: fix the safety cable to the <strong>frame</strong>.<br />
- Connect the receiver connection cable to the connector<br />
on the electric box.<br />
- Connect the connection cables of the 2 electric motors in<br />
the <strong>frame</strong> to the connector on the electric box.<br />
- Lay the cables in the grooves in the polystyrene tray <strong>and</strong><br />
fix it using the cable gl<strong>and</strong>.<br />
- Mount the connector <strong>and</strong> cables protection lid.<br />
- Fix the <strong>frame</strong> to the unit using the 4 screws supplied.<br />
The <strong>frame</strong> guarantees sealing between air <strong>intake</strong> <strong>and</strong><br />
flow, therefore, it must be fixed correctly to the unit<br />
<strong>with</strong>out undergoing deformations.<br />
- Mount the <strong>intake</strong> grid, hooking it to the hinge on the<br />
<strong>frame</strong>.<br />
- Close the <strong>intake</strong> grid <strong>and</strong> tighten the two ratchets (on the<br />
side opposite the hinge) by ¼ of a turn.<br />
- Adjust the position of the unit by the support bracket by<br />
means of the nuts, in a way that the unit is level <strong>and</strong> the<br />
<strong>frame</strong> rests slightly in the suspended ceiling.<br />
- Insert the supplied batteries into the remote control.<br />
- Start the fan coil <strong>and</strong> carry out a functioning test. The functions<br />
are described in the user manual.<br />
• AIR FILTER<br />
G3 (EN 779) filtration performance.<br />
V0 (UL94) fire resistance.<br />
Can be easily extracted <strong>and</strong> is supplied <strong>with</strong> the GLA10M<br />
grid accessories.<br />
Use a suction device to remove built up dust.<br />
• INSTALLATION IN PROXIMITY OF A WALL<br />
If installed in proximity of a wall it is possible to close the<br />
corresponding flow inlet using the gasket supplied.<br />
9<br />
English
English<br />
MAINTENANCE<br />
- Routine maintenance is reduced to the periodical cleaning of the air filter. It must be extracted from the unit <strong>and</strong> then remounted<br />
after it has been cleaned using a suction device.<br />
Danger: interrupt the electric power supply if the unit must be accessed.<br />
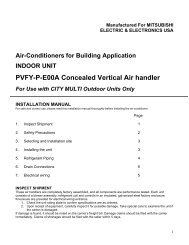
USE<br />
An opening of 20° is recommended in heating mode <strong>and</strong> 10° in cooling mode. These positions are indicated <strong>with</strong> two raised<br />
lines on the <strong>louvers</strong> (see figure).<br />
Ventilation is allowed <strong>with</strong> the <strong>louvers</strong> closed.<br />
Pressing the SWING button, the four defl ector louvres will turn around their own axis alternately from the 0° position (louvre<br />
closed) to the 20° position (louvre open in heating position).<br />
On reaching the desired position, press the SWING button again to block the louvres. On the contrary these will continue to<br />
turn for a maximum time of 2 minutes <strong>and</strong> will then stop. In this case, to modify the position, act on the SWING button again.<br />
WARNING: Do not try to act manually on the defl ector louvres of the GLL M grid unit so as not to jeopardise functioning.<br />
Position of the <strong>louvers</strong> in heating mode opening 20°.<br />
Position of the <strong>louvers</strong> in cooling mode opening 10°.<br />
Ventilation is allowed <strong>with</strong> the <strong>louvers</strong> closed.<br />
10
DATI DIMENSIONALI • DIMENSIONS • DONNÉES DES LES DIMENSIONS • ABMESSUNGEN<br />
DATOS DIMENSIONALES [mm]<br />
<strong>GLL10M</strong><br />
754<br />
470<br />
26<br />
64<br />
754<br />
21
<strong>GLL10M</strong><br />
22<br />
N<br />
L<br />
- L - N<br />
> 650mm<br />
230VAC<br />
230VAC<br />
L<br />
N
SA<br />
23
1<br />
2<br />
3<br />
24
26<br />
PERICOLO: Togliere tensione prima d’iniziare le operazioni di pulizia del filtro e/o dell’unità.<br />
DANGER: Switch off power supply before cleaning filter <strong>and</strong>/or unit.<br />
DANGER: Couper la tension avant de commencer les opérations de nettoyage du filtre et/ou de l'unité.<br />
GEFAHR: Vor der Reinigung des Filters und/oder des Gerätes die Strom versorgung abschalten.<br />
PELIGRO: Quitar la tensión antes de iniciar las operaciones de limpieza del filtro o de la unidad.