Create successful ePaper yourself
Turn your PDF publications into a flip-book with our unique Google optimized e-Paper software.
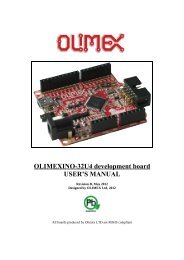
MCI Electronics<br />
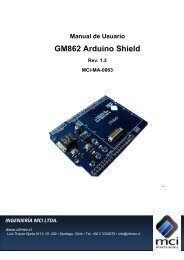
User’s Manual<br />
<strong>GM862</strong> <strong>Arduino</strong> <strong>Shield</strong><br />
Rev. 1.3<br />
MCI-MA-0063<br />
www.olimex.cl<br />
Luis Thayer Ojeda 0115. Of. 402 ▪ Santiago, Chile ▪ Tel. +56 2 3339579 ▪ info@olimex.cl
MCI Ltda.<br />
Luis Thayer Ojeda 0115. Of. 402<br />
Santiago, Chile<br />
www.olimex.cl<br />
Tel: +56 2 3339579<br />
Fax: +56 2 3350589<br />
® MCI Ltda. 2011<br />
Attention: Any changes and modifications done to the device will void its warranty<br />
unless expressly authorized by MCI.<br />
Manual Code: MCI – MA - 0063
<strong>GM862</strong> <strong>Arduino</strong> <strong>Shield</strong> User’s Manual Page 3 of 13<br />
INTRODUCTION .................................................................................................... 4<br />
FUNCTIONALITIES ................................................................................................ 4<br />
DEVICE PARTS ...................................................................................................... 5<br />
QUICK INSTALLATION AND PROGRAMMING GUIDE FOR THE <strong>GM862</strong><br />
ARDUINO SHIELD .......................................................................................... 6<br />
<strong>GM862</strong>_SMS EXAMPLE SOURCE CODE ............................................................. 8<br />
<strong>GM862</strong>_LOAD_HTML EXAMPLE SOURCE CODE ................................................ 9<br />
<strong>GM862</strong>_GPRS EXAMPLE SOURCE CODE ......................................................... 11<br />
PORT MAPPING .................................................................................................. 13<br />
DOCUMENT HISTORY ........................................................................................ 13<br />
Luis Thayer Ojeda 0115 Of. 402 ▪ Santiago, Chile ▪ Tel. +56 2 3339579 ▪ info@olimex.cl<br />
www.olimex.cl
<strong>GM862</strong> <strong>Arduino</strong> <strong>Shield</strong> User’s Manual Page 4 of 13<br />
INTRODUCTION<br />
The main purpose of this document is to describe the <strong>GM862</strong> <strong>Arduino</strong> <strong>Shield</strong><br />
functionalities.<br />
This document covers all the functionalities supported by the shield. Basic<br />
<strong>GM862</strong> modem configuration procedures are also suggested.<br />
The <strong>GM862</strong> <strong>Arduino</strong> <strong>Shield</strong> enables de <strong>Arduino</strong> board to make phone calls,<br />
send SMS messages, send GPRS data, activate I/O board pins and much more.<br />
This merges the great amount of functionalities and flexibility of <strong>GM862</strong> modems<br />
with the easiness and simplicity of <strong>Arduino</strong>. These features enables the user to<br />
develop projects on the following areas:<br />
Telemetry and Telecontrol.<br />
Intelligent security systems.<br />
Intelligent automatic selling systems.<br />
Vehicle fleet management systems.<br />
FUNCTIONALITIES<br />
The <strong>GM862</strong> <strong>Arduino</strong> <strong>Shield</strong> basically provides adequate power for the Telit<br />
<strong>GM862</strong> modem, and also adapts the pins for working with <strong>Arduino</strong>.<br />
Some specific features of this device are:<br />
1) 5-9 [VDC] power regulation to 3.8 [VDC]<br />
2) 3 [A] maximum current consumption<br />
3) Power indicator Led<br />
4) <strong>GM862</strong> modem status indicator Led<br />
5) User configurable Led<br />
6) <strong>GM862</strong> ON/OFF button<br />
7) <strong>Arduino</strong> reset button<br />
8) <strong>GM862</strong> modem ADC port connection<br />
9) Dimensions: 76 x 54 [mm]<br />
Luis Thayer Ojeda 0115 Of. 402 ▪ Santiago, Chile ▪ Tel. +56 2 3339579 ▪ info@olimex.cl<br />
www.olimex.cl
<strong>GM862</strong> <strong>Arduino</strong> <strong>Shield</strong> User’s Manual Page 5 of 13<br />
DEVICE PARTS<br />
GSM Antenna<br />
Connector<br />
<strong>GM862</strong> Modem<br />
Connector<br />
ADC Jumper<br />
Fig.1 <strong>GM862</strong> <strong>Arduino</strong> <strong>Shield</strong> board.<br />
LED PWR<br />
LED STAT<br />
LED USER<br />
ON/OFF Button<br />
<strong>Arduino</strong> Reset<br />
Button<br />
GPS Antenna<br />
Connection<br />
<strong>GM862</strong> Modem Connector: <strong>GM862</strong>-GPS modem connector<br />
LED STAT: <strong>GM862</strong> modem operation indicator Led<br />
LED PWR: <strong>GM862</strong> modem energized indicator Led<br />
LED USER: User configurable indicator<br />
GSM Antenna Connector: External GSM antenna connector<br />
GPS Antenna Connector: External GPS antenna connector<br />
ON/OFF Button: ON/OFF modem button<br />
<strong>Arduino</strong> Reset Button: Resets the <strong>Arduino</strong> board<br />
ADC Jumper: Jumper for setting the <strong>GM862</strong> modem ADC conversion value to<br />
0 V.<br />
Luis Thayer Ojeda 0115 Of. 402 ▪ Santiago, Chile ▪ Tel. +56 2 3339579 ▪ info@olimex.cl<br />
www.olimex.cl
<strong>GM862</strong> <strong>Arduino</strong> <strong>Shield</strong> User’s Manual Page 6 of 13<br />
QUICK INSTALLATION AND PROGRAMMING GUIDE FOR THE<br />
<strong>GM862</strong> ARDUINO SHIELD<br />
Before installing and programming the <strong>GM862</strong> <strong>Arduino</strong> <strong>Shield</strong> a virtual serial<br />
port must be installed, and also, some of the <strong>Shield</strong> pins have to be connected. This<br />
is for communication with both the modem and PC, at the same time. This makes<br />
the software debugging procedure more fluid than using the hardware serial port<br />
only.<br />
1. Download the example program here.<br />
2. Install the <strong>Shield</strong>. See fig.2 for reference.<br />
A. Connect the <strong>GM862</strong> modem.<br />
B. Align the shield in order to connect the shield side pins to the<br />
corresponding pins of the <strong>Arduino</strong>.<br />
C. Assembly the shield to the <strong>Arduino</strong> board ensuring ALL of the pins are<br />
connected.<br />
3. Insert SIM card into <strong>GM862</strong> modem.<br />
4. Connect 5-9 VDC <strong>Arduino</strong> board power supply.<br />
5. Connect <strong>Arduino</strong> USB port to the PC.<br />
6. If the FTDI drivers haven’t been installed, install them (Download here).<br />
7. Open <strong>Arduino</strong> Alpha (Download here).<br />
8. Open source code (Example source code introduced in section 5).<br />
NewSoftSerial library must be in installed in <strong>Arduino</strong>\libraries\NewSoftSerial<br />
9. Change the phone number you want to send a SMS.<br />
10. Click Upload button in <strong>Arduino</strong> Alpha.<br />
11. Wait until Stat LED is ON.<br />
A. The modem behavior can also be seen by clicking the Serial Monitor<br />
button, configuring a baud rate of 9600 bps.<br />
At the end of this sequence, a text message was sent to the telephone number<br />
indicated in the source code.<br />
Luis Thayer Ojeda 0115 Of. 402 ▪ Santiago, Chile ▪ Tel. +56 2 3339579 ▪ info@olimex.cl<br />
www.olimex.cl
<strong>GM862</strong> <strong>Arduino</strong> <strong>Shield</strong> User’s Manual Page 7 of 13<br />
D<br />
A<br />
TELIT<br />
Fig.2 <strong>GM862</strong> <strong>Arduino</strong> <strong>Shield</strong> board assembly.<br />
Luis Thayer Ojeda 0115 Of. 402 ▪ Santiago, Chile ▪ Tel. +56 2 3339579 ▪ info@olimex.cl<br />
www.olimex.cl<br />
C<br />
B
<strong>GM862</strong> <strong>Arduino</strong> <strong>Shield</strong> User’s Manual Page 8 of 13<br />
<strong>GM862</strong>_SMS EXAMPLE SOURCE CODE<br />
The following code was extracted from the library developed by http://tinkerlog.com<br />
and modified for working with <strong>Arduino</strong> Duemilanove board.<br />
This code sends an SMS to a programmer-defined number, with a pre-defined text.<br />
It also does the modem initialization and configuration.<br />
To upload the example source code, open this file<br />
scketch\<strong>GM862</strong>_SMS\<strong>GM862</strong>_SMS.pde<br />
Search function “modem.sendSMS(“+569phone_number”,”message”)”. And<br />
replace phone number and message.<br />
Upload program to <strong>Arduino</strong>.<br />
If you open Serial monitor configured to 9600bps, you can see the procedures<br />
executed by <strong>Arduino</strong>.<br />
The source files can be downloaded from the author website or from<br />
www.olimex.cl.<br />
/*<br />
File: <strong>GM862</strong>_SMS.pde<br />
Author: Moisés Campos<br />
MCI Electronics<br />
www.olimex.cl<br />
*/<br />
#include <br />
#include <br />
#include "<strong>GM862</strong>.h"<br />
#define BUF_LENGTH 100<br />
#define txGprs_pin 3<br />
#define rxGprs_pin 2<br />
NewSoftSerial ser(rxGprs_pin,txGprs_pin);<br />
<strong>GM862</strong> modem(&ser);<br />
void setup()<br />
{<br />
Serial.begin(9600);<br />
modem.switchOn();<br />
modem.init();<br />
while (!modem.isRegistered())<br />
{<br />
delay(1000);<br />
modem.checkNetwork();<br />
}<br />
}<br />
void loop()<br />
{<br />
modem.sendSMS("+56998300000", "Hello World!");<br />
digitalWrite(ST_LED_pin,HIGH);<br />
delay(2000);<br />
modem.switchOff();<br />
while(1);<br />
}<br />
Luis Thayer Ojeda 0115 Of. 402 ▪ Santiago, Chile ▪ Tel. +56 2 3339579 ▪ info@olimex.cl<br />
www.olimex.cl
<strong>GM862</strong> <strong>Arduino</strong> <strong>Shield</strong> User’s Manual Page 9 of 13<br />
<strong>GM862</strong>_LOAD_HTML EXAMPLE SOURCE CODE<br />
This example configures a HTTP connection with a web server. After connect, the<br />
module request a HTML file from server and show it on Serial monitor, configured<br />
at 9600 bps.<br />
To upload the example source code, open this file scketch\<strong>GM862</strong>_LOAD_HTML\<br />
<strong>GM862</strong>_LOAD_HTML.pde<br />
Search function modem.settoInternet(“APN”, “user….). Replace APN, user name<br />
and password for the configuration used by your mobile internet provider<br />
Upload program to <strong>Arduino</strong>.<br />
If you open Serial monitor configured to 9600bps, you can see the procedures<br />
executed by <strong>Arduino</strong>.<br />
/*<br />
File: <strong>GM862</strong>_SMS.pde<br />
Author: Moisés Campos<br />
MCI Electronics<br />
www.olimex.cl<br />
*/<br />
#include <br />
#include <br />
#include "<strong>GM862</strong>.h"<br />
#define BUF_LENGTH 100<br />
#define txGprs_pin 3<br />
#define rxGprs_pin 2<br />
NewSoftSerial ser(rxGprs_pin,txGprs_pin);<br />
<strong>GM862</strong> modem(&ser);<br />
char generalBuffer[500];<br />
void setup()<br />
{<br />
Serial.begin(9600);<br />
modem.switchOn();<br />
modem.init();<br />
while (!modem.isRegistered())<br />
{<br />
delay(1000);<br />
modem.checkNetwork();<br />
}<br />
modem.settoInternet("APN","username","password","www.roundsolutions.com", "80");<br />
}<br />
void loop()<br />
{<br />
modem.connecttoServer();<br />
byte i = 0;<br />
Serial.println("Load html...");<br />
modem.sendd("GET / HTTP/1.0\r\n"); // search twitter for gm862<br />
modem.sendd("Connection: keep-alive\r\n"); // write on the socket<br />
modem.sendd("\r\n");<br />
Serial.println("receiving ...");<br />
while (i++ < 50) {<br />
modem.receive(generalBuffer);<br />
Luis Thayer Ojeda 0115 Of. 402 ▪ Santiago, Chile ▪ Tel. +56 2 3339579 ▪ info@olimex.cl<br />
www.olimex.cl
<strong>GM862</strong> <strong>Arduino</strong> <strong>Shield</strong> User’s Manual Page 10 of 13<br />
if (strlen(generalBuffer) > 0) {<br />
Serial.print("buf:");<br />
Serial.println(generalBuffer);<br />
i--;<br />
}<br />
}<br />
Serial.println("done");<br />
modem.closedConection();<br />
digitalWrite(ST_LED_pin,HIGH);<br />
modem.switchOff();<br />
while(1);<br />
}<br />
Luis Thayer Ojeda 0115 Of. 402 ▪ Santiago, Chile ▪ Tel. +56 2 3339579 ▪ info@olimex.cl<br />
www.olimex.cl
<strong>GM862</strong> <strong>Arduino</strong> <strong>Shield</strong> User’s Manual Page 11 of 13<br />
<strong>GM862</strong>_GPRS EXAMPLE SOURCE CODE<br />
This example opens a TCP/IP socket, reads an analog input and sends data to<br />
configured server in realtime.<br />
To upload the example source code, open this file scketch\<strong>GM862</strong>_GPRS\<br />
<strong>GM862</strong>_GPRS.pde<br />
Search function modem.settoInternet(“APN”, “user….). Replace APN, user name<br />
and password for the configuration used by your mobile internet provider<br />
Upload program to <strong>Arduino</strong>.<br />
If you open Serial monitor configured to 9600bps, you can see the procedures<br />
executed by <strong>Arduino</strong>.<br />
/*<br />
File: <strong>GM862</strong>_SMS.pde<br />
Author: Moisés Campos<br />
MCI Electronics<br />
www.olimex.cl<br />
*/ #include <br />
#include <br />
#include "<strong>GM862</strong>.h"<br />
#define BUF_LENGTH 100<br />
#define txGprs_pin 3<br />
#define rxGprs_pin 2<br />
NewSoftSerial ser(rxGprs_pin,txGprs_pin);<br />
<strong>GM862</strong> modem(&ser);<br />
char generalBuffer[100];<br />
void setup()<br />
{<br />
Serial.begin(9600);<br />
modem.switchOn();<br />
modem.init();<br />
while (!modem.isRegistered())<br />
{<br />
delay(1000);<br />
modem.checkNetwork();<br />
}<br />
modem.settoInternet("APN", "username", "password", "domain", "port");<br />
}<br />
void loop()<br />
{<br />
modem.connecttoServer();<br />
char iteracion =0;<br />
while(iteracion < 4)<br />
{<br />
char tmp;<br />
Serial.println("");<br />
float temperature = float(analogRead(0));<br />
temperature = processinSensor(temperature,-21.244,1.7908,-0.0278,0.0003,0,(100.0/1024));<br />
strcpy(generalBuffer,"Temperatura Actual = ");<br />
char *pTemporal = generalBuffer + strlen(generalBuffer);<br />
ftoa(pTemporal,temperature,1);<br />
Luis Thayer Ojeda 0115 Of. 402 ▪ Santiago, Chile ▪ Tel. +56 2 3339579 ▪ info@olimex.cl<br />
www.olimex.cl
}<br />
<strong>GM862</strong> <strong>Arduino</strong> <strong>Shield</strong> User’s Manual Page 12 of 13<br />
modem.transmittoServer(generalBuffer);<br />
delay(5000);<br />
iteracion++;<br />
Serial.println(generalBuffer);<br />
}<br />
modem.closedConection();<br />
digitalWrite(ST_LED_pin,HIGH);<br />
delay(2000);<br />
modem.switchOff();<br />
while(1);<br />
float processinSensor(float sensor, float a, float ax,float axx, float axxx,float axxxx,<br />
float factor) {<br />
sensor=(sensor*factor);//valor normalizado, y luego transformado en %<br />
sensor= (axxxx*pow(sensor,4)+axxx*pow(sensor,3)+axx*pow(sensor,2)+ax*sensor+a);<br />
return sensor;}<br />
void *ftoa(char *a, double f, int precision){<br />
float p[] = {0.0,10.0,100.0,1000.0,10000.0,100000.0,1000000.0,10000000.0,100000000.0};<br />
char *ret = a;<br />
char mantiza[10];<br />
long heiltal = long(f);<br />
ltoa(heiltal, a, 10);<br />
while (*a != '\0') a++;<br />
*a++ = '.';<br />
long decimal = abs(long((f - float(heiltal)) * p[precision]));<br />
ltoa(decimal, mantiza, 10);<br />
for(;strlen(mantiza) < precision; precision--)<br />
*a++ = '0';<br />
strcpy(a , mantiza);}<br />
Luis Thayer Ojeda 0115 Of. 402 ▪ Santiago, Chile ▪ Tel. +56 2 3339579 ▪ info@olimex.cl<br />
www.olimex.cl
<strong>GM862</strong> <strong>Arduino</strong> <strong>Shield</strong> User’s Manual Page 13 of 13<br />
PORT MAPPING<br />
<strong>GM862</strong> <strong>Arduino</strong> <strong>Shield</strong> port mapping<br />
Pin Name/Function<br />
DIGITAL 0 Serial RX<br />
DIGITAL 1 Serial TX<br />
DIGITAL 2 SoftSerial RX<br />
DIGITAL 3 SoftSerial TX<br />
DIGITAL 4 ON/OFF Modem<br />
RESET RESET Ard<br />
EAR_HF+ Handset ear output, phase +<br />
EAR_HF- Handset ear output, phase -<br />
MIC_HF- Handsfree microphone input; phase -,<br />
nominal level 3mVrms<br />
MIC_HF+ Handsfree microphone input; phase +,<br />
nominal level 3mVrms<br />
GPIO5 Configurable general purpose I/O pin<br />
GPIO6 GP I/O pin or ALARM output pin<br />
GPIO7 GP I/O pin or Buzzer output pin<br />
GPIO8 Configurable general purpose I/O pin<br />
GPIO9 Configurable general purpose I/O pin<br />
GPIO10 Configurable general purpose I/O pin<br />
GPIO11 Configurable general purpose I/O pin<br />
GPIO12 Configurable general purpose I/O pin<br />
ADC ADC input<br />
3.8V 3.8V regulated voltage<br />
DOCUMENT HISTORY<br />
Revision Date Edited by Description/Changes<br />
1.0 August 12, 2010 E. Martin Initial document version<br />
1.1 September 22, 2010 E. Martin Software Serial Port<br />
usage example code is<br />
included.<br />
1.2 November 23, 2010 E. Martin New board version<br />
update.<br />
1.3 July 21, 2011 M. Campos Includes new examples<br />
and library<br />
improvements.<br />
Luis Thayer Ojeda 0115 Of. 402 ▪ Santiago, Chile ▪ Tel. +56 2 3339579 ▪ info@olimex.cl<br />
www.olimex.cl