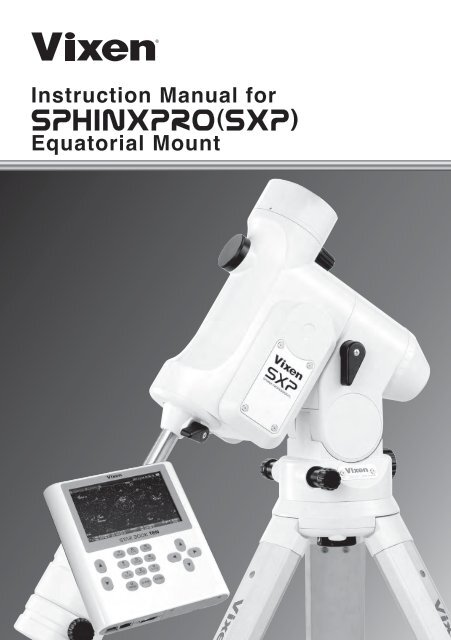
Sphinx SXP Manual - Vixen Optics
Sphinx SXP Manual - Vixen Optics
Sphinx SXP Manual - Vixen Optics

You also want an ePaper? Increase the reach of your titles
YUMPU automatically turns print PDFs into web optimized ePapers that Google loves.
PREFACE<br />
Thank you for your purchase the <strong>Vixen</strong> <strong>SXP</strong> equatorial mount.<br />
The <strong>SXP</strong> equatorial mount is a high precision sturdy mount ideal for astrophotography. The cutting-edge STAR BOOK TEN Hand Controller<br />
feratures a high definision large color LCD screen with intuitive controls to help you enjoy your astronomical observation.<br />
* The manual describes the functions and uses of the <strong>SXP</strong> equatorial mount and vsrious <strong>Vixen</strong> Telescopes. You may occasionally find<br />
descriptions not relevant to your model.<br />
* Use this instruction manal in conjunction with your telescope manual.<br />
* Features may be updated or new functions added. Please visit <strong>Vixen</strong>'s website for the latest software updates.<br />
* Use the correct power source for the <strong>SXP</strong> equatorial mount or the optional AC Adapter sold separately.<br />
Carefully read the instructions before use.<br />
* Follow the instructions precisely.<br />
* Keep this manual nearby to find quick answers to questions.<br />
* This instruction manual will assist you in the safe use of the <strong>SXP</strong> equatorial mount.<br />
WARNING!<br />
Never look directly at the sun with your naked eyes or through your telescope and finder scope.<br />
Permanent and irreversible eye damage may result.<br />
* This equipment has been tested and found to comply with the limits for a Class B digital device, pursuant of Part 15 of the FCC rules.<br />
CAUTION<br />
* Do not try to restrain the movement of the mount when in operation, which may lead to injuries to you or damage to your equipment.<br />
* Do not use the product in a wet environment.<br />
* Do not turn on the power switch of the mount under circumstances when internal condensation is suspected on the equipment. It may cause a<br />
failure by a short circuit.<br />
* Do not attempt to disassemble or alter any part of the equipment that is not expressly described in this manual. This could damage the mount ,<br />
result in electricasl shock or lead to injury.<br />
* Do not use the D-sub 9pin cable of the STAR BOOK TEN to connect to other equipment such as a PC. It may cause a failure, heating, or<br />
electrical shock.<br />
HANDLING and STORAGE<br />
* Do not expose the product to rain, water drops, dirt or sand.<br />
* When cleaning, do not use solvent such as paint thinners.<br />
* For storage, keep the product in a dry place, and do not expose to direct sunlight.<br />
* Remove the batteries from the battery compartment if the product is not used for a long time.<br />
2
BEFORE USE<br />
Checking the Package Contents<br />
The <strong>SXP</strong> Equatorial mount package contains the items listed below.<br />
Check if all the items are included.<br />
Package Consisting of:<br />
<strong>SXP</strong> Equatorial Mount<br />
SX Counterweights 3.7kg and 1.9kg<br />
STAR BOOK TEN Hand Controller<br />
STAR BOOK Cable<br />
Ferrite Core for LAN cable<br />
Phillips Head Screwdriver<br />
Size M8 Screws<br />
Allen Wrenches; one each of 6mm, 5mm, 1.5mm and 0.5 inch<br />
Cigarette-lighter Plug Cord<br />
Strap for STAR BOOK TEN<br />
CR2032 Battery for STAR BOOK TEN's built-in clock<br />
(Checking Purpose Only)<br />
<strong>SXP</strong> Instruction <strong>Manual</strong> (This book)<br />
Note:<br />
* Your <strong>SXP</strong> mount package may differ when you purchase it as a<br />
complete telescope package.<br />
* A power supply unit is sold separately.<br />
1<br />
1<br />
1<br />
1<br />
1<br />
1<br />
2<br />
1<br />
1<br />
1<br />
1<br />
1<br />
4<br />
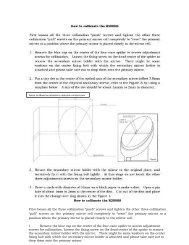
Basics of the Equatorial Mounts<br />
What is an Equatorial Mount?<br />
In the northern hemisphere, stars appear to turn around the polar<br />
star (the north celestial pole) making approximately one rotation per<br />
day. This is called diurnal motion and occurs because the earth<br />
turns on its own axis once a day. The equatorial mount is a platform<br />
which is designed to rotate parallel to earth's rotational axis.<br />
North Celestial Pole<br />
North Celestial Pole<br />
North Pole<br />
Equator<br />
Zenith<br />
Basic movement of the <strong>SXP</strong> Mount<br />
Polar Axis<br />
Horizon<br />
South Pole<br />
Earth's Axis<br />
Every movement of the electrically driven <strong>SXP</strong> Mount is fully<br />
controlled by the STAR BOOK TEN hand controller. The mount will<br />
perform smooth and accurate movements when each component on<br />
the mount is balanced correctly. An unbalanced mount may cause<br />
vibrations and can result in tracking errors or failure of rotational<br />
mechanisms. Make sure that the telescope is well balanced.<br />
CAUTION<br />
Do not rotate the mount manually without loosening the<br />
clamp levers.<br />
The <strong>SXP</strong> mount has clamps which allow you to rotate the Right<br />
Ascension (R.A) and Declination (DEC.) axes freely for quick set up<br />
and compact storage of the mount. Remember to tighten the clamp<br />
levers when you use the mount. The clamp levers should be<br />
loosened to protect the inner gear train for storage and when you<br />
transport the mount.<br />
Never connect the STAR BOOK cable to other equipment such as a<br />
PC. This could result in electrical shock, fire, or damage to the<br />
equipment. (The specifications of the STAR BOOK cable are not<br />
compatible with RS232C connectors.)<br />
Be careful not to bang the mount against other objects. This could<br />
damage the gears and bearings.
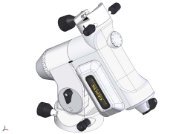
BEFORE USE<br />
<strong>SXP</strong> Mount Components<br />
Polar Axis Front Cap<br />
Set Position Guidepost<br />
Motor Housing<br />
Counterweight Bar Lock Lever<br />
Counterweight Bar<br />
Counterweight Lock Screw<br />
Counterweight 3.7kg<br />
(8.18 lb)<br />
Counterweight 1.9kg<br />
(4.2 lb)<br />
Counterweight<br />
Safety Thumbscrew<br />
Dew Shield<br />
Objective lens (Inside)<br />
Dovetail Tube Plate<br />
Dovetail-plate Mounting Block<br />
SXG Half Pillar<br />
Fixing Bolt with Grip<br />
SXG Tripod<br />
Leg Bracket<br />
Extension Clamps<br />
R.A. Axis(Polar Axis)<br />
[<strong>SXP</strong> Mount]<br />
[<strong>SXP</strong> Mount series telescope package with optical tube and tripod]<br />
<strong>SXP</strong>-AX103S shown as an example<br />
Safety Screw<br />
Carry Handle<br />
Lock Screw<br />
Finder Scope<br />
Eyepiece<br />
Flip Mirror Daigonal<br />
Focuser Draw-tube<br />
Focus Knobs<br />
Fixing Bolt(Inside)with Grip<br />
Fixing Knob<br />
STAR BOOK TEN<br />
5<br />
Leg Tip<br />
Declination Axis<br />
Mount Head<br />
(Optical Tube Attachment Base)<br />
DEC. Clamp Lever<br />
R.A. Clamp Lever<br />
Polar Axis Rear Cap<br />
(Polar Scope Cover)<br />
Polar Axis Scope<br />
(Built-in)<br />
Altitude Scale<br />
Altitude Adjustment Knob<br />
(For Polar Alignment)<br />
Azimuth Adjustment Knobs<br />
(For Polar Alignment)<br />
Power Switch<br />
DC12V Power<br />
Connecting Port<br />
Controller Connecting Port<br />
Set Position Guidepost<br />
Altitude Clamp Lever<br />
(For Polar Alignment)
Chapter 1 PREPARATION<br />
Tips on Proper Balancing<br />
The balance arrangements below illustrate various possible settings, depending on the length and weight of your optical tube. The center<br />
of gravity of the telescope is given as 25cm from the intersection of the R.A. and DEC axes.<br />
No counterweight:<br />
from 1.3kg (2.8 lbs.) up to 2.0kg (4.4 lbs.)<br />
25cm<br />
1.3〜2.0kg<br />
(32.5〜51.4kg・m)<br />
A 1.0kg (2.2 lb) counterweight:<br />
from 2.9kg (6.3 lbs.) up to 3.9kg (8.5 lbs.)<br />
25cm<br />
2.9〜3.9kg<br />
(74.5〜98.5kg・m)<br />
25cm<br />
3.7〜5.5kg<br />
(94.5〜139.5kg・m)<br />
25cm<br />
4.7〜7.3kg<br />
(117.7〜184.1kg・m)<br />
23.1cm<br />
A 1.9kg (4.1 lb) counterweight:<br />
22.7cm<br />
23.7cm<br />
47.1cm<br />
from 3.7kg (8.1 lbs.) up to 5.5kg (12.1 lbs.)<br />
A 2.8kg (6.1 lb) counterweight:<br />
46.4cm<br />
from 4.7kg (10.3 lbs.) up to 7.3kg (16.0 lbs.)<br />
1.0kg 1.0kg<br />
1.9kg 1.9kg<br />
47.4cm<br />
2.8kg<br />
2.8kg<br />
18<br />
A 3.7 kg (8.1 lb) counterweight:<br />
from 5.7kg (12.5 lbs.) up to 9.2kg (8.6 lbs.)<br />
25cm<br />
5.7〜9.2kg<br />
(142.8〜230.5kg・m)<br />
25cm<br />
8.0〜12.4kg<br />
(201.4〜310.6kg・m)<br />
25cm<br />
9.2〜13.8kg<br />
(232.1〜345.8kg・m)<br />
25cm<br />
10.5〜15.1kg<br />
(264.5〜379.2kg・m)<br />
24.7cm<br />
48.4cm<br />
3.7kg<br />
48.4cm<br />
42.2cm<br />
28.9cm<br />
22.7cm<br />
48.4cm<br />
41.2cm<br />
30.9cm<br />
23.7cm<br />
48.4cm<br />
40.2cm<br />
32.9cm<br />
24.7cm<br />
3.7kg<br />
A 3.7kg (8.1 lb) & a 1.9kg (4.1 lb) counterweights:<br />
from 8.0kg (17.6 lbs.) up to 12.4kg (27.3 lbs.)<br />
1.9kg+ 3.7kg 1.9kg+ 3.7kg<br />
A 3.7kg (8.1 lb) & a 2.8kg (6.1 lb) counterweights:<br />
from 9.2kg (20.2 lbs.) up to 13.8kg (30.3 lbs.)<br />
Two 3.7kg (8.1 lb) counterweights:<br />
from 4.7kg (10.3 lbs.) up to 7.3kg (16.0 lbs.)<br />
2.8kg + 3.7kg 2.8kg + 3.7kg<br />
3.7kg + 3.7kg 3.7kg + 3.7kg
Chapter 4 AUTOMATIC GOTO SLEWING<br />
INDEX<br />
Craters Seas, Ocean, Bays, Lakes and Marsh<br />
Albategnius<br />
Alphonsus<br />
Archimedes<br />
Aristarchus<br />
Aristillus<br />
Aristotle<br />
Arzachel<br />
Atlas<br />
Autolycus<br />
Billy<br />
Blancanus<br />
Boscovich<br />
Briggs<br />
Bullialdus<br />
Burg<br />
Campanus<br />
Capuanus<br />
Cardnus<br />
Cassini<br />
Catharina<br />
Clavius<br />
Cleomedes<br />
Columbus<br />
Copernicus<br />
Crüger<br />
Curtius<br />
Cyrillus<br />
Darwin<br />
De La Rue<br />
Eddington<br />
Endymion<br />
Eratosthenes<br />
Eudoxus<br />
Fabricius<br />
Faraday<br />
Flammarion<br />
Fra Mauro<br />
Fracastorius<br />
Furnerius<br />
Gambert<br />
Gassendi<br />
Gauss<br />
045<br />
008<br />
011<br />
010<br />
034<br />
012<br />
009<br />
055<br />
035<br />
097<br />
080<br />
046<br />
108<br />
030<br />
051<br />
085<br />
087<br />
102<br />
033<br />
021<br />
006<br />
014<br />
062<br />
001<br />
096<br />
077<br />
020<br />
094<br />
052<br />
105<br />
053<br />
003<br />
050<br />
070<br />
025<br />
044<br />
041<br />
064<br />
018<br />
040<br />
027<br />
058<br />
Geminus<br />
Goclenius<br />
Goldschmidt<br />
Grimaldi<br />
Guericke<br />
Gutenberg<br />
Hainzel<br />
Harpalus<br />
Hedin<br />
Hercules<br />
Hevelius<br />
Julius Caesar<br />
Kepler<br />
Kraft<br />
Krasnov<br />
Lagrange<br />
Lamarck<br />
Lambert<br />
Landberg<br />
Langrenus<br />
Longomontanus<br />
Macrobius<br />
Maginus<br />
Mairan<br />
Manilius<br />
Manzinus<br />
Marius<br />
Massala<br />
Maurolycus<br />
Mee<br />
Mercator<br />
Mersenius<br />
Metius<br />
Moretus<br />
Parry<br />
Petavius<br />
Philolaus<br />
Piccolomini<br />
Pitatus<br />
Pitiscus<br />
Plato<br />
Pliny<br />
057<br />
061<br />
114<br />
028<br />
043<br />
031<br />
088<br />
111<br />
100<br />
054<br />
099<br />
047<br />
029<br />
103<br />
095<br />
091<br />
092<br />
037<br />
039<br />
015<br />
083<br />
059<br />
078<br />
109<br />
048<br />
076<br />
101<br />
056<br />
023<br />
089<br />
086<br />
093<br />
069<br />
079<br />
042<br />
017<br />
113<br />
022<br />
081<br />
072<br />
005<br />
049<br />
Posidonius<br />
Ptolemaeus<br />
Purbach<br />
Pythagoras<br />
Rabbi Levi<br />
Regiomontanus<br />
Reinhold<br />
Riccioli<br />
Römer<br />
Russell<br />
Santbech<br />
Scheiner<br />
Schickard<br />
Schiller<br />
Seleucus<br />
Sharp<br />
Snellius<br />
Stadius<br />
Stevinus<br />
Stöffler<br />
Struve<br />
Taruntius<br />
Theophilus<br />
Timocharis<br />
Tycho<br />
Vendelinus<br />
Vlacq<br />
W. Bond<br />
Walter<br />
Wilhelm<br />
Zagut<br />
013<br />
007<br />
073<br />
112<br />
068<br />
074<br />
038<br />
098<br />
032<br />
107<br />
063<br />
084<br />
026<br />
090<br />
104<br />
110<br />
065<br />
004<br />
066<br />
024<br />
106<br />
060<br />
019<br />
036<br />
002<br />
016<br />
071<br />
115<br />
075<br />
082<br />
067<br />
42<br />
Mare Australe (Southern Sea)<br />
Mare Crisium (Sea of Crises)<br />
Mare Fecunditatis (Sea of Fertility)<br />
Mare Frigoris (Sea of Cold)<br />
Mare Humboldtianum (Humbolt Sea)<br />
Mare Humorum (Sea of Moisture)<br />
Mare Imbriun (Sea of Rain)<br />
Mare Nectaris (Sea of Nectar)<br />
Mare Nubium (Sea of Clouds)<br />
Mare Orientale (Eastern Sea)<br />
Mare Serenitatis (Sea of Serenity)<br />
Mare Smythii (Sea of Smith)<br />
Mare Tranquillitatis (Sea of Tranquillity)<br />
Mare Vaporum (Sea of Vapors)<br />
Oceans Procellarum (Ocean of Storm)<br />
Lacus Mortis (Lake of the Dead)<br />
Lacus Somniorum (Lake of Dreams)<br />
Lacus Temporis<br />
Sinus Iridum (Rainbow Bay)<br />
Sinus Roris (Bay of Dew)<br />
Sinus Aestuum (Seething Bay)<br />
Sinus Medii (Central Bay)<br />
Sinus Amoris<br />
Palus Epidemiarum<br />
Palus Putredinis (Marsh of Decay)<br />
Mountains, Scarps, Valleys and Rills<br />
Montes Alpes (Alps Mountains)<br />
Montes Apenninus (Apennine Mountains)<br />
Montes Carpatus (Carpathian Mountains)<br />
Montes Caucasus (Caucasian Mountains)<br />
Montes Haemus (Haemus Mountains)<br />
Montes Jura (Jura Mountains)<br />
Montes Pyrenaeus (Pyrenee Mountains)<br />
Montes Taurus (Taurus Mountains)<br />
Rupes Altai (Altai Scarp)<br />
Rupes Recta (Straight Wall)<br />
Rima Ariadaeus<br />
Rima Hyginus (Hyginus Cleft)<br />
Rima Sharp<br />
Vallis Rheita (Rheita Valley)<br />
Vallis Schroteri (Schroter's Valley)<br />
O<br />
E<br />
H<br />
A<br />
L<br />
I<br />
B<br />
K<br />
J<br />
N<br />
C<br />
M<br />
D<br />
G<br />
F<br />
P<br />
Q<br />
R<br />
S<br />
T<br />
U<br />
V<br />
W<br />
X<br />
Y<br />
a<br />
b<br />
c<br />
f<br />
g<br />
e<br />
d<br />
h<br />
j<br />
i<br />
l<br />
m<br />
o<br />
k<br />
n
Chapter 4 AUTOMATIC GOTO SLEWING<br />
Entering the Orbital Elements of the Comet<br />
OK: Choose OK to slew the telescope to the comet you chose.<br />
Press the key to start the Go-To slewing. To stop, shift the cursor to Cancel with the<br />
or • direction key and press the (or ) key. The entry dialog box disappears and<br />
you are ready to choose another.<br />
Change Data: Choose “Change Data” to rewrite the orbital elements.<br />
To change the parameters of the set orbital elements, display the entry dialog box and choose “Change Data” with the or direction<br />
key. Then, press the key to change the parameters.<br />
Delete: Choose “Delete” to clear the orbital elements.<br />
To delete the entered orbital elements of a comet, display the entry dialog box and choose “Delete” with the or direction key. Then,<br />
press the key.<br />
Note: If your STAR BOOK TEN is connected to a PC with LAN, the orbital elements can be input, changed or deleted through the PC.<br />
48
Chapter 5 APPLICATION<br />
Warning for Telescope Reverse<br />
This allows setting a point of the warning message to warn you against turning of the optical tube to the opposite position. The alarm sounds<br />
at the same time the warning message is indicated. The timing of the warning message can be designated by angle and it can be set to recall<br />
repeatedly with an interval of every one degree and more until the mount stops.<br />
Warning for Telescope Reverse<br />
Over : An angle to the west from the meridian as a point of warning for the telescope reverse. The setting value cannot exceed the angle to<br />
stop the mount forcedly.<br />
Step<br />
: An Interval to recall the warning message. The setting is available from 1 degree to 90 degrees.<br />
In the “Cross Over Meridian” dialog box, choose “Warning for Telescope Reverse” and press the key (or the key) to call up the dialog<br />
box. Move the cursor to an available entry space with the or direction key and enter your desired value with the or direction key.<br />
Then, press the key twice to enter and leave the dialog box.<br />
Override Meridian Stop Point<br />
This allows setting a point to make the optical tube turn to the opposite position manually when it goes over the meridian.<br />
Override Meridian Stop Point<br />
Over : An angle to the west from the meridian as a point of turning the optical tube to the opposite position. The setting range is restricted<br />
by either the value of “warning for the telescope reverse” or the value of “Goto (East Side)”; It is determined by the larger one and<br />
available up to 90 degrees west of the meridian.<br />
In the “Cross Over Meridian” dialog box, choose the “Override Meridian Stop Point” dialog box and press the key (or the key) to call up<br />
the dialog box. Enter your desired value with the or direction key. Then, press the key twice to enter and leave the dialog box.<br />
GoTo (East Side)<br />
The “Cross Ovewr Meridian” setting screen<br />
This allows shifting a point of the telescope reverse to the east side of the meridian. You can slew the telescope to your object located<br />
adjacent to the culmination so that the optical tube keeps the position just after the telescope reverse finishes. It is a convenient feature as<br />
you can start long-exposure astrophotography on the south side of the sky without interrupting the tracking<br />
Over : An angle to the east from the meridian as a point of turning the optical tube on the east side of the meridian to the opposite position.<br />
The setting range is restricted by the value of “override meridian stop point”<br />
In the “Cross Over Meridian” dialog box, choose the “GoTo (East Side)” dialog box and press the key (or the key) to call up the dialog<br />
box. Enter your desired value with the or direction key. Then, press the key twice to enter and leave the dialog box.<br />
85<br />
Example of warning for Telescope Reverse 5<br />
degrees Step 2 degrees<br />
The “Cross Ovewr Meridian” setting screen Example of stop at 20 degrees west of the meridian<br />
The “Cross Ovewr Meridian” setting screen Example of top at 10 degrees east of the meridian
Chapter 5 APPLICATION<br />
System Setting<br />
You can choose the settings for various functions to suite your preference. Press the key<br />
to call up “System Menu”.<br />
In “System Menu”, choose “System Setting” with the or direction key and press the<br />
key (or the key) to call up the dialog box.<br />
Note: Most of menus in “System Setting” are accessible at “Initial Configuration” which<br />
is displayed each time immediately after you turn on the power switch of the <strong>SXP</strong> mount.<br />
Local Time Setting<br />
In the “System Setting” menu, choose “Local Time Setting” with the or direction key and<br />
press the key (or the key) to call up the dialog box. Refer to the Chaptor 2 “Initial<br />
Setting”.<br />
Location<br />
In the “System Setting” menu, choose “Location” with the or direction key and press the<br />
key (or the key) to call up the dialog box. Refer to the Chaptor 2 “Initial Setting”<br />
LCD Adjust<br />
In the “System Setting” menu, choose “LCD Adjust” with the or direction key and press<br />
the key (or the key) to call up the dialog box. Refer to page 60.<br />
Night Vision<br />
In the “System Setting” menu, choose “Night Vision” with the or direction key and press<br />
the key (or the key) to call up the dialog box. Refer to page 61.<br />
87
30mm<br />
APPENDIX<br />
Connectors on the STAR BOOK TEN<br />
154mm<br />
Connectors on the <strong>SXP</strong> Mount<br />
CONTROLLER DC12V OFF ON<br />
○ I<br />
Expansion Slot Cover<br />
Controller Cable Connecting Port (D-sub 9pin male)<br />
LAN Connecting Port (10BASE-T)<br />
External Autoguider Connecting Port<br />
169mm<br />
6<br />
Ra- Dec- Dec+ Ra+ GND NC<br />
99<br />
A.G.<br />
1<br />
Power Switch<br />
Controller Cable Connecting Port<br />
(D-sub 9pin male)<br />
12V Power Connecting Port<br />
(DC 12V EIAJ RC5320A Class4),<br />
Center positive polarity<br />
Power Connection Port DC 12V, Center positive polarity
APPENDIX<br />
Dimensions of the <strong>SXP</strong> Mount<br />
147mm(5.79")<br />
123mm(4.84")<br />
128mm(5.04")<br />
Screw Holes on the Mount Head<br />
Fulcrum<br />
(The intersection of the R.A. and DEC axes)<br />
471mm(18.54") 98mm(3.86")<br />
264.5mm (Effective length)(10.41")<br />
M8 (Pitch 1.25mm)<br />
Screw Hole Depth: 11mm(0.43")<br />
100<br />
343mm(13.50")<br />
Dimensions of the SXG Half Pillar<br />
(Sold separately)<br />
33.5mm<br />
(1.32")<br />
207.5mm<br />
(8.17")<br />
15mm<br />
(0.59")<br />
88mm(3.46")<br />
79mm(3.11")<br />
45mm<br />
(1.77") 17mm<br />
130mm(5.12")<br />
45mm<br />
(1.77")<br />
φ45.2<br />
(1.78")<br />
12mm<br />
(0.47")<br />
(0.67")<br />
Height of Fulcrum at an angle of 35 degrees<br />
255.5mm(10.06")<br />
359mm(14.13")
1156mm(45.51")<br />
839.5mm(33.05")<br />
APPENDIX<br />
Dimensions of theSXG-HAL130 Tripod<br />
(Sold separately)<br />
730mm(28.74")<br />
128mm<br />
(5.04")<br />
Dimensions of the SXG-P85 Pillar<br />
(Sold separately)<br />
655mm(25.79")<br />
171mm(6.73") 3mm(0.12")<br />
10.5mm(0.41")<br />
M12×1.75<br />
Allen screw<br />
60mm long<br />
33.5mm(1.32")<br />
M6x1<br />
Allen screw<br />
15mm long<br />
M8x1.25<br />
Allen screw<br />
20mm long<br />
145mm<br />
(5.71")<br />
33.5mm(1.32")<br />
20mm<br />
(0.79")<br />
807mm(31.77")<br />
1299mm(51.14")<br />
φ114.3mm<br />
(4.50")<br />
1327.5mm(52.26")<br />
φ128mm(5.04")<br />
46.7mm(1.84")<br />
M12×1.75<br />
Allen screw<br />
50mm long<br />
101<br />
φ1412mm<br />
(55.59")<br />
φ920mm<br />
(36.22")<br />
M12x1.75<br />
P.C.D.850mm(33.46")<br />
φ880mm<br />
(34.65")<br />
* Actual dimensions may differ slightly on your product.<br />
* The specifications are subject to change without notice.