Caution - TA Triumph-Adler
Caution - TA Triumph-Adler
Caution - TA Triumph-Adler

Create successful ePaper yourself
Turn your PDF publications into a flip-book with our unique Google optimized e-Paper software.
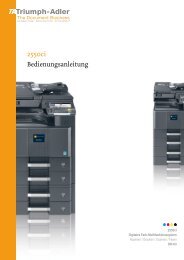
14 Confirm settings, place the original, and<br />
press the Start key.<br />
Scanning of the original begins.<br />
If continuous scan is enabled, proceed<br />
to Step 15. If continuous sending is<br />
enabled, proceed to Step 16.<br />
15 If [Batch Scanning] is set to [On] from<br />
[Edit] from the scanner settings screen,<br />
after scanning is complete, a screen<br />
prompt appears asking whether to<br />
continue scanning or to finish.<br />
To continue scanning, place the next<br />
original, select scanner settings as<br />
necessary and press the Start key.<br />
When done, press [Scanning finished].<br />
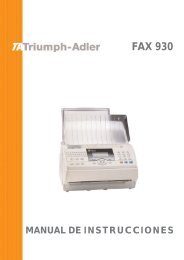
16 If [Continuous TX] is enabled from the<br />
scanner settings screen, after a<br />
transmission is complete, the scanner<br />
settings screen is displayed with the<br />
same settings used in the previous<br />
transmission.<br />
Scan an Image for Scan to PC<br />
To continue, place the next original,<br />
select scanner settings as necessary<br />
and press the Start key.<br />
To end the operation, press [Cancel] ([Job cancel]).<br />
Basic Operation<br />
Use Scan to PC to save scanned original images as files to a folder on a computer. Access to this<br />
feature is provided by installing the Scanner File Utility on the target computer.<br />
Before using Scan to PC<br />
Configure the following before using Scanner File Utility for the first time.<br />
1 Install Scanner File Utility on the sending computer.<br />
Now scanning originals.<br />
Orig. Page<br />
11×8½"<br />
1 sided<br />
Top Edge<br />
User name: UserA<br />
2 Launch Scanner File Utility and register the folders to save image files.<br />
Send E-mail<br />
3 From the operation panel, register the IP address of the target computer, a registration name and a<br />
save number.<br />
In the save number entry field, enter the same number (from 001-100) as registered for the save<br />
folder in Scanner File Utility.<br />
NOTE: Refer to Modifying Common Address Book on page 2-35 for how to add to the Common<br />
Address Book from the operation panel.<br />
.3<br />
riginal(s).<br />
riginals and press start key.<br />
nning finished" key to finish scanning.<br />
Step .2<br />
Top Edge<br />
Orig. Set<br />
Direction<br />
200dpi<br />
Scanning<br />
Resolution<br />
Quality<br />
Auto<br />
File Name<br />
Input<br />
JPEG<br />
File Type<br />
Edit<br />
Place the original and select destination.<br />
Send E-mail-Continuous TX<br />
Destination<br />
To:<br />
User A<br />
Enter<br />
dest.<br />
Address<br />
Book<br />
Send<br />
8½×11"<br />
SCAN0006_nnn.jpg<br />
Original<br />
1. Page<br />
SCAN0004_nnn.jpg<br />
Ready to scan. ( Full-Color )<br />
Delete<br />
Register Prgrm<br />
08/08/’05 14:00<br />
Cancel<br />
Scanning<br />
finished<br />
08/08<br />
Original<br />
11×8½"<br />
08/08<br />
Single Scan<br />
Auto<br />
Top Edge<br />
Select<br />
Orig.Size<br />
Orig. Set<br />
Direction<br />
Auto size<br />
200dpi<br />
Select<br />
Send Size<br />
Scanning<br />
Resolution<br />
Basic Quality<br />
3-23