Caution - TA Triumph-Adler
Caution - TA Triumph-Adler
Caution - TA Triumph-Adler

You also want an ePaper? Increase the reach of your titles
YUMPU automatically turns print PDFs into web optimized ePapers that Google loves.
Basic Operation<br />
3-22<br />
NOTE: The private address book is not displayed if the Address Book for Scanner is not running on<br />
the sender(user)’s computer.<br />
9 Confirm the destination(s) and press [Close].<br />
Return to Step 4 to continue adding recipients.<br />
10 Confirm the destination(s). Press [] or<br />
[] to confirm that all selected<br />
destinations are correct. Press [Delete] if<br />
a selected destination is not needed.<br />
Scanner Setup<br />
11 Press the Auto Color, Full Color or Black&White key<br />
to select a color mode.<br />
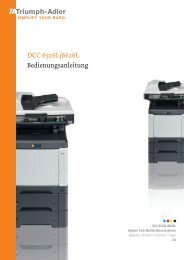
12 The scanner setup screen is displayed<br />
in the right side of the screen. Press the<br />
appropriate keys to configure the various<br />
settings. This section explains the setup<br />
procedure using [Orig. Set Direction] as<br />
an example.<br />
Press [Orig. Set Direction].<br />
13 If the original has been loaded with Top<br />
edge set at the rear, select [Top Edge]<br />
([Back Edge]). If the original has been<br />
set to the left, press [Left Top Edge]<br />
([Left top corner]). Press [Close] to save<br />
the setting, or press [Back] to leave<br />
settings as they are and return to the<br />
screen shown in Step 10.<br />
Ready to scan. ( Full-Color )<br />
Place the original and select destination.<br />
Send E-mail-Sending<br />
Destination<br />
To: User A<br />
To: User B<br />
Enter<br />
dest.<br />
Address<br />
Book<br />
riginal and select destination.<br />
ending<br />
Address<br />
Book<br />
Register Prgrm<br />
Original<br />
11×8½"<br />
08/08<br />
Cont. TX to<br />
Auto<br />
Top Edge<br />
Select<br />
Orig.Size<br />
Orig. Set<br />
Direction<br />
Auto size<br />
200dpi<br />
Select<br />
Send Size<br />
Scanning<br />
Resolution<br />
Basic Quality<br />
NOTE: The original may not be scanned correctly if original set direction is not correctly configured.<br />
Be sure to confirm the original set direction when configuring the scanner.<br />
Delete<br />
to scan. ( Full-Color )<br />
A<br />
B<br />
to scan.<br />
Delete<br />
riginal and select destination.<br />
tion<br />
Register Prgrm<br />
( Full-Color )<br />
"Check direction of original" shown at<br />
right side of display. Follow the steps.<br />
If setting mode is wrong, incorrect send<br />
will result.<br />
Auto<br />
Top Edge<br />
Select<br />
Orig.Size<br />
Orig. Set<br />
Direction<br />
Auto size<br />
200dpi<br />
Select<br />
Send Size<br />
Scanning<br />
Resolution<br />
Original Send<br />
11×8½" 8½×11"<br />
08/08/’05 14:00<br />
Cont. TX to<br />
Cancel<br />
Auto<br />
File Name<br />
Input<br />
JPEG<br />
File Type<br />
Basic Quality Edit<br />
Original Send<br />
11×8½" 8½×11"<br />
08/08/’05 14:00<br />
Back<br />
Select Original Image<br />
Direction.<br />
Top Edge<br />
Close<br />
Left Top<br />
Edge