MENU - TA Triumph-Adler GmbH
MENU - TA Triumph-Adler GmbH
MENU - TA Triumph-Adler GmbH

You also want an ePaper? Increase the reach of your titles
YUMPU automatically turns print PDFs into web optimized ePapers that Google loves.
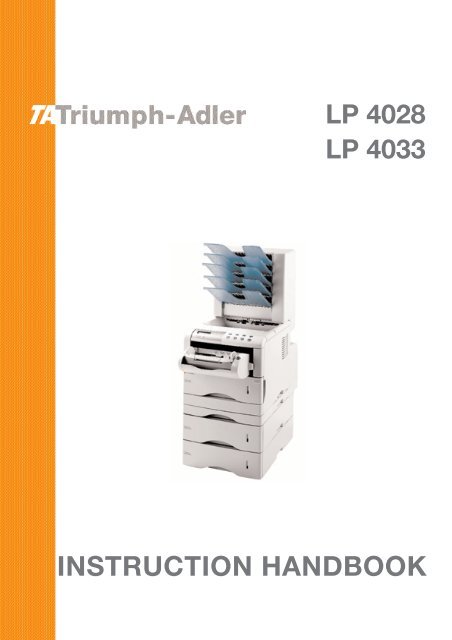
LP 4028<br />
LP 4033<br />
INSTRUCTION HANDBOOK
Caution on Installation<br />
No liability is assumed for any damage caused by improper installation.<br />
Notice on Software<br />
Software used with this printer must support the printer’s emulation mode. The printer is factory-set to emulate the PCL. The emulation<br />
mode can be changed by following the procedures described in Chapter 1.<br />
Notice on This Guide<br />
The information in this guide is subject to change without notification. Additional pages may be inserted in future editions. The user<br />
is asked to excuse any technical inaccuracies or typographical errors in the present edition.<br />
No responsibility is assumed if accidents occur while the user is following the instructions in this guide. No responsibility is assumed<br />
for defects in the printer’s firmware (contents of its read-only memory).<br />
This guide, any copyrightable subject matter sold or provided with or in connection with the sale of the page printer, are protected by<br />
copyright. All rights are reserved. Copying or other reproduction of all or part of this guide, any copyrightable subject matter without<br />
the prior written consent of U<strong>TA</strong>X <strong>GmbH</strong> is prohibited. Any copies made of all or part of this guide, any copyrightable subject<br />
must contain the same copyright notice as the material from which the copying is done.<br />
Regarding Tradenames<br />
PRESCRIBE is a registered trademark of Kyocera Corporation. KPDL and KIR (Kyocera Image Refinement) are trademarks of<br />
Kyocera Corporation.<br />
Diablo 630 is a product of Xerox Corporation. IBM Proprinter X24E is a product of International Business Machines Corporation. Epson<br />
LQ-850 is a product of Seiko Epson Corporation.<br />
Hewlett-Packard, PCL, and PJL are registered trademarks of Hewlett-Packard Company. Centronics is a trade name of Centronics<br />
Data Computer Inc. PostScript is a registered trademark of Adobe Systems Incorporated. Macintosh is a registered trademark of Apple<br />
computer, Inc. Microsoft, Windows, and Windows NT are registered trademarks of Microsoft Corporation. PowerPC and Microdrive<br />
are trademarks of International Business Machines Corporation. CompactFlash is a trademark of SanDisk Corporation. ENERGY<br />
S<strong>TA</strong>R is a U.S. registered mark. All other brand and product names are registered trademarks or trademarks of their respective<br />
companies.<br />
This Kyocera Mita page printer uses PeerlessPrintXL to provide the HP LaserJet compatible PCL6 language emulation. PeerlessPrintXL<br />
is a trademark of The Peerless Group, Redondo Beach, CA 90278, U.S.A.<br />
This product was developed using the Tornado Real Time Operating System and Tools from Wind River Systems.<br />
This product contains UFST and MicroType ® from Agfa Monotype Corporation.<br />
i
IBM PROGRAM LICENSE AGREEMENT<br />
The device you have purchased contains one or more software programs ("Programs") which belong to international business machines<br />
corporation ("IBM"). This document defines the terms and conditions under which the software is being licensed to you by IBM. If you<br />
do not agree with the terms and conditions of this license, then within 14 days after your acquisition of the device you may return the<br />
device for a full refund. If you do not so return the device within the 14 days, then you will be assumed to have agreed to these terms<br />
and conditions.<br />
The Programs are licensed not sold. IBM, or the applicable IBM country organization, grants you a license for the Programs only in the<br />
country where you acquired the Programs. You obtain no rights other than those granted you under this license.<br />
The term "Programs" means the original and all whole or partial copies of it, including modified copies or portions merged into other<br />
programs. IBM retains title to the Programs. IBM owns, or has licensed from the owner, copyrights in the Programs.<br />
1. License<br />
Under this license, you may use the Programs only with the device on which they are installed and transfer possession of the Programs<br />
and the device to another party.<br />
If you transfer the Programs, you must transfer a copy of this license and any other documentation to the other party. Your license is<br />
then terminated. The other party agrees to these terms and conditions by its first use of the Program.<br />
You may not:<br />
1) use, copy, modify, merge, or transfer copies of the Program except as provided in this license;<br />
2) reverse assemble or reverse compile the Program; or<br />
3) sublicense, rent, lease, or assign the Program.<br />
2. Limited Warranty<br />
The Programs are provided "AS IS."<br />
There are no other warranties covering the Programs (or conditions), express or implied, including, but not limited to, the implied<br />
warranties of merchantability and fitness for a particular purpose.<br />
Some jurisdictions do not allow the exclusion of implied warranties, so the above exclusion may not apply to you.<br />
3. Limitation of Remedies<br />
IBM’s entire liability under this license is the following;<br />
1) For any claim (including fundamental breach), in any form, related in any way to this license, IBM’s liability will be for actual<br />
damages only and will be limited to the greater of:<br />
a) the equivalent of U.S.$25,000 in your local currency; or<br />
b) IBM’s then generally available license fee for the Program<br />
This limitation will not apply to claims for bodily injury or damages to real or tangible personal property for which IBM is legally liable.<br />
IBM will not be liable for any lost profits, lost savings, or any incidental damages or other economic consequential damages, even if<br />
IBM, or its authorized supplier, has been advised of the possibility of such damages. IBM will not be liable for any damages claimed by<br />
you based on any third party claim. This limitation of remedies also applies to any developer of Programs supplied to IBM. IBM’s and<br />
the developer’s limitations of remedies are not cumulative. Such developer is an intended beneficiary of this Section. Some jurisdictions<br />
do not allow these limitations or exclusions, so they may not apply to you.<br />
4. General<br />
You may terminate your license at any time. IBM may terminate your license if you fail to comply with the terms and conditions of this<br />
license. In either event, you must destroy all your copies of the Program. You are responsible for payment of any taxes, including<br />
personal property taxes, resulting from this license. Neither party may bring an action, regardless of form, more than two years after<br />
the cause of action arose. If you acquired the Program in the United States, this license is governed by the laws of the State of New York.<br />
If you acquired the Program in Canada, this license is governed by the laws of the Province of Ontario. Otherwise, this license is<br />
governed by the laws of the country in which you acquired the Program.<br />
ii
Typeface Trademark Acknowledgement<br />
All resident fonts in this printer are licensed from Agfa Corporation.<br />
Helvetica, Palatino and Times are registered trademarks of Linotype-Hell AG.<br />
ITC Avant Garde Gothic, ITC Bookman, ITC ZapfChancery and ITC Zapf Dingbats are registered trademarks of International Typeface<br />
Corporation.<br />
Agfa Japan License Agreement<br />
1. “Software” shall mean the digitally encoded, machine readable, scalable outline data as encoded in a special format as well as the<br />
UFST Software.<br />
2. You agree to accept a non-exclusive license to use the Software to reproduce and display weights, styles and versions of letters,<br />
numerals, characters and symbols (“Typefaces”) solely for your own customary business or personal purposes at the address stated<br />
on the registration card you return to Agfa Japan. Under the terms of this License Agreement, you have the right to use the Fonts<br />
on up to three printers. If you need to have access to the fonts on more than three printers, you need to acquire a multi-user license<br />
agreement which can be obtained from Agfa Japan. Agfa Japan retains all rights, title and interest to the Software and Typefaces<br />
and no rights are granted to you other than a License to use the Software on the terms expressly set forth in this Agreement.<br />
3. To protect proprietary rights of Agfa Japan, you agree to maintain the Software and other proprietary information concerning the<br />
Typefaces in strict confidence and to establish reasonable procedures regulating access to and use of the Software and Typefaces.<br />
4. You agree not to duplicate or copy the Software or Typefaces, except that you may make one backup copy. You agree that any such<br />
copy shall contain the same proprietary notices as those appearing on the original.<br />
5. This License shall continue until the last use of the Software and Typefaces, unless sooner terminated. This License may be<br />
terminated by Agfa Japan if you fail to comply with the terms of this License and such failure is not remedied within thirty (30)<br />
days after notice from Agfa Japan. When this License expires or is terminated, you shall either return to Agfa Japan or destroy all<br />
copies of the Software and Typefaces and documentation as requested.<br />
6. You agree that you will not modify, alter, disassemble, decrypt, reverse engineer or decompile the Software.<br />
7. Agfa Japan warrants that for ninety (90) days after delivery, the Software will perform in accordance with Agfa Japan-published<br />
specifications, and the diskette will be free from defects in material and workmanship. Agfa Japan does not warrant that the<br />
Software is free from all bugs, errors and omissions.<br />
The parties agree that all other warranties, expressed or implied, including warranties of fitness for a particular purpose and<br />
merchantability, are excluded.<br />
8. Your exclusive remedy and the sole liability of Agfa Japan in connection with the Software and Typefaces is repair or replacement<br />
of defective parts, upon their return to Agfa Japan.<br />
In no event will Agfa Japan be liable for lost profits, lost data, or any other incidental or consequential damages, or any damages<br />
caused by abuse or misapplication of the Software and Typefaces.<br />
9. New York, U.S.A. law governs this Agreement.<br />
10. You shall not sublicense, sell, lease, or otherwise transfer the Software and/or Typefaces without the prior written consent of Agfa<br />
Japan.<br />
11. Use, duplication or disclosure by the Government is subject to restrictions as set forth in the Rights in Technical Data and Computer<br />
Software clause at FAR 252-227-7013, subdivision (b)(3)(ii) or subparagraph (c)(1)(ii), as appropriate. Further use, duplication or<br />
disclosure is subject to restrictions applicable to restricted rights software as set forth in FAR 52.227-19 (c)(2).<br />
12. You acknowledge that you have read this Agreement, understand it, and agree to be bound by its terms and conditions. Neither<br />
party shall be bound by any statement or representation not contained in this Agreement. No change in this Agreement is effective<br />
unless written and signed by properly authorized representatives of each party. By opening this diskette package, you agree to<br />
accept the terms and conditions of this Agreement.<br />
Cautions for Toner Handling<br />
• Do not incinerate toner and toner containers. Dangerous sparks may cause burn.<br />
• Never open the toner container or waste toner box.<br />
• Make sure not to inhale the toner, and not to rub your eyes or touch your mouth with the hands stained with the toner. And make<br />
sure not to stick to your skin.<br />
• For the disposal of old toner container and waste toner box, consult your dealer. Or dispose of the toner or toner containers in<br />
accordance with Federal, state and Local rules and regulations.<br />
• Keep away the toner container and the waste toner box from children.<br />
iii
Contents<br />
Contents<br />
Introduction ................................................................................................ ix<br />
Features ........................................................................................................................................................... x<br />
For More Information... ................................................................................................................................ xiii<br />
Guide to the Operation Guide...................................................................................................................... xiv<br />
Chapter 1 Using the Operator Panel ....................................................... 1-1<br />
Understanding the Operator Panel ............................................................................................................. 1-2<br />
Message Display .................................................................................................................................... 1-2<br />
Interface Indicator ................................................................................................................................. 1-3<br />
Paper Size Indicator............................................................................................................................... 1-3<br />
Paper Type Indicator ............................................................................................................................. 1-4<br />
READY, DA<strong>TA</strong>, and ATTENTION Indicators ...................................................................................... 1-4<br />
Keys ........................................................................................................................................................ 1-5<br />
Menu System Road Map........................................................................................................................ 1-6<br />
Printing Test Pages .................................................................................................................................... 1-12<br />
Menu Map ............................................................................................................................................ 1-12<br />
Status Page........................................................................................................................................... 1-14<br />
Service Status Page ............................................................................................................................. 1-18<br />
Network Interface Status Page ........................................................................................................... 1-19<br />
Font Lists.............................................................................................................................................. 1-21<br />
Received Data Dumping ...................................................................................................................... 1-23<br />
Paper Handling........................................................................................................................................... 1-24<br />
Setting the Paper Size ......................................................................................................................... 1-24<br />
Setting the Paper Size in Paper Cassette ............................................................................ 1-24<br />
Setting the Paper Size in MP Tray ....................................................................................... 1-28<br />
Setting the Paper Type ........................................................................................................................ 1-30<br />
Setting the Paper Type in Paper Cassette ........................................................................... 1-30<br />
Setting the Paper Type in MP Tray ..................................................................................... 1-31<br />
Creating Custom Paper Type ............................................................................................... 1-32<br />
Resetting the Custom Paper Type ........................................................................................ 1-36<br />
MP Tray Mode...................................................................................................................................... 1-37<br />
Selecting the Paper Feed Source ......................................................................................................... 1-38<br />
Selecting the Output Stack ................................................................................................................. 1-39<br />
Overriding A4 and Letter Size Difference .......................................................................................... 1-40<br />
iv
v<br />
Contents<br />
Pagination ................................................................................................................................................... 1-41<br />
Emulation............................................................................................................................................. 1-41<br />
Changing the Emulation ...................................................................................................... 1-41<br />
Alternative Emulation for KPDL Emulation ...................................................................... 1-42<br />
Printing KPDL Errors .......................................................................................................... 1-43<br />
Font....................................................................................................................................................... 1-44<br />
Default font ............................................................................................................................ 1-44<br />
Default Font Size ................................................................................................................... 1-46<br />
Changing Type for Courier/Letter Gothic ............................................................................ 1-47<br />
Setting the Character Pitch for Courier/Letter Gothic ....................................................... 1-48<br />
Code Set................................................................................................................................................ 1-49<br />
Number of Copies................................................................................................................................. 1-50<br />
Printing Orientation............................................................................................................................ 1-51<br />
KIR (KM Image Refinement)....................................................................................................... 1-52<br />
Ecoprint ................................................................................................................................................ 1-54<br />
Resolution............................................................................................................................................. 1-55<br />
e-MPS .......................................................................................................................................................... 1-56<br />
Quick Copy ........................................................................................................................................... 1-57<br />
Proof and Hold ..................................................................................................................................... 1-59<br />
Printing a Private Job ......................................................................................................................... 1-61<br />
Printing a Stored Job........................................................................................................................... 1-63<br />
Printing a Code Job ............................................................................................................................. 1-65<br />
Printing a List of Code Jobs ................................................................................................................ 1-67<br />
Retrieving Jobs from Virtual Mailbox (VMB) .................................................................................... 1-68<br />
Printing a List of VMB ........................................................................................................................ 1-69<br />
e-MPS Configuration ........................................................................................................................... 1-70<br />
Interface ...................................................................................................................................................... 1-74<br />
Parallel Interface Mode ....................................................................................................................... 1-74<br />
USB Interface Mode............................................................................................................................. 1-75<br />
Serial Interface Parameters ................................................................................................................ 1-76<br />
Network Interface Parameters............................................................................................................ 1-78<br />
Operating the Storage Device.................................................................................................................... 1-81<br />
Activating the RAM Disk .................................................................................................................... 1-81<br />
Reading Data ....................................................................................................................................... 1-83<br />
Writing Data......................................................................................................................................... 1-84<br />
Deleting Data ....................................................................................................................................... 1-86<br />
Reading Fonts from a CompactFlash Card ........................................................................................ 1-87<br />
Formatting a Storage Device............................................................................................................... 1-88<br />
Printing a List of Data Names ............................................................................................................ 1-89
Contents<br />
Configuration.............................................................................................................................................. 1-91<br />
Page Protect Mode ............................................................................................................................... 1-91<br />
Linefeed (LF) Action ............................................................................................................................ 1-92<br />
Carriage-Return (CR) Action .............................................................................................................. 1-93<br />
Wide A4 Pitch....................................................................................................................................... 1-94<br />
Print Density........................................................................................................................................ 1-95<br />
Total Printed Pages.............................................................................................................................. 1-96<br />
Toner Counter Resetting ..................................................................................................................... 1-96<br />
Message Language............................................................................................................................... 1-97<br />
Automatic Form Feed Timeout............................................................................................................ 1-99<br />
Sleep Timer Setting ........................................................................................................................... 1-100<br />
Printer Resetting ............................................................................................................................... 1-102<br />
Resource Protection ........................................................................................................................... 1-103<br />
Alarm (Buzzer) Setting...................................................................................................................... 1-104<br />
Auto Continue Setting ....................................................................................................................... 1-105<br />
Duplex Printing Error Detection Setting .........................................................................................1-107<br />
Chapter 2 Paper Selection....................................................................... 2-1<br />
General Guidelines....................................................................................................................................... 2-2<br />
Paper Availability .................................................................................................................................. 2-2<br />
Paper Specifications............................................................................................................................... 2-2<br />
Selecting the Right Paper...................................................................................................................... 2-3<br />
Special Paper ................................................................................................................................................ 2-7<br />
Transparency (Overhead Projection Film) ........................................................................................... 2-7<br />
Adhesive-Backed Labels........................................................................................................................ 2-8<br />
Paper Type .................................................................................................................................................. 2-12<br />
Chapter 3 Maintenance ........................................................................... 3-1<br />
Toner Container Replacement ..................................................................................................................... 3-2<br />
Toner Container Replacement Interval................................................................................................ 3-2<br />
Replenishing Toner................................................................................................................................ 3-3<br />
Waste Toner Box Replacement .................................................................................................................... 3-6<br />
Replacing the Waste Toner Box............................................................................................................. 3-6<br />
Cleaning ........................................................................................................................................................ 3-9<br />
Cleaning the Charger Wire ................................................................................................................... 3-9<br />
Cleaning the Charger Grid.................................................................................................................. 3-10<br />
Paper Transfer Unit............................................................................................................................. 3-12<br />
vi
vii<br />
Contents<br />
Chapter 4 Troubleshooting ...................................................................... 4-1<br />
General Guide............................................................................................................................................... 4-2<br />
Print Quality Problems ................................................................................................................................ 4-3<br />
Indicators and Messages .............................................................................................................................. 4-6<br />
Indicators................................................................................................................................................ 4-6<br />
Maintenance Messages.......................................................................................................................... 4-7<br />
Error Messages .................................................................................................................................... 4-10<br />
Correcting a Paper Jam.............................................................................................................................. 4-12<br />
Jam at the Paper Cassette or Inside the Printer ............................................................................... 4-14<br />
Paper Jam at the Option Duplexer ..................................................................................................... 4-16<br />
Paper Jam at the Option Sorter .......................................................................................................... 4-18<br />
Jam at the MP Tray............................................................................................................................. 4-20<br />
Chapter 5 Fonts ....................................................................................... 5-1<br />
List of Fonts .................................................................................................................................................. 5-2<br />
PCL (Scalable and Bitmap) Fonts......................................................................................................... 5-2<br />
KPDL Fonts (1) ...................................................................................................................................... 5-5<br />
KPDL Fonts (2) ...................................................................................................................................... 5-6<br />
Appendix A Options.................................................................................... A-1<br />
Available Options .........................................................................................................................................A-2<br />
Expanding the Printer Memory...................................................................................................................A-3<br />
Installing Option Units ................................................................................................................................A-9<br />
PF-60 Paper Feeder................................................................................................................................A-9<br />
DU-61 Duplexer ...................................................................................................................................A-12<br />
SO-60 Sorter.........................................................................................................................................A-15<br />
EF-60 Envelope Feeder ........................................................................................................................A-21<br />
PT-4/PT-60 Rear Tray .........................................................................................................................A-25<br />
Network Interface Card.......................................................................................................................A-26<br />
Microdrive (Hard Disk)........................................................................................................................A-28<br />
CompactFlash (Memory) Card ............................................................................................................A-30<br />
Appendix B Host Computer Interface ........................................................ B-1<br />
Parallel Interface ......................................................................................................................................... B-2<br />
Parallel Interface Communication Modes ........................................................................................... B-2<br />
Interface Signals ................................................................................................................................... B-2<br />
USB Interface .............................................................................................................................................. B-5<br />
Specifications ........................................................................................................................................ B-5<br />
Interface Signals ................................................................................................................................... B-5
Contents<br />
Serial Interface (Option) ............................................................................................................................. B-6<br />
RS-232C Interface................................................................................................................................. B-6<br />
RS-232C Protocol......................................................................................................................................... B-7<br />
PRESCRIBE FRPO D0 Command....................................................................................................... B-9<br />
RS-232C Cable Connection ....................................................................................................................... B-10<br />
Obtain a Suitable RS-232C Cable...................................................................................................... B-10<br />
Connecting the Printer to the Computer........................................................................................... B-10<br />
Appendix C Specifications ......................................................................... C-1<br />
Glossary .......................................................................................Glossary-1<br />
Index ................................................................................................. Index-1<br />
viii
Introduction<br />
This <strong>TA</strong> <strong>Triumph</strong>-<strong>Adler</strong> page printer has many extremely desirable features. It was designed to<br />
make a contribution to a cleaner environment as well as to represent the latest generation of<br />
page printer technology.<br />
This section contains the following subsections.<br />
• Features<br />
• For More Information...<br />
• Guide to the Operation Guide<br />
ix
Features<br />
This section outlines the common major printer features of the LP 3033<br />
page printer.<br />
Ultra long life modules<br />
The drum, developer, and fuser have been designed for ultra long life.<br />
Amorphous silicon drum<br />
The drum has been developed using the unique ceramic technology<br />
using amorphous silicon.<br />
KIR (KM Image Refinement)<br />
This is KM ’s original smoothing function. It uses software to enhance<br />
the printer’s resolution and produce high-quality printing. The default<br />
setting is On.<br />
Superb print quality<br />
Using 1200 dpi resolution in Fast 1200 mode or Fine 1200 mode, the<br />
printout is close to typeset quality. Also, with KM Image Refinement<br />
(KIR) technology, high quality printing can be achieved even at 300 dpi and<br />
600 dpi.<br />
Large paper capacity<br />
Approximately 500 sheets can be loaded into the paper cassette, and about<br />
100 sheets can be loaded into the MP tray.<br />
Wide variety of print media<br />
As well as standard paper, the printer will print on transparency, labels<br />
and other types of special purpose media.<br />
Sleep Mode<br />
Conserves energy during the printer’s idle periods.<br />
Ecoprint<br />
Extends the toner yield by reducing the amount of toner used on the page.<br />
Displaying printer messages in any of eight languages<br />
Printer messages can be displayed in English, French, German, Italian,<br />
Dutch, Spanish, or Portuguese.<br />
x
USB (Universal Serial Bus) Interface<br />
This printer supports Hi-Speed USB 2.0 standards. Connection to a<br />
computer with a USB interface gives a higher communication speed than<br />
parallel interface connection.<br />
e-MPS<br />
‘e-MPS’ is an abbreviation for ‘enhanced-Multiple Printing System,’ which<br />
is a post-processing function that combines electronic sorting, job<br />
retention, and virtual mailboxing.<br />
When printing multiple copies of a document, the data is transferred from<br />
the computer to the printer only for the first copy; the data is then stored<br />
on the printer’s hard disk. Copies of the document are printed using the<br />
stored data.<br />
Printing is performed faster with less computer spooling time and less<br />
network traffic.<br />
Furthermore, printed data that is stored on the hard disk can be called up<br />
using job retention functions, such as Quick Copy etc., allowing you to<br />
quickly print additional copies of a document from the printer at any time,<br />
without needing to re-spool the document or start up the computer system.<br />
Printer control language PRESCRIBE<br />
The printer uses PRESCRIBE, a page printer control language with<br />
enhanced color graphics capabilities. The simple commands<br />
of PRESCRIBE allow the programmers to easily define pagination and<br />
device control.<br />
KPDL3<br />
KPDL3 is the implementation of the PostScript page description<br />
language Level 3. The printer has 80 fonts that are compatible with Adobe<br />
PostScript fonts. (The printer also has 80 PCL fonts.)<br />
PDF direct printing<br />
Allows you to send a selected PDF (version 1.4 or less) file directly to the<br />
printer without invoking a printer driver.<br />
Account management system<br />
The account management system function records the number of pages<br />
printed by each department. The administrator can preset the maximum<br />
number of pages that each department will be allowed to print.<br />
xi
Microdrive (hard disk unit) slot for various functions such as job<br />
retention, VMB, and more<br />
By saving print jobs onto the Microdrive, they can be printed out at the<br />
operator panel when desired. The electronic sort function can be used for<br />
much faster printing.<br />
CompactFlash card slot for option fonts, macros, forms, etc.<br />
Data in the CompactFlash card can be selectively read from the printer’s<br />
operator panel.<br />
SNMP compliance<br />
The printer complies with Simple Network Management Protocol (SNMP).<br />
The SNMP is used for providing and transferring management information<br />
(MIB) between the printer and the host computer.<br />
Built-in and external network interfaces<br />
Because the network interface supports TCP/IP, IPX/SPX, NetBEUI and<br />
EtherTalk protocols, network printing is possible with various<br />
environments including Windows, Macintosh, UNIX and NetWare, etc.<br />
Support for network printer monitor utility (KM-NET VIEWER)<br />
Allows network wide management of printers. See the readme file in the<br />
CD-ROM (comes with the printer) for details.<br />
xii
For More Information...<br />
Note<br />
Item Description<br />
Installation Guide<br />
(paper manual)<br />
KX Printer Driver<br />
Installation Guide<br />
(paper manual)<br />
Operation Guide<br />
(this manual)<br />
KX Printer Drivers<br />
Operation Guide<br />
PRESCRIBE Command<br />
Technical Reference<br />
PRESCRIBE Command<br />
Reference<br />
• For information on how to install the printer driver software, refer to<br />
the KX Printer Driver Installation Guide that is included with the<br />
printer.<br />
• For information on how to use the printer driver software, refer to the<br />
KX Printer Driver Operation Guide that is included on the CD-ROM<br />
(comes with the printer).<br />
xiii<br />
Describes procedures from printer setup to printing<br />
a test page.<br />
Describes the procedure to install the printer driver<br />
software.<br />
Guides you through topics concerning the<br />
operations and maintenance of the printer.<br />
Describes how to install and set the printer driver.<br />
PRESCRIBE is the native language of the<br />
printers. This Technical Reference contains<br />
the information about how the printing is<br />
performed using the PRESCRIBE commands as<br />
well as the font and emulation description. Also<br />
included is a list of permanent parameters and<br />
their explanation needed when customizing your<br />
printer.<br />
Gives a detailed explanation of the PRESCRIBE<br />
command syntax and parameters with the aid of<br />
print examples.
Guide to the Operation Guide<br />
This Operation Guide has the following chapters:<br />
Chapter 1 Using the Operator Panel<br />
This chapter explains the message display, indicators and keys on the<br />
operator panel, and how to make various settings from the operator panel.<br />
Chapter 2 Paper Selection<br />
This chapter explains the types of paper that can be used with the printer.<br />
Chapter 3 Maintenance<br />
This chapter explains how to replace the toner container, waste toner box,<br />
and how to care for your printer.<br />
Chapter 4 Troubleshooting<br />
This chapter explains how to handle printer problems that may occur, such<br />
as paper jams.<br />
Chapter 5 Fonts<br />
This chapter explains about fonts and lists the printer’s internal fonts.<br />
Appendix A Options<br />
This appendix explains how to expand the printer’s memory and how to<br />
install each option unit.<br />
Appendix B Host Computer Interface<br />
This appendix explains the pin assignment and specifications for the<br />
printer’s parallel interface, USB interface, and option serial interface.<br />
Appendix C Specifications<br />
This appendix lists the printer’s specifications.<br />
Glossary<br />
This glossary explains the terminology used in this guide.<br />
The following symbols are used to attract your attention in this guide. The<br />
symbols and their meanings are as follows:<br />
xiv
Note<br />
Caution<br />
Warning<br />
Option<br />
Indicates tips or advice useful for operation.<br />
Indicates situations that are potentially hazardous to the human body or<br />
devices.<br />
Indicates situations that are potentially extremely hazardous to the<br />
human body or devices.<br />
Indicates operations that can be performed or are effective only when the<br />
required option unit is installed.<br />
xv
Chapter 1 Using the Operator<br />
Panel<br />
1<br />
This chapter explains the following topics:<br />
• Understanding the Operator Panel<br />
• Printing Test Pages<br />
• Paper Handling<br />
• Pagination<br />
• e-MPS<br />
• Interface<br />
• Operating the Storage Device<br />
• Configuration<br />
1-1
Understanding the Operator Panel<br />
Understanding the Operator Panel<br />
Message Display<br />
The operator panel has a LCD message display, three indicators, and eight<br />
keys.<br />
Messages that appear on the display and functions of indicators and keys<br />
are explained in the sections that follows.<br />
The message display gives information in the form of short messages. The<br />
eight messages listed below are displayed during normal warm-up and<br />
printing.<br />
Other messages that may appear when the printer needs the operator’s<br />
attention are explained in Chapter 4.<br />
Message Meaning<br />
Self test The printer is self-testing after power-up.<br />
Please wait The printer is warming up and is not ready. When<br />
the printer is switched on for the first time after the<br />
toner container is installed, (Adding toner)<br />
also appears.<br />
Ready The printer is ready to print.<br />
Processing The printer is receiving data, generating graphics,<br />
reading a CompactFlash card/Microdrive, or<br />
printing.<br />
Sleeping The printer is in sleep mode. The printer wakes<br />
from sleep mode whenever the GO key on the<br />
operator panel is pressed, the cover is opened or<br />
closed, or data is received. The printer then warms<br />
up and goes online. The time that the printer takes<br />
to enter sleep mode depends on the sleep timer<br />
setting.<br />
Cancelling data Jobs inside the printer are being canceled. To cancel<br />
a job, see the table on page 1-5.<br />
Waiting The printer is waiting for the end-of-job command<br />
before printing the last page. Pressing the GO key<br />
allows you to obtain the last page immediately.<br />
FormFeed Time Out The printer is printing the last page after a waiting<br />
period.<br />
Table 1-1<br />
1-2
Interface Indicator<br />
Note<br />
Paper Size Indicator<br />
Note<br />
INTERFACE<br />
1-3<br />
Understanding the Operator Panel<br />
The interface indicator shows the interface that is currently used. It uses<br />
the following abbreviations:<br />
PAR Standard bi-directional parallel interface<br />
USB Standard USB interface<br />
NET Network interface<br />
SER Option serial interface (RS-232C)<br />
OPT Option network interface card<br />
--- No interface is active.<br />
Each interface has a timeout time of 30 seconds during which the other<br />
interface should wait to receive a print job. Even a print job has been<br />
complete on the interface, you should wait for this period until the other<br />
interface begins printing the job.<br />
SIZE<br />
This indicator indicates the paper size of the current paper cassette. The<br />
following abbreviations are used to indicate the paper sizes.<br />
Message<br />
Display<br />
Paper Size Message<br />
Display<br />
Paper Size<br />
A4 ISO A4 (21 × 29.7 cm) EX Executive (7-1/4 × 10-1/2 inches)<br />
A5 ISO A5 (14.8 × 21 cm) #6 Commercial 6-3/4<br />
(3-5/8 × 6-1/2 inches) †<br />
A6 ISO A6<br />
(10.5 × 14.8 cm) †<br />
† With only the MP tray feeding.<br />
#9 Commercial 9<br />
(3-7/8 × 8-7/8 inches) †<br />
B5 JIS B5 (18.2 × 25.6 cm) O2 Oficio II (8-1/2 × 13 inches)<br />
B6 JIS B6<br />
(12.8 × 18.2 cm) †<br />
16K 16 kai (19.7 × 27.3 cm)<br />
LT Letter<br />
(8-1/2 × 11 inches)<br />
ST Statement (5-1/2 × 8-1/2 inches) †<br />
LG Legal<br />
(8-1/2 × 14 inches)<br />
MO Monarch<br />
(3-7/8 × 7-1/2 inches) †<br />
BU Business<br />
(4-1/8 × 9-1/2 inches) †<br />
DL ISO DL (11 × 22 cm) †<br />
C5 ISO C5<br />
(16.2 × 22.9 cm)<br />
FO Folio (21 × 33 cm)<br />
HA Japanese Postcard (10 × 14.8 cm) †<br />
OH Return Postcard (20 × 14.8 cm) †<br />
Y2 Envelope (Youkei 2)<br />
(11.4 × 16.2 cm) †<br />
Y4 Envelope (Youkei 4)<br />
(10.5 × 23.5 cm) †<br />
b5 ISO B5 (17.6 × 25 cm) CU Custom Size<br />
(14.8 × 21 cm to 21.6 × 35.6 cm)<br />
Table 1-2<br />
While the printer is processing data, the SIZE indicator indicates the<br />
paper size selected by the application software.
Understanding the Operator Panel<br />
Paper Type Indicator<br />
TYPE<br />
This shows the paper type defined for the current paper casette. Automatic<br />
cassette switching is available according to the paper type.<br />
The paper type can be specified at the operator panel. See Creating<br />
Custom Paper Type on page 1-32.<br />
The following abbreviations are used to indicate the paper type.<br />
READY, DA<strong>TA</strong>, and ATTENTION Indicators<br />
Message Display Paper Type Message Display Paper Type<br />
None Auto LETTERHEA Letterhead<br />
PLAIN Plain COLOR Color<br />
TRNSPRNCY Transparency †<br />
PREPUNCHE Prepunched<br />
PREPRINTE Preprinted ENVELOPE Envelope †<br />
LABELS Labels †<br />
† With only the MP tray feeding.<br />
The following indicators light during<br />
normal operation and when the<br />
printer needs attention.<br />
1-4<br />
CARDSTOCK Cardstock †<br />
BOND Bond THICK Thick †<br />
RECYCLED Recycled HIGH QUAL High quality<br />
VELLUM Vellum †<br />
CUSTOM 1 (to 8) Custom 1 (to 8)<br />
ROUGH Rough<br />
Table 1-3<br />
Indicator Description<br />
READY Flashing: Indicates when an error occurs that you can clear<br />
by yourself.<br />
Lit: Indicates that the printer is on-line.<br />
The printer prints received data.<br />
Off: Indicates that the printer is off-line. Data can be received<br />
but will not be printed. Also indicates when printing is<br />
automatically stopped due to occurrence of an error.<br />
Flashing: Indicates data transfer is taking place.<br />
DA<strong>TA</strong><br />
Lit: Indicates either that data is being processed, or that data<br />
is being written to the memory card.<br />
ATTENTION<br />
Flashing: Indicates when the printer needs maintenance<br />
attention or the printer is warming up (Please wait).<br />
Lit: Indicates when a problem or an error occurs that you can<br />
clear by yourself.<br />
(For example, paper jam occurs.)<br />
Table 1-4<br />
Ready<br />
PAR A4 PLAIN<br />
INTERFACE SIZE TYPE<br />
READY<br />
DA<strong>TA</strong><br />
ATTENTION
Keys<br />
Note<br />
The operator panel keys are used to<br />
configure the printer. Note the<br />
certain keys have the secondary<br />
function.<br />
1-5<br />
Understanding the Operator Panel<br />
Settings made with these keys effect only the interface currently in use.<br />
GO<br />
CANCEL <strong>MENU</strong> ENTER<br />
Key Function<br />
• Switches the printer on-line and off-line.<br />
• Prints and feed out one page.<br />
GO • Cancels specific errors.<br />
• Cancels a printing job.<br />
To cancel, proceed as follows:<br />
1 Check if Processing is displayed in the message display.<br />
2 Press the CANCEL key.<br />
3 Print Cancel? appears in the message display and then interface to be canceled.<br />
Parallel<br />
USB<br />
Network<br />
CANCEL<br />
Serial (appears only when an option serial interface board kit is installed)<br />
Option (appears only when an option network interface card is installed)<br />
Press the CANCEL key again if you wish to stop the cancellation of printing.<br />
4 Select the interface to cancel using the or key and then press the ENTER key. Printing<br />
from the selected interface will stop. Cancelling data appears in the message display<br />
and printing stops after the current page is printed.<br />
• Resets numeric values, or cancels a setting procedure.<br />
• Used to stop the sounding of the alarm buzzer an error occurs.<br />
<strong>MENU</strong><br />
Table 1-5<br />
?<br />
ENTER<br />
†<br />
†<br />
• When pressed during mode selection, terminates the setting and the printer returns to the<br />
Ready condition.<br />
• Used to select the emulation, font, character code set; to read an CompactFlash card, and<br />
more.<br />
Used to access a desired item or enter numeric values. In some of the control procedures, the ><br />
and < keys are used to enter or exit a sub item.<br />
Used to access a desired item or enter of numeric values. In some of the control procedures, the<br />
> and < keys are used to enter or exit a sub item.<br />
Used as the < key in the mode selection function.<br />
•Used as the > key in the mode selection function.<br />
• Displays online help messages on the message display when paper jam errors occur. When<br />
pressed in the Ready condition, displays explanations of online help messages. When pressed<br />
while the online help is displayed, cancels the online help.<br />
Finalizes numeric values and other selections.<br />
† If you hold down the ENTER key and press the <strong>MENU</strong> key when Ready is shown on this printer, the AdministrationID menu<br />
will be displayed. This menu is the setting menu for administration under the Account Management System and is normally not<br />
used. Press the <strong>MENU</strong> key to return to the Ready display.<br />
?
Understanding the Operator Panel<br />
Menu System Road Map<br />
Ready<br />
PAR A4 PLAIN<br />
<strong>MENU</strong><br />
Print<br />
Menu Map<br />
Print<br />
Status Page<br />
e-MPS ><br />
Continued on next page<br />
Note<br />
This section explains how to use the menu selection system. The <strong>MENU</strong> key<br />
on the operator panel allows you to use the menu to set or change the<br />
printer environment such as the number of copies to make, emulation, etc.,<br />
to your specific needs. Settings can be made when Ready is indicated on<br />
the printer message display.<br />
The printer obeys the most recently received printer settings sent from<br />
the application software, or from the printer driver, which take priority<br />
over operator panel settings.<br />
The following is the hierarchy diagram of the menu selection system of the<br />
printer.<br />
The vertical transition is made with the and keys and horizontal<br />
transition is made with the > and < keys. To change or finalize<br />
configuration on an item, use the ENTER key.<br />
>Quick Copy<br />
>Private/Stored<br />
>Print VMB Data<br />
>List of VMB<br />
>List of<br />
Code JOB<br />
>e-MPS ><br />
Configuration<br />
1-6<br />
>>Quick Copy<br />
>>Temp.Code JOB<br />
Size<br />
>>Perm.Code JOB<br />
Size<br />
>>VMB Size<br />
These items will not appear unless the printer<br />
is installed with the applicable option unit.
Continued from previous page<br />
Interface ><br />
Parallel<br />
Interface USB<br />
><br />
Network Interface ><br />
Serial Interface ><br />
Option<br />
Continued on next page<br />
>Parallel I/F<br />
Auto<br />
Normal<br />
High Speed<br />
Nibble (high)<br />
>NetWare<br />
>NetWare Off<br />
><br />
On<br />
>TCP/IP<br />
Off<br />
On<br />
>Ether Talk<br />
Off<br />
>Network Status<br />
Page On<br />
>Baud Rate<br />
9600<br />
>Data Bits<br />
8<br />
>Stop Bits<br />
1<br />
>Parity<br />
None<br />
>Protocol<br />
DTR (pos.)&XON<br />
>NetWare<br />
>NetWare Off<br />
><br />
On<br />
>TCP/IP<br />
Off<br />
On<br />
>Ether Talk<br />
Off<br />
>OPT. StatusPage<br />
Off<br />
1-7<br />
Understanding the Operator Panel<br />
>>NetWare Frame<br />
Auto<br />
>>DHCP<br />
OFF<br />
>>IP Address<br />
>>Subnet Mask<br />
>>Gateway<br />
>>NetWare Frame<br />
Auto<br />
>>DHCP<br />
OFF<br />
>>IP Address<br />
>>Subnet Mask<br />
>>Gateway
Understanding the Operator Panel<br />
Continued from previous page<br />
Emulation<br />
PCL 6<br />
Emulation ><br />
KPDL<br />
Emulation ><br />
KPDL (AUTO)<br />
Emulation<br />
Line Printer<br />
Emulation<br />
IBM Proprinter<br />
Emulation<br />
DIABLO 630<br />
Emulation<br />
EPSON LQ-850<br />
Font ><br />
Page Set ><br />
Continued on next page<br />
>Print KPDL errs<br />
Off<br />
On<br />
>Alt. Emulation<br />
PCL 6<br />
>Print KPDL errs<br />
Off<br />
On<br />
Font Select ><br />
Internal ><br />
Option<br />
>Code Set<br />
IBM PC-8<br />
>List of<br />
Internal Fonts<br />
>List of<br />
Option Fonts<br />
>Copies<br />
>Orientation<br />
Portrait<br />
Landscape<br />
>Page Protect<br />
Auto<br />
On<br />
001<br />
>LF Action<br />
LF only<br />
CR and LF<br />
Ignore LF<br />
>CR Action<br />
CR only<br />
CR and LF<br />
Ignore CR<br />
>Wide A4<br />
Off<br />
On<br />
>> I000<br />
>>Courier<br />
Dark<br />
Regular<br />
>>Letter Gothic<br />
Regular<br />
Dark<br />
>>Size<br />
012.00<br />
>>Pitch<br />
10.00 cpi<br />
1-8
Continued from previous page<br />
Print Quality ><br />
Continued on next page<br />
>KIR Mode<br />
On<br />
Off<br />
>Ecoprint Mode<br />
Off<br />
On<br />
>Resolution<br />
Fast 1200 mode<br />
Fine 1200 mode<br />
300 dpi<br />
600 dpi<br />
Hard Disk > >Read Data<br />
>Write Data<br />
>Delete Data<br />
>List of<br />
Partitions<br />
RAM Disk Mode<br />
RAM Off Disk Mode<br />
>RAM Disk Size<br />
On<br />
>Read Data<br />
>Write Data<br />
>Delete Data<br />
>List of<br />
Partitions<br />
Memory Card ><br />
>Print Density<br />
03<br />
>Read Fonts<br />
>Read Data<br />
>Write Data<br />
>Delete Data<br />
>Format<br />
>List of<br />
Partitions<br />
1-9<br />
Understanding the Operator Panel
Understanding the Operator Panel<br />
Continued from Previous page<br />
Paper Handling ><br />
Continued on next page<br />
>MP Tray Mode<br />
Cassette<br />
>MP Tray Size<br />
A4 or Letter<br />
>MP Tray Type<br />
Plain<br />
>EF Size<br />
DL or Business<br />
>EF Type<br />
Envelope<br />
>BulkFeeder Size<br />
A4<br />
>BulkFeeder Type<br />
Plain<br />
>Cassette Size<br />
A4<br />
>Cassette Size ><br />
Custom<br />
>Cassette Type<br />
Plain<br />
>Feed Select<br />
Cassette<br />
>Duplex Mode<br />
None<br />
>Stack Select<br />
Top >Stack tray Select FaceDn<br />
RearTray FaceUp<br />
>Sorter Mode<br />
Sorter<br />
>Override A4/LT<br />
>Override Off A4/LT<br />
On<br />
>Type Adjust ><br />
Custom 1<br />
>Reset Type<br />
Adjust<br />
Life Counters > >Total Print<br />
0123456<br />
>New Toner<br />
Installed<br />
1-10<br />
>>Unit<br />
mm<br />
inch<br />
† The option bulk paper feeder can only be installed on the LP 3033.<br />
†<br />
†<br />
>>X Dimension<br />
>>Y Dimension<br />
>>Paper weight<br />
Normal 2<br />
>>Duplex Path<br />
Enable<br />
Disable
Continued from previous page<br />
Others ><br />
>Form Feed<br />
Time Out 030sec.<br />
>Sleep Timer ><br />
015 min.<br />
>Print HEX-DUMP<br />
>Printer Reset<br />
>Resource Prot.<br />
Off<br />
Permanent<br />
Perm / Temp<br />
>Buzzer<br />
On<br />
Off<br />
†† This menu is for service personnel.<br />
>MSG Language<br />
English<br />
>Auto Continue ><br />
Mode On<br />
Mode Off<br />
>Finishing ><br />
1-11<br />
>>Sleep Mode<br />
On<br />
Off<br />
>>Auto Continue<br />
Timer 030sec.<br />
>>Duplex<br />
Off<br />
On<br />
>Service > >>Print<br />
Status Page<br />
>>Print<br />
Event Log<br />
>>Developer<br />
>>DRUM-CTRL<br />
00<br />
>>Drum<br />
Understanding the Operator Panel<br />
††<br />
††<br />
††
Printing Test Pages<br />
Printing Test Pages<br />
Menu Map<br />
This section explains the procedure for printing the printer’s internal<br />
information using the menu selection system. The menu map is usefull as a<br />
reference to guide yourself through the menu selection system.<br />
The status page is a list of parameters and settings for most basic printer<br />
configurations. You may be required to produce a status page when<br />
requesting service to the printer.<br />
The printer prints a full list of menu selection system. Note that menus<br />
indicated on the list may vary depending on which option units are<br />
installed on the printer.<br />
1<br />
2<br />
3<br />
4<br />
Press the <strong>MENU</strong> key.<br />
Press the or key repeatedly until Print Menu Map appears.<br />
Print<br />
Menu Map<br />
Press the ENTER key. A question mark (?) appears.<br />
Print<br />
Menu Map ?<br />
Press the ENTER key again. The printer prints a menu map.<br />
1-12
Sample <strong>MENU</strong> MAP<br />
<strong>MENU</strong> MAP<br />
1-13<br />
LP 3033 Page Printer<br />
Printing Test Pages
Printing Test Pages<br />
Status Page<br />
If you want to check the printer's current status, including memory<br />
available and option settings, you can find the information you need on the<br />
status page.<br />
1<br />
2<br />
3<br />
4<br />
Press the <strong>MENU</strong> key.<br />
Press the or key repeatedly until Print Status Page appears.<br />
Print<br />
Status Page<br />
Press the ENTER key. A question mark (?) appears.<br />
Print<br />
Status Page ?<br />
Press the ENTER key again. The printer prints a status page.<br />
For a full description of the status page, see the following pages.<br />
1-14
2<br />
4<br />
6<br />
Hardware Information<br />
Page Information<br />
1-15<br />
Printing Test Pages<br />
The following is a sample status page. The numbers below refer to the<br />
contents explained on the following pages.<br />
Memory<br />
Installed Options<br />
Network Status Emulation<br />
Interfaces<br />
S<strong>TA</strong>TUS PAGE<br />
Error Log<br />
Toner Gauge<br />
KIR Test pattern ON<br />
Note<br />
0<br />
LP 3033 Page Printer<br />
Firmware Version: Released: 1<br />
Items and values on the status page may vary depending on the printer’s<br />
firmware version.<br />
100<br />
3<br />
5<br />
7<br />
8<br />
9<br />
10<br />
11
Printing Test Pages<br />
1 — Software Version<br />
This information shows the firmware version and date of issue of the<br />
printer.<br />
2 — Hardware Information<br />
This information shows various printer settings, such as the size and type<br />
of the paper in the paper cassettes.<br />
3 — Memory<br />
This shows the amount of total memory installed in the printer, the<br />
amount of currently available memory, and the current status of the RAM<br />
disk. See Operating the Storage Device on page 1-81.<br />
4 — Page Information<br />
This shows the print resolution, number of copies, and the total page count.<br />
5 — Installation Options<br />
This shows the option(s) installed in the printer.<br />
6 — Network Status<br />
This shows the IP address, Subnet Mask address, and Default Gateway<br />
address for the network interface card in the printer.<br />
7 — Emulation<br />
This shows all available emulations of the printer. The printer is shipped<br />
from the factory with PCL 6 emulation selected as the default.<br />
8 — Error Log<br />
This shows the last three instances of the following types of errors, listing<br />
them in the order of their occurrence:<br />
• KPDL (PostScript) errors<br />
• Memory card errors<br />
• Memory card, hard disk, RAM disk errors<br />
The most recent error is displayed on the top line of the Error Log. For<br />
error remedies, see section Error Messages on page 4-10. Error<br />
information is cleared when the printer’s power is turned off.<br />
9 — Toner Gauge<br />
This shows the approximate level of remaining toner. When the value is<br />
100, the toner container is full.<br />
1-16
10 — Interface Information<br />
1-17<br />
Printing Test Pages<br />
This information shows the default font and the default emulation for all<br />
interfaces installed in the printer.<br />
11 — KIR Test Pattern<br />
KIR is the KM’s original smoothing function. This test pattern<br />
shows the effect of the KIR system.
Printing Test Pages<br />
Service Status Page<br />
The service status page contains printer settings information that is more<br />
detailed than the standard status page and is therefore for mostly service<br />
purposes. However, since there is a great deal of information available on<br />
the service status page that may be helpful to you, the procedure for<br />
printing it out is given below.<br />
1<br />
2<br />
3<br />
4<br />
5<br />
6<br />
7<br />
8<br />
Press the <strong>MENU</strong> key.<br />
Press the or key repeatedly until Others > appears.<br />
Others ><br />
Press the > key.<br />
Press the or key repeatedly until >Service > appears.<br />
>Service ><br />
Press the > key.<br />
Press the or key repeatedly until >>Print Status Page<br />
appears.<br />
>>Print<br />
Status Page<br />
Press the ENTER key. A question mark (?) appears.<br />
>>Print<br />
Status Page ?<br />
Press the ENTER key again. The display indicates Processing and<br />
printing starts.<br />
1-18
Network Interface Status Page<br />
Note<br />
1-19<br />
Printing Test Pages<br />
You can print out a status page for the network interface. The network<br />
interface status page shows the firmware version, the network addresses,<br />
and other information under various network protocols about the network<br />
interface card. The default setting is Off (not print). If the setting is<br />
changed to On (print) as follows, however, the network interface status<br />
page will be printed when the printer status page is printed.<br />
Printing out a network interface status page may not be possible with the<br />
option network interface card. For details, see the manual for the network<br />
interface.<br />
1<br />
2<br />
3<br />
LP 3033 Page Printer<br />
NETWORK S<strong>TA</strong>TUS PAGE<br />
Press the <strong>MENU</strong> key.<br />
Press the or key repeatedly until Interface > appears.<br />
Interface ><br />
Parallel<br />
Press the ENTER key. A blinking question mark (?) appears.<br />
Interface<br />
? Parallel
Printing Test Pages<br />
4<br />
5<br />
6<br />
7<br />
8<br />
9<br />
10<br />
Press the or key repeatedly until Network appears.<br />
Interface<br />
? Network<br />
Press the ENTER key again. A > appears.<br />
Interface ><br />
Network<br />
Press the > key and then press the or key repeatedly until the<br />
message display indicates >Network Status Page.<br />
>Network Status<br />
Page Off<br />
The default setting is Off. If it is set to On, change it as follows.<br />
Press the ENTER key. A blinking question mark (?) appears.<br />
>Network Status<br />
Page ? Off<br />
Select On using the or key.<br />
>Network Status<br />
Page ? On<br />
Press the ENTER key again.<br />
>Network Status<br />
Page On<br />
Press the <strong>MENU</strong> key. The message display returns to Ready.<br />
1-20
Font Lists<br />
1-21<br />
Printing Test Pages<br />
To help in selecting fonts, you can print the lists of the fonts including<br />
option fonts.<br />
1<br />
2<br />
3<br />
4<br />
5<br />
6<br />
7<br />
8<br />
Press the <strong>MENU</strong> key.<br />
Press the or key repeatedly until Font > appears.<br />
Font ><br />
Press the > key.<br />
Press the or key repeatedly until > Font Select> appears.<br />
>Font Select ><br />
Internal<br />
To print a list of the internal fonts, check that Internal is<br />
displayed. To print a list of option fonts, press the ENTER key. Press<br />
the or key repeatedly until the message display indicates<br />
Option and press the ENTER key.<br />
Press the or key repeatedly until >List of Internal Fonts<br />
or >List of Option Fonts appears.<br />
>List of<br />
Internal Fonts<br />
Press the ENTER key. A question mark (?) appears.<br />
>List of<br />
Internal Fonts?<br />
Press the ENTER key again. Processing appears, then Ready. The<br />
printer prints a list of fonts with a short sample and font ID<br />
(number) for each font.
Printing Test Pages<br />
Font Lists<br />
Internal Scalable and Bitmapped Fonts List<br />
1-22<br />
PRESCRIBE<br />
Font Name Scalable/Bitmap Password Selection [FSET] Font ID<br />
Internal Scalable and Bitmapped Fonts List<br />
PRESCRIBE<br />
Font Name Scalable/Bitmap Password Selection [FSET] Font ID
Received Data Dumping<br />
1-23<br />
Printing Test Pages<br />
It is possible to print data received by the printer as hexadecimal code for<br />
the purposes of debugging programs and files.<br />
1<br />
2<br />
3<br />
4<br />
5<br />
6<br />
7<br />
8<br />
Press the <strong>MENU</strong> key.<br />
Press the or key repeatedly until Others > appears.<br />
Others ><br />
Press the > key.<br />
Press the or key repeatedly until > Print HEX-DUMP appears.<br />
>Print HEX-DUMP<br />
Press the ENTER key. A question mark (?) appears.<br />
>Print HEX-DUMP?<br />
Press the ENTER key again. Processing appears for a second, and<br />
then Waiting appears.<br />
Processing<br />
Waiting<br />
Send data to be dumped to the printer. The message Processing<br />
will be displayed during receiving the data.<br />
Once the dumped data you require has been output, it is possible to<br />
cancel the printing of any further dumped data by taking the printer<br />
offline by pressing the GO key and then pressing the CANCEL key.<br />
Once all data has been received, the message Waiting will appear.<br />
Press the GO key to finish printing.
Paper Handling<br />
Paper Handling<br />
Setting the Paper Size<br />
This section explains how to use the operator panel to change the paper<br />
size and type for each paper source, the mode for the MP (multi-purpose)<br />
tray, and other settings regarding paper handling.<br />
Set the paper sizes according to the sizes of paper to be set in the paper<br />
cassette and the MP tray.<br />
If they do not match, printing will not be made on the correct size paper<br />
when automatic paper size selection is made by the application software<br />
(printer driver).<br />
Setting the Paper Size in Paper Cassette<br />
To set the standard sizes A5, A4, B5, Letter, and Legal (for U. S. A. only)<br />
size for the paper cassette, use the following procedure to set the paper size<br />
dial of the paper cassette.<br />
If you use a non-standard size, see Custom Paper Size on next page.<br />
Properly set the paper into the paper cassette. For details about the<br />
adjustment of the paper guides and paper stopper inside the paper<br />
cassette, set the Installation Guide supplies with the printer.<br />
1<br />
2<br />
Turn the paper size dial so that the size of the paper you are going to<br />
use appears in the paper size window.<br />
Paper Size Dial Paper Size Window<br />
Adjust the paper guides and paper stopper inside the paper cassette<br />
to the size of the paper to be used and load the paper into the<br />
cassette.<br />
The paper size setting for the paper cassette is completed.<br />
1-24
1-25<br />
Paper Handling<br />
Custom Paper Size<br />
In addition to the standard sizes A5, A4, B5, Letter, and Legal (for U. S. A.<br />
only) size for the paper cassette, paper of other sizes can be fed as custom<br />
sizes. When placing paper of sizes other than A5, A4, B5, Letter, or Legal<br />
(for U. S. A. only) into the paper cassette, set the size of the paper to be<br />
used into the printer by following the procedure given below. If an option<br />
paper feeder (PF-60) is installed, custom sizes for its paper cassette can be<br />
set using the same procedure.<br />
This menu appears when the paper size dial of the paper cassette is set to<br />
OTHER.<br />
Properly set the paper into the paper cassette. For details about the<br />
adjustment of the paper guides and paper stopper inside the paper<br />
cassette, see the Installation Guide supplied with the printer.<br />
Setting Paper Size Dial<br />
Use the following procedure to set the paper size dial to OTHER.<br />
1<br />
2<br />
Pull out the paper cassette from the printer and turn the paper size<br />
dial to OTHER. See step 1 in Setting the Paper Size in Paper<br />
Cassette.<br />
Adjust the paper guides and paper stopper inside the paper cassette<br />
to the size of the paper to be used and load the paper into the<br />
cassette.<br />
When using non-standard size paper, read the next section to set the<br />
paper size from the operator panel.<br />
Setting a custom size from the Operator Panel<br />
Set the size of the paper loaded in the paper cassette into the printer from<br />
the printer operator panel.<br />
1<br />
2<br />
3<br />
Press the <strong>MENU</strong> key.<br />
Press the or key repeatedly until Paper Handling > appears.<br />
Paper Handling ><br />
Press the > key.
Paper Handling<br />
4<br />
5<br />
6<br />
7<br />
Press the or key repeatedly until >Cassette Size > appears.<br />
If option paper feeders are added, Cassette 1 Size will appear for<br />
the standard paper cassette and Cassette 2 Size, Cassette 3<br />
Size, and Cassette 4 Size will appear for the option paper<br />
feeders.<br />
>Cassette Size ><br />
Custom<br />
Press the ENTER key. A blinking question mark (?) appears.<br />
>Cassette Size<br />
? Custom<br />
Press the or key to display the desired paper size. The message<br />
display toggles through the following paper sizes:<br />
Custom<br />
Oficio II<br />
Folio<br />
16K<br />
C5<br />
A5<br />
B5<br />
ISO B5<br />
A4<br />
Executive<br />
Letter<br />
Legal<br />
When the desired paper size is displayed, press the ENTER key. The<br />
paper size is set for the paper cassette.<br />
If you selected Custom in step 6, be sure to set the unit of<br />
measurement and the dimensions of the paper as described in the<br />
following sections.<br />
1-26
Selecting the Unit of Measurement<br />
Then, use the following procedure to set the unit of measurement.<br />
1<br />
2<br />
3<br />
4<br />
5<br />
Press the > key.<br />
1-27<br />
Paper Handling<br />
Press the or key repeatedly until >>Unit appears. The unit of<br />
measurement can be selected between millimeters and inches. The<br />
current unit of measurement is displayed (the default setting is mm).<br />
>>Unit<br />
mm<br />
Press the ENTER key. A blinking question mark (?) appears.<br />
>>Unit<br />
? mm<br />
Select mm or inch using the or key.<br />
Press the ENTER key.<br />
Set the dimensions of paper as described in the next section.<br />
Entering the Width and Length<br />
Then, use the following procedure to set the paper size.<br />
Enter the paper size for X Dimension and Y Dimension as<br />
shown in the figure.<br />
148 to 216 mm<br />
(5.83 to 8.5 inches)<br />
X Dimension<br />
Y Dimension<br />
210 to 356 mm<br />
(8.27 to 14.02 inches)
Paper Handling<br />
1<br />
2<br />
3<br />
4<br />
5<br />
6<br />
7<br />
When the unit of measurement is set, press the key.<br />
>>X Dimension appears as shown below (the paper width setting).<br />
Press the ENTER key. A blinking cursor ( ) appears.<br />
Press the or key to increase or decrease the value of the figure<br />
where the cursor is blinking and display the desired width. The<br />
width can be set between 148 and 216 mm (5.83 to 8.5 inches). You<br />
can use the > and < keys to move the cursor right and left.<br />
Display the paper width and press the ENTER key.<br />
When the width is set, press the key. >>Y Dimension appears<br />
(the paper length setting). Set the desired length in the same way as<br />
the width. The length can be set between 210 and 356 mm (8.27 to<br />
14.02 inches).<br />
Display the paper length, press the ENTER key.<br />
Press the <strong>MENU</strong> key. The message display returns to Ready.<br />
To print using the custom size set above, define the same custom size<br />
on the printer driver. For details, see KX Printer Drivers<br />
Operation Guide.<br />
Setting the Paper Size in MP Tray<br />
When using the MP tray in the cassette mode, you should set the same<br />
paper size to the MP tray as that is used to format the job to print. The<br />
factory default setting is A4 or Letter.<br />
This menu does not appears when the option envelope feeder is installed on<br />
the printer.<br />
For more details about the paper sizes that can be fed from the MP tray, see<br />
Chapter 2.<br />
1<br />
2<br />
>>X Dimension<br />
216 mm<br />
>>X Dimension<br />
216 mm<br />
Press the <strong>MENU</strong> key.<br />
Press the or key repeatedly until Paper Handling > appears.<br />
Paper Handling ><br />
1-28
3<br />
4<br />
5<br />
6<br />
7<br />
8<br />
Press the > key.<br />
1-29<br />
Paper Handling<br />
Press the or key repeatedly until >MP Tray Size appears.<br />
>MP Tray Size<br />
A4<br />
Press the ENTER key. A blinking question mark (?) appears.<br />
>MP Tray Size<br />
? A4<br />
Press the or key to display the desired MP tray size. The display<br />
changes as shown below.<br />
A4<br />
Executive<br />
Letter<br />
Legal<br />
Custom<br />
Hagaki<br />
OufukuHagaki<br />
Oficio II<br />
Statement<br />
Folio<br />
Youkei 2<br />
Youkei 4<br />
16K<br />
Monarch<br />
Business<br />
Comm. #9<br />
Comm. #6 3/4<br />
DL<br />
C5<br />
A6<br />
B6<br />
A5<br />
B5<br />
ISO B5<br />
When the desired paper size is displayed, press the ENTER key.<br />
Press the <strong>MENU</strong> key. The message display returns to Ready.<br />
The paper size setting for the MP tray is completed.
Paper Handling<br />
Setting the Paper Type<br />
Set the paper types according to the paper to be set in the cassette and the<br />
MP tray.<br />
Setting the Paper Type in Paper Cassette<br />
Make this setting to match the paper type fed from the paper cassette of<br />
the printer. If the paper type is set correctly, you can perform printing<br />
using the media type selection function from the application software<br />
(printer driver). The factory default setting is Plain.<br />
For more details about the paper types that can be fed from the paper<br />
cassette, see Chapter 2.<br />
1<br />
2<br />
3<br />
4<br />
5<br />
6<br />
7<br />
8<br />
Press the <strong>MENU</strong> key.<br />
Press the or key repeatedly until Paper Handling > appears.<br />
Paper Handling ><br />
Press the > key.<br />
Press the or key repeatedly until >Cassette Type appears.<br />
>Cassette Type<br />
Plain<br />
Press the ENTER key. A blinking question mark (?) appears.<br />
>Cassette Type<br />
? Plain<br />
Press the or key to display the desired cassette type. The display<br />
changes as shown below.<br />
Plain<br />
Preprinted<br />
Bond<br />
Recycled<br />
Rough<br />
Letterhead<br />
Color<br />
Prepunched<br />
High quality<br />
Custom(1 to 8)<br />
When the desired cassette type is displayed, press the ENTER key.<br />
Press the <strong>MENU</strong> key. The message display returns to Ready.<br />
1-30
1-31<br />
Paper Handling<br />
Setting the Paper Type in MP Tray<br />
You can automatically select the paper cassette according to the selection<br />
made by the application software (printer driver). The factory default<br />
setting is Plain.<br />
This menu does not appears when the option envelope feeder is installed on<br />
the printer.<br />
For more details about the paper types that can be fed from the MP tray,<br />
see Chapter 2.<br />
1<br />
2<br />
3<br />
4<br />
5<br />
Press the <strong>MENU</strong> key.<br />
Press the or key repeatedly until Paper Handling > appears.<br />
Paper Handling ><br />
Press the > key.<br />
Press the or key repeatedly until >MP Tray Type appears.<br />
>MP Tray Type<br />
Plain<br />
Press the ENTER key. A blinking question mark (?) appears.<br />
>MP Tray Type<br />
? Plain
Paper Handling<br />
6<br />
7<br />
8<br />
Press the or key to display the desired MP tray type. The display<br />
changes as shown below.<br />
Plain<br />
Transparency<br />
Preprinted<br />
Labels<br />
Bond<br />
Recycled<br />
Vellum<br />
Rough<br />
Letterhead<br />
Color<br />
Prepunched<br />
Envelope<br />
Cardstock<br />
Thick<br />
High quality<br />
Custom (1 to 8)<br />
When the desired MP tray type is displayed, press the ENTER key.<br />
Press the <strong>MENU</strong> key and the message display returns to Ready.<br />
Creating Custom Paper Type<br />
The following describes the procedure used to set a user-defined paper type<br />
for the printer. Eight custom user settings may be registered. After having<br />
been set, any of these may be called up when setting the paper type for a<br />
paper source.<br />
The paper weight and duplex path can be set (see Setting the Paper<br />
Weight on page 1-34, and Setting the Duplex Path on page 1-35) after<br />
selecting the paper type to be customized as follows. For how to reset the<br />
customized settings, see Resetting the Custom Paper Type on page 1-36.<br />
1<br />
2<br />
3<br />
4<br />
Press the <strong>MENU</strong> key.<br />
Press the or key repeatedly until Paper Handling > appears.<br />
Paper Handling ><br />
Press the > key.<br />
Press the or key repeatedly until >Type Adjust > appears.<br />
>Type Adjust ><br />
Custom 1<br />
1-32
5<br />
6<br />
7<br />
8<br />
Press the ENTER key. A blinking question mark (?) appears.<br />
>Type Adjust ><br />
? Custom 1<br />
1-33<br />
Paper Handling<br />
Press the or key to display the desired paper type. The display<br />
changes as shown below.<br />
Custom (1 to 8)<br />
Plain<br />
Transparency<br />
Preprinted<br />
Labels<br />
Bond<br />
Recycled<br />
Vellum<br />
Rough<br />
Letterhead<br />
Color<br />
Prepunched<br />
Envelope<br />
Cardstock<br />
Thick<br />
High quality<br />
When the paper type to be customized is displayed, press the ENTER<br />
key.<br />
Press the > key and proceed to Setting the Paper Weight on the<br />
following page.<br />
Proceed to Setting the Paper Weight and Setting the Duplex Path<br />
starting from the following page.
Paper Handling<br />
Setting the Paper Weight<br />
You can set the paper thickness for your custom paper type to be<br />
customized.<br />
1<br />
2<br />
3<br />
4<br />
5<br />
6<br />
Display the custom paper type (see Creating Custom Paper Type<br />
on page 1-32) and press the > key.<br />
Press the or key repeatedly until >>Paper Weight appears.<br />
>>Paper Weight<br />
Normal 2<br />
Press the ENTER key. A blinking question mark (?) appears.<br />
>>Paper Weight<br />
? Normal 2<br />
Press the or key to display the desired paper thickness. The<br />
display changes as shown below. For details of the default setting for<br />
each paper type, see Paper Type on page 2-12.<br />
Light<br />
Normal 1<br />
Normal 2<br />
Normal 3<br />
Heavy l<br />
Heavy 2<br />
Heavy 3<br />
Extra Heavy<br />
When the desired paper thickness displayed, press the ENTER key.<br />
Press the <strong>MENU</strong> key. The message display returns to Ready.<br />
If the paper type is set to Custom and the option duplexer is installed<br />
on the printer, duplex printing can be enabled and disabled. See<br />
Setting the Duplex Path on the following page.<br />
1-34
Option<br />
Setting the Duplex Path<br />
1-35<br />
Paper Handling<br />
To use this function, the duplexer must be installed on the printer.<br />
If the paper type is set to Custom and the option duplexer is installed on<br />
the printer, you can set whether or not to enable duplex printing as follows.<br />
The default setting is Enable.<br />
1<br />
2<br />
3<br />
4<br />
5<br />
6<br />
Display the custom paper type (see Creating Custom Paper Type<br />
on page 1-32) and press the > key.<br />
Press the or key repeatedly until >>Duplex Path appears.<br />
>>Duplex Path<br />
Enable<br />
Press the ENTER key. A blinking question mark (?) appears.<br />
>>Duplex Path<br />
? Enable<br />
Select Enable or Disable using the or key. For details of the<br />
default setting for each paper type, see Paper Type on page 2-12.<br />
Press the ENTER key.<br />
Press the <strong>MENU</strong> key. The message display returns to Ready.<br />
The custom paper type setting is completed.
Paper Handling<br />
Resetting the Custom Paper Type<br />
Resets the settings of Custom 1 to 8 that are set in Creating Custom<br />
Paper Type on page 1-32.<br />
1<br />
2<br />
3<br />
4<br />
5<br />
6<br />
Press the <strong>MENU</strong> key.<br />
Press the or key repeatedly until Paper handling > appears.<br />
Paper Handling ><br />
Press the > key.<br />
Press the or key repeatedly until >Reset Type Adjust<br />
appears.<br />
>Reset Type<br />
Adjust<br />
Press the ENTER key. A question mark (?) appears.<br />
>Reset Type<br />
Adjust ?<br />
Press the ENTER key. All the customized paper weight and duplex<br />
path settings will be reset to the default. The message display<br />
returns to Ready.<br />
1-36
MP Tray Mode<br />
Note<br />
1-37<br />
Paper Handling<br />
The MP tray can be used in either of two modes – first or cassette. The<br />
MP tray feed paper differently depending on the mode:<br />
• Cassette Mode<br />
This is the default mode. The MP tray acts in the same manner as<br />
other paper source. The printer can correctly feed paper from any paper<br />
source as you command on the printer driver. The cassette mode<br />
provides a faster printing speed than the first mode.<br />
• First Mode<br />
The MP tray automatically feeds paper placed on the MP tray<br />
overriding another paper source that is selected on the printer driver.<br />
After all paper sheets in the MP tray have been used up (approximately<br />
100 sheets [A4 size, 0.11 mm thickness]), paper will be fed from the<br />
paper source originally selected. This mode is convenient to feed paper<br />
of special size or type without reloading the current paper source.<br />
However, the MP tray must be kept empty if you desire to feed paper<br />
from the intended paper source.<br />
This menu does not appears when the option envelope feeder is installed on<br />
the printer.<br />
The maximum capacity for the MP tray of 100 sheets is based on A4<br />
paper. If you use Legal size paper on the MP tray, the number of paper<br />
you use should be considerably smaller than 100 sheets to avoid<br />
possible paper jam.<br />
To switch the MP tray to First mode, proceed as follows:<br />
1<br />
2<br />
3<br />
4<br />
Press the <strong>MENU</strong> key.<br />
Press the or key repeatedly until Paper Handling > appears.<br />
Paper Handling ><br />
Press the > key.<br />
Press the or key repeatedly until >MP Tray Mode appears.<br />
>MP Tray Mode<br />
Cassette
Paper Handling<br />
5<br />
6<br />
7<br />
8<br />
Press the ENTER key. A blinking question mark (?) appears.<br />
Select First or Cassette using the or key.<br />
Press the ENTER key.<br />
Selecting the Paper Feed Source<br />
Press the <strong>MENU</strong> key. The message display returns to Ready.<br />
You can select from which paper source printing will be performed. If no<br />
option units are installed, the only selections are the paper cassette and<br />
MP tray of the printer. If option paper feeders are installed, they can also<br />
be selected using the manner described below.<br />
1<br />
2<br />
3<br />
4<br />
5<br />
6<br />
7<br />
8<br />
>MP Tray Mode<br />
? Cassette<br />
Press the <strong>MENU</strong> key.<br />
Press the or key repeatedly until Paper Handling > appears.<br />
Paper Handling ><br />
Press the > key.<br />
Press the or key repeatedly until >Feed Select appears.<br />
>Feed Select<br />
Cassette<br />
Press the ENTER key. A blinking question mark (?) appears.<br />
>Feed Select<br />
? Cassette<br />
Select MP tray or Cassette using the or key.<br />
Press the ENTER key.<br />
Press the <strong>MENU</strong> key. The message display returns to Ready.<br />
1-38
Selecting the Output Stack<br />
1-39<br />
Paper Handling<br />
The following procedure allows you to select whether printouts will be<br />
received by the top tray or to the rear tray. If an option sorter is installed, it<br />
can also be selected using the manner described below.<br />
1<br />
2<br />
3<br />
4<br />
5<br />
6<br />
7<br />
8<br />
Press the <strong>MENU</strong> key.<br />
Press the or key repeatedly until Paper Handling > appears.<br />
Paper Handling ><br />
Press the > key.<br />
Press the or key repeatedly until >Stack Select appears.<br />
>Stack Select<br />
Top tray FaceDn<br />
Press the ENTER key. A blinking question mark (?) appears.<br />
>Stack Select<br />
?Top tray FaceDn<br />
Press the or key to display the desired destination. The output<br />
tray changes as shown below.<br />
Top tray FaceDn (Printer’s top tray) [Default]<br />
RearTray FaceUp (Printer’s rear tray) [Option rear tray required]<br />
Sorter FaceDn [Option sorter required]<br />
When the desired paper source displayed, press the ENTER key.<br />
Press the <strong>MENU</strong> key. The message display returns to Ready.
Paper Handling<br />
Overriding A4 and Letter Size Difference<br />
This selects whether to enable or disable the difference between A4 size<br />
and Letter size. Under the default setting of Off, the paper size of the<br />
paper source is matched to the paper size formatting the jobs. If these<br />
differ, a corresponding error message is displayed. When this is set to On,<br />
printing is performed even if the actual paper size differs from the paper<br />
size formatting the jobs.<br />
1<br />
2<br />
3<br />
4<br />
5<br />
6<br />
7<br />
8<br />
Press the <strong>MENU</strong> key.<br />
Press the or key repeatedly until Paper Handling > appears.<br />
Paper Handling ><br />
Press the > key.<br />
Press the or key repeatedly until >Override A4/LT appears.<br />
>Override A4/LT<br />
Off<br />
Press the ENTER key. A blinking question mark (?) appears.<br />
>Override A4/LT<br />
? Off<br />
Select On or Off using the or key.<br />
Press the ENTER key.<br />
Press the <strong>MENU</strong> key. The message display returns to Ready.<br />
1-40
Pagination<br />
Emulation<br />
Changing the Emulation<br />
1-41<br />
Pagination<br />
The items regarding pagination can be made from the operator panel. The<br />
items that can be set are shown below.<br />
• Emulation<br />
• Font<br />
• Code Set<br />
• Number of Copies<br />
• Printing Orientation<br />
• KIR<br />
• Ecoprint<br />
• Resolution<br />
The following procedure allows you to select the printer’s emulation mode.<br />
To change the emulation mode, proceed as follows:<br />
1<br />
2<br />
3<br />
4<br />
Press the <strong>MENU</strong> key.<br />
Press the or key repeatedly until Emulation appears. One of<br />
the emulation modes shown below appears, indicating the current<br />
emulation.<br />
PCL 6 (default)<br />
KPDL<br />
KPDL (AUTO)<br />
Line Printer<br />
IBM Proprinter<br />
DIABLO 630<br />
EPSON LQ-850<br />
KPDL is the implementation of the PostScript page<br />
description language.<br />
Press the ENTER key. A blinking question mark (?) appears.<br />
Emulation<br />
?PCL 6<br />
Press the or key repeatedly until the desired emulation mode<br />
appears.
Pagination<br />
5<br />
6<br />
Press the ENTER key.<br />
Press the <strong>MENU</strong> key. The message display returns to Ready.<br />
Alternative Emulation for KPDL Emulation<br />
The auto KPDL (KPDL (AUTO)) emulation enables the printer to<br />
automatically change the emulation mode according to the print job<br />
received. The alternative emulation can be selected using the operator<br />
panel. The default alternative emulation is PCL 6.<br />
1<br />
2<br />
3<br />
4<br />
5<br />
6<br />
7<br />
Press the <strong>MENU</strong> key.<br />
Press the or key repeatedly until Emulation appears.<br />
Emulation<br />
PCL 6<br />
Press the ENTER key. A blinking question mark (?) appears.<br />
Emulation<br />
?PCL 6<br />
Press the or key repeatedly until the message display indicated<br />
KPDL (AUTO) appears.<br />
Emulation<br />
?KPDL (AUTO)<br />
Press the ENTER key.<br />
Press the > key. When > Print KPDL Errs is displayed, press the<br />
or key. The display cycles through the emulation in the following<br />
order:<br />
PCL 6 (default)<br />
Line Printer<br />
IBM Proprinter<br />
DIABLO 630<br />
EPSON LQ-850<br />
Press the ENTER key. A blinking question mark (?) appears.<br />
>Alt. Emulation<br />
?PCL 6<br />
1-42
Printing KPDL Errors<br />
8<br />
9<br />
10<br />
Press the or key repeatedly until the desired alternative<br />
emulation appears.<br />
Press the ENTER key.<br />
Press the <strong>MENU</strong> key. The message display returns to Ready.<br />
1-43<br />
Pagination<br />
The printer can print error descriptions when printing error occurs during<br />
KPDL emulation. The default is Off – the printer does not print KPDL<br />
errors.<br />
1<br />
2<br />
3<br />
4<br />
5<br />
6<br />
7<br />
Press the <strong>MENU</strong> key.<br />
Press the or key repeatedly until Emulation > appears.<br />
Emulation<br />
PCL 6<br />
Press the ENTER key. A blinking question mark (?) appears.<br />
Emulation<br />
?PCL 6<br />
Select KPDL or KPDL (AUTO) using the or key.<br />
Emulation<br />
?KPDL<br />
Press the ENTER key.<br />
Press the > key. The message display changes to that shown below. If<br />
>Alt. Emulation is displayed when the KPDL (AUTO) emulation<br />
is selected, press the or key to change it.<br />
>Print KPDL Errs<br />
Off<br />
Press the ENTER key. A blinking question mark (?) appears.<br />
>Print KPDL Errs<br />
? Off
Pagination<br />
Font<br />
Default font<br />
8<br />
9<br />
10<br />
Select On using the or key.<br />
Press the ENTER key.<br />
Press the <strong>MENU</strong> key. The message display returns to Ready.<br />
You can select the default font for the current interface. In addition to the<br />
internal fonts, all fonts that are downloaded to the printer memory, or fonts<br />
stored on a CompactFlash card, Microdrive, or option ROM, can be selected<br />
as the default font.<br />
In this menu, you can also set the type and pitch for Courier and Letter<br />
Gothic.<br />
1<br />
2<br />
3<br />
4<br />
5<br />
>Print KPDL Errs<br />
? On<br />
Press the <strong>MENU</strong> key.<br />
Press the or key repeatedly until Font > appears.<br />
Font ><br />
Press the > key.<br />
Press the or key repeatedly until >Font Select > appears.<br />
>Font Select ><br />
Internal<br />
To select an internal font, check that Internal is displayed. If<br />
Internal is not displayed, press the ENTER key. Press the or<br />
key repeatedly until the message display indicates Internal and<br />
press the ENTER key.<br />
To select an option font, press the ENTER key. Press the or key<br />
repeatedly until the message display indicates Option and press the<br />
ENTER key. This operation is possible only when option fonts are<br />
installed in the printer.<br />
1-44
6<br />
7<br />
8<br />
9<br />
10<br />
1-45<br />
Pagination<br />
Press the > key. The message display changes to that show below.<br />
>> I000<br />
The letter before the number indicates the type of font as shown<br />
below:<br />
Letter Description<br />
I Internal font<br />
S Soft (down load) font<br />
M Fonts in an option CompactFlash card<br />
H Fonts in a RAM disk or option Microdrive.<br />
O Fonts in an option ROM<br />
Table 1-6<br />
Press the ENTER key. A blinking question mark (?) appears.<br />
>>?I000<br />
Press the or key repeatedly until the desired font number<br />
appears. For font numbers of the internal fonts, see List of Fonts on<br />
page 5-2.<br />
When the desired font is displayed, press the ENTER key.<br />
Press the <strong>MENU</strong> key. The message display returns to Ready.
Pagination<br />
Default Font Size<br />
The following procedure determines the size of the default font. If the<br />
default font is a fixed font such as Courier or Letter Gothic, the character<br />
pitch can be changed instead of the font size.<br />
1<br />
2<br />
3<br />
4<br />
5<br />
6<br />
7<br />
8<br />
9<br />
10<br />
Press the <strong>MENU</strong> key.<br />
Press the or key repeatedly until Font > appears.<br />
Font ><br />
Press the > key.<br />
Press the or key repeatedly until >Font Select > appears.<br />
>Font Select ><br />
Internal<br />
Check that Internal is displayed and press the > key.<br />
Press the or key repeatedly until >>Size appears.<br />
>>Size<br />
012.00 point(s)<br />
Press the ENTER key. A blinking cursor ( _ ) appears.<br />
>>Size<br />
012.00 point(s)<br />
Press the or key to increase or decrease the value of the figure<br />
where the cursor is blinking. The font size can be set between 4 and<br />
999.75 points, in 0.25-point increments. You can use the > or < key to<br />
move the cursor right and left.<br />
When the desired size is displayed, press the ENTER key.<br />
Press the <strong>MENU</strong> key. The message display returns to Ready.<br />
1-46
1-47<br />
Pagination<br />
Changing Type for Courier/Letter Gothic<br />
Courier or Letter Gothic font type can be selected as Regular or Dark. For<br />
example, to change the type of Courier, proceed as follows:<br />
1<br />
2<br />
3<br />
4<br />
5<br />
6<br />
7<br />
8<br />
9<br />
10<br />
Press the <strong>MENU</strong> key.<br />
Press the or key repeatedly until Font > appears.<br />
Font ><br />
Press the > key.<br />
Press the or key repeatedly until >Font Select > appears.<br />
>Font Select ><br />
Internal<br />
Check that Internal is displayed and press the > key.<br />
Press the or key repeatedly until >>Courier appears.<br />
>>Courier<br />
Regular<br />
Press the ENTER key. A blinking question mark (?) appears.<br />
>>Courier<br />
? Regular<br />
Select Regular or Dark using the or key.<br />
Press the ENTER key.<br />
Press the <strong>MENU</strong> key and the message display returns to Ready.
Pagination<br />
Setting the Character Pitch for Courier/Letter Gothic<br />
The character pitch for fixed fonts is adjustable when the default font is<br />
Courier or Letter Gothic.<br />
1<br />
2<br />
3<br />
4<br />
5<br />
6<br />
7<br />
8<br />
9<br />
10<br />
Press the <strong>MENU</strong> key.<br />
Press the or key repeatedly until Font > appears.<br />
Font ><br />
Press the > key.<br />
Press the or key repeatedly until >Font Select > appears.<br />
>Font Select ><br />
Internal<br />
Check that Internal is displayed and press the > key.<br />
Press the or key repeatedly until >>Pitch appears.<br />
>>Pitch<br />
10.00 cpi<br />
Press the ENTER key. A blinking cursor ( _ ) appears.<br />
>>Pitch<br />
10.00 cpi<br />
Press the or key to increase or decrease the value of the figure<br />
where the cursor is blinking. The character pitch can be set between<br />
0.44 and 99.99 characters per inch, in 0.01 character-per-inch<br />
increments. You can use the > or < keys to move the cursor right and<br />
left.<br />
When the desired size is displayed, press the ENTER key.<br />
Press the <strong>MENU</strong> key. The message display returns to Ready.<br />
1-48
Code Set<br />
1-49<br />
Pagination<br />
You can change the character code set. Available character code sets vary<br />
depending on the current font. (The default is IBM PC-8.)<br />
1<br />
2<br />
3<br />
4<br />
5<br />
6<br />
7<br />
Press the <strong>MENU</strong> key.<br />
Press the or key repeatedly until Font > appears.<br />
Font ><br />
Press the > key. Press the or key until > Code Set appears.<br />
>Code Set<br />
IBM PC-8<br />
Press the ENTER key. A blinking question mark (?) appears.<br />
>Code Set<br />
?IBM PC-8<br />
Press the or key until the desired character code set appears.<br />
Press the ENTER key.<br />
Press the <strong>MENU</strong> key. The message display returns to Ready.
Pagination<br />
Number of Copies<br />
You can set the number of copies to be printed of each page for the current<br />
interface. The number of copies can be set between 1 and 999.<br />
1<br />
2<br />
3<br />
4<br />
5<br />
6<br />
7<br />
8<br />
Press the <strong>MENU</strong> key.<br />
Press the or key repeatedly until Page set > appears.<br />
Page Set ><br />
Press the > key.<br />
Press the or key repeatedly until >Copies appears.<br />
>Copies<br />
Press the ENTER key. A blinking cursor ( _ ) appears.<br />
>Copies<br />
Press the or key to increase or decrease the value of the figure<br />
where the cursor is blinking. It can be set between 1 and 999. You<br />
can use the > and < keys to move the right and left.<br />
When the desired size is displayed, press the ENTER key.<br />
Press the <strong>MENU</strong> key. The message display returns to Ready.<br />
1-50<br />
001<br />
001
Printing Orientation<br />
The default orientation of the page can be selected from the portrait<br />
(upright) and landscape (sideways) page orientation.<br />
1<br />
2<br />
3<br />
4<br />
5<br />
6<br />
7<br />
8<br />
Portrait orientation Landscape orientation<br />
Press the <strong>MENU</strong> key.<br />
Press the or key repeatedly until Page Set > appears.<br />
Press the > key.<br />
A A<br />
Page Set ><br />
Press the or key repeatedly until >Orientation appears.<br />
>Orientation<br />
Portrait<br />
Press the ENTER key. A blinking question mark (?) appears.<br />
>Orientation<br />
? Portrait<br />
Select Portrait or Landscape using the or key.<br />
Press the ENTER key.<br />
Press the <strong>MENU</strong> key. The message display returns to Ready.<br />
1-51<br />
Pagination
Pagination<br />
KIR (KM Image Refinement)<br />
Status Page<br />
KIR Checking<br />
Lines<br />
Note<br />
Hardware Information<br />
Page Information<br />
Memory<br />
Installed Options<br />
Network Status Emulation<br />
Interfaces<br />
Toner Gauge<br />
KIR Test pattern ON<br />
0<br />
This printer incorporates the KIR (KM Image Refinement) smoothing<br />
function. This function provides high print quality by providing software<br />
enhancement of print resolution.<br />
Q<br />
Set the print density to 3 when setting the KIR mode. For details on print<br />
density, see page 1-95.<br />
Look at the check line, the last line on a status page, to make the optimum<br />
KIR mode setting.<br />
FS-3830N Page Printer<br />
S<strong>TA</strong>TUS PAGE<br />
Firmware Version: Released:<br />
Error Log<br />
100<br />
1-52<br />
With KIR Off With KIR On (default)<br />
Optimized stripes<br />
The current KIR setting is optimal.<br />
Dark vertical stripes<br />
Set the KIR mode to Off. Try printing the status<br />
page again. If you still get dark vertical stripes,<br />
adjust the print density control to a lighter setting.<br />
White vertical stripes<br />
Set the KIR mode to On. Try printing the status<br />
page again. If you still get white vertical stripes,<br />
adjust the print density control to a darker setting.
1<br />
2<br />
3<br />
4<br />
5<br />
6<br />
7<br />
8<br />
Press the <strong>MENU</strong> key.<br />
1-53<br />
Pagination<br />
Press the or key repeatedly until Print Quality > appears.<br />
Print Quality ><br />
Press the > key.<br />
Press the or key repeatedly until >KIR Mode appears.<br />
>KIR Mode<br />
On<br />
Press the ENTER key. A blinking question mark (?) appears.<br />
>KIR Mode<br />
? On<br />
Select On or Off using the or key.<br />
Press the ENTER key.<br />
Press the <strong>MENU</strong> key. The message display returns to Ready.
Pagination<br />
Ecoprint<br />
The Ecoprint enables you to reduce the amount of toner consumed on the<br />
page so as to save your printing costs. You can set to Ecoprint mode on, as<br />
follows. (The factory default setting is Off.)<br />
The Ecoprint setting has no effect on the print speed.<br />
The Ecoprint mode setting is On when the printing image becomes lighter,<br />
yet very readable.<br />
1<br />
2<br />
3<br />
4<br />
5<br />
6<br />
7<br />
8<br />
Press the <strong>MENU</strong> key.<br />
Press the or key repeatedly until Print Quality > appears.<br />
Press the > key.<br />
Ecoprint setting is Off<br />
(default).<br />
Print Quality ><br />
Press the or key repeatedly until >EcoPrint Mode appears.<br />
>EcoPrint Mode<br />
Off<br />
Press the ENTER key. A blinking question mark (?) appears.<br />
>EcoPrint Mode<br />
? Off<br />
Select On or Off using the or key.<br />
Press the ENTER key.<br />
Press the <strong>MENU</strong> key. The message display returns to Ready.<br />
1-54<br />
Ecoprint setting is On
Resolution<br />
1-55<br />
Pagination<br />
Proceed as follows to set the default print resolution from four ways — 300<br />
dpi, 600 dpi, Fast 1200 mode, and Fine 1200 mode. The clarity of<br />
printed characters and graphics becomes sharper in this order.<br />
1<br />
2<br />
3<br />
4<br />
5<br />
6<br />
7<br />
8<br />
Press the <strong>MENU</strong> key.<br />
Press the or key repeatedly until Print Quality > appears.<br />
Print Quality ><br />
Press the > key.<br />
Press the or key repeatedly until >Resolution appears.<br />
>Resolution<br />
Fast 1200 mode<br />
Press the ENTER key. A blinking question mark (?) appears.<br />
>Resolution<br />
? Fast 1200 mode<br />
Select Fast 1200 mode, Fine 1200 mode, 300 dpi or 600 dpi<br />
using the or key.<br />
Press the ENTER key.<br />
Press the <strong>MENU</strong> key. The message display returns to Ready.
e-MPS<br />
e-MPS<br />
Note<br />
e-MPS is an abbreviation for ‘enhanced-Multiple Printing System’ which<br />
implements the following functions that are available from the printer<br />
driver:<br />
• Job Retention<br />
• Job Storage<br />
In either job mode, when printing a document, the print data is transferred<br />
from the computer to the printer then stored on the printer’s hard disk.<br />
Since copies of the document are printed using the stored data, printing is<br />
performed faster with less computer spooling time and less network traffic.<br />
• To use the e-MPS system, an option hard disk must be installed in the<br />
printer. For details, see Appendix A Options.<br />
• The RAM disk may also be used in the Proof-and-Hold and Private<br />
Print modes. See Activating the RAM Disk on page 1-81 for details on<br />
RAM disk setup.<br />
Job Retention<br />
Job Retention has four modes as summarized below. These modes are<br />
selected when you choose on the printer driver through the application<br />
software:<br />
Mode Quick Copy Proof and Hold Private Print Stored Job<br />
Primary function To later print<br />
additional copies<br />
To proof the first copy<br />
before printing<br />
multiple copies<br />
1-56<br />
To hold the document<br />
in printer to prevent<br />
unauthorized access<br />
To electronically<br />
store documents such<br />
as fax cover pages<br />
Start storing by Printer driver Printer driver Printer driver Printer driver<br />
On terminating print<br />
setting from<br />
application software<br />
Prints<br />
simultaneously<br />
Prints one copy<br />
simultaneously<br />
Does not print Does not print<br />
Retrieved by Operator panel Operator panel Operator panel Operator panel<br />
Default number of<br />
copies printed at<br />
retrieval<br />
Maximum number of<br />
jobs stored †<br />
Same as storing<br />
(can be changed)<br />
One less<br />
(can be changed)<br />
Same as storing<br />
(can be changed)<br />
32, expandable to 50 32, expandable to 50 Depends on the hard<br />
disk capacity<br />
(Private jobs are<br />
deleted automatically<br />
once it is retrieved.)<br />
One<br />
(can be changed)<br />
Depends on the hard<br />
disk capacity<br />
PIN security No No Yes Yes (if necessary)<br />
Data after printing Stored Stored Deleted Stored<br />
Data at power off Deleted Deleted Deleted Stored<br />
Hard disk required Yes No No Yes<br />
Table 1-7<br />
† Jobs in excess will cause the earlier ones to be deleted.
Quick Copy<br />
Note<br />
1-57<br />
e-MPS<br />
Job Storage<br />
Job storage stores print jobs either temporarily or permanently, or in<br />
virtual mailboxes, as you click an appropriate radio button on the printer<br />
driver when printing from a computer.<br />
Virtual Mailbox<br />
Virtual mailbox is part of Job Storage, which stores print jobs on the<br />
Virtual mailbox is part of Job Storage, which stores print jobs on the hard<br />
disk without printing. It enables you to retrieve jobs later from the<br />
operator panel or the KM-NET Printer Disk Manager utility in the CD-<br />
ROM.<br />
Each mailbox may be used by an individual who desires to share the<br />
printer in this mode. By default, each mailbox is numbered from ‘Tray 001,’<br />
‘Tray 002,’ ... etc. To ‘post’ a job in one of these mailboxes, you assign a<br />
numbered or named mailbox on the printer driver when printing.<br />
To retrieve the stored job for printing, see Retrieving Jobs from Virtual<br />
Mailbox (VMB) on page 1-68.<br />
The virtual mailbox can be used in PCL 6 emulation only.<br />
This mode enables you to print the requested number of copies of a job,<br />
simultaneously storing the job on the Microdrive. When additional copies<br />
are required, you can reprint the required number of copies from the<br />
printer operator panel. To print a job as a quick copy job, see KX Printer<br />
Drivers Operation Guide.<br />
The default number of print jobs that can be stored on the Microdrive is 32.<br />
This value can be increased to up to 50 from the e-MPS Configuration<br />
menu. For details, see e-MPS Configuration on page 1-70. When the<br />
number of jobs reaches the limit, the oldest job will be overwritten by the<br />
new one.<br />
When the printer is turned off, all stored jobs will be deleted.<br />
Printing Additional Copies using Quick Copy<br />
To print additional copies of a job stored in the printer:<br />
1<br />
2<br />
Press the <strong>MENU</strong> key.<br />
Press the or key repeatedly until e-MPS > appears.<br />
e-MPS >
e-MPS<br />
3<br />
4<br />
5<br />
6<br />
7<br />
8<br />
9<br />
10<br />
Press the > key.<br />
Press the or key repeatedly until >Quick Copy appears<br />
followed by the user name (Harold, in this example). The user name<br />
is assigned at printing using the printer driver.<br />
>Quick Copy<br />
Harold<br />
Press the ENTER key. A blinking question mark (?) appears before<br />
the user name.<br />
>Quick Copy<br />
?Harold<br />
Press the or key to display the desired user name, Arlen, in this<br />
example.<br />
>Quick Copy<br />
?Arlen<br />
Press the ENTER key. The job name entered in the printer driver<br />
(Report, in this example) appear with a blinking question mark (?)<br />
before the letters.<br />
>Arlen<br />
?Report<br />
Press the or key to scroll to the desired job title.<br />
Press the ENTER key. The number of copies to be printed can be set.<br />
To increase the copy count, press the key; to decrease the copy<br />
count, press the key.<br />
>Report<br />
Copies 001<br />
Press the ENTER key to finalize the copy count. The printer prints<br />
the specified number of copies for the job.<br />
1-58
Proof and Hold<br />
1-59<br />
e-MPS<br />
Deleting a Quick Copy Job<br />
All quick copy jobs are automatically deleted when the printer is turned off.<br />
If you desire to explicitly delete a stored quick copy job, proceed as follows:<br />
1<br />
2<br />
3<br />
4<br />
Follow steps 1 through 8 in the above section to let the title of the job<br />
displayed.<br />
When the title of the job is displayed, e.g. Report, below, press the<br />
ENTER key. The cursor below the copy count starts to blink.<br />
Press the key repeatedly until Delete appears below the title.<br />
Press the ENTER key. The stored quick copy job is deleted.<br />
When you print multiple copies, this mode first prints one copy so that you<br />
can proof it before continuing to print the remaining copies. Since you can<br />
proof the printouts before printing the remaining copies, wastage of paper<br />
can be reduced.<br />
The printer prints one copy and, at the same time, saves the print job on<br />
the Microdrive. You can also change the number of copies when resuming<br />
printing from the operator panel.<br />
When the printer is turned off, all stored jobs will be deleted.<br />
Printing Remaining Copies of a Proof and Hold Job<br />
Printing a Proof and Hold job on the operator panel is similar to printing a<br />
quick copy job. To print remaining copies of a job held in the printer:<br />
1<br />
2<br />
3<br />
>Report<br />
Copies 001<br />
>Report<br />
Delete _<br />
Press the <strong>MENU</strong> key.<br />
Press the or key repeatedly until e-MPS > appears.<br />
e-MPS ><br />
Press the > key.
e-MPS<br />
4<br />
5<br />
6<br />
7<br />
8<br />
9<br />
10<br />
Press the or key repeatedly until >Quick Copy appears<br />
followed by the user name (Harold, in this example). The user name<br />
is assigned at printing using the printer driver.<br />
>Quick Copy<br />
Harold<br />
Press the ENTER key. A blinking question mark (?) appears before<br />
the user name.<br />
>Quick Copy<br />
?Harold<br />
Press the or key to display the desired user name, Arlen, in this<br />
example.<br />
>Quick Copy<br />
?Arlen<br />
Press the ENTER key. The job name entered in the printer driver<br />
(Report, in this example) appear with a blinking question mark (?)<br />
before the letters.<br />
>Arlen<br />
?Report<br />
Press the or key to scroll to the desired job title.<br />
Press the ENTER key. The number of copies to be printed can be set.<br />
To increase the copy count, press the key; to decrease the copy<br />
count, press the key.<br />
>Report<br />
Copies 001<br />
Press the ENTER key to finalize the copy count. The printer prints<br />
the specified number of copies for the job.<br />
1-60
Printing a Private Job<br />
1-61<br />
e-MPS<br />
In private printing, you can specify that a job is not printed until you<br />
release the job from the operator panel. At sending the job from the<br />
application software, you should specify a 4-digit access code in the printer<br />
driver. The job is released for printing by entering the access code on the<br />
operator panel. Thus, this function ensures confidentiality of the print job.<br />
When the printer is turned off, all the print jobs will be deleted.<br />
Releasing a Private Job<br />
To print a private job through the operator panel:<br />
1<br />
2<br />
3<br />
4<br />
5<br />
6<br />
7<br />
Press the <strong>MENU</strong> key.<br />
Press the or key repeatedly until e-MPS > appears.<br />
e-MPS ><br />
Press the > key.<br />
Press the or key repeatedly until >Private/Stored appears.<br />
The name entered in the printer driver (Harold, in this example)<br />
also appears.<br />
>Private/Stored<br />
Harold<br />
Press the ENTER key. A blinking question mark (?) before a user<br />
name appears.<br />
>Private/Stored<br />
?Harold<br />
Press the or key to display the desired user name (Arlen, in this<br />
example).<br />
>Private/Stored<br />
?Arlen<br />
Press the ENTER key. The user name and the job name (Agenda, in<br />
this example) entered in the printer driver appear with a blinking<br />
question mark (?).<br />
>Arlen<br />
?Agenda
e-MPS<br />
8<br />
9<br />
10<br />
11<br />
Press the or key to display the desired job title.<br />
Press the ENTER key. The ID input line appears. Enter the four-digit<br />
access code entered in the printer driver and press the ENTER key.<br />
To enter the ID, press the < or > key to move the cursor to the<br />
number to be changed and then enter the correct number by pressing<br />
the or key.<br />
You can set the number of copies to be printed. To increase the copy<br />
count, press the key; to decrease the copy count, press the key.<br />
Press the ENTER key to finalize the copy count. The printer prints<br />
the specified number of copies for the job.<br />
Deleting a Private Job<br />
To delete a stored private job, proceed as follows:<br />
1<br />
2<br />
3<br />
4<br />
>Agenda<br />
ID 0000<br />
>Agenda<br />
Copies 001<br />
Follow steps 1 through 8 in the above section.<br />
When the title of the job to be printed is displayed (Agenda, in this<br />
example), press the ENTER key. Enter the four-digit access code<br />
entered in the printer driver and press the ENTER key.<br />
>Agenda<br />
Copies 001<br />
Press the key repeatedly until Delete appears for the number of<br />
copies.<br />
>Agenda<br />
Delete _<br />
Press the ENTER key. The private job is deleted from the Microdrive.<br />
1-62
Printing a Stored Job<br />
1-63<br />
e-MPS<br />
The procedure below allows you to store print jobs to the Microdrive that<br />
are frequently needed such as fax cover pages, check lists, and order forms,<br />
for printing at any later time using the operator panel.<br />
The print jobs will not be deleted when the printer is turned off.<br />
Releasing a Stored Job<br />
To print a stored job through the operator panel:<br />
1<br />
2<br />
3<br />
4<br />
5<br />
6<br />
7<br />
Press the <strong>MENU</strong> key.<br />
Press the or key repeatedly until e-MPS > appears.<br />
e-MPS ><br />
Press the > key.<br />
Press the or key repeatedly until >Private/Stored appears.<br />
The name entered in the printer driver (Harold, in this example)<br />
also appears.<br />
>Private/Stored<br />
Harold<br />
Press the ENTER key. A blinking question mark (?) before a user<br />
name appears.<br />
>Private/Stored<br />
?Harold<br />
Press the or key to display the desired user name (Arlen, in this<br />
example).<br />
>Private/Stored<br />
?Arlen<br />
Press the ENTER key. The user name and the job name (Agenda, in<br />
this example) entered in the printer driver appear with a blinking<br />
question mark (?).<br />
>Arlen<br />
?Agenda
e-MPS<br />
8<br />
9<br />
10<br />
11<br />
Press the or key to display the desired job title.<br />
Press the ENTER key. If you entered an access code for the printer<br />
driver, the ID input line appears. Enter the four-digit access code<br />
entered in the printer driver and press the ENTER key. To enter the<br />
ID, press the < or > key to move the cursor to the number to be<br />
changed and then enter the correct number by pressing the or<br />
key.<br />
You can specify the number of copies to print. To increase the copy<br />
count, press the key; to decrease the key.<br />
Press the ENTER key to finalize the copy count. The printer prints<br />
the specified number of copies for the job.<br />
Deleting a Stored Job<br />
To delete a stored job, proceed as follows:<br />
1<br />
2<br />
3<br />
4<br />
>Agenda<br />
ID 0000<br />
>Agenda<br />
Copies 001<br />
Follow steps 1 through 8 in the above section.<br />
When the title of the job to be printed is displayed (Agenda, in this<br />
example), press the ENTER key. If you entered an access code for the<br />
printer driver, enter the four-digit access code and press the ENTER<br />
key.<br />
>Agenda<br />
Copies 001<br />
Press the key repeatedly until Delete appears for the number of<br />
copies.<br />
>Agenda<br />
Delete _<br />
Press the ENTER key. The stored job is deleted from the Microdrive.<br />
1-64
Printing a Code Job<br />
1-65<br />
e-MPS<br />
KM-NET Job Manager<br />
Install the KM-NET for Clients software from the CD-ROM supplied with<br />
the printer. To do this, from the CD-ROM Main Menu, select Printer<br />
Utilities > KM-NET for Clients.<br />
1 Browse through Windows Start > Programs > KM > KM-<br />
NET for Client<br />
3<br />
Click the Add Printer icon (below). Select the Local or Network port.<br />
2<br />
Add Printer Icon<br />
Follow the wizard until the Discovered Printing System(s) dialog<br />
box is reached. When the printer is found in the list, click (highlight)<br />
it, then Finish.
e-MPS<br />
4<br />
Select the printer and then click on the Job Manager icon. The jobs<br />
that are stored in that printer will be displayed. To print the job,<br />
right click Job name and then click Print on the drop down list that<br />
appears.<br />
Job Manager Icon<br />
For more detailed information, refer to KM-NET for Clients Operation<br />
Guide that is included on the CD-ROM which comes with the printer.<br />
1-66
Printing a List of Code Jobs<br />
1-67<br />
e-MPS<br />
If you select Permanent Job Storage on the printer driver, you can have a<br />
List of Code Job printed using the operator panel.<br />
1<br />
2<br />
3<br />
4<br />
5<br />
6<br />
Press the <strong>MENU</strong> key.<br />
Press the or key repeatedly until e-MPS > appears.<br />
e-MPS ><br />
Press the > key.<br />
Press the or key repeatedly until >List of Code JOB appears.<br />
>List of<br />
Code JOB<br />
Press the ENTER key. A question mark (?) appears.<br />
>List of<br />
Code JOB ?<br />
Press the ENTER key again. The printer prints a Code Job list.
e-MPS<br />
Retrieving Jobs from Virtual Mailbox (VMB)<br />
Option<br />
To use this mode, an option Microdrive must be installed in the printer.<br />
To retrieve the jobs posted in the virtual mailbox, proceed as follows.<br />
1<br />
2<br />
3<br />
4<br />
5<br />
6<br />
Press the <strong>MENU</strong> key.<br />
Press the or key repeatedly until e-MPS > appears.<br />
e-MPS ><br />
Press the > key.<br />
Press the or key repeatedly until >Print VMB Data appears.<br />
The virtual mailbox number will also appear.<br />
>Print VMB Data<br />
Tray001:<br />
Press the ENTER key. A blinking question mark (?) appears.<br />
>Print VMB Data<br />
Tray001?<br />
Press the ENTER key. The document in the mailbox is printed and<br />
automatically deleted from the mailbox.<br />
1-68
Printing a List of VMB<br />
1-69<br />
e-MPS<br />
A Virtual Mailbox list includes the jobs currently stored in the mailboxes.<br />
1<br />
2<br />
3<br />
4<br />
5<br />
6<br />
Press the <strong>MENU</strong> key.<br />
Press the or key repeatedly until e-MPS > appears.<br />
e-MPS ><br />
Press the > key.<br />
Press the or key repeatedly until >List of VMB appears.<br />
>List of VMB<br />
Press the ENTER key. A question mark (?) appears.<br />
>List of VMB ?<br />
Press the ENTER key again. The printer prints a list of jobs currently<br />
posted in the virtual mailboxes.
e-MPS<br />
e-MPS Configuration<br />
Option<br />
Note<br />
You can change the following parameters for e-MPS operation:<br />
• Maximum number of Quick Copy/Proof and Hold jobs<br />
• Maximum space assigned to temporary code jobs<br />
• Maximum space assigned to permanent code jobs<br />
• Maximum space assigned to virtual mailboxes<br />
The total amount of storage areas specified must not exceed the total<br />
size of the Microdrive. Otherwise, you may only be able to accommodate<br />
print jobs of a smaller amount of print jobs than specified.<br />
Changing the Maximum Number of Quick Copy/Proof and Hold<br />
Jobs<br />
This changes maximum number of Quick Copy/Proof and Hold jobs from 0<br />
to 50. The default is 32.<br />
1<br />
2<br />
3<br />
4<br />
5<br />
6<br />
7<br />
Press the <strong>MENU</strong> key.<br />
Press the or key repeatedly until e-MPS > appears.<br />
e-MPS ><br />
Press the > key.<br />
Press the or key repeatedly until >e-MPS Configuration ><br />
appears.<br />
>e-MPS ><br />
Configuration<br />
Press the > key.<br />
Press the or key repeatedly until >>Quick Copy appears.<br />
>>Quick Copy<br />
Press the ENTER key. A blinking cursor ( ) appears.<br />
>>Quick Copy<br />
1-70<br />
32<br />
32
8<br />
9<br />
10<br />
1-71<br />
e-MPS<br />
Press the or key to increase or decrease the value at the blinking<br />
cursor. The value can be set between 0 and 50. Use the > and < keys<br />
to move the cursor right and left.<br />
When the desired maximum number of jobs is set, press the ENTER<br />
key.<br />
Press the <strong>MENU</strong> key. The message display returns to Ready.<br />
Maximum Space Assigned to Temporary Code Jobs<br />
This changes the Microdrive space that holds temporary code jobs. You can<br />
change the maximum space from 0 to 9999 (megabytes). The actual<br />
maximum size depends on the size of free hard disk space, however. The<br />
default size is 50 MB.<br />
1<br />
2<br />
3<br />
4<br />
5<br />
6<br />
7<br />
Press the <strong>MENU</strong> key.<br />
Press the or key repeatedly until e-MPS > appears.<br />
e-MPS ><br />
Press the > key.<br />
Press the or key repeatedly until >e-MPS Configuration ><br />
appears.<br />
>e-MPS ><br />
Configuration<br />
Press the > key.<br />
Press the or key repeatedly until >>Temp. Code JOB Size<br />
appears.<br />
>>Temp. Code JOB<br />
Size 050MB<br />
To change the maximum disk space, press the ENTER key. A<br />
blinking cursor ( ) appears.<br />
>>Temp. Code JOB<br />
Size 050MB
e-MPS<br />
8<br />
9<br />
10<br />
Press the or key to increase or decrease, respectively, the value<br />
at the blinking cursor. Use the > and < keys to move the cursor right<br />
and left.<br />
When the desired size is displayed, press the ENTER key.<br />
Press the <strong>MENU</strong> key. The message display returns to Ready.<br />
Maximum Space Assigned to Permanent Code Jobs<br />
This changes the Microdrive space that holds permanent code jobs. You can<br />
change the maximum space from 0 to 9999 (megabytes). The actual<br />
maximum size depends on the size of free Microdrive space, however. The<br />
default size is 50 MB.<br />
1<br />
2<br />
3<br />
4<br />
5<br />
6<br />
7<br />
8<br />
Press the <strong>MENU</strong> key.<br />
Press the or key repeatedly until e-MPS > appears.<br />
e-MPS ><br />
Press the > key.<br />
Press the or key repeatedly until >e-MPS Configuration ><br />
appears.<br />
>e-MPS ><br />
Configuration<br />
Press the > key.<br />
Press the or key repeatedly until >>Perm. Code JOB Size<br />
appears.<br />
>>Perm. Code JOB<br />
Size 050MB<br />
Press the ENTER key. A blinking cursor ( ) appears.<br />
>>Perm. Code JOB<br />
Size 050MB<br />
Press the or key to increase or decrease, respectively, the value<br />
at the blinking cursor. Use the > and < keys to move the cursor right<br />
and left.<br />
1-72
9<br />
10<br />
When the desired size is displayed, press the ENTER key.<br />
Press the <strong>MENU</strong> key. The message display returns to Ready.<br />
1-73<br />
e-MPS<br />
Maximum Space Assigned to Virtual Mailboxes<br />
This changes the Microdrive space for virtual mailboxes. You can change<br />
the maximum space from 0 to 9999 (megabytes). The actual maximum size<br />
depends on the size of free Microdrive space, however. The default size is<br />
50 MB.<br />
1<br />
2<br />
3<br />
4<br />
5<br />
6<br />
7<br />
8<br />
9<br />
10<br />
Press the <strong>MENU</strong> key.<br />
Press the or key repeatedly until e-MPS > appears.<br />
e-MPS ><br />
Press the > key.<br />
Press the or key repeatedly until >e-MPS Configuration ><br />
appears.<br />
>e-MPS ><br />
Configuration<br />
Press the > key.<br />
Press the or key repeatedly until >>VMB Size appears.<br />
>>VMB Size<br />
050MB<br />
Press the ENTER key. A blinking cursor ( ) appears.<br />
>>VMB Size<br />
050MB<br />
Press the or key to increase or decrease, respectively, the value<br />
at the blinking cursor. Use the > and < keys to move the cursor right<br />
and left.<br />
When the desired size is displayed, press the ENTER key.<br />
Press the <strong>MENU</strong> key. The message display returns to Ready.
Interface<br />
Interface<br />
Note<br />
Parallel Interface Mode<br />
This printer is equipped with a parallel interface, a USB interface and a<br />
network interface. An optional serial interface and a second network<br />
interface can be installed as well. Various printing environment<br />
parameters such as the default emulation can be changed indepently on<br />
different interfaces by using the printer’s menu selection system. Before<br />
select the interface to apply the changes in the procedure described below.<br />
This interface selection described below does not select which interface<br />
data will be received from. The printer automatically selects an interface<br />
data is received.<br />
The parallel interface mode of this printer supports a bi-directional/highspeed<br />
mode. Normally, this interface is used under the default setting<br />
AUTO. For details, see Appendix B. After setting the interface, be sure to<br />
reset the printer or turn the power off at least once. The new setting will be<br />
enabled thereafter.<br />
1<br />
2<br />
3<br />
4<br />
5<br />
Press the <strong>MENU</strong> key.<br />
Press the or key repeatedly until Interface > appears. One of<br />
the interface names shown below appears, indicating the current<br />
interface.<br />
Parallel (default)<br />
USB<br />
Network<br />
Serial (when a serial interface board kit is installed)<br />
Option (when a network interface card is installed)<br />
Press the ENTER key. A blinking question mark (?) appears.<br />
Interface<br />
? Parallel<br />
If Parallel is not displayed, press the or key repeatedly until it<br />
is Parallel.<br />
If you want to abandon the interface selection procedure, press the<br />
CANCEL key. The interface remains unchanged.<br />
Press the ENTER key again.<br />
Press the > key. The message display changes to the communication<br />
mode menu.<br />
1-74
USB Interface Mode<br />
6<br />
7<br />
8<br />
Press the ENTER key. A blinking question mark (?) appears.<br />
Press the or key to display the desired mode. The display<br />
changes as shown below. Press the ENTER key.<br />
Auto (default)<br />
Normal<br />
High Speed<br />
Nibble (high)<br />
Press the <strong>MENU</strong> key. The message display returns to Ready.<br />
About USB interface, for details, see Appendix C.<br />
1<br />
2<br />
3<br />
4<br />
5<br />
6<br />
>Parallel I/F<br />
? Auto<br />
Press the <strong>MENU</strong> key.<br />
Press the or key until Interface > appears. One of the<br />
interface names shown below appears, indicating the current<br />
interface.<br />
Parallel (default)<br />
USB<br />
Network<br />
Serial (when a serial interface board kit is installed)<br />
Option (when a network interface card is installed)<br />
Press the ENTER key. A blinking question mark (?) appears.<br />
Interface<br />
? Parallel<br />
Press the or key until USB appears.<br />
Interface<br />
? USB<br />
Press the ENTER key.<br />
Press the <strong>MENU</strong> key. The message display returns to Ready.<br />
1-75<br />
Interface
Interface<br />
Serial Interface Parameters<br />
Option<br />
This section applies to the printers having the option serial interface<br />
board kit installed.<br />
The baud rate, data bits, stop bits, parity, and protocol for the serial<br />
interface can be set as follows:<br />
1<br />
2<br />
3<br />
4<br />
5<br />
Press the <strong>MENU</strong> key.<br />
Press the or key repeatedly until Interface > appears. One of<br />
the interface names shown below appears, indicating the current<br />
interface.<br />
Parallel (default)<br />
USB<br />
Network<br />
Serial (when a serial interface board kit is installed)<br />
Option (when a network interface card is installed)<br />
Press the ENTER key. A blinking question mark (?) appears.<br />
Interface<br />
? Parallel<br />
If you want to abandon the interface selection procedure, press the<br />
CANCEL key. The interface remains unchanged.<br />
Press the or key repeatedly until Serial appears.<br />
Interface<br />
? Serial<br />
Press the ENTER key again.<br />
1-76
Note<br />
6<br />
7<br />
8<br />
1-77<br />
Interface<br />
Press the > key. Each time the or key is pressed, the setting item<br />
and current setting change as shown below.<br />
Display the setting item to be changed and press the ENTER key. A<br />
question mark (?) appears.<br />
The following example explains how to change the baud rate. The<br />
settings for other items can be changed in a similar manner.<br />
Press the or key to display the desired setting. The setting<br />
changes as shown below.<br />
The baud rate can be selected from 1200, 2400, 4800, 9600 (default),<br />
19200, 38400, 57600, and 115200.<br />
Some computers may not be compatible with a baud rate of 115200 bps.<br />
If you set the baud rate to 115200 and communication problems occur,<br />
lower the baud rate.<br />
9<br />
10<br />
>Baud Rate<br />
9600<br />
>Data Bits<br />
8<br />
>Stop Bits<br />
1<br />
>Parity<br />
None<br />
>Protocol<br />
DTR(pos.)&XON<br />
>Baud Rate<br />
? 9600<br />
Definable baud rates: 1200, 2400, 4800,<br />
9600 (default), 19200, 38400, 57600,<br />
115200<br />
Definable data bits: 7, 8 (default)<br />
Definable stop bits: 1 (default), 2<br />
Definable parity: None (default), Odd, Even,<br />
Ignore<br />
Definable protocol: DTR(pos.)&XON<br />
(default), DTR(positive), DTR<br />
(negative), XON/XOFF, ETX/ACK<br />
Display the desired baud rate and press the ENTER key.<br />
Press the <strong>MENU</strong> key. The message display returns to Ready.
Interface<br />
Network Interface Parameters<br />
This printer supports TCP/IP, NetWare and EtherTalk protocols. In<br />
addition, you can install the option network interface card in the option<br />
interface slot.<br />
Using the operator panel, you can:<br />
• Activate or deactivate TCP/IP, NetWare, and EtherTalk<br />
• Activate or deactivate DHCP<br />
• Enter IP address, subnet mask address, and default gateway address<br />
To confirm or change network card parameters, proceed as follows:<br />
1<br />
2<br />
3<br />
4<br />
5<br />
Press the <strong>MENU</strong> key.<br />
Press the or key repeatedly until Interface > appears. One of<br />
the interface names shown below appears, indicating the current<br />
interface.<br />
Parallel (default)<br />
USB<br />
Network<br />
Serial (when a serial interface board kit is installed)<br />
Option (when a network interface card is installed)<br />
Press the ENTER key. A blinking question mark (?) appears.<br />
Interface<br />
? Parallel<br />
If the option network interface card is installed in the printer,<br />
Option will be displayed. The setting procedure is basically the<br />
same even in this case.<br />
Press the or key repeatedly until Network appears.<br />
Interface<br />
? Network<br />
Press the ENTER key again.<br />
1-78
6<br />
7<br />
Press the > key. Each time the or key is pressed, the display<br />
changes as shown below.<br />
>NetWare ><br />
On<br />
>TCP/IP ><br />
On<br />
>EtherTalk<br />
Off<br />
>Network Status<br />
Page On<br />
1-79<br />
Interface<br />
Range<br />
Set this item to On when you connect to a<br />
network using NetWare. In submenu (>),<br />
frame mode can be selected from Auto,<br />
Ethernet, 802.2, 802.3, and 802.3 SNAP.<br />
Set this item to On when you connect to a<br />
network using TCP/IP. Submenu (>) has<br />
items including DHCP, IP address, subnet<br />
mask address, and gateway address.<br />
When the item is set to On, the printer prints<br />
out a network status page when it prints the<br />
printer status. See page 1-19.<br />
The following example explains how to activate TCP/IP protocol to<br />
connect the printer in the network. You can select Netware or<br />
EtherTalk in a similar manner.<br />
>TCP/IP ><br />
On<br />
EtherTalk must be activated (On) for<br />
networking with Macintosh computers.<br />
If TCP/IP is currently Off is displayed, select On using the or<br />
key. Press the ENTER key again.<br />
>TCP/IP<br />
? On<br />
>TCP/IP ><br />
On
Interface<br />
8<br />
9<br />
10<br />
11<br />
12<br />
Press the > key. Each time the or key is pressed, the item<br />
changes as shown below.<br />
>>DHCP<br />
Off<br />
>>IP Address<br />
000.000.000.000<br />
>>Subnet Mask<br />
000.000.000.000<br />
>>Gateway<br />
000.000.000.000<br />
Display the item to be set and press the ENTER key.<br />
For DHCP, a question mark (?) appears. For IP Address, Subnet<br />
Mask, and Gateway, the cursor ( ) blinks.<br />
For DHCP, select On or Off using the or key. For IP Address,<br />
Subnet Mask, and Gateway addresses, press the or key to<br />
change the number (000 to 255) where the cursor is blinking. You<br />
can use the > and < key to move the cursor right and left.<br />
To obtain these addresses, consult your network administrator.<br />
Press the ENTER key.<br />
Press the <strong>MENU</strong> key. The message display returns to Ready.<br />
1-80
Operating the Storage Device<br />
Note<br />
Activating the RAM Disk<br />
1-81<br />
Operating the Storage Device<br />
The printer supports three types of storage devices: CompactFlash card,<br />
Microdrive, and RAM disk.<br />
The printer is equipped with a slot for a CompactFlash card and a<br />
Microdrive. By inserting a CompactFlash card or Microdrive into the<br />
printer, the following operations become available. For details about the<br />
handling of the CompactFlash card and Microdrive, see Appendix A.<br />
The following procedure assumes use of a CompactFlash card. The similar<br />
procedure can be applied when using the Microdrive.<br />
You can format the Microdrive using the operator panel when the first<br />
time you installed a new Microdrive. About formatting a new Microdrive.<br />
The RAM disk is a memory space shared within the printer memory that<br />
can temporarily store print jobs for electronic sorting. The stored print job<br />
can then be used to print multiple copies of the job reducing the total<br />
amount of period required to print the whole job. It acts similar to the<br />
option Microdrive except that the data is effective only during the printer<br />
is powered up.<br />
To set up the RAM disk, the option Microdrive must not be installed.<br />
To use the RAM disk, activate and enter the desired size of the RAM disk<br />
in the manner described below. The maximum RAM disk size can be<br />
calculated as follows:<br />
Maximum RAM disk size = Total printer memory - 9 MB<br />
For example, if the total memory installed in your printer is 96 MB, you<br />
can set 87 MB of RAM disk. If you attempt to set the RAM disk size beyond<br />
this restriction, the printer automatically round it down so that the size is<br />
always 9 MB less than the total printer memory. Once the RAM disk size is<br />
set, the printer must be reset.<br />
By default, the RAM disk is not activated (Off). To confirm the RAM disk<br />
size or activate the RAM disk, proceed as follows:<br />
1<br />
2<br />
Press the <strong>MENU</strong> key.<br />
Press the or key repeatedly until RAM Disk Mode > appears.<br />
RAM Disk Mode<br />
Off
Operating the Storage Device<br />
3<br />
4<br />
5<br />
6<br />
7<br />
The default setting is Off. Press the ENTER key. A blinking question<br />
mark (?) appears. Select On using the or key, and then press the<br />
ENTER key.<br />
RAM Disk Mode<br />
? On<br />
Press the > key to display >RAM Disk Size.<br />
>RAM Disk Size<br />
0087 Mbyte<br />
Press the ENTER key again, and change the RAM disk size using the<br />
or key. It is not possible to make a setting that exceeds total<br />
printer memory. The default value for the RAM disk is the total<br />
printer memory minus 9 MB. This parameter may be set anywhere<br />
from 0001 to 1024 depending on the available printer memory.<br />
When the desired RAM disk size is displayed, press the ENTER key.<br />
Press the <strong>MENU</strong> key and restart the printer. The setting will be<br />
activated after restart.<br />
1-82
Reading Data<br />
1-83<br />
Operating the Storage Device<br />
To read data on a CompactFlash card, Microdrive, or the RAM disk use the<br />
following procedure:<br />
1<br />
2<br />
3<br />
4<br />
5<br />
6<br />
7<br />
Press the <strong>MENU</strong> key.<br />
Press the or key repeatedly until Memory Card >, Hard Disk<br />
> or RAM Disk Mode > appears.<br />
Memory Card ><br />
Press the > key.<br />
Press the or key repeatedly until >Read Data appears. The<br />
data name also appears.<br />
>Read Data<br />
data name<br />
Press the ENTER key. A blinking question mark (?) appears before<br />
the data name.<br />
>Read Data<br />
?data name<br />
Press the or key to display the desired data name.<br />
Press the ENTER key. Processing appears and the reading of data<br />
from the storage device starts.
Operating the Storage Device<br />
Writing Data<br />
Note<br />
You can write data to a CompactFlash card, the Microdrive, or the RAM<br />
disk using the operator panel. When writing data to the storage device, a<br />
name is automatically assigned to the data. The CompactFlash card or the<br />
Microdrive or the RAM disk must be formatted. Otherwise, the >Write<br />
Data message explained below will not appear on the display. To format a<br />
CompactFlash card or the Microdrive or the RAM disk, see Formatting a<br />
Storage Device on page 1-88.<br />
You can format the Microdrive or the RAM disk using the operator panel<br />
when the first time you installed a new Microdrive or the RAM disk. About<br />
formatting a new Microdrive.<br />
After writing is complete, you can print a list of data stored in the storage<br />
device for confirmation. See Printing a List of Data Names on page<br />
1-89.<br />
To write data to a CompactFlash card, the Microdrive or the RAM disk,<br />
proceed as follows:<br />
1<br />
2<br />
3<br />
4<br />
5<br />
6<br />
Press the <strong>MENU</strong> key.<br />
Press the or key repeatedly until Memory Card >, Hard Disk<br />
> or RAM Disk Mode > appears.<br />
Memory Card ><br />
Press the > key.<br />
Press the or key repeatedly until >Write Data appears.<br />
>Write Data<br />
Press the ENTER key. A question mark (?) appears.<br />
>Write Data ?<br />
Press the ENTER key. Processing appears, then Waiting.<br />
1-84
7<br />
8<br />
1-85<br />
Operating the Storage Device<br />
In this state, send the file from the computer to the printer.<br />
The file is written onto the storage device given a destination name<br />
(also referred to as a partition name) which the printer automatically<br />
assigns one after another as follows:<br />
DataS001 (first data),<br />
DataS002 (second data),<br />
DataS003 (third data)...<br />
In the example above, if the file TEST.TXT is the first data to be<br />
written onto the storage device, the destination name will be<br />
DataS001.<br />
As the printer receives data, the message display changes to<br />
Processing, then when the end of the data is received, the message<br />
display changes to Waiting.<br />
Check that the message display has changed to Waiting, then press<br />
the GO key. This writes the file to the memory card and instructs the<br />
printer to automatically print out a CompactFlash card write<br />
information page as shown below.<br />
LP 3033/4033 Page Printer<br />
WRITE INFORMATION<br />
Partition Type. Type of data written (currently only type 2 is supported).<br />
Partition Name. Name of data written.<br />
Write Partition Length. Length (size) of the data written.<br />
Others. Additional information, such as error information.<br />
When the write information page is printed, the message display<br />
returns to Ready.<br />
If the writing was not completed successfully, an error code appears<br />
on the message display. For details, see Error Messages on page<br />
4-10. If this happens, press the GO key. The message display returns<br />
to Ready.
Operating the Storage Device<br />
Deleting Data<br />
9<br />
Repeat above steps until you have transferred all data (files) that<br />
you want to write to the CompactFlash card. Each time you finish<br />
writing data, a CompactFlash card write information page is printed<br />
from the printer showing the information explained in step 4 above,<br />
but pertaining only to the data just written. To see all data contained<br />
in the CompactFlash card at once, print a list of data names as<br />
explained on page 1-89, Printing a List of Data Names.<br />
You can use the printer’s operator panel to delete data from a<br />
CompactFlash card, the Microdrive or the RAM disk.<br />
1<br />
2<br />
3<br />
4<br />
5<br />
6<br />
7<br />
Press the <strong>MENU</strong> key.<br />
Press the or key repeatedly until Memory Card >, Hard Disk<br />
> or RAM Disk Mode > appears.<br />
Memory Card ><br />
Press the > key.<br />
Press the or key repeatedly until > Delete Data appears. The<br />
data name also appears.<br />
>Delete Data<br />
data name<br />
Press the ENTER key. A blinking question mark (?) appears before<br />
the data name.<br />
>Delete Data<br />
?data name<br />
Press the or key to display the desired data name.<br />
Press the ENTER key. Processing appears and the data is deleted<br />
from the CompactFlash card.<br />
1-86
Reading Fonts from a CompactFlash Card<br />
1-87<br />
Operating the Storage Device<br />
If a font (CompactFlash) card is already inserted into the slot when the<br />
printer is turned on, the fonts are automatically read into the printer.<br />
To re-read fonts into the printer from a CompactFlash card, proceed as<br />
follows.<br />
1<br />
2<br />
3<br />
4<br />
5<br />
6<br />
7<br />
8<br />
Press the <strong>MENU</strong> key.<br />
Press the or key repeatedly until Memory Card > appears.<br />
Memory Card ><br />
Press the > key.<br />
Press the or key repeatedly until >Read Fonts appears.<br />
>Read Fonts<br />
Press the ENTER key. A question mark (?) appears.<br />
>Read Fonts ?<br />
Press the ENTER key. Processing appears and the reading of fonts<br />
from the CompactFlash card starts.<br />
When the reading of fonts ends, the message display returns to<br />
>Read fonts.<br />
Press the <strong>MENU</strong> key. The message display returns to Ready.
Operating the Storage Device<br />
Formatting a Storage Device<br />
Note<br />
A new CompactFlash card or Microdrive must be formatted before it can be<br />
used in the printer. You can format the storage device using the printer<br />
operator panel.<br />
• Formatting will destroy any existing data on a storage device.<br />
• You can format the Microdrive using the operator panel when the first<br />
time you installed a new Microdrive. About formatting a new<br />
Microdrive.<br />
To format a CompactFlash card or the Microdrive, use the following<br />
procedure:<br />
1<br />
2<br />
3<br />
4<br />
5<br />
6<br />
Press the <strong>MENU</strong> key.<br />
Press the or key repeatedly until Memory Card > or Hard<br />
Disk >appears.<br />
Memory Card ><br />
Press the > key.<br />
Press the or key repeatedly until >Format appears.<br />
>Format<br />
Press the ENTER key. A question mark (?) appears.<br />
>Format ?<br />
Press the ENTER key. Processing appears and formatting of the<br />
CompactFlash card or the Microdrive starts.<br />
1-88
Printing a List of Data Names<br />
1-89<br />
Operating the Storage Device<br />
When the formatting is successfully completed, the printer automatically<br />
prints out a format information page as shown below.<br />
Capacity. The total size of the CompactFlash card or the Microdrive memory.<br />
Used Space. The size the printer uses for its system.<br />
Free Space. The size remaining in the CompactFlash card or the Microdrive for storing<br />
data.<br />
When the format information is printed, the message display returns to<br />
Ready.<br />
The printer prints a list of all data names (referred to as partitions) stored<br />
in the storage device for reference. (Printing a list is also available for a<br />
font card.)<br />
To print a list of data names for the CompactFlash card, the Microdrive, or<br />
the RAM disk proceed as follows.<br />
1<br />
2<br />
3<br />
4<br />
Press the <strong>MENU</strong> key.<br />
Press the or key repeatedly until Memory Card >, Hard Disk<br />
>, or RAM Disk Mode > appears.<br />
Press the > key.<br />
LP 3033/4033 Page Printer<br />
FORMAT INFORMATION<br />
Memory Card ><br />
Press the or key repeatedly until >List of Partitions<br />
appears.<br />
>List of<br />
Partitions
Operating the Storage Device<br />
5<br />
6<br />
Press the ENTER key. A question mark (?) appears.<br />
>List of<br />
Partitions ?<br />
Press the ENTER key. Processing appears and the printing of the<br />
list starts.<br />
The list provides the following information that are automatically<br />
generated by the printer about data currently stored in the storage<br />
device:<br />
Device Name/Number. Description for the storage device. For example,<br />
‘MEMORY CARD/A’ is indicated for a memory card.<br />
Capacity. Total capacity of the storage device in bytes.<br />
Used Space. The total space used for data stored in the storage device in bytes.<br />
Free Space. The space remaining in the storage device for storing more data,<br />
including the memory space required by the printer for its file system.<br />
Partition Name. The name assigned automatically by the printer for written<br />
data.<br />
Partition Size. Size of the written data in bytes.<br />
Partition Type. The type identifying the written data, i.e., whether it is host<br />
data (Data) or font data (Font).<br />
When the list of file names (partition list) for the storage device is<br />
printed, the display returns to Ready.<br />
1-90<br />
PARTITION LIST<br />
Device Information<br />
Partition Information<br />
LP 3033/4033 Page Printer
Configuration<br />
Page Protect Mode<br />
1-91<br />
Configuration<br />
This section explains the details of printer settings. The following items<br />
are covered.<br />
• Page Protect Mode<br />
• Linefeed (LF) Action<br />
• Carriage-Return (CR) Action<br />
• Wide A4 Pitch<br />
• Print Density<br />
• Total Printed Pages<br />
• Toner Counter Resetting<br />
• Message Language<br />
• Automatic Form Feed Timeout<br />
• Sleep Timer Setting<br />
• Printer Resetting<br />
• Resource Protection<br />
• Alarm (Buzzer) Setting<br />
• Auto Continue Setting<br />
• Duplex Printing Error Detection Setting<br />
The Page Protect Menu does not normally appear, however, Page Protect<br />
will be forcibly set to On if a print overrun error occurs due to insufficient<br />
printer memory. When this has happened, be sure to reset Page Protect<br />
to Auto (default) in order to maintain the optimum use of printer memory.<br />
1<br />
2<br />
3<br />
4<br />
Press the <strong>MENU</strong> key.<br />
Press the or key repeatedly until Page set > appears.<br />
Page set ><br />
Press the > key.<br />
Press the or key repeatedly until >Page Protect appears.<br />
>Page Protect<br />
On
Configuration<br />
Linefeed (LF) Action<br />
5<br />
6<br />
7<br />
8<br />
Press the ENTER key. A blinking question mark (?) appears.<br />
Press the or key repeatedly until Auto appears.<br />
Press the ENTER key.<br />
Press the <strong>MENU</strong> key. The message display returns to Ready.<br />
This procedure instructs the printer what to do when it receives a linefeed<br />
code (character code 0AH).<br />
1<br />
2<br />
3<br />
4<br />
5<br />
6<br />
>Page Protect<br />
? On<br />
>Page Protect<br />
? Auto<br />
Press the <strong>MENU</strong> key.<br />
Press the or key repeatedly until Page set > appears.<br />
Page set ><br />
Press the > key.<br />
Press the or key repeatedly until >LF Action appears.<br />
>LF Action<br />
LF only<br />
Press the ENTER key. A blinking question mark (?) appears.<br />
>LF Action<br />
? LF only<br />
Press the or key repeatedly until desired linefeed action<br />
appears.<br />
LF only A linefeed is performed. (default)<br />
CR and LF A linefeed and carriage return are performed.<br />
Ignore LF The linefeed is ignored.<br />
1-92
7<br />
8<br />
Carriage-Return (CR) Action<br />
When the desired action is displayed, press the ENTER key.<br />
Press the <strong>MENU</strong> key. The message display returns to Ready.<br />
1-93<br />
Configuration<br />
This procedure instructs the printer what to do when it receives a carriagereturn<br />
code (character code 0DH)<br />
1<br />
2<br />
3<br />
4<br />
5<br />
6<br />
7<br />
8<br />
Press the <strong>MENU</strong> key.<br />
Press the or key repeatedly until Page set > appears.<br />
Page set ><br />
Press the > key.<br />
Press the or key repeatedly until >CR Action appears.<br />
>CR Action<br />
CR only<br />
Press the ENTER key. A blinking question mark (?) appears.<br />
>CR Action<br />
? CR only<br />
Press the or key repeatedly until desired carriage-return action<br />
appears.<br />
CR only A carriage-return is performed. (default)<br />
CR and LF A carriage-return and linefeed are performed.<br />
Ignore CR The carriage-return code is ignored.<br />
When the desired action is displayed, press the ENTER key.<br />
Press the <strong>MENU</strong> key. The message display returns to Ready.
Configuration<br />
Wide A4 Pitch<br />
Turn this to On to increase the maximum number of characters that can be<br />
printed in a line for A4 page (78 characters at 10 pitch) and Letter size<br />
page (80 characters at 10 pitch). This setting is effective in only PCL 6<br />
emulation.<br />
1<br />
2<br />
3<br />
4<br />
5<br />
6<br />
7<br />
8<br />
Press the <strong>MENU</strong> key.<br />
Press the or key repeatedly until Page set > appears.<br />
Page set ><br />
Press the > key.<br />
Press the or key repeatedly until >Wide A4 appears.<br />
>Wide A4<br />
Off<br />
Press the ENTER key. A blinking question mark (?) appears.<br />
>Wide A4<br />
? Off<br />
Select On or Off using the or key.<br />
Press the ENTER key.<br />
Press the <strong>MENU</strong> key. The message display returns to Ready.<br />
1-94
Print Density<br />
1-95<br />
Configuration<br />
The print density can be adjusted in five steps: from 01 (light) to 05 (dark).<br />
The factory setting is 03.<br />
1<br />
2<br />
3<br />
4<br />
5<br />
6<br />
7<br />
8<br />
Press the <strong>MENU</strong> key.<br />
Press the or key repeatedly until Print Quality > appears.<br />
Print Quality ><br />
Press the > key.<br />
Press the or key repeatedly until >Print Density appears.<br />
>Print Density<br />
03<br />
Press the ENTER key. A blinking question mark (?) appears.<br />
>Print Density<br />
? 03<br />
Select the print density from five steps from 01 (light) to 05 (dark)<br />
using the or key.<br />
Press the ENTER key.<br />
Press the <strong>MENU</strong> key. The message display returns to Ready.
Configuration<br />
Total Printed Pages<br />
This procedure displays the total number of printed pages.<br />
1<br />
2<br />
3<br />
4<br />
5<br />
Toner Counter Resetting<br />
Press the <strong>MENU</strong> key.<br />
Press the or key repeatedly until Life Counters > appears.<br />
Press the > key.<br />
Press the or key repeatedly until >Total Print appears, the<br />
total number of printed pages displayed.<br />
Press the <strong>MENU</strong> key. The message display returns to Ready.<br />
When the toner container is replaced, reset the toner counter as follows so<br />
that an accurate toner gauge measurement is indicated on the status page.<br />
Note that if this operation is performed when the toner container is not<br />
replaced, the toner gauge measurement will not be indicated correctly.<br />
Also refer to the Installation Guide supplied with the toner kit when<br />
replacing the toner container.<br />
1<br />
2<br />
3<br />
4<br />
Life Counters ><br />
>Total Print<br />
0012345<br />
Press the <strong>MENU</strong> key.<br />
Press the or key repeatedly until Life Counters > appears.<br />
Life Counters ><br />
Press the > key.<br />
Press the or key repeatedly until >New Toner Installed.<br />
appears<br />
>New Toner<br />
Installed<br />
1-96
Message Language<br />
5<br />
6<br />
Press the ENTER key. A question mark (?) appears.<br />
Press the ENTER key. The toner counter is reset. The message<br />
display returns to Ready.<br />
1-97<br />
Configuration<br />
You can select the language of the messages on the message display by<br />
following the procedure given below.<br />
1<br />
2<br />
3<br />
4<br />
5<br />
>New Toner<br />
Installed ?<br />
Press the <strong>MENU</strong> key.<br />
Press the or key repeatedly until Others > appears.<br />
Others ><br />
Press the > key.<br />
Press the or key repeatedly until >MSG Language appears. The<br />
default message language is English.<br />
>MSG Language<br />
English<br />
To change the language, press the ENTER key. A blinking question<br />
mark (?) appears.<br />
>MSG Language<br />
? English
Configuration<br />
6<br />
7<br />
8<br />
Press the key. The display cycles through the available selections<br />
in the following order (The key cycles in the reverse order):<br />
>MSG Language<br />
? English<br />
>Langue<br />
? Francais<br />
>Anzeigesprache<br />
? Deutsch<br />
>Lingua<br />
? Italiano<br />
>Berichttaal<br />
? Nederlands<br />
>Idioma<br />
? Español<br />
>Idioma da MSG<br />
? Portugues<br />
Press the ENTER key.<br />
Press the <strong>MENU</strong> key. The message display returns to Ready.<br />
1-98
Automatic Form Feed Timeout<br />
1-99<br />
Configuration<br />
When the printer receives no data for a certain time, it time out and<br />
releases the current interface: it prints whatever data it has in its buffer<br />
and feeds out the page. You can adjust the time-out time as follows:<br />
1<br />
2<br />
3<br />
4<br />
5<br />
6<br />
7<br />
8<br />
Press the <strong>MENU</strong> key.<br />
Press the or key repeatedly until Others > appears.<br />
Others ><br />
Press the > key.<br />
Press the or key repeatedly until >Form Feed Time appears.<br />
The default setting is 30 seconds.<br />
>Form Feed<br />
Time Out 030sec.<br />
Press the ENTER key. A blinking cursor ( ) appears.<br />
>Form Feed Time.<br />
Time Out 030sec.<br />
Press the or key to increase or decrease the value of the figure<br />
where the cursor is blinking and set the desired time. The time can<br />
be set between 0 and 495 seconds, in 5-second increments. You can<br />
use the > and < keys to move the cursor right and left.<br />
Display the desired time and press the ENTER key.<br />
Press the <strong>MENU</strong> key. The message display returns to Ready.
Configuration<br />
Sleep Timer Setting<br />
The printer has a sleep timer to conserve power when the printer is not<br />
printing, processing, or receiving data. You can adjust the timer value, the<br />
length of time the printer waits before entering sleeping mode in the<br />
absence of data.<br />
1<br />
2<br />
3<br />
4<br />
5<br />
6<br />
7<br />
8<br />
Press the <strong>MENU</strong> key.<br />
Press the or key repeatedly until Others > appears.<br />
Others ><br />
Press the > key.<br />
Press the or key repeatedly until >Sleep Timer > appears.<br />
The default setting is 015 min.<br />
>Sleep Timer ><br />
015 min.<br />
Press the ENTER key. A blinking cursor ( _ ) appears.<br />
>Sleep Timer<br />
015 min.<br />
Press the or key to increase or decrease the value of the figure<br />
where the cursor is blinking and set the desired time. The timer can<br />
be set between 5 and 240 min, in 5-minute increments. You can use<br />
the > and < keys to move the cursor right and left.<br />
Press the ENTER key.<br />
Press the <strong>MENU</strong> key. The message display returns to Ready.<br />
1-100
1-101<br />
Configuration<br />
Turning Off the Sleep Timer<br />
You can turn off the sleep timer function by following the procedure given<br />
below.<br />
1<br />
2<br />
3<br />
4<br />
5<br />
6<br />
7<br />
8<br />
9<br />
Press the <strong>MENU</strong> key.<br />
Press the or key repeatedly until Others > appears.<br />
Others ><br />
Press the > key.<br />
Press the or key repeatedly until >Sleep Timer > appears.<br />
>Sleep Timer ><br />
015 min.<br />
Press the > key and display >>Sleep Mode.<br />
>>Sleep Mode<br />
On<br />
Press the ENTER key. A blinking question mark (?) appears.<br />
>>Sleep Mode<br />
? On<br />
Select Off using the or key.<br />
>>Sleep Mode<br />
? Off<br />
Press the ENTER key.<br />
Press the <strong>MENU</strong> key. The message display returns to Ready.
Configuration<br />
Printer Resetting<br />
The procedure described below resets the printer’s temporary conditions,<br />
such as the current unit of measurement, page orientation, font, character<br />
code set, margins, etc., set by commands to their default values.<br />
1<br />
2<br />
3<br />
4<br />
5<br />
6<br />
Press the <strong>MENU</strong> key.<br />
Press the or key repeatedly until Others > appears.<br />
Others ><br />
Press the > key.<br />
Press the or key repeatedly until >Printer Reset appears.<br />
>Printer Reset<br />
Press the ENTER key. A question mark (?) appears.<br />
>Printer Reset ?<br />
Press the ENTER key again. Self test appears while the printer is<br />
resetting itself, then Please wait followed by Ready.<br />
Self test<br />
Please wait<br />
Ready<br />
1-102
Resource Protection<br />
Note<br />
1-103<br />
Configuration<br />
When you switch from the PCL 6 emulation to another, all downloaded<br />
fonts and macros are lost. Resource protection preserves these PCL<br />
resources in memory so that they are intact when you change the<br />
emulation back to PCL 6.<br />
Resource protection requires extra memory to store the downloaded<br />
fonts and macros. The total size of the printer memory recommended for<br />
using the resource protection option is affected by several factors. See<br />
Appendix A.<br />
1<br />
2<br />
3<br />
4<br />
5<br />
6<br />
7<br />
8<br />
Press the <strong>MENU</strong> key.<br />
Press the or key repeatedly until Others > appears.<br />
Others ><br />
Press the > key.<br />
Press the or key repeatedly until >Resource Prot. appears.<br />
>Resource Prot.<br />
Off<br />
Press the ENTER key. A blinking question mark (?) appears.<br />
>Resource Prot.<br />
? Off<br />
Press the or key to display the desired mode. The display<br />
changes as shown below.<br />
Off (default)<br />
Permanent<br />
Perm / Temp<br />
When the desired mode is displayed, press the ENTER key.<br />
Press the <strong>MENU</strong> key. The message display returns to Ready.
Configuration<br />
Alarm (Buzzer) Setting<br />
In addition to the message displayed when the paper supply is exhausted,<br />
or when paper jamming occurs, an audio warning is made to sound. This is<br />
useful, for example, when the printer is in a location some distance from<br />
the user.<br />
The audio alarm is set to On when leaving the factory. If the alarm is set to<br />
Off, it is made not to sound.<br />
1<br />
2<br />
3<br />
4<br />
5<br />
6<br />
7<br />
8<br />
Press the <strong>MENU</strong> key.<br />
Press the or key repeatedly until Others > appears.<br />
Others ><br />
Press the > key.<br />
Press the or key repeatedly until Buzzer appears.<br />
>Buzzer<br />
On<br />
Press the ENTER key. A blinking question mark (?) appears.<br />
>Buzzer<br />
? On<br />
Select On or Off using the or key.<br />
Press the ENTER key.<br />
Press the <strong>MENU</strong> key. The message display returns to Ready.<br />
1-104
Auto Continue Setting<br />
1-105<br />
Configuration<br />
When Auto Continue is enabled, the printer will automatically print the<br />
next received data following a preset amount of time passes after any one<br />
of the following errors occurs:<br />
Memory overflow Press GO<br />
Print overrun Press GO<br />
KPDL error Press GO<br />
File not found Press GO<br />
Hard disk err Press GO<br />
RAM disk error Press GO<br />
MemoryCard err Press GO<br />
Duplex disabled Press GO<br />
If one of the above errors is caused by someone on a network where the<br />
printer is being shared, for example, data sent from another person will be<br />
printed after a preset amount of time.<br />
1<br />
2<br />
3<br />
4<br />
5<br />
6<br />
7<br />
8<br />
Press the <strong>MENU</strong> key.<br />
Press the or key repeatedly until Others > appears.<br />
Others ><br />
Press the > key.<br />
Press the or key repeatedly until Auto Continue > appears.<br />
>Auto Continue ><br />
Mode On<br />
Press the ENTER key. A blinking question mark (?) appears.<br />
>Auto Continue<br />
Mode ? On<br />
Select On or Off using the or key.<br />
Press the ENTER key.<br />
Press the <strong>MENU</strong> key. The message display returns to Ready.
Configuration<br />
Setting the Auto Continue Recovery Time<br />
Follow the procedure given below to change the recovery time for Auto<br />
Continue.<br />
1<br />
2<br />
3<br />
4<br />
5<br />
6<br />
7<br />
8<br />
9<br />
Press the <strong>MENU</strong> key.<br />
Press the or key repeatedly until Others > appears.<br />
Others ><br />
Press the > key.<br />
Press the or key repeatedly until Auto Continue Mode ><br />
appears.<br />
>Auto Continue ><br />
Mode On<br />
Press the > key and display >>Auto Continue Timer.<br />
Press the ENTER key. A blinking cursor ( ) appears.<br />
>>Auto Continue<br />
Timer 000Sec.<br />
Press the or key to increase or decrease the value of the figure<br />
where the cursor is blinking and set the desired time. The time must<br />
be set between 000 and 495 seconds, in 5-second increments. If set to<br />
000, printing will be continued immediately without allowing any<br />
time interval. You can use the > and < keys to move the cursor right<br />
and left.<br />
Display the desired time and press the ENTER key.<br />
Press the <strong>MENU</strong> key. The message display returns to Ready.<br />
1-106
Duplex Printing Error Detection Setting<br />
1-107<br />
Configuration<br />
If the error detection setting for duplex printing has been turned On, and<br />
you attempt to print onto a paper size and paper type that cannot be used<br />
for duplex printing, the Duplex disabled Press GO error message will<br />
be displayed and printing will stop. To print onto one-side of the paper only<br />
when this message is displayed, press the GO key. The default setting is<br />
Off.<br />
1<br />
2<br />
3<br />
4<br />
5<br />
6<br />
7<br />
8<br />
9<br />
Press the <strong>MENU</strong> key.<br />
Press the or key repeatedly until Others > appears.<br />
Others ><br />
Press the > key.<br />
Press the or key repeatedly until >Finishing Error ><br />
appears.<br />
>Finishing ><br />
Error<br />
Press the > key and display >>Duplex.<br />
>>Duplex<br />
Off<br />
Press the ENTER key. A blinking question mark (?) appears.<br />
>>Duplex<br />
? Off<br />
Press the or key to change Off to On.<br />
>>Duplex<br />
? On<br />
Press the ENTER key.<br />
Press the <strong>MENU</strong> key. The message display returns to Ready.
Chapter 2 Paper Selection<br />
This chapter explains the following topics:<br />
2<br />
• General Guidelines<br />
• Special Paper<br />
• Paper Type<br />
2-1
General Guidelines<br />
General Guidelines<br />
Note<br />
Paper Availability<br />
Paper Specifications<br />
The printer is designed to print on high-quality copier bond paper (the kind<br />
used in ordinary dry copier machines), but it can also accept a variety of<br />
other types of paper within the limits specified below.<br />
The manufacturer assumes no liability for problems that occur when<br />
paper not satisfying these requirements is used.<br />
Selection of the right paper is important. Using the wrong paper can result<br />
in paper jams, misfeeding, curling, poor print quality, and paper waste, and<br />
in extreme cases can damage the printer. The guidelines given below will<br />
increase the productivity of your office by ensuring efficient, trouble-free<br />
printing and reducing wear and tear on the printer.<br />
Most types of paper are compatible with a variety of machines. Paper<br />
intended for xerographic copiers can also be used with the printer.<br />
There are three general grades of paper: economy, standard, and premium.<br />
The most significant difference between grades is the ease with which they<br />
pass through the printer. This is affected by the smoothness, size, and<br />
moisture content of the paper, and the way in which the paper is cut. The<br />
higher the grade of paper you use, the less risk there will be of paper jams<br />
and other problems, and the higher the level of quality your printed output<br />
will reflect.<br />
Differences between paper from different suppliers can also affect the<br />
printer’s performance. A high-quality printer cannot produce high-quality<br />
results when the wrong paper is used. Low-priced paper is not economical<br />
in the long run if it causes printing problems.<br />
Paper in each grade is available in a range of basis weights (defined later).<br />
The traditional standard weights are 16, 20, and 28 pounds (60 to 105 g/m²).<br />
The following table summarizes the basic paper specifications. Details are<br />
given on the following pages.<br />
Item Specification<br />
Weight<br />
Cassette: 60 to 105 g/m² (16 to 28 lb/ream)<br />
MP tray: 60 to 200 g/m² (16 to 53 lb/ream)<br />
Thickness 0.086 to 0.110 mm (3.4 to 4.3 mils)<br />
Dimensional accuracy ±0.7 mm (±0.0276 inches)<br />
Squareness of corners 90° ±0.2°<br />
Moisture content 4 to 6 %<br />
Direction of grain Long grain<br />
Pulp content 80 % or more<br />
Table 2-1<br />
2-2
Selecting the Right Paper<br />
2-3<br />
General Guidelines<br />
Laser printing is a process involving laser light, electrostatic discharge,<br />
toner, and heat. In addition, as the paper passes through the printer it<br />
undergoes considerable sliding, bending, and twisting motions. A highquality<br />
printing paper matching the printer’s requirements withstands all<br />
these stresses, enabling the printer to turn out clean, crisp printed copies<br />
consistently.<br />
Remember that all paper is not the same. Some of the factors to consider<br />
when selecting paper for the printer are as follows:<br />
Condition of the Paper<br />
Avoid using paper that is bent at the edges, curled, dirty, torn, embossed, or<br />
contaminated with lint, clay, or paper shreds.<br />
Use of paper in these conditions can lead to illegible printing, misfeeding,<br />
and paper jams, and can shorten the life of the printer. In particular, avoid<br />
using paper with a surface coating or other surface treatment. The paper<br />
should have as smooth and even a surface as possible.<br />
Composition<br />
Do not use paper that has been coated or surface-treated and contains<br />
plastic or carbon. The heat of fusing can cause such paper to give off<br />
harmful fumes.<br />
Bond paper should contain at least 80 % pulp. Not more than 20 % of the<br />
total paper content should consist of cotton or other fibers.
General Guidelines<br />
Paper Size<br />
Cassettes and an MP tray are available for the paper sizes listed in the<br />
table below. The dimensional tolerances are ±0.7 mm (±0.0276 inches) for<br />
the length and width. The angle at the corners must be 90° ±0.2°.<br />
Multi-purpose<br />
tray<br />
Size Cassette or<br />
multi-purpose<br />
tray<br />
Smoothness<br />
The paper should have a smooth, uncoated surface. Paper with a rough or<br />
sandy surface can cause voids in the printed output. Paper that is too<br />
smooth, however, can cause multiple feeding and fogging problems.<br />
(Fogging is a gray background effect.)<br />
Basis Weight<br />
Basis weight is the weight of a standard quantity of paper. In the<br />
traditional system, the standard quantity is a ream consisting of 500<br />
sheets measuring 17 × 22 inches each. In the metric system the standard<br />
quantity is 1 square meter.<br />
Paper that is too light or too heavy can cause misfeeding, jams, and<br />
premature wear of the printer. Uneven paper weight can cause multiple<br />
feeds, print defects, poor toner fusing, blurring, and other print quality<br />
problems. The proper weight is 60 to 105 g/m² for the paper cassette, and<br />
60 to 200 g/m² for the MP tray.<br />
2-4<br />
Size<br />
Monarch 3-7/8 × 7-1/2 inches Legal 8-1/2 × 14 inches<br />
Business 4-1/8 × 9-1/2 inches Letter 8-1/2 × 11 inches<br />
ISO A6 10.5 × 14.8 cm ISO A4 21 × 29.7 cm<br />
ISO DL 11 × 22 cm ISO A5 14.8 × 21 cm<br />
Commercial 9 3-7/8 × 8-7/8 inches ISO C5 16.2 × 22.9 cm<br />
Commercial 6-3/4 3-5/8 × 6-1/2 inches ISO B5 17.6 × 25 cm<br />
JIS B6 12.8 × 18.2 cm JIS B5 18.2 × 25.7 cm<br />
Statement 5-1/2 × 8-1/2 inches Executive 7-1/4 × 10-1/2<br />
inches<br />
Hagaki 10 × 14.8 cm Oficio II 8-1/2 × 13 inches<br />
Ofuku-Hagaki 14.8 × 20 cm Folio 21 × 33 cm<br />
Youkei 2 11.4 × 16.2 cm 16K 19.7 × 27.3 cm<br />
Youkei 4 10.5 × 23.5 cm<br />
Custom Cassette: 14.8 to 21.6 cm × 21 to 29.7 cm<br />
For U. S. A.: 5-13/16 to 8-1/2 inches × 8-1/4 to 14 inches<br />
Table 2-2<br />
MP tray: 7 to 21.6 cm × 14.8 to 29.7 cm<br />
(2-13/16 to 8-1/2 inches × 5-13/16 to 11-11/16 inches)
U. S. Bond<br />
Weight (lb)<br />
Europe Metric<br />
Weight (g/m²)<br />
Table 2-3<br />
2-5<br />
General Guidelines<br />
Paper Weight Equivalence Table<br />
Paper weight is listed with expression in U.S. bond weight (lb) and<br />
European metric (g/m²). The shaded point indicates the standard weight.<br />
16 17 20 21 22 24 27 28 32 34 36 39 42 43 47 53<br />
60 64 75 80 81 90 100 105 120 128 135 148 157 163 176 199<br />
Thickness (Caliper)<br />
Thick paper is referred to as high-caliper paper and thin paper as lowcaliper<br />
paper. The paper used with the printer should be neither extremely<br />
thick nor extremely thin. If you are having problems with paper jams,<br />
multiple feeds, and faint printing, the paper you are using may be too thin.<br />
If you are having problems with paper jams and blurred printing, the<br />
paper may be too thick. The proper thickness is 0.086 to 0.110 mm (3.4 to<br />
4.3 mils).<br />
Moisture Content<br />
Moisture content is defined as the percent ratio of moisture to the dry mass<br />
of the paper. Moisture can affect the paper’s appearance, feedability, curl,<br />
electrostatic properties, and toner fusing characteristics.<br />
The moisture content of the paper varies with the relative humidity in the<br />
room. When the relative humidity is high and the paper absorbs moisture,<br />
the paper edges expand, becoming wavy in appearance. When the relative<br />
humidity is low and the paper loses moisture, the edges shrink and<br />
tighten, and print contrast may suffer.<br />
Wavy or tight edges can cause misfeeding and alignment anomalies. The<br />
moisture content of the paper should be 4 to 6%.<br />
To ensure the proper moisture content, it is important to store the paper in<br />
a controlled environment. Some tips on moisture control are:<br />
• Store paper in a cool, dry location.<br />
• Keep the paper in its wrapping as long as possible. Rewrap paper that<br />
is not in use.<br />
• Store paper in its original carton. Place a pallet, etc., under the carton<br />
to separate it from the floor.<br />
• After removing paper from storage, let it stand in the same room as the<br />
printer for 48 hours before use.<br />
• Avoid leaving paper where it is exposed to heat, sunlight, or damp.
General Guidelines<br />
Note<br />
Paper Grain<br />
When paper is manufactured, it is cut into sheets with the grain running<br />
parallel to the length (long grain) or parallel to the width (short grain).<br />
Short grain paper can cause feeding problems in the printer. All paper used<br />
in the printer should be long grain.<br />
Other Paper Properties<br />
Porosity: Refers to the density of the paper structure; that is, how openly<br />
or compactly the fibers are bonded.<br />
Stiffness: Limp paper can buckle inside the printer, while paper that is too<br />
stiff may bind. Either way the result is a paper jam.<br />
Curl: Most paper has a natural tendency to curl in one direction. The<br />
paper should be loaded so that the natural curl is downward, to counteract<br />
the upward curl imparted by the printer. Printed sheets will then come out<br />
flat. Most paper also has a top and bottom surface. Loading instructions<br />
are usually given on the paper package.<br />
If the paper is considerably curled in one direction, e.g. when the paper<br />
was used to print on one side, try to roll the paper in the opposite<br />
direction to counteract the curl. Printed sheets will then come out flat.<br />
Electrostatic properties: During the printing process, the paper is<br />
electrostatically charged to attract the toner. The paper must be able to<br />
release this charge so that printed sheets do not cling together in the<br />
output tray.<br />
Whiteness: The contrast of the printed page depends on the whiteness of<br />
the paper. Whiter paper provides a sharper, brighter appearance.<br />
Quality control: Uneven sheet size, corners that are not square, ragged<br />
edges, welded (uncut) sheets, and crushed edges and corners can cause the<br />
printer to malfunction in various ways. A quality paper supplier should<br />
take considerable care to ensure that these problems do not occur.<br />
Packaging: Paper should be packed in a sturdy carton to protect it from<br />
damage during transport. Quality paper obtained from a reputable<br />
supplier is usually properly packaged.<br />
2-6
Special Paper<br />
Note<br />
2-7<br />
Special Paper<br />
This section explains printing on special paper. The page printer can use<br />
the following types of special paper. In this case, set the media type<br />
according to the table below.<br />
Paper type Media type<br />
Colored paper Color<br />
Preprinted paper Preprinted<br />
Overhead projector transparencies Transparency<br />
Postcards Cardstock<br />
Envelopes Envelope<br />
Labels Labels<br />
Table 2-4<br />
When using the above types of paper, be sure to use products that are<br />
specified for use with photocopiers and/or page printers. Feed paper other<br />
than colored paper or pre-printed paper from the MP (multi-purpose) tray.<br />
Use paper that is sold specifically for use with copiers (heat-fusing type).<br />
Label paper and envelopes should not be placed in the cassette; they must<br />
be fed manually and delivered in the face up stack.<br />
Since the composition and quality of special paper vary considerably,<br />
special paper is more likely than white bond paper to give trouble during<br />
printing. No liability will be assumed if moisture, etc., given off in printing<br />
on special paper causes harm to the machine or operator.<br />
Before purchasing any type of special paper, test a sample on the printer<br />
and check that print quality is satisfactory.<br />
Transparency (Overhead Projection Film)<br />
Specifications for each type of special paper are given below.<br />
Transparency must be able to withstand the heat of fusing during the<br />
printing process. It should satisfy the conditions given in the table below.<br />
Item Specification<br />
Tolerance of heat Must tolerate at least 190 °C (374 °F)<br />
Thickness 0.100 to 0.110 mm (3.9 to 4.3 mils)<br />
Material Polyester<br />
Dimensional accuracy ±0.7 mm (±0.0276 inch)<br />
Squareness of corners 90° ± 0.2°<br />
Table 2-5<br />
To avoid trouble, transparency must be delivered face-up.<br />
If transparency jams frequently, pull the top of the sheet very gently as it<br />
leaves the printer.
Special Paper<br />
Adhesive-Backed Labels<br />
Note<br />
The basic rule for printing on adhesive labels is that the adhesive must<br />
never come into contact with any part of the printer. Adhesive paper<br />
sticking to the drum or rollers will damage the printer.<br />
Be sure to feed label paper from the MP tray. Feeding label paper from a<br />
paper cassette may cause printer failure.<br />
Label paper has a structure comprised of three layers, as shown in the<br />
figure below. The top sheet is printed on. The adhesive layer consists of<br />
pressure-sensitive adhesives. The carrier sheet (also called the linear or<br />
backing sheet) holds the labels until use. Due to the complexity of its<br />
composition, adhesive-backed label paper is particularly likely to give<br />
trouble in printing.<br />
Adhesive label paper must be entirely covered by its top sheet, with no<br />
spaces between the individual labels. Labels with spaces in between are<br />
apt to peel off, causing serious paper jam problems.<br />
Some label paper is manufactured with an extra margin of top sheet<br />
around the edge. Do not remove the extra top sheet from the carrier sheet<br />
until after printing is finished.<br />
Acceptable<br />
2-8<br />
Top sheet (white bond paper)<br />
Adhesive<br />
Carrier sheet<br />
Top sheet<br />
Carrier sheet<br />
Unacceptable
The table below lists the specifications for adhesive label paper.<br />
Item Specification<br />
Weight of top sheet 44 to 74 g/m² (12 to 20 lb/ream)<br />
Composite weight 104 to 151 g/m² (28 to 40 lb/ream)<br />
Thickness of top sheet 0.086 to 0.107 mm (3.9 to 4.2 mils)<br />
Composite thickness 0.115 to 0.145 mm (4.5 to 5.7 mils)<br />
Moisture content 4 to 6 % (composite)<br />
Table 2-6<br />
2-9<br />
Special Paper<br />
Postcards<br />
Fan the stack of postcards and align the edges before loading them in the<br />
MP tray. Make sure the postcards you are going to set are not curled.<br />
Feeding curled postcards may cause paper jams.<br />
Some postcards have rough edges on the back (those are created when the<br />
paper is cut). In this case, put the postcards on a flat place and rub the<br />
edges with, for example, a ruler to smooth them.<br />
Envelopes<br />
The printer can print on envelopes using paper with a basis weight of 60 to<br />
79 g/m² (16 to 21 lb/ream). Envelopes must be manually fed.<br />
An envelope is a more complex object than a single sheet of paper. For this<br />
reason, it may not be possible to obtain consistent print quality over the<br />
entire envelope surface.<br />
Many envelopes have a diagonal grain orientation (See Paper Grain on<br />
page 2-6). This orientation is more likely to wrinkle and crease on its way<br />
through the printer. Before purchasing envelopes for use with the printer,<br />
test a sample to verify the envelope’s suitability.<br />
Do not use envelopes that have an encapsulated liquid adhesive.<br />
Avoid long printing runs consisting of envelopes only. Extensive envelope<br />
printing can cause premature printer wear.
Special Paper<br />
Note<br />
To avoid jamming due to curled envelopes, do not leave more than<br />
approximately 10 printed envelopes stacked in the paper trays during<br />
multiple envelope printing.<br />
Envelopes should be fed in the face-up position, right edge first.<br />
Thick Paper<br />
Fan the stack of paper and align the edges before loading them in the MP<br />
tray. Some types of paper have rough edges on the back (those are created<br />
when the paper is cut). In this case, put the paper on a flat place and rub<br />
the edges once or twice with, for example, a ruler to smooth them in the<br />
same way as described in Postcards on page 2-9. Feeding rough edged<br />
paper may cause paper jams.<br />
If the paper jams even after you smooth it out in such a way, set the paper<br />
in the MP tray with the leading edge raised up a few millimeters as shown<br />
in the illustration.<br />
2-10
Note<br />
2-11<br />
Special Paper<br />
Colored Paper<br />
Colored paper should satisfy the same conditions as white bond paper,<br />
listed in Paper Specifications on page 2-2. In addition, the pigments<br />
used in the paper must be able to withstand the heat of fusing during the<br />
printing process (up to 200 °C or 392 °F).<br />
Preprinted Paper<br />
Preprinted paper should have a bond paper base. The preprinted ink must<br />
be able to withstand the heat of fusing during the printing process, and<br />
must not be affected by silicone oil.<br />
Do not use paper with any kind of surface treatment, such as the type of<br />
paper commonly used for calendars.<br />
Recycled Paper<br />
Select recycled paper that meets the same specifications as the white bond<br />
paper (see Paper Specifications on page 2-2) except whiteness.<br />
Before purchasing recycled paper, test a sample on the printer and check<br />
that the print quality is satisfactory.
Paper Type<br />
Paper Type<br />
The printer is capable of printing under the optimum setting for the type of<br />
paper being used.<br />
Setting the paper type for the paper source from the printer’s operator<br />
panel will cause the printer to automatically select the paper source and<br />
print in the mode best suited to that type of paper.<br />
A different paper type setting can be made for each paper source including<br />
the MP tray. Not only can preset paper types be selected, but it is also<br />
possible for you to define and select customized paper types. See Creating<br />
Custom Paper Type on page 1-32.<br />
The following types of paper can be set.<br />
Paper source MP Paper Paper Duplex path<br />
tray Cassette Weight (MP tray available<br />
only in Cassette<br />
Paper Type<br />
mode)<br />
Plain Yes Yes Normal 2 Yes<br />
Transparency Yes No Extra Heavy No<br />
Preprinted Yes Yes Normal 1 Yes<br />
Labels Yes No Heavy 1 No<br />
Bond Yes Yes Normal 3 Yes<br />
Recycled Yes Yes Normal 2 Yes<br />
Vellum Yes No Light No<br />
Rough Yes Yes Normal 3 Yes<br />
Letterhead Yes Yes Normal 3 Yes<br />
Color Yes Yes Normal 3 Yes<br />
Prepunched Yes Yes Normal 1 Yes<br />
Envelope Yes No Heavy 3 No<br />
Cardstock Yes No Heavy 3 No<br />
Thick Yes No Heavy 1 No<br />
High quality Yes Yes Normal 2 Yes<br />
Custom 1 (to 8) †<br />
Yes Yes Normal 2 Yes<br />
Table 2-7<br />
† This is a paper type defined and registered by the user. Up to eight types of user settings<br />
may be defined. For details on Creating Custom Paper Type on page 1-32.<br />
2-12<br />
Yes: Can be stored No: Cannot be stored
Chapter 3 Maintenance<br />
3<br />
This chapter explains how to replace the toner container and how to clean parts such as the<br />
registration roller and charger wire.<br />
This chapter explains the following topics:<br />
• Toner Container Replacement<br />
• Waste Toner Box Replacement<br />
• Cleaning<br />
3-1
Toner Container Replacement<br />
Toner Container Replacement<br />
Toner Container Replacement Interval<br />
Note<br />
The toner container in the printer should be replaced as soon as the<br />
message display shows Toner low or soon after. If you continue to use the<br />
printer, eventually the toner supply will be exhausted at which point the<br />
printer will stop printing and the Replace toner Clean printer<br />
message will be shown instructing you to install a new toner kit.<br />
Assuming an average toner coverage of 5% and Ecoprint mode turned off,<br />
the toner container will need replacing approximately once every 20,000<br />
pages. †<br />
† For a new printer with a toner kit installed for the first time, the<br />
number of copies that can be printed will be approximately 10,000.<br />
Toner Kits to be Used<br />
Contents: Toner container<br />
Waste toner box<br />
Wiper cloth<br />
Grid cleaner<br />
2 plastic bags (for disposal of the old toner container and<br />
waste toner box)<br />
Installation Guide<br />
• Be sure to distance items such as floppy disks during toner container<br />
replacement.<br />
• Be sure to clean the inside of the printer when replacing the toner<br />
container. For details, see Cleaning on page 3-9.<br />
• Use of original <strong>TA</strong> <strong>Triumph</strong>-<strong>Adler</strong> toner kits is highly recommended to<br />
prevent printer trouble and ensure the long life of the printer.<br />
3-2
Replenishing Toner<br />
Note<br />
Note<br />
1<br />
2<br />
Open the printer top cover all the way.<br />
3-3<br />
Toner Container Replacement<br />
Pull the lock lever (green colored) to the right and gently lift the old<br />
toner container.<br />
Keep the toner container as level as possible while removing.<br />
3<br />
Lock Lever<br />
Top Cover<br />
Put the old toner container in the plastic bag supplied with the toner<br />
kit and dispose of it.<br />
Old Toner Container<br />
The old toner container may be incinerated without the risk of generating<br />
harmful gas.
Toner Container Replacement<br />
4<br />
5<br />
6<br />
7<br />
Take the new toner container from the bag.<br />
With the label side down, thoroughly shake the toner container (in<br />
the direction of the arrows) ten times or more. This ensures that the<br />
toner is evenly distributed inside.<br />
10 times or<br />
more<br />
Carefully remove the protective seal (orange colored).<br />
Install the toner container into the printer.<br />
3-4<br />
New Toner Container<br />
Protective Seal
Note<br />
8<br />
9<br />
3-5<br />
Toner Container Replacement<br />
Push firmly on the top of the toner container at the positions marked<br />
PUSH HERE.<br />
When the toner container fits into place, it will lock with a clicking<br />
sound.<br />
Close the top cover.<br />
It is necessary to clean the inside of the printer after replacing the toner<br />
container. If the toner container is replaced when Replace toner Clean<br />
printer is displayed, Clean printer Press GO will appear after<br />
replacement. After cleaning the inside of the printer (see Cleaning on<br />
page 3-9), the message will disappear when the GO key is pressed, and<br />
the printer will be ready for printing.
Waste Toner Box Replacement<br />
Waste Toner Box Replacement<br />
Replacing the Waste Toner Box<br />
Note<br />
Note<br />
When replacing the toner container, the used waste toner box in the<br />
printer should also be replaced with the new one from the new toner kit.<br />
1<br />
2<br />
Open the left cover on the left side of the printer.<br />
Left Cover<br />
While holding the waste toner box, press the lock lever and then<br />
gently remove the waste toner box.<br />
Lock Lever<br />
Remove the waste toner box as gently as possible so as not to scatter<br />
the toner inside. Do not let the opening of the waste toner box face<br />
downward.<br />
3-6<br />
Old Waste<br />
Toner Box
3<br />
4<br />
5<br />
3-7<br />
Waste Toner Box Replacement<br />
Cap the waste toner box after removing from the printer.<br />
To avoid toner spilling, place the capped waste toner box in the<br />
plastic bag supplied before proper disposal.<br />
Plastic Bag<br />
Open the cap of the new waste toner box.<br />
Cap<br />
Cap<br />
Old Waste<br />
Toner Box<br />
New Waste<br />
Toner Box
Waste Toner Box Replacement<br />
6<br />
7<br />
8<br />
Insert the new waste toner box as shown in the figure below. The box<br />
will be locked when it fits into place.<br />
Ensure that it is correctly inserted and close the left cover.<br />
The printer parts must be cleaned when replacing the toner<br />
container. See Cleaning on page 3-9.<br />
When the toner container is replaced, reset the toner counter (see<br />
Toner Counter Resetting on page 1-96).<br />
3-8<br />
New Waste Toner<br />
Box
Cleaning<br />
Note<br />
Cleaning the Charger Wire<br />
3-9<br />
Cleaning<br />
To avoid print quality problems, the following printer parts must be<br />
cleaned with every toner container replacement. In addition, the charger<br />
wire and paper transfer unit should be cleaned from time to time, or<br />
whenever print quality problems occur.<br />
If the toner container was replaced when Replace toner Clean<br />
printer was displayed, Clean printer Press GO will appear after<br />
replacement. After cleaning the inside of the printer following the<br />
procedure shown below, press the GO key; the message will disappear<br />
and the printer will be ready for printing.<br />
The charger wire is a part in the drum unit that needs to be periodically<br />
cleaned. You can clean the charger wire by pulling the cleaning knob as<br />
instructed below.<br />
1<br />
2<br />
Open the left cover on the left side of the printer.<br />
Left Cover Charger Unit<br />
Pull the cleaning knob (green colored) slowly in and out a few times.<br />
This cleans charger wire inside the printer.<br />
Cleaning Knob<br />
(Green)
Cleaning<br />
Cleaning the Charger Grid<br />
Note<br />
The charger grid is a part located at the bottom of the charger unit, which<br />
also needs to be cleaned. You should use a grid cleaner attaching it to the<br />
printer and pull out the charger unit as instructed below.<br />
1<br />
Take the grid cleaner from protective bag in the new toner kit, and<br />
remove the cap.<br />
The grid cleaner pad is supplied with water soaked. Perform the<br />
following procedure before the pad dries.<br />
2<br />
Protective Bag<br />
Attach the grid cleaner to the printer with the pad at the top, as<br />
shown in the figure.<br />
3-10<br />
Cap<br />
Grid Cleaner<br />
Grid Cleaner
3<br />
4<br />
3-11<br />
Cleaning<br />
Slowly pull out and then push back in the charger unit at least 5<br />
times. It is easier to pull out the charger unit for the first time if it is<br />
raised slightly, as shown in the figure.<br />
This cleans grid part underneath the charger unit.<br />
Charger Unit<br />
(3)<br />
Remove the grid cleaner from the printer and dispose of it. The grid<br />
cleaner is not re-usable.<br />
(1)<br />
(2)
Cleaning<br />
Paper Transfer Unit<br />
5<br />
After cleaning the charger wire and grid, push the charger unit all<br />
the way in and close the left cover.<br />
To avoid print quality problems due to paper dust and debris, clean the<br />
paper transfer unit in the following manner.<br />
1<br />
While pulling the paper transfer unit release lever (green colored),<br />
pull out the paper transfer unit.<br />
3-12<br />
Paper Transfer Unit Release Lever<br />
(green colored)<br />
Paper Transfer Unit
Note<br />
2<br />
3-13<br />
Cleaning<br />
Wipe away the paper dust on the registration roller and the paper<br />
ramp using the wiper cloth included in the toner kit.<br />
Wiper Cloth<br />
Transfer Roller [Black]<br />
See Note below.<br />
Paper Transfer Unit<br />
Paper Ramp<br />
Registration Roller [Metal]<br />
Be careful not to touch the transfer roller (the black roller) during<br />
cleaning as this may adversely affect print quality.
Chapter 4 Troubleshooting<br />
4<br />
This chapter explains how to handle printer problems that may occur. If a problem cannot be<br />
corrected, contact your local <strong>TA</strong> <strong>Triumph</strong>-<strong>Adler</strong> dealer.<br />
This chapter explains the following topics:<br />
• General Guide<br />
• Print Quality Problems<br />
• Indicators and Messages<br />
• Correcting a Paper Jam<br />
4-1
General Guide<br />
General Guide<br />
There are quite a few printer problems that you can deal with by yourself. This section explains how to<br />
correct these problems. Therefore, if some kind of problem should occur, check the following before<br />
concluding the printer is broken.<br />
Symptom Check Items Corrective Action<br />
The printer will not<br />
print from the<br />
computer.<br />
Check the READY<br />
indicator.<br />
Check the ATTENTION<br />
indicator.<br />
Off Look through the items below and check<br />
anything that seems appropriate.<br />
Flashing An error has occurred. For details on error<br />
warnings and remedies, see Indicators on<br />
page 4-6.<br />
Lit See the appropriate item below.<br />
Flashing See Indicators on page 4-6<br />
Lit<br />
A maintenance message appears in the<br />
message display.<br />
See Maintenance Messages on page 4-7<br />
Print quality is not good. See Print Quality Problems on page 4-3.<br />
Paper is jammed. See Correcting a Paper Jam on page 4-12.<br />
Nothing lights on the<br />
operator panel even<br />
when power is turned<br />
on and the fan makes<br />
no noise.<br />
The printer prints a<br />
status page, but data<br />
from the computer is<br />
not being printed<br />
normally.<br />
Table 4-1<br />
Check that the power cord is properly<br />
plugged into the power outlet.<br />
Check that the power switch is really in the ON ( ) position.<br />
If you still cannot correct a printer problem even after checking the above, please contact your local <strong>TA</strong> <strong>Triumph</strong>-<strong>Adler</strong> dealer.<br />
4-2<br />
Turn off the printer’s power, plug in the power<br />
cord securely, and try turning on the printer’s<br />
power again.<br />
Check the interface cable. Connect both ends of the interface cable<br />
securely. Try replacing the printer cable. For<br />
details on the parallel interface for this printer,<br />
see Appendix B.<br />
Check program files and application<br />
software.<br />
Try printing another file or using another<br />
print command. If the problem occurs only<br />
with a specific file or application, check the<br />
printer settings for that application.
Print Quality Problems<br />
4-3<br />
Print Quality Problems<br />
As the following table shows, there are many possible causes of print quality problems, such as blank<br />
output as. The troubleshooting procedure for each type of problem is explained below. If you still can not<br />
solve the problem, contact your local <strong>TA</strong> <strong>Triumph</strong>-<strong>Adler</strong> dealer.<br />
Printed Results Corrective Action<br />
Completely blank printout Check the developer unit.<br />
Open the printer top cover and check that the developer<br />
unit is inserted correctly and check that the developer’s<br />
connector is connected properly.<br />
Check the toner container.<br />
Open the printer top cover and check that the toner<br />
container is correctly installed in the printer. See Toner<br />
Container Replacement on page 3-2.<br />
All-black printout Check the charger unit.<br />
Open the printer left cover and check that the charger<br />
unit is correctly installed.<br />
Dropouts, horizontal streaks, stray dots Clean the charger wire.<br />
Open the printer left cover. Pull the cleaning knob (green<br />
colored) slowly in and out a few times. See Cleaning on<br />
page 3-9.<br />
Black or white vertical streaks Check the operator panel.<br />
If the Toner low message is displayed and the<br />
ATTENTION indicator is flashing, install a new toner kit.<br />
See Toner Container Replacement on page 3-2.<br />
Clean the charger wire.<br />
Open the printer left cover. Pull the cleaning knob (green<br />
colored) slowly in and out a few times. See Cleaning on<br />
page 3-9.<br />
Table 4-2
Print Quality Problems<br />
Printed Results Corrective Action<br />
Faint or blurred printing Check the Ecoprint setting.<br />
When this setting is On, switch it to Off on the Operator<br />
Panel. (See Ecoprint on page 1-54)<br />
Check the operator panel.<br />
• If the Toner low message is displayed and the<br />
ATTENTION indicator is flashing, install a new toner<br />
kit. See Toner Container Replacement on page<br />
3-2.<br />
• Set the print density from the operator panel to a<br />
higher level than the current setting. See Print<br />
Density on page 1-95.<br />
• Make sure the paper type setting is correct. See<br />
Paper Type on page 2-12<br />
Clean the charger wire.<br />
Open the printer left cover. Pull the cleaning knob (green<br />
colored) slowly in and out a few times. See Cleaning on<br />
page 3-9<br />
Grey background. Check the operator panel.<br />
If the Toner low message is displayed and the<br />
ATTENTION indicator is flashing, install a new toner kit.<br />
See Toner Container Replacement on page 3-2.<br />
Check the print density.<br />
Display the print density menu from the operator panel<br />
and select a lighter density setting. See Print Density on<br />
page 1-95.<br />
Clean the charger wire.<br />
Open the printer’s left cover. Pull the cleaning knob<br />
(green colored) slowly in and out a few times. See Toner<br />
Container Replacement on page 3-2.<br />
Check the charger unit installation.<br />
Open the printer left cover and check that the charger<br />
unit is correctly installed and seated as far as it will go.<br />
See Cleaning on page 3-9.<br />
Table 4-2 (Continued)<br />
4-4
Printed Results Corrective Action<br />
4-5<br />
Print Quality Problems<br />
Dirt on the top edge or back of the paper Check the paper chute and the ramp.<br />
Pull out the paper transfer unit and check for toner on the<br />
paper ramp. Clean the paper ramp using a soft, dry, lintfree<br />
cloth. See Cleaning on page 3-9.<br />
Check the transfer roller.<br />
If the transfer roller is dirty with toner, try printing<br />
several pages.<br />
Characters out of position. Check the file or program.<br />
Check whether the problem is being caused by a<br />
PRESCRIBE command error. If the problem occurs only<br />
with a specific file or program, the most likely cause is an<br />
error in a parameter to a command or command syntax.<br />
Table 4-2 (Continued)
Indicators and Messages<br />
Indicators and Messages<br />
Indicators<br />
Indicator Name Condition Description<br />
Table 4-3<br />
READY<br />
DA<strong>TA</strong><br />
ATTENTION<br />
Ready<br />
indicator<br />
Data<br />
indicator<br />
Attention<br />
indicator<br />
The tables on the following pages indicate how to respond to problems<br />
indicated by the operator panel indicators and messages.<br />
Flashing An error occurs that you can clear by yourself.<br />
Lit The printer is on-line. The printer is ready to print.<br />
Off<br />
The printer is off-line. The printer stores but does not print received<br />
data. Also indicates when printing is automatically stopped due to<br />
occurrence of an error.<br />
Flashing Data transfer is taking place.<br />
Lit<br />
Flashing<br />
Either data is being processed, or data is being written onto the<br />
option CompactFlash card or Microdrive.<br />
The printer needs maintenance attention or the printer is warming<br />
up (Please wait).<br />
Lit<br />
A problem or an error occurs that you can clear by yourself. (For<br />
example, a paper jam occurs.)<br />
Off Operations are normal.<br />
4-6
Maintenance Messages<br />
4-7<br />
Indicators and Messages<br />
The following table lists maintenance messages that you can deal with by yourself. If Call service<br />
person appears, turn off the printer, disconnect the power cord, and contact your dealer.<br />
Message Corrective Action<br />
Add paper (paper source) The paper has run out. Supply paper according to the paper source displayed (paper<br />
cassette, MP tray, or option paper feeder).<br />
Messages indicating the printer status (Ready, Please wait, Processing † ,<br />
Waiting, and FormFeed Time Out † ) are displayed alternately.<br />
Call service<br />
F000<br />
Call service<br />
####<br />
Call service<br />
####:0123456<br />
Cassette #<br />
not loaded<br />
Check waste<br />
toner box<br />
Clean printer<br />
Press GO<br />
Close duplexer<br />
rear cover<br />
Close<br />
left cover<br />
Close sorter<br />
rear cover<br />
Close<br />
top cover<br />
Close paper<br />
transfer unit<br />
Duplex disabled<br />
Press GO<br />
<br />
The ATTENTION indicator turns on and the READY indicator goes off. Indicates a<br />
problem with the controller and the operator panel. Call a service person. The printer<br />
does not operate when this message is displayed.<br />
The ATTENTION indicator turns on. Indicates a controller error. Call a service person.<br />
The printer does not operate when this message is displayed.<br />
The ATTENTION indicator turns on. Indicates a mechanical error. Or an unsupported<br />
option hardware has been installed. Be sure to install proper option hardware<br />
compatible with the LP 3033/4033 . Call a service person. 0123456 indicates the number<br />
of printed pages.<br />
The paper cassette may not be properly inserted into the printer. Reinsert the paper<br />
cassette. The paper source number (#) is only displayed when there is an option paper<br />
feeder installed.<br />
The waste toner box is not installed. After installing the waste toner box, you should<br />
be able to print. Replace the old waste toner box with the new one which is included<br />
in the toner kit. The message will also be shown if the waste toner box has become full.<br />
The waste toner box should be replaced when the message display eventually shows<br />
Toner low. See Toner Container Replacement on page 3-2.<br />
Please clean the inside of the printer. See Cleaning on page 3-9.<br />
This message will be displayed when replacing the toner container after the message<br />
Replace toner Clean printer is displayed. After cleaning the inside of the<br />
printer, press the GO key and the printer will be ready for printing.<br />
If Auto Continue is set to On, printing will be automatically resumed after a preset<br />
period of time.<br />
Open the option duplexer rear cover, then close tightly.<br />
Open the left cover, then close tightly.<br />
Open the sorter rear cover, then close tightly.<br />
Open the top cover, then close tightly.<br />
Open the paper transfer unit, then close tightly.<br />
You attempted to print with a paper size and paper type that cannot be used for<br />
duplex printing. Press the GO key to print onto one-side of the paper only.<br />
:Alarm buzzer sounds when an error occurs. Press the CANCEL key to stop the alarm buzzer.<br />
Table 4-4
Indicators and Messages<br />
Message Corrective Action<br />
Load Cassette #<br />
(paper size)/(paper type) ††<br />
Load MP tray<br />
(paper size)/(paper type) ††<br />
Missing<br />
duplex drawer<br />
Paper jam<br />
###############<br />
Remove paper<br />
sorter tray ##<br />
Replace toner<br />
Clean printer<br />
Set paper<br />
Press GO<br />
Sorter tray ##<br />
paper full<br />
There is data for printing that matches with a paper cassette setting (paper size,<br />
paper type), but there is no paper in the paper cassette.<br />
Set paper into the paper source as displayed on the operator panel, and press the<br />
GO key to restart printing. However, the paper source number (#) is only displayed<br />
when there is an option paper feeder installed.<br />
Or, if you want to print from a different paper source press the and key to display<br />
Use alternative? and you can change the source for paper feeding.<br />
After selecting a paper source and pressing the <strong>MENU</strong> key, Paper Handling ><br />
appears. By pressing the > key, the paper type settings menu appears. After setting<br />
the correct paper type, press the ENTER key and printing starts.<br />
There is no paper cassette set (paper size, paper type) that matches with the data for<br />
printing, so printing is done from the MP tray. Set paper into the MP tray that<br />
matches the paper size and type shown on the display and press the GO key to restart<br />
printing.<br />
Or, if you want to print from a different paper source press the and key to display<br />
Use alternative? and you can change the source for paper feeding.<br />
After selecting a paper source and pressing the <strong>MENU</strong> key, Paper Handling ><br />
appears. By pressing the > key, the paper type settings menu appears. After setting<br />
the correct paper type, press the ENTER key and printing starts.<br />
The duplex drawer is either not installed or incorrectly inserted. Insert the duplex<br />
drawer securely.<br />
Open the top cover or the paper transfer unit and correct the paper jam (or paper misfeeding<br />
in the paper cassette). The location of the paper jam is also indicated in place<br />
of the #’s. Online help messages which are useful for correcting the paper jam will be<br />
displayed by pressing the ? key. (See Correcting a Paper Jam on page 4-12)<br />
There is still paper in the option sorter’s tray indicated by # when the power was<br />
turned on or the sorter’s mode was switched. Remove all the paper inside the sorter.<br />
Replace the toner container using a new toner kit. The printer does not operate when<br />
this message is displayed. See Toner Container Replacement on page 3-2.<br />
The MP tray is out of paper. Load paper and press the GO key. (Note that feeding the<br />
paper having a paper size which does not match the current paper size from the MP<br />
tray can cause paper jam.)<br />
The sorter tray indicated by # is now full. Remove some of the paper from the sorter<br />
tray concerned.<br />
Toner low Replace the toner container using a new toner kit. See Toner Container<br />
Replacement on page 3-2.<br />
Top tray<br />
paper full<br />
<br />
The top tray has become full (approx. 250 pages). You must remove all printed pages<br />
from the top tray. When the printer senses that the top tray is empty again, it will<br />
continues printing into the top tray.<br />
:Alarm buzzer sounds when an error occurs. Press the CANCEL key to stop the alarm buzzer.<br />
Table 4-4 (Continued)<br />
<br />
<br />
<br />
<br />
<br />
<br />
<br />
4-8
Message Corrective Action<br />
Warning<br />
image adapt<br />
Warning<br />
low memory<br />
Table 4-4 (Continued)<br />
4-9<br />
Indicators and Messages<br />
Printing job cannot be done in current resolution because there is not enough internal<br />
memory. Try adding more memory or changing resolution. See Appendix A.<br />
The printer’s internal memory is running low due to the number of fonts and macros<br />
downloaded. Print a status page to see how much user memory is left, and try deleting<br />
unnecessary fonts and macros. See Appendix A.<br />
† These messages will not appear if the number of copies is set to 2 or more.<br />
†† (paper size) and (paper type) are displayed flashing alternately.
Indicators and Messages<br />
Error Messages<br />
The following table lists error messages that can be dealt with by the user.<br />
Message Corrective Action<br />
File not found<br />
Press GO<br />
Format error<br />
Memory card<br />
Format error<br />
Hard disk<br />
Hard disk err ##<br />
Press GO<br />
VMB: A VMB tray that was specified for output does not contain any jobs, or the VMB<br />
tray is not being used. Confirm the VMB tray.<br />
If Auto Continue is set to On, printing will be automatically resumed after a preset<br />
period of time. See Auto Continue Setting on page 1-105.<br />
This message appears when the printer is in the ready state and the CompactFlash<br />
(memory) card is not formatted, and therefore cannot be read or written. Follow the<br />
procedure in Formatting a Storage Device on page 1-88 to format the card.<br />
Initialization (formatting) of the Microdrive is required. Initialize the Microdrive.<br />
(See Operating the Storage Device on page 1-81.)<br />
Look at the error code given in place of ## and refer to the corresponding description<br />
given below.<br />
01: Microdrive format error. If this error recurs even if the power has been turned off<br />
and then on, reformat the Microdrive.<br />
02: The disk system is not installed. Recheck the requirements for using the system<br />
and the devices.<br />
04: There is no available Microdrive space. Delete unnecessary files, etc., in order to<br />
free up space.<br />
05: The specified file does not exist in the Microdrive.<br />
06: There is no memory available to the Microdrive system. Increase the available<br />
memory.<br />
10: Formatting is not possible because host data is being spooled on the Microdrive.<br />
Wait until the Microdrive is ready, and then format.<br />
85: VMB; Alias error (the alias setting was lost, or the VMB tray corresponding to<br />
the alias does not exist). Set the alias again.<br />
97: Code job; The number of permanent code job reached the limit value, and no<br />
more can be saved. Either delete some unnecessary jobs, etc., or increase the<br />
limit.<br />
99: A print job for the specified ID does not exist in the Microdrive.<br />
I/F occupied This message is displayed when you attempt to use the printer’s operator panel to<br />
change the environmental settings on the interface from which data are presently<br />
being received.<br />
ID error The ID entered for a private job, or a stored job is not correct. Check the ID that is set<br />
using the printer driver.<br />
Insert the same<br />
memory card<br />
KPDL error ##<br />
Press GO<br />
<br />
You have inserted the wrong CompactFlash (memory) card when the Insert again<br />
message was displayed. Remove the wrong CompactFlash card from the printer’s<br />
CompactFlash card slot and insert the correct CompactFlash card. The printer again<br />
reads it from the beginning of the data.<br />
Current print processing cannot continue. To print out an error report, display ><br />
Print KPDL errs from the mode select menu, and select On. Press the GO key to<br />
resume printing. You can abandon printing by the CANCEL key.<br />
If Auto Continue is set to On, printing will be automatically resumed after a preset<br />
period of time. See Auto Continue Setting on page 1-105.<br />
:Alarm buzzer sounds when an error occurs. Press the CANCEL key to stop the alarm buzzer.<br />
Table 4-5<br />
<br />
<br />
<br />
4-10
Message Corrective Action<br />
Memory card err<br />
Insert again<br />
Memory overflow<br />
Press GO<br />
MemoryCard err##<br />
Press GO<br />
4-11<br />
Indicators and Messages<br />
The CompactFlash card is accidentally removed from the printer’s memory card slot<br />
during reading. If you continue reading the memory card, insert the same memory<br />
card into the slot again. The printer again reads it from the beginning of the data.<br />
Note: We recommend that you follow the reading procedure from the<br />
beginning to ensure correct reading of the memory card.<br />
The total amount of data received by the printer exceeds the printer’s internal<br />
memory. Try adding more memory (expansion DIMM). Press the GO key to resume<br />
printing. You can abandon printing by the CANCEL key.<br />
If Auto Continue is set to On, printing will be automatically resumed after a preset<br />
period of time. See Auto Continue Setting on page 1-105.<br />
This message appears when an error occurs during access to the CompactFlash card<br />
using the PRESCRIBE RWER command or from the printer’s operator panel. Look at<br />
the error code given in place of ## and refer to the corresponding description given<br />
below.<br />
01: The CompactFlash card does not meet specifications. This CompactFlash card<br />
cannot be used by this printer. Insert a CompactFlash card which can be used by<br />
this printer.<br />
(See CompactFlash (Memory) Card on page A-30.)<br />
02: The CompactFlash card is not installed. Recheck the requirements for using the<br />
CompactFlash card.<br />
04: The capacity of the CompactFlash card is insufficient. Clean up files.<br />
05: Specified file not on CompactFlash card.<br />
06: No memory for use by CompactFlash card. Expand printer memory.<br />
Paper path error There is no paper cassette in the feeder, or the cassette is not inserted properly. After<br />
reinserting the paper cassette, you should be able to print. When two or more option<br />
feeders are installed and the lowest one is selected, the same message will appear if<br />
any of the upper paper feeder and the printer cassette is improperly installed.<br />
Print overrun<br />
Press GO<br />
RAM disk error##<br />
Press GO<br />
The data transferred to the printer was too complex to print on a page. Press the<br />
GO key to resume printing. (The page may break in some pages.)<br />
You can abandon printing by the CANCEL key.<br />
Note: After this message is displayed, page protect mode will be On. To<br />
maintain optimum use of memory during printing, display >Page protect<br />
from the operator panel, and re-select Auto.<br />
See Page Protect Mode on page 1-91.<br />
If Auto Continue is set to On, printing will be automatically resumed after a preset<br />
period of time. See Auto Continue Setting on page 1-105.<br />
Look at the error code given in place of ## and refer to the corresponding description<br />
given below.<br />
01: Abnormal format. Try turning the power off and on again.<br />
02: RAM disk mode is Off. Turn RAM disk mode On.<br />
04: No disk space. Clean up files.<br />
05: Specified file not on disk.<br />
06: No memory for use by disk system. Expand printer memory.<br />
Virtual mail box The storage area for the VMB is full. Print out accumulated VMB data.<br />
full<br />
:Alarm buzzer sounds when an error occurs. Press the CANCEL key to stop the alarm buzzer.<br />
<br />
Table 4-5 (Continued)
Correcting a Paper Jam<br />
Correcting a Paper Jam<br />
The Paper jam message is displayed on the message display when paper<br />
becomes stuck in the paper transport system, the paper feed timing is<br />
incorrect, or paper fails to feed at all. The jam can be corrected by removing<br />
the paper.<br />
The printer goes off-line when the Paper jam message is displayed.<br />
When a paper jam occurs, a paper jam message and the paper jam location<br />
are indicated on the message display. Details of the messages and paper<br />
jam locations are as follows:<br />
Paper jam<br />
message<br />
Paper jam<br />
Cassette 1<br />
Paper jam<br />
Cassette 2 (to 4)<br />
Paper jam<br />
Duplexer<br />
Paper jam<br />
Sorter<br />
Paper jam<br />
MP Tray<br />
Table 4-6<br />
Paper jam<br />
location<br />
4-12<br />
A<br />
B<br />
C<br />
D<br />
Description<br />
Paper is jammed at the paper<br />
cassette or inside the printer.<br />
Paper is jammed at the option<br />
paper feeder’s cassette.<br />
Paper is jammed inside the rear<br />
cover of the option duplexer or at<br />
the duplexer drawer.<br />
Paper is jammed at the option<br />
sorter.<br />
Reference<br />
page<br />
4-14<br />
4-14<br />
4-16<br />
4-18<br />
E Paper is jammed at the MP tray. 4-20
Note<br />
4-13<br />
Correcting a Paper Jam<br />
When the jammed paper has been removed, open and close the printer’s<br />
top cover or the paper transfer unit. Then the printer automatically warms<br />
up, goes on-line, and continues printing. Depending on the point at which<br />
the jam occurred, the printer may or may not print the jammed page.<br />
If paper jams occur frequently, try using a different type of paper, replace<br />
with paper from another ream, turn the stack of paper over, or turn the<br />
paper the other way around. Read the information in Chapter 2. Also, look<br />
for tiny pieces of paper that may have been torn off and overlooked when<br />
the jammed paper was removed.<br />
If you cannot solve the problem by changing the paper, there may be a<br />
problem with the printer. Call a service person.<br />
When pulling the paper, pull it gently so as not to tear it. Torn pieces of<br />
paper are difficult to remove and may be easily overlooked, deterring the<br />
jam recovery.<br />
Online help messages<br />
With the online help message function, this printer can display the<br />
procedure to correct a paper jam on the message display. When a paper jam<br />
message is displayed, press the ? key. The display will show<br />
Please wait after the jammed paper has been removed.<br />
Pressing the key at the online help message display shows the next step;<br />
pressing the key shows the previous step.<br />
To exit the online help message display, press the ?<br />
key. The previously<br />
shown paper jam message appears.<br />
Online help messages that can be displayed when a paper jam occurs and<br />
their respective corrective actions are given below:
Correcting a Paper Jam<br />
Jam at the Paper Cassette or Inside the Printer<br />
Paper jam<br />
Cassette 1<br />
-- HELP S<strong>TA</strong>RT --<br />
Press key<br />
?<br />
?<br />
Examples of online help<br />
messages<br />
Open<br />
cassette 1 and<br />
pull out paper<br />
transfer unit<br />
then remove<br />
the paper jam.<br />
Paper is jammed at the paper cassette or inside the printer. Remove the<br />
jammed paper using the procedure given below.<br />
While the display alternates between the paper jam message and HELP<br />
S<strong>TA</strong>RT, press the ? key. An online help message appears.<br />
1<br />
2<br />
Pull out the paper cassette and remove the jammed paper.<br />
Push the paper cassette back in. While pulling the paper transfer<br />
unit release lever (green colored), pull out the paper transfer unit.<br />
4-14<br />
Paper Transfer Unit Release Lever<br />
(green colored)<br />
Paper Transfer Unit
Also, remove<br />
the paper jam<br />
from<br />
rear cover.<br />
Close paper<br />
transfer unit.<br />
- HELP END --<br />
Press Key<br />
?<br />
?<br />
3<br />
4<br />
5<br />
4-15<br />
Correcting a Paper Jam<br />
If paper is jammed before the registration roller, remove it as shown<br />
in A. If paper is jammed under the registration roller, remove it as<br />
shown in B.<br />
A B<br />
Registration<br />
Roller Registration<br />
Roller<br />
Open the rear cover and remove the jammed paper.<br />
Rear Cover<br />
Push the paper cassette and paper transfer unit back in and close<br />
the rear cover.
Correcting a Paper Jam<br />
Paper Jam at the Option Duplexer<br />
Paper jam<br />
Duplexer<br />
-- HELP S<strong>TA</strong>RT --<br />
Press key<br />
?<br />
?<br />
Examples of online help<br />
messages<br />
Open duplexer<br />
rear cover and<br />
remove<br />
the paper jam.<br />
Pull out<br />
duplex drawer,<br />
Paper is jammed inside the rear cover of the option duplexer or at the<br />
duplexer drawer. Remove the jammed paper using the procedure given<br />
below.<br />
While the display alternates between the paper jam message and HELP<br />
S<strong>TA</strong>RT, press the ? key. An online help message appears.<br />
1<br />
2<br />
Open the rear cover of the duplexer and remove the jammed paper.<br />
Pull out the duplex drawer.<br />
4-16<br />
Rear Cover<br />
Duplex Drawer
and remove<br />
the paper jam.<br />
Close<br />
rear cover<br />
and<br />
duplex drawer.<br />
- HELP END --<br />
Press Key<br />
?<br />
?<br />
3<br />
4<br />
Remove the jammed paper.<br />
4-17<br />
Correcting a Paper Jam<br />
Close the rear cover of the duplexer and the duplex drawer.
Correcting a Paper Jam<br />
Paper Jam at the Option Sorter<br />
Paper jam<br />
Sorter<br />
-- HELP S<strong>TA</strong>RT --<br />
Press key<br />
?<br />
?<br />
Examples of online help<br />
messages<br />
Open sorter<br />
rear cover<br />
and remove<br />
the paper jam<br />
Paper is jammed at the option sorter. Remove the jammed paper using the<br />
procedure given below.<br />
While the display alternates between the paper jam message and HELP<br />
S<strong>TA</strong>RT, press the ? key. An online help message appears.<br />
1<br />
2<br />
Open the rear cover of the option sorter.<br />
Remove the jammed paper. If both ends of the paper are inside the<br />
sorter, turn the paper feed gears in the direction of the arrows. The<br />
paper can then be removed easily.<br />
4-18<br />
Paper Feed Gears<br />
Rear Cover
Close<br />
rear cover.<br />
- HELP END --<br />
Press Key<br />
?<br />
?<br />
3<br />
Close the rear cover of the option sorter.<br />
4-19<br />
Correcting a Paper Jam
Correcting a Paper Jam<br />
Jam at the MP Tray<br />
Paper jam<br />
MP tray<br />
-- HELP S<strong>TA</strong>RT --<br />
Press key<br />
?<br />
?<br />
Examples of online help<br />
messages<br />
Check the<br />
MP tray and<br />
remove<br />
the paper jam.<br />
Open and close<br />
top cover to<br />
release paper<br />
jam error.<br />
- HELP END --<br />
Press Key<br />
?<br />
?<br />
Paper is jammed at the MP tray. Remove the jammed paper using the<br />
procedure given below.<br />
While the display alternates between the paper jam message and HELP<br />
S<strong>TA</strong>RT, press the ? key. An online help message appears.<br />
1<br />
2<br />
Remove the paper jammed at the MP tray.<br />
Open and close the top cover (the paper jam error will be reset).<br />
4-20
Chapter 5 Fonts<br />
5<br />
This appendix explains the types of fonts you can use with the printer. A font is a set of<br />
characters of a particular design. The design is referred to as a typeface. Several<br />
characteristics identify a font. These include the code set (For details on the code sets, read<br />
the Programming Manual on the supplied CD-ROM), spacing, pitch, height, style, stroke<br />
weight, and typeface family.<br />
5-1
List of Fonts<br />
List of Fonts<br />
PCL (Scalable and Bitmap) Fonts<br />
Font<br />
number Font samples<br />
0<br />
1<br />
2<br />
3<br />
4<br />
5<br />
6<br />
7<br />
8<br />
9<br />
10<br />
11<br />
12<br />
13<br />
14<br />
15<br />
16<br />
17<br />
18<br />
19<br />
20<br />
21<br />
22<br />
23<br />
24<br />
25<br />
26<br />
27<br />
This section contains a full list of the printer’s internal fonts. The printer<br />
has 80 PCL fonts, 1 bitmap font, and 80 PostScript Level 3 compatible<br />
fonts. You can print the font list from the printer by using the printer’s<br />
operator panel key. To print a list of fonts, see Font Lists on page 1-21.<br />
Font may be downloaded to the printer’s memory from an option memory<br />
card or a hard disk.<br />
5-2
Font<br />
number Font samples<br />
28<br />
29<br />
30<br />
31<br />
32<br />
33<br />
34<br />
35<br />
36<br />
37<br />
38<br />
39<br />
40<br />
41<br />
42<br />
43<br />
44<br />
45<br />
46<br />
47<br />
48<br />
49<br />
50<br />
51<br />
52<br />
53<br />
54<br />
55<br />
56<br />
57<br />
58<br />
59<br />
60<br />
61<br />
62<br />
63<br />
64<br />
65<br />
66<br />
67<br />
5-3<br />
List of Fonts
List of Fonts<br />
Font<br />
number Font samples<br />
68<br />
69<br />
70<br />
71<br />
72<br />
73<br />
74<br />
75<br />
76<br />
77<br />
78<br />
79<br />
80<br />
5-4
KPDL Fonts (1)<br />
5-5<br />
List of Fonts
List of Fonts<br />
KPDL Fonts (2)<br />
5-6
Appendix A Options<br />
A<br />
This appendix explains how to expand the printer’s memory and how to install each option<br />
unit. Also refer to the manuals of the respective option units.<br />
This appendix explains the following option units:<br />
• Expanding the Printer Memory<br />
• PF-60 Paper Feeder<br />
• DU-61 Duplexer<br />
• SO-60 Sorter<br />
• EF-60 Envelope Feeder<br />
• PT-4/PT-60 Rear Tray<br />
• Network Interface Card<br />
• Microdrive (Hard Disk)<br />
• CompactFlash (Memory) Card<br />
A-1
Available Options<br />
Available Options<br />
4<br />
Printer<br />
EF-60<br />
Envelope<br />
Feeder<br />
SO-60<br />
1 Sorter<br />
PT-4/PT-60<br />
2 Rear Tray<br />
3<br />
Network<br />
Interface Card<br />
(3.3 V DC) or<br />
Serial Interface<br />
Board Kit<br />
DU-61<br />
5 Duplex unit<br />
Order of<br />
Installation<br />
Printer combined with options<br />
PF-60<br />
6 Paper Feeder<br />
A-2<br />
1 SO-60 Sorter<br />
Equipped with five trays each with 200 sheets capacity.<br />
Performs sorting, collating, and mailbox functions.<br />
Attaches to the top of the printer.<br />
2 PT-4/PT-60 Rear Tray<br />
It attaches to the rear of the printer.<br />
3 Network Interface Card<br />
Insert the card into the option interface slot at the rear of<br />
the printer. The printer can be used on network<br />
environments including Windows, Macintosh, UNIX,<br />
NetWare, etc.<br />
Serial lnterface Board<br />
Connect to the computer’s serial printer port with a serial<br />
cable.<br />
4 EF-60 Envelope Feeder<br />
Holds more envelopes at a time than the MP tray. This<br />
envelope feeder can be attached to the front of the printer<br />
after the MP tray has been removed.<br />
5 DU-61 Duplex unit<br />
Performs duplex printing for short edge and long edge<br />
binding. Attaches to the bottom of the printer.<br />
6 PF-60 Paper Feeder<br />
Holds approximately 500 sheets of A5 to A4/Letter and<br />
Legal size paper. Up to three paper feeders can be<br />
attached to the bottom of the printer.<br />
Other Options<br />
Bulk Paper Feeder (PF-8E)<br />
Holds approximately 2,000 sheets of 76 to 216 mm (3 to 8-1/2") ×<br />
148 to 305 mm (5-13/16 to 12") size paper. This bulk paper feeder<br />
can be attached to the front of the printer after the MP tray has<br />
been removed, but can only be installed on the LP 3033/4033.<br />
Paper Cassette (PC-60LG)<br />
Holds A5 to A4/Letter and Legal size paper.<br />
Microdrive (Hard Disk Unit)<br />
Enables the electronic sorting and job retention functions. To be<br />
inserted into the slot designed for it on the main circuit board of<br />
the printer. See your dealer for purchasing information<br />
regarding the Microdrives that are best suited for use with this<br />
printer.<br />
CompactFlash Card<br />
This is a microchip card that may contain option fonts, macros,<br />
and forms. Insert the card into the card slot located near the<br />
handle on the right of the printer. See your dealer for purchasing<br />
information regarding the CompactFlash Cards that are best<br />
suited for use with this printer.<br />
Memory DIMM<br />
See your dealer for purchasing information of the DIMM that<br />
are best suited for use with this printer. See Expanding the<br />
Printer Memory for the installation procedure.
Expanding the Printer Memory<br />
Note<br />
A-3<br />
Expanding the Printer Memory<br />
This section explains how to expand the printer’s memory. Expanded<br />
printer memory enables you to print more complex pages, download more<br />
fonts, and define more macros.<br />
This section first explains how to remove the main circuit board and then<br />
how to install a DIMM (Dual In-line Memory Module) on the main circuit<br />
board.<br />
The LP 3033/4033 comes supplied with 96 MB of memory installed, while the<br />
LP 3028/4028 comes with 64 MB of memory. Two sockets are provided on the<br />
LP 3033/4033 and one socket on the LP 3028/4028 for expanding that memory.<br />
Expanding the printer’s memory allows more complex printing jobs to be<br />
accomplished and increases the printing speed. By installing DIMM into<br />
your printer, the memory of the LP 3033/4033 can be increased to a maximum<br />
of 576 MB and that of the LP 3028/4028 to a maximum of 320 MB.<br />
• The expansion memory should be installed only by a <strong>TA</strong> <strong>Triumph</strong>-<strong>Adler</strong><br />
authorized dealer or <strong>TA</strong> <strong>Triumph</strong>-<strong>Adler</strong> certified technician. <strong>TA</strong> shall<br />
not be liable for damage due to improper installation of the<br />
expansion memory.<br />
• The 32 MB DIMM memory that come standard with the LP 4033<br />
is installed in one of the expansion sockets.
Expanding the Printer Memory<br />
Note<br />
Note<br />
Removing the Main Circuit Board<br />
The main circuit board of the printer is equipped with two sockets for<br />
memory expansion. Expansion memory is available in the form of DIMM.<br />
The following instructions are intended for the technician only.<br />
Notes on Handling the Main Circuit Board and DIMM<br />
Protect the electronics by taking these precautions:<br />
• Before touching the main circuit board and DIMM, touch a water pipe<br />
or other large metal object to discharge yourself of static electricity.<br />
While doing the work, it is recommended that you wear an antistatic<br />
wrist strap.<br />
• Touch the main circuit board and DIMM only at the edges.<br />
Removing the Main Circuit Board from the Printer<br />
Be sure to remove the CompactFlash Card (memory card) first if inserted<br />
in the printer’s card slot.<br />
Remove the main circuit board completely from the printer as follows:<br />
1<br />
Turn the printer off and unplug its power cord. Disconnect the<br />
printer from the host computer.<br />
A-4<br />
YES NO
Note<br />
2<br />
3<br />
Remove the two screws from the printer’s rear panel.<br />
A-5<br />
Expanding the Printer Memory<br />
Pull the main circuit board all the way out of the printer.<br />
DIMM Sockets<br />
• Before pulling the main circuit board out, clear away the area behind<br />
the printer. Foreign objects, accidentally sticking to the back of the<br />
main circuit board, can cause serious damage to the printer.<br />
• There are two sockets are provided on the LP 3033/4033 and one socket<br />
on the LP 3028/4028 for expanding the printer's memory. (The extra<br />
32 MB of DIMM memory that come standard with the LP 3033/4033 is<br />
installed in one of the expansion sockets.)<br />
Install the DIMM as described on the following page.<br />
Screws
Expanding the Printer Memory<br />
DIMM to be used<br />
16 MB, 32 MB, 64 MB, 128 MB, and 256 MB DIMM can be used for<br />
memory expansion. See your <strong>TA</strong> <strong>Triumph</strong>-<strong>Adler</strong> dealer for purchasing<br />
information of the DIMM that are best suited for use with this printer.<br />
Installing DIMM<br />
Insert the DIMM into the socket as shown below.<br />
1<br />
2<br />
3<br />
4<br />
5<br />
Remove the DIMM from its package.<br />
Open the clips on both ends of the DIMM socket.<br />
Insert the DIMM into the socket, so that the notches on the DIMM<br />
align with the corresponding protusions in the socket.<br />
Close the clips of the DIMM socket to secure the DIMM.<br />
When you finish installing the DIMM, reinsert the main circuit<br />
board into the printer by reversing the removal procedure.<br />
Clip<br />
A-6<br />
DIMM<br />
Socket<br />
Clip
A-7<br />
Expanding the Printer Memory<br />
Removing DIMM<br />
To remove a DIMM, carefully pull the end clips outwards, then pull the<br />
DIMM out of the socket.<br />
Return the main circuit board to the printer by reversing the procedure<br />
explained in Removing the Main Circuit Board from the Printer.<br />
Testing the Expansion Memory<br />
After you finish installing DIMM in the printer, test the printer to see if the<br />
installation was successful.<br />
To test the expansion memory, proceed as follows:<br />
1<br />
2<br />
3<br />
4<br />
5<br />
Make sure printer is turned off. Plug the power cord into the printer<br />
and turn the printer on.<br />
Press the <strong>MENU</strong> key on the operator panel.<br />
Press the and key repeatedly until Print Status Page<br />
appears.<br />
Press the ENTER key twice.<br />
If the installation was successful, the amount of memory shown on<br />
the status page will correspond with the amount of expanded<br />
memory. (The factory installed memory size is 64 MB for the<br />
LP 3028/3033 and 96 MB for LP 3033/4033.)
Expanding the Printer Memory<br />
Adjusting the Memory on the Printer Driver<br />
After you install the additional memory to the printer, follow the<br />
instructions below to set the printer driver so that the printer can use the<br />
memories efficiently.<br />
1<br />
2<br />
3<br />
4<br />
Click the Windows start button, and click Printers and Faxes.<br />
Right click the LP 3033/4033 KX icon, and click<br />
Properties.<br />
The Properties dialog box will open. Click the Device Settings tab.<br />
Enter the total memory size installed to the printer (up to 576 MB)<br />
in the Memory box.<br />
Click the OK button to close the window.<br />
A-8
Installing Option Units<br />
PF-60 Paper Feeder<br />
Note<br />
A-9<br />
Installing Option Units<br />
Up to three option paper feeders can be installed below the printer. A paper<br />
feeder can hold approximately 500 sheets of paper at a time. By using<br />
option paper feeders in conjunction with the printer paper cassette, which<br />
can also hold approximately 500 sheets of paper, up to approximately 2,000<br />
sheets of paper can be fed continuously. The paper cassette of the paper<br />
feeder can feed Legal size paper.<br />
When installing more than one paper feeder, first stack the paper feeders<br />
together.<br />
1<br />
2<br />
3<br />
Turn off the printer and disconnect the power cord and printer cable.<br />
Gently place the printer on top of the paper feeder(s).<br />
Pull the paper cassette all the way out of the paper feeder.
Installing Option Units<br />
4<br />
5<br />
6<br />
Push down the bottom plate until it locks.<br />
Set the paper size dial to the size of paper to be used.<br />
Adjust the paper guides and paper stopper to the size of paper to be<br />
used.<br />
A-10
Note<br />
7<br />
Load paper.<br />
A-11<br />
Installing Option Units<br />
• Do not load more paper than will fit under the load limits on the paper<br />
guides.<br />
• The paper cassette will hold approximately 500 sheets of paper with a<br />
80 g/m² (21 lb) basis weight, or with a thickness of 0.11 mm.<br />
8<br />
9<br />
Load Limit Load Limit<br />
Set the stack of paper so that it is under the clips as shown in the<br />
figure.<br />
Clip Clip<br />
Insert the paper cassette back in.
Installing Option Units<br />
DU-61 Duplex unit<br />
Install the option duplexer immediately below the printer. By combining<br />
the two binding modes (short edge bind and long edge bind) with the two<br />
printing orientations (portrait and landscape), duplex printing is possible<br />
in four different methods. Duplex printing can be specified from the<br />
application (printer driver).<br />
1<br />
2<br />
3<br />
Remove the tape and the pad from the duplexer.<br />
While pushing the rear cover release lever inward, remove the<br />
duplexer rear cover.<br />
Turn off the printer and disconnect the power cord and printer cable.<br />
A-12<br />
Pad
4<br />
5<br />
6<br />
Gently place the printer on top of the duplexer.<br />
A-13<br />
Installing Option Units<br />
Connect the printer cable (parallel interface cable, USB interface<br />
cable, serial interface cable or network interface cable) according to<br />
your operation environment. If you are using a paper cassette for<br />
Legal size paper, be sure to pull the cassette out towards you first<br />
before you connect the printer cable.<br />
Connect the power cord to the printer.
Installing Option Units<br />
7<br />
8<br />
Pass the connected cable and power cord through the opening in the<br />
duplexer.<br />
Install the duplexer rear cover.<br />
A-14
SO-60 Sorter<br />
A-15<br />
Installing Option Units<br />
Install the option sorter on top of the printer. It is equipped with five sorter<br />
trays, with a capacity of 200 sheets each. There are three modes in which<br />
printouts can be received: the sorter mode, the collator mode, and the mail<br />
box mode (for details about the modes, see KX Printer Drivers<br />
Operation Guide.<br />
The following installation procedure explains how to install the sorter<br />
when the option paper feeder (PF-60) and duplexer (DU-61) have already<br />
been installed.<br />
1<br />
2<br />
3<br />
4<br />
Unpack the sorter and place it on its side.<br />
Remove the tapes from the sorter.<br />
Unfold the two attachment legs of the sorter.<br />
Legs<br />
Tape<br />
Tape<br />
Turn off the printer and disconnect the power cord and printer cable.
Installing Option Units<br />
5<br />
6<br />
7<br />
If the duplexer is installed, remove the duplexer rear cover, power<br />
cord, and printer cable.<br />
Remove the sorter connection cover from the printer. Store the<br />
removed cover in a safe place.<br />
Install the sorter by inserting the four hooks on its attachment legs<br />
into the notches in the printer.<br />
Notch<br />
Hook<br />
Notch<br />
Hook<br />
A-16<br />
Sorter Connection<br />
Cover<br />
Notch<br />
Hook<br />
Notch<br />
Hook
8<br />
9<br />
A-17<br />
Installing Option Units<br />
Push the sorter down. The levers of the attachment legs are in the<br />
lock position.<br />
When removing the sorter, unlock the attachment legs by releasing<br />
the levers as shown in the figure one by one, and then lift the sorter.<br />
Connect the sorter cable to the printer.<br />
Sorter Cable
Installing Option Units<br />
When disconnecting the sorter cable, hold the grip on the connector as<br />
shown in the figure and then pull it out.<br />
10<br />
11<br />
Grip<br />
The sorter is equipped with two power cord sockets. The upper one is<br />
to be connected to a power outlet and the lower one is to be connected<br />
to the printer. If you are using a paper cassette for Legal size paper,<br />
be sure to pull the cassette out towards you first before you connect<br />
the printer cable.<br />
To power supply<br />
To printer<br />
Secure the connected sorter cable and power cord to an attachment<br />
leg on the sorter.<br />
A-18<br />
Power Cord
12<br />
13<br />
14<br />
A-19<br />
Installing Option Units<br />
If the duplexer is installed, secure the power cord to the duplexer.<br />
Take care not to loosen the power cord.<br />
If the duplexer is installed, remove the two cut-out portions from the<br />
upper part of the duplexer rear cover removed in step 5.<br />
Reinstall the duplexer rear cover.<br />
NO<br />
Duplexer<br />
Rear Cover
Installing Option Units<br />
Warning<br />
15<br />
16<br />
Install the five sorter trays to the sorter.<br />
Sorter Tray<br />
Connect the power cord supplied with the printer to the sorter.<br />
Do not move or lift the printer with the sorter installed.<br />
A-20<br />
NO
EF-60 Envelope Feeder<br />
Note<br />
A-21<br />
Installing Option Units<br />
Install the option envelope feeder at the front of the printer. By installing<br />
the envelope feeder, you can print on a wide variety of different envelope<br />
sizes. And the EF-60 feeds envelopes automatically, making it easy to print<br />
on large quantities of envelopes at one time.<br />
Installing the envelope feeder on the printer<br />
Turn OFF the power to the printer before installing the envelope feeder.<br />
1<br />
2<br />
Pull the printer’s paper transfer unit release lever (green colored),<br />
then draw the paper transfer unit fully out of the printer.<br />
Paper Transfer Unit Release Lever<br />
(green colored)<br />
Paper Transfer Unit<br />
Gently tilt the MP tray toward the printer until that it rests on its<br />
side as shown in the figure, and remove the MP tray from the printer<br />
by lifting it straight upward.<br />
MP tray
Installing Option Units<br />
3<br />
4<br />
Fit both ends of the envelope feeder into their mountings on the<br />
paper transfer unit as shown in the figure and lay the envelope<br />
feeder down toward you.<br />
Return the paper transfer unit into the printer with the envelope<br />
feeder mounted.<br />
Load envelopes into the envelope feeder<br />
1<br />
Envelope Feeder<br />
Push the bottom tray downward, as shown in the figure, until you<br />
hear a clicking sound to secure it.<br />
A-22<br />
Bottom Tray
Note<br />
2<br />
3<br />
A-23<br />
Installing Option Units<br />
Pull out the sub-tray that matches the size of the envelopes.<br />
Sub-tray<br />
Load envelopes into the envelope feeder so that they feed in face up,<br />
right edge first. Then adjust the envelope feeder’s paper guides to the<br />
width of the envelope.<br />
Paper Guides<br />
• Do not set different types of envelopes into the feeder at the same<br />
time.<br />
• Do not load envelopes into the envelope feeder higher than the<br />
limitation marks ( ) on either side of the feeder.<br />
• Do not force paper into the envelope feeder. Damage to the<br />
mechanism may result.
Installing Option Units<br />
Note<br />
4<br />
Press the paper setting button. The envelope feeder’s bottom tray is<br />
lifted and envelopes that are fed are secured to the envelope feeder.<br />
• Paper feed errors may occur when using large envelopes. If this<br />
happens, remove the envelopes and move the switch to the up ( )<br />
position as shown in the figure. This improves seating of the<br />
envelopes in the envelope feeder.<br />
• Do not touch envelopes while they are being fed, or attempt to pull an<br />
envelope back once it starts being fed. Damage to the mechanism<br />
may result.<br />
• To avoid trouble, we recommend that envelopes be delivered face-up<br />
using the option rear tray. Refer to next page.<br />
A-24<br />
Paper Setting Button
PT-4/PT-60 Rear Tray<br />
A-25<br />
Installing Option Units<br />
Use the rear tray when you wish paper to be stacked with the printed side<br />
facing up (reverse order), or when you are printing on envelopes, postcards,<br />
transparencies, or thick paper. When installing it directly to the printer,<br />
use PT-4. If an option duplexer has been installed, use PT-60.<br />
1<br />
2<br />
Install the paper stopper according to the size of paper to be used.<br />
(same for both PT-4 and PT-60)<br />
Legal Size<br />
A4 Size<br />
Letter Size<br />
Paper Stopper<br />
Install the rear tray on the rear of the printer.<br />
Rear Tray (PT-4)<br />
When installing directly to the printer<br />
Rear Tray (PT-60)<br />
If a duplexer has been installed to the printer
Installing Option Units<br />
Network Interface Card<br />
Insert the option network interface card into the option interface slot at the<br />
rear of the printer. Along with the standard for the network interface on<br />
the printer, the network interface card supports TCP/IP, IPX/SPX,<br />
NetBEUI, and EtherTalk protocols, so that the printer can be used on<br />
network environments including Windows, Macintosh, UNIX, NetWare,<br />
etc.<br />
1<br />
2<br />
3<br />
Turn off the printer and disconnect the power cord and printer cable.<br />
Remove the two screws from the option interface slot cover.<br />
Insert the network interface card and secure it with the screws<br />
removed in step 2.<br />
A-26<br />
Option Interface<br />
Slot Cover<br />
Screws<br />
Network Interface<br />
Card<br />
Screws
4<br />
5<br />
Connect the network cable.<br />
Network Cable<br />
A-27<br />
Installing Option Units<br />
Set the network address from the printer operator panel (for details<br />
about the modes, see Network Interface Parameters on page<br />
1-78).
Installing Option Units<br />
Microdrive (Hard Disk)<br />
Insert the Microdrive into its slot on the main circuit board of the printer. If<br />
a Microdrive is installed in the printer, received data can be rasterized and<br />
stored on this Microdrive. This enables high-speed printing of multiple<br />
copies using an electric sort function. Also, you can use the e-MPS<br />
functions. For details, see e-MPS on page 1-56.<br />
For details of available Microdrives, see your dealer.<br />
1<br />
2<br />
3<br />
Turn off the printer and disconnect the power cord and printer cable.<br />
Remove the two screws from the rear panel.<br />
Pull the main circuit board all the way out of the printer.<br />
A-28<br />
Rear Panel<br />
Screws<br />
Main Circuit<br />
Board
4<br />
5<br />
A-29<br />
Installing Option Units<br />
Install the Microdrive into its slot on the main circuit board.<br />
Microdrive Slot<br />
Microdrive<br />
Return the main circuit board to the printer by reversing the<br />
procedure followed when removing it.
Installing Option Units<br />
CompactFlash (Memory) Card<br />
Note<br />
Insert the CompactFlash card into the card slot located near the handle on<br />
the right of the printer. A CompactFlash card is a microchip card that may<br />
contain option fonts, macros, forms, etc. The printer reads the contents of<br />
the card into its internal memory when printer is turned on. The presence<br />
of this data in the printer memory can be confirmed on the status printout.<br />
For details of available CompactFlash cards, see your dealer.<br />
1<br />
Turn off the printer.<br />
Do not insert or remove a CompactFlash card while power is on. If the<br />
CompactFlash card is removed while the printer is on, damage could<br />
result in the printer’s electronics or the CompactFlash card.<br />
2<br />
Insert the CompactFlash card in the slot. Insert it face up, connector<br />
end first. Push it in all the way.<br />
A-30<br />
CompactFlash<br />
Card
Appendix B Host Computer<br />
Interface<br />
B<br />
This appendix explains the signals used in the printer’s parallel and RS-232C interfaces. It<br />
also lists pin assignments, signal functions, timings, connector specifications, and voltage<br />
levels. The RS-232C protocols are also covered. Finally, it explains how to use the printer in<br />
a multi-computer environment.<br />
This appendix explains the following topics:<br />
• Parallel Interface<br />
• USB Interface<br />
• Serial Interface (Option)<br />
• RS-232C Protocol<br />
• RS-232C Cable Connection<br />
B-1
Parallel Interface<br />
Parallel Interface<br />
Parallel Interface Communication Modes<br />
Note<br />
Interface Signals<br />
The printer features fast data transmission with the parallel interface. The<br />
parallel interface mode can be activated from the operator panel.<br />
See Parallel Interface Mode on page 1-74.<br />
Use a parallel printer cable that complies with the IEEE1284 standard.<br />
You can choose from four communication modes:<br />
Communication<br />
Mode<br />
Reception Transmission<br />
Auto [default] High-speed/ECP Nibble/ECP<br />
Nibble (high) High-speed Nibble<br />
High-speed High-speed —<br />
Normal Normal —<br />
Table B-1<br />
The pins of the parallel interface connector carry the signals listed in the<br />
table in Parallel Connector Pin Assignment on page B-3. Asterisks in<br />
the table indicate signals that are active low. The table also indicates<br />
whether each signal is incoming or outgoing with respect to the printer.<br />
B-2
B-3<br />
Parallel Interface<br />
Pin In/out Description<br />
1 In Strobe* [nStrobe]<br />
2 In/Out Data 0 [Data 1]<br />
3 In/Out Data 1 [Data 2]<br />
4 In/Out Data 2 [Data 3]<br />
5 In/Out Data 3 [Data 4]<br />
6 In/Out Data 4 [Data 5]<br />
7 In/Out Data 5 [Data 6]<br />
8 In/Out Data 6 [Data 7]<br />
9 In/Out Data 7 [Data 8]<br />
10 Out Acknowledge* [nAck]<br />
11 Out Busy [Busy]<br />
12 Out Paper Empty [PError], returns paper empty status if FRPO<br />
O2=2<br />
13 Out Select (Online) [nSelect], returns off-line status if FRPO O2=2<br />
14 In Auto-feed [nAutoFd]<br />
15 - Not connected<br />
16 - 0 V DC<br />
17 - Chassis GND<br />
18 - +5 V DC<br />
19 - Ground<br />
20 - Ground<br />
21 - Ground<br />
22 - Ground<br />
23 - Ground<br />
24 - Ground<br />
25 - Ground<br />
26 - Ground<br />
27 - Ground<br />
28 - Ground<br />
29 - Ground<br />
30 - Ground<br />
31 In Ignored [nInit]<br />
32 Out Error*, returns error status if FRPO O2=2 [nFault]<br />
33 - Not connected<br />
34 - Not connected<br />
35 Out Power Ready<br />
36 In Ignored [nSelectIn]<br />
Table B-2 Parallel Connector Pin Assignment<br />
[ ]: Signal names in the Auto mode and Nibble (high) mode (IEEE1284). In the Auto mode and<br />
Nibble (high) mode, these signals are bi-directional.
Parallel Interface<br />
Note<br />
Detailed descriptions of the signals follow.<br />
Strobe* [nStrobe] (Pin 1)<br />
A negative-going Strobe* pulse causes the printer to read and latch the<br />
data on the Data 0 [1] to Data 7 [8] signal lines.<br />
Data 0 [1] to Data 7 [8] (Pins 2 to 9)<br />
These eight signals form the data byte sent from the host computer to the<br />
printer. Data 7 [8] is the most significant bit.<br />
Acknowledge* [nAck] (Pin 10)<br />
This negative-going pulse acknowledges the previous character received by<br />
the printer.<br />
Busy [Busy] (Pin 11)<br />
This signal is high when the printer is busy and low when it is able to<br />
accept more data.<br />
Paper Empty [PError] (Pin 12)<br />
This signal goes high when the printer has received a print job and run out<br />
of paper.<br />
Select [Online] (Pin 13)<br />
This signal is high when the printer is online and low when the printer is<br />
offline. It goes low when the GO key is pressed to set the printer offline.<br />
+5 V DC (Pin 18)<br />
This line is connected to the printer’s +5 V DC line (+5 V ±0.5 V, maximum<br />
400 mA, fused).<br />
Error* [nFault] (Pin 32)<br />
When the high-speed parallel line control is on (FRPO O2=2), this line<br />
returns error status.<br />
Power Ready (Pin 35)<br />
This signal is high when the printer is turned on.<br />
The Paper Empty, Online, and Error signals are not used unless enabled<br />
by the FRPO command (O2 parameter).<br />
B-4
USB Interface<br />
Specifications<br />
Interface Signals<br />
B-5<br />
USB Interface<br />
This printer supports the Hi-Speed USB 2.0/Full-Speed USB 2.0 interface<br />
specifications and interface signals are as follows.<br />
Basic specification<br />
Complies with the Hi-Speed USB 2.0/Full-Speed USB 2.0.<br />
Connectors<br />
Printer: B-type receptacle (female) with upstream port<br />
Cable: B-type plug (male)<br />
Cable<br />
Use shielded cable that complies with the Hi-Speed USB 2.0 standards and<br />
not longer than 5 meters (16 feet).<br />
Transfer Mode<br />
High speed (480 Mbps)<br />
Full speed (12 Mbps)<br />
Power Control<br />
Self-power device<br />
Pin Signal Description<br />
1 Vbus Power supply (+5 V)<br />
2 D- Data transmission<br />
3 D+ Data transmission<br />
4 GND Signal ground<br />
Shell — Shield<br />
Table B-3
Serial Interface (Option)<br />
Serial Interface (Option)<br />
RS-232C Interface<br />
Installing the option serial interface board kit in the printer<br />
enables connection to a computer with an RS-232C standard serial<br />
interface.<br />
Interface Signals<br />
The pins of the printer’s RS-232C interface connector carry the signals<br />
listed in table below. The table also indicates whether each signal is<br />
incoming or outgoing with respect to the printer.<br />
Table B-4<br />
Pin In/out Signal Description<br />
1 - FG Frame ground<br />
2 Out TXD Transmit Data<br />
3 In RXD Receive Data<br />
4 Out RTS Request To Send<br />
5 In CTS Clear To Send<br />
6 In DSR Data Set Ready<br />
7 - SG Signal Ground<br />
20 Out DTR Data Terminal Ready<br />
Brief descriptions of the signals follow.<br />
FG - Frame Ground - (Pin 1)<br />
This pin is connected directly to the printer frame.<br />
TXD - Transmit Data - (Pin 2)<br />
This output carries asynchronous data sent by the printer to the computer.<br />
It is used mainly in handshaking protocols.<br />
RXD - Receive Data - (Pin 3)<br />
This input carries serial asynchronous data sent by the computer to the<br />
printer.<br />
RTS - Request To Send - (Pin 4)<br />
This output is always held high (above 3 volts).<br />
CTS - Clear To Send - (Pin 5)<br />
DSR - Data Set Ready - (Pin 6)<br />
Unused.<br />
B-6
RS-232C Protocol<br />
B-7<br />
RS-232C Protocol<br />
SG - Signal Ground - (Pin 7)<br />
All signals can transmit between the printer and the host computer to send<br />
each signal with a signal ground.<br />
DTR - Data Terminal Ready - (Pin 20)<br />
This output is used as a buffer nearly-full handshake line. It is held high<br />
(above 3 volts) when the buffer can accept more data.<br />
RS-232C Interface Voltage Levels<br />
The voltage levels of the interface signals conform to EIA RS-232C<br />
specifications. SPACE is from 3 volts to 15 volts. MARK is from -3 volts to<br />
-15 volts. Voltages between -3 volts and 3 volts are undefined.<br />
A protocol is a set of rules the computer follows in sending data to the<br />
printer. The RS-232C parameters are stored in battery backed-up memory.<br />
They are indicated on the status printout. They can be changed by the<br />
FRPO (firmware reprogram) command described in the Programming<br />
Manual provided on the CD-ROM supplied with the printer. The<br />
parameters and their identification codes are given below.<br />
H1: Baud rate<br />
Parameter value Baud rate<br />
12 1200<br />
24 2400<br />
48 4800<br />
96 9600<br />
19 19200<br />
38 38400<br />
57 57600<br />
11 115200<br />
Table B-5<br />
The factory setting is 9600 baud.<br />
H2: Data bits<br />
7 or 8, factory-set to 8.<br />
H3: Stop bits<br />
1 or 2, factory-set to 1.
RS-232C Protocol<br />
Note<br />
H4: Parity<br />
Parameter value Meaning<br />
0 None<br />
1 Odd<br />
2 Even<br />
3 Ignore<br />
Table B-6<br />
The factory setting is “None” (0 on the status printout).<br />
H5: Protocol logic<br />
Parameter value Meaning<br />
0 Combination of 1 and 3 below<br />
1 DTR/DSR, positive logic<br />
2 DTR/DSR, negative logic<br />
3 XON/XOFF<br />
4 ETX/ACK<br />
5 XON/XOFF recognized only as protocol<br />
Table B-7<br />
The factory setting is 0.<br />
H6: Buffer nearly-full threshold<br />
This is a percentage from 0 to 99. The factory setting is 90.<br />
H7: Buffer nearly-empty threshold<br />
This is a percentage from 0 to 99. The factory setting is 70.<br />
The factory settings of the buffer nearly-full and nearly-empty thresholds<br />
(H6 and H7) are subject to change without notification.<br />
The gap between the nearly-full and nearly-empty thresholds allows the<br />
computer to send a fairly large amount of data in a continuous stream.<br />
H8: Received-data buffer size<br />
This is the size of the input buffer, specified in units of 10 Kbytes. The<br />
factory-set value is 6, meaning 60 Kbytes.<br />
Since DTR/DSR protocol is not used with the RS-422A standard, select a<br />
parameter value other than 0, 1, or 2 for the H5 setting when using the<br />
RS-422A interface.<br />
B-8
PRESCRIBE FRPO D0 Command<br />
B-9<br />
RS-232C Protocol<br />
The PRESCRIBE FRPO D0 command provides control over XON/XOFF<br />
operation when an error occurs on the serial interface. The following table<br />
summarizes the error status corresponding to different D0 values.<br />
Timing of XON transfer to<br />
Serial interface error<br />
host while Ready or Waiting<br />
Error not handled Error handled<br />
XON sent every 3-5 seconds D0=0 (default) D0=1<br />
XON not sent D0=10 D0=11<br />
Table B-8
RS-232C Cable Connection<br />
RS-232C Cable Connection<br />
Obtain a Suitable RS-232C Cable<br />
Connecting the Printer to the Computer<br />
Make sure that the RS-232C cable is wired correctly. The cable must be a<br />
null modem cable; that is, one in which pin 2 on either end of the cable is<br />
connected to pin 3 on the other end. You cannot use a straight cable such as<br />
IBM communication adapter cable type 1502067 unless you purchase a<br />
null modem adapter.<br />
Check that the power of both the printer and the computer is switched off.<br />
1<br />
2<br />
3<br />
4<br />
5<br />
6<br />
Discharge yourself of static electricity by touching a metal object<br />
such as a doorknob.<br />
Plug the printer end of the RS-232C interface cable into the printer’s<br />
RS-232C connector and screw it in place.<br />
Plug the other end of the cable into the computer’s RS-232C interface<br />
connector.<br />
Switch on the printer’s power.<br />
The printer’s RS-232C parameters are factory-set to the following<br />
values:<br />
Baud rate=9600 bps, data bits (character length)=8 bits, stop bits=1,<br />
parity=none<br />
The two RS-232C protocols are XON/XOFF and DTR. The printer<br />
performs both of them simultaneously, using positive logic for DTR.<br />
If you are uncertain as to the printer’s current parameter settings,<br />
you can reset them to the values listed above. See Serial Interface<br />
Parameters on page 1-76.<br />
Set the computer to the same parameters as the printer. On many<br />
computers this can be done by setting DIP switches before the power<br />
is turned on. Another method is as follows:<br />
B-10
With Windows XP, make settings as follows:<br />
1<br />
2<br />
3<br />
4<br />
5<br />
6<br />
B-11<br />
RS-232C Cable Connection<br />
Click on the Start button in the Windows XP task bar and align the<br />
cursor with Settings, then click on Control Panel from among the<br />
items displayed.<br />
The Control Panel window opens. Double click on System.<br />
System Properties window opens. Click on the Hardware tab, then<br />
click on the Device Manager button, and double click on Ports (COM<br />
& LPT).<br />
Double click on Communications Port.<br />
The Communications Port Properties dialog is displayed for the<br />
selected COM port. Click on the Port Settings tab and set the port<br />
properties.<br />
After setting the properties, click the OK button.
RS-232C Cable Connection<br />
With Windows 95/98/Me, make settings as follows:<br />
1<br />
2<br />
3<br />
4<br />
5<br />
6<br />
Click on Start button in the Windows 95/98/Me Task Bar and align<br />
the cursor with Settings, then click on Control Panel from among<br />
the items displayed.<br />
The control panel folder opens. Double click on System.<br />
System Properties opens. Click on the Device Manager tab, then<br />
click on the COM port to be used.<br />
Click on Properties button.<br />
The Properties sheet is displayed for the selected COM port. Click on<br />
the Port Settings tab and set the port properties.<br />
After setting the properties, click OK button.<br />
B-12
In DOS, enter the following commands:<br />
C:\>MODE COM1:96,N,8,1,P<br />
C:\>MODE LPT1:=COM1<br />
To test the interface, enter the following:<br />
CTRL P<br />
C:\>DIR<br />
CTRL P<br />
B-13<br />
RS-232C Cable Connection<br />
The software settings made using the above procedures are temporary. On<br />
most computers, permanent settings must be made with DIP switches.
Appendix C Specifications<br />
C<br />
C-1
Specifications<br />
Specifications<br />
Item Description<br />
LP 3028/4028 LP 3033/4033<br />
Printing method Electrophotography, laser scan<br />
Printing speed 28 pages/minute (A4 size) when<br />
printing multiple copies of the same<br />
page<br />
Resolution Fast 1200 mode with KIR<br />
Fine 1200 mode<br />
600 dpi with KIR<br />
300 dpi with KIR<br />
First print Approx. 19.5 seconds or less (A4<br />
size), depending on input data<br />
Warm-up time Approx. 10 seconds or less<br />
(from sleep mode)<br />
Approx. 18 seconds or less<br />
(from power on)<br />
at 23 °C, 120 or 230 V<br />
Controller PowerPC 750CXe (300 MHz)<br />
C-2<br />
33 pages/minute (A4 size) when<br />
printing multiple copies of the same<br />
page<br />
Approx. 26.5 seconds or less (A4<br />
size), depending on input data<br />
Approx. 15 seconds or less<br />
(from sleep mode)<br />
Approx. 20 seconds or less<br />
(from power on)<br />
at 23 °C, 120 or 230 V<br />
Main memory 64 MB, expandable up to 320 MB 96 MB, expandable up to 576 MB<br />
Interfaces Parallel IEEE1284, 1<br />
USB Hi-Speed USB 2.0 (480 Mbps)/Full-Speed USB 2.0 (12 Mbps), 1<br />
Network Protocol support: TCP/IP, IPX/SPX, NetBEUI, EtherTalk, 1<br />
Option Serial interface/Network interface card, 1<br />
Memory card slot 1 (CompactFlash card)<br />
Hard disk slot 1 (Microdrive)<br />
Self test Performed at power-up<br />
Maximum duty cycle 125,000 pages/month 150,000 pages/month<br />
Drum Amorphous silicon drum<br />
Toner saving Ecoprint mode<br />
Paper Plain paper (See Chapter 2)<br />
Paper feed trays Cassette A5 to A4/Letter universal cassette 148 to 216 mm × 210 to 297 mm. Holds<br />
500 sheets of thickness 0.11 mm<br />
For U. S. A.: A5 to A4/Letter and Legal universal cassette 5-13/16 to 8-1/2"<br />
× 8-1/4 to 14"<br />
MP tray 70 to 216 mm (2-3/4 to 8-1/2") × 148 to 297 mm (5-13/16 to 11-11/16") (see<br />
page 2-4). Holds 100 sheets of thickness 0.11 mm<br />
Capacity of output Top tray 250 sheets of thickness 0.11 mm<br />
trays<br />
Rear tray PT-4: 250 sheets of thickness 0.11 mm<br />
(Option) PT-60: 100 sheets of thickness 0.11 mm<br />
Table C-1
Item Description<br />
LP 3028/4028 LP 3033/4033<br />
Ambient conditions Temperature: 10 to 32.5 °C (50 to 90.5 °F)<br />
Humidity: 20 to 80 % RH<br />
Optimum conditions: 23 °C (73.4 °F), 60 % RH<br />
Altitude: Max. 2,000 m (6,500 feet)<br />
Illumination: Max. 1,500 lux<br />
Power requirements 120 V, 60 Hz, max. 8.0 A (U. S. A./Canada)<br />
220–240 V, 50 Hz/60 Hz, max. 4.0 A (European countries)<br />
Max. allowable voltage fluctuation: ±10 %<br />
Max. allowable frequency fluctuation: ±2 %.<br />
Power consumption Max: 1008 W<br />
During printing: 425 W<br />
During sleep mode: 13 W<br />
Operating noise (in accordance<br />
with ISO 7779 [Bystander Position,<br />
sound pressure level at the front])<br />
During printing: LpA = 55 dB (A)<br />
During standby: LpA = 33 dB (A)<br />
During sleep mode: Immeasurably<br />
low<br />
C-3<br />
Specifications<br />
Max: 1008 W<br />
During printing: 521 W<br />
During sleep mode: 13 W<br />
During printing: LpA = 57 dB (A)<br />
During standby: LpA = 36 dB (A)<br />
During sleep mode: Immeasurably<br />
low<br />
Dimensions 345 (13-9/16) wide × 300 (11-13/16) high × 390 mm (18-1/4") deep<br />
[( ): U. S. A.]<br />
Weight 13.2 kg (29-9/16 lb) [( ): U. S. A.]<br />
Table C-1 (Continued)
Glossary C<br />
Glossary-1
Glossary<br />
Cassette mode<br />
This is an operation mode for the MP tray. When<br />
this mode is used, approximately 100 sheets of<br />
plain paper can be fed continuously, the same as<br />
for the cassette.<br />
dpi (dots per inch)<br />
This indicates the number of dots printed per<br />
inch, and is the unit of printer resolution.<br />
Ecoprint<br />
This is a printing mode that controls toner<br />
consumption. Pages printed in the Ecoprint mode<br />
are lighter than pages printed in the normal<br />
mode. The default setting is Off.<br />
Emulation<br />
This refers to emulation of manufacturers’<br />
printers. The printer emulates operation of the<br />
following printers: PCL, Line printer, IBM<br />
Proprinter, DIABLO 630, EPSON LQ-850,<br />
KPDL.<br />
Expansion memory<br />
This option is used to increase printer memory.<br />
The printer has an expansion socket, into which<br />
you can install a 32 MB, 64 MB, 128 MB, or<br />
256 MB DIMM (Dual Inline Memory Module).<br />
See your local <strong>TA</strong> <strong>Triumph</strong>-<strong>Adler</strong> dealer to purchase<br />
the DIMM that is best suited for use with this<br />
printer.<br />
First mode<br />
This is an operation mode for the MP tray. When<br />
the MP tray setting is set to first mode (priority<br />
printing from the MP tray) with paper inserted<br />
in the MP tray, the first paper will always feed<br />
from there even if another paper source is<br />
selected. The printer is set to the cassette mode<br />
(another MP tray operation mode) as the factory<br />
default, but you can change this setting from the<br />
operator panel.<br />
Glossary-2<br />
IEEE1284<br />
This is a standard used when connecting a<br />
printer to a computer, and was established by the<br />
Institute of Electrical and Electronic Engineers<br />
in 1994.<br />
KIR (KM Image Refinement)<br />
This is KM ’s original smoothing function. It<br />
uses software to enhance the printer’s resolution<br />
and produce high-quality printing. The default<br />
setting is On.<br />
KM-NET VIEWER<br />
This is a network management tool that can be<br />
used with the LP series. You can<br />
view information for printers connected to the<br />
network using SNMP commands. KM-NET<br />
VIEWER is contained on the CD-ROM supplied<br />
with the printer.<br />
MB (mega byte)<br />
This unit is used to express data quantities and<br />
memory capacities. 1 MB is equivalent to<br />
1024 kB, or 1,048,576 bytes.<br />
MP tray<br />
This is an abbreviation for Multi-Purpose tray.<br />
The MP tray is used instead of the cassette when<br />
printing on envelopes, postcards, transparency<br />
sheets, and labels.<br />
Offline<br />
The printer can receive data, but cannot print.<br />
Turn the printer online if you want to print.<br />
Online<br />
The printer can output received data.
Operator panel<br />
This is located on the top of the printer. The<br />
panel consists of the message display three<br />
indicators and eight keys. The message display<br />
shows the printer’s status. Press the keys when<br />
you want to switch the printer between online<br />
and offline status, or to cancel printing.<br />
Outline font<br />
With outline fonts, characters outlines are<br />
represented by numerical expressions, and fonts<br />
can be enlarged, reduced, or painted in different<br />
ways by changing the numeric values of those<br />
expressions. Printing remains clear even if you<br />
enlarge fonts, since the letters are defined by an<br />
outline. You can specify font size in steps of 0.25<br />
points up to 999.75 points.<br />
Parallel interface<br />
With this interface, data transfer between the<br />
printer and the computer takes place on 8-bit<br />
chunks. The printer can perform IEEE1284<br />
compatible bi-directional communications.<br />
Printer driver<br />
The printer driver makes it possible for you to<br />
print data created using application software.<br />
The printer driver for either the printer is on the<br />
CD-ROM supplied with the printer. Install the<br />
printer driver on the computer connected to the<br />
printer.<br />
RAM disk<br />
This is a virtual disk drive that uses part of the<br />
printer’s memory. With RAM disk you can set<br />
any memory size arbitrarily, and use electronic<br />
sorting (to reduce print time).<br />
Rear tray<br />
Tray installed at the rear of the printer. Select<br />
paper output to the rear tray when printing on<br />
postcards, envelopes, or labels.<br />
Glossary-3<br />
Simple Network Management<br />
Protocol (SNMP)<br />
Glossary<br />
This is a protocol for the management of<br />
networks that use TCP/IP (Transmission Control<br />
Protocol/Internet Protocol).<br />
Sleep mode<br />
This mode is activated after a specified amount<br />
of time elapses. The printer goes into economy<br />
mode and a minimum amount of power is<br />
consumed. You can change the amount of time<br />
before the printer goes into sleep mode from the<br />
printer’s operator panel. The default setting is 15<br />
minutes.<br />
Status page<br />
This lists printer conditions, such as the printer’s<br />
memory, the total number of copies printed, and<br />
paper source settings.<br />
USB (Universal Serial Bus)<br />
An interface standard for tow to middle speed<br />
serial interfaces. This printer supports Hi-Speed<br />
USB 2.0. The maximum transfer rate is<br />
480 Mbps and the maximum cable length is<br />
5 meters (16 feet).
Index<br />
Index-1
A<br />
Adhesive label 2-8<br />
Alarm (Buzzer) setting 1-104<br />
Amorphous silicon drum x<br />
Auto continue 1-105<br />
C<br />
Cassette size 1-24<br />
Charger unit 3-11<br />
Cleaning 3-9<br />
charger wire 3-9<br />
grid cleaner 3-10<br />
paper transfer unit 3-12<br />
Cleaning knob 3-9<br />
Code job 1-67, 1-72<br />
CompactFlash card xii, 1-81, A-2, A-30<br />
D<br />
Developer unit 4-3<br />
DIMM A-4<br />
Duplexer (DU-61) 4-16, A-12<br />
E<br />
Ecoprint x, 1-54<br />
e-MPS 1-56, 1-70<br />
Emulation 1-16, 1-41, Glossary-2<br />
Envelope feeder (EF-60) A-21<br />
Envelopes 2-9<br />
Error messages 4-10<br />
Expansion memory Glossary-2<br />
F<br />
Font 5-1<br />
Font lists 1-21<br />
G<br />
Grid cleaner 3-2, 3-10<br />
I<br />
Indicators 1-4, 4-6<br />
Interface 1-3, B-1<br />
Internal font 5-2<br />
K<br />
Index-2<br />
Keys 1-5<br />
KIR 1-17, 1-52<br />
KM-NET VIEWER xii, Glossary-2<br />
L<br />
Left cover 3-6, 3-9<br />
M<br />
Main circuit board A-4, A-28<br />
Maintenance messages 4-7<br />
Memory expansion A-4<br />
Menu map 1-12<br />
Menu system road map 1-6<br />
Message display 1-2<br />
Message language 1-97<br />
Microdrive 1-81, A-2, A-28<br />
MP tray 1-24<br />
cassette mode 1-37, Glossary-2<br />
first mode 1-37, Glossary-2<br />
paper guides 1-25<br />
N<br />
Network interface xii, 1-3, 1-78<br />
status page 1-19<br />
Network interface card A-2<br />
O<br />
Online help messages 1-5, 4-13<br />
Operator panel 1-2, Glossary-3<br />
indicators 1-4<br />
INTERFACE indicator 1-3<br />
message display 1-2<br />
SIZE indicator 1-3<br />
TYPE indicator 1-4<br />
Options A-2<br />
Orientation 1-51<br />
P<br />
Paper 2-1<br />
adhesive labels 2-8<br />
colored paper 2-11<br />
condition 2-3<br />
envelope 2-9<br />
grain 2-6<br />
postcards 2-9
preprinted paper 2-11<br />
recycled paper 2-11<br />
size 2-4<br />
special paper 2-7<br />
specifications 2-2<br />
thick paper 2-10<br />
thickness 2-5<br />
type 2-7<br />
weight 2-4<br />
Paper cassette 1-3, A-9<br />
clip A-11<br />
load limit A-11<br />
Paper feeder (PF-60) A-9<br />
Paper guide 1-25<br />
Paper jam 4-12<br />
Paper size dial 1-24, 1-25, A-10<br />
Paper size window 1-24<br />
Paper stopper 1-25, A-10, A-25<br />
Paper transfer unit release lever 3-12<br />
Parallel interface 1-3, 1-74, B-2, Glossary-3<br />
communication modes B-2<br />
pin assignment B-3<br />
Plastic bag 3-2<br />
PRESCRIBE command xi, xiii, B-9<br />
PRESCRIBE Programming Manual xiii<br />
Print density 1-95<br />
Print quality 4-3<br />
Printer driver 1-6, A-8, Glossary-3<br />
Printer drivers guide xiii<br />
Protocol 1-76, B-7<br />
R<br />
RAM disk 1-81, Glossary-3<br />
Rear tray (PT-4/PT-60) A-25, Glossary-3<br />
Recycled paper 2-11<br />
Registration roller 3-13, 4-15<br />
Resolution 1-55<br />
Resource protection 1-103<br />
RS-232C 1-76, B-6, B-7, B-10<br />
RS-422A B-7<br />
S<br />
Serial interface 1-76, B-6<br />
computer interface B-11<br />
protocol 1-76, B-7<br />
RS-232C mode B-6<br />
Serial interface board kit (IB-11) A-2, B-6<br />
Service status page 1-18<br />
Simple Network Management Protocol<br />
(SNMP) xii, Glossary-3<br />
Index-3<br />
Sleep mode x, 1-2, 1-100, Glossary-3<br />
Sleep timer 1-2, 1-100<br />
Sorter (SO-60) 4-18, A-15<br />
Specifications C-1<br />
Status page 1-14<br />
T<br />
Toner container 3-2<br />
dispose 3-3<br />
grid cleaner 3-10<br />
lock lever 3-3<br />
protective seal 3-4<br />
replacement 3-2<br />
Toner gauge 1-16, 1-96<br />
Toner kit 3-2<br />
Top cover 3-3<br />
Troubleshooting<br />
error messages 4-10<br />
indicators 4-6<br />
interface 4-2<br />
maintenance messages 4-7<br />
quality problems 4-3<br />
Typeface 5-1<br />
U<br />
USB interface xi, 1-3, 1-75, B-5, Glossary-3<br />
V<br />
Virtual Mailbox (VMB) 1-68<br />
W<br />
Waste toner box 3-2, 3-6<br />
Windows B-12<br />
Wiper cloth 3-2, 3-13