Create successful ePaper yourself
Turn your PDF publications into a flip-book with our unique Google optimized e-Paper software.
GeneAmp ® <strong>PCR</strong> <strong>System</strong> <strong>2700</strong><br />
For Amplification of Nucleic Acids<br />
User Guide
© Copyright 2001, 2006 Applied Biosystems<br />
NOTICE TO PURCHASER: Label License<br />
The <strong>GeneAmp®</strong> <strong>PCR</strong> <strong>System</strong> <strong>2700</strong> thermal cycler is covered by one or more of US Patents Nos. 5,038,852, 5,333,675, 5,656,493, 5,475,610,<br />
5,602,756, 6,703,236, and corresponding claims in their non-US counterparts, owned by Applera Corporation. No right is conveyed expressly, by<br />
implication, or by estoppel under any other patent claim, such as claims to apparatus, reagents, kits, or methods such as 5’ nuclease methods. Further<br />
information on purchasing licenses may be obtained by contacting the Director of Licensing, Applied Biosystems, 850 Lincoln Centre Drive, Foster<br />
City, California 94404, USA.<br />
Applied Biosystems and MicroAmp are registered trademarks of Applera Corporation or its subsidiaries in the U.S. and certain other countries.<br />
ABI and BigDye are trademarks of Applera Corporation or its subsidiaries in the U.S. and certain other countries.<br />
AmpErase, AmpliTaq, AmpliTaq Gold, EnviroAmp, GeneAmp and TaqMan are registered trademarks of Roche Molecular <strong>System</strong>s, Inc.<br />
Microsoft, Windows, and Windows NT are registered trademarks of Microsoft Corporation in the United States and/or other countries.<br />
All other trademarks are the sole property of their respective owners.<br />
The information contained in this document is subject to change without notice.<br />
Produced 5/2006<br />
Part Number 4317898, Rev. B
Contents<br />
1 Introduction and Safety<br />
Overview . . . . . . . . . . . . . . . . . . . . . . . . . . . . . . . . . . . . . . . . . . . . . . . . . . . . . . . . . . . . . . . . . . 1-1<br />
About This Manual. . . . . . . . . . . . . . . . . . . . . . . . . . . . . . . . . . . . . . . . . . . . . . . . . . . . . . . . . . . 1-2<br />
Instrument Safety . . . . . . . . . . . . . . . . . . . . . . . . . . . . . . . . . . . . . . . . . . . . . . . . . . . . . . . . . . . . 1-3<br />
Electrical Requirements . . . . . . . . . . . . . . . . . . . . . . . . . . . . . . . . . . . . . . . . . . . . . . . . . . . . . . . 1-7<br />
Laboratory Environmental Requirements . . . . . . . . . . . . . . . . . . . . . . . . . . . . . . . . . . . . . . . . . 1-9<br />
Chemical Safety . . . . . . . . . . . . . . . . . . . . . . . . . . . . . . . . . . . . . . . . . . . . . . . . . . . . . . . . . . . . 1-10<br />
2 <strong>System</strong> Overview<br />
Overview . . . . . . . . . . . . . . . . . . . . . . . . . . . . . . . . . . . . . . . . . . . . . . . . . . . . . . . . . . . . . . . . . . 2-1<br />
Introducing the GeneAmp <strong>PCR</strong> <strong>System</strong> <strong>2700</strong> . . . . . . . . . . . . . . . . . . . . . . . . . . . . . . . . . . . . . . 2-2<br />
About the Control Panel . . . . . . . . . . . . . . . . . . . . . . . . . . . . . . . . . . . . . . . . . . . . . . . . . . . . . . . 2-4<br />
Overview of Functions . . . . . . . . . . . . . . . . . . . . . . . . . . . . . . . . . . . . . . . . . . . . . . . . . . . . . . . . 2-5<br />
Introducing an Important Screen . . . . . . . . . . . . . . . . . . . . . . . . . . . . . . . . . . . . . . . . . . . . . . . . 2-6<br />
3 Getting Started<br />
Overview . . . . . . . . . . . . . . . . . . . . . . . . . . . . . . . . . . . . . . . . . . . . . . . . . . . . . . . . . . . . . . . . . . 3-1<br />
Powering On. . . . . . . . . . . . . . . . . . . . . . . . . . . . . . . . . . . . . . . . . . . . . . . . . . . . . . . . . . . . . . . . 3-2<br />
Adding Yourself as a User . . . . . . . . . . . . . . . . . . . . . . . . . . . . . . . . . . . . . . . . . . . . . . . . . . . . . 3-3<br />
Creating a Method . . . . . . . . . . . . . . . . . . . . . . . . . . . . . . . . . . . . . . . . . . . . . . . . . . . . . . . . . . . 3-5<br />
Editing Your Method . . . . . . . . . . . . . . . . . . . . . . . . . . . . . . . . . . . . . . . . . . . . . . . . . . . . . . . . . 3-7<br />
Starting and Stopping a Run. . . . . . . . . . . . . . . . . . . . . . . . . . . . . . . . . . . . . . . . . . . . . . . . . . . . 3-8<br />
More Features. . . . . . . . . . . . . . . . . . . . . . . . . . . . . . . . . . . . . . . . . . . . . . . . . . . . . . . . . . . . . . 3-10<br />
4 Runs<br />
Overview . . . . . . . . . . . . . . . . . . . . . . . . . . . . . . . . . . . . . . . . . . . . . . . . . . . . . . . . . . . . . . . . . . 4-1<br />
Using Disposables . . . . . . . . . . . . . . . . . . . . . . . . . . . . . . . . . . . . . . . . . . . . . . . . . . . . . . . . . . . 4-2<br />
Loading Samples . . . . . . . . . . . . . . . . . . . . . . . . . . . . . . . . . . . . . . . . . . . . . . . . . . . . . . . . . . . . 4-5<br />
Starting a Run. . . . . . . . . . . . . . . . . . . . . . . . . . . . . . . . . . . . . . . . . . . . . . . . . . . . . . . . . . . . . . . 4-7<br />
Pausing or Stopping a Run . . . . . . . . . . . . . . . . . . . . . . . . . . . . . . . . . . . . . . . . . . . . . . . . . . . . . 4-9<br />
Reviewing the History of a Run . . . . . . . . . . . . . . . . . . . . . . . . . . . . . . . . . . . . . . . . . . . . . . . . 4-11<br />
When a Run Completes . . . . . . . . . . . . . . . . . . . . . . . . . . . . . . . . . . . . . . . . . . . . . . . . . . . . . .4-13<br />
iii
iv<br />
5 Methods and Users<br />
Overview . . . . . . . . . . . . . . . . . . . . . . . . . . . . . . . . . . . . . . . . . . . . . . . . . . . . . . . . . . . . . . . . . . 5-1<br />
Adding, Changing, or Deleting a User Name . . . . . . . . . . . . . . . . . . . . . . . . . . . . . . . . . . . . . . 5-2<br />
Creating a Method . . . . . . . . . . . . . . . . . . . . . . . . . . . . . . . . . . . . . . . . . . . . . . . . . . . . . . . . . . . 5-6<br />
Changing a Method Using Advanced Features . . . . . . . . . . . . . . . . . . . . . . . . . . . . . . . . . . . . . 5-9<br />
Handling Methods . . . . . . . . . . . . . . . . . . . . . . . . . . . . . . . . . . . . . . . . . . . . . . . . . . . . . . . . . . 5-18<br />
6 Utilities<br />
Overview . . . . . . . . . . . . . . . . . . . . . . . . . . . . . . . . . . . . . . . . . . . . . . . . . . . . . . . . . . . . . . . . . . 6-1<br />
Configuring the Instrument . . . . . . . . . . . . . . . . . . . . . . . . . . . . . . . . . . . . . . . . . . . . . . . . . . . . 6-2<br />
Upgrading <strong>System</strong> Firmware. . . . . . . . . . . . . . . . . . . . . . . . . . . . . . . . . . . . . . . . . . . . . . . . . . . 6-4<br />
Connecting to a Printer . . . . . . . . . . . . . . . . . . . . . . . . . . . . . . . . . . . . . . . . . . . . . . . . . . . . . . . 6-5<br />
Calculating the Melting Temperature . . . . . . . . . . . . . . . . . . . . . . . . . . . . . . . . . . . . . . . . . . . . 6-6<br />
Running Hardware Diagnostics. . . . . . . . . . . . . . . . . . . . . . . . . . . . . . . . . . . . . . . . . . . . . . . . . 6-7<br />
Running the Calibration Verification Test . . . . . . . . . . . . . . . . . . . . . . . . . . . . . . . . . . . . . . . . . 6-9<br />
Running the Temperature Non-Uniformity Test . . . . . . . . . . . . . . . . . . . . . . . . . . . . . . . . . . . . 6-9<br />
Running <strong>System</strong> Performance Diagnostics . . . . . . . . . . . . . . . . . . . . . . . . . . . . . . . . . . . . . . . 6-10<br />
7 Maintenance<br />
Overview . . . . . . . . . . . . . . . . . . . . . . . . . . . . . . . . . . . . . . . . . . . . . . . . . . . . . . . . . . . . . . . . . . 7-1<br />
Cleaning the Instrument . . . . . . . . . . . . . . . . . . . . . . . . . . . . . . . . . . . . . . . . . . . . . . . . . . . . . . 7-2<br />
Replacing Fuses. . . . . . . . . . . . . . . . . . . . . . . . . . . . . . . . . . . . . . . . . . . . . . . . . . . . . . . . . . . . . 7-4<br />
8 Troubleshooting<br />
Overview . . . . . . . . . . . . . . . . . . . . . . . . . . . . . . . . . . . . . . . . . . . . . . . . . . . . . . . . . . . . . . . . . . 8-1<br />
If There’s a Power Failure . . . . . . . . . . . . . . . . . . . . . . . . . . . . . . . . . . . . . . . . . . . . . . . . . . . . . 8-2<br />
Display Screen Error Messages. . . . . . . . . . . . . . . . . . . . . . . . . . . . . . . . . . . . . . . . . . . . . . . . . 8-3<br />
Troubleshooting Information. . . . . . . . . . . . . . . . . . . . . . . . . . . . . . . . . . . . . . . . . . . . . . . . . . . 8-6<br />
A Getting Help<br />
Overview . . . . . . . . . . . . . . . . . . . . . . . . . . . . . . . . . . . . . . . . . . . . . . . . . . . . . . . . . . . . . . . . . . A-1<br />
Technical Support . . . . . . . . . . . . . . . . . . . . . . . . . . . . . . . . . . . . . . . . . . . . . . . . . . . . . . . . . . . A-2<br />
B Specifications<br />
Overview . . . . . . . . . . . . . . . . . . . . . . . . . . . . . . . . . . . . . . . . . . . . . . . . . . . . . . . . . . . . . . . . . . B-1<br />
<strong>System</strong> Specifications . . . . . . . . . . . . . . . . . . . . . . . . . . . . . . . . . . . . . . . . . . . . . . . . . . . . . . . . B-2<br />
Control Panel Specifications . . . . . . . . . . . . . . . . . . . . . . . . . . . . . . . . . . . . . . . . . . . . . . . . . . . B-2<br />
Sample Temperature Information . . . . . . . . . . . . . . . . . . . . . . . . . . . . . . . . . . . . . . . . . . . . . . . B-3<br />
Printer Specifications. . . . . . . . . . . . . . . . . . . . . . . . . . . . . . . . . . . . . . . . . . . . . . . . . . . . . . . . . B-3
C Supplied Methods<br />
Overview . . . . . . . . . . . . . . . . . . . . . . . . . . . . . . . . . . . . . . . . . . . . . . . . . . . . . . . . . . . . . . . . . .C-1<br />
About the Methods . . . . . . . . . . . . . . . . . . . . . . . . . . . . . . . . . . . . . . . . . . . . . . . . . . . . . . . . . . .C-2<br />
D Screen Flowcharts<br />
Overview . . . . . . . . . . . . . . . . . . . . . . . . . . . . . . . . . . . . . . . . . . . . . . . . . . . . . . . . . . . . . . . . . .D-1<br />
Run . . . . . . . . . . . . . . . . . . . . . . . . . . . . . . . . . . . . . . . . . . . . . . . . . . . . . . . . . . . . . . . . . . . . . . .D-2<br />
Stop or End of Run. . . . . . . . . . . . . . . . . . . . . . . . . . . . . . . . . . . . . . . . . . . . . . . . . . . . . . . . . . .D-3<br />
Create/Edit . . . . . . . . . . . . . . . . . . . . . . . . . . . . . . . . . . . . . . . . . . . . . . . . . . . . . . . . . . . . . . . . .D-4<br />
User. . . . . . . . . . . . . . . . . . . . . . . . . . . . . . . . . . . . . . . . . . . . . . . . . . . . . . . . . . . . . . . . . . . . . . .D-5<br />
Utilities . . . . . . . . . . . . . . . . . . . . . . . . . . . . . . . . . . . . . . . . . . . . . . . . . . . . . . . . . . . . . . . . . . . .D-6<br />
Diagnostics . . . . . . . . . . . . . . . . . . . . . . . . . . . . . . . . . . . . . . . . . . . . . . . . . . . . . . . . . . . . . . . . .D-7<br />
Upgrade . . . . . . . . . . . . . . . . . . . . . . . . . . . . . . . . . . . . . . . . . . . . . . . . . . . . . . . . . . . . . . . . . . .D-8<br />
Index<br />
v
Introduction and Safety 1<br />
Overview<br />
About This Chapter This chapter provides information to help you safely operate the GeneAmp <strong>PCR</strong><br />
<strong>System</strong> <strong>2700</strong>.<br />
In This Chapter Topics in this chapter include the following:<br />
1<br />
Topics See Page<br />
About This Manual 1-2<br />
Instrument Safety 1-3<br />
Electrical Requirements 1-7<br />
Laboratory Environmental Requirements 1-9<br />
Chemical Safety 1-10<br />
Introduction and Safety 1-1
About This Manual<br />
1-2 Introduction and Safety<br />
Overview This manual describes how to use the GeneAmp <strong>PCR</strong> <strong>System</strong> <strong>2700</strong>. It includes the<br />
following chapters and appendixes:<br />
Chapter 1, “Introduction and Safety,” contains safety information.<br />
Chapter 2, “<strong>System</strong> Overview,” provides an introductory overview of the<br />
<br />
instrument.<br />
Chapter 3, “Getting Started,” is a tutorial.<br />
Chapter 4, “Runs,” describes how to use disposables, load samples, and start and<br />
<br />
stop a run.<br />
Chapter 5, “Methods and Users,” tells how to create and edit a method and how to<br />
<br />
add a user.<br />
Chapter 6, “Utilities,” describes how to configure the instrument and perform<br />
<br />
diagnostic tests.<br />
Chapter 7, “Maintenance,” provides procedures for cleaning the sample block and<br />
<br />
replacing fuses.<br />
Chapter 8, “Troubleshooting,”lists error messages and other problems and gives<br />
<br />
ways to resolve them.<br />
Appendix A, “Getting Help,” describes how to get technical support.<br />
Appendix B, “Specifications,” contains instrument specifications.<br />
Appendix C, “Supplied Methods,” describes precoded methods provided in the<br />
<br />
system software.<br />
Appendix D, “Screen Flowcharts,” contains flowcharts showing various screen<br />
<br />
paths from the Main Menu.
Instrument Safety<br />
Safe Operation Before operating the instrument, read the information in this section concerning<br />
hazards and potential hazards. Ensure that anyone involved with the operation of the<br />
instrument is instructed in both general safety practices for laboratories and specific<br />
safety practices for the instrument.<br />
Safety Alert Symbols The following chart is an illustrated glossary of all electrical symbols that are used on<br />
Applied Biosystems instruments. Whenever such symbols appear on instruments,<br />
please observe appropriate safety procedures.<br />
Electrical Symbols<br />
~<br />
~<br />
This symbol indicates the On position of the main power switch.<br />
This symbol indicates the Off position of the main power switch.<br />
This symbol indicates the On/Off position of a push-push main power switch.<br />
This symbol indicates that a terminal may be connected to another<br />
instrument’s signal ground reference. This is not a protected ground terminal.<br />
This symbol indicates that this is a protective grounding terminal that must be<br />
connected to earth ground before any other electrical connections are made<br />
to the instrument.<br />
A terminal marked with this symbol either receives or delivers alternating<br />
current or voltage.<br />
A terminal marked with this symbol can receive or supply an alternating and a<br />
direct current or voltage.<br />
This symbol indicates the presence of high voltage and warns the user to<br />
proceed with caution.<br />
This symbol alerts you to consult the manual for further information and to<br />
proceed with caution.<br />
Introduction and Safety 1-3
1-4 Introduction and Safety<br />
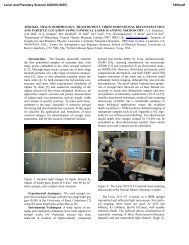
Electrical Safety Testing<br />
Routine safety testing of analytical instruments (e.g., high potential voltage testing)<br />
may be required by various safety agencies.<br />
Non-electrical Symbols<br />
Testing should only be carried out by qualified personnel after seeking advice<br />
from the Applied Biosystems Service Department.<br />
This symbol illustrates a heater hazard. Proceed with caution when working<br />
around these areas to avoid being burned by hot components.
Instrument<br />
Warnings Diagram<br />
The following diagram shows where the hazards and warnings labels are located on<br />
rear of the system <strong>2700</strong>.<br />
Foster City CA94404 USA<br />
GeneAmp <strong>PCR</strong> <strong>System</strong> <strong>2700</strong><br />
Part No. 4322620<br />
Serial No. XXXS0000001<br />
FUSE<br />
8 AMP T (SB) (5 x 20 MM) x 2<br />
Use 250 V Fuse<br />
100/120/220/230/240 VAC~<br />
50/60 HZ<br />
Maximum Power 420 VA<br />
GR1987<br />
WARNING:<br />
Risk of electric shock. Disconnect power<br />
cord from supply before replacing fuses or<br />
removing power supply module from instrument.<br />
WARNING:<br />
For continued protection against risk of fire,<br />
replace only with Listed and Certified fuses of the<br />
specified type and ratings.<br />
US LISTED<br />
Laboratory Use Electrical<br />
Equipment 3Z77<br />
Group 1, Class B<br />
N2284<br />
Made in Singapore<br />
Introduction and Safety 1-5
Routine<br />
Maintenance for<br />
Safe Operation<br />
Instrument Safety<br />
Labels<br />
Before Operating the<br />
Instrument<br />
1-6 Introduction and Safety<br />
Periodically clean the instrument as described on page 7-2. If you use any cleaning or<br />
decontamination method, except those recommended in the manual, you should risk<br />
damaging the equipment.<br />
Maintain your instrument in good working order. In the event that the instrument has<br />
been subjected to adverse environmental conditions (such as fire, flood, earthquake,<br />
etc.), contact your local sales office for advice.<br />
Safety labels are located on the instrument. Each safety label has three parts:<br />
A signal word panel, which implies a particular level of observation or action (e.g.,<br />
<br />
CAUTION or WARNING). If a safety label encompasses multiple hazards, the<br />
signal word corresponding to the greatest hazard is used.<br />
A message panel, which explains the hazard and any user action required.<br />
A safety alert symbol, which indicates a potential personal safety hazard.<br />
Ensure that everyone involved with the operation of the instrument has:<br />
Received instruction in general safety practices for laboratories<br />
Received instruction in specific safety practices for the instrument<br />
Read and understood all related MSDSs<br />
!<br />
CAUTION Avoid using this instrument in a manner not specified by Applied Biosystems.<br />
Although the instrument has been designed to protect the user, this protection can be impaired<br />
if the instrument is used improperly.
Electrical Requirements<br />
Danger of Burns<br />
Electrical Shock<br />
Hazard<br />
! WARNING PHYSICAL INJURY HAZARD. Hot surface. Use care when working around this<br />
area to avoid being burned by hot components.<br />
AVERTISSEMENT: Surface chaude.<br />
GR1988<br />
! WARNING ELECTRICAL HAZARD. To reduce the chance of electrical shock, do not<br />
remove covers that require tool access. No user-serviceable parts are inside. Refer servicing to<br />
Applied Biosystems qualified service personnel.<br />
AVERTISSEMENT: Pour réduire le reique de chocs électriques, ne pas ouvrir les couvercies si<br />
un outil est nécessaire. Ne contient aucune pièce pouvant être réparée par l’utilisateur. Confier<br />
le dépannage au personnel qualifié de Applied Biosystems.<br />
The 3-pronged power cord and receptacle at the instrument rear contain the<br />
grounding connector.<br />
! WARNING ELECTRICAL HAZARD. Grounding circuit continuity is vital for safe operation of<br />
equipment. Never operate equipment with grounding conductor disconnected.<br />
AVERTISSEMENT: Risque de choc électrique. Pour un fonctionnement sans danger. Ne jamais<br />
utiliser l’equipment si le fil de terre n’est pas raccordé.<br />
!<br />
WARNING ELECTRICAL SHOCK HAZARD. Severe electrical shock, which could cause<br />
physical injury or death, can result from working on an instrument when the high voltage power<br />
supply is operating. To avoid electrical shock, disconnect the power supply to the instrument,<br />
unplug the power cord, and wait at least 1 minute before working on the instrument.<br />
GR1987<br />
Power on/off switch<br />
3-pronged power cord<br />
receptacle<br />
Introduction and Safety 1-7
Fire Hazard<br />
Grounding and<br />
Electrical Safety<br />
1-8 Introduction and Safety<br />
AVERTISSEMENT: Pour éviter les chocs électriques, débrancher le cordon d’alimentation avant<br />
le dépannage.<br />
! WARNING FIRE HAZARD. For continued protection against the risk of fire, replace fuses<br />
only with Listed and Certified fuses of the same type and rating as those currently in the<br />
instrument.<br />
AVERTISSEMENT: Afin d’assurer la protection contre les risques d’incendie, remplacer<br />
uniquement par un fusible de méme type et de méme courant nominal.<br />
The system <strong>2700</strong> must be grounded for protection against electrical shock.<br />
! CAUTION ELECTRICAL HAZARD. Do not use an adapter to a two-terminal outlet since this<br />
does not provide positive ground protection.<br />
Fuses Improper fuses can damage the wiring system and cause a fire.<br />
!<br />
WARNING ELECTRICAL FIRE HAZARD. Before turning on the instrument, verify that the<br />
fuses are properly installed.<br />
GR1987<br />
Fuse compartment
Laboratory Environmental Requirements<br />
Introduction Take the precautions described in this section whenever you operate the system <strong>2700</strong>.<br />
Read this section before you install the instrument.<br />
Temperature,<br />
Humidity, and<br />
Environment<br />
Emission/Immunity<br />
Statement<br />
! CAUTION The instrument should be used according to the instructions provided in this<br />
manual. If used otherwise, the protection provided by this instrument may be impaired.<br />
IMPORTANT This instrument is designed for indoor use.<br />
IMPORTANT Do not operate in a Cold Room or a refrigerated area. The system <strong>2700</strong> will<br />
operate safely when the ambient temperature is 5 °C to 40 °C (41 °F to 104 °F) and will meet<br />
performance specifications when the ambient temperature is 15 °C to 30 °C and the ambient<br />
relative humidity is 20 to 80%. These specifications have been calculated for altitudes between<br />
0 and 2,000 meters.<br />
!<br />
CAUTION FIRE HAZARD. This instrument is not designed for operation in an explosive<br />
environment. Do not place the instrument close to potentially explosive materials or objects.<br />
IMPORTANT The instrument should be stored between –20 °C and 60 °C (–4 °F and 140 °F)<br />
at altitudes between 0 and 12,000 meters.<br />
Note This instrument is able to withstand transient overvoltage according to Installation<br />
Category II as defined in IEC 1010-1.<br />
Pollution The installation category (overvoltage category) for this instrument is II, and it is<br />
classified as portable equipment. The instrument has a pollution degree rating of 2<br />
and may be installed in an environment that has nonconductive pollutants only.<br />
For our European customers, any product marked with the CE label meets the<br />
European EMC directive 89/336/EEC and the Low Voltage Directive 72/23/EEC. This<br />
product meets Class B emission limits.<br />
Introduction and Safety 1-9
Chemical Safety<br />
Documentation User<br />
Attention Words<br />
Chemical Hazard<br />
Warning<br />
Chemical Waste<br />
Hazard Warning<br />
1-10 Introduction and Safety<br />
Five user attention words appear in the text of all Applied Biosystems user<br />
documentation. Each word implies a particular level of observation or action as<br />
described below.<br />
Note Calls attention to useful information.<br />
IMPORTANT Indicates information that is necessary for proper instrument operation.<br />
! CAUTION Indicates a potentially hazardous situation which, if not avoided, may result in<br />
minor or moderate injury. It may also be used to alert against unsafe practices.<br />
! WARNING Indicates a potentially hazardous situation which, if not avoided, could result in<br />
death or serious injury.<br />
! DANGER Indicates an imminently hazardous situation which, if not avoided, will result in<br />
death or serious injury. This signal word is to be limited to the most extreme situations.<br />
! WARNING CHEMICAL HAZARD. Some of the chemicals used with Applied Biosystems<br />
instruments and protocols are potentially hazardous and can cause injury, illness, or death.<br />
Read and understand the material safety data sheets (MSDSs) provided by the<br />
<br />
chemical manufacturer before you store, handle, or work with any chemicals or<br />
hazardous materials.<br />
Minimize contact with and inhalation of chemicals. Wear appropriate personal<br />
<br />
protective equipment when handling chemicals (e.g., safety glasses, gloves, or<br />
protective clothing). For additional safety guidelines, consult the MSDS.<br />
Do not leave chemical containers open. Use only with adequate ventilation.<br />
Check regularly for chemical leaks or spills. If a leak or spill occurs, follow the<br />
<br />
manufacturer’s cleanup procedures as recommended on the MSDS.<br />
Comply with all local, state/provincial, or national laws and regulations related to<br />
<br />
chemical storage, handling, and disposal.<br />
!<br />
WARNING CHEMICAL WASTE HAZARD. Wastes produced by Applied Biosystems<br />
instruments are potentially hazardous and can cause injury, illness, or death.<br />
Read and understand the material safety data sheets (MSDSs) provided by the<br />
<br />
manufacturers of the chemicals in the waste container before you store, handle, or<br />
dispose of chemical waste.<br />
Handle chemical wastes in a fume hood.<br />
Minimize contact with and inhalation of chemical waste. Wear appropriate<br />
<br />
personal protective equipment when handling chemicals (e.g., safety glasses,<br />
gloves, or protective clothing).<br />
After emptying the waste container, seal it with the cap provided.<br />
Dispose of the contents of the waste tray and waste bottle in accordance with<br />
<br />
good laboratory practices and local, state/provincial, or national environmental<br />
and health regulations.
About MSDSs Some of the chemicals used with this instrument may be listed as hazardous by their<br />
manufacturer. When hazards exist, warnings are prominently displayed on the labels<br />
of all chemicals.<br />
Chemical manufacturers supply a current MSDS before or with shipments of<br />
hazardous chemicals to new customers and with the first shipment of a hazardous<br />
chemical after an MSDS update. MSDSs provide you with the safety information you<br />
need to store, handle, transport and dispose of the chemicals safely.<br />
We strongly recommend that you replace the appropriate MSDS in your files each<br />
time you receive a new MSDS packaged with a hazardous chemical.<br />
! WARNING CHEMICAL HAZARD. Be sure to familiarize yourself with the MSDSs<br />
before using reagents or solvents.<br />
Ordering MSDSs You can order free additional copies of MSDSs for chemicals manufactured or<br />
distributed by Applied Biosystems using the contact information below.<br />
To order MSDSs... Then...<br />
Over the Internet a. Go to our Web site at<br />
www.appliedbiosystems.com/techsupp.<br />
b. Click MSDSs.<br />
By automated telephone<br />
service from any country<br />
By telephone in the United<br />
States<br />
By telephone from Canada<br />
By telephone from any other<br />
country<br />
If you have... Then...<br />
The MSDS document<br />
number or the Document<br />
on Demand index number<br />
c. You can open and download a PDF (using Adobe ®<br />
Acrobat Reader) of the document by selecting it, or you<br />
can choose to have the document sent to you by fax or<br />
email.<br />
See “To Obtain Documents on Demand” on page A-4.<br />
Dial 1-800-327-3002, then press 1.<br />
Enter one of these<br />
numbers in the appropriate<br />
field on this page<br />
The product part number Select Click Here, then<br />
Keyword(s)<br />
enter the part number or<br />
keyword(s) in the field on<br />
this page.<br />
To order in... Then dial 1-800-668-6913 and...<br />
English Press 1, then 2, then 1 again<br />
French Press 2, then 2, then 1<br />
See “To Contact Technical Support by Telephone or Fax” on<br />
page A-2.<br />
For chemicals not manufactured or distributed by Applied Biosystems, call the<br />
chemical manufacturer.<br />
Introduction and Safety 1-11
About Waste<br />
Disposal<br />
1-12 Introduction and Safety<br />
As the generator of potentially hazardous waste, it is your responsibility to perform the<br />
actions listed below.<br />
Characterize (by analysis if necessary) the waste generated by the particular<br />
<br />
applications, reagents, and substrates used in your laboratory.<br />
Ensure the health and safety of all personnel in your laboratory.<br />
Ensure that the instrument waste is stored, transferred, transported, and disposed<br />
<br />
of according to all local, state/provincial, or national regulations.<br />
Note Radioactive or biohazardous materials may require special handling, and disposal<br />
limitations may apply.
<strong>System</strong> Overview 2<br />
Overview<br />
About This Chapter This chapter provides an introductory overview to the GeneAmp <strong>PCR</strong> <strong>System</strong> <strong>2700</strong>.<br />
In This Chapter This chapter contains the following topics:<br />
2<br />
Topic See Page<br />
Introducing the GeneAmp <strong>PCR</strong> <strong>System</strong> <strong>2700</strong> 2-2<br />
About the Control Panel 2-4<br />
Overview of Functions 2-5<br />
Introducing an Important Screen 2-6<br />
<strong>System</strong> Overview 2-1
Introducing the GeneAmp <strong>PCR</strong> <strong>System</strong> <strong>2700</strong><br />
About the<br />
Instrument<br />
2-2 <strong>System</strong> Overview<br />
The GeneAmp <strong>PCR</strong> <strong>System</strong> <strong>2700</strong> is an automated instrument, specifically designed<br />
for the amplification of nucleic acids using the GeneAmp Polymerase Chain Reaction<br />
(<strong>PCR</strong>) process.<br />
The instrument has an integrated 96-well sample block, which houses an internal<br />
Peltier heating/cooling unit. The sample block is made of aluminum to provide optimal<br />
thermal transfer rate.<br />
Platinum sensors provide:<br />
Wide temperature range: 4 °C to 99.9 °C<br />
<br />
Accuracy: ±0.25 °C from 35 °C to 100 °C<br />
<br />
Long term stability and high reliability<br />
The sample block accommodates several different types of MicroAmp disposable<br />
tubes and plates, which must be used in order to create a sealed chamber.<br />
The system <strong>2700</strong> has an easy-to-use, intuitive user interface, which is described in<br />
“About the Control Panel” on page 2-4.<br />
GR1988<br />
Sample block<br />
Control panel<br />
Power on/off<br />
RS485 port
Comparing the<br />
<strong>System</strong> <strong>2700</strong><br />
to Previous<br />
Instruments<br />
The system <strong>2700</strong> can be compared to the GeneAmp <strong>PCR</strong> <strong>System</strong> 9700, as shown<br />
below:<br />
<strong>System</strong> <strong>2700</strong> <strong>System</strong> 9700<br />
Almost the same user interface as<br />
<br />
previous instruments<br />
Integrated sample block<br />
Uses same disposables as 96-well<br />
<br />
sample block on system 9700<br />
Small footprint<br />
Instruments can be “packed”<br />
<br />
side-by-side on a bench because the<br />
air flows out the back, rather than the<br />
sides.<br />
Interchangeable sample blocks with 60,<br />
<br />
96, or dual-384 wells<br />
Networking capabilities<br />
High “instrument diagnostics”<br />
<br />
capabilities<br />
Variable ramp rates and cycling speeds<br />
PCMCIA slot for software upgrade and<br />
<br />
Methods Transportability card<br />
<strong>System</strong> Overview 2-3
About the Control Panel<br />
2-4 <strong>System</strong> Overview<br />
Overview The control panel for the system <strong>2700</strong> consists of a display screen and keys, including<br />
function keys (F1–F5), numeric keys, arrow keys, and the Enter, CE, and Stop keys,<br />
as shown in the figure below.<br />
STOP<br />
Stop key<br />
08:00 AM 09/25/00 25.0°C<br />
<strong>GeneAmp®</strong> <strong>PCR</strong> <strong>System</strong> <strong>2700</strong><br />
Version<br />
User: adrian<br />
Run Create Edit Util User<br />
F1 F2 F3 F4 F5<br />
1<br />
Display The display screen is a window that you use for communicating with the instrument’s<br />
software.<br />
F1 to F5 Keys Use the function keys (F1 to F5) to activate the “button” on the screen above the key;<br />
for example, F1 for Run. The display is not a touch screen. Throughout this manual<br />
you will find instructions to press F1 (Run) or press F2 (Create). The function keys<br />
permit you to navigate from screen to screen and perform other actions.<br />
Selecting a Field Most screens have a highlighter that you use to select a field. To move the highlighter,<br />
use the arrow keys or the Enter key.<br />
Entering Numbers Use the numeric keys (0–9) to enter numeric values, then press Enter or an arrow key.<br />
When you type temperatures and times (minutes:seconds), the system takes care of<br />
the decimal point and colon, respectively. If necessary, you can use the CE key to<br />
clear a field and then reenter values.<br />
2<br />
4 5 6<br />
7 8 9<br />
ENTER 0 CE<br />
Numeric keys<br />
3<br />
Display screen<br />
with Main Menu<br />
F1 to F5 keys<br />
Arrow keys
Overview of Functions<br />
Main Menu as Base The Main Menu is the base from which you start all instrument functions. From it you<br />
can choose five different paths: Run, Create, Edit, Util (Utilities), and User. The<br />
functions available from each of these paths are summarized in the chart below.<br />
Procedures for performing these functions are given in subsequent chapters. Charts<br />
showing screen flows from each path on the Main Menu are provided in Appendix D,<br />
“Screen Flowcharts.”<br />
08:00 AM 09/25/00 25.0°C<br />
<strong>GeneAmp®</strong> <strong>PCR</strong> <strong>System</strong> <strong>2700</strong><br />
Run<br />
Select a stored method and start<br />
a run<br />
Pause the run<br />
View method information<br />
At end of run, view history of<br />
method<br />
See Chapter 4<br />
Version<br />
User: adrian<br />
Run Create Edit Util User<br />
F1 F2 F3 F4 F5<br />
Create/Edit<br />
Create or change a method :<br />
(Both selections let you do the same<br />
thing, except that Create provides you<br />
with a default method, while Edit lets<br />
you choose a stored method.)<br />
Change temperatures and times and the<br />
number of <strong>PCR</strong> cycles<br />
Insert a hold or cycle<br />
Define and insert a programmed pause<br />
Delete a time/temperature segment<br />
Increment or decrement a time or<br />
temperature at the completion of each<br />
cycle<br />
Name and store the method<br />
See Chapter 5<br />
white<br />
User<br />
Add a user name<br />
Assign a PIN number to a<br />
user name<br />
Lock or unlock all<br />
methods belonging to a<br />
user<br />
Edit or delete a user<br />
name<br />
See Chapter 5<br />
Utilities<br />
Configure your instrument (time, date,<br />
pause time out, etc.)<br />
Use the Tm calculator<br />
Delete a method*<br />
View history of the last method run*<br />
Perform hardware diagnostics<br />
(display and keypad)<br />
Run system performance tests<br />
(heating and cooling rate, and cycle<br />
time)<br />
Run temperature verification and<br />
temperature uniformity tests<br />
Upgrade firmware<br />
See Chapter 6<br />
*See Chapter 5<br />
<strong>System</strong> Overview 2-5
Introducing an Important Screen<br />
Create/Edit Screen One of the features that makes the system <strong>2700</strong> easy to use is its graphical<br />
representation of a method, as shown below on the Create/Edit screen. The graph is<br />
the wavy line.<br />
2-6 <strong>System</strong> Overview<br />
Temperatures above<br />
Times below<br />
1 Hld 3 Tmp 25 Cycles 2 Holds<br />
94.0 94.0<br />
5:00 0:30<br />
Create/Edit<br />
55.0<br />
0:30<br />
72.0<br />
0:30<br />
72.0<br />
7:00<br />
A method is a set of instructions in which you specify how the instrument should heat<br />
and cool your samples in a <strong>PCR</strong> thermal profile.<br />
On the Create/Edit screen, temperatures are shown above the graph in degrees<br />
Celsius. Hold times in minutes and seconds are shown below the graph. The central<br />
portion of the screen, delineated by dashed lines, is the <strong>PCR</strong> segment. In this<br />
example, the <strong>PCR</strong> segment repeats 25 times. After <strong>PCR</strong> (in the post-<strong>PCR</strong> segment),<br />
the instrument holds the samples at 72 °C for 7 minutes, then cools to 4 °C and holds<br />
the samples at this temperature until you stop the run.<br />
4.0<br />
Start Store Print More Cancel<br />
F1 F2 F3 F4 F5<br />
<strong>PCR</strong> Segment<br />
<strong>PCR</strong> segment repeated<br />
25 times (cycles)
Getting Started 3<br />
Overview<br />
About This Chapter This chapter walks you through some basic procedures to help you learn to use the<br />
GeneAmp <strong>PCR</strong> <strong>System</strong> <strong>2700</strong>.<br />
The system <strong>2700</strong> is intuitive and easy to use. We’ll start by using the instrument<br />
without samples and experiment with the user interface. The following pages describe<br />
how to set yourself up as a user and create a method. Other features are introduced<br />
later in the chapter.<br />
In This Chapter This chapter contains the following topics:<br />
3<br />
Topic See Page<br />
Powering On 3-2<br />
Adding Yourself as a User 3-3<br />
Creating a Method 3-5<br />
Editing Your Method 3-7<br />
Starting and Stopping a Run 3-8<br />
More Features 3-10<br />
Getting Started 3-1
Powering On<br />
3-2 Getting Started<br />
Procedure To turn on the instrument power:<br />
Step Action<br />
1 Press the power on/off switch at the rear of the instrument.<br />
A whirring fan sounds, and the Splash screen appears briefly.<br />
A P P L I E D B I O S Y S T E M S<br />
The Startup screen appears.<br />
2 Wait several seconds for the Main Menu to appear, then you can use any of the<br />
functions displayed above the function keys.<br />
Note The Main Menu should appear within a few seconds. If any permanent<br />
patterns of lines or bars display on the screen, refer to our Web site. a<br />
a. http://www.appliedbiosystems.com/<strong>2700</strong><br />
www.appliedbiosystems.com<br />
F1 F2 F3 F4 F5<br />
Applied Biosystems<br />
<strong>GeneAmp®</strong> <strong>PCR</strong> <strong>System</strong> <strong>2700</strong><br />
Copyright © 1996<br />
Version<br />
F1 F2 F3 F4 F5<br />
08:00 AM 09/25/00 25.0°C<br />
<strong>GeneAmp®</strong> <strong>PCR</strong> <strong>System</strong> <strong>2700</strong><br />
Version<br />
User: adrian<br />
Run Create Edit Util User<br />
F1 F2 F3 F4 F5
Adding Yourself as a User<br />
Purpose It’s important to add yourself as a user because you will want to keep your methods<br />
separate from those belonging to others. Also, the system requires a user name when<br />
you store a method.<br />
Procedure To add yourself as a user:<br />
Step Action<br />
1 From the Main Menu press F5 (User).<br />
The Select User Name screen appears.<br />
<br />
adrian<br />
anna<br />
2 Press F2 (New).<br />
The User Name screen appears.<br />
Select User Name<br />
dave<br />
doug<br />
faye<br />
Accept New Edit Delete Cancel<br />
F1 F2 F3 F4 F5<br />
Note The blank space after the z is used to insert blank spaces.<br />
3 Spell out your name by using the arrow keys to move the highlighter at the right of<br />
the screen to the first letter of your name, then press Enter, then highlight the<br />
second letter and press Enter, etc. When you have finished entering your name (up<br />
to six characters), press F1 (Accept) to save it.<br />
The Security Code screen appears.<br />
jenife<br />
mamood<br />
mike<br />
murray<br />
nayana<br />
ngui<br />
User Name<br />
abcdefghi<br />
jklmnopqrj<br />
stuvwxyz<br />
.,-+/():=<br />
Use ENTER key to select a character.<br />
Accept Backsp<br />
Cancel<br />
F1 F2 F3 F4 F5<br />
User Name: adrian PIN number: None<br />
Protection: Unlocked<br />
Press PIN # to create a #. Then you set<br />
protection to Locked to prevent methods<br />
from being overwritten or deleted.<br />
Accept Name<br />
PIN#<br />
Cancel<br />
F1 F2 F3 F4 F5<br />
Getting Started 3-3
3-4 Getting Started<br />
To add yourself as a user: (continued)<br />
Step Action<br />
4 Press F5 (Cancel). You can learn about security later.<br />
The Select User Name screen appears.<br />
<br />
adrian<br />
anna<br />
Select User Name<br />
dave<br />
doug<br />
faye<br />
jenife<br />
mamood<br />
mike<br />
murray<br />
nayana<br />
ngui<br />
Accept New Edit Delete Cancel<br />
F1 F2 F3 F4 F5<br />
5 With your name highlighted, press F1 (Accept) to return to the Main Menu.
Creating a Method<br />
Procedure To create a method :<br />
Step Action<br />
1 From the Main Menu press F2 (Create).<br />
The Create/Edit screen appears with a default method displayed.<br />
1 Hld 3 Tmp 25 Cycles 2 Holds<br />
94.0 94.0<br />
5:00 0:30<br />
55.0<br />
0:30<br />
2 Use the arrow keys to move the highlighter to a temperature or time on the graph<br />
and change the parameter.<br />
For example, move the highlighter to the 5:00 time at the left of the screen in the<br />
pre-<strong>PCR</strong> portion. Press 5 3 0 then press Enter, for 5:30.<br />
3 Make a change to the top line.<br />
For example, use the arrow keys to move the highlighter to the 1 in the upper left<br />
corner of the screen. Press 2, then Enter. Notice that you’ve added a hold (another<br />
time and temperature segment) to the graph.<br />
4 Press F2 (Store) to save the method.<br />
The Store Method on Instrument screen appears.<br />
The system has given the method a default name of “exp000”. We will use a<br />
different name.<br />
5 Press F3 (Method).<br />
The Method Name screen appears.<br />
72.0<br />
0:30<br />
72.0<br />
7:00<br />
6 Press the CE key to clear the field. Then spell out test01 by highlighting each letter<br />
and pressing Enter after each one.<br />
4.0<br />
Start Store Print More Cancel<br />
F1 F2 F3 F4 F5<br />
Store Method on Instrument<br />
User: adrian<br />
Method:exp000<br />
Free Mem: 122 methods 946 segments<br />
Accept User Method<br />
Cancel<br />
F1 F2 F3 F4 F5<br />
Method Name exp000<br />
abcdefghi<br />
jklmnopqrj<br />
stuvwxyz<br />
.,-+/():=<br />
Use ENTER key to select a character.<br />
Accept Backsp<br />
Cancel<br />
F1 F2 F3 F4 F5<br />
Getting Started 3-5
3-6 Getting Started<br />
To create a method (continued):<br />
Step Action<br />
7 Press F1 (Accept).<br />
The Store Method on Instrument screen appears again with “test01” as the method<br />
name. On the system <strong>2700</strong>, a method has a method name, and it is associated with<br />
a particular user.<br />
8 Press F1 (Accept).<br />
The system saves your method and returns to the Main Menu.
Editing Your Method<br />
Procedure To edit the method :<br />
Step Action<br />
1 From the Main Menu press F2 (Edit).<br />
The Stored Methods screen appears. You have only one method, so it’s already<br />
highlighted. If there were more than one method listed, you would highlight it to<br />
select it.<br />
Methods<br />
test01<br />
2 Press F1 (Edit).<br />
The Create/Edit screen appears. This is the same screen you accessed from the<br />
Create path from the Main Menu. The Create and Edit paths allow you to do the<br />
same things once you reach this screen.<br />
3 Move the highlighter to any parameter and change it.<br />
For example, move the highlighter to 94.0 in the Pre-<strong>PCR</strong> segment and press 9 0 0<br />
then Enter for 90.0 °C.<br />
4 Press F2 (Store).<br />
The Store Method on Instrument screen appears.<br />
5 Press F1 (Accept) to save the method under the same name (“test01”).<br />
The Main Menu is displayed.<br />
User<br />
adrian<br />
Size<br />
11<br />
LastUsed<br />
01/04/00<br />
Edit View User Sort Cancel<br />
F1 F2 F3 F4 F5<br />
1 Hld 3 Tmp 25 Cycles 2 Holds<br />
94.0 94.0<br />
5:00 0:30<br />
55.0<br />
0:30<br />
72.0<br />
0:30<br />
72.0<br />
7:00<br />
F1 F2 F3 F4 F5<br />
4.0<br />
Start Store Print More Cancel<br />
Store Method on Instrument<br />
User: adrian<br />
Method:test01<br />
Free Mem: 122 methods 946 segments<br />
Accept User Method<br />
Cancel<br />
F1 F2 F3 F4 F5<br />
Getting Started 3-7
Starting and Stopping a Run<br />
Before You Begin Let’s assume that we’ve loaded our samples properly and we’re ready to start a run.<br />
3-8 Getting Started<br />
Procedure To start, then stop a run :<br />
Step Action<br />
1 From the Main menu press F1 (Run).<br />
The Stored Methods screen appears.<br />
Methods<br />
test01<br />
Since we have only one method (“test01”), it’s already highlighted (selected).<br />
2 Press F1 (Start).<br />
The Select Method Options screen appears.<br />
3 Change the reaction volume to 40, then press F1 (Start).<br />
The Run Time screen appears.<br />
User<br />
adrian<br />
Size<br />
11<br />
LastUsed<br />
01/04/00<br />
Start View User Sort Cancel<br />
F1 F2 F3 F4 F5<br />
Select Method Options<br />
Reaction Volume: 50 µL<br />
Enter a value from 5 to 100 µL<br />
Start Cancel<br />
F1 F2 F3 F4 F5<br />
Sample temperature increments<br />
Sample 56.7 Cycle 1 of 25<br />
Flashes to warn you<br />
HOT<br />
55.0<br />
2:00<br />
94.0<br />
10:00<br />
94.0<br />
0:30<br />
55.0<br />
0:30<br />
72.0<br />
0:30<br />
72.0<br />
5:00<br />
4.0<br />
Pause Info<br />
F1 F2 F3 F4 F5
To start, then stop a run (continued):<br />
Step Action<br />
4 Press the Stop key.<br />
The Confirm Stop screen appears.<br />
Sample 50.1 Confirm Stop HOT<br />
Resume<br />
5 Press the Stop key again to abort the run.<br />
The End of Run screen appears.<br />
Press STOP to abort.<br />
Press Resume to continue.<br />
F1 F2 F3 F4 F5<br />
11:30 AM<br />
Method:test01<br />
End of Run<br />
25.1°C<br />
Run aborted at 11:30:05 AM 01/04/00.<br />
Length of run is 01:34:25.<br />
Hist Exit<br />
F1 F2 F3 F4 F5<br />
6 Press F5 (Exit) to return to the Main Menu.<br />
Getting Started 3-9
More Features<br />
Navigating from the<br />
Main Menu<br />
3-10 Getting Started<br />
Overview Now you know the basics of operating the system <strong>2700</strong>. The system provides<br />
additional features. Some things you might try are discussed below.<br />
Explore paths from the Main Menu to find out what’s available on the system. Refer to<br />
the charts in Appendix D, “Screen Flowcharts.”<br />
Looking at Methods Look at a list of all methods, sort the list, and view individual methods:<br />
Creating Your<br />
Method<br />
Accessing More<br />
Run Screens<br />
Protecting Your<br />
Methods<br />
List all methods on the instrument. Access the Stored Methods screen by<br />
<br />
pressing F1 (Run) or F5 (Edit) on the Main Menu. Then press F3 (User) to reach<br />
the Select User Name screen. Press F2 (All) to display the Stored Methods<br />
screen listing all methods on the system. Use the down and up arrow keys to<br />
scroll through the list.<br />
Sort the methods by pressing F4 (Sort).<br />
View any method by pressing F2 (View).<br />
Select yourself as the user again by pressing F3 (User), highlighting your name,<br />
<br />
then pressing F1 (Accept).<br />
Create your most commonly used method. If your method is more complex than the<br />
one we edited earlier, you can change it using one of the following:<br />
Insert a hold or cycle<br />
Define and insert a programmed pause<br />
Automatically increment or decrement a time or temperature at the completion of<br />
<br />
each cycle<br />
Delete a segment<br />
These functions can be accessed from the Modify screen, which is reached by<br />
pressing F4 (More) on the Create/Edit screen. See the Create/Edit chart on page D-4.<br />
Start a run to see what else is available from the Run path from the Main Menu. After<br />
you start a run, the Run Time screen, which shows a graph of your method, appears.<br />
From there you can do the following:<br />
View the Method Information screen by pressing F4 (Info)<br />
Briefly pause, then resume a run by pressing F1 (Pause)<br />
Stop the run by pressing the Stop key twice. From the End of Run screen, press<br />
<br />
F1 (Hist) to view the History File.<br />
Consider using a PIN number and locking your methods.<br />
Each user of the system <strong>2700</strong> should have his/her own user name. That way, each<br />
person’s methods can be kept separate. When you add a user name, the system<br />
prompts you to create a PIN number. If you have a PIN number, no one can change<br />
your user name. Once you have created a PIN number for yourself and confirmed it,<br />
the system allows you to lock your methods. By default they are unlocked. Locking
safeguards all your methods. Only someone who knows your PIN number can<br />
overwrite or delete any of your methods.<br />
When you attempt to change and store one of your methods after locking them, the<br />
system protects you by prompting you to enter your PIN number before it will allow<br />
you to store the method. This is a small inconvenience for the benefit it provides.<br />
When you are creating a new method, the system does not prompt you for your PIN<br />
number.<br />
If you decide you don’t want your methods locked, you can easily change them back<br />
to unlocked.<br />
To learn how to protect your methods, see the User chart on page D-5.<br />
Getting Started 3-11
Runs 4<br />
Overview<br />
About This Chapter This chapter tells what you need to know to run your samples: the MicroAmp <br />
disposables you use to hold your samples, how to load samples, and how to start and<br />
stop a run.<br />
In This Chapter This chapter contains the following topics:<br />
4<br />
Topic See Page<br />
Using Disposables 4-2<br />
Loading Samples 4-5<br />
Starting a Run 4-7<br />
Pausing or Stopping a Run 4-9<br />
Reviewing the History of a Run 4-11<br />
When a Run Completes 4-13<br />
Runs 4-1
Using Disposables<br />
4-2 Runs<br />
Introduction The following section describes the possible tube configurations, choosing a tube<br />
configuration, and sample tray and plate configurations.<br />
IMPORTANT The Tray or the Tray/Retainer are essential for the operation of the GeneAmp <br />
<strong>PCR</strong> <strong>System</strong> <strong>2700</strong>.<br />
Tube Configurations The MicroAmp disposables you can use to hold your <strong>PCR</strong> samples include four<br />
different types of tube configurations, as shown in the figure below.<br />
MicroAmp ® Reaction<br />
Tubes with Caps<br />
MicroAmp Reaction<br />
Tubes with<br />
MicroAmp ® Cap<br />
(8-Strip)<br />
MicroAmp® Reaction<br />
Tubes with Full Plate<br />
Cover<br />
MicroAmp ® 8-Strip<br />
Reaction Tubes GR1086b
Choosing a Tube<br />
Configuration<br />
Sample Tray and<br />
Plate Configurations<br />
Use the table below to help you choose a tube configuration.<br />
You can prepare samples for the instrument using any of the four tube configurations.<br />
All the tube configurations, except the MicroAmp Reaction Tubes with Caps use the<br />
MicroAmp ® 96-Well Tray/Retainer.<br />
If you want to use... Choose a tube configuration that uses the...<br />
eight or more samples MicroAmp 96-Well Tray/Retainer.<br />
Only a few samples, or<br />
MicroAmp Tray for tubes with attached caps.<br />
Want to remove single tubes from<br />
<br />
the sample block without removing<br />
the caps from all the tubes<br />
The following table lists the possible sample tray and plate configurations. The<br />
MicroAmp ® Splash-Free Support Base shown below is used when loading samples but<br />
should not be placed in the sample block.<br />
With this vessel... Use... As Shown<br />
MicroAmp ® Optical<br />
96-Well Reaction<br />
Plate<br />
MicroAmp 96-Well Full Plate Cover<br />
MicroAmp<br />
Reaction Tubes<br />
with Caps<br />
MicroAmp Caps, 8 Caps/Strip<br />
MicroAmp ® 96-Well Tray for Tubes with<br />
Caps<br />
GR2004<br />
GR2006<br />
GR2007<br />
MicroAmp 96-Well<br />
Full Plate Cover<br />
MicroAmp Optical<br />
96-Well Reaction<br />
Plate<br />
MicroAmp<br />
Splash-Free Support<br />
Base<br />
MicroAmp Caps,<br />
8-Strip<br />
MicroAmp Optical<br />
96-Well Reaction<br />
Plate<br />
MicroAmp<br />
Splash-Free Support<br />
Base<br />
MicroAmp Reaction<br />
Tubes with Caps<br />
MicroAmp 96-Well<br />
Tray<br />
for Tubes with Caps<br />
MicroAmp<br />
Splash-Free Support<br />
Base<br />
Runs 4-3
With this vessel... Use... As Shown<br />
MicroAmp 8 Strip<br />
Tubes or Single<br />
Tubes<br />
4-4 Runs<br />
MicroAmp 96-Well<br />
Tray/Retainer<br />
MicroAmp Caps, 8<br />
Caps/Strip<br />
MicroAmp 96-Well<br />
Full Plate Cover<br />
Part Numbers You can order disposables for the system <strong>2700</strong> from Applied Biosystems by part<br />
number.<br />
GR2005<br />
GR2003<br />
MicroAmp Caps,<br />
8-Strip<br />
MicroAmp 96-Well<br />
Retainer<br />
MicroAmp 8-Strip<br />
Tubes or Single<br />
Tubes<br />
MicroAmp 96-Well<br />
Tray<br />
MicroAmp<br />
Splash-Free Support<br />
Base<br />
MicroAmp 96-Well<br />
Full Plate Cover<br />
MicroAmp 96-Well<br />
Retainer<br />
MicroAmp 8-Strip<br />
Tubes or Single<br />
Tubes<br />
MicroAmp 96-Well<br />
Tray<br />
MicroAmp<br />
Splash-Free Support<br />
Base<br />
Disposable Part Number<br />
MicroAmp 96-Well Tray/Retainer Sets 403081<br />
MicroAmp Multipurpose Tool 413950<br />
MicroAmp Splash-Free Support Base 4312063<br />
MicroAmp Reaction Tubes N801-0533<br />
MicroAmp Caps, 12 Caps/Strip N801-0534<br />
MicroAmp Caps, 8 Caps/Strip N801-0535<br />
MicroAmp Reaction Tubes with Caps N801-0540<br />
MicroAmp 96-Well Tray for Tubes with Caps N801-0541<br />
MicroAmp 96-Well Full Plate Cover N801-0550<br />
MicroAmp Optical 96-Well Reaction Plate N801-0560<br />
MicroAmp 8-Strip Reaction Tubes N801-0580<br />
MicroAmp Centrifuge Adapter N801-3822
Loading Samples<br />
Procedures for<br />
Loading Samples<br />
Loading Tubes with<br />
Attached Caps<br />
Loading the 96-Well<br />
Reaction Plate<br />
Loading the 96-Well<br />
Tray/Retainer<br />
The following procedures describe how to load samples for:<br />
Tubes with attached caps.<br />
96-well reaction plate.<br />
96-well tray/retainer assembly.<br />
Note Do not use mineral oil or glycerine in the sample block or as a vapor barrier over the<br />
<strong>PCR</strong> reaction mixture in the tubes. The MicroAmp Reaction Tubes fit tightly in the wells and a<br />
heated cover exerts an even pressure on all tubes and eliminates condensation on the tubes.<br />
To load tubes with attached caps:<br />
Step Action<br />
1 Set the 96-well tray on a splash-free support base.<br />
2 Place the reaction tubes in the tray.<br />
3 Pipette the samples into the reaction tubes.<br />
4 Cap the tubes.<br />
See “Placing the Sample Tray or Plate onto the Sample Block” on page 4-6.<br />
To load the 96-well reaction plate:<br />
Step Action<br />
1 Place the reaction plate on the splash-free support base.<br />
2 Pipette the samples into the sample wells.<br />
3 Cap the tubes using either the MicroAmp 96-Well Full Plate Cover or the MicroAmp<br />
Caps, 8 Caps/Strip.<br />
See “Placing the Sample Tray or Plate onto the Sample Block” on page 4-6.<br />
To load the 96-well tray/retainer:<br />
Step Action<br />
1 Place the tray on the splash-free support base.<br />
2 Load tubes onto the tray, either using single tubes or using the 8-strip tubes.<br />
3 Place retainer over the tubes.<br />
4 Pipette the sample into the tubes.<br />
5 Cap the tubes using either the MicroAmp 96-Well Full Plate Cover or the<br />
MicroAmp Caps, 8 Caps/Strip.<br />
See “Placing the Sample Tray or Plate onto the Sample Block” on page 4-6.<br />
Runs 4-5
Placing the Sample<br />
Tray or Plate onto<br />
the Sample Block<br />
4-6 Runs<br />
Removing the<br />
Samples<br />
The steps for placing the sample tray in the block are the same for a sample<br />
tray/retainer, a sample tray without a retainer, for tubes with attached caps, or for the<br />
96-well plate.<br />
To place the sample tray in the block:<br />
Step Action<br />
1 Lift the sample tray from the splash-free support base and place it in the sample<br />
block.<br />
Place the MicroAmp Tray or Plate onto the sample block so that the well numbered<br />
A1 is located at the upper left corner of the tray, as shown below. This orients the<br />
tray for proper fit.<br />
A1<br />
A<br />
B<br />
C<br />
D<br />
E<br />
F<br />
G<br />
H<br />
1 2 3 4 5 6 7 8 9 10 11 12<br />
IMPORTANT Do not place the base in the sample block.<br />
2 Pull the lever down to engage the heated cover and the sample tray.<br />
GR1070<br />
Sample caps may pop off if the cover is opened when the block temperature is above 27 °C.
Starting a Run<br />
Procedure To start a run:<br />
Step Action<br />
1 Load your samples, as described in “Loading Samples” on page 4-5.<br />
Note Disposables must be used.<br />
2 If the instrument power is not on, press the power-on button at the front of the<br />
instrument.<br />
3 From the Main Menu press F1 (Run).<br />
The Stored Methods screen appears.<br />
Methods<br />
User Size LastUsed<br />
appl01<br />
exp000<br />
exp001<br />
exp002<br />
adrian<br />
adrian<br />
adrian<br />
adrian<br />
11<br />
10<br />
12<br />
13<br />
03/04/00<br />
02/22/00<br />
02/10/00<br />
02/02/00<br />
Start View User Sort Cancel<br />
F1 F2 F3 F4 F5<br />
4 Select a method by highlighting one of the displayed methods.<br />
If the method you want is not displayed, see “Handling Methods” on page 5-18.<br />
5 Press F1 (Start).<br />
The Select Method Options screen appears.<br />
Select Method Options<br />
Reaction Volume: 50 µL<br />
Enter a value from 5 to 100 µL<br />
Start Cancel<br />
F1 F2 F3 F4 F5<br />
6 Enter the reaction volume, then press F1 (Start).<br />
If the temperature of the heated cover is less than 103 °C, the screen shown below<br />
appears.<br />
Please wait. Cover is heating<br />
Current temperature: 65°C<br />
The run will begin when the<br />
heated cover reaches 103°C.<br />
Cancel<br />
F1 F2 F3 F4 F5<br />
Runs 4-7
4-8 Runs<br />
To start a run: (continued)<br />
Step Action<br />
7 Wait for the heated cover to reach 103 °C.<br />
The Run Time screen displays and the method you selected starts running.<br />
Sample 56.7 Cycle 1 of 25 HOT<br />
55.0<br />
2:00<br />
94.0<br />
10:00<br />
94.0<br />
0:30<br />
55.0<br />
0:30<br />
72.0<br />
0:30<br />
Pause Info<br />
F1 F2 F3 F4 F5<br />
8 Optional. To find out when the run will end, press F4 (Info).<br />
The Method Information screen appears.<br />
72.0<br />
5:00<br />
When you are through viewing this screen, press F4 (Return) to redisplay the Run<br />
Time screen.<br />
4.0<br />
02:32 PM Information 55.2°C<br />
User: lisa Method: General <strong>PCR</strong><br />
Run started at 01:32:30 PM, 03/01/00.<br />
Run will end at 06:35:30 PM, 03/01/00.<br />
Reaction vol: 50 µL<br />
Return<br />
F1 F2 F3 F4 F5
Pausing or Stopping a Run<br />
Overview This section describes how you can pause a run or stop it completely.<br />
Pausing a Run During a run, the Run Time screen is displayed.<br />
Sample 56.7 Cycle 1 of 25 HOT<br />
55.0<br />
2:00<br />
94.0<br />
10:00<br />
94.0<br />
0:30<br />
55.0<br />
0:30<br />
72.0<br />
0:30<br />
72.0<br />
5:00<br />
4.0<br />
Pause Info<br />
F1 F2 F3 F4 F5<br />
From this screen you can pause a run for a prespecified length of time and then<br />
resume it. For example, you might pause a run in order to add a reagent.<br />
Note Do not touch the sample block or the bottom of the heated cover during a pause.<br />
To pause a run:<br />
Step Action<br />
1 With the Run Time screen displayed, press F1 (Pause).<br />
The Pause screen appears.<br />
Sample 56.7 Cycle 1 of 25 HOT<br />
55.0<br />
2:00<br />
94.0<br />
10:00<br />
94.0<br />
0:30<br />
55.0<br />
0:30<br />
72.0<br />
0:30<br />
72.0<br />
5:00<br />
4.0<br />
Resume<br />
Paused. Will resume in mm:ss<br />
F1 F2 F3 F4 F5<br />
2 To resume the run, press F1 (Resume) to return to the Run Time screen.<br />
During a pause, the samples remain at the temperature they were paused at. The<br />
instrument resumes the run automatically if the pause time out expires before you<br />
press F1 to resume the run.<br />
By default the pause time out period is 10 minutes. To specify a different time, see<br />
“Configuring the Instrument” on page 6-2.<br />
Runs 4-9
4-10 Runs<br />
Stopping a Run The Stop key can be used to stop a run.<br />
To stop a run before it completes:<br />
Step Action<br />
1 Press the Stop key.<br />
The Confirm Stop screen appears.<br />
Sample 50.1 Confirm Stop HOT<br />
Press STOP to abort.<br />
Press Resume to continue.<br />
Resume<br />
F1 F2 F3 F4 F5<br />
2 Press the Stop key again to stop the run.<br />
The run stops and the End of Run screen appears.<br />
11:30 AM<br />
Method:exp001<br />
End of Run<br />
25.1°C<br />
Run aborted at 11:30:05 AM 02/01/00.<br />
Length of run is 01:34:25.<br />
Hist Exit<br />
F1 F2 F3 F4 F5<br />
If any errors occur during a run, the following message appears: “Exception<br />
occurred, check history file.” Press F1 (Hist) to review the history file. For more<br />
information, see the following section.<br />
3 Press F5 (Exit) to return to the Main Menu.<br />
In the above procedure, after the Stop key was pressed the first time, the run could<br />
have been resumed within the prespecified time (default is 10 minutes). This time is<br />
the same pause time out discussed in “Pausing a Run” on page 4-9. The instrument<br />
aborts the run automatically if the pause time out expires before you press F1 to<br />
resume the run.
Reviewing the History of a Run<br />
Reviewing the<br />
History<br />
From the End of Run screen or the Utilities path, you can display the History File<br />
screen, which provides information about the run that just ended. This information<br />
includes the events and errors that occured during the run. The instrument stores this<br />
information until it is overwritten by the next method used.<br />
To review the history:<br />
Step Action<br />
1 Access the History File screen by:<br />
Pressing F1 (Hist) from the End of Run screen, or<br />
Pressing F4 (Util) from the Main Menu, then F4 (More) from the Utilities 1<br />
<br />
screen, then F3 (Hist) from the Utilities 2 screen.<br />
History of method exp002<br />
User: adrian Reaction volume: 50 µL<br />
Run started at 02:30:45 PM, 02/01/00.<br />
Run aborted at 02:50:42 PM, 02/01/00.<br />
Length of run 00:19:57<br />
No exceptions PageDn Print Return<br />
F1 F2 F3 F4 F5<br />
2 Press F3 (Page Dn) or F2 (Page Up) to scroll through the file.<br />
3 Optional. Press F4 (Print) to print the record.<br />
History Formats The following table lists the history line formats.<br />
Pre-<strong>PCR</strong> hold in Pre-<strong>PCR</strong> xx Setpt xx<br />
<strong>PCR</strong> segment in Cycle xx Setpt xx Repxx<br />
Any other hold in Hold xx Setpt xx<br />
Runs 4-11
History File Records The following table lists the history file record, a description of the record, and the type<br />
of record.<br />
Record Description Type<br />
History of method xxxxxxxxxxxxxxx<br />
User xxxxxx Reaction volume xxx µL<br />
Run started at hh:mm:ss am mm/dd/yy<br />
This header record is always created. Report<br />
Run ended at hh:mm:ss am mm/dd/yy<br />
Length of run hh:mm:ss RampSpeed: 9600<br />
Power failure in Cycle xx at Setpt xx.<br />
Power failed at hh:mm:ss am for hh:mm:ss.<br />
Run resumed at hh:mm:ss am<br />
Drift error in Cycle xx Setpt xx Repxx. Temperature<br />
drifted x.x°c from setpt<br />
Cover error in Cycle xx Setpt xx Repxx.<br />
Heated cover at xx.x°c<br />
Sensor error in Cycle xx Setpt xx Repxx.<br />
Block sensor failure.<br />
Sensor error in Cycle xx Setpt xx Repxx.<br />
Cover sensor failure.<br />
Setpt error in Cycle xx Setpt xx Repxx.<br />
Could not reach xx.x in hh:mm:ss<br />
Program pause in Cycle xx Setpt xx Rep xxx Method<br />
paused at xx °C for hh:mm:ss<br />
Manual pause in Cycle xx Setpt xx Rep xxx Method<br />
paused at xx °C for hh:mm:ss<br />
a. http://www.appliedbiosystems.com/<strong>2700</strong><br />
4-12 Runs<br />
There was a power failure during a<br />
specified point in a cycle.<br />
The message, for >18, indicates that<br />
the power was off for more than 18<br />
hours.<br />
Block drift error.<br />
The block has drifted ± 2 °C from set<br />
point during the hold segment of a run.<br />
Heated cover drift error.<br />
Report<br />
Report<br />
Report<br />
The cover has drifted ± 5 °C from<br />
105 °C anytime during the run.<br />
Block sensor failure. Fatal error.<br />
Access our Web<br />
site. a<br />
Heated cover sensor failure. Fatal error.<br />
This setpoint error is only logged for<br />
setpoints above 15 °C.<br />
The limit is 5 times the normal ramping<br />
time.<br />
A programmed pause was<br />
encountered.<br />
Access our Web<br />
site. a<br />
Fatal error.<br />
Access our Web<br />
site. a<br />
Report<br />
You paused the run. Report
When a Run Completes<br />
End of Run Screen When a run ends, the End of Run screen appears. However, if your method has an<br />
indefinite hold of 4 °C (for example), you must first press the Stop key to display the<br />
screen shown below.<br />
Method Not Stored<br />
Screen<br />
11:30 AM End of Run 25.1°C<br />
Method: General <strong>PCR</strong><br />
Run completed at 11:30:05 AM, 02/01/00.<br />
Length of run is 01:34:25.<br />
Hist Exit<br />
F1 F2 F3 F4 F5<br />
If you created a new method but have not stored it, when F5 (Exit) is pressed, the<br />
Method Not Stored screen displays to give you the opportunity to save the method<br />
before returning to the Main Menu.<br />
If you attempt to exit the End of Run screen before storing a new method, the Method<br />
Not Stored screen appears.<br />
Method Not Stored<br />
Press Store to save the method.<br />
Press Exit to delete the method.<br />
Store<br />
Exit<br />
F1 F2 F3 F4 F5<br />
If you want to store the method, press F2 (Store). For more information about naming<br />
and storing a method, see “Creating a Method” on page 5-6.<br />
Runs 4-13
Methods and Users 5<br />
Overview<br />
About This Chapter This chapter provides procedures for creating and editing a method whether it is<br />
simple or more complex. Procedures for adding and handling user names are also<br />
included.<br />
In This Chapter This chapter contains the following topics:<br />
5<br />
Topic See Page<br />
Adding, Changing, or Deleting a User Name 5-2<br />
Creating a Method 5-6<br />
Changing a Method Using Advanced Features 5-9<br />
Handling Methods 5-18<br />
Methods and Users 5-1
Adding, Changing, or Deleting a User Name<br />
Introduction On the GeneAmp <strong>PCR</strong> <strong>System</strong> <strong>2700</strong>, methods are stored by both method name and<br />
user name. It’s important to have your own user name to keep your methods separate<br />
from those belonging to other users. Even if you are the only user of the system, you<br />
still need a user name.<br />
Adding a User Name To add a user:<br />
5-2 Methods and Users<br />
A user name can be added, as well as changed or deleted. You can protect your user<br />
name by having a PIN number. When a PIN number has been created, only the<br />
person who knows the PIN number can change the user name. Additionally, once you<br />
have PIN, the system allows you to lock your methods. When your methods are<br />
locked, only the person who knows the PIN number can overwrite or delete them.<br />
Having a PIN number is optional, as is locking your methods.<br />
Step Action<br />
1 From the Main Menu, press F5 (User).<br />
The Select User Name screen appears.<br />
Select User Name<br />
dave jenife<br />
adrian doug mamood<br />
anna faye mike<br />
Accept New Edit Delete Cancel<br />
F1 F2 F3 F4 F5<br />
2 Press F2 (New).<br />
The User Name screen appears.<br />
murray<br />
nayana<br />
ngui<br />
Note The blank space after the z is used to insert blank spaces.<br />
User Name<br />
abcdefghi<br />
jklmnopqrj<br />
stuvwxyz<br />
.,-+/():=<br />
Use ENTER key to select a character.<br />
Accept Backsp<br />
Cancel<br />
F1 F2 F3 F4 F5
To add a user: (continued)<br />
Step Action<br />
3 Spell the name by using the arrow keys to highlight the first letter of the name, then<br />
press Enter, then highlight the second letter, then press Enter, etc.<br />
When you have finished spelling the name (up to six characters), press F1 (Accept).<br />
The Security Code screen appears.<br />
User Name: hank PIN number: None<br />
Protection: Unlocked<br />
Press PIN # to create a #. Then you set<br />
protection to Locked to prevent methods<br />
from being overwritten or deleted.<br />
Accept Name PIN#<br />
Cancel<br />
F1 F2 F3 F4 F5<br />
If you want to add a PIN number, continue with the next step. If not, press F5<br />
(Cancel) to return to the Select User Name screen, which now shows your newly<br />
added user name.<br />
4 Press F3 (PIN#).<br />
The Create a PIN Number screen appears.<br />
Create a PIN Number<br />
Your PIN number protects the access to<br />
your user name and protection level<br />
Enter a PIN number. New PIN #: XXXX<br />
Accept Cancel<br />
F1 F2 F3 F4 F5<br />
5 Use the numeric keys to type a 4-digit PIN number, then press F1 (Accept).<br />
The Confirm PIN Number screen appears.<br />
Confirm PIN Number<br />
Your PIN number protects the access to<br />
your user name and protection level<br />
Enter a PIN number again. PIN #: XXXX<br />
Press Accept to confirm your PIN #.<br />
Accept Cancel<br />
F1 F2 F3 F4 F5<br />
6 Retype the same 4-digit PIN number, then press F1 (Accept).<br />
The Protection Status screen appears.<br />
Username: hank PIN number: XXXX<br />
Protection: Unlocked<br />
Press PIN # to create a #. Then you set<br />
protection to Locked to prevent methods<br />
from being overwritten or deleted.<br />
Accept Name<br />
PIN# Lock Cancel<br />
F1 F2 F3 F4 F5<br />
Methods and Users 5-3
Changing a User<br />
Name<br />
5-4 Methods and Users<br />
To add a user: (continued)<br />
Step Action<br />
7 Optional. Notice that the Protection field is set to Unlocked.<br />
Press F4 (Lock) to lock your methods. This toggles between a Locked and<br />
Unlocked state.<br />
Press F1 (Accept) to accept the protection status displayed and return to the Select<br />
User Name screen.<br />
8 Press F1 (Accept) to return to the Main Menu.<br />
A user name can be changed. However, if a PIN number was assigned to the name,<br />
only the person who knows the PIN number can change the name.<br />
To change a user name:<br />
Step Action<br />
1 From the Main Menu, press F5 (User).<br />
The Select User Name screen appears.<br />
<br />
adrian<br />
anna<br />
Select User Name<br />
dave<br />
doug<br />
faye<br />
jenife<br />
mamood<br />
mike<br />
Accept New Edit Delete Cancel<br />
F1 F2 F3 F4 F5<br />
2 Highlight the user name you want, then press F3 (Edit).<br />
3 Optional. If the system has a PIN number for this user, the Security Check screen<br />
appears.<br />
Security Check<br />
Type the PIN number, then press F1 (Accept).<br />
murray<br />
nayana<br />
ngui<br />
To perform this action, you must enter<br />
your PIN #:<br />
Your PIN #:<br />
Accept Cancel<br />
F1 F2 F3 F4 F5
Deleting a User<br />
Name<br />
To change a user name: (continued)<br />
Step Action<br />
4 When the following screen appears, function key F4 may or may not be active,<br />
depending on whether this user has a PIN number.<br />
Username: hank PIN number: XXXX<br />
Protection: Unlocked<br />
Press PIN # to create a #. Then you set<br />
protection to Locked to prevent methods<br />
from being overwritten or deleted.<br />
Accept Name PIN# Lock Cancel<br />
F1 F2 F3 F4 F5<br />
Press F2 (Name).<br />
The User Name screen appears.<br />
User Name<br />
abcdefghi<br />
jklmnopqrj<br />
stuvwxyz<br />
.,-+/():=<br />
Use ENTER key to select a character.<br />
Accept Backsp<br />
Cancel<br />
F1 F2 F3 F4 F5<br />
5 Press the CE key to clear the previous name, then enter a new user name, as<br />
follows:<br />
Spell the name by using the arrow keys to highlight the first letter, then press Enter,<br />
then highlight the second letter, then press Enter, etc. When you have finished<br />
spelling the name (up to six characters), press F1 (Accept).<br />
The Security Code screen appears again.<br />
6 If you want to create a new PIN number, continue with step 4 of “Adding a User<br />
Name” on page 5-2. If not, press F5 (Cancel) to return to the Select User Name<br />
screen, which shows the changed user name.<br />
You can delete a user name if there are no methods stored for that name.<br />
To delete a user name:<br />
Step Action<br />
1 From the Main Menu, press F5 (User).<br />
The Select User Name screen appears.<br />
Select User Name<br />
dave jenife<br />
adrian doug mamood<br />
anna faye mike<br />
murray<br />
nayana<br />
ngui<br />
Accept New Edit Delete Cancel<br />
F1 F2 F3 F4 F5<br />
2 Use the arrow keys to highlight the user name you want to delete, then press F4<br />
(Delete).<br />
The Select User Name screen is redisplayed minus the name you deleted.<br />
Methods and Users 5-5
Creating a Method<br />
Introduction A method is a set of instructions in which you specify how the instrument should heat<br />
and cool your samples in a <strong>PCR</strong> thermal profile. On the system <strong>2700</strong> a method is<br />
represented graphically, as shown below on the Create/Edit screen. the graph is the<br />
wavy line in the middle.<br />
5-6 Methods and Users<br />
Temperatures above<br />
Times below<br />
1 Hld 3 Tmp 25 Cycles 2 Holds<br />
94.0 94.0<br />
5:00 0:30<br />
Create/Edit<br />
55.0<br />
0:30<br />
72.0<br />
0:30<br />
72.0<br />
7:00<br />
On the Create/Edit screen, temperatures are shown above the graph in degrees<br />
Celsius. Hold times in minutes and seconds are shown below the graph. The central<br />
portion of the screen, delineated by dashed lines, is the <strong>PCR</strong> segment. In this<br />
example, the <strong>PCR</strong> segment repeats 25 times. After <strong>PCR</strong> (in the post-<strong>PCR</strong> segment),<br />
the instrument holds the samples at 72 °C for 7 minutes, then cools to 4 °C and holds<br />
the samples at this temperature until you stop the run.<br />
We call this the “Create/Edit screen” because it is the same screen with the same<br />
functions, whether you are creating a new method or editing an existing one. When<br />
you create a new method, the system provides a default method (shown above).<br />
For an overview of the Create/Edit screen flow, see the chart on page D-4.<br />
Before creating a method, you need to have added yourself as a user. You will be<br />
prompted for your user name when you attempt to store the method. For more<br />
information, see “Adding, Changing, or Deleting a User Name” on page 5-2.<br />
4.0<br />
Start Store Print More Cancel<br />
F1 F2 F3 F4 F5<br />
<strong>PCR</strong> Segment<br />
<strong>PCR</strong> segment repeated<br />
25 times
Procedure To create a method:<br />
Step Action<br />
1 From the Main Menu, press F2 (Create).<br />
The Create/Edit screen appears.<br />
1 Hld 3 Tmp 25 Cycles 2 Holds<br />
94.0 94.0<br />
5:00 0:30<br />
55.0<br />
0:30<br />
72.0<br />
0:30<br />
72.0<br />
7:00<br />
2 Change times or temperatures or number of cycles by highlighting each parameter<br />
you want to change, typing in a new value with the numeric keys, then pressing<br />
Enter.<br />
If the method you want to create is more complex that the one shown above,<br />
continue with the procedure and create and store a method as close to your ideal<br />
one as possible, then see “Changing a Method Using Advanced Features” on<br />
page 5-9.<br />
3 When you have finished changing parameters, press F2 (Store).<br />
The Store Method on Instrument screen appears.<br />
4.0<br />
Start Store Print More Cancel<br />
F1 F2 F3 F4 F5<br />
Parameter Explanation<br />
Temperature The number above the graph in °C. Valid range is 4.0 °C to<br />
99.9 °C.<br />
Time The number below the graph in min:sec format. Valid range is<br />
00.00 to 99:59; however, a value of 99:00 or greater creates a<br />
hold time of ∞ that lasts indefinitely. A hold time of ∞ can be used<br />
only as the final hold time on the graph (in the post-<strong>PCR</strong> portion).<br />
For more information, see “About Post-<strong>PCR</strong> Parameters” on<br />
page 5-8.<br />
Hold Called Hld, Tmp, or Holds in the top line of the screen. This<br />
parameter determines the number of time/temperature<br />
segments in each portion of the graph delineated by dashed<br />
lines. In the pre-<strong>PCR</strong> portion, this value is usually 1. In the <strong>PCR</strong><br />
portion (middle), 3 is typical for many <strong>PCR</strong> amplifications:<br />
template denaturation, primer annealing, and primer extension,<br />
although the valid range is 2–6.<br />
Cycles The number of times you want the <strong>PCR</strong> portion (middle) of the<br />
graph to repeat. Valid range is 2–99.<br />
Store Method on Instrument<br />
User: adrian<br />
Method:exp000<br />
Free Mem: 122 methods 946 segments<br />
Accept User Method<br />
Cancel<br />
F1 F2 F3 F4 F5<br />
Methods and Users 5-7
About Post-<strong>PCR</strong><br />
Parameters<br />
5-8 Methods and Users<br />
To create a method: (continued)<br />
Step Action<br />
4 Note If you want to use the method name provided by the system (e.g., exp000),<br />
skip to step 6. If you want to use a different name, press F3 (Method) to display the<br />
Method Name screen.<br />
Method Name exp001<br />
abcdefghi<br />
jklmnopqrj<br />
stuvwxyz<br />
.,-+/():=<br />
Use ENTER key to select a character.<br />
Accept Backsp<br />
Cancel<br />
F1 F2 F3 F4 F5<br />
5 Press the CE key to clear the method name, then spell out the new name by<br />
highlighting the first letter, then pressing Enter, highlighting the second letter, then<br />
pressing Enter, etc. Numeric keys can be used as well.<br />
When you have finished spelling the name, press F1 (Accept) to return to the Store<br />
Method on Instrument screen.<br />
6 When the method name you want to use is displayed on the Store Method on<br />
Instrument screen, press F1 (Accept). Your method is stored and you are returned<br />
to the Main Menu.<br />
The post-<strong>PCR</strong> incubation temperature and hold time parameters define how to hold<br />
your samples at a specified temperature until you are ready to analyze them.<br />
Note If the idle state setpoint, or the last hold of the method are below 15 °C, then the heated<br />
cover will automatically set to 50 °C<br />
Typical Post-<strong>PCR</strong> Parameter Settings:<br />
Temperature Time (min:sec) Use for<br />
72 °C 7:00 Complete extension of all amplicons<br />
72 °C 99:59 (×) AmpErase applications<br />
4 °C 99:59 (×) General storage
Changing a Method Using Advanced Features<br />
Introduction The previous section told you how to create and store a method. If you want to change<br />
a method or make a more complex method, the features described in this section will<br />
help.<br />
Editing a Method To edit an existing method:<br />
Step Action<br />
1 From the Main Menu, press F3 (Edit).<br />
The Stored Methods screen appears.<br />
Methods<br />
User Size LastUsed<br />
appl01<br />
exp000<br />
exp001<br />
exp002<br />
adrian<br />
adrian<br />
adrian<br />
adrian<br />
11<br />
10<br />
12<br />
13<br />
03/04/00<br />
02/22/00<br />
02/10/00<br />
02/02/00<br />
Edit View User Sort Cancel<br />
F1 F2 F3 F4 F5<br />
2 Highlight the method you want to change, then press F1 (Edit).<br />
The Create/Edit screen appears.<br />
1 Hld 3 Tmp 25 Cycles 2 Holds<br />
94.0 94.0<br />
5:00 0:30<br />
This screen is the same one that can be accessed by pressing F2 (Create) from the<br />
Main Menu. Once you have reached this screen, you can perform the same<br />
functions, regardless of how you accessed it.<br />
From this screen you can:<br />
55.0<br />
0:30<br />
72.0<br />
0:30<br />
72.0<br />
7:00<br />
F1 F2 F3 F4 F5<br />
4.0<br />
Start Store Print More Cancel<br />
Action See Topic Page<br />
Change parameters<br />
displayed on this screen<br />
Creating a Method 5-6<br />
Use advanced features Inserting a Hold<br />
5-10<br />
Deleting a Hold<br />
Inserting a Cycle<br />
Inserting a Programmed Pause<br />
Editing a Programmed Pause<br />
Deleting a Programmed Pause<br />
5-11<br />
5-12<br />
5-14<br />
5-15<br />
5-16<br />
Auto-Incrementing/ Decrementing<br />
Temperature Control Parameters<br />
5-16<br />
Store the method Creating a Method 5-6<br />
Methods and Users 5-9
Inserting a Hold A hold is a single time/temperature segment of a method, e.g., samples are held at<br />
94.0 °C for 5 minutes, 00 seconds (5:00).<br />
5-10 Methods and Users<br />
There are two ways you can insert a hold into a method:<br />
You can increment the value of the Hld, Tmp, or Holds fields on the Create/Edit<br />
<br />
screen, then press the Enter key. This adds a hold at the far right of the pre-<strong>PCR</strong>,<br />
<strong>PCR</strong>, or post-<strong>PCR</strong> segment, separated by dashed lines, respectively.<br />
You can use the procedure described below to insert a hold to the left of any<br />
<br />
segment.<br />
To insert a hold:<br />
Step Action<br />
1 From the Create/Edit screen, use the arrow keys to highlight a time or temperature<br />
parameter to the left of which you want to insert a hold.<br />
2 Press F4 (More).<br />
The Insert-Delete-More screen appears.<br />
1 Hld 3 Tmp 25 Cycles 2 Holds<br />
94.0 94.0<br />
5:00 0:30<br />
Note The Modify function (F1) also displays if the highlighted parameter was in<br />
the <strong>PCR</strong> segment.<br />
3 Press F2 (Insert).<br />
55.0<br />
0:30<br />
The Insert screen appears.<br />
72.0<br />
0:30<br />
72.0<br />
7:00<br />
4.0<br />
Insert Delete More<br />
F1 F2 F3 F4 F5<br />
1 Hld 3 Tmp 25 Cycles 2 Holds<br />
94.0 94.0<br />
5:00 0:30<br />
55.0<br />
0:30<br />
72.0<br />
0:30<br />
72.0<br />
7:00<br />
4.0<br />
Hold Cycle<br />
Pause<br />
Cancel<br />
F1 F2 F3 F4 F5<br />
Note The Pause function will not display on the Insert screen if the highlighted<br />
segment already has a pre-programmed pause or if highlighter is not on a <strong>PCR</strong><br />
segment parameter.
To insert a hold: (continued)<br />
Step Action<br />
4 Press F1 (Hold)<br />
Deleting a Hold There are two ways to delete a hold:<br />
The Insert-Delete-More screen appears showing the hold you added.<br />
2 Pre-<strong>PCR</strong> 3 Tmp 25 Cycles 2 Holds<br />
4.0<br />
0:30<br />
94.0 94.0<br />
5:00 0:30 55.0<br />
0:30<br />
Insert<br />
Delete<br />
72.0<br />
0:30<br />
More<br />
72.0<br />
7:00<br />
F1 F2 F3 F4 F5<br />
Note The Modify function (F1) also displays if the inserted hold was in the <strong>PCR</strong><br />
segment.<br />
5 Change the temperature and time of the new hold as necessary.<br />
6 Press F4 (More) to return to the Create/Edit screen.<br />
You can decrement the value of the Hld, Tmp, or Holds fields on the Create/Edit<br />
<br />
screen, then press Enter. This deletes a hold at the far right of the pre-<strong>PCR</strong>, <strong>PCR</strong>,<br />
or post-<strong>PCR</strong> segment, separated by dashed lines, respectively.<br />
You can use the procedure described below to delete a hold you highlight.<br />
<br />
To delete a hold:<br />
Step Action<br />
1 From the Create/Edit screen, use the arrow keys to highlight a time or temperature<br />
of a hold (segment) you want to delete.<br />
2 Press F4 (More).<br />
The Insert-Delete More screen appears.<br />
1 Hld 3 Tmp 25 Cycles 2 Holds<br />
94.0 94.0<br />
5:00 0:30<br />
Insert<br />
55.0<br />
0:30<br />
Delete<br />
72.0<br />
0:30<br />
72.0<br />
7:00<br />
More<br />
F1 F2 F3 F4 F5<br />
4.0<br />
4.0<br />
Note The Modify function (F1) also displays if the highlighted parameter was in<br />
the <strong>PCR</strong> segment.<br />
Methods and Users 5-11
Inserting a Cycle A cycle is a <strong>PCR</strong> portion of a method usually consisting of three time/temperature<br />
parameters and delineated by dashed lines. The instrument repeats these three<br />
temperatures and times for the number specified in the Cycles field (default is 25).<br />
5-12 Methods and Users<br />
To delete a hold: (continued)<br />
Step Action<br />
3 Press F3 (Delete).<br />
The Insert-Delete-More screen redisplays minus the hold you deleted.<br />
3 Tmp 25 Cycles 2 Holds<br />
94.0<br />
0:30<br />
Modify<br />
55.0<br />
0:30<br />
Insert<br />
72.0<br />
0:30<br />
72.0<br />
7:00<br />
Delete<br />
Note The Modify function (F1) also displays if the next highlighted parameter was<br />
in the <strong>PCR</strong> segment.<br />
4.0<br />
More<br />
F1 F2 F3 F4 F5<br />
4 Press F4 (More) to return to the Create/Edit screen.<br />
To insert a cycle:<br />
Step Action<br />
1 From the Create/Edit screen, use the arrow keys to highlight a time or temperature<br />
parameter to the left of which you want to insert a cycle.<br />
2 Press F4 (More).<br />
The Insert-Delete-More screen appears.<br />
1 Hld 3 Tmp 25 Cycles 2 Holds<br />
94.0 94.0<br />
5:00 0:30<br />
Note The Modify function (F1)also displays if the highlighted parameter was in<br />
the <strong>PCR</strong> segment.<br />
3 Press F2 (Insert).<br />
55.0<br />
0:30<br />
The Insert screen appears.<br />
72.0<br />
0:30<br />
72.0<br />
7:00<br />
4.0<br />
Insert Delete More<br />
F1 F2 F3 F4 F5<br />
1 Hld 3 Tmp 25 Cycles 2 Holds<br />
94.0 94.0<br />
5:00 0:30<br />
55.0<br />
0:30<br />
72.0<br />
0:30<br />
72.0<br />
7:00<br />
4.0<br />
Hold Cycle<br />
Pause<br />
Cancel<br />
F1 F2 F3 F4 F5<br />
Note The Pause function will not display on the Insert screen if the highlighted<br />
segment already has a pre-programmed pause or if highlighter is not on a <strong>PCR</strong><br />
segment parameter.
To insert a cycle: (continued)<br />
Step Action<br />
4 Press F2 (Cycle)<br />
The Modify screen appears showing the cycle (<strong>PCR</strong> segment) you added.<br />
1 Hld 3 Tmp 25 Cycles<br />
94.0 94.0<br />
5:00 0:30 55.0<br />
0:30<br />
Modify<br />
Insert<br />
72.0<br />
0:30<br />
Delete<br />
3 Tmp 25 Cycles<br />
94.0<br />
0:30 55.0<br />
0:30<br />
More<br />
F1 F2 F3 F4 F5<br />
5 Change the temperatures and times of the new cycle as necessary.<br />
6 Press F4 (More) to return to the Create/Edit screen.<br />
72.0<br />
0:30<br />
Note You can delete a cycle by entering 0 in the Tmp field, then pressing Enter.<br />
Methods and Users 5-13
Inserting a<br />
Programmed Pause<br />
5-14 Methods and Users<br />
A programmed pause is a point in the <strong>PCR</strong> portion of a method when cycling stops for<br />
a specified length of time. You define the frequency and length of the pause and the<br />
cycle at which it begins.<br />
To insert a programmed pause:<br />
Step Action<br />
1 From the Create/Edit screen, use the arrow keys to highlight a time or temperature<br />
parameter of the <strong>PCR</strong> segment during which you want to insert a programmed<br />
pause.<br />
2 Press F4 (More).<br />
The Modify screen appears.<br />
1 Hld 3 Tmp 25 Cycles 2 Holds<br />
94.0 94.0<br />
5:00 0:30<br />
3 Press F2 (Insert).<br />
The Insert screen appears.<br />
4 Press F3 (Pause).<br />
55.0<br />
0:30<br />
72.0<br />
0:30<br />
72.0<br />
7:00<br />
Modify Insert Delete More<br />
F1 F2 F3 F4 F5<br />
1 Hld 3 Tmp 25 Cycles 2 Holds<br />
94.0 94.0<br />
5:00 0:30<br />
55.0<br />
0:30<br />
72.0<br />
0:30<br />
72.0<br />
7:00<br />
The Define Programmed Pause screen appears.<br />
The fields that can be changed are highlighted in the illustration here.<br />
5 Type in the values you want to change. When you move the highlighter to No, the<br />
functions F2 (Yes) and F3 (No) become active. Press the appropriate key.<br />
4.0<br />
4.0<br />
Hold Cycle Pause<br />
Cancel<br />
F1 F2 F3 F4 F5<br />
Define Programmed Pause<br />
Start first pause at cycle 1 of 25.<br />
Pause every 25 cycles for 00:30.<br />
Accept Cancel<br />
F1 F2 F3 F4 F5
Editing a<br />
Programmed Pause<br />
To insert a programmed pause: (continued)<br />
Step Action<br />
6 Press F2 (Accept).<br />
The Insert-Delete-More-Edit screen appears showing the programmed pause you<br />
inserted.<br />
1 Hld 4 Tmp 25 Cycles 2 Holds<br />
94.0 94.0 Pause<br />
5:00 0:30 0:30 55.0<br />
0:30<br />
72.0<br />
0:30<br />
72.0<br />
7:00<br />
F1 F2 F3 F4 F5<br />
Note You can insert only one pause in each cycle.<br />
7 Press F4 (More) to return to the Create/Edit screen.<br />
If you have inserted a programmed pause in the <strong>PCR</strong> portion of your method, you can<br />
edit the parameters of the pause at any time.<br />
To edit a programmed pause:<br />
Step Action<br />
4.0<br />
Insert Delete More Edit<br />
1 From the Create/Edit screen, use the arrow keys to highlight the word Pause.<br />
2 Press F4 (More).<br />
The Insert-Delete-More-Edit screen appears.<br />
1 Hld 4 Tmp 25 Cycles 2 Holds<br />
94.0 94.0 Pause<br />
5:00 0:30 0:30 55.0<br />
0:30<br />
72.0<br />
0:30<br />
72.0<br />
7:00<br />
F1 F2 F3 F4 F5<br />
3 Press F5 (Edit).<br />
The Defined Programmed Pause screen appears.<br />
The fields that can be changed are highlighted in the illustration here.<br />
4 Make your changes to any fields, then press F1 (Accept)<br />
The Insert-Delete-More-Edit screen appears again.<br />
5 Press F4 (More) to return to the Create/Edit screen.<br />
4.0<br />
Insert Delete More Edit<br />
Define Programmed Pause<br />
Start first pause at cycle 1 of 25.<br />
Pause every 25 cycles for 00:30.<br />
Accept Cancel<br />
F1 F2 F3 F4 F5<br />
Methods and Users 5-15
Deleting a<br />
Programmed Pause<br />
Auto-Incrementing/<br />
Decrementing<br />
Temperature<br />
Control Parameters<br />
5-16 Methods and Users<br />
To delete a programmed pause:<br />
Step Action<br />
1 From the Create/Edit screen, use the arrow keys to highlight the word Pause.<br />
2 Press F4 (More).<br />
The Insert-Delete-More-Edit screen appears.<br />
1 Hld 4 Tmp 25 Cycles 2 Holds<br />
94.0 94.0 Pause<br />
5:00 0:30 0:30 55.0<br />
0:30<br />
72.0<br />
0:30<br />
72.0<br />
7:00<br />
3 Press F3 (Delete).<br />
The Modify screen appears without the pause.<br />
4 Press F4 (More) to return to the Create/Edit screen.<br />
Using the AutoX function, you can automatically increase or decrease the value for<br />
any <strong>PCR</strong> segment parameter a fixed amount every cycle.<br />
Note This feature is particularly useful towards the end of the amplification process since the<br />
amount of <strong>PCR</strong> product, available to be extended, increases with the number of cycles while the<br />
amount of available enzyme remains constant.<br />
4.0<br />
Insert Delete More Edit<br />
F1 F2 F3 F4 F5<br />
To automatically increase or decrease temperature control parameters:<br />
Step Action<br />
1 Use the arrow keys from the Create/Edit screen to select a time or temperature<br />
parameter in the <strong>PCR</strong> segment.<br />
2 Press F4 (More).<br />
The Modify screen appears.<br />
1 Hld 3 Tmp 25 Cycles 2 Holds<br />
94.0 94.0<br />
5:00 0:30<br />
3 Press F1 (Modify).<br />
55.0<br />
0:30<br />
72.0<br />
0:30<br />
The Select Modification screen appears.<br />
72.0<br />
7:00<br />
Modify Insert Delete More<br />
F1 F2 F3 F4 F5<br />
Select Modification<br />
AutoX<br />
- Increments or decrements time<br />
or temperature at the<br />
completion of each cycle<br />
4.0<br />
AutoX Cancel<br />
F1 F2 F3 F4 F5
To automatically increase or decrease temperature control parameters: (continued)<br />
Step Action<br />
4 Press F1 (AutoX).<br />
The AutoX screen appears.<br />
2 Pre-<strong>PCR</strong> 3 Tmp 25 Cycles 2 Holds<br />
Accept<br />
+0.0<br />
+0:00<br />
+<br />
+0.0<br />
+0:00<br />
*<br />
-<br />
+0.0<br />
+0:00<br />
Cancel<br />
F1 F2 F3 F4 F5<br />
Note If you have inserted a programmed pause, the AutoX screen displays the pause, but<br />
you cannot modify it from the AutoX screen.<br />
5 Highlight the <strong>PCR</strong> time or temperature parameter that you want modified when you<br />
run your method.<br />
Note From the AutoX screen, you cannot modify the number of parameters in<br />
each segment or the number of cycles.<br />
6 Use the numeric keypad to change numeric values. Press F2 (+) or F3 (-) to change<br />
the plus or minus signs.<br />
The selected sign displays in the current field. After you press Enter or an arrow<br />
key, an asterisk (*) appears for parameters that have been modified.<br />
2 Pre-<strong>PCR</strong> 3 Tmp 25 Cycles 2 Holds<br />
+0.0<br />
+0:00<br />
*<br />
+1.0<br />
-0:01<br />
+0.0<br />
+0:00<br />
Accept + -<br />
Cancel<br />
F1 F2 F3 F4 F5<br />
7 Press F1 (Accept) to accept all entries on the AutoX screen and return to the Modify<br />
screen.<br />
8 Press F4 (More) to return to the Create/Edit screen.<br />
Methods and Users 5-17
Handling Methods<br />
Introduction In this section we describe how to select a method, view method parameters, sort<br />
methods, search for a method, and print and delete a method.<br />
Predefined Methods The system <strong>2700</strong> supplies five predefined methods that you can run:<br />
5-18 Methods and Users<br />
AmpliTaq Gold <br />
BigDye Terminator<br />
General <strong>PCR</strong><br />
Time Release <strong>PCR</strong><br />
Touchdown <strong>PCR</strong><br />
Each of these methods is stored under the user name . You can edit these<br />
methods and store them under a different name, a different user name, or select any<br />
one and run it. For more information about these methods, see Appendix C, “Supplied<br />
Methods.”
Selecting a Method If the method you want to run has already been created and stored, you can select it<br />
from a list. If the method you want to run has not been created, see “Creating a<br />
Method” on page 5-6.<br />
To select a method:<br />
Step Action<br />
1 Access the Stored Methods screen. Most frequently you do this by pressing F2<br />
(Run) or F3 (Edit) from the Main Menu.<br />
The Stored Methods screen appears.<br />
Methods<br />
User Size LastUsed<br />
appl01<br />
exp000<br />
exp001<br />
exp002<br />
adrian<br />
adrian<br />
adrian<br />
adrian<br />
11<br />
10<br />
12<br />
13<br />
03/04/00<br />
02/22/00<br />
02/10/00<br />
02/02/00<br />
Edit View User Sort Cancel<br />
F1 F2 F3 F4 F5<br />
About This Screen<br />
The top line of the display continuously cycles between the following three lines:<br />
Methods User Size Stored<br />
<br />
– Stored represents the date the method was last saved. In the appropriate<br />
case, this column designates the date last used.<br />
– The units for the Size field are based on a calculation of the complexity and<br />
length of a method relative to a maximum size of 1102 size segments for the<br />
storage capacity of the instrument.<br />
Used Mem: xxx methods xxx segments<br />
<br />
– The Used Mem field displays the number of size segments used by all stored<br />
methods.<br />
Free Mem: xxx methods xxx segments<br />
<br />
– The Free Mem field displays the number of size segments available to store<br />
created methods.<br />
2 If you need help deciding which method to select, you can:<br />
View method parameters<br />
<br />
Sort methods by different categories<br />
Search for a method by user name<br />
<br />
Each of these topics is discussed later in this section.<br />
3 Select a method by using the up and down arrow keys to move the highlighter to a<br />
method listed on the Stored Methods screen.<br />
Note You can use the up and down arrow keys as repeat keys for quick scrolling.<br />
4 Press F1 to continue the function you began.<br />
Methods and Users 5-19
Viewing Method<br />
Parameters<br />
Sorting Methods If you have a large number of stored methods, you can sort them by name, date last<br />
used, date stored, and size.<br />
5-20 Methods and Users<br />
To view the parameters of a method before running it:<br />
Step Action<br />
1 Press F2 (View) from the Stored Methods screen.<br />
The View Method screen appears.<br />
The screen shows all the parameters of the method you selected.<br />
2 Hld 3 Tmp 25 Cycles 2 Holds<br />
55.0<br />
2:00<br />
94.0<br />
10:00<br />
94.0<br />
0:30<br />
55.0<br />
0:30<br />
72.0<br />
0:30<br />
72.0<br />
5:00<br />
4.0<br />
Start Method: exp 001 Return<br />
F1 F2 F3 F4 F5<br />
2 After reviewing <strong>PCR</strong> and post-<strong>PCR</strong> parameters of a stored method, you can:<br />
Press F1 (Start) to start the method.<br />
<br />
To sort methods:<br />
Press F5 (Return) and return to the Stored Methods screen.<br />
You cannot edit parameters from the View Method screen.<br />
Step Action<br />
1 Press F4 (Sort) from the Stored Methods screen.<br />
The Sort Methods screen appears.<br />
Sort Methods<br />
By: Method name<br />
Date last used<br />
Date stored<br />
Method size<br />
Accept Cancel<br />
F1 F2 F3 F4 F5
Searching for<br />
Methods<br />
To sort methods:<br />
Step Action<br />
2 Use the up and down arrow keys to select the type of sort.<br />
The following table describes the sort methods.<br />
Choose this item... To sort methods...<br />
Method name alphabetically.<br />
Date last used chronologically in descending order by<br />
date of use.<br />
The last method which ran or was<br />
stored is listed first.<br />
Date stored<br />
chronologically by date stored.<br />
Note Uses the most recent title and The last method stored is listed first.<br />
date, between date last used and the<br />
date stored.<br />
Method size in increasing order by the amount of<br />
memory used to store each method.<br />
3 Press F1 (Accept) to accept a selection.<br />
The largest size method is listed first.<br />
This returns you to the Stored Methods screen where the displayed methods are<br />
sorted according to your selection in step 2.<br />
You can find any method that has been stored under a user name.<br />
To search for a method:<br />
Step Action<br />
1 Press F3 (User) from the Stored Methods screen.<br />
The Select User Name screen appears.<br />
<br />
adrian<br />
anna<br />
Select User Name<br />
dave<br />
doug<br />
faye<br />
jenife<br />
mamood<br />
mike<br />
murray<br />
nayana<br />
ngui<br />
Accept All<br />
Cancel<br />
F1 F2 F3 F4 F5<br />
2 From this screen you can:<br />
Press F2 (All) to list all the methods currently stored on the instrument.<br />
Press F1 (Accept) to display the methods stored under the highlighted name.<br />
3 Making a selection returns you to the Stored Methods screen which now displays<br />
the methods of the user you selected.<br />
Methods and Users 5-21
Printing a Method If you have a printer connected to your instrument and have configured your<br />
instrument for it, you can print a record of the parameters in a method. For more<br />
information see “Configuring the Instrument” on page 6-2.<br />
Deleting a Method<br />
5-22 Methods and Users<br />
To print a method:<br />
Step Action<br />
1 From the Create/Edit screen, press F3 (Print).<br />
This prints a copy of the parameters for the method displayed on the screen.<br />
To delete a method:<br />
Step Action<br />
1 From the Main Menu press F4 (Util).<br />
The Utilities 1 screen appears.<br />
2 Press F4 (More)<br />
Utilities<br />
Diag - Instrument diagnostics<br />
TmCalc - Calculates melting temp<br />
Config - Instrument configuration<br />
Diag TmCalc Config More Exit<br />
F1 F2 F3 F4 F5<br />
The Utilities 2 screen appears.<br />
Utilities<br />
Delete - Delete a Method<br />
Hist - Display history of last run<br />
Delete Hist More Exit<br />
F1 F2 F3 F4 F5<br />
3 Press F1 (Delete).<br />
The Stored Methods screen appears.<br />
Methods<br />
User Size LastUsed<br />
appl01<br />
exp000<br />
exp001<br />
exp002<br />
adrian<br />
adrian<br />
adrian<br />
adrian<br />
11<br />
10<br />
12<br />
13<br />
03/04/00<br />
02/22/00<br />
02/10/00<br />
02/02/00<br />
Delete View User Sort Cancel<br />
F1 F2 F3 F4 F5
To delete a method: (continued)<br />
Step Action<br />
4 Use the arrow keys to highlight the method you want to delete, then press F1<br />
(Delete).<br />
The Delete Method screen appears.<br />
Delete Method<br />
Methods on Inst User Size Stored<br />
exp001<br />
adrian12<br />
02/10/00<br />
Press Yes to delete the method<br />
Yes Cancel<br />
F1 F2 F3 F4 F5<br />
5 Press F1 (Yes) to delete the method.<br />
If the method was... Then...<br />
Unlocked the method is deleted.<br />
Locked the Security Check screen appears.<br />
Type the PIN number, then press F1<br />
(Accept). The Delete Method screen<br />
appears.<br />
Press F1 (Yes) to delete the method.<br />
After the method is deleted, the Stored Methods screen appears.<br />
Note Even after you delete the last method stored under a user name, the name<br />
is not removed from the instrument. To delete the name, see “Deleting a User<br />
Name” on page 5-5.<br />
Methods and Users 5-23
Utilities 6<br />
Overview<br />
About This Chapter This chapter provides information about almost all functions that can be performed<br />
from the Util (Utilities) selection on the Main Menu.<br />
In This Chapter This chapter contains the following topics:<br />
6<br />
Topic See Page<br />
Configuring the Instrument 6-2<br />
Upgrading <strong>System</strong> Firmware 6-4<br />
Connecting to a Printer 6-5<br />
Calculating the Melting Temperature 6-6<br />
Running Hardware Diagnostics 6-7<br />
Running the Calibration Verification Test 6-9<br />
Running the Temperature Non-Uniformity Test 6-9<br />
Running <strong>System</strong> Performance Diagnostics 6-10<br />
Utilities 6-1
Configuring the Instrument<br />
6-2 Utilities<br />
Overview There are about six parameters or features you can enable or disable on the<br />
GeneAmp <strong>System</strong> <strong>2700</strong>. These six fields are spread across two configuration<br />
screens. Pressing F4 (More) takes you from screen to screen in a circle.<br />
Procedure To configure the instrument:<br />
Step Action<br />
1 From the Main Menu, press F4 (Util).<br />
The Utilities 1 screen appears.<br />
Utilities<br />
Diag - Instrument diagnostics<br />
TmCalc - Calculates melting temp<br />
Config - Instrument configuration<br />
Diag TmCalc Config More Exit<br />
F1 F2 F3 F4 F5<br />
2 Press F3 (Config).<br />
The Configuration 1 screen appears. You can press F4 (More) to cycle from one<br />
configuration screen to the next.<br />
Instrument Configuration<br />
Time: 11:30 AM<br />
Date: 03/01/00 M/D/Y<br />
Run Time Printer: Off<br />
Accept PM 24Hr More Cancel<br />
F1 F2 F3 F4 F5<br />
Instrument Configuration<br />
Pause Time Out: 10:00 (00:01-99:59)<br />
Idle State Setpoint: 25.0°C (4.0-99.9)<br />
Baud Rate: 9600<br />
Accept More Cancel<br />
F1 F2 F3 F4 F5<br />
3 On each configuration screen you can:<br />
Action Explanation<br />
Change field values Use arrow keys to highlight the value of the<br />
appropriate field, then see “Parameters” below.<br />
Press F1 (Accept) This stores your entries and returns to the<br />
Utilities 1 screen.<br />
Press F4 (More) This displays the next configuration screen.<br />
Press F5 (Cancel) This returns to the Utilities 1 screen without saving.
Parameters Below are parameters that are used on the configuration screens.<br />
Field Explanation<br />
Time Use the numeric keys to enter the time. Choose AM, PM, or 24-Hour<br />
using the function keys.<br />
Date Use the numeric keys to change the date. Choose M/D/Y, D/M/Y, or<br />
Y/M/D format for month, day, and year, using the function keys.<br />
Run Time Printer Choose On or Off using the function keys. Enabling the printer allows<br />
you to print method parameters or records of run time events directly<br />
from the display screen. See “Connecting to a Printer” on page 6-5.<br />
Pause Time Out Use the numeric keys to enter the minutes:seconds in the range<br />
shown on the configuration screen. This field sets the length of time<br />
the instrument pauses when you press F1 (Pause) or the Stop key<br />
from the Run Time screen. See “Pausing or Stopping a Run” on<br />
page 4-9.<br />
Idle State Setpoint Use the numeric keys to type a temperature in the range shown on<br />
the configuration screen. This value is the temperature at which the<br />
instrument will remain when powered up but idle.<br />
IMPORTANT After a run is completed or terminated, there is<br />
approximately a 30-second delay before the instrument attains the<br />
specified idle state temperature. This allows you to stop one method<br />
and start another before the instrument temperature changes.<br />
Baud Rate Use the function keys Up and Down to choose a baud rate. Values<br />
are 38400, 19200, 9600, 4800, 2400, 1200, and 600.<br />
This value is the rate at which the instrument transmits data through<br />
the printer port and serial port.<br />
Item Value<br />
Baud Rate 9600<br />
Parity NONE<br />
Data Bits 8<br />
Stop Bits 1<br />
Utilities 6-3
Upgrading <strong>System</strong> Firmware<br />
About the Upgrade When a new version of system firmware becomes available, you can download it from<br />
our Web site, http://www.appliedbiosystems.com/<strong>2700</strong>. Instructions for performing the<br />
upgrade will also be posted on the Web site.<br />
6-4 Utilities<br />
In order to perform the upgrade, you will need to connect a PC communication cable<br />
P/N N805-1327 to the RS485 port on the side of the system <strong>2700</strong> (shown below) to a<br />
serial port on a MIcrosoft ® Windows ® -based computer that has Internet access.<br />
GR1989<br />
RS485 port
Connecting to a Printer<br />
Introduction If you elect to connect an optional printer to your system <strong>2700</strong>, you can print out a<br />
hard copy of the time and temperature parameters for <strong>PCR</strong> methods you create.<br />
Specifications You can connect the system <strong>2700</strong> to any printer with a serial (RS-232C) interface<br />
board and the following specifications:<br />
Baud Rate 9600<br />
Parity NONE<br />
Data Bits 8<br />
Stop Bits 1<br />
Cable Connections Connect one end of your Applied Biosystems (N805-1326) printer cable to the RS-485<br />
serial port on the side panel of the system <strong>2700</strong> and connect the other end to the<br />
serial adapter card port on the rear panel of the printer.<br />
Installing a Printer See your printer manual for instructions on how to connect the printer cable to your<br />
printer and complete any other necessary installation steps.<br />
After you have conncted the printer cable and installed the printer, you must configure<br />
the instrument for the printer. See “Configuring the Instrument” on page 6-2.<br />
Utilities 6-5
Calculating the Melting Temperature<br />
6-6 Utilities<br />
Procedure Use the T m Calculator to determine the denaturation temperature of a primer set of<br />
known sequence.<br />
To calculate the melting temperature:<br />
Step Action<br />
1 Press F4 (Util) from the Main Menu. The Utilities 1 screen appears.<br />
Utilities<br />
Diag - Instrument diagnostics<br />
TmCalc - Calculates melting temp<br />
Config - Instrument configuration<br />
Diag TmCalc Config More Exit<br />
F1 F2 F3 F4 F5<br />
2 Press F2 (TmCalc).<br />
The T m Calculator appears.<br />
[Salt]: 50 mM [Primer] 0.20 uM<br />
P1: 5’<br />
P2: 5’<br />
Tm of P1= Tm of P2=<br />
Press ENTER to calculate Tm’s<br />
Return<br />
3 Enter the salt concentration.<br />
The default is 50. Enter values 5 to 1000.<br />
4 Enter the primer concentration.<br />
The default is 0.20. Enter values 0.01 to 10.00.<br />
5 Enter primer sequence in P1 using the function keys for A, C, G, or T.<br />
6 Enter primer sequence in P2 and press Enter to calculate the Tms. The melting points are displayed. Use this information to program a run.<br />
For more information, see Chapter 5, “Methods and Users.”<br />
7 Press F5 (Return) to display the Utilities 1 screen.
Running Hardware Diagnostics<br />
Overview The system <strong>2700</strong> allows you to perform two hardware diagnostic tests:<br />
Testing the<br />
Display Screen<br />
Visually determine if the Liquid Crystal Display (LCD) screen is functioning<br />
<br />
properly<br />
Verify the operation of the keypad<br />
Both tests are performed from the Hardware Diagnostics screen.<br />
Hardware Diagnostics<br />
Disp - LCD Display Diagnostic<br />
Keypad - Keypad Diagnostic<br />
Disp Keypad<br />
Exit<br />
F1 F2 F3 F4 F5<br />
The Display diagnostic test allows you to visually determine if the display screen is<br />
properly functioning by turning on and off all the LCD pixels.<br />
To test the display screen:<br />
Step Action<br />
1 Access the Display Diagnostics screen.<br />
a. From the Main Menu press F4 (Util) to access the Utilities 1 screen.<br />
b. Press F1 (Diag) to display the Diagnostics screen.<br />
c. Press F1 (Hard) to display the Hardware Diagnostics screen.<br />
d. Press F1 (Disp).<br />
The Display Diagnostics screen appears.<br />
Display Diagnostics<br />
1. Read all instructions first.<br />
2. Press Run to turn ON all pixels.<br />
3. Press STOP to turn OFF all pixels.<br />
4. Press STOP to exit.<br />
Run Exit<br />
F1 F2 F3 F4 F5<br />
2 Read and perform the instructions on the screen.<br />
Utilities 6-7
Testing the Keypad Use the keypad diagnostic test to verify that all 22 keys on the control panel are<br />
functioning properly.<br />
6-8 Utilities<br />
To test the keypad:<br />
Step Action<br />
1 Access the Keypad Diagnostics screen.<br />
a. From the Main Menu press F4 (Util) to access the Utilities 1 screen.<br />
b. Press F1 (Diag) to display the Diagnostics screen.<br />
c. Press F1 (Hard) to display the Hardware Diagnostics screen.<br />
d. Press F2 (Keypad).<br />
The Keypad Diagnostic screen appears.<br />
2 Press F1 (Run).<br />
Keypad Diagnostic<br />
After pressing Run, press the blinking<br />
key or press STOP twice to exit.<br />
Run Exit<br />
F1 F2 F3 F4 F5<br />
The Control Panel screen appears.<br />
STOP<br />
F1 F2 F3 F4 F5<br />
1 2 3<br />
4 5 6<br />
7 8 9<br />
ENTER 0 CE<br />
F1 F2<br />
F3 F4 F5<br />
3 Press each indicated flashing key.<br />
After you have pressed each key in order, the test ends, and the Hardware<br />
Diagnostics screen appears.
Running the Calibration Verification Test<br />
Why Use This Test? Use this test to verify the temperature calibration of your system <strong>2700</strong>.<br />
Equipment Required This test requires the 0.2-mL Temperature Verification <strong>System</strong> (P/N 4317939) for<br />
96-well thermal cyclers.<br />
For more information on performing the test, refer to the instructions included with<br />
your Temperature Verification <strong>System</strong>. Follow the procedure for the GeneAmp <strong>PCR</strong><br />
<strong>System</strong> 9700.<br />
Running the Temperature Non-Uniformity Test<br />
Why Use This Test? Use this test to verify the temperature non-uniformity of the sample block in the<br />
system <strong>2700</strong>.<br />
Equipment Required This test requires the 0.2-mL Temperature Verification <strong>System</strong> (P/N 4317939) for<br />
96-well thermal cyclers.<br />
For more information on performing the test, refer to the instructions included with<br />
your Temperature Verification <strong>System</strong>. Follow the procedure for the GeneAmp <strong>PCR</strong><br />
<strong>System</strong> 9700.<br />
Utilities 6-9
Running <strong>System</strong> Performance Diagnostics<br />
6-10 Utilities<br />
Overview After you have configured the system <strong>2700</strong>, conduct the system performance tests to<br />
verify the integrity of the cooling and heating system.<br />
Running the<br />
Rate Test<br />
There are two system performance tests:<br />
Rate Test<br />
<br />
Cycle Test<br />
IMPORTANT Before you begin these tests, make sure that you place an empty 96-well plate<br />
with full plate cover on the sample block (or use an empty tray and cover the wells with caps or<br />
the full plate cover). Close the heated cover, and pull the lever down.<br />
Both of these tests are performed from the <strong>System</strong> Performance screen.<br />
<strong>System</strong> Performance<br />
Rate - Cool and Heat Rate Test<br />
Cycle - Cycle Performance Test<br />
Rate Cycle<br />
Exit<br />
F1 F2 F3 F4 F5<br />
Use the Rate Test to verify that the Peltier units are operating correctly. The test takes<br />
approximately two minutes to run.<br />
To run the Rate Test:<br />
Step Action<br />
1 Access the Warning screen.<br />
a. From the Main Menu press F4 (Util) to access the Utilities 1 screen.<br />
b. Press F1 (Diag) to display the Diagnostics screen.<br />
c. Press F2 (<strong>System</strong>) to display the <strong>System</strong> Performance screen.<br />
d. Press F1 (Rate).<br />
The Warning screen appears.<br />
WARNING!!!<br />
Install an empty Microplate<br />
with a MicroAmp Full Plate Cover.<br />
Cont<br />
Cancel<br />
F1 F2 F3 F4 F5<br />
2 After you have installed a plate and cover, press F1 (Cont).<br />
The instrument then runs through a series of tests where the sample block is<br />
stabilized at 35 °C, 94 °C, and 4 °C.
Running the<br />
Cycle Test<br />
To run the Rate Test: (continued)<br />
Step Action<br />
3 At the conclusion of the test, the Cool and Heat Rate Test screen appears. The<br />
screen displays the test results and whether the test results passed or failed.<br />
Cool and Heat Rate Test Pass<br />
Heating rate: x.xx °C/s<br />
Cooling rate: x.xx °C/s<br />
Print<br />
Cancel<br />
F1 F2 F3 F4 F5<br />
The following table lists the passing ranges for the Rate Test.<br />
Heating Rate > 1.25 °C /second<br />
Cooling Rate > 1.55 °C /second<br />
Use the Cycle Test to verify that the <strong>PCR</strong> cycling function operates properly. This test<br />
takes approximately 15 minutes to run.<br />
To run the Cycle Test:<br />
Step Action<br />
1 Access the Warning screen.<br />
a. From the Main Menu press F4 (Util) to access the Utilities 1 screen.<br />
b. Press F1 (Diag) to display the Diagnostics screen.<br />
c. Press F2 (<strong>System</strong>) to display the <strong>System</strong> Performance screen.<br />
d. Press F2 (Cycle).<br />
The Warning screen appears.<br />
WARNING!!!<br />
Install an empty Microplate<br />
with a MicroAmp Full Plate Cover.<br />
Cont<br />
Cancel<br />
F1 F2 F3 F4 F5<br />
2 After you have installed a plate cover, press F1 (Cont).<br />
The Cycle Test executes a standard <strong>PCR</strong> cycling reaction, measures, and reports<br />
the average cycle time, and the cycle to cycle variation.<br />
Note Pressing Pause during the Cycle Test may generate false test results. Re-run the<br />
Cycle Test if Pause was pressed during the test.<br />
Utilities 6-11
6-12 Utilities<br />
To run the Cycle Test: (continued)<br />
Step Action<br />
3 At the conclusion of the test, the display indicates test results and whether the test<br />
results passed or failed.<br />
Cycle Performance Pass<br />
Average Cycle Time: xxx.x sec<br />
Cycle Time STD: x.x sec<br />
Print<br />
Cancel<br />
F1 F2 F3 F4 F5<br />
The following table lists the passing ranges for the Cycle Test.<br />
Average Cycle Time
Maintenance 7<br />
Overview<br />
About This Chapter This chapter provides procedures for maintaining your GeneAmp <strong>PCR</strong> <strong>System</strong> <strong>2700</strong>.<br />
! WARNING Do not remove the instrument cover. There are no components inside the<br />
system <strong>2700</strong> that you can safely service yourself. If you suspect a problem, refer to our Web<br />
site,<br />
http://www.appliedbiosystems.com/<strong>2700</strong><br />
In This Chapter This chapter contains the following topics:<br />
7<br />
Topic See Page<br />
Cleaning the Instrument 7-2<br />
Replacing Fuses 7-4<br />
Maintenance 7-1
Cleaning the Instrument<br />
7-2 Maintenance<br />
Preparation To clean the sample wells, raise the lid. The cleaning position is shown below.<br />
Cleaning the Sample<br />
Wells<br />
GR1988<br />
Heated platen<br />
Heated cover<br />
Sample wells<br />
If you use any cleaning or decontamination method, except those recommended in<br />
the manual, you risk damaging the equipment. Clean the sample wells once a month<br />
or as needed.<br />
To clean the sample wells:<br />
Step Action<br />
1 If a method is running, press the Stop key twice.<br />
2 Turn off the instrument.<br />
3 Wait 1 minute for the block to cool.<br />
4 Lift the lever and open the hinged heated cover.<br />
5 Remove the sample tray from the block and set it aside.<br />
6 Use a cotton swab soaked in pure isopropanol to clean the sample wells<br />
thoroughly.<br />
!<br />
WARNING CHEMICAL HAZARD. Isopropanol is a flammable liquid and<br />
vapor. It may cause eye, skin, and upper respiratory tract irritation. Prolonged or<br />
repeated contact may dry skin and cause irritation. It may cause central nervous<br />
system effects such as drowsiness, dizziness, and headache, etc. Please read the<br />
MSDS, and follow the handling instructions. Wear appropriate protective eyewear,<br />
clothing, and gloves.
Cleaning the Heated<br />
Cover<br />
To clean the sample wells: (continued)<br />
Step Action<br />
7 Remove any remaining isopropanol from the cover before reloading the sample<br />
tray.<br />
Note If the sample wells become contaminated from the samples, clean the wells<br />
thoroughly with a cotton swab soaked in bleach and then rinse with water.<br />
! WARNING CHEMICAL HAZARD. Sodium hypochlorite (bleach) is a liquid<br />
disinfectant that can be corrosive to the skin and can cause skin depigmentation.<br />
Please read the MSDS, and follow the handling instructions. Wear appropriate<br />
protective eyewear, clothing, and gloves.<br />
! WARNING During instrument operation, the temperature of the heated cover can be as<br />
high as 108 °C, and the temperature of the sample block can be as high as 100 °C. Before<br />
performing the procedure, wait until the heated cover and sample block reach room<br />
temperature.<br />
To clean the heated cover:<br />
Step Action<br />
1 If a method is running, press the Stop key twice.<br />
2 Turn off the instrument.<br />
3 Wait 20 to 30 minutes for the heated cover to cool down.<br />
4 Lift the lever and open the hinged heated cover.<br />
5 Soak a cotton swab or piece of clean cloth with pure isopropanol and gently wipe<br />
the heated platen.<br />
! WARNING CHEMICAL HAZARD. Isopropanol is a flammable liquid and<br />
vapor. It may cause eye, skin, and upper respiratory tract irritation. Prolonged or<br />
repeated contact may dry skin and cause irritation. It may cause central nervous<br />
system effects such as drowsiness, dizziness, and headache, etc. Please read the<br />
MSDS, and follow the handling instructions. Wear appropriate protective eyewear,<br />
clothing, and gloves.<br />
6 Remove any remaining isopropanol from the cover.<br />
Note If the platen becomes contaminated with amplified DNA, then raise the<br />
heated cover to the cleaning position, and wipe the platen with a cloth or cotton<br />
swab soaked in bleach and then rinse with water.<br />
!<br />
WARNING CHEMICAL HAZARD. Sodium hypochlorite (bleach) is a liquid<br />
disinfectant that can be corrosive to the skin and can cause skin depigmentation.<br />
Please read the MSDS, and follow the handling instructions. Wear appropriate<br />
protective eyewear, clothing, and gloves.<br />
Note Clean the heated platen once a month or as needed.<br />
Maintenance 7-3
Replacing Fuses<br />
7-4 Maintenance<br />
Introduction All instruments have factory-installed fuses. If you need to change the fuses, use the<br />
procedure below.<br />
Procedure<br />
! WARNING FIRE HAZARD. For continued protection against the risk of fire, replace fuses<br />
only with Listed and Certified fuses of the same type and rating as those currently in the<br />
instrument.<br />
The fuse compartment is located at the instrument rear, as shown below.<br />
Items Needed<br />
GR1990<br />
Two fuses of the same type you are removing<br />
Fine flat-tip screwdriver<br />
To replace the fuses:<br />
Step Action<br />
Fuse compartment<br />
1 Turn off the system <strong>2700</strong> and disconnect the power cord from the instrument rear.<br />
! WARNING ELECTRIC SHOCK HAZARD. Disconnect the power cord before<br />
opening fuse compartment.<br />
Wait 30 seconds before any further work to let any electrical charges dissipate.<br />
2 Insert the screwdriver tip at the top edge of the fuse compartment door and pry it<br />
open.<br />
GR1990<br />
The door opens to reveal the red fuse holder.<br />
Insert screwdriver tip here.<br />
GR1987
To replace the fuses: (continued)<br />
Step Action<br />
3 Insert the screwdriver tip at the edges of the red fuse holder and gently remove it<br />
from the instrument.<br />
4 Remove the two fuses from the fuse holder and replace them with two of the same<br />
type.<br />
5 Return the fuse holder to the instrument, and close the fuse compartment door.<br />
Press it until it locks into place.<br />
6 Connect the instrument power cord.<br />
GR1992<br />
Fuse<br />
Insert screwdriver tip here<br />
Fuse holder<br />
Fuse compartment door<br />
GR1991<br />
Fuse holder<br />
Maintenance 7-5
Troubleshooting 8<br />
Overview<br />
About This Chapter This chapter explains how to solve instrument problems.<br />
In This Chapter This chapter contains the following topics:<br />
8<br />
Topic See Page<br />
If There’s a Power Failure 8-2<br />
Display Screen Error Messages 8-3<br />
Troubleshooting Information 8-6<br />
Troubleshooting 8-1
If There’s a Power Failure<br />
Automated Restart<br />
Function<br />
If Power Is<br />
Interrupted<br />
8-2 Troubleshooting<br />
An automated restart function allows for power outages and safe continuation of a<br />
<strong>PCR</strong> run after resumption of power.<br />
The instrument does the following in a power failure:<br />
1. Restarts or continues the <strong>PCR</strong> experiment.<br />
The instrument determines what temperature was being approached, or was<br />
holding.<br />
Upon resumption of power, it will go to that temperature and count down the time<br />
remaining in the hold as soon as the temperature is within the specified clock start<br />
limit.<br />
2. Incubates the samples until such time as the experiment can be continued.<br />
3. Enters a record for any power outage in the history file.
Display Screen Error Messages<br />
User Input Error<br />
Messages<br />
The following table lists user input error messages, a description of the message, and<br />
recommended action.<br />
Message Description Recommended Action<br />
Can only enter an infinity hold<br />
at end<br />
A method can only have a Hold segment<br />
with an infinity hold as the last segment in a<br />
method.<br />
This message occurs when you try to enter<br />
an infinity hold segment in the middle of a<br />
method.<br />
Delete your methods first User tried to delete a user name that has<br />
methods stored under it.<br />
Enter a name or CANCEL You did not enter at least one character on<br />
the User Name screen before pressing the<br />
Accept key.<br />
Assign finite time segments to holds<br />
within a method.<br />
Delete or transfer the associated<br />
methods before deleting a user name.<br />
Enter the user name to which the<br />
desired method is assigned.<br />
Enter oligo sequence Incomplete TmCalc data. Enter a value in the P1 and P2 fields of<br />
the TmCalc.<br />
Enter user and method names<br />
or CANCEL<br />
You did not enter a user name and a method<br />
name before storing a method.<br />
Field is full You tried to enter more data in a field than<br />
the field size allows.<br />
Infinity hold not allowed in<br />
cycle<br />
A method can have an infinity hold segment<br />
as the last segment in the method.<br />
Specify the method name and choose<br />
a user to store a method.<br />
Reenter data within the specifications<br />
of the field.<br />
Use finite values for cycle segments<br />
within the method.<br />
Invalid password/pin#<br />
This message occurs when you tried to<br />
enter an infinity time in a cycle segment.<br />
You entered an incorrect PIN#. Enter the correct PIN#.<br />
List of user names is full The maximum number of users has been<br />
entered into the system.<br />
Delete unused user names.<br />
Maximum of 6 segments<br />
allowed<br />
You tried to insert more than six temperature<br />
control parameters into a hold or cycle.<br />
Method battery RAM initialized Stored methods have been reset due to<br />
hardware or software failure.<br />
Method requires at least one<br />
segment<br />
Not all methods may be lost.<br />
You deleted all temperature control<br />
parameters in a method.<br />
Do not assign more than six hold or<br />
cycle parameters to a method.<br />
Check method directory.<br />
Refer to our Web site. a<br />
Review and correct the method to<br />
include the temperature parameter(s).<br />
No seconds in time field<br />
A method must have at least one time and<br />
temperature parameter.<br />
You did not include seconds in the time field. Include seconds when entering the<br />
time.<br />
Not enough method memory<br />
left<br />
This error occurs:<br />
When you attempt to exceed the limit of<br />
<br />
137 methods.<br />
When you attempt to store or create a<br />
<br />
new method that is larger than the<br />
available storage space.<br />
Determine how much storage<br />
<br />
memory is available on the<br />
instrument.<br />
Delete or store rarely used methods<br />
<br />
elsewhere.<br />
Troubleshooting 8-3
Message Description Recommended Action<br />
Not implemented yet The feature is not implemented in the<br />
current firmware version.<br />
Printer not responding The printer has been disconnected or is off<br />
line.<br />
Remove infinity hold first A method can have an infinity hold segment<br />
as the last segment in the method.<br />
8-4 Troubleshooting<br />
Upgrade firmware when the new<br />
version is available from Applied<br />
Biosystems.<br />
Check printer connections and power<br />
switch.<br />
Add segments prior to the post-<strong>PCR</strong><br />
infinity hold.<br />
Tm temperature out of range<br />
This message occurs when a user tries to<br />
add a segment after one which contains an<br />
infinity hold.<br />
Tm out of range. Check input value and retry.<br />
User name already defined You entered a user name that already exists. Do not duplicate user names.<br />
Valid range is You entered a number out of range.<br />
Re-enter a value within the parameters<br />
The message include the valid range limits.<br />
of the field.<br />
a. http://www.appliedbiosystems.com/<strong>2700</strong>
Serious Error<br />
Messages<br />
The following table lists error messages that may indicate a serious problem such as<br />
hardware malfunction. A description of the problem and recommended action are<br />
provided.<br />
Message Description Recommended Action<br />
Error 1 Block shut off by hardware due to thermal<br />
runaway.<br />
Note the error number, and refer to our Web site. a<br />
Error 2 Block thermal runaway<br />
Error 3 Heated cover shut off by hardware due to<br />
thermal runaway.<br />
Error 4 Heat sink is too hot. Ambient conditions may Ensure that the fan is running and instrument vents are<br />
be too warm.<br />
clear.<br />
Error 13<br />
Instrument may not perform to specification.<br />
<strong>System</strong> can’t allocate timer<br />
Error 14 Stack overflow software error<br />
Error 15 LCD screen timed-out<br />
Error 16 Preferences battery RAM initializedb User configuration has been reset due to<br />
software error.<br />
Error 17 Invalid pointer system error.<br />
Error 18 Watchdog timeout software failure.<br />
a. http://www.appliedbiosystems.com/<strong>2700</strong><br />
Move instrument to well-ventilated location (15–30 °C).<br />
Run rate test diagnostic.<br />
Note the error number, and refer to our Web site. a<br />
Error 5 Heat sink sensor failure Note the error number, and refer to our Web site. a<br />
<br />
<br />
Error 6 Heated cover thermal runaway<br />
Error 7 Heated cover sensor failure<br />
Error 8 Setpoint could not be reached<br />
The instrument could not reach a<br />
temperature parameter set by the user.<br />
The unit has a Peltier or power amplifier<br />
failure.<br />
Ambient conditions may be out of<br />
recommended range.<br />
Error 9 Sample block sensor failure Note the error number, and refer to our Web site. a<br />
Error 10 Battery RAM version number lostb Error 11 Bus error<br />
Error 12 Calibration battery RAM initializedb If this error occurs... Then...<br />
immediately after a<br />
firmware upgrade<br />
Switch the instrument<br />
power off, then on again.<br />
any other time See recommended actions<br />
for Error 4.<br />
b. If your instrument has been in storage for more than 3 months, it is possible that the battery has lost its charge but can recover. Contact<br />
Applied Biosystems Technical Support.<br />
Troubleshooting 8-5
Troubleshooting Information<br />
Troubleshooting<br />
Table<br />
8-6 Troubleshooting<br />
The following table lists the problem, possible causes, and a check and/or remedy for<br />
troubleshooting the system <strong>2700</strong>.<br />
<br />
<br />
Problem Possible Causes Check and/or Remedy<br />
Control panel not responding Key stuck in down position.<br />
Look for depressed key and<br />
Keypad failure.<br />
free it.<br />
Cooling rate too slow Ambient temperature is too warm.<br />
Peltier failure.<br />
Run keypad diagnostic.<br />
Refer to our Web site. a<br />
Move instrument to<br />
<br />
well-ventilated location<br />
(15–30 °C).<br />
Run rate test diagnostic.<br />
Refer to our Web site. a<br />
Cycling time too long Peltier failure. Run cycle test diagnostic.<br />
Displayed temperature does not match<br />
specified temperature<br />
Instrument may require calibration. Run the temperature verification<br />
test.<br />
Refer to our Web site. a<br />
Heated cover not responsive Heated cover failure. Refer to our Web site. a<br />
Heating rate too slow Peltier failure. Run rate test diagnostic.<br />
Instrument can’t reach high or low<br />
temperature range<br />
Peltier failure.<br />
Ambient temperature too warm.<br />
Refer to our Web site. a<br />
Run rate test diagnostic.<br />
Run cycle test diagnostic.<br />
Refer to our Web site. a<br />
<br />
Instrument making too much noise Fan failure. Check for vent obstructions.<br />
No screen display<br />
Fuse blown.<br />
Is power switch ON?<br />
No response when you turn the<br />
instrument on<br />
Not connected to power source.<br />
Printer fails Incorrect printer configuration.<br />
Incorrect printer cable.<br />
Whirring fan does not sound Fuse blown.<br />
a. http://www.appliedbiosystems.com/<strong>2700</strong><br />
Not connected to power source.<br />
Is power cord connected?<br />
Check fuses.<br />
Check printer for baud rate =<br />
<br />
9600, no parity, one stop bit,<br />
eight data bits.<br />
Purchase Applied Biosystems<br />
<br />
printer cable.<br />
Is power switch ON?<br />
<br />
Is power cord connected?<br />
Check fuses.<br />
Refer to our Web site. a
Getting Help A<br />
Overview<br />
About This<br />
Appendix<br />
This appendix describes how to get technical help from Applied Biosystems.<br />
A<br />
Getting Help A-1
Technical Support<br />
Contacting<br />
Technical Support<br />
To Contact Technical<br />
Support by E-Mail<br />
Hours for Telephone<br />
Technical Support<br />
To Contact Technical<br />
Support by<br />
Telephone or Fax<br />
A-2 Getting Help<br />
You can contact Applied Biosystems for technical support by telephone or fax, by<br />
e-mail, or through the Internet. You can order Applied Biosystems user documents,<br />
MSDSs, certificates of analysis, and other related documents 24 hours a day. In<br />
addition, you can download documents in PDF format from the Applied Biosystems<br />
Web site (please see the section “To Obtain Documents on Demand” following the<br />
telephone information below).<br />
Contact technical support by e-mail for help in the following product areas:<br />
Product Area E-mail address<br />
Sequence Detection <strong>System</strong>s and <strong>PCR</strong> pcrlab@appliedbiosystems.com<br />
In the United States and Canada, technical support is available at the following times:<br />
Product Hours<br />
Chemiluminescence 8:30 a.m. to 5:30 p.m. Eastern Time<br />
Framingham support 8:00 a.m. to 6:00 p.m. Eastern Time<br />
All Other Products 5:30 a.m. to 5:00 p.m. Pacific Time<br />
In North America<br />
To contact Applied Biosystems Technical Support, use the telephone or fax numbers<br />
given below. (To open a service call for other support needs, or in case of an<br />
emergency, dial 1-800-831-6844 and press 1.)<br />
Product or<br />
Product Area<br />
Outside North America<br />
Telephone<br />
Dial...<br />
<strong>PCR</strong> and Sequence Detection 1-800-762-4001,<br />
then press 1 for <strong>PCR</strong>,<br />
2 for the 7700, 7900 or<br />
5700,<br />
6 for the 6700<br />
or dial 1-800-831-6844,<br />
then press 5<br />
Telephone<br />
Region<br />
Dial...<br />
Africa and the Middle East<br />
Africa (English Speaking) and West Asia<br />
(Fairlands, South Africa)<br />
Africa (French Speaking; Courtaboeuf<br />
Cedex, France)<br />
Fax<br />
Dial...<br />
1-240-453-4613<br />
Fax<br />
Dial...<br />
27 11 478 0411 27 11 478 0349<br />
33 1 69 59 85 11 33 1 69 59 85 00<br />
South Africa (Johannesburg) 27 11 478 0411 27 11 478 0349<br />
Middle Eastern Countries and North<br />
Africa (Monza, Italia)<br />
39 (0)39 8389 481 39 (0)39 8389 493
Region<br />
Eastern Asia, China, Oceania<br />
Australia (Scoresby, Victoria) 61 3 9730 8600 61 3 9730 8799<br />
China (Beijing) 86 10 64106608 or<br />
86 800 8100497<br />
86 10 64106617<br />
Hong Kong 852 2756 6928 852 2756 6968<br />
India (New Delhi) 91 11 653 3743/3744 91 11 653 3138<br />
Korea (Seoul) 82 2 593 6470/6471 82 2 593 6472<br />
Malaysia (Petaling Jaya) 60 3 79588268 603 79549043<br />
Singapore 65 896 2168 65 896 2147<br />
Taiwan (Taipei Hsien) 886 2 2358 2838 886 2 2358 2839<br />
Thailand (Bangkok) 66 2 719 6405 66 2 319 9788<br />
Europe<br />
Austria (Wien) 43 (0)1 867 35 75 0 43 (0)1 867 35 75 11<br />
Belgium 32 (0)2 532 4484 32 (0)2 582 1886<br />
Czech Republic and Slovakia (Praha) 420 2 35365189 420 2 35364314<br />
Denmark (Naerum) 45 45 58 60 00 45 45 58 60 01<br />
Finland (Espoo) 358 (0)9 251 24 250 358 (0)9 251 24 243<br />
France (Paris) 33 (0)1 69 59 85 85 33 (0)1 69 59 85 00<br />
Germany (Weiterstadt) 49 (0) 6150 101 0 49 (0) 6150 101 101<br />
Hungary (Budapest) 36 (0)1 270 8398 36 (0)1 270 8288<br />
Italy (Milano) 39 (0)39 83891 39 (0)39 838 9492<br />
Norway (Oslo) 47 23 12 06 05 47 23 12 05 75<br />
Poland, Lithuania, Latvia, and Estonia<br />
(Warszawa)<br />
48 (22) 866 40 10 48 (22) 866 40 20<br />
Portugal (Lisboa) 351 (0)22 605 33 14 351 (0)22 605 33 15<br />
Russia (Moskva) 7 502 935 8888 7 502 564 8787<br />
South East Europe (Zagreb, Croatia) 385 1 34 91 927/838 385 1 34 91 840<br />
Spain (Tres Cantos) 34 (0)91 806 1210 34 (0)91 806 1206<br />
Sweden (Stockholm) 46 (0)8 619 4400 46 (0)8 619 4401<br />
Switzerland (Rotkreuz) 41 (0)41 799 7777 41 (0)41 790 0676<br />
The Netherlands (Nieuwerkerk a/d<br />
IJssel)<br />
Telephone<br />
Dial...<br />
Fax<br />
Dial...<br />
31 (0)180 392400 31 (0)180 392409 or<br />
31 (0)180 392499<br />
United Kingdom (Warrington, Cheshire) 44 (0)1925 825650 44 (0)1925 282502<br />
All other countries not listed (Warrington,<br />
UK)<br />
44 (0)1925 282481<br />
Japan<br />
44 (0)1925 282509<br />
Japan (Hacchobori, Chuo-Ku, Tokyo) 81 20 477392 (Toll free) 81 20 477120 (Toll free)<br />
or<br />
or<br />
81 3 5566 6230<br />
81 3 5566 6507<br />
Getting Help A-3
To Reach Technical<br />
Support Through<br />
the Internet<br />
To Obtain<br />
Documents on<br />
Demand<br />
A-4 Getting Help<br />
Telephone<br />
Fax<br />
Region<br />
Dial...<br />
Latin America<br />
Dial...<br />
Caribbean countries, Mexico, and<br />
Central America<br />
52 55 35 3610 52 55 66 2308<br />
Brazil 0 800 704 9004 or<br />
55 11 5070 9654<br />
55 11 5070 9694/95<br />
Argentina 800 666 0096 55 11 5070 9694/95<br />
Chile 1230 020 9102 55 11 5070 9694/95<br />
Uruguay 0004 055 654 55 11 5070 9694/95<br />
We strongly encourage you to visit our Web site for answers to frequently asked<br />
questions and for more information about our products. You can also order technical<br />
documents or an index of available documents and have them faxed or e-mailed to<br />
you through our site. The Applied Biosystems Web site address is<br />
http://www.appliedbiosystems.com/techsupp<br />
To submit technical questions from North America or Europe:<br />
Step Action<br />
1 Access the Applied Biosystems Technical Support Web site.<br />
2 Under the Troubleshooting heading, click Support Request Forms, then select the<br />
relevant support region for the product area of interest.<br />
3 In the Personal Assistance form, enter the requested information and your question,<br />
then click Ask Us RIGHT NOW.<br />
4 In the Customer Information form, enter the requested information and your<br />
question, then click Ask Us RIGHT NOW.<br />
Within 24 to 48 hours, you will receive an e-mail reply to your question from an<br />
Applied Biosystems technical expert.<br />
Free, 24-hour access to Applied Biosystems technical documents, including MSDSs,<br />
is available by fax or e-mail or by download from our Web site.<br />
To order<br />
documents... Then...<br />
by index number a. Access the Applied Biosystems Technical Support Web site at<br />
http://www.appliedbiosystems.com/techsupp<br />
b. Click the Index link for the document type you want, then find the<br />
document you want and record the index number.<br />
c. Use the index number when requesting documents following the<br />
procedures below.<br />
by phone for fax<br />
delivery<br />
a. From the U.S. or Canada, call 1-800-487-6809, or<br />
from outside the U.S. and Canada, call 1-858-712-0317.<br />
b. Follow the voice instructions to order the documents you want.<br />
Note There is a limit of five documents per request.
To Obtain Customer<br />
Training<br />
Information<br />
To order<br />
documents... Then...<br />
through the<br />
Internet for fax or<br />
e-mail delivery<br />
a. Access the Applied Biosystems Technical Support Web site at<br />
http://www.appliedbiosystems.com/techsupp<br />
b. Under Resource Libraries, click the type of document you want.<br />
c. Enter or select the requested information in the displayed form, then<br />
click Search.<br />
d. In the displayed search results, select a check box for the method of<br />
delivery for each document that matches your criteria, then click<br />
Deliver Selected Documents Now (or click the PDF icon for the<br />
document to download it immediately).<br />
e. Fill in the information form (if you have not previously done so), then<br />
click Deliver Selected Documents Now to submit your order.<br />
Note There is a limit of five documents per request for fax delivery but<br />
no limit on the number of documents you can order for e-mail delivery.<br />
The Applied Biosystems Training web site at<br />
www.appliedbiosystems.com/techsupp/training.html<br />
provides course descriptions, schedules, and other training-related information.<br />
Getting Help A-5
Specifications B<br />
Overview<br />
About This<br />
Appendix<br />
This appendix provides specifications for the GeneAmp <strong>PCR</strong> <strong>System</strong> <strong>2700</strong>.<br />
B<br />
Specifications B-1
<strong>System</strong> Specifications<br />
B-2 Specifications<br />
Dimensions The table below lists the footprint and the weight of the system <strong>2700</strong>.<br />
Power<br />
Configurations<br />
Control Panel Specifications<br />
Footprint<br />
Note You must provide sufficient space around the instrument for unrestricted air<br />
circulation.<br />
Height 21.5 cm (8.5 in)<br />
Width 21 cm (8.25 in)<br />
Depth<br />
Weight<br />
35 cm (14 in)<br />
Instrument 5.9 kg (13 lbs)<br />
There is one version of the system <strong>2700</strong>. The power requirements of the instrument<br />
under various power configurations are:<br />
VAC ~100/120 8 AMP T (5x20 mm)<br />
or<br />
8 AMP slow blow (3 AB)<br />
VAC ~220/230/240 8 AMP T (5x20 mm)<br />
Display Screen The display screen is a 7 x 40 character display with a 60 x 240 pixel resolution<br />
graphics mode.<br />
Keys The instrument control panel consists of a display screen and 22 keys:<br />
5 function keys<br />
<br />
4 arrow keys<br />
Stop key<br />
Enter key<br />
10-number keypad<br />
CE key<br />
50/60 Hz<br />
Use 250 V fuses<br />
Max Power 420 VA
Sample Temperature Information<br />
Temperature The table below lists sample temperature information.<br />
Printer Specifications<br />
Serial Interface<br />
Board Specifications<br />
Note Sample temperatures are displayed in degrees Celsius to the nearest 0.1 °C.<br />
Sample Temperature Range 4.0 to 99.9 °C.<br />
Temperature Calibration Traceable to National Institute of Standards and<br />
Technology (NIST).<br />
The system <strong>2700</strong> can use any printer with a serial (RS-232C) interface board with the<br />
following parameters.<br />
Baud Rate 9600<br />
Parity NONE<br />
Data Bits 8<br />
Stop Bits 1<br />
Cable Part Number Connect the printer to the instrument port with printer cable part number N805-1326.<br />
Specifications B-3
Supplied Methods C<br />
Overview<br />
About This<br />
Appendix<br />
This appendix describes precoded methods supplied with your instrument.<br />
C<br />
Supplied Methods C-1
About the Methods<br />
Five Precoded<br />
Methods<br />
C-2 Supplied Methods<br />
The GeneAmp ® <strong>PCR</strong> <strong>System</strong> <strong>2700</strong> supplies you with five precoded methods stored<br />
under the user name :<br />
AmpliTaq Gold ®<br />
BigDye Terminator<br />
General <strong>PCR</strong><br />
Time Release <strong>PCR</strong><br />
Touchdown <strong>PCR</strong><br />
AmpliTaq Gold The AmpliTaq Gold protocol specifies a 5-minute pre-<strong>PCR</strong> heat step, required for the<br />
activation of AmpliTaq Gold DNA Polymerase. This additional step provides<br />
seamless “hot start” <strong>PCR</strong> and replaces labor intensive methods such as manual hot<br />
start or wax bead-mediated hot start techniques.<br />
1 Hld<br />
95.0<br />
5:00<br />
3 Tmp 35 Cycles<br />
95.0<br />
0:15<br />
55.0<br />
0:15<br />
72.0<br />
0:30<br />
2 Holds<br />
72.0<br />
7:00<br />
4.0<br />
Start Method: AmpliTaq Gold Return<br />
F1 F2 F3 F4 F5<br />
<br />
Utilizing hot start techniques helps to minimize the formation of primer-dimers or<br />
non-specific products, thus increasing specificity and sensitivity of <strong>PCR</strong>.<br />
You can find further information on AmpliTaq Gold DNA Polymerase in the product<br />
insert (P/N N808-0241) or at the Applied Biosystems Web site.
BigDye Terminator The BigDye Terminator protocol is used for cycle sequencing. It consists of<br />
3-temperature <strong>PCR</strong> for 25 cycles followed by an infinite hold at 4 °C.<br />
3 Tmp 25 Cycles<br />
96.0<br />
1 Hld<br />
0:10 50.0 60.0<br />
0:05 4:00 4.0<br />
Start Method: BigDye Return<br />
F1 F2 F3 F4 F5<br />
The reagents used include the sequencing enzyme AmpliTaq ® DNA Polymerase, FS,<br />
and fluorescent labeled dye terminators. Four different fluorescent dyes, one for each<br />
base, are incorporated into extension products. These products can then by purified.<br />
Subsequently, electrophoresis and data analysis can be performed on them. This<br />
process is further described in the protocol ABI PRISM ® BigDye Terminator Cycle<br />
Sequencing Ready Reaction Kits (P/N 4303237).<br />
General <strong>PCR</strong> The General <strong>PCR</strong> method is a basic one and can be easily modified with both pre-<br />
and post-<strong>PCR</strong> holds.<br />
1 Hld 3 Tmp 35 Cycles 2 Holds<br />
95.0<br />
1.00<br />
95.0<br />
0:15<br />
55.0<br />
0:15<br />
72.0<br />
0:30<br />
72.0<br />
7:00<br />
Time Release <strong>PCR</strong> The Time Release <strong>PCR</strong> method is designed for use with AmpliTaq Gold DNA<br />
Polymerase. The enzyme is activated more slowly than with the AmpliTaq Gold<br />
method. Here the pre-<strong>PCR</strong> hold is only 1 minute, and the number of cycles is<br />
increased to 40.<br />
4.0<br />
Start Return<br />
Method: General <strong>PCR</strong><br />
F1 F2 F3 F4 F5<br />
1 Hld 3 Tmp 40 Cycles 2 Holds<br />
95.0<br />
1.00<br />
95.0<br />
0:15<br />
55.0<br />
0:15<br />
72.0<br />
0:30<br />
72.0<br />
7:00<br />
4.0<br />
Start Return<br />
Method: Time Release <strong>PCR</strong><br />
F1 F2 F3 F4 F5<br />
Supplied Methods C-3
Touchdown <strong>PCR</strong> When the optimal annealing temperature is unknown, one strategy, Touchdown <strong>PCR</strong>,<br />
incrementally decreases the annealing temperature in early cycles in order to<br />
maximize the yield of specific products.<br />
C-4 Supplied Methods<br />
2 Tmp x 20<br />
95.0<br />
0:15 65.0<br />
0:30<br />
*<br />
2 Tmp x 10<br />
95.0<br />
0:15<br />
55.0<br />
0:30<br />
Start Method: Touchdown <strong>PCR</strong> Return<br />
F1 F2 F3 F4 F5<br />
This supplied method has an initial annealing temperature (65 °C) that incrementally<br />
decreases by an additional 0.5 °C in each of the first 20 cycles, followed by 10 cycles<br />
at 55 °C.
Screen Flowcharts D<br />
Overview<br />
About This<br />
Appendix<br />
This appendix provides flowcharts showing screen flows for various functions you<br />
might want to use. These charts provide an overview of a procedure.<br />
In This Appendix Flowcharts are included for the following topics:<br />
D<br />
Topic See Page<br />
Run D-2<br />
Stop or End of Run D-3<br />
Create/Edit D-4<br />
User D-5<br />
Utilities D-6<br />
Diagnostics D-7<br />
Upgrade D-8<br />
Screen Flowcharts D-1
Run<br />
Select Method Options<br />
Select Method Options<br />
Reaction Volume: 50 µL<br />
Enter a value from 5 to 100 µL<br />
Start Cancel<br />
F1 F2 F3 F4 F5<br />
Sample 56.7 Cycle 1 of 25 HOT<br />
55.0<br />
2:00<br />
94.0<br />
10:00<br />
94.0<br />
0:30<br />
55.0<br />
0:30<br />
72.0<br />
0:30<br />
72.0<br />
5:00<br />
4.0<br />
Pause Info<br />
F1 F2 F3 F4 F5<br />
Sample 56.7 Cycle 1 of 25 HOT<br />
55.0<br />
2:00<br />
94.0<br />
10:00<br />
94.0<br />
0:30<br />
55.0<br />
0:30<br />
72.0<br />
0:30<br />
72.0<br />
5:00<br />
4.0<br />
Resume Paused. Will resume in mm:ss<br />
F1 F2 F3 F4 F5<br />
D-2 Screen Flowcharts<br />
Stored Methods<br />
Methods<br />
appl01<br />
exp000<br />
exp001<br />
exp002<br />
User<br />
adrian<br />
adrian<br />
adrian<br />
adrian<br />
Size<br />
11<br />
10<br />
12<br />
13<br />
LastUsed<br />
03/04/00<br />
02/22/00<br />
02/10/00<br />
02/02/00<br />
Start View User Sort Cancel<br />
F1 F2 F3 F4 F5<br />
Run Time<br />
Pause<br />
Main Menu<br />
08:00 AM 09/25/00 25.0°C<br />
<strong>GeneAmp®</strong> <strong>PCR</strong> <strong>System</strong> <strong>2700</strong><br />
Version<br />
User: adrian<br />
Run Create Edit Util User<br />
F1 F2 F3 F4 F5<br />
Enter reaction<br />
volume here<br />
View Method<br />
2 Hld 3 Tmp 25 Cycles 2 Holds<br />
55.0<br />
2:00<br />
94.0<br />
10:00<br />
94.0<br />
0:30<br />
55.0<br />
0:30<br />
72.0<br />
0:30<br />
72.0<br />
5:00<br />
4.0<br />
Start Method: exp 001 Return<br />
F1 F2 F3 F4 F5<br />
Method Information<br />
Sorting Criteria<br />
02:32 PM Information 55.2°C<br />
User: lisa Method: General <strong>PCR</strong><br />
Run started at 01:32:30 PM, 03/01/00.<br />
Run will end at 06:35:30 PM, 03/01/00.<br />
Reaction vol: 50 µL<br />
Return<br />
F1 F2 F3 F4 F5<br />
Go to Select User<br />
Name<br />
Sort Methods<br />
By: Method name<br />
Date last used<br />
Date stored<br />
Method size<br />
Accept Cancel<br />
F1 F2 F3 F4 F5
Stop or End of Run<br />
At end of run<br />
History File<br />
History of method exp002<br />
User: adrian Reaction volume: 50 µL<br />
Run started at 02:30:45 PM, 02/01/00.<br />
Run aborted at 02:50:42 PM, 02/01/00.<br />
Length of run 00:19:57<br />
No exceptions PageDn Print Return<br />
F1 F2 F3 F4 F5<br />
Sample 50.1 Confirm Stop HOT<br />
Press STOP to abort.<br />
Press Resume to continue.<br />
Resume<br />
F1 F2 F3 F4 F5<br />
Go to Run Time<br />
Stop pressed<br />
Confirm Stop<br />
Stop pressed<br />
again<br />
End of Run<br />
11:30 AM End of Run 25.1°C<br />
Method: General <strong>PCR</strong><br />
Run completed at 11:30:05 AM, 02/01/00.<br />
Length of run is 01:34:25.<br />
Hist Exit<br />
F1 F2 F3 F4 F5<br />
Method Not Stored<br />
Has method<br />
been stored? Yes Go to Main Menu<br />
No<br />
Method Not Stored<br />
Press Store to save the method.<br />
Press Exit to delete the method.<br />
Store<br />
Exit<br />
F1 F2 F3 F4 F5<br />
Go to Store<br />
Method on<br />
Instrument<br />
Screen Flowcharts D-3
Create/Edit<br />
You can highlight parameters<br />
and type in new values here.<br />
The More key is present<br />
only when you highlight a<br />
temperature or time.<br />
AutoX<br />
D-4 Screen Flowcharts<br />
1 Hld 3 Tmp 25 Cycles 2 Holds<br />
94.0 94.0<br />
5:00 0:30<br />
Store Method on Instrument<br />
2 Pre-<strong>PCR</strong> 3 Tmp 25 Cycles 2 Holds<br />
+0.0<br />
+0:00 *<br />
+1.0<br />
-0:30<br />
+0.0<br />
+0:00<br />
Accept +<br />
*<br />
-<br />
Cancel<br />
F1 F2 F3 F4 F5<br />
Create/Edit<br />
55.0<br />
0:30<br />
72.0<br />
0:30<br />
72.0<br />
7:00<br />
4.0<br />
Start Store Print More Cancel<br />
F1 F2 F3 F4 F5<br />
Store Method on Instrument<br />
User: april<br />
Method:exp002<br />
Free Mem: 122 methods 946 segments<br />
Accept User Method<br />
Cancel<br />
F1 F2 F3 F4 F5<br />
Go to Select User<br />
Name<br />
Method Name<br />
Method Name exp001<br />
abcdefghi<br />
jklmnopqrj<br />
stuvwxyz<br />
.,-+/():=<br />
Use ENTER key to select a character.<br />
Accept Backsp<br />
Cancel<br />
F1 F2 F3 F4 F5<br />
Select Modification<br />
Select Modification<br />
AutoX - Increments or decrements time<br />
or temperature at the<br />
completion of each cycle<br />
AutoX Cancel<br />
F1 F2 F3 F4 F5<br />
08:00 AM<br />
Main Menu<br />
09/25/00 25.0°C<br />
<strong>GeneAmp®</strong> <strong>PCR</strong> <strong>System</strong> <strong>2700</strong><br />
Version<br />
User: adrian<br />
Run Create Edit Util User<br />
F1 F2 F3 F4 F5<br />
Inserts a hold or cycle to<br />
the left of the highlighted<br />
time or temperature<br />
1 Hld 3 Tmp 25 Cycles 2 Holds<br />
94.0 94.0<br />
5:00 0:30<br />
The Modify key is present only when you<br />
highlight a <strong>PCR</strong> temperature or time.<br />
The Insert and Delete keys are present<br />
only when you highlight any temperature<br />
or time.<br />
Modify<br />
55.0<br />
0:30<br />
Stored Methods<br />
Methods<br />
User Size LastUsed<br />
appl01<br />
exp000<br />
exp001<br />
exp002<br />
adrian<br />
adrian<br />
adrian<br />
adrian<br />
11<br />
10<br />
12<br />
13<br />
03/04/00<br />
02/22/00<br />
02/10/00<br />
02/02/00<br />
Edit View User Sort Cancel<br />
F1 F2 F3 F4 F5<br />
72.0<br />
0:30<br />
72.0<br />
7:00<br />
Modify Insert Delete More<br />
F1 F2 F3 F4 F5<br />
Deletes highlighted<br />
segment<br />
Insert<br />
4.0<br />
Go to Create/Edit<br />
2 Pre-<strong>PCR</strong> 3 Tmp 25 Cycles 2 Holds<br />
55.0<br />
2:00<br />
94.0 94.0<br />
10:00 0:30 *<br />
55.0<br />
0:30<br />
72.0<br />
0:30<br />
72.0<br />
5:00<br />
4.0<br />
Hold Cycle Pause<br />
Cancel<br />
F1 F2 F3 F4 F5<br />
Define Programmed Pause<br />
Define Programmed Pause<br />
Start first pause at cycle 1 of 25.<br />
Pause every 25 cycles for 00:30.<br />
Accept Cancel<br />
F1 F2 F3 F4 F5<br />
Inserts a pause.<br />
Then you can edit<br />
the pause or go to<br />
Create/Edit
User<br />
Go to Main Menu<br />
Highlight each letter<br />
then press Enter<br />
to spell the name.<br />
User Name<br />
User Name<br />
abcdefghi<br />
jklmnopqrj<br />
stuvwxyz<br />
.,-+/():=<br />
Use ENTER key to select a character.<br />
Accept Backsp<br />
Cancel<br />
Security Code<br />
F1 F2 F3 F4 F5<br />
User Name: hank PIN number: None<br />
Protection: Unlocked<br />
Press PIN # to create a #. Then you set<br />
protection to Locked to prevent methods<br />
from being overwritten or deleted.<br />
Accept Name PIN#<br />
Cancel<br />
F1 F2 F3 F4 F5<br />
Go to Select User<br />
Name<br />
Go to User Name<br />
PIN Confirmation<br />
Confirm PIN Number<br />
Your PIN number protects the access to<br />
your user name and protection level<br />
Enter a PIN number again. PIN #: XXXX<br />
Press Accept to confirm your PIN #.<br />
Accept Cancel<br />
F1 F2 F3 F4 F5<br />
08:00 AM<br />
Main Menu<br />
09/25/00 25.0°C<br />
<strong>GeneAmp®</strong> <strong>PCR</strong> <strong>System</strong> <strong>2700</strong><br />
Version<br />
User: adrian<br />
Run Create Edit Util User<br />
F1 F2 F3 F4 F5<br />
<br />
adrian<br />
anna<br />
Select User Name<br />
Select User Name<br />
dave<br />
doug<br />
faye<br />
jenife<br />
mamood<br />
mike<br />
murray<br />
nayana<br />
ngui<br />
Accept New Edit Delete Cancel<br />
F1 F2 F3 F4 F5<br />
No<br />
New PIN Number<br />
Create a PIN Number<br />
Your PIN number protects the access to<br />
your user name and protection level<br />
Enter a PIN number. New PIN #: XXXX<br />
Accept Cancel<br />
F1 F2 F3 F4 F5<br />
Do you have a<br />
PIN number?<br />
Security Check<br />
Security Check<br />
To perform this action, you must enter<br />
your PIN number.<br />
Your PIN #:<br />
Accept Cancel<br />
F1 F2 F3 F4 F5<br />
Protection Status<br />
It's gone unless you<br />
have a method<br />
Yes<br />
Username: hank PIN number: XXXX<br />
Protection: Unlocked<br />
Press PIN # to create a #. Then you set<br />
protection to Locked to prevent methods<br />
from being overwritten or deleted.<br />
Accept Name PIN# Lock Cancel<br />
F1 F2 F3 F4 F5<br />
Go to Select User<br />
Name<br />
Toggles Locked/<br />
Unlocked<br />
Screen Flowcharts D-5
Utilities<br />
Diagnostics<br />
Hard<br />
Diagnostics<br />
- Hardware Diagnostics<br />
<strong>System</strong> - <strong>System</strong> Performance Tests<br />
TmpVer - Temperature Verification<br />
Upgrad - Firmware Upgrade<br />
Hard <strong>System</strong> TmpVer Upgrad Exit<br />
F1 F2 F3 F4 F5<br />
D-6 Screen Flowcharts<br />
Utilities 1<br />
Utilities<br />
Diag - Instrument diagnostics<br />
TmCalc - Calculates melting temp<br />
Config - Instrument configuration<br />
Diag TmCalc Config More Exit<br />
F1 F2 F3 F4 F5<br />
See Diagnostics chart Methods<br />
Tm Calculator<br />
[Salt]: 50 mM [Primer] 0.20 uM<br />
P1: 5’<br />
P2: 5’<br />
Tm of P1= Tm of P2=<br />
Press ENTER to calculate Tm’s<br />
Configuration 1<br />
Instrument Configuration<br />
Time: 11:30 AM<br />
Date: 03/01/00 M/D/Y<br />
Run Time Printer: Off<br />
Accept PM 24Hr More Cancel<br />
F1 F2 F3 F4 F5<br />
Configuration 2<br />
Instrument Configuration<br />
Pause Time Out: 10:00 (00:01-99:59)<br />
Idle State Setpoint: 25.0°C (4.0-99.9)<br />
Baud Rate: 9600<br />
Accept More Cancel<br />
F1 F2 F3 F4 F5<br />
08:00 AM<br />
Main Menu<br />
09/25/00 25.0°C<br />
<strong>GeneAmp®</strong> <strong>PCR</strong> <strong>System</strong> <strong>2700</strong><br />
Version<br />
User: adrian<br />
Run Create Edit Util User<br />
F1 F2 F3 F4 F5<br />
Go to<br />
Configuration 1<br />
Utilities 2<br />
Utilities<br />
Delete - Delete a Method<br />
Hist - Display history of last run<br />
Delete Hist<br />
More Exit<br />
F1 F2 F3 F4 F5<br />
Go to Utilities 1<br />
exp000<br />
exp0001<br />
exp001a<br />
exp002<br />
View<br />
Stored Methods<br />
User<br />
faye<br />
faye<br />
faye<br />
faye<br />
User<br />
Size<br />
11 6<br />
9<br />
8<br />
LastUsed<br />
11/16/99<br />
11/16/99<br />
11/16/99<br />
11/16/99<br />
Delete Sort Cancel<br />
F1 F2 F3 F4 F5<br />
Delete Method<br />
Delete Method<br />
Methods on Inst User Size Stored<br />
exp001<br />
lisa 15 09/01/96<br />
Press Yes to delete the method<br />
Yes Cancel<br />
F1 F2 F3 F4 F5<br />
Method is gone<br />
unless it was locked
Diagnostics<br />
08:00 AM<br />
Main Menu<br />
09/25/00 25.0°C<br />
<strong>GeneAmp®</strong> <strong>PCR</strong> <strong>System</strong> <strong>2700</strong><br />
Version<br />
User: adrian<br />
Run Create Edit Util User<br />
F1 F2 F3 F4 F5<br />
Display Diagnostics<br />
Display Diagnostics<br />
1. Read all instructions first.<br />
2. Press Run to turn ON all pixels.<br />
3. Press STOP to turn OFF all pixels.<br />
4. Press STOP to exit.<br />
Run Exit<br />
F1 F2 F3 F4 F5<br />
Diagnostics<br />
Hard<br />
Diagnostics<br />
- Hardware Diagnostics<br />
<strong>System</strong> - <strong>System</strong> Performance Tests<br />
TmpVer - Temperature Verification<br />
Upgrad - Firmware Upgrade<br />
Hard <strong>System</strong> TmpVer Upgrad Exit<br />
F1 F2 F3 F4 F5<br />
Hardware Diagnostics<br />
Hardware Diagnostics<br />
Disp - LCD Display Diagnostic<br />
Keypad - Keypad Diagnostic<br />
Disp Keypad<br />
Exit<br />
F1 F2 F3 F4 F5<br />
Utilities<br />
Diag - Instrument diagnostics<br />
TmCalc - Calculates melting temp<br />
Config - Instrument configuration<br />
Diag TmCalc Config More Exit<br />
F1 F2 F3 F4 F5<br />
See Chapter 6 See Upgrade chart<br />
STOP<br />
Utilities 1<br />
Keypad Diagnostic<br />
Keypad Diagnostic<br />
After pressing Run, press the blinking<br />
key or press STOP twice to exit.<br />
Run Exit<br />
F1 F2 F3 F4 F5<br />
Control Panel<br />
F1 F2 F3 F4 F5<br />
1 2 3<br />
4 5 6<br />
7 8 9<br />
ENTER 0 CE<br />
F1 F2 F3 F4 F5<br />
Screen Flowcharts D-7
Upgrade<br />
08:00 AM<br />
Main Menu<br />
09/25/00 25.0°C<br />
<strong>GeneAmp®</strong> <strong>PCR</strong> <strong>System</strong> <strong>2700</strong><br />
Version<br />
User: adrian<br />
Run Create Edit Util User<br />
F1 F2 F3 F4 F5<br />
D-8 Screen Flowcharts<br />
Diagnostics<br />
Hard<br />
Diagnostics<br />
- Hardware Diagnostics<br />
<strong>System</strong> - <strong>System</strong> Performance Tests<br />
TmpVer - Temperature Verification<br />
Upgrad - Firmware Upgrade<br />
Hard <strong>System</strong> TmpVer Upgrad Exit<br />
F1 F2 F3 F4 F5<br />
Firmware Upgrade<br />
Firmware Upgrade<br />
Serial - Upgrade from serial port<br />
Serial Exit<br />
F1 F2 F3 F4 F5<br />
Serial Port Firmware Upgrade<br />
Serial Port Firmware Upgrade<br />
Attach cable from RS485 port on <strong>2700</strong> to<br />
serial port on computer. Press Update,<br />
then begin download of file from the<br />
computer.<br />
Update<br />
Exit<br />
F1 F2 F3 F4 F5<br />
DO NOT TURN OFF THE INSTRUMENT<br />
OR REMOVE SERIAL CABLE!<br />
Upgrading over the serial port<br />
will take approximately 10 minutes.<br />
Instrument will re-boot when complete.<br />
F1 F2 F3 F4 F5<br />
Utilities 1<br />
Utilities<br />
Diag - Instrument diagnostics<br />
TmCalc - Calculates melting temp<br />
Config - Instrument configuration<br />
Diag TmCalc Config More Exit<br />
F1 F2 F3 F4 F5
Index<br />
A<br />
AmpliTaq Gold, about supplied method C-2<br />
AutoX function 5-16 to 5-17<br />
B<br />
baud rate 6-3<br />
BigDye Terminator, about supplied method C-3<br />
C<br />
calibration verification test 6-9<br />
CE key 2-4<br />
chemical hazard warning 1-10<br />
chemical waste hazard warning 1-10<br />
cleaning instrument 7-2 to 7-3<br />
configuring instrument 6-2 to 6-3<br />
control panel 2-4<br />
create/edit<br />
flowchart of screens D-4<br />
screen 5-6<br />
screen, described 2-6<br />
customer support. See technical support A-2<br />
cycle test 6-11 to 6-12<br />
cycle, inserting 5-12 to 5-13<br />
D<br />
date, configuring 6-3<br />
diagnostics<br />
flowchart of screens D-7<br />
hardware 6-7 to 6-8<br />
dimensions B-2<br />
display<br />
overview 2-4<br />
specifications B-2<br />
testing 6-7<br />
disposables 4-2 to 4-4<br />
Documents on Demand A-4<br />
E<br />
electrical safety 1-3 to 1-8<br />
electrical shock hazard 1-7<br />
e-mail, address for technical support A-2<br />
end of run<br />
flowchart of screens D-3<br />
screen 4-13<br />
enter key 2-4<br />
environment 1-9<br />
error messages 8-3 to 8-5<br />
F<br />
features 2-5, 3-10<br />
field, selecting 2-4<br />
fire hazard 1-8<br />
firmware, upgrading 6-4<br />
flowcharts D-1 to D-8<br />
function keys 2-4<br />
fuses<br />
precautions about 1-8<br />
replacing 7-4 to 7-5<br />
G<br />
GeneAmp <strong>PCR</strong> <strong>System</strong> <strong>2700</strong><br />
overview 2-2 to 2-3<br />
General <strong>PCR</strong>, about supplied method C-3<br />
grounding 1-8<br />
H<br />
hardware diagnostics 6-7 to 6-8<br />
hazards and warnings 1-3 to 1-12<br />
heated cover, cleaning 7-3<br />
help. See technical support A-2<br />
history file 4-11 to 4-12<br />
hold<br />
deleting 5-11 to 5-12<br />
inserting 5-10 to 5-11<br />
humidity 1-9<br />
I<br />
idle state setpoint 6-3<br />
Internet address<br />
Applied Biosystems 6-4<br />
customer training information A-5<br />
Documents on Demand A-4<br />
K<br />
keypad 2-4<br />
testing 6-8<br />
L<br />
labels, safety 1-6<br />
laboratory environmental requirements 1-9<br />
M<br />
main menu 2-5<br />
maintenance, routine 1-6, 7-1 to 7-3<br />
melting temperature 6-6<br />
method<br />
creating 3-5 to 3-6, 5-6 to 5-8<br />
defined 2-6, 5-6<br />
deleting 5-22 to 5-23<br />
editing 3-7, 5-9<br />
locked 5-2 to 5-4<br />
printing 5-22<br />
protecting 3-10, 5-2 to 5-4<br />
searching for 5-21<br />
Index-1
selecting 5-19<br />
sorting 5-20 to 5-21<br />
supplied C-2 to C-4<br />
viewing parameters 5-20<br />
method not stored screen 4-13<br />
MicroAmp disposables 4-2 to 4-4<br />
MSDSs 1-11<br />
N<br />
numbers, entering 2-4<br />
O<br />
operating precautions 1-9<br />
P<br />
pause time out 6-3<br />
pause, programmed<br />
deleting 5-16<br />
editing 5-15<br />
inserting 5-14 to 5-15<br />
<strong>PCR</strong> segment 2-6<br />
PIN number 5-2 to 5-5<br />
pollution 1-9<br />
post-<strong>PCR</strong><br />
parameters 5-8<br />
segment 2-6<br />
power failure 8-2<br />
power on 3-2<br />
precautions, operating 1-9<br />
printer<br />
connecting to 6-5<br />
run time 6-3<br />
R<br />
rate test 6-10 to 6-11<br />
reaction tubes 4-2 to 4-4<br />
restart function 8-2<br />
run 4-1 to 4-13<br />
flowchart of screens D-2<br />
history of 4-11 to 4-12<br />
pausing 4-9<br />
starting 3-8 to 3-9, 4-7 to 4-8<br />
stopping 3-8 to 3-9, 4-10<br />
S<br />
safety 1-1 to 1-12<br />
sample block, cleaning 7-2 to 7-3<br />
sample tubes 4-2 to 4-4<br />
samples<br />
loading 4-5 to 4-6<br />
removing 4-6<br />
specifications B-2 to B-3<br />
starting 3-1 to 3-11<br />
stop key 2-4<br />
stop, flowchart of screens D-3<br />
symbols, safety 1-3 to 1-4<br />
Index-2<br />
system <strong>2700</strong><br />
functions 2-5<br />
overview 2-2 to 2-3, 3-10 to 3-11<br />
T<br />
technical support A-2 to A-5<br />
e-mail address A-2<br />
Internet address A-4<br />
regional sales offices A-2 to A-4<br />
telephone/fax (North America) A-2<br />
temperature<br />
control 5-16 to 5-17<br />
idle state setpoint 6-3<br />
melting, calculating 6-6<br />
operating precautions 1-9<br />
specifications B-3<br />
verification test 6-9<br />
testing, electrical safety 1-4<br />
Time Release <strong>PCR</strong>, about supplied method C-3<br />
time, configuring 6-3<br />
Tm calculator 6-6<br />
Touchdown <strong>PCR</strong>, about supplied method C-4<br />
training<br />
obtaining information A-5<br />
troubleshooting 8-1 to 8-6<br />
U<br />
upgrade, flowshart of screens D-8<br />
user name<br />
adding 3-3 to 3-4, 5-2 to 5-4<br />
changing 5-4 to 5-5<br />
deleting 5-5<br />
flowchart of screens D-5<br />
utilities<br />
flowchart of screens D-6<br />
procedures 6-1 to 6-12<br />
W<br />
warning<br />
chemical hazard 1-10<br />
chemical waste hazard 1-10<br />
waste disposal 1-12<br />
WWW address<br />
Applied Biosystems 6-4, A-4<br />
Documents on Demand A-4
Headquarters<br />
850 Lincoln Centre Drive<br />
Foster City, CA 94404 USA<br />
Phone: +1 650.638.5800<br />
Toll Free (In North America): +1 800.345.5224<br />
Fax: +1 650.638.5884<br />
Worldwide Sales and Support<br />
Applied Biosystems vast distribution and<br />
service network, composed of highly trained<br />
support and applications personnel, reaches<br />
into 150 countries on six continents. For sales<br />
office locations and technical support, please<br />
call our local office or refer to our Web site at<br />
www.appliedbiosystems.com.<br />
www.appliedbiosystems.com<br />
Applera Corporation is committed to providing<br />
the world’s leading technology and information<br />
for life scientists. Applera Corporation consists of<br />
the Applied Biosystems and Celera Genomics<br />
businesses.<br />
Produced 5/2006<br />
Part Number 4317898 Rev. B