jQuery 1.4 Animation Techniques - Index of
jQuery 1.4 Animation Techniques - Index of jQuery 1.4 Animation Techniques - Index of
[ 161 ] Chapter 6 Gothic Medium", Sans-serif; } #confirmation p { margin:0; position:relative; top:18px; } 4. Save the CSS as drop.css. 5. When the page loads, the message should initially be displayed before fading away after a short interval: The previous screenshot shows the message slowly being hidden. It will appear to slide up and fade out at the same time when being hidden after the timer interval has passed. What just happened? The underlying markup of the message itself is extremely simple; we just need a container and the actual message. In our example the message is hardcoded into the page, but we could easily set this dynamically depending on the action being reported.
Extended Animations with jQuery UI The CSS is equally as simple, supplying a background color for the page to better highlight the message, and providing some basic styles for the container and the message itself. The most important rule (in this implementation) is that the container is initially hidden from view. Our script shows the message as soon as the page has loaded, but normally it would be triggered by the completion of some system action. We use the effect() method to initiate the effect and configure the mode to show and the direction to up (the element will still appear to drop downwards because it is positioned absolutely) using a configuration object passed as the second argument to the effect() method. Within the callback function passed to the effect method, we create an inline function stored in the timer variable. Within this function we just hide the confirmation message, using the effect() method and setting the mode configuration option to hide and the direction option to up once again. After this function definition we use JavaScript's setTimeout function to execute the timer function after three seconds have elapsed. We use a closure to call our timer function in keeping with the current best-practice. The explode effect The explode effect provides a great visual show by literally exploding the selected element into a specified number of pieces before fading them away. This effect can be used with both the effect API as well as show, hide, or toggle logic. Configuration options When using the explode effect we can control how many pieces the element is exploded into, and whether the element is shown or hidden: Option Default Usage mode "hide" Sets whether the element is shown or hidden when used with the effect() method. Other values are show, effect, and toggle. pieces 9 Sets the number of pieces the element is exploded into. [ 162 ]
- Page 132 and 133: [ 111 ] Chapter 5 The previous scre
- Page 134 and 135: [ 113 ] Chapter 5 The styles we use
- Page 136 and 137: [ 115 ] Chapter 5 What just happene
- Page 138 and 139: }, html: copy, width: expander.widt
- Page 140 and 141: [ 119 ] Chapter 5 If the image alre
- Page 142 and 143: [ 121 ] Chapter 5 d. Two objects wh
- Page 144 and 145: [ 123 ] Chapter 5 text-align:center
- Page 146 and 147: [ 125 ] Chapter 5 What just happene
- Page 148 and 149: [ 127 ] Chapter 5 Finally, we retur
- Page 150 and 151: [ 129 ] Chapter 5 Once we've define
- Page 152 and 153: } }; $(config.selector).find("a").c
- Page 154 and 155: [ 133 ] Chapter 5 In the previous s
- Page 156: Have a go hero - extending the plug
- Page 159 and 160: Extended Animations with jQuery UI
- Page 161 and 162: Extended Animations with jQuery UI
- Page 163 and 164: Extended Animations with jQuery UI
- Page 165 and 166: Extended Animations with jQuery UI
- Page 167 and 168: Extended Animations with jQuery UI
- Page 169 and 170: Extended Animations with jQuery UI
- Page 171 and 172: Download from Wow! eBook Extended
- Page 173 and 174: Extended Animations with jQuery UI
- Page 175 and 176: Extended Animations with jQuery UI
- Page 177 and 178: Extended Animations with jQuery UI
- Page 179 and 180: Extended Animations with jQuery UI
- Page 181: Extended Animations with jQuery UI
- Page 185 and 186: Extended Animations with jQuery UI
- Page 187 and 188: Extended Animations with jQuery UI
- Page 189 and 190: Extended Animations with jQuery UI
- Page 191 and 192: Extended Animations with jQuery UI
- Page 193 and 194: Extended Animations with jQuery UI
- Page 195 and 196: Extended Animations with jQuery UI
- Page 197 and 198: Extended Animations with jQuery UI
- Page 199 and 200: Extended Animations with jQuery UI
- Page 201 and 202: Full Page Animations Can we animate
- Page 203 and 204: Full Page Animations display:block;
- Page 205 and 206: Download from Wow! eBook Full Page
- Page 207 and 208: Full Page Animations Have a go hero
- Page 209 and 210: Full Page Animations 4. Save this f
- Page 211 and 212: Full Page Animations 2. The bgpos c
- Page 213 and 214: Full Page Animations nav ul { margi
- Page 215 and 216: Full Page Animations screensize = {
- Page 217 and 218: Full Page Animations What just happ
- Page 219 and 220: Full Page Animations The second sec
- Page 221 and 222: Full Page Animations Pop quiz - cre
- Page 223 and 224: Full Page Animations Time for actio
- Page 225 and 226: Full Page Animations Next we define
- Page 228 and 229: 8 Other Popular Animations This cha
- Page 230 and 231: [ 209 ] Chapter 8 } .slider #scroll
Extended <strong>Animation</strong>s with <strong>jQuery</strong> UI<br />
The CSS is equally as simple, supplying a background color for the page to better highlight<br />
the message, and providing some basic styles for the container and the message itself.<br />
The most important rule (in this implementation) is that the container is initially hidden<br />
from view.<br />
Our script shows the message as soon as the page has loaded, but normally it would be<br />
triggered by the completion <strong>of</strong> some system action. We use the effect() method to<br />
initiate the effect and configure the mode to show and the direction to up (the element<br />
will still appear to drop downwards because it is positioned absolutely) using a configuration<br />
object passed as the second argument to the effect() method.<br />
Within the callback function passed to the effect method, we create an inline function stored<br />
in the timer variable. Within this function we just hide the confirmation message, using the<br />
effect() method and setting the mode configuration option to hide and the direction<br />
option to up once again.<br />
After this function definition we use JavaScript's setTimeout function to execute the timer<br />
function after three seconds have elapsed. We use a closure to call our timer function in<br />
keeping with the current best-practice.<br />
The explode effect<br />
The explode effect provides a great visual show by literally exploding the selected element<br />
into a specified number <strong>of</strong> pieces before fading them away. This effect can be used with both<br />
the effect API as well as show, hide, or toggle logic.<br />
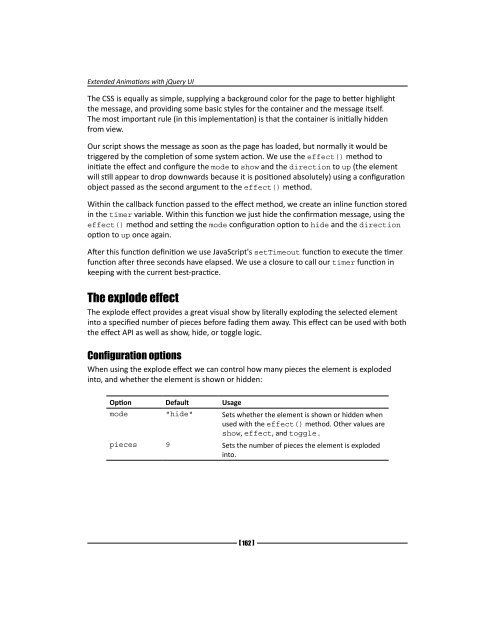
Configuration options<br />
When using the explode effect we can control how many pieces the element is exploded<br />
into, and whether the element is shown or hidden:<br />
Option Default Usage<br />
mode "hide" Sets whether the element is shown or hidden when<br />
used with the effect() method. Other values are<br />
show, effect, and toggle.<br />
pieces 9 Sets the number <strong>of</strong> pieces the element is exploded<br />
into.<br />
[ 162 ]


