

Batman: Arkham City Riddler guide
Batman: Arkham City Riddler guide
Batman: Arkham City Riddler guide

You also want an ePaper? Increase the reach of your titles
YUMPU automatically turns print PDFs into web optimized ePapers that Google loves.
www.dehkadeshop.ir<br />
<strong>Batman</strong>: <strong>Arkham</strong> <strong>City</strong> <strong>Riddler</strong> <strong>guide</strong><br />
Our walkthrough to every <strong>Arkham</strong> <strong>City</strong> challenge! Every riddle, every<br />
trophy, every camera, every balloon and more!<br />
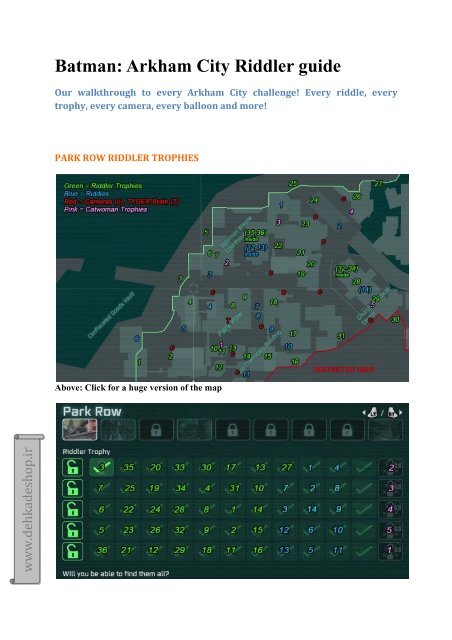
PARK ROW RIDDLER TROPHIES<br />
Above: Click for a huge version of the map
www.dehkadeshop.ir<br />
PARK ROW - RIDDLER TROPHY #1<br />
You’re going to need to dive bomb from a nearby gargoyle in order to put enough pressure<br />
on the <strong>Riddler</strong> panel to light up the <strong>Riddler</strong> switch above it. You’ll also need to detonate your<br />
shock wave after you land.<br />
PARK ROW - RIDDLER TROPHY #2<br />
This trophy can be seen inside a cage, but proximity mines are blocking the way in. Use your<br />
disruptor: mine detonator to disable them and claim your prize.<br />
PARK ROW - RIDDLER TROPHY #3
www.dehkadeshop.ir<br />
You need to use the disruptor: firearm jammer to disable the TYGER sentry in this danger<br />
zone. After that, just walk around the sentry to find a trophy.<br />
PARK ROW - RIDDLER TROPHY #4<br />
On this roof southwest of the courhouse. It’s behind some bars, which are locked by a<br />
hackable console. Use your crytopgraphic sequencer.<br />
<strong>Batman</strong>: <strong>Arkham</strong> <strong>City</strong> <strong>Riddler</strong> <strong>guide</strong>
www.dehkadeshop.ir<br />
Our walkthrough to every <strong>Arkham</strong> <strong>City</strong> challenge! Every riddle, every<br />
trophy, every camera, every balloon and more!<br />
PARK ROW RIDDLER TROPHIES<br />
Above: Click for a huge version of the map<br />
PARK ROW - RIDDLER TROPHY #1
www.dehkadeshop.ir<br />
You’re going to need to dive bomb from a nearby gargoyle in order to put enough pressure<br />
on the <strong>Riddler</strong> panel to light up the <strong>Riddler</strong> switch above it. You’ll also need to detonate your<br />
shock wave after you land.<br />
PARK ROW - RIDDLER TROPHY #2<br />
This trophy can be seen inside a cage, but proximity mines are blocking the way in. Use your<br />
disruptor: mine detonator to disable them and claim your prize.<br />
PARK ROW - RIDDLER TROPHY #3
www.dehkadeshop.ir<br />
You need to use the disruptor: firearm jammer to disable the TYGER sentry in this danger<br />
zone. After that, just walk around the sentry to find a trophy.<br />
PARK ROW - RIDDLER TROPHY #4<br />
On this roof southwest of the courhouse. It’s behind some bars, which are locked by a<br />
hackable console. Use your crytopgraphic sequencer.
www.dehkadeshop.ir<br />
PARK ROW - RIDDLER TROPHY #5<br />
You need an upgraded hacker to disable the electricity and open the bars.<br />
PARK ROW - RIDDLER TROPHY #6<br />
There are four riddler switches you need to activate simultaneously. Locate the caged trophy.<br />
The nearest switch to it should be saved for last; find the other three and rig them with<br />
explosive gel. Return to the first switch, detonate your gel, then use your batarang to hit this<br />
remaining switch.<br />
PARK ROW - RIDDLER TROPHY #7
www.dehkadeshop.ir<br />
Locate the liquor store pictured above. To the right is a weak wall that you can blow using<br />
explosive gel. Past that, there is a door that can be opened using your remote electric<br />
charge. The trophy is just beyond that door.<br />
PARK ROW - RIDDLER TROPHY #8<br />
Near where you might rescue a politcal prisoner. You’ll have to hop a fence to get here, but<br />
once you do, do a running slide to reach this trophy.
www.dehkadeshop.ir<br />
PARK ROW - RIDDLER TROPHY #9<br />
On a roof just across from the front entrance to the court house. Step on the riddler panel to<br />
open the cage, then nab the trophy. If only they were all this easy...<br />
PARK ROW - RIDDLER TROPHY #10
www.dehkadeshop.ir<br />
Walk around the building just west of the Gotham Casinos and you’ll spot a trophy behind<br />
some bars. The soft wood paneling above the bars can be broken if you glide into it from the<br />
opposite roof.<br />
PARK ROW - RIDDLER TROPHY #11<br />
Directly across from the Gotham Casinos entrace there is a door just beyond a chain link<br />
fence that can be opened using the remote electric charge. Open it to find the trophy.<br />
PARK ROW - RIDDLER TROPHY #12<br />
You’ll need to use your remote electrical charge to activate the transformers in sequence,<br />
moving the trophy through the chainlink cage.<br />
PARK ROW - RIDDLER TROPHY #13
www.dehkadeshop.ir<br />
Under a car just outside the entrance to the Gotham Casinos. You’ll have to grab it while<br />
doing a running slide since the car is too low to simply crouch under.<br />
PARK ROW - RIDDLER TROPHY #14<br />
Use your freeze blast to stop the hot steam, then slideunder the fence to nab this trophy.
www.dehkadeshop.ir<br />
PARK ROW - RIDDLER TROPHY #15<br />
This gargoyle is riddled with riddler symbols. Grappling up to it will unlock the riddler door<br />
just below it. Inside you’ll find a trophy.<br />
PARK ROW - RIDDLER TROPHY #16
www.dehkadeshop.ir<br />
Here you’ll see what appears to be five blinking panels, but detective mode shows only the<br />
far right one to be connected to the cage. Wait for that panel to light up before throwing your<br />
batarang.<br />
PARK ROW - RIDDLER TROPHY #17<br />
On this roof there is some soft wooden panelling that you can remove with explosive gel.<br />
Can’t miss it in detective mode.<br />
PARK ROW - RIDDLER TROPHY #18<br />
You’ll notice a panel here inside a chainlink cage, right by a caged trophy. Pilot your remote<br />
batarang through the nearby duct to activate the panel. Remember to use LT/L2 to slow your<br />
batarang down as it rounds the corner.<br />
PARK ROW - RIDDLER TROPHY #19
www.dehkadeshop.ir<br />
Use your freeze blast to stop the hot steam, then duck under the fence to nab this trophy.<br />
PARK ROW - RIDDLER TROPHY #20<br />
Look for a caged trophy. There is a riddler switch just west of it on some smoke stacks. Use<br />
your batarang.
www.dehkadeshop.ir<br />
PARK ROW - RIDDLER TROPHY #21<br />
On a high roof just northwest of the clocktower you’ll see a pressure pad. Face west and look<br />
down. The pad opens a trap door below. Jump down before it closes and use your explosive<br />
gel to reach the trophy.<br />
PARK ROW - RIDDLER TROPHY #22<br />
You need to touch all three of the panels surrounding this cage BEFORE you touch the<br />
ground. Glide into the highest panel from the opposite building, then press A to push off and<br />
glide in the opossite direction. Touch the next panel, then again press A to push off, making<br />
sure to end your flight on the third and final panel.<br />
PARK ROW - RIDDLER TROPHY #23<br />
Three spurts of explosive gel detonated simultaneously will do the trick here.<br />
PARK ROW - RIDDLER TROPHY #24
www.dehkadeshop.ir<br />
In the political prisoner shanty town, look for some soft wood panelling. Since it’s at ground<br />
level, you can just punch through.<br />
PARK ROW - RIDDLER TROPHY #25<br />
You’ll need to use your disruptor: firearm jammer on this TYGER sentry gun. After that<br />
just slap some explosive gel on the right wall to access the trophy.
www.dehkadeshop.ir<br />
PARK ROW - RIDDLER TROPHY #26<br />
You’ll need to chuck your batarang at each panel when it lights up. They light up in a<br />
certain sequence, so study the pattern and try to anticipate.<br />
PARK ROW - RIDDLER TROPHY #27<br />
You may spot this trophy long before you can reach it. You need to create an ice platform<br />
using the freeze blast, and then use your grapnel to pull yourself over to the trophy.<br />
PARK ROW - RIDDLER TROPHY #28
www.dehkadeshop.ir<br />
On the church roof, smack dab in the middle. You only need the cryptographic sequencer to<br />
use hack the nearby panel.<br />
PARK ROW - RIDDLER TROPHY #29<br />
In the alley behind the church you’ll see four riddler panels. Stepping on the first unlocks the<br />
trophy cages above, but you need to somehow get over the other three red panels or the cage
www.dehkadeshop.ir<br />
will close again. Use the line launcher and attach it to the far left wall (the fence directly in<br />
front of you won’t work). Turn around and grapple up to claim the trophy.<br />
PARK ROW - RIDDLER TROPHY #30<br />
This one is located south west of the church. Use the remote electric charge to disable the<br />
electricty, then use your explosive gel on the left wall.<br />
PARK ROW - RIDDLER TROPHY #31<br />
Turn on detective mode and follow the wiring to find a riddler panel high above this caged<br />
trophy. Hit the panel with a batarang then quickly drop down before the cage closes.<br />
PARK ROW - RIDDLER TROPHY #32
www.dehkadeshop.ir<br />
Look for the soft wood panelling at the back of the confessional, near medic Adam<br />
Hamasaki. He’s in the northeast corner.<br />
PARK ROW - RIDDLER TROPHY #33<br />
Above the door to the belltower there is a small area that you can grapple up into. From here<br />
you can see soft wood panelling on the other side of the main entrance, but on the same level.<br />
Use your line launcher to bust through it.
www.dehkadeshop.ir<br />
PARK ROW - RIDDLER TROPHY #34<br />
As you’re making your way up to the bell tower from inside the church, check above this<br />
archway for a trophy. Use your batclaw to get it down.<br />
PARK ROW - RIDDLER TROPHY #35<br />
Stand near the back door and pilot a remote batarang through the nearby electric arc, down<br />
the stairs, over the bars, and into the fusebox. This will unlock the nearby cell, which contains<br />
a trophy.<br />
PARK ROW - RIDDLER TROPHY #36
www.dehkadeshop.ir<br />
As you head up the stairs from the courthouse basement make sure to look up. There is a<br />
trophy above the door; use your grapnel to get it down.<br />
<strong>Batman</strong>: <strong>Arkham</strong> <strong>City</strong> <strong>Riddler</strong> <strong>guide</strong><br />
Our walkthrough to every <strong>Arkham</strong> <strong>City</strong> challenge! Every riddle, every<br />
trophy, every camera, every balloon and more!<br />
Words: Matt Hughes on October 18, 2011<br />
133 Comments<br />
Email<br />
Share / Save
www.dehkadeshop.ir<br />
PARK ROW RIDDLER TROPHIES<br />
Above: Click for a huge version of the map<br />
PARK ROW - RIDDLER TROPHY #1<br />
You’re going to need to dive bomb from a nearby gargoyle in order to put enough pressure<br />
on the <strong>Riddler</strong> panel to light up the <strong>Riddler</strong> switch above it. You’ll also need to detonate your<br />
shock wave after you land.
www.dehkadeshop.ir<br />
PARK ROW - RIDDLER TROPHY #2<br />
This trophy can be seen inside a cage, but proximity mines are blocking the way in. Use your<br />
disruptor: mine detonator to disable them and claim your prize.<br />
PARK ROW - RIDDLER TROPHY #3
www.dehkadeshop.ir<br />
You need to use the disruptor: firearm jammer to disable the TYGER sentry in this danger<br />
zone. After that, just walk around the sentry to find a trophy.<br />
PARK ROW - RIDDLER TROPHY #4<br />
On this roof southwest of the courhouse. It’s behind some bars, which are locked by a<br />
hackable console. Use your crytopgraphic sequencer.<br />
PARK ROW - RIDDLER TROPHY #5
www.dehkadeshop.ir<br />
You need an upgraded hacker to disable the electricity and open the bars.<br />
PARK ROW - RIDDLER TROPHY #6<br />
There are four riddler switches you need to activate simultaneously. Locate the caged trophy.<br />
The nearest switch to it should be saved for last; find the other three and rig them with<br />
explosive gel. Return to the first switch, detonate your gel, then use your batarang to hit this<br />
remaining switch.<br />
PARK ROW - RIDDLER TROPHY #7
www.dehkadeshop.ir<br />
Locate the liquor store pictured above. To the right is a weak wall that you can blow using<br />
explosive gel. Past that, there is a door that can be opened using your remote electric<br />
charge. The trophy is just beyond that door.<br />
PARK ROW - RIDDLER TROPHY #8<br />
Near where you might rescue a politcal prisoner. You’ll have to hop a fence to get here, but<br />
once you do, do a running slide to reach this trophy.
www.dehkadeshop.ir<br />
PARK ROW - RIDDLER TROPHY #9<br />
On a roof just across from the front entrance to the court house. Step on the riddler panel to<br />
open the cage, then nab the trophy. If only they were all this easy...<br />
PARK ROW - RIDDLER TROPHY #10
www.dehkadeshop.ir<br />
Walk around the building just west of the Gotham Casinos and you’ll spot a trophy behind<br />
some bars. The soft wood paneling above the bars can be broken if you glide into it from the<br />
opposite roof.<br />
PARK ROW - RIDDLER TROPHY #11<br />
Directly across from the Gotham Casinos entrace there is a door just beyond a chain link<br />
fence that can be opened using the remote electric charge. Open it to find the trophy.<br />
PARK ROW - RIDDLER TROPHY #12<br />
You’ll need to use your remote electrical charge to activate the transformers in sequence,<br />
moving the trophy through the chainlink cage.<br />
PARK ROW - RIDDLER TROPHY #13
www.dehkadeshop.ir<br />
Under a car just outside the entrance to the Gotham Casinos. You’ll have to grab it while<br />
doing a running slide since the car is too low to simply crouch under.<br />
PARK ROW - RIDDLER TROPHY #14<br />
Use your freeze blast to stop the hot steam, then slideunder the fence to nab this trophy.
www.dehkadeshop.ir<br />
PARK ROW - RIDDLER TROPHY #15<br />
This gargoyle is riddled with riddler symbols. Grappling up to it will unlock the riddler door<br />
just below it. Inside you’ll find a trophy.<br />
PARK ROW - RIDDLER TROPHY #16
www.dehkadeshop.ir<br />
Here you’ll see what appears to be five blinking panels, but detective mode shows only the<br />
far right one to be connected to the cage. Wait for that panel to light up before throwing your<br />
batarang.<br />
PARK ROW - RIDDLER TROPHY #17<br />
On this roof there is some soft wooden panelling that you can remove with explosive gel.<br />
Can’t miss it in detective mode.<br />
PARK ROW - RIDDLER TROPHY #18<br />
You’ll notice a panel here inside a chainlink cage, right by a caged trophy. Pilot your remote<br />
batarang through the nearby duct to activate the panel. Remember to use LT/L2 to slow your<br />
batarang down as it rounds the corner.<br />
PARK ROW - RIDDLER TROPHY #19
www.dehkadeshop.ir<br />
Use your freeze blast to stop the hot steam, then duck under the fence to nab this trophy.<br />
PARK ROW - RIDDLER TROPHY #20<br />
Look for a caged trophy. There is a riddler switch just west of it on some smoke stacks. Use<br />
your batarang.
www.dehkadeshop.ir<br />
PARK ROW - RIDDLER TROPHY #21<br />
On a high roof just northwest of the clocktower you’ll see a pressure pad. Face west and look<br />
down. The pad opens a trap door below. Jump down before it closes and use your explosive<br />
gel to reach the trophy.<br />
PARK ROW - RIDDLER TROPHY #22<br />
You need to touch all three of the panels surrounding this cage BEFORE you touch the<br />
ground. Glide into the highest panel from the opposite building, then press A to push off and<br />
glide in the opossite direction. Touch the next panel, then again press A to push off, making<br />
sure to end your flight on the third and final panel.<br />
PARK ROW - RIDDLER TROPHY #23<br />
Three spurts of explosive gel detonated simultaneously will do the trick here.<br />
PARK ROW - RIDDLER TROPHY #24
www.dehkadeshop.ir<br />
In the political prisoner shanty town, look for some soft wood panelling. Since it’s at ground<br />
level, you can just punch through.<br />
PARK ROW - RIDDLER TROPHY #25<br />
You’ll need to use your disruptor: firearm jammer on this TYGER sentry gun. After that<br />
just slap some explosive gel on the right wall to access the trophy.
www.dehkadeshop.ir<br />
PARK ROW - RIDDLER TROPHY #26<br />
You’ll need to chuck your batarang at each panel when it lights up. They light up in a<br />
certain sequence, so study the pattern and try to anticipate.<br />
PARK ROW - RIDDLER TROPHY #27<br />
You may spot this trophy long before you can reach it. You need to create an ice platform<br />
using the freeze blast, and then use your grapnel to pull yourself over to the trophy.<br />
PARK ROW - RIDDLER TROPHY #28
www.dehkadeshop.ir<br />
On the church roof, smack dab in the middle. You only need the cryptographic sequencer to<br />
use hack the nearby panel.<br />
PARK ROW - RIDDLER TROPHY #29<br />
In the alley behind the church you’ll see four riddler panels. Stepping on the first unlocks the<br />
trophy cages above, but you need to somehow get over the other three red panels or the cage
www.dehkadeshop.ir<br />
will close again. Use the line launcher and attach it to the far left wall (the fence directly in<br />
front of you won’t work). Turn around and grapple up to claim the trophy.<br />
PARK ROW - RIDDLER TROPHY #30<br />
This one is located south west of the church. Use the remote electric charge to disable the<br />
electricty, then use your explosive gel on the left wall.<br />
PARK ROW - RIDDLER TROPHY #31<br />
Turn on detective mode and follow the wiring to find a riddler panel high above this caged<br />
trophy. Hit the panel with a batarang then quickly drop down before the cage closes.<br />
PARK ROW - RIDDLER TROPHY #32
www.dehkadeshop.ir<br />
Look for the soft wood panelling at the back of the confessional, near medic Adam<br />
Hamasaki. He’s in the northeast corner.<br />
PARK ROW - RIDDLER TROPHY #33<br />
Above the door to the belltower there is a small area that you can grapple up into. From here<br />
you can see soft wood panelling on the other side of the main entrance, but on the same level.<br />
Use your line launcher to bust through it.
www.dehkadeshop.ir<br />
PARK ROW - RIDDLER TROPHY #34<br />
As you’re making your way up to the bell tower from inside the church, check above this<br />
archway for a trophy. Use your batclaw to get it down.<br />
PARK ROW - RIDDLER TROPHY #35<br />
Stand near the back door and pilot a remote batarang through the nearby electric arc, down<br />
the stairs, over the bars, and into the fusebox. This will unlock the nearby cell, which contains<br />
a trophy.<br />
PARK ROW - RIDDLER TROPHY #36
www.dehkadeshop.ir<br />
As you head up the stairs from the courthouse basement make sure to look up. There is a<br />
trophy above the door; use your grapnel to get it down.<br />
PARK ROW CATWOMAN TROPHIES<br />
PARK ROW - CATWOMAN TROPHY #1
www.dehkadeshop.ir<br />
The way to this trophy is at ground level. Look for some bars underneath the “Gotham<br />
Hardware” sign.<br />
PARK ROW - CATWOMAN TROPHY #2<br />
Just west of the courthouse at ground level. If <strong>Batman</strong> has already blown the weak wall with<br />
his explosive gel, Catwoman can just walk into this area and grab the trophy from the ceiling.<br />
PARK ROW - CATWOMAN TROPHY #3
www.dehkadeshop.ir<br />
Just northeast of the courthouse, very near the Catwoman spawn point. Pounce onto the<br />
bottom of the cage and open the vent to get to the trophy.<br />
PARK ROW - CATWOMAN TROPHY #4<br />
On the corner of this roof, out in the open.
www.dehkadeshop.ir<br />
PARK ROW - CATWOMAN TROPHY #5<br />
Step on the first <strong>Riddler</strong> panel, then pounce to the ceiling of the cage to avoid the other three<br />
red panels. Make your way past them and to the trophy.<br />
PARK ROW RIDDLE SOLUTIONS<br />
Above: Click for a huger version of this map
www.dehkadeshop.ir<br />
PARK ROW - RIDDLE SOLUTION #1<br />
“Its far from PURRFECT, but she calls it home.”<br />
PARK ROW - RIDDLE SOLUTION #2
www.dehkadeshop.ir<br />
“You’ve been warned. People aren’t the only unstable part of this city.”<br />
PARK ROW - RIDDLE SOLUTION #3<br />
“DA campaign special: Get two votes, for the price of one.”
www.dehkadeshop.ir<br />
PARK ROW - RIDDLE SOLUTION #4<br />
Above: Inside building accessible after defeating Mad Hatter<br />
“I wonder how you can land an appointment with this milliner? Perhaps it would be best to<br />
book?”<br />
PARK ROW - RIDDLE SOLUTION #5
www.dehkadeshop.ir<br />
“Has this flower tuned over a new leaf?”<br />
PARK ROW - RIDDLE SOLUTION #6<br />
“This den is where the vicious animals take your treasure. Is it theft, if it’s already stolen?”<br />
PARK ROW - RIDDLE SOLUTION #7
www.dehkadeshop.ir<br />
Above: Use detective mode from courthouse flagpole<br />
“This question can only be answered from an unusual perspective. Can you get yourself<br />
there?”<br />
PARK ROW - RIDDLE SOLUTION #8<br />
“Do you have strange thoughts? Maybe you should seek help?”
www.dehkadeshop.ir<br />
PARK ROW - RIDDLE SOLUTION #9<br />
“I am an actor who can transform a film with the final cut. Who am I?”<br />
PARK ROW - RIDDLE SOLUTION #10<br />
“Six legs went in and only two came out. Where am I?”
www.dehkadeshop.ir<br />
PARK ROW - RIDDLE SOLUTION #11<br />
“Acing the chemistry test will illuminate you.”<br />
PARK ROW - RIDDLE SOLUTION #12<br />
Above: Inside courthouse, on judge’s desk
www.dehkadeshop.ir<br />
“BANG! BANG! Order in the court.”<br />
PARK ROW - RIDDLE SOLUTION #13<br />
Above: Inside courthouse, basement cell<br />
“Who’s crazy enough to date this guy?”<br />
PARK ROW - RIDDLE SOLUTION #14<br />
Above: Inside church
www.dehkadeshop.ir<br />
“If you find the name, does the Cash come hand in hand?”<br />
THE BOWERY RIDDLER TROPHIES<br />
Above: Click for a huge version of this map<br />
THE BOWERY - RIDDLER TROPHY #1
www.dehkadeshop.ir<br />
This trophy’s cage will automatically open, provided you stay a fair distance away. Use<br />
your Batclaw to grab the trophy.<br />
THE BOWERY - RIDDLER TROPHY #2<br />
As soon as you stand on the nearby riddler panel, you’ll have two seconds to do a running<br />
slide through the vents while the bars are retracted.
www.dehkadeshop.ir<br />
THE BOWERY - RIDDLER TROPHY #3<br />
This trophy is behind some bars at ground level. Use your cryptographic sequencer on the<br />
nearby console.<br />
THE BOWERY - RIDDLER TROPHY #4
www.dehkadeshop.ir<br />
There’s a structural weakness just left of this danger zone. Blow the wall and climb into the<br />
maintenance vent. You’ll come out on the other side where the trophy awaits, safe from the<br />
sentry.<br />
THE BOWERY - RIDDLER TROPHY #5<br />
Just use your remote electric charge on this door at ground level to reach the trophy inside.<br />
THE BOWERY - RIDDLER TROPHY #6
www.dehkadeshop.ir<br />
Before stepping onto the <strong>Riddler</strong> panel, slap explosive gel on all three <strong>Riddler</strong> switches.<br />
When you step on the panel, one of the switches will light up. Make sure to zoom in (click<br />
right stick) on that explosive charge so that you can detonate separately from the others. Do<br />
the same for the second and third switches when they light up.<br />
THE BOWERY - RIDDLER TROPHY #7<br />
This trophy is caged and is surrounded by three panels. You need to get creative with your<br />
line launcher and land on the three panels without touching anything else. See the video.<br />
Make sure to drop from the line at the right time to avoid overshooting.<br />
THE BOWERY - RIDDLER TROPHY #8
www.dehkadeshop.ir<br />
This trophy rests on the horse statue just outside the entrance to the Iceberg Lounge. Use<br />
your Batclaw to get it down.<br />
THE BOWERY - RIDDLER TROPHY #9<br />
This <strong>Riddler</strong> trophy is in the lower streets, very near #7. You need to do a dive bomb and<br />
pull up in order to glide over the electrified fence that stands in your way. See the video.<br />
THE BOWERY - RIDDLER TROPHY #10
www.dehkadeshop.ir<br />
There are no traps or cages around this trophy, just look behind this support column.<br />
THE BOWERY - RIDDLER TROPHY #11<br />
This trophy is resting atop the cable car track support column.
www.dehkadeshop.ir<br />
THE BOWERY - RIDDLER TROPHY #12<br />
This one is inside a cable car. Hack the nearby console with your cryptographic sequencer<br />
to gain access to the trophy.<br />
THE BOWERY - RIDDLER TROPHY #13<br />
Stepping on the panel lights up the left <strong>Riddler</strong> switch. However, when you hit that switch,<br />
bars raise up and block you from throwing gadgets at a distance. You need to stand on the<br />
panel and use your line launcher: tight rope to get inside the cage. Once you’re in, you can<br />
throw Batarangs at both switches from your tightrope.<br />
THE BOWERY - RIDDLER TROPHY #14
www.dehkadeshop.ir<br />
This one is out in the open, on the museum roof along the southern edge of the map.<br />
THE BOWERY - RIDDLER TROPHY #15<br />
You can find this trophy at ground level. Just do a running slide under the small opening in<br />
the cage.
www.dehkadeshop.ir<br />
THE BOWERY - RIDDLER TROPHY #16<br />
Check the lower streets, under the museum entrance. You can see a trophy through a window.<br />
Break punch through the soft wood panelling to the left of that window to gain access.<br />
THE BOWERY - RIDDLER TROPHY #17
www.dehkadeshop.ir<br />
Stand on top of the entrance to the subway and face the museum. You’ll see some soft wood<br />
panelling that you can break through using your line launcher. Alternatively, you can leap<br />
from the bridge above the subway entrance and do a dive bomb glide to break in that way.<br />
THE BOWERY - RIDDLER TROPHY #18<br />
Check the lower streets for this small Italian cuisine shop. Use your remote electric charge<br />
on the door to get inside and nab the trophy.<br />
THE BOWERY - RIDDLER TROPHY #19<br />
This trophy is under the bridge but above the cable car tracks. There are six riddler switches;<br />
use three quick Batarangs and then quickly turn around and use another quick three. If<br />
you’re fast enough, the trophy cage should unlock and you can use the Batclaw to claim your<br />
prize.<br />
THE BOWERY - RIDDLER TROPHY #20
www.dehkadeshop.ir<br />
Search the lower streets for a cluster of proximity mines near a structural weakness. Use your<br />
disruptor: mine detonator to clear the area in front of the wall, then use your explosive gel<br />
to break through.<br />
THE BOWERY - RIDDLER TROPHY #21<br />
Look on top of one of the arches located on the roof of this building. Use your Batclaw to get<br />
the trophy down.
www.dehkadeshop.ir<br />
THE BOWERY - RIDDLER TROPHY #22<br />
There’s a <strong>Riddler</strong> trophy through that window. Use your explosive gel to gain access.<br />
THE BOWERY - RIDDLER TROPHY #23<br />
Use your remote electric charge on the two generators to push and pull the trophy through<br />
the cage maze, stepping on the panel open the hatches when necessary.<br />
THE BOWERY - RIDDLER TROPHY #24<br />
The panel next to this caged <strong>Riddler</strong> trophy is one of three. The other two are on the sides of<br />
nearby buildings. Hop onto the roof of the building across from the trophy and glide into the<br />
first panel. Press A/X to bounce off the wall and glide into the second panel. Repeat, only this<br />
time land on the panel next to the cage.<br />
THE BOWERY - RIDDLER TROPHY #25<br />
This trophy is on the roof, near a switch that is completely caged in. Throw a Remote<br />
Batarang through the nearby open duct. Once you’ve exited the other side, turn around to<br />
find a second duct adjacent to the first. Navigate through this one to get to the switch. Make<br />
sure to use the brakes!
www.dehkadeshop.ir<br />
THE BOWERY - RIDDLER TROPHY #26<br />
Simply use your cryptographic sequencer on the console to unlock the cage.<br />
THE BOWERY - RIDDLER TROPHY #27
www.dehkadeshop.ir<br />
This cable car has weak wood panelling on one side. Simply glide into it from any high roof.<br />
THE BOWERY - RIDDLER TROPHY #28<br />
If you switch on detective mode you’ll notice there are two wires running from the trophy<br />
cage to two separate switches. Plant explosive gel on the one pictured above, then run over to<br />
the other switch. Detonate the gel, then use your Batarang on the other switch.<br />
THE BOWERY - RIDDLER TROPHY #29
www.dehkadeshop.ir<br />
Use your explosive gel on the structural weakness. Simple stuff.<br />
THE BOWERY - RIDDLER TROPHY #30<br />
There is some soft wood panelling on the side of this building. Simply glide through it and<br />
grab the trophy on the other side.
www.dehkadeshop.ir<br />
THE BOWERY - RIDDLER TROPHY #31<br />
Use your freeze blast to stop the steam, then do a running slide under the fence.<br />
THE BOWERY - RIDDLER TROPHY #32<br />
There’s a trophy up on the wall here. Use your Batclaw to get it down.
www.dehkadeshop.ir<br />
THE BOWERY - RIDDLER TROPHY #33<br />
Use your cryptographic sequencer to lower the bars blocking this rooftop doorway.<br />
THE BOWERY - RIDDLER TROPHY #34<br />
There are three panels attached to this trophy cage. The first is on a roof to the south. Jump<br />
from that first panel down to the second, and then use your line launcher to reach the final<br />
panel.<br />
THE BOWERY - RIDDLER TROPHY #35
www.dehkadeshop.ir<br />
(Processing center) Use your freeze blast to create an ice raft at the pool, which is at the very<br />
bottom of the area. From your raft, use your Batclaw to open the rusty hatch.<br />
THE BOWERY - RIDDLER TROPHY #36<br />
(Processing center) Inside the elevator on the ceiling. Hack the console on the left to open the<br />
doors. Use your Batclaw to get it down.
www.dehkadeshop.ir<br />
THE BOWERY - RIDDLER TROPHY #37<br />
(Processing center) Destroy the structural weakness above the door at this location using your<br />
explosive gel.<br />
THE BOWERY - RIDDLER TROPHY #38
www.dehkadeshop.ir<br />
(Processing center) Enter the torture chamber and break the mirror. Look straight up at the<br />
ceiling. Use your Batclaw to get the trophy down.<br />
THE BOWERY - RIDDLER TROPHY #39<br />
Behind the heavy metal TYGER security doors. Use your cryptographic sequencer to hack<br />
the console on the left and open the door. Once inside, use your Batclaw to get the trophy<br />
down from the ceiling.<br />
THE BOWERY CATWOMAN TROPHIES<br />
THE BOWERY - CATWOMAN RIDDLER TROPHY #1<br />
There’s a soft wood panelling wall that you need <strong>Batman</strong> to bust through on the side of this<br />
building. Enter through that hold, and pounce on the ceiling. Open the grate and grab the<br />
trophy.<br />
THE BOWERY - CATWOMAN RIDDLER TROPHY #2
www.dehkadeshop.ir<br />
This trophy is out in the open on this roof.<br />
THE BOWERY - CATWOMAN RIDDLER TROPHY #3<br />
Underneath the bridge. Pounce to the ceiling and crawl over to the trophy.
www.dehkadeshop.ir<br />
THE BOWERY - CATWOMAN RIDDLER TROPHY #4<br />
On this ledge. The trophy is fenced in on two sides, so you need to drop down to the lowest<br />
level and climb the wall.<br />
THE BOWERY - CATWOMAN RIDDLER TROPHY #5<br />
On the roof of the museum, just north of center.
www.dehkadeshop.ir<br />
<strong>Batman</strong>: <strong>Arkham</strong> <strong>City</strong> <strong>Riddler</strong> <strong>guide</strong><br />
Our walkthrough to every <strong>Arkham</strong> <strong>City</strong> challenge! Every riddle, every<br />
trophy, every camera, every balloon and more!<br />
Words: Matt Hughes on October 18, 2011<br />
133 Comments<br />
Email<br />
Share / Save<br />
THE BOWERY RIDDLE ANSWERS
www.dehkadeshop.ir<br />
THE BOWERY RIDDLE ANSWER #1<br />
"You don’t have to be crazy to shop here, do you?"<br />
THE BOWERY RIDDLE ANSWER #2
www.dehkadeshop.ir<br />
"<strong>Arkham</strong> city is not the place to be rich or famous. Bruce Wayne has never felt quite so<br />
wanted."<br />
THE BOWERY RIDDLE ANSWER #3<br />
"Cowboy, trilby, or bowler? Hats off to anyone brave enough to try one on."
www.dehkadeshop.ir<br />
THE BOWERY RIDDLE ANSWER #4<br />
"The feuding families always sit down to a good meal. Will there be a massacre?"<br />
THE BOWERY RIDDLE ANSWER #5<br />
"You’re a dummy if you don’t try and buy one."
www.dehkadeshop.ir<br />
THE BOWERY RIDDLE ANSWER #6<br />
"Do you need to look SHARP to campaign for change?"<br />
THE BOWERY RIDDLE ANSWER #7
www.dehkadeshop.ir<br />
"Studies have shown that if you’re not on your best behavior, you’ll come out crazy. How<br />
Strange?"<br />
THE BOWERY RIDDLE ANSWER #8<br />
"Was the writing on the wall from the moment you entered?"<br />
THE BOWERY RIDDLE ANSWER #9
www.dehkadeshop.ir<br />
Above: Inside processing center, facing west<br />
"This question can only be answered from an unusual perspective. Can you get yourself<br />
there?"<br />
THE BOWERY RIDDLE ANSWER #10<br />
Above: Inside processing center, northwest torture room<br />
"You don’t want to be caught off-guard in this place, do you?"
www.dehkadeshop.ir<br />
THE BOWERY RIDDLE ANSWER #11<br />
Above: Look at wonder Tower<br />
"My intellect towers above yours, <strong>Batman</strong>. I wonder if you’ll ever solve this riddle?"
www.dehkadeshop.ir<br />
AMUSEMENT MILE RIDDLER TROPHIES
www.dehkadeshop.ir<br />
AMUSEMENT MILE - RIDDLER TROPHY #1<br />
Inside a danger zone. You’ll need to use the freeze blast to create an ice raft, then use the<br />
disruptor: firearm jammer to disable the TYGER sentry. Pull yourself in using the grapel<br />
and grab the trophy.
www.dehkadeshop.ir<br />
AMUSEMENT MILE - RIDDLER TROPHY #2<br />
Inside this rooftop shanty. Use your explosive gel to ruin the hobo hole, then grab your<br />
trophy.<br />
AMUSEMENT MILE - RIDDLER TROPHY #3<br />
Find the Gotham Casinos sign at ground level, then look to the left. Step on the riddler panel,<br />
then turn around and use your line launcher on the soft wooden panelling in the distance.<br />
You’ll crash through it to find a trophy.<br />
AMUSEMENT MILE - RIDDLER TROPHY #4
www.dehkadeshop.ir<br />
This trophy rotates automatically; it’s just a matter of timing your running slide under the<br />
fence so that you can grab it when it’s face down.<br />
AMUSEMENT MILE - RIDDLER TROPHY #5<br />
You might be able to see the trophy in its cozy chain link cage, but in order to reach it you’ll<br />
need to follow the grating north until you can drop down and see underneath. You’ll need to<br />
throw a freeze blast at into the water at the far end near the wall, then use your line launcher<br />
to get onto it. From here you should have be able to take an easy shot at the generator with<br />
your remote electric charge. Alternatively, use the line launcher tight rope ability to bypass<br />
the need for a freeze blast.<br />
AMUSEMENT MILE - RIDDLER TROPHY #6<br />
There are three riddler panels you need to step on without touching anything else. The first is<br />
on a roof just southwest of the caged trophy. Simply glide to the other two and the cage will<br />
open.<br />
AMUSEMENT MILE - RIDDLER TROPHY #7<br />
There are six total riddler switches you have to hit nearly simultaneously to open the gate.<br />
The switches reset after about four seconds, so you need to plant explosive gel on the upper<br />
three, then jump down and face the right most switch. Detonate your gel, then quickly throw
www.dehkadeshop.ir<br />
your batarang, run to the next switch, throw another, and the same for the final switch. The<br />
timing is tight, so make sure to use a quick batarang by just tapping LT/L2.<br />
AMUSEMENT MILE - RIDDLER TROPHY #8<br />
You simply need to use your disruptor: mine detonator to destroy the proximity mines. Be<br />
prepared to wait, though, since you can only take out two before your disruptor needs to cool<br />
down. The challenge here is patience. Damn that brilliant criminal!<br />
AMUSEMENT MILE - RIDDLER TROPHY #9<br />
There are three panels nearby. Look for the first on a high rooftop just north of the caged<br />
trophy. Glide from this one into the one the wall, then make sure to press A to glide off the<br />
wall in the opposite direction so that you can tag the final panel. From there, get back to the<br />
cage as quickly as you can.<br />
AMUSEMENT MILE - RIDDLER TROPHY #10
www.dehkadeshop.ir<br />
A simple sprint over these three adjacent panels will unlock the cage.<br />
AMUSEMENT MILE - RIDDLER TROPHY #11<br />
Use your remote electric charge on the generator before stepping on the switch to move the<br />
trophy to the right. Then quickly hop on the riddler panel in order to open the small trap door,<br />
which will allow the trophy to move to the opening.
www.dehkadeshop.ir<br />
AMUSEMENT MILE - RIDDLER TROPHY #12<br />
On the GCR radio tower, out in the open. Can’t miss it.<br />
AMUSEMENT MILE - RIDDLER TROPHY #13
www.dehkadeshop.ir<br />
The riddler panel here alternates between green and red. Step on it when it’s green to unlock<br />
the nearby trophy cage.<br />
AMUSEMENT MILE - RIDDLER TROPHY #14<br />
Stand on the riddler panel. This will light up the nearby switches in a certain sequence.<br />
Memorize the sequence, then use your batarang or remote electric charge to deactivate<br />
each switch in order. This process repeats three times, each with a different pattern, so stay<br />
on the panel or everything will reset.<br />
AMUSEMENT MILE - RIDDLER TROPHY #15<br />
The hatches inside this duct open every few seconds. Pilot a remote batarang straight<br />
through to hit the first riddler switch, then pilot another through the duct making sure to take<br />
the first left to come out on the end with the second switch.<br />
AMUSEMENT MILE - RIDDLER TROPHY #16
www.dehkadeshop.ir<br />
Inside the Krank Co. Toys building. It’s on a chair behind the receptionist’s counter. Use the<br />
batclaw to grab it.<br />
AMUSEMENT MILE - RIDDLER TROPHY #17<br />
There is some soft wood panelling just below the massive Gotham <strong>City</strong> Olympus sign. Use<br />
explosive gel on it.
www.dehkadeshop.ir<br />
AMUSEMENT MILE - RIDDLER TROPHY #18<br />
Use your cryptographic sequencer to hack the console and lower the bars.<br />
AMUSEMENT MILE - RIDDLER TROPHY #19
www.dehkadeshop.ir<br />
There is some soft wood panelling along the side of the building that you need to glide<br />
through. Get the required momentum by leaping from the roof just north of the GCPD. Once<br />
inside turn right and grab the trophy.<br />
AMUSEMENT MILE - RIDDLER TROPHY #20<br />
Open up the GCPD vehicle access door using your remote electrical charge. Once inside, go<br />
straight ahead down the ramp to find a structural weakness. Slap on some explosive gel and<br />
grab the trophy on the other side of the wall.<br />
AMUSEMENT MILE - RIDDLER TROPHY #21
www.dehkadeshop.ir<br />
Under these stairs is a trophy. Simply go around to the right of the stairs to find a small area<br />
to duck under.<br />
AMUSEMENT MILE - RIDDLER TROPHY #22<br />
There is some debris in the water behind GCPD that you can stand on. From it, look for an<br />
inverted trophy just underneath the back entrance to the building. Use your batclaw.
www.dehkadeshop.ir<br />
AMUSEMENT MILE - RIDDLER TROPHY #23<br />
This one is under the building. Start on the floating ice behind the GCPD building. Create a<br />
raft using your freeze blast, then pull yourself under the building using the many hook points<br />
available. Once you are close to the bars, hack the nearby console using your cryptographic<br />
sequencer with range amplifier.<br />
AMUSEMENT MILE - RIDDLER TROPHY #24<br />
Stepping on the riddler panel near the trophy cage lights up some switches along the bottom<br />
of a nearby building. Stand on the panel, and use three remote batarangs to hit all three<br />
switches before your time runs out. Time slows down when you’re piloting a batarang, but<br />
you’ll still need to use the boost when you can.<br />
AMUSEMENT MILE - RIDDLER TROPHY #25<br />
You need to leap from the GCPD building and dive bomb then pull up to get the proper<br />
trajectory. If you do it just right, you’ll smack into the riddler panel, the hatch above you will<br />
open, and you can use your grapnel to pull yourself up to the trophy.<br />
AMUSEMENT MILE - RIDDLER TROPHY #26
www.dehkadeshop.ir<br />
Stand on the nearby panel and use your batclaw to grab the trophy when the cage opens.<br />
AMUSEMENT MILE - RIDDLER TROPHY #27<br />
Stepping on this riddler panel lights up three switches below, but it also surrounds them with<br />
a cage. The trick is to create an ice raft using your freeze blast in front of the switches and<br />
plant explosive gel on each one. Go back to the panel, stand on it, and detonate your gel to<br />
claim your prize.
www.dehkadeshop.ir<br />
AMUSEMENT MILE - RIDDLER TROPHY #28<br />
Use some explosive gel to destroy the structural weakness. Too easy.<br />
AMUSEMENT MILE - RIDDLER TROPHY #29
www.dehkadeshop.ir<br />
Southwest of the bridge there is a boat in the water. Stand on this boat and look up at the<br />
underside of the bridge. Throw a freeze blast into the water directly under the trophy, then<br />
jump to it and use your batclaw to bring the prize down.<br />
AMUSEMENT MILE - RIDDLER TROPHY #30<br />
Use your remote electrical charge on the crane controls to lift a riddler trophy out of the<br />
water. Use your batclaw to grab the trophy from the crane’s hook.<br />
AMUSEMENT MILE - RIDDLER TROPHY #31<br />
There are three panels you need to step on without setting foot on anything else. You need to<br />
stand on the first one and use your grapel boost ability to escape the cage, glide around, and<br />
dive back in on the next panel. See the video if you’re having trouble.<br />
AMUSEMENT MILE - RIDDLER TROPHY #32<br />
In order to get the glide path required to skim over all six red panels without touching any of<br />
them, you need to do a dive bomb into a pull up from one of the GCPD gargoyles just<br />
northwest of this trophy. The pull up will give you enough speed to maintain the level flight<br />
required.
www.dehkadeshop.ir<br />
AMUSEMENT MILE - RIDDLER TROPHY #33<br />
(Inside GCPD) Look inside one of the cells along the southern edge of the building. Use your<br />
cryptographic sequencer on the nearby console, then use explosive gel to enter the cell with<br />
the trophy in it.<br />
AMUSEMENT MILE - RIDDLER TROPHY #34
www.dehkadeshop.ir<br />
(Inside GCPD) Inside the morgue located at the east of the building. The trophy is on a desk.<br />
AMUSEMENT MILE - RIDDLER TROPHY #35<br />
(Inside GCPD) This trophy is in the northern most cell along the west of the building. You<br />
need to pilot a remote batarang through the eclectic arcs found near the morgue (east side),<br />
through the small opening at the top of the trophy’s cell, and into the fuse box.<br />
AMUSEMENT MILE - RIDDLER TROPHY #36<br />
(Inside GCPD) This trophy is up in the ceiling in the southwest corner of the building. Use<br />
your line launcher to move from panel to panel without touching anything else. Start with<br />
the two panels across from each other, then when you are zipping back across the gap hold<br />
the aim button to fire another line perpendicular to the one you’re on. As soon as you do this,<br />
press the drop down button so that you don’t smack into the wall.<br />
AMUSEMENT MILE - RIDDLER TROPHY #37
www.dehkadeshop.ir<br />
This trophy is in under the stairs on the southwest corner of GCPD’s roof. You need to be on<br />
the building just west of here and use your cryptographic sequencer: range amplifier to<br />
hack the console. Once you do, the bars protecting the trophy will drop.<br />
AMUSEMENT MILE CATWOMAN TROPHIES<br />
AMUSEMENT MILE - CATWOMAN TROPHY #1
www.dehkadeshop.ir<br />
This trophy is under the bridge that leads the plant-infested building.<br />
AMUSEMENT MILE - CATWOMAN TROPHY #2<br />
Underneath GCPD. Make sure <strong>Batman</strong> has already busted through the weak<br />
wood paneling on the north side so that you’ll have access.<br />
AMUSEMENT MILE - CATWOMAN TROPHY #3
www.dehkadeshop.ir<br />
Inside Krank Co. Toys. You’ll need to have completed the Bane side quest as <strong>Batman</strong> to open<br />
up this room.<br />
AMUSEMENT MILE - CATWOMAN TROPHY #4<br />
Just inside this roof access doorway. You may have to expose the trophy as <strong>Batman</strong> by using<br />
explosive gel.
www.dehkadeshop.ir<br />
AMUSEMENT MILE - CATWOMAN TROPHY #5<br />
Search southeast of this trophy to find an area where you can pounce onto the underside of<br />
the raised road.
www.dehkadeshop.ir<br />
AMUSEMENT MILE RIDDLE SOLUTIONS
www.dehkadeshop.ir<br />
AMUSEMENT MILE - RIDDLE SOLUTION #1<br />
“This questions can only be answered from an unusual perspective. Can you get yourself<br />
there?” In order to see the bottom of the question mark, you need to lower the door across the<br />
way using your remote electric charge.
www.dehkadeshop.ir<br />
AMUSEMENT MILE - RIDDLE SOLUTION #2<br />
“Which acrobat family gambled with their lives, and has now been left to fly solo?”<br />
AMUSEMENT MILE - RIDDLE SOLUTION #3<br />
“Would an invitation to party like the gods be a bolt out of the blue?”
www.dehkadeshop.ir<br />
AMUSEMENT MILE - RIDDLE SOLUTION #4<br />
“If you’re afraid, don’t be scared to crow about it.”<br />
AMUSEMENT MILE - RIDDLE SOLUTION #5
www.dehkadeshop.ir<br />
“This place has taken a TURN for the worse. Is it a little BEAR for your tastes?”<br />
AMUSEMENT MILE - RIDDLE SOLUTION #6<br />
Always a shining example of justice? Not if you ask me.”<br />
AMUSEMENT MILE - RIDDLE SOLUTION #7
www.dehkadeshop.ir<br />
“If she is the ROOT of evil, how could anyone be expected to CONTAIN her?”<br />
AMUSEMENT MILE - RIDDLE SOLUTION #8<br />
“Look out! Can you see where the madness began?”
www.dehkadeshop.ir<br />
AMUSEMENT MILE - RIDDLE SOLUTION #9<br />
“Park in his spot and you may just get a ticket.” This is underneath GCPD. Line launcher<br />
required.<br />
<strong>Batman</strong>: <strong>Arkham</strong> <strong>City</strong> <strong>Riddler</strong> <strong>guide</strong><br />
Our walkthrough to every <strong>Arkham</strong> <strong>City</strong> challenge! Every riddle, every<br />
trophy, every camera, every balloon and more!<br />
Words: Matt Hughes on October 18, 2011<br />
133 Comments<br />
Email<br />
Share / Save
www.dehkadeshop.ir<br />
INDUSTRIAL DISTRICT RIDDLER TROPHIES
www.dehkadeshop.ir<br />
INDUSTRIAL DISTRICT - RIDDLER TROPHY #1<br />
Use your remote electric charge to dip the crane into the water, then bring it back up. There<br />
should be a riddler trophy resting in the crane’s hook. Use your batclaw to grab it.<br />
INDUSTRIAL DISTRICT - RIDDLER TROPHY #2
www.dehkadeshop.ir<br />
There is a structural weakness under the Gotham Hardware sign. Blow it using your<br />
explosive gel. Once inside, use your remote electric charge on the two generators to<br />
maneuver the riddler trophy over to the right.<br />
INDUSTRIAL DISTRICT - RIDDLER TROPHY #3<br />
This is another carnival-style “test your strength” kind of test. You need to dive bomb from a<br />
very high place (the massive chimneys to the east) and make sure to hit your shockwave<br />
when you land on the panel.<br />
INDUSTRIAL DISTRICT - RIDDLER TROPHY #4<br />
Use your cryptographic sequencer with range amplifier to hack the console. This will raise<br />
the electrified bars and allow you to reach the trophy.<br />
INDUSTRIAL DISTRICT - RIDDLER TROPHY #5
www.dehkadeshop.ir<br />
Run along this series of panels, making sure you only step on each one as it turns green.<br />
INDUSTRIAL DISTRICT - RIDDLER TROPHY #6<br />
Stand on the first panel and use your line launcher to get to the second without touching any<br />
other part of the ground. You’ll need to drop from the line soon after you launch it, so be<br />
ready. Repeat for the third panel.
www.dehkadeshop.ir<br />
INDUSTRIAL DISTRICT - RIDDLER TROPHY #7<br />
Underneath the crane.<br />
INDUSTRIAL DISTRICT - RIDDLER TROPHY #8<br />
When you step on this riddler panel, one of the many switches in front of your will light up.<br />
A moment later, all of the switches light up and then rotate. If you can hit the switch that light<br />
up first, the trophy is yours.
www.dehkadeshop.ir<br />
INDUSTRIAL DISTRICT - RIDDLER TROPHY #9<br />
Open the door on the left with your remote electrical charge. Once inside, stand on the riddler<br />
panel in order to activate the console on the other side of the chain link fence. From where<br />
you are, use your cryptographic sequencer with range amplifier to hack the console, which<br />
will open the trophy cage. Then just blow the weak wall with gel and claim your prize.<br />
INDUSTRIAL DISTRICT - RIDDLER TROPHY #10
www.dehkadeshop.ir<br />
Do a running slide under these bars, then look straight up. The trophy is on the ceiling, just<br />
above the car closest to the bars. Use your batclaw to get it down.<br />
INDUSTRIAL DISTRICT - RIDDLER TROPHY #11<br />
Use your line launcher to get to the trophy without touching the electrified ground. Use the<br />
button near the trophy to turn the electricity off, allowing for a painless escape.
www.dehkadeshop.ir<br />
INDUSTRIAL DISTRICT - RIDDLER TROPHY #12<br />
This is the elusive trophy. Get on a high part of the roof of the steel mill (see video) and face<br />
south. There is a hole in the side of the prison wall. You’re going to need to do a dive bomb<br />
then pull up in order to make the distance.<br />
INDUSTRIAL DISTRICT - RIDDLER TROPHY #13<br />
You need to dive bomb from the steel mill roof and pull up just before entering the cage in<br />
the water. Make sure to keep your dive close to the cage entrance or you’ll overshoot it when<br />
you pull up.<br />
INDUSTRIAL DISTRICT - RIDDLER TROPHY #14<br />
On this balcony at the eastern most part of the Steel Mill.<br />
INDUSTRIAL DISTRICT - RIDDLER TROPHY #15
www.dehkadeshop.ir<br />
You’ll notice the riddler switch is facing the direction opposite its cage. Throw a remote<br />
control batarang to hit the switch, which will give you plenty of time to grab the trophy<br />
seeing as you’re already standing right next to it.<br />
INDUSTRIAL DISTRICT - RIDDLER TROPHY #16
www.dehkadeshop.ir<br />
Zap the train engine with a remote electrical charge. This will move it forward and position it<br />
right underneath a structural weakness. Stand on the engine and use your explosive gel, then<br />
use your batclaw to take the trophy off the ceiling.<br />
INDUSTRIAL DISTRICT - RIDDLER TROPHY #17<br />
You can punch (or do a flying kick ‘cause it’s cooler) right through this soft wood panelling<br />
to reach the trophy on the other side.<br />
INDUSTRIAL DISTRICT - RIDDLER TROPHY #18
www.dehkadeshop.ir<br />
At ground level look for this flaming trash can. The wall next to it is a structural weakness.<br />
Use your explosive gel.<br />
INDUSTRIAL DISTRICT - RIDDLER TROPHY #19<br />
Hack the device next to the trophy cage with your cryptographic sequencer.
www.dehkadeshop.ir<br />
INDUSTRIAL DISTRICT - RIDDLER TROPHY #20<br />
There is some soft wood panelling on the side of this skinny building that you can glide<br />
through but be careful; there is a panel on the wall opposite the weak wood that you need to<br />
touch before hitting the ground (which is covered in red panels). The only way to do this is<br />
by pulling off a dive bomb & pull up combo. As soon as you touch the panel on the wall,<br />
make sure to push off and glide again.<br />
INDUSTRIAL DISTRICT - RIDDLER TROPHY #21<br />
Look down in the water with detective mode on. You’ll notice there is a rusty hatch down<br />
there. Use your freeze blast to create a raft directly under said hatch, then use your batclaw to<br />
pull it open. The riddler trophy will fall out.<br />
INDUSTRIAL DISTRICT - RIDDLER TROPHY #22
www.dehkadeshop.ir<br />
These panels alternate from green to red. You need run at a steady speed as you follow along<br />
with them, making sure to only step on a panel when it is green. Step on all three when<br />
they’re green and the trophy cage will open.<br />
INDUSTRIAL DISTRICT - RIDDLER TROPHY #23
www.dehkadeshop.ir<br />
(Inside Zsasz hideout) From the floating wooden bridge, throw a freeze blast into the water to<br />
your right. If you can throw it far enough, you’ll be able to see a trophy on the wall when you<br />
jump out to your makeshift raft. Use your batclaw to nab your prize.<br />
INDUSTRIAL DISTRICT - RIDDLER TROPHY #24<br />
(Inside Zsasz hideout) After you’ve defeated Zsasz, turn on the console at the center of the<br />
room. This will create an electric arc nearby. Head back through the double doors you came<br />
in through and look to the left to find a vent. Crawl through it, and emerge next to a caged<br />
trophy. From here, you want to maneuver a remote controlled batarang through the arc of<br />
electricity and back into the ducts, where there is a fuse box. Make sure to wait for the water<br />
level to fall.<br />
INDUSTRIAL DISTRICT - RIDDLER TROPHY #25<br />
There are three panels on the sides of the three giant chimneys in the area. You’ll have to<br />
touch all three in a row without touching the ground. Glide to the far chimney, then push off<br />
and do a grapnel boost off of one of the tall chimneys to gain some altitude. This should give<br />
you time to glide around and hit the second panel. Repeat this process for the third.<br />
INDUSTRIAL DISTRICT - RIDDLER TROPHY #26<br />
Hack the console with your cryptographic sequencer. Nice and easy...
www.dehkadeshop.ir<br />
INDUSTRIAL DISTRICT - RIDDLER TROPHY #27<br />
The panel on the left adds three lights to the pattern. The panel on the right adds four. Your<br />
goal is turn on all the lights and leave nothing unlit. If all else fails, just keep stepping on the<br />
left panel.<br />
INDUSTRIAL DISTRICT - RIDDLER TROPHY #28
www.dehkadeshop.ir<br />
Use your disruptor: mine detonator to remove the mines. You can only do two at time before<br />
a lengthy cool down period, so be patient.<br />
INDUSTRIAL DISTRICT - RIDDLER TROPHY #29<br />
Use your remote electric charge on the two generators in order to force the trophy to the other<br />
end of the chain link maze.
www.dehkadeshop.ir<br />
INDUSTRIAL DISTRICT - RIDDLER TROPHY #30<br />
This trophy is on the ceiling of one of the pods at the top of the ferris wheel. Use your<br />
batclaw to grab it.<br />
INDUSTRIAL DISTRICT - RIDDLER TROPHY #31<br />
Standing on this riddler panels will partially open some heavy metal doors for a short period<br />
of time, provided you stay on the panel. Step onto the panel and immediately throw a remote<br />
batarang through the metal door in front of you. Pilot it into the switch on the right, then<br />
immediately throw a quick batarang at the center switch. Finally, throw another remote<br />
batarang through the metal door and into the switch on the left. If you’re quick enough, you<br />
should be able to hit all three switches before the metal door shuts.<br />
INDUSTRIAL DISTRICT - RIDDLER TROPHY #32
www.dehkadeshop.ir<br />
You’ll need the freeze blast to block the steam-spewing pipes and the disruptor: mine<br />
detonator to disarm the two proximity mines. Do all that and the trophy is yours.<br />
INDUSTRIAL DISTRICT - RIDDLER TROPHY #33<br />
There is some soft wood panelling at street level across from the entrance to Jokers Funland.<br />
Punch your way through it to find a trophy.
www.dehkadeshop.ir<br />
INDUSTRIAL DISTRICT - RIDDLER TROPHY #34<br />
There is some wood paneling on side of the building in which this trophies lies. Glide into it<br />
from a height and grab the trophy. Looks like Catwoman might have a harder time here<br />
though...<br />
INDUSTRIAL DISTRICT - RIDDLER TROPHY #35<br />
Step into the cage (follow the arrow) and use your line launcher. Prepare to fire the line again<br />
at a perpendicular angle to the first as soon as you can. Once you’ve done that, quickly use<br />
the line launcher tightrope. From here, you can grapple up to the trophy.<br />
INDUSTRIAL DISTRICT - RIDDLER TROPHY #36
www.dehkadeshop.ir<br />
Just use your explosive gel on this structural weakness.<br />
INDUSTRIAL DISTRICT - RIDDLER TROPHY #37<br />
The panel to open this trophy cage is on the roof of this structure. Once you step on it, you’ll<br />
have six seconds to drop down and grab the trophy with your batclaw. This should be more<br />
than enough time.
www.dehkadeshop.ir<br />
INDUSTRIAL DISTRICT CATWOMAN TROPHIES<br />
INDUSTRIAL DISTRICT - CATWOMAN TROPHY #1<br />
Stand on the railing and climb down. You’ll crawl underneath the catwalk and be touching<br />
distance from the trophy.<br />
INDUSTRIAL DISTRICT - CATWOMAN TROPHY #2
www.dehkadeshop.ir<br />
If you’ve already located Nora Fries as <strong>Batman</strong>, you can enter this building as Catwoman.<br />
Once inside, crawl down into the vents. You’ll come out in front of a trophy.<br />
INDUSTRIAL DISTRICT - CATWOMAN TROPHY #3<br />
Make sure you’ve broken the soft wood paneling with a <strong>Batman</strong> glide beforehand. Stand on<br />
one of the riddler panels and pounce to the ceiling. Drop onto the second panel, and repeat for<br />
the third.<br />
INDUSTRIAL DISTRICT - CATWOMAN TROPHY #4
www.dehkadeshop.ir<br />
At the top of this building, there is a chain link roof. On the underside of that roof you’ll find<br />
the trophy.<br />
INDUSTRIAL DISTRICT - CATWOMAN TROPHY #5<br />
On the roof of the steel mill, right around the center, look for a small fenced in area with a<br />
seal & beach ball. The trophy is on the ceiling of that fenced in area.
www.dehkadeshop.ir<br />
<strong>Batman</strong>: <strong>Arkham</strong> <strong>City</strong> <strong>Riddler</strong> <strong>guide</strong><br />
Our walkthrough to every <strong>Arkham</strong> <strong>City</strong> challenge! Every riddle, every<br />
trophy, every camera, every balloon and more!<br />
Words: Matt Hughes on October 18, 2011<br />
133 Comments<br />
Email<br />
Share / Save
www.dehkadeshop.ir<br />
INDUSTRIAL DISTRICT RIDDLE SOLUTIONS
www.dehkadeshop.ir<br />
INDUSTRIAL DISTRICT - RIDDLE SOLUTION #1<br />
“Which notorious family keeps talking trash?”<br />
INDUSTRIAL DISTRICT - RIDDLE SOLUTION #2
www.dehkadeshop.ir<br />
“Can you find this cool couple before the romance thaws?” Inside the building in which you<br />
find Nora Fries.<br />
INDUSTRIAL DISTRICT - RIDDLE SOLUTION #3<br />
“This question can only be answered from an unusual perspective. Can you get yourself<br />
there?” Stand on the chimney of the same building where you found #2 and look west.
www.dehkadeshop.ir<br />
INDUSTRIAL DISTRICT - RIDDLE SOLUTION #4<br />
“Breaking news! Get out while you still can.”<br />
INDUSTRIAL DISTRICT - RIDDLE SOLUTION #5
www.dehkadeshop.ir<br />
“If you’re planning on making a mark in <strong>Arkham</strong> <strong>City</strong>, you’ll need a special kind of realtor.”<br />
Inside Zsasz’s hideout.<br />
INDUSTRIAL DISTRICT - RIDDLE SOLUTION #6<br />
“Was this parasite ratted out, or does he continue to plague Gotham?”<br />
INDUSTRIAL DISTRICT - RIDDLE SOLUTION #7
www.dehkadeshop.ir<br />
“Air, sea or land. It would be criminal not to use these wise guys, wouldn’t it?”<br />
INDUSTRIAL DISTRICT - RIDDLE SOLUTION #8<br />
“Does Zsasz still pose a threat? This guy called to find out.”<br />
INDUSTRIAL DISTRICT - RIDDLE SOLUTION #9
www.dehkadeshop.ir<br />
“Did you hear the HOLE story of how Black Mask escaped?”<br />
SUBWAY RIDDLER TROPHIES
www.dehkadeshop.ir<br />
SUBWAY - RIDDLER TROPHY #1<br />
As soon as you enter the subway station, take the north stairs and turn right as you descend.<br />
You’ll spot a vent along the right wall. Pull open the cover and find a trophy just inside.
www.dehkadeshop.ir<br />
SUBWAY - RIDDLER TROPHY #2<br />
Look for some floor grates near the tracks. Open them up and you’ll find a trophy.<br />
SUBWAY - RIDDLER TROPHY #3
www.dehkadeshop.ir<br />
As soon as you enter the subway station, look for a ticket booth. The trophy is inside that<br />
booth, blocked off by heavy bars. Use your cryptographic sequencer on the console to gain<br />
entry.<br />
SUBWAY - RIDDLER TROPHY #4<br />
If you’re coming from the west, look for a door at the back of the room as soon as you enter<br />
the subway station. Past that door, you’ll spot a Catwoman trophy. Turn right and look for a<br />
vent cover. Crawl through it, then use explosive gel on the floor after you emerge.<br />
SUBWAY - RIDDLER TROPHY #5
www.dehkadeshop.ir<br />
On the lower floor of the western subway station (the one with the tracks) you’ll notice a<br />
console on the eastern wall. Use your cryptographic sequencer on it to open the large metal<br />
doors. Enter the train car on the left to find your trophy.<br />
SUBWAY - RIDDLER TROPHY #6<br />
Look for this area between two cars, one of which is stuck in a collapsed wall. The trophy is<br />
on the ground between them.
www.dehkadeshop.ir<br />
SUBWAY - RIDDLER TROPHY #7<br />
Look for a structural weakness at the end of the southern tracks (before you enter the room<br />
with the thugs) that blocks off the northern track. Turn left. The riddler panel lights up three<br />
switches located on the roofs of the subway cars in front of you. Stand on the panel and use<br />
your remote Batarang to hit the switches. A timer will begin counting down as soon as you<br />
hit one of the switches, so make sure to start with the furthest switch and use the boost on<br />
your Batarang as much as possible.<br />
SUBWAY - RIDDLER TROPHY #8, #9, #10<br />
Duck under the riddler door very near trophy #7 to find a room with three caged trophies. Use<br />
your cryptographic sequencer to hack the console. This will open the cages, but it will also<br />
electrify the floor and close off the exit. Use your line launcher: tight rope to wait out the<br />
electricity, then claim your prizes.<br />
SUBWAY - RIDDLER TROPHY #11<br />
You can use your grapple to get up to this trophy from the room below it. Use your<br />
cryptographic sequencer on the console next to cage.<br />
SUBWAY - RIDDLER TROPHY #12
www.dehkadeshop.ir<br />
From atop the gargoyles in this room, you can spot some weak wood paneling on the west<br />
side. Glide through it to find a trophy.<br />
SUBWAY - RIDDLER TROPHY #13<br />
Crawl through the opening that runs under the stairs, as seen here. There is a trophy waiting<br />
for you.
www.dehkadeshop.ir<br />
SUBWAY - RIDDLER TROPHY #14<br />
There is a room just above trophy #13. Stand east of that room and look up at it. You can<br />
shoot your remote electrical charge at the fuse box through a gap.<br />
SUBWAY - RIDDLER TROPHY #15
www.dehkadeshop.ir<br />
Check the ceiling of this subway car. Use your Batclaw to get the trophy down.<br />
SUBWAY - RIDDLER TROPHY #16<br />
There is a metal door that can be partially opened using your remote electrical charge. Do a<br />
running slide under it and find a trophy resting on a crate to your left.<br />
SUBWAY - RIDDLER TROPHY #17
www.dehkadeshop.ir<br />
Use your freeze blast to create a raft in the pool at the bottom of this room. The trophy is<br />
along the southern edge.<br />
SUBWAY - RIDDLER TROPHY #18<br />
In the same room as #17 you’ll spot a caged trophy on the wall just below a console. Use<br />
your cryptographic sequencer with range amplifier to open the cage. Then use your<br />
Batclaw to grab the trophy.
www.dehkadeshop.ir<br />
SUBWAY - RIDDLER TROPHY #19<br />
In this corner you’ll see several sections of soft wood panelling and some floor grates. You<br />
can go through the panels or the grates, just make sure to descend the short staircase you see<br />
afterwards to find a trophy.<br />
SUBWAY - RIDDLER TROPHY #20
www.dehkadeshop.ir<br />
Use your line launcher to reach this trophy.<br />
SUBWAY - RIDDLER TROPHY #21<br />
In the room with the two waterfalls (for lack of a better word) look up. There is a point where<br />
you can use your grapple.
www.dehkadeshop.ir<br />
SUBWAY - RIDDLER TROPHY #22, #23, #24<br />
Use your explosive gel to destroy the structural weakness guarding these trophies. Crawl<br />
under the door, step on the panel, and hit the <strong>Riddler</strong> switch that turns on behind you. This<br />
will open the cages, but it will also release steam from the six vents in the room. Use your<br />
freeze blast to stop the steam before it kills you. After you close all six vents you’ll be able<br />
to leave the room.<br />
SUBWAY - RIDDLER TROPHY #25<br />
In the room with the two waterfalls, chuck a freeze blast into the water to create a raft. From<br />
the raft, you can spot this trophy on the wall. Use your Batclaw.<br />
SUBWAY - RIDDLER TROPHY #26<br />
There’s a gate blocking you from this trophy. The gate is controlled by the fuse box beyond<br />
it. Run south down the tunnel until you find some electric arcs running across the ceiling.<br />
Pilot a remote Batarang through them and all the way back into the fuse box.<br />
SUBWAY CATWOMAN TROPHIES<br />
SUBWAY - CATWOMAN TROPHY #1
www.dehkadeshop.ir<br />
On the upper floor of the subway station, look for a room on the east side. The trophy is just<br />
past the door, on top of a desk.<br />
SUBWAY - CATWOMAN TROPHY #2<br />
Just west of this marking on the map, you’ll see a hatch on the ceiling that Catwoman can<br />
open. Climb up through it and double back to find your trophy.
www.dehkadeshop.ir<br />
SUBWAY - CATWOMAN TROPHY #3<br />
Just above the door that <strong>Batman</strong> might open using an electric charge, you’ll find the trophy.<br />
SUBWAY - CATWOMAN TROPHY #4
www.dehkadeshop.ir<br />
On the ceiling in the area of the maintenance tunnel where the floor is missing.<br />
SUBWAY - CATWOMAN TROPHY #5<br />
This is on the underside of the bridge, in the room with the waterfalls. Stand on the bridge’s<br />
railing and climb down to go inverted.<br />
SUBWAY RIDDLE SOLUTIONS
www.dehkadeshop.ir<br />
SUBWAY - RIDDLE SOLUTION #1<br />
“BOARD at drive-time? I’m not going to broadcast any more clues!”<br />
SUBWAY - RIDDLE SOLUTION #2
www.dehkadeshop.ir<br />
“This question can only be answered from an unusual perspective. Can you get yourself<br />
there?” Inside a subway car, looking through the mirror that is on your left as you enter.<br />
SUBWAY - RIDDLE SOLUTION #3<br />
“Coming back from the dead is cheating on any day of the week.”
www.dehkadeshop.ir<br />
SUBWAY - RIDDLE SOLUTION #4<br />
“It’s vacation time. Where shall I go? Somewhere venomous?”<br />
SUBWAY - RIDDLE SOLUTION #5<br />
“This Killer was collared, but is he now on the loose?” In the room with the waterfalls,<br />
grapple up to the west ledge. Use explosive gel on the weakened floor you find once up there.
www.dehkadeshop.ir<br />
<strong>Batman</strong>: <strong>Arkham</strong> <strong>City</strong> <strong>Riddler</strong> <strong>guide</strong><br />
Our walkthrough to every <strong>Arkham</strong> <strong>City</strong> challenge! Every riddle, every<br />
trophy, every camera, every balloon and more!<br />
Words: Matt Hughes on October 18, 2011<br />
133 Comments<br />
Email<br />
Share / Save<br />
STEEL MILL RIDDLER TROPHIES
www.dehkadeshop.ir<br />
STEEL MILL RIDDLER TROPHY #1<br />
Grapple up to this ledge and use your explosive gel on the structural weakness.<br />
STEEL MILL RIDDLER TROPHY #2
www.dehkadeshop.ir<br />
Use your line launcher or freeze blast to get across the water, then hack the console using<br />
your cryptographic sequencer.<br />
STEEL MILL RIDDLER TROPHY #3<br />
Throw a Batarang at this <strong>Riddler</strong> switch and the bars above it will lower. Use your line<br />
launcher to get over there, then crawl through the vent you see to find a trophy.
www.dehkadeshop.ir<br />
STEEL MILL RIDDLER TROPHY #4<br />
Notice the trophy behind bars. Use your Batclaw to open the hatch left of these bars, then<br />
pilot a remote Batarang to the north and look for an electricity arc over the water. Bring the<br />
electrified Batarang back through the hatch opening and into the fuse box.<br />
STEEL MILL RIDDLER TROPHY #5<br />
Use your freeze blast to create a raft in the water. Face east and you’ll notice a high point to<br />
which you can grapple. Find the trophy up there.<br />
STEEL MILL RIDDLER TROPHY #6
www.dehkadeshop.ir<br />
Float down the river on your raft toward the grinder on the left. Look up at the ceiling to spot<br />
this trophy. Use your Batarang to get it down as soon as you have a clear shot.<br />
STEEL MILL RIDDLER TROPHY #7<br />
Stand on the bridge to the north of this trophy’s location and use your Batclaw to remove the<br />
vent cover. Climb inside that vent to find a trophy.
www.dehkadeshop.ir<br />
STEEL MILL RIDDLER TROPHY #8<br />
Use your remote electrical charge on the nearby generator to move the cart. The trophy will<br />
then be revealed.<br />
STEEL MILL RIDDLER TROPHY #9
www.dehkadeshop.ir<br />
Crawl through the vent in the northwest room and use your grapple to get up to the high ledge<br />
you find on the other side.<br />
STEEL MILL RIDDLER TROPHY #10<br />
This trophy is in the center of the room. You’ll need to do a running slide and pick up the<br />
trophy as you’re moving.<br />
STEEL MILL RIDDLER TROPHY #11
www.dehkadeshop.ir<br />
Look for a hatch on the wall. Use your Batclaw to pull it open, then use your Batclaw again<br />
to grab the trophy.<br />
STEEL MILL RIDDLER TROPHY #12<br />
If you enter the Assembly Line from the southernmost entrance on the west side, look up and<br />
to your left. There is a ledge above the vent that you can grapple too. Once you have, use<br />
your explosive gel to destroy the structural weakness.
www.dehkadeshop.ir<br />
STEEL MILL RIDDLER TROPHY #13<br />
Step out into the main room and use your remote electrical charge on the generator. This<br />
will pull all of the carts towards the generator, revealing an opening. Use your freeze blast to<br />
stop the steam then crawl in to find your trophy.<br />
STEEL MILL RIDDLER TROPHY #14<br />
There is a vent cover in the same room as the generator used in #13. Pry it open and crawl<br />
through to find your next trophy.<br />
STEEL MILL RIDDLER TROPHY #15
www.dehkadeshop.ir<br />
Hack this console using your cryptographic sequencer to open the elevator door, granting<br />
access to the trophy.<br />
STEEL MILL RIDDLER TROPHY #16<br />
Crawl under the floor grates and look for this pipe spewing steam. Close it off with your<br />
freeze blast, then climb past it to find a trophy.
www.dehkadeshop.ir<br />
STEEL MILL RIDDLER TROPHY #17<br />
Use your remote electrical charge on the generator in this room, pushing and pulling the<br />
crane hook until it smashes into the fan on the back wall. Just beyond that fan you’ll find a<br />
trophy.<br />
STEEL MILL RIDDLER TROPHY #18
www.dehkadeshop.ir<br />
Navigate through the area under the floor grates and head south until you reach the spot<br />
where you first entered the steel mill near the start of the game. Look for a hatch that can be<br />
pulled open with the Batclaw.<br />
STEEL MILL RIDDLER TROPHY #19
www.dehkadeshop.ir<br />
Continue through the vent you opened up during #17 and drop down into the hole you find.<br />
From there, use your line launcher to reach the riddler panel. Simply standing on it will open<br />
the trophy cage.<br />
STEEL MILL RIDDLER TROPHY #20<br />
Just to the left of the freight elevators is a hatch that can be pulled open with your Batclaw.<br />
Do so to find a trophy.<br />
STEEL MILL RIDDLER TROPHY #21
www.dehkadeshop.ir<br />
At the bottom of the elevator shaft you’ll find a small hole that allows you to go even deeper.<br />
Drop in there to find a trophy.<br />
STEEL MILL RIDDLER TROPHY #22<br />
Drop to the bottom of the freight elevator shaft and look up. Grapple to the point pictured<br />
above to find a trophy.
www.dehkadeshop.ir<br />
STEEL MILL RIDDLER TROPHY #23<br />
Use your explosive gel on the structural weakness to find a trophy.<br />
STEEL MILL RIDDLER TROPHY #24
www.dehkadeshop.ir<br />
Use your quick Batarangs to destroy all the purple penguins. The trophy will then be<br />
revealed. Use your Batclaw to grab it.<br />
STEEL MILL CATWOMAN TROPHIES<br />
STEEL MILL - CATWOMAN TROPHY # 1<br />
On the underside of this bridge. Walk to the edge and climb down to reach the trophy.<br />
STEEL MILL - CATWOMAN TROPHY #2
www.dehkadeshop.ir<br />
This trophy is on the underside of one of the walkways in the smelting chamber.<br />
STEEL MILL - CATWOMAN TROPHY #3<br />
Climb up the high section of this area of the map. There is a grate that you can crawl through<br />
- as seen above - to reach the trophy.
www.dehkadeshop.ir<br />
STEEL MILL - CATWOMAN TROPHY #4<br />
Provided you opened this elevator door as <strong>Batman</strong> using the cryptographic sequencer, you<br />
can just pick up the Catwoman trophy without issue.<br />
STEEL MILL - CATWOMAN TROPHY #5
www.dehkadeshop.ir<br />
In order to have access to this trophy, you need <strong>Batman</strong> to use the remote electrical charge on<br />
the generator in the loading bay to smash the crane hook through the fan on the south wall.<br />
This opens a path down to a pit of fire. As Catwoman you can pounce to the ceiling and crawl<br />
over the fence to reach a trophy.<br />
<strong>Batman</strong>: <strong>Arkham</strong> <strong>City</strong> <strong>Riddler</strong> <strong>guide</strong><br />
Our walkthrough to every <strong>Arkham</strong> <strong>City</strong> challenge! Every riddle, every<br />
trophy, every camera, every balloon and more!<br />
Words: Matt Hughes on October 18, 2011<br />
133 Comments<br />
Email<br />
Share / Save<br />
STEEL MILL RIDDLE SOLUTIONS
www.dehkadeshop.ir<br />
STEEL MILL - RIDDLE SOLUTION #1<br />
“What can BOYLE and Freeze at the same time?”<br />
STEEL MILL - RIDDLE SOLUTION #2
www.dehkadeshop.ir<br />
“This question can only be answered from an unusual perspective. Can you get yourself<br />
there?” Seen from an ice raft, south of location marked on map.<br />
STEEL MILL - RIDDLE SOLUTION #3<br />
“Do you really need to hammer it home? Everyone knows Harley is stupid.”
www.dehkadeshop.ir<br />
STEEL MILL - RIDDLE SOLUTION #4<br />
“Surely someone was clowning around when they qualified this person?”<br />
STEEL MILL - RIDDLE SOLUTION #5<br />
“Once assembled, do these two become one again?”
www.dehkadeshop.ir<br />
STEEL MILL - RIDDLE SOLUTION #6<br />
“The more things change the more they stay the same. What dummy said that?”<br />
STEEL MILL - RIDDLE SOLUTION #7
www.dehkadeshop.ir<br />
“What’s a funnyman without his box of tricks?”<br />
<strong>Batman</strong>: <strong>Arkham</strong> <strong>City</strong> <strong>Riddler</strong> <strong>guide</strong><br />
Our walkthrough to every <strong>Arkham</strong> <strong>City</strong> challenge! Every riddle, every<br />
trophy, every camera, every balloon and more!<br />
Words: Matt Hughes on October 18, 2011<br />
133 Comments<br />
Email<br />
Share / Save<br />
MUSEUM RIDDLER TROPHIES
www.dehkadeshop.ir<br />
MUSEUM - RIDDLER TROPHY #1<br />
Use three quick Batarangs in a row to unlock this trophy cage.<br />
MUSEUM - RIDDLER TROPHY #2
www.dehkadeshop.ir<br />
This trophy is on the catwalk above the T-Rex.<br />
MUSEUM - RIDDLER TROPHY #3<br />
Use your explosive gel on the structural weakness here to gain access to your trophy.
www.dehkadeshop.ir<br />
MUSEUM - RIDDLER TROPHY #4<br />
Use your disruptor: firearm jammer to disable the TYGER sentry guarding this trophy.<br />
MUSEUM - RIDDLER TROPHY #5
www.dehkadeshop.ir<br />
Use your cryptographic sequencer with range amplifier to hack the far console next to the<br />
trophy. This will disable the trap that brings metal bars down whenever you try and approach<br />
the trophy.<br />
MUSEUM - RIDDLER TROPHY #6<br />
Use your remote electrical charge to open this door. The trophy is in the grass on the other<br />
side. This trophy is not pictured above because we accidentally grabbed it before taking the<br />
screenshot.<br />
MUSEUM - RIDDLER TROPHY #7<br />
The trophy is in the ceiling of the room that contains #6. Run back to the north and find a<br />
place to grapple up to. From there, you can use your line launcher to break through the<br />
fragile glass and claim your prize.<br />
MUSEUM - RIDDLER TROPHY #8<br />
First, hack the console at the top of the gladiator pit using your cryptographic sequencer.<br />
Drop down into the pit, and pilot a remote controlled Batarang through the newly created<br />
electric arcs on the fence to the north. Take your electrified Batarang underneath the<br />
southern-most door, around the corner, through the open spot at the top of the window, and<br />
into the fuse box. Voila. I mean booya...
www.dehkadeshop.ir<br />
MUSEUM - RIDDLER TROPHY #9<br />
Jump through the glass just right of where you found #8. Follow the path until you reach the<br />
next trophy.<br />
MUSEUM - RIDDLER TROPHY #10
www.dehkadeshop.ir<br />
Use your Batclaw to pry open this rusty metal hatch and expose the trophy.<br />
MUSEUM - RIDDLER TROPHY #11<br />
Raise the elevator using your remote electrical charge. Now you can plant explosive gel on<br />
the structural weakness to the right and grab the trophy waiting on the other side.<br />
MUSEUM - RIDDLER TROPHY #12
www.dehkadeshop.ir<br />
Use your freeze blast to create an ice raft in the water. There should be a hatch you can pull<br />
open with your Batclaw to expose a trophy.<br />
MUSEUM - RIDDLER TROPHY #13<br />
Look for a spot to grapple up onto the catwalk in the northwest part of the room. From there,<br />
use your line launcher to head south west, then aim another line over to where the trophy is.<br />
MUSEUM - RIDDLER TROPHY #14
www.dehkadeshop.ir<br />
In the western part of the room, look for a trophy floating inside a fenced in area. Use your<br />
line launcher: tight rope to get above it, then use your freeze blast to create a raft. Hope<br />
down and grab that trophy.<br />
MUSEUM - RIDDLER TROPHY #15<br />
This trophy is in an open treasure chest inside the display. Enter from the back.
www.dehkadeshop.ir<br />
MUSEUM - RIDDLER TROPHY #16<br />
Use your freeze blast to stop the steam, then crouch past the frozen valve to claim the trophy.<br />
MUSEUM - RIDDLER TROPHY #17
www.dehkadeshop.ir<br />
Enter the Iceberg Lounge from the outside of the museum. Use your disruptor: mine<br />
detonator to clear the proximity mines so you can slide under the gate and grab the trophy.<br />
MUSEUM - RIDDLER TROPHY #18<br />
Use your remote electrical charge to enter this small room. Once inside, use your charge<br />
again by targeting any one of the switches and firing only when it lights up.<br />
MUSEUM - RIDDLER TROPHY #19
www.dehkadeshop.ir<br />
Under the floor vents, right next to the leaking door to the Iceberg Lounge.<br />
MUSEUM - RIDDLER TROPHY #20<br />
Use your freeze blast to stop the steam, then wooden pallets to find a trophy resting on a<br />
crate.
www.dehkadeshop.ir<br />
MUSEUM - RIDDLER TROPHY #21<br />
Look under the corner of the bridge that runs over the mammoth. Use your cryptographic<br />
sequencer with range amplifier to hack the console that is near the caged trophy. When the<br />
cage opens, use your Batclaw to claim your prize.<br />
MUSEUM - RIDDLER TROPHY #22
www.dehkadeshop.ir<br />
Simply punch through the weak wood panelling on either side of this trophy’s location to<br />
gain access to it.<br />
MUSEUM - RIDDLER TROPHY #23<br />
Hack this console with your cryptographic sequencer to lift the gate that stands in the way<br />
of you and your precious final trophy.<br />
MUSEUM CATWOMAN TROPHIES<br />
MUSEUM - CATWOMAN TROPHY #1
www.dehkadeshop.ir<br />
Check the ceiling. You can pounce up to it, open the grate, and grab the trophy.<br />
MUSEUM - CATWOMAN TROPHY #2<br />
Just to right as you enter this room from the east. Climb down to the underside of the<br />
walkway you’re on, then crawl over and open the grate from underneath.
www.dehkadeshop.ir<br />
MUSEUM - CATWOMAN TROPHY #3<br />
Once you’ve picked up #3, stand over the grate you came in through and pounce to the<br />
ceiling. Crawl west to claim your next trophy.<br />
MUSEUM - CATWOMAN TROPHY #4<br />
Stand at this location and look at the ceiling. There’s the trophy. Pounce up to grab it.
www.dehkadeshop.ir<br />
MUSEUM - CATWOMAN TROPHY #5<br />
On top of the display case where you found Mr. Freeze’s suit.
www.dehkadeshop.ir<br />
MUSEUM RIDDLE SOLUTIONS<br />
MUSEUM - RIDDLE SOLUTION #1
www.dehkadeshop.ir<br />
“Who’s in control here? The puppet or the puppeteer?”<br />
MUSEUM - RIDDLE SOLUTION #2<br />
“Was he framed? Or does it run in the family?”
www.dehkadeshop.ir<br />
MUSEUM - RIDDLE SOLUTION #3<br />
“Have Joker’s pets laughed themselves to death, or just eaten too much?”<br />
MUSEUM - RIDDLE SOLUTION #4<br />
“Brothers in arms. Brothers at war. Who’s right? Who’s... Left?”
www.dehkadeshop.ir<br />
MUSEUM - RIDDLE SOLUTION #5<br />
Seen by looking at the northwestern wall while standing on a raft in the northeast corner.<br />
MUSEUM - RIDDLE SOLUTION #6
www.dehkadeshop.ir<br />
“How do you protect yourself when it’s raining bullets?”<br />
MUSEUM - RIDDLE SOLUTION #7<br />
“Can anyone TOP the Penguin when it comes to the full VIP treatment?” Enter Iceberg<br />
Lounge from outside the museum.<br />
MUSEUM - RIDDLE SOLUTION #8
www.dehkadeshop.ir<br />
"See no evil, hear no evil, speak no evil, or there will be explosive consequences.”<br />
<strong>Batman</strong>: <strong>Arkham</strong> <strong>City</strong> <strong>Riddler</strong> <strong>guide</strong><br />
Our walkthrough to every <strong>Arkham</strong> <strong>City</strong> challenge! Every riddle, every<br />
trophy, every camera, every balloon and more!<br />
Words: Matt Hughes on October 18, 2011<br />
133 Comments<br />
Email<br />
Share / Save
www.dehkadeshop.ir<br />
WONDER CITY RIDDLER TROPHIES
www.dehkadeshop.ir
www.dehkadeshop.ir<br />
WONDER CITY RIDDLER TROPHY #1<br />
Turn around and face the entrance to the collapsed streets, then look up. Use your freeze<br />
blast to block the steam, then grapple up and grab your trophy.<br />
WONDER CITY RIDDLER TROPHY #2
www.dehkadeshop.ir<br />
Instead of grappling up to the steam vents as per #1, look up and to your right. Grapple up<br />
here to find trophy #2.<br />
WONDER CITY RIDDLER TROPHY #3<br />
Use your freeze blast to create a raft in the water below, but make sure you throw it all the<br />
way to the other end. From that raft, use your grapnel boost to bust through the soft wood<br />
panelling on the ceiling. You can then grab the trophy with your Batclaw.<br />
WONDER CITY RIDDLER TROPHY #4<br />
You’ll notice that whenever you enter the same room as trophy #4, the cage around it will<br />
close. Clear the window in this building using explosive gel, then exit and use your line<br />
launcher to go around the other side. You’ll have a clear shot at the trophy through the<br />
window you just cleared; use your Batclaw.<br />
WONDER CITY RIDDLER TROPHY #5
www.dehkadeshop.ir<br />
Without moving from the ledge you used to grab #4, use your Batclaw to claim trophy #5 as<br />
well.<br />
WONDER CITY RIDDLER TROPHY #6<br />
In the middle of the water down below floats a trophy. Use your freeze blast to create a raft<br />
near it, then simply jump to your raft and grab the prize.
www.dehkadeshop.ir<br />
WONDER CITY RIDDLER TROPHY #7<br />
Go back to the platform you stood on to reach trophy #4. From here you can grapple up to the<br />
second floor of the building that contains this trophy. Look to the ceiling when you get up<br />
there.<br />
WONDER CITY RIDDLER TROPHY #8
www.dehkadeshop.ir<br />
Use your cryptographic sequencer to hack the console, opening the large metal door.<br />
Descend the stairs and look up at the ceiling to find this trophy.<br />
WONDER CITY RIDDLER TROPHY #9<br />
Use your cryptographic sequencer on this console to lower the bars.
www.dehkadeshop.ir<br />
WONDER CITY RIDDLER TROPHY #10<br />
There’s nothing difficult about this one. Just drop to the lowest level and check this corridor.<br />
WONDER CITY RIDDLER TROPHY #11<br />
Use your explosive gel on this structural weakness. The trophy is just behind it.
www.dehkadeshop.ir<br />
WONDER CITY RIDDLER TROPHY #12<br />
Simply look up at the ceiling above this caged trophy. Throw your Batarang at the <strong>Riddler</strong><br />
switch there.<br />
WONDER CITY RIDDLER TROPHY #13
www.dehkadeshop.ir<br />
Use your cryptographic sequencer with range amplifier to hack the console beyond the<br />
fence.<br />
WONDER CITY RIDDLER TROPHY #14<br />
You can leap out over the water and use your grapnel to get onto this ledge.<br />
WONDER CITY RIDDLER TROPHY #15
www.dehkadeshop.ir<br />
This trophy is frozen solid and hanging from a rope in mid-air. Use your Batarang to get it<br />
down, then use your freeze blast to create a raft next to the trophy in the water.<br />
WONDER CITY RIDDLER TROPHY #16<br />
Use your line launcher to create a tight rope high above the water. Use your freeze blast to<br />
create a raft underneath the trophy, then use your Batclaw to get it down.
www.dehkadeshop.ir<br />
WONDER CITY RIDDLER TROPHY #17<br />
On the middle floor of this building you’ll find a caged trophy. Step on the panel and use<br />
your line launcher to reach another panel to the north. From there, look west and use your<br />
line launcher again to reach that panel. The cage will then be opened.<br />
WONDER CITY RIDDLER TROPHY #18<br />
There is a small opening that you do a running slide through at the bottom of the Billingham<br />
Butchers building.<br />
WONDER CITY RIDDLER TROPHY #19
www.dehkadeshop.ir<br />
This one is at street level, resting in a baby carriage.<br />
WONDER CITY RIDDLER TROPHY #20<br />
Walk straight into the drugstore and blow the structural weakness in front of you with your<br />
explosive gel. On the other side you’ll see a caged trophy. You need to throw a remote<br />
Batarang all the way around the building to the other side of the wall and hit the <strong>Riddler</strong><br />
switch. You’ll then have about 10 seconds to grab the trophy. If you’re already standing near<br />
it, this won’t be a problem.<br />
WONDER CITY RIDDLER TROPHY #21
www.dehkadeshop.ir<br />
Just punch through this soft wood panelling to reach the trophy.<br />
WONDER CITY RIDDLER TROPHY #22<br />
Use your disruptor: mine detonator to disable the proximity mine here, then just do a<br />
running slide to get your trophy.
www.dehkadeshop.ir<br />
WONDER CITY RIDDLER TROPHY #23<br />
Use your remote electrical charge on the generator at the foot of this door. The trophy waits<br />
on the other side.<br />
WONDER CITY RIDDLER TROPHY #24
www.dehkadeshop.ir<br />
When the elevator stops and you step out, turn right. You’ll see a trophy behind some bars.<br />
You need to go in the other direction, and shimmy all the way around the tower instead of<br />
dropping down where you normally would.<br />
WONDER CITY RIDDLER TROPHY #25<br />
Climb Wonder Tower. Just after you cross the wire, you’ll be able to grapple further up the<br />
tower. As soon as you get up there, drop back down. You’ll land on top of a cage, and the<br />
trophy will be to your right.<br />
<strong>Batman</strong>: <strong>Arkham</strong> <strong>City</strong> <strong>Riddler</strong> <strong>guide</strong><br />
Our walkthrough to every <strong>Arkham</strong> <strong>City</strong> challenge! Every riddle, every<br />
trophy, every camera, every balloon and more!<br />
Words: Matt Hughes on October 18, 2011<br />
133 Comments<br />
Email<br />
Share / Save
www.dehkadeshop.ir<br />
WONDER CITY RIDDLE SOLUTIONS
www.dehkadeshop.ir
www.dehkadeshop.ir<br />
WONDER CITY - RIDDLE SOLUTION #1<br />
“Crime is a global issue. You’ll never stop it, <strong>Batman</strong>.”<br />
WONDER CITY - RIDDLE SOLUTION #2
www.dehkadeshop.ir<br />
“Read all about it! Is this a sign of the Times?”<br />
WONDER CITY - RIDDLE SOLUTION #3<br />
“Wanted: Dead... and alive?”
www.dehkadeshop.ir<br />
WONDER CITY - RIDDLE SOLUTION #4<br />
“Do these demonic twins pose a threat?”<br />
WONDER CITY - RIDDLE SOLUTION #5<br />
“Where can you get a wonderful view of the past?”
www.dehkadeshop.ir<br />
WONDER CITY - RIDDLE SOLUTION #6<br />
“This question can only be answered from an unusual perspective. Can you get yourself<br />
there?”<br />
<strong>Batman</strong>: <strong>Arkham</strong> <strong>City</strong> <strong>Riddler</strong> <strong>guide</strong><br />
Our walkthrough to every <strong>Arkham</strong> <strong>City</strong> challenge! Every riddle, every<br />
trophy, every camera, every balloon and more!<br />
Words: Matt Hughes on October 18, 2011<br />
133 Comments<br />
Email<br />
Share / Save<br />
PHYSICAL CHALLENGES<br />
Chances are you’ll complete most of The <strong>Riddler</strong>’s physical challenges unintentionally while<br />
scouring <strong>Arkham</strong> <strong>City</strong> questing and hunting trophies. There are, however, several that may<br />
remain elusive for you. We’ve listed those below, along with advice on how to complete<br />
them.<br />
PHYSICAL CHALLENGE #1<br />
Glide continuously for over 150 meters [without using the Grapnel Boost upgrade]
www.dehkadeshop.ir<br />
For some reason doing exactly what the description says isn’t good enough. Find a high place<br />
- the chimneys in the Industrial District work great - and leap off. Make sure to do about four<br />
or five dive bombs into pull-ups in a row. This should be enough to complete the challenge.<br />
PHYSICAL CHALLENGE #2<br />
Perform five consecutive line launches without touching the ground
www.dehkadeshop.ir<br />
Go to any part of the city with lots of buildings (we did it right in front of the courthouse) and<br />
find one long stretch to use your line launcher. The beauty is you can press left trigger almost<br />
immediately after launching your first line and launch another, meaning you don’t have to<br />
cover much distance at all to complete this challenge.<br />
PHYSICAL CHALLENGE #3<br />
Glide for 30 meters while maintaining a height of less than 5 meters above the water<br />
Chances are you’ve probably done this while completing the AR challenges. It requires fairly<br />
strict timing; you’ll need to pull up from a dive bomb just before you hit the drink and hold<br />
your glide as long as possible. Make sure to hold down after you pull up to avoid flying too<br />
high. Fortunately, 30 meters is nothing in terms of distance while you’re gliding, and 5<br />
meters above the water is pretty generous.<br />
PHYSICAL CHALLENGE #4<br />
Perform a Batclaw Slam (5 required)<br />
All you need to do is use a quick Batclaw during combat (LT + Y, or L2 + triangle) and then<br />
immediately press the attack button as the enemy is coming towards you. This is quite<br />
satisfying.<br />
PHYSICAL CHALLENGE #5
www.dehkadeshop.ir<br />
Aerial Attack off a stunned enemy into another (3 required)<br />
You’ll need to stun an enemy with your cape (B or circle), then double tap the jump button to<br />
vault on top of them. As you’re doing that, quickly press the attack button and hold the left<br />
stick in the direction of another enemy.<br />
PHYSICAL CHALLENGE #6<br />
Hit an explosive object with a Batarang before it is thrown<br />
Enemies will often grab objects and hold them above their heads for a while, waiting for a<br />
ripe opportunity. Whenever one of these enemies is holding a fire extinguisher or a propane<br />
tank, use your quick Batarang on them (double tap LT or L2).<br />
PHYSICAL CHALLENGE #7<br />
Take out 2 enemies at once with the Glide Boost Attack<br />
The only difficult part to this challenge is finding two enemies standing close enough<br />
together in an area that allows for an attack from great height. Try the entrance to Joker’s<br />
section of the Industrial district. Hone in on an enemy, press the attack button while gliding,<br />
then hold RT/R2.<br />
PHYSICAL CHALLENGE #8
www.dehkadeshop.ir<br />
Fly a fully boosted Remote Batarang into a thug and send him flying<br />
The best way to do this is to find some enemies that haven’t detected you yet, or pick a fight<br />
and then hop onto a lamp post where you can’t be reached. Make sure to pilot the Batarang<br />
close to the ground until just before you hit the enemy, then pull up and drive that sucker into<br />
the schmuck’s torso.<br />
PHYSICAL CHALLENGE #9<br />
Use the Reverse Batarang to knock down an enemy<br />
It’s best to do this on an unsuspecting enemy. It’s not easy to pull this off in the heat of<br />
combat.<br />
PHYSICAL CHALLENGE #10<br />
Perform a Grapnel Boost Takedown
www.dehkadeshop.ir<br />
There is a rooftop in the southwest corner of Amusement Mile that is usually patrolled by two<br />
armed guards, and they often walk near the edges. If you can’t spring this attack on them, get<br />
their attention, drop to the street, and wait for them to peer over the edge of the roof.<br />
PHYSICAL CHALLENGE #11<br />
Use the Remote Electrical Charge to temporarily disable a backpack Jammer device<br />
Even after you beat the game, you can always find one of these devices on a guard in the<br />
central area of the subway.