Download the XP40iW English User Manual in PDF format - Samson
Download the XP40iW English User Manual in PDF format - Samson
Download the XP40iW English User Manual in PDF format - Samson

Create successful ePaper yourself
Turn your PDF publications into a flip-book with our unique Google optimized e-Paper software.
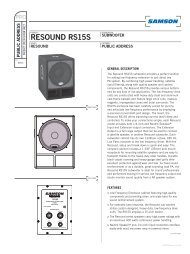
E PEDITION<br />
XP40i<br />
XP40iw<br />
PORTABLE PA SYSTEMS
WARNING<br />
TO PREVENT FIRE OR SHOCK HAZARD. DO NOT USE THIS PLUG WITH AN EXTENSION CORD, RECEPTACLE<br />
OR OTHER OUTLET UNLESS THE BLADES CAN BE FULLY INSERTED TO PREVENT BLADE EXPOSURE.<br />
TO PREVENT FIRE OR SHOCK HAZARD. DO NOT EXPOSE THIS APPLIANCE TO RAIN OR MOISTURE.<br />
TO PREVENT ELECTRICAL SHOCK, MATCH WIDE BLADE PLUG TO WIDE SLOT AND FULLY INSERT.<br />
1.<br />
2.<br />
3.<br />
4.<br />
5.<br />
6.<br />
7.<br />
8.<br />
9.<br />
10.<br />
11.<br />
12.<br />
This lightn<strong>in</strong>g flash with<br />
arrowhead symbol, with<strong>in</strong> an<br />
equilateral triangle, is<br />
<strong>in</strong>tended to alert <strong>the</strong> user to<br />
<strong>the</strong> presence of un<strong>in</strong>sulated<br />
“dangerous voltage” with<strong>in</strong><br />
<strong>the</strong> product’s enclosure that<br />
may be of sufficient magnitude<br />
to constitute a risk of<br />
electric shock to persons.<br />
CAUTION<br />
RISK OF ELECTRIC SHOCK<br />
DO NOT OPEN<br />
Warn<strong>in</strong>g: To reduce <strong>the</strong> risk of<br />
electric shock, do not remove<br />
cover (or back). No userserviceable<br />
parts <strong>in</strong>side. For<br />
service, refer to qualified<br />
service personnel.<br />
The exclamation po<strong>in</strong>t with<strong>in</strong><br />
an equilateral triangle is<br />
<strong>in</strong>tended to alert <strong>the</strong> user to<br />
<strong>the</strong> presence of important<br />
operat<strong>in</strong>g and ma<strong>in</strong>tenance<br />
(servic<strong>in</strong>g) <strong>in</strong>structions <strong>in</strong> <strong>the</strong><br />
literature accompany<strong>in</strong>g <strong>the</strong><br />
appliance.<br />
IMPORTANT SAFETY INSTRUCTIONS<br />
Read <strong>the</strong>se <strong>in</strong>structions.<br />
Keep <strong>the</strong>se <strong>in</strong>structions.<br />
Heed all warn<strong>in</strong>gs.<br />
Follow all <strong>in</strong>structions.<br />
Do not use this apparatus near water.<br />
Clean only with dry cloth.<br />
Do not block any ventilation open<strong>in</strong>gs. Install <strong>in</strong> accordance with <strong>the</strong> manufacturer’s <strong>in</strong>structions.<br />
Do not <strong>in</strong>stall near any heat sources such as radiators, heat registers, stoves, or o<strong>the</strong>r apparatus<br />
(<strong>in</strong>clud<strong>in</strong>g amplifiers) that produce heat.<br />
Do not defeat <strong>the</strong> safety purpose of <strong>the</strong> polarized or ground<strong>in</strong>g type plug. A polarized plug has two<br />
blades with one wider than <strong>the</strong> o<strong>the</strong>r. A ground<strong>in</strong>g type plug has two blades and a third ground<strong>in</strong>g prong.<br />
The wide blade or <strong>the</strong> third prong are provided for your safety. If <strong>the</strong> provided plug does not fit <strong>in</strong>to your<br />
outlet, consult an electrician for replacement of <strong>the</strong> obsolete outlet.<br />
Protect <strong>the</strong> power cord from be<strong>in</strong>g walked on or p<strong>in</strong>ched particularly at <strong>the</strong> plugs, convenience receptacles,<br />
and at <strong>the</strong> po<strong>in</strong>t where <strong>the</strong>y exit from <strong>the</strong> apparatus.<br />
Only use attachments/accessories specified by <strong>the</strong> manufacturer.<br />
Use only with <strong>the</strong> cart, stand, tripod, bracket, or table specified by <strong>the</strong> manufacturer,<br />
or sold with <strong>the</strong> apparatus. When a cart is used, use caution when<br />
mov<strong>in</strong>g <strong>the</strong> cart/apparatus comb<strong>in</strong>ation to avoid <strong>in</strong>jury from tip-over.<br />
13. Unplug <strong>the</strong> apparatus dur<strong>in</strong>g lighten<strong>in</strong>g, sort or when unused for long periods of time.<br />
Refer all servic<strong>in</strong>g to qualified personnel. Service is required when <strong>the</strong> apparatus has been damaged <strong>in</strong><br />
any way, such as power supply cord or plug is damaged, liquid has been spilled or objects have fallen<br />
<strong>in</strong>to <strong>the</strong> apparatus has been exposed to ra<strong>in</strong> or moisture, does not operate normally, or has been<br />
dropped.<br />
14. This appliance shall not be exposed to dripp<strong>in</strong>g or splash<strong>in</strong>g water and that no object filled with liquid<br />
such as vases shall be placed on <strong>the</strong> apparatus.<br />
15. Caution-to prevent electrical shock, match wide blade plug wide slot fully <strong>in</strong>sert.<br />
16. Please keep a good ventilation environment around <strong>the</strong> entire unit.
ATTENTION: Pour éviter tout risque d’électrocution ou d’<strong>in</strong>cendie, ne pas exposer cet appareil à la pluie ou à<br />
l’humidité. Pour éviter tout risque d’électrocution, ne pas ôter le couvercle ou le dos du boîtier. Cet appareil ne contient<br />
aucune pièce remplaçable par l'utilisateur. Confiez toutes les réparations à un personnel qualifié. Le signe<br />
avec un éclair dans un triangle prévient l’utilisateur de la présence d’une tension dangereuse et non isolée dans<br />
l’appareil. Cette tension constitue un risque d’électrocution. Le signe avec un po<strong>in</strong>t d’exclamation dans un triangle<br />
prévient l’utilisateur d’<strong>in</strong>structions importantes relatives à l’utilisation et à la ma<strong>in</strong>tenance du produit.<br />
Consignes de sécurité importantes<br />
1. Veuillez lire toutes les <strong>in</strong>structions avant d’utiliser l’appareil.<br />
2. Conserver ces <strong>in</strong>structions pour toute lecture ultérieure.<br />
3. Lisez avec attention toutes les consignes de sécurité.<br />
4. Suivez les <strong>in</strong>structions du fabricant.<br />
5. Ne pas utiliser cet appareil près d’une source liquide ou dans un lieu humide.<br />
6. Nettoyez l’appareil uniquement avec un tissu humide.<br />
7. Veillez à ne pas obstruer les fentes prévues pour la ventilation de l’appareil. Installez l’appareil selon les<br />
<strong>in</strong>structions du fabricant.<br />
8. Ne pas <strong>in</strong>staller près d’une source de chaleur (radiateurs, etc.) ou de tout équipement susceptible de générer<br />
de la chaleur (amplificateurs de puissance par exemple).<br />
9. Ne pas retirer la terre du cordon secteur ou de la prise murale. Les fiches canadiennes avec polarisation<br />
(avec une lame plus large) ne doivent pas être modifiées. Si votre prise murale ne correspond pas au<br />
modèle fourni, consultez votre électricien.<br />
10. Protégez le cordon secteur contre tous les dommages possibles (p<strong>in</strong>cement, tension, torsion,, etc.). Veillez à<br />
ce que le cordon secteur soit libre, en particulier à sa sortie du boîtier.<br />
11. Déconnectez l’appareil du secteur en présence d’orage ou lors de périodes d’<strong>in</strong>utilisation prolongées.<br />
12. Consultez un service de réparation qualifié pour tout dysfonctionnement (dommage sur le cordon secteur,<br />
baisse de performances, exposition à la pluie, projection liquide dans l’appareil, <strong>in</strong>troduction d’un objet<br />
dans le boîtier, etc.).<br />
ACHTUNG: Um die Gefahr e<strong>in</strong>es Brandes oder Stromschlags zu verr<strong>in</strong>gern, sollten Sie dieses Gerät weder<br />
Regen noch Feuchtigkeit aussetzen.Um die Gefahr e<strong>in</strong>es Stromschlags zu verr<strong>in</strong>gern, sollten Sie weder Deckel<br />
noch Rückwand des Geräts entfernen. Im Innern bef<strong>in</strong>den sich ke<strong>in</strong>e Teile, die vom Anwender gewartet<br />
werden können. Überlassen Sie die Wartung qualifiziertem Fachpersonal.Der Blitz mit Pfeilspitze im gleichseitigen<br />
Dreieck soll den Anwender vor nichtisolierter “gefährlicher Spannung” im Geräte<strong>in</strong>nern warnen. Diese<br />
Spannung kann so hoch se<strong>in</strong>, dass die Gefahr e<strong>in</strong>es Stromschlags besteht. Das Ausrufezeichen im gleichseitigen<br />
Dreieck soll den Anwender auf wichtige Bedienungs- und Wartungsan leitungen aufmerksam machen, die<br />
im mitgelieferten In<strong>format</strong>ionsmaterial näher beschrieben werden.<br />
Wichtige Sicherheitsvorkehrungen<br />
1. Lesen Sie alle Anleitungen, bevor Sie das Gerät <strong>in</strong> Betrieb nehmen.<br />
2. Bewahren Sie diese Anleitungen für den späteren Gebrauch gut auf.<br />
3. Bitte treffen Sie alle beschriebenen Sicherheitsvorkehrungen.<br />
4. Befolgen Sie die Anleitungen des Herstellers.<br />
5. Benutzen Sie das Gerät nicht <strong>in</strong> der Nähe von Wasser oder Feuchtigkeit.<br />
6. Verwenden Sie zur Re<strong>in</strong>igung des Geräts nur e<strong>in</strong> feuchtes Tuch.<br />
7. Blockieren Sie ke<strong>in</strong>e Belüftungsöffnungen. Nehmen Sie den E<strong>in</strong>bau des Geräts nur entsprechend den<br />
Anweisungen des Herstellers vor.<br />
8. Bauen Sie das Gerät nicht <strong>in</strong> der Nähe von Wärmequellen wie Heizkörpern, Wärmeklappen, Öfen oder<br />
anderen Geräten (<strong>in</strong>klusive Verstärkern) e<strong>in</strong>, die Hitze erzeugen.<br />
9. Setzen Sie die Sicherheitsfunktion des polarisierten oder geerdeten Steckers nicht außer Kraft. E<strong>in</strong> polarisierter<br />
Stecker hat zwei flache, unterschiedlich breite Pole. E<strong>in</strong> geerdeter Stecker hat zwei flache Pole und<br />
e<strong>in</strong>en dritten Erdungsstift. Der breitere Pol oder der dritte Stift dient Ihrer Sicherheit. Wenn der vorhandene<br />
Stecker nicht <strong>in</strong> Ihre Steckdose passt, lassen Sie die veraltete Steckdose von e<strong>in</strong>em Elektriker ersetzen.<br />
10. Schützen Sie das Netzkabel dah<strong>in</strong>gehend, dass niemand darüber laufen und es nicht geknickt werden<br />
kann. Achten Sie hierbei besonders auf Netzstecker, Mehrfachsteckdosen und den Kabelanschluss am<br />
Gerät.<br />
11. Ziehen Sie den Netzstecker des Geräts bei Gewittern oder längeren Betriebspausen aus der Steckdose.<br />
12. Überlassen Sie die Wartung qualifiziertem Fachpersonal. E<strong>in</strong>e Wartung ist notwendig, wenn das Gerät auf<br />
irgende<strong>in</strong>e Weise, beispielsweise am Kabel oder Netzstecker beschädigt wurde, oder wenn Flüssigkeiten<br />
oder Objekte <strong>in</strong> das Gerät gelangt s<strong>in</strong>d, es Regen oder Feuchtigkeit ausgesetzt war, nicht mehr wie<br />
gewohnt betrieben werden kann oder fallen gelassen wurde.
PRECAUCION: Para reducir el riesgo de <strong>in</strong>cendios o descargas, no permita que este aparato quede expuesto a la lluvia<br />
o la humedad. Para reducir el riesgo de descarga eléctrica, nunca quite la tapa ni el chasis. Dentro del aparato no hay<br />
piezas susceptibles de ser reparadas por el usuario. Dirija cualquier reparación al servicio técnico oficial. El símbolo<br />
del relámpago dentro del triángulo equilátero pretende advertir al usuario de la presencia de “voltajes peligrosos” no<br />
aislados dentro de la carcasa del producto, que pueden ser de la magnitud suficiente como para constituir un riesgo de<br />
descarga eléctrica a las personas. El símbolo de exclamación dentro del triángulo equilátero quiere advertirle de la existencia<br />
de importantes <strong>in</strong>strucciones de manejo y mantenimiento (reparaciones) en los documentos que se adjuntan<br />
con este aparato.<br />
Instrucciones importantes de seguridad<br />
1. Lea todo este manual de <strong>in</strong>strucciones antes de comenzar a usar la unidad.<br />
2. Conserve estas <strong>in</strong>strucciones para cualquier consulta en el futuro.<br />
3. Cumpla con todo lo <strong>in</strong>dicado en las precauciones de seguridad.<br />
4. Observe y siga todas las <strong>in</strong>strucciones del fabricante.<br />
5. Nunca utilice este aparato cerca del agua o en lugares húmedos.<br />
6. Limpie este aparato solo con un trapo suave y ligeramente humedecido.<br />
7. No bloquee n<strong>in</strong>guna de las aberturas de ventilación. Instale este aparato de acuerdo a las <strong>in</strong>strucciones del fabricante.<br />
8. No <strong>in</strong>stale este aparato cerca de fuentes de calor como radiadores, calentadores, hornos u otros aparatos (<strong>in</strong>cluyendo<br />
amplificadores) que produzcan calor.<br />
9. No anule el sistema de seguridad del enchufe de tipo polarizado o con toma de tierra. Un enchufe polarizado<br />
tiene dos bornes, uno más ancho que el otro. Uno con toma de tierra tiene dos bornes normales y un tercero para<br />
la conexión a tierra. El borne ancho o el tercero se <strong>in</strong>cluyen como medida de seguridad. Cuando el enchufe no<br />
encaje en su salida de corriente, llame a un electricista para que le cambie su salida anticuada.<br />
10. Evite que el cable de corriente quede en una posición en la que pueda ser pisado o aplastado, especialmente en<br />
los enchufes, receptáculos y en el punto en el que salen de la unidad.<br />
11. Desconecte de la corriente este aparato durante las tormentas eléctricas o cuando no lo vaya a usar durante un<br />
periodo de tiempo largo.<br />
12. Dirija cualquier posible reparación solo al servicio técnico oficial. Deberá hacer que su aparato sea reparado<br />
cuando esté dañado de alguna forma, como si el cable de corriente o el enchufe están dañados, o si se han derramado<br />
líquidos o se ha <strong>in</strong>troducido algún objeto dentro de la unidad, si esta ha quedado expuesta a la lluvia o la<br />
humedad, si no funciona normalmente o si ha caído al suelo.<br />
ATTENZIONE: per ridurre il rischio di <strong>in</strong>cendio o di scariche elettriche, non esponete questo apparecchio a pioggia o<br />
umidità. Per ridurre il pericolo di scariche elettriche evitate di rimuoverne il coperchio o il pannello posteriore. Non esistono<br />
all'<strong>in</strong>terno dell'apparecchio parti la cui regolazione è a cura dell'utente. Per eventuale assistenza, fate riferimento<br />
esclusivamente a personale qualificato. Il fulm<strong>in</strong>e con la punta a freccia all'<strong>in</strong>terno di un triangolo equilatero avvisa l'utente<br />
della presenza di "tensioni pericolose" non isolate all'<strong>in</strong>terno dell'apparecchio, tali da costituire un possibile rischio di<br />
scariche elettriche dannose per le persone. Il punto esclamativo all'<strong>in</strong>terno di un triangolo equilatero avvisa l'utente della<br />
presenza di importanti istruzioni di manutenzione (assistenza) nella documentazione che accompagna il prodotto.<br />
Importanti Istruzioni di Sicurezza<br />
1. Prima di usare l'apparecchio, vi preghiamo di leggerne per <strong>in</strong>tero le istruzioni.<br />
2. Conservate tali istruzioni per una eventuale consultazione futura.<br />
3. Vi preghiamo di rispettare tutte le istruzioni di sicurezza.<br />
4. Seguite tutte le istruzioni del costruttore.<br />
5. Non usate questo apparecchio vic<strong>in</strong>o ad acqua o umidità.<br />
6. Pulite l'apparecchio esclusivamente con un panno asciutto.<br />
7. Evitate di ostruire una qualsiasi delle aperture di ventilazione. Posizionatelo seguendo le istruzioni del costruttore.<br />
8. Non posizionatelo vic<strong>in</strong>o a sorgenti di calore come radiatori, scambiatori di calore, forni o altri apparecchi (amplificatori<br />
compresi) <strong>in</strong> grado di generare calore.<br />
9. Non disattivate la protezione di sicurezza costituita dalla sp<strong>in</strong>a polarizzata o dotata di collegamento a terra. Una<br />
sp<strong>in</strong>a polarizzata è dotata di due sp<strong>in</strong>otti, uno più piccolo ed uno più grande. Una sp<strong>in</strong>a dotata di collegamento a<br />
terra è dotata di due sp<strong>in</strong>otti più un terzo sp<strong>in</strong>otto di collegamento a terra. Questo terzo sp<strong>in</strong>otto, eventualmente<br />
anche più grande, viene fornito per la vostra sicurezza. Se la sp<strong>in</strong>a fornita <strong>in</strong> dotazione non si adatta alla vostra<br />
presa, consultate un elettricista per la sostituzione della presa obsoleta.<br />
10. Proteggete il cavo di alimentazione <strong>in</strong> modo che non sia possibile camm<strong>in</strong>arci sopra né piegarlo, con particolare<br />
attenzione alle prese, ai punti di collegamento e al punto <strong>in</strong> cui esce dall'apparecchio.<br />
11. Staccate l'apparecchio dalla alimentazione <strong>in</strong> caso di temporali o tempeste o se non lo usate per un lungo periodo.<br />
12. Per l'assistenza, fate riferimento esclusivamente a personale qualificato. È necessaria l'assistenza se l'apparecchio ha<br />
subito un qualsiasi tipo di danno, come danni al cavo o alla sp<strong>in</strong>a di alimentazione, nel caso <strong>in</strong> cui sia stato versato<br />
del liquido o siano caduti oggetti al suo <strong>in</strong>terno, sia stato esposto a pioggia o umidità, non funzioni correttamente<br />
o sia stato fatto cadere.
Copyright 2010, <strong>Samson</strong> Technologies Corp.<br />
Pr<strong>in</strong>ted January, 2010 v1.<br />
<strong>Samson</strong> Technologies Corp.<br />
45 Gilp<strong>in</strong> Avenue<br />
Hauppauge, New York 11788-8816<br />
Phone: 1-800-3-SAMSON (1-800-372-6766)<br />
Fax: 631-784-2201<br />
www.samsontech.com
Table of Contents<br />
Introduction. . . . . . . . . . . . . . . . . . . . . . . . . . . . . . . . . . . . . . . . . . . 1 -2<br />
XP40i and XP40iw Features . . . . . . . . . . . . . . . . . . . . . . . . . . . . . . . . . . 3<br />
XP40i and XP40iw Front and Top Views . . . . . . . . . . . . . . . . . . . . . . . . . . 4<br />
XP40i Rear View . . . . . . . . . . . . . . . . . . . . . . . . . . . . . . . . . . . . . . . . . 5<br />
XP40iw Rear View . . . . . . . . . . . . . . . . . . . . . . . . . . . . . . . . . . . . . . . . 6<br />
XP40i and XP40iw Quick Start . . . . . . . . . . . . . . . . . . . . . . . . . . . . . . 7 - 8<br />
Sett<strong>in</strong>g Up and Us<strong>in</strong>g <strong>the</strong> XP40i and XP40iw . . . . . . . . . . . . . . . . . . . . . . . 9<br />
Operat<strong>in</strong>g <strong>the</strong> XP40i and XP40iw . . . . . . . . . . . . . . . . . . . . . . . . . . . 10 - 14<br />
Connect<strong>in</strong>g to <strong>the</strong> LINE Level Input . . . . . . . . . . . . . . . . . . . . . . . . . . .10<br />
Connect<strong>in</strong>g to <strong>the</strong> Microphone Input . . . . . . . . . . . . . . . . . . . . . . . . .10<br />
Sett<strong>in</strong>g a Good Level . . . . . . . . . . . . . . . . . . . . . . . . . . . . . . . . . . . .10<br />
Us<strong>in</strong>g EQ. . . . . . . . . . . . . . . . . . . . . . . . . . . . . . . . . . . . . . . . . . . .10<br />
Us<strong>in</strong>g <strong>the</strong> Aux <strong>in</strong>put. . . . . . . . . . . . . . . . . . . . . . . . . . . . . . . . . . . . .11<br />
Us<strong>in</strong>g LINK to Connect Two XP40i’s . . . . . . . . . . . . . . . . . . . . . . . . 12 - 14<br />
Us<strong>in</strong>g <strong>the</strong> XP40iw Wireless Microphone . . . . . . . . . . . . . . . . . . . . . . . 15 - 18<br />
Speaker System Specifications . . . . . . . . . . . . . . . . . . . . . . . . . . . . . . . .19<br />
Wireless Specifications . . . . . . . . . . . . . . . . . . . . . . . . . . . . . . . . . . . . .20
1<br />
Introduction<br />
Thank you for purchas<strong>in</strong>g <strong>the</strong> Expedition XP40i all-<strong>in</strong>-one, portable sound system<br />
from <strong>Samson</strong> Technologies. The XP40i is a compact PA system ideal for use <strong>in</strong> a<br />
variety of live sound applications. The XP40i is loud and clear, produc<strong>in</strong>g a big<br />
sound <strong>in</strong> a surpris<strong>in</strong>gly small package. The self conta<strong>in</strong>ed PA features a 2-way<br />
speaker system employ<strong>in</strong>g a six-<strong>in</strong>ch woofer and a 1-<strong>in</strong>ch titanium tweeter, 40<br />
watts of <strong>in</strong>ternal power and an onboard four-channel mixer. Plus, <strong>the</strong>re’s an<br />
<strong>in</strong>tegrated iPod dock that’s compatible with <strong>the</strong> latest iPod models mak<strong>in</strong>g <strong>the</strong><br />
XP40i an ideal choice for music playback for any application. The mixer features two<br />
<strong>in</strong>puts for microphones, an iPod level control, as well as l<strong>in</strong>e <strong>in</strong>puts for connect<strong>in</strong>g a<br />
laptop, CD player or even an electronic keyboard. The XP40i’s mixer also provide a<br />
Bass and Treble control to adjust <strong>the</strong> overall tonal response of <strong>the</strong> sound system. A<br />
L<strong>in</strong>k connector is provided so that multiple XP40i’s can be configured <strong>in</strong>to a larger<br />
system. Do you need a sound system for outdoor use where no electrical hook-up<br />
is available? That’s no problem for <strong>the</strong> XP40i. The <strong>in</strong>ternal gel-cell battery allows<br />
<strong>the</strong> system to be self-powered, so you can use your sound system outside <strong>in</strong> a park,<br />
playground or ball field without <strong>the</strong> need for an electrical hook up. The XP40i’s<br />
<strong>in</strong>ternal molded-<strong>in</strong> handle allows for easy transport and <strong>the</strong> speaker can be easily<br />
stand-mounted us<strong>in</strong>g <strong>the</strong> <strong>in</strong>tegral 1 3/8-<strong>in</strong>ch speaker stand receptacle. The XP40i’s<br />
cab<strong>in</strong>et is constructed us<strong>in</strong>g high-impact, scuff resistant, polypropylene provid<strong>in</strong>g<br />
excellent protection of <strong>the</strong> <strong>in</strong>ternal components and f<strong>in</strong>ished <strong>in</strong> an attractive<br />
dark charcoal color which helps keeps <strong>the</strong> unit look<strong>in</strong>g good even when be<strong>in</strong>g<br />
transported from venue to venue. For added flexibility, <strong>the</strong> unit is also available<br />
with an onboard wireless microphone system as <strong>the</strong> model XP40iw. The XP40iw’s<br />
<strong>in</strong>ternal VHF wireless receiver works with <strong>the</strong> <strong>in</strong>cluded H5 wireless handheld<br />
microphone allow<strong>in</strong>g a user to move freely on stage or <strong>in</strong> a crowd. The Expedition<br />
XP40i and XP40iw are ideal for bus<strong>in</strong>ess conferences, meet<strong>in</strong>gs, PowerPo<strong>in</strong>t<br />
presentations, tradeshows, classrooms, auditoriums, playgrounds, outdoor<br />
carnivals and fairs or just about any application where high quality portable sound<br />
is needed.<br />
Please reta<strong>in</strong> <strong>the</strong> orig<strong>in</strong>al pack<strong>in</strong>g materials and if possible, return <strong>the</strong> unit <strong>in</strong> <strong>the</strong><br />
orig<strong>in</strong>al carton and pack<strong>in</strong>g materials. If you purchased your <strong>Samson</strong> product<br />
outside <strong>the</strong> United States, please contact your local distributor for warranty<br />
<strong>in</strong><strong>format</strong>ion and service.
Introduction<br />
This manual covers both <strong>the</strong> XP40i and XP40iw models and it should be assumed<br />
that <strong>the</strong> features are identical unless o<strong>the</strong>rwise stated. In <strong>the</strong>se pages, you’ll f<strong>in</strong>d a<br />
detailed description of <strong>the</strong> features of <strong>the</strong> XP40i and XP40iw PA systems, as well as<br />
a guided tour through <strong>the</strong>ir control panels, step-by-step <strong>in</strong>structions for its setup<br />
and use, and full specifications. You’ll also f<strong>in</strong>d a warranty card enclosed—please<br />
don’t forget to fill it out and mail it <strong>in</strong> so that you can receive onl<strong>in</strong>e technical<br />
support and so we can send you updated <strong>in</strong><strong>format</strong>ion about <strong>the</strong>se and o<strong>the</strong>r<br />
<strong>Samson</strong> products <strong>in</strong> <strong>the</strong> future. Also, be sure to check out our website (www.<br />
samsontech.com) for complete <strong>in</strong><strong>format</strong>ion about our full product l<strong>in</strong>e.<br />
With proper care and adequate air circulation, your Expedition system will operate<br />
trouble free for many years. We recommend you record your serial number <strong>in</strong> <strong>the</strong><br />
space provided below for future reference.<br />
Serial number: ____________________________________________<br />
Date of purchase: __________________________________________<br />
Should your unit ever require servic<strong>in</strong>g, a Return Authorization number (RA) must<br />
be obta<strong>in</strong>ed before shipp<strong>in</strong>g your unit to <strong>Samson</strong>. Without this number, <strong>the</strong> unit<br />
will not be accepted. Please call <strong>Samson</strong> at 1-800-3SAMSON (1-800-372-6766) for<br />
a Return Authorization number prior to shipp<strong>in</strong>g your unit. If you purchased your<br />
<strong>Samson</strong> product outside <strong>the</strong> United States, please contact your local distributor for<br />
warranty <strong>in</strong><strong>format</strong>ion and service.<br />
2
• The XP40iw and XP40i are 2-way self-powered 40-watt speaker systems.<br />
• A deep and rich low frequency response is produced thanks to <strong>the</strong> proprietary<br />
six-<strong>in</strong>ch, heavy-duty woofer.<br />
• Built-<strong>in</strong> iPod dock for great sound<strong>in</strong>g, easy playback of just about any<br />
iPod model with 30-p<strong>in</strong> standard connector.<br />
• A one-<strong>in</strong>ch titanium tweeter is fitted on a 60 x 60 degree, one-<strong>in</strong>ch throat horn,<br />
for clean and clear high frequency response with even sound dispersion.<br />
• The XP40i features a built-<strong>in</strong> rear mounted three-channel mixer and <strong>the</strong> XP40iw<br />
features a four-channel mixer, both with Mic and L<strong>in</strong>e level <strong>in</strong>puts, Aux <strong>in</strong>put<br />
for connect<strong>in</strong>g your Computer, CD or MP3 audio device, plus Bass and Treble<br />
tone controls.<br />
• The XP40iw features an onboard VHF wireless receiver and wireless dynamic<br />
handheld microphone transmitter provides freedom of movement for speaker<br />
or performer.<br />
• The <strong>in</strong>ternal, rechargeable, Gel-cell battery provides 8 to 10 hours of operation<br />
with out <strong>the</strong> need of an electrical hook-up.<br />
• A L<strong>in</strong>k connector is supplied for expand<strong>in</strong>g your sound system with additional<br />
XP40i's or XP40iw's.<br />
• The XP40i and XP40iw are built us<strong>in</strong>g durable, thick-walled, solid<br />
polypropylene plastic construction and is f<strong>in</strong>ished <strong>in</strong> a sleek black texture.<br />
• Three year extended warranty.<br />
XP40i and XP40iw Features<br />
Monitor<br />
3
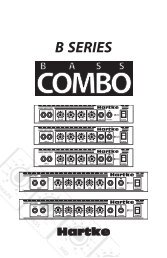
XP40i and XP40iw Front and Top Views<br />
Front View<br />
Monitor<br />
Front View<br />
1 Titanium Tweeter – A 1-<strong>in</strong>ch<br />
(25mm), titanium diaphragm<br />
horn loaded tweeter produces<br />
an articulate and sweet high<br />
frequency response.<br />
2 Controlled Dispersion Horn –<br />
1 <strong>in</strong>ch throat, 60 x 60 degree<br />
wide dispersion horn provides<br />
extensive coverage and l<strong>in</strong>ear<br />
off- axis response.<br />
3 6-Inch Woofer – Custom<br />
designed , heavy-duty, 6” low<br />
frequency driver provides deep<br />
bass.<br />
1<br />
2<br />
3<br />
4<br />
5<br />
6<br />
4<br />
Top View<br />
4 Steel Grill – Durable steel grill<br />
provides protection for, and easy<br />
access to LF driver.<br />
5 Enclosure – Thick-wall, rugged<br />
polypropylene plastic<br />
enclosure.<br />
6 POWER LED – The Green LED<br />
illum<strong>in</strong>ates when <strong>the</strong> unit is<br />
powered on.<br />
Top View<br />
7 iPod Dock – Built-<strong>in</strong> 30-p<strong>in</strong><br />
standard iPod dock supports most<br />
iPod models.<br />
8 Handle – Ergonomically correct<br />
molded-<strong>in</strong> carry handle provides<br />
easy transport.<br />
7<br />
8
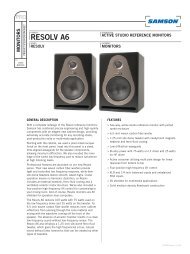
1 LEVEL (CH 1) – Used to control <strong>the</strong><br />
level of <strong>the</strong> CHANNEL 1 <strong>in</strong>put.<br />
2 LEVEL (CH 2) – Used to control <strong>the</strong><br />
level of <strong>the</strong> CHANNEL 2 <strong>in</strong>put.<br />
3 iPod LEVEL- Used to control <strong>the</strong><br />
level of <strong>the</strong> iPod <strong>in</strong>put.<br />
4 BASS - Controls <strong>the</strong> low band<br />
of <strong>the</strong> Channel Equalizer, +/- 15 dB<br />
at 100Hz.<br />
5 POWER – Switches on <strong>the</strong> XP40i’s<br />
ma<strong>in</strong> power.<br />
6 MIC/INST (connector) - Combo<br />
XLR plus 1/4 <strong>in</strong>ch Input for<br />
connect<strong>in</strong>g microphone or<br />
Instrument level signals.<br />
7 AUX IN - 1/8-<strong>in</strong>ch Auxiliary l<strong>in</strong>e<br />
<strong>in</strong>put for connect<strong>in</strong>g a Laptop, CD<br />
or MP3 player.<br />
1 6<br />
2<br />
3<br />
4<br />
5<br />
5<br />
XP40i Rear View<br />
7<br />
8<br />
9<br />
10<br />
11<br />
12<br />
13<br />
8 INSTRUMENT Input - 1/4-<strong>in</strong>ch<br />
phone jack connector used to<br />
connect <strong>in</strong>strument or l<strong>in</strong>e level<br />
signals.<br />
9 LINK - 1/4-<strong>in</strong>ch phone jack<br />
connector used to l<strong>in</strong>k a second<br />
XP40i or XP40iw.<br />
10 Treble - Controls <strong>the</strong> high band<br />
of <strong>the</strong> Channel Equalizer, +/- 15 dB<br />
at 10kHz.<br />
11 PEAK LED - The Red LED<br />
illum<strong>in</strong>ates at <strong>the</strong> level where<br />
distortion occurs.<br />
12 DC POWER INLET – Connect<br />
<strong>the</strong> supplied standard DC power<br />
adapter here.<br />
13 BATTERY LED - Show <strong>the</strong> status of<br />
<strong>the</strong> battery charge level.
XP40iw Rear View<br />
1 LEVEL (CH 1) – Used to control <strong>the</strong><br />
level of <strong>the</strong> CHANNEL 1 <strong>in</strong>put.<br />
2 LEVEL (CH 2) – Used to control <strong>the</strong><br />
level of <strong>the</strong> CHANNEL 2 <strong>in</strong>put..<br />
3 RF LED - Illum<strong>in</strong>ates when an RF<br />
signal is detected.<br />
4 LEVEL (WIRELESS) – Used to<br />
control <strong>the</strong> level of <strong>the</strong> wireless<br />
microphone.<br />
5 BASS - Controls <strong>the</strong> low band<br />
of <strong>the</strong> Channel Equalizer, +/- 15 dB<br />
at 100Hz.<br />
6 POWER – Switches on <strong>the</strong> XP40iw’s<br />
ma<strong>in</strong> power.<br />
7 MIC/INST (connector) - Combo XLR<br />
plus 1/4 <strong>in</strong>ch Input for connect<strong>in</strong>g<br />
microphone or Instrument level<br />
signals.<br />
8 AUX IN - 1/8-<strong>in</strong>ch Auxiliary l<strong>in</strong>e<br />
<strong>in</strong>put for connect<strong>in</strong>g a Laptop, CD or<br />
MP3 player.<br />
1 7<br />
2<br />
3<br />
4<br />
5<br />
6<br />
6<br />
9 INSTRUMENT Input - 1/4-<strong>in</strong>ch<br />
phone jack connector used to<br />
connect <strong>in</strong>strument or l<strong>in</strong>e level<br />
signals.<br />
10 iPod LEVEL Used to control <strong>the</strong><br />
level of <strong>the</strong> iPod <strong>in</strong>put.<br />
11 LINK - 1/4-<strong>in</strong>ch phone jack<br />
connector used to l<strong>in</strong>k a second<br />
XP40i or XP40iw.<br />
12 Treble - Controls <strong>the</strong> high band<br />
of <strong>the</strong> Channel Equalizer, +/- 15 dB<br />
at 10kHz.<br />
13 PEAK LED - The Red LED illum<strong>in</strong>ates<br />
at <strong>the</strong> level where distortion occurs.<br />
14 DC POWER INLET – Connect<br />
<strong>the</strong> supplied standard DC power<br />
adapter here.<br />
15 BATTERY LED - Show <strong>the</strong> status of<br />
<strong>the</strong> battery charge level.<br />
8<br />
9<br />
10<br />
11<br />
12<br />
13<br />
14<br />
15
XP40i and XP40iw Quick Start<br />
In <strong>the</strong> follow<strong>in</strong>g pages of this manual, you will f<strong>in</strong>d a detailed explanation of all<br />
<strong>the</strong> XP40i and XP40iw’s functions and controls, but if you just want to get started<br />
quickly you can follow <strong>the</strong> steps below.<br />
Us<strong>in</strong>g a Microphone<br />
• Be sure that <strong>the</strong> XP40i’s<br />
POWER switch is set to <strong>the</strong><br />
OFF position.<br />
• Turn <strong>the</strong> CHANNEL 1,<br />
CHANNEL 2 and iPod<br />
LEVEL controls fully<br />
counterclockwise to <strong>the</strong> off<br />
position.<br />
• Connect <strong>the</strong> power adapter<br />
to an AC socket.<br />
• Us<strong>in</strong>g a standard XLR cable,<br />
plug a microphone <strong>in</strong>to <strong>the</strong><br />
XP40i’s CHANNEL 1 INPUT.<br />
• Switch <strong>the</strong> XP40iw’s Power<br />
switch to <strong>the</strong> ON position.<br />
• While speak<strong>in</strong>g <strong>in</strong>to <strong>the</strong><br />
microphone, slowly raise <strong>the</strong><br />
CHANNEL 1 LEVEL control<br />
until you have reached <strong>the</strong><br />
desired level.<br />
Us<strong>in</strong>g an Instrument Level Signal<br />
• Be sure that <strong>the</strong> XP40i’s Power switch is set to <strong>the</strong> off position.<br />
• Turn <strong>the</strong> LINE and MIC LEVEL controls fully counterclockwise to <strong>the</strong> off<br />
position.<br />
• Connect <strong>the</strong> power adapter to an AC socket.<br />
• Us<strong>in</strong>g a standard 1/4 <strong>in</strong>ch cable, connect an <strong>in</strong>strument level signal from a<br />
guitar or keyboard <strong>in</strong>to <strong>the</strong> XP40i’s INSTRUMENT INPUT.<br />
• Switch <strong>the</strong> XP40i’s POWER switch to <strong>the</strong> ON position.<br />
• Now, play your keyboard or guitar while slowly rais<strong>in</strong>g <strong>the</strong> XP40iw’s CHANNEL<br />
2 LEVEL control until you have reached <strong>the</strong> desired level.<br />
IMPORTANT NOTE: Be sure to keep <strong>the</strong> MIC LEVEL control all <strong>the</strong> way off if <strong>the</strong>re is<br />
no microphone connected.<br />
7
XP40i and XP40iw Quick Start<br />
XP40i and XP40iw - iPod Playback<br />
Your Expedition XP40i system has many sophisticated features, but if you just want<br />
to play music from your iPod, you can follow <strong>the</strong> simple steps below to get started.<br />
• Unpack <strong>the</strong> XP40i or XP40iw system components and <strong>in</strong>cluded adapter. Be<br />
sure to save <strong>the</strong> packag<strong>in</strong>g 1 <strong>in</strong> case you ever move or need to send 7 <strong>the</strong> unit for<br />
service.<br />
• Set <strong>the</strong> XP40i <strong>in</strong> place where you want to listen to your music. 8<br />
2<br />
• Turn all <strong>the</strong> <strong>in</strong>put channels down by rotat<strong>in</strong>g <strong>the</strong> LEVEL control9knobs to <strong>the</strong>ir<br />
fully counter clockwise position. Then, set <strong>the</strong> BASS and TREBLE controls to<br />
3<br />
10<br />
<strong>the</strong>ir 12:00 positions.<br />
4<br />
11<br />
• Check that <strong>the</strong> rear panel POWER switch is set to <strong>the</strong> OFF position.Then, plug<br />
<strong>the</strong> supplied power adapter <strong>in</strong>to <strong>the</strong> rear panel DC <strong>in</strong>let, and <strong>the</strong>n, plug <strong>the</strong><br />
wall socket adapter <strong>in</strong>to 5an<br />
acceptable power outlet, but don’t12 turn <strong>the</strong> unit on<br />
just yet.<br />
13<br />
• If your iPod came with a 6dock<br />
adapter (most do) <strong>in</strong>stall it <strong>in</strong>to <strong>the</strong> 14 iPod dock on<br />
top of <strong>the</strong> XP40i or XP40iw.<br />
15<br />
• Next, <strong>in</strong>stall your iPod <strong>in</strong>to <strong>the</strong> XP40i or XP40iw. Be sure <strong>the</strong> iPod is seated all<br />
<strong>the</strong> way <strong>in</strong> and that it's mak<strong>in</strong>g a good connection <strong>in</strong> <strong>the</strong> dock.<br />
• Now power on your XP40i system us<strong>in</strong>g <strong>the</strong> rear panel POWER switch but keep<br />
<strong>the</strong> volume down to start.<br />
• Now press Play on your favorite iPod tune and adjust <strong>the</strong> XP40i’s rear panel<br />
iPod LEVEL control until your reach a comfortable listen<strong>in</strong>g level.<br />
iPod<br />
Monitor<br />
8
Sett<strong>in</strong>g Up and Us<strong>in</strong>g <strong>the</strong> XP40i and XP40iw<br />
Microphone Position<strong>in</strong>g - How to Reduce<br />
Feedback<br />
Feedback is <strong>the</strong> annoy<strong>in</strong>g howl<strong>in</strong>g<br />
and squeal<strong>in</strong>g that is heard when<br />
<strong>the</strong> microphone gets too close to <strong>the</strong><br />
speaker and <strong>the</strong> volume is high. You get<br />
feedback when <strong>the</strong> microphone picks up<br />
<strong>the</strong> amplified signal from <strong>the</strong> speaker,<br />
and <strong>the</strong>n amplifies through <strong>the</strong> speaker<br />
aga<strong>in</strong>, and <strong>the</strong>n picks it up aga<strong>in</strong>, and<br />
so on and so on. In general, it is always<br />
recommended that any LIVE mic (a mic<br />
that’s on) is positioned beh<strong>in</strong>d <strong>the</strong> speaker<br />
enclosures. This will give you <strong>the</strong> best<br />
level from your system before feedback.<br />
One possible exception is when you are<br />
adjust<strong>in</strong>g <strong>the</strong> sounds of <strong>the</strong> microphones,<br />
s<strong>in</strong>ce you want to listen <strong>in</strong> front of <strong>the</strong><br />
speaker to hear properly. To do this, lower<br />
your mixers MAIN VOLUME while sett<strong>in</strong>g<br />
<strong>the</strong> EQ and effect from <strong>in</strong> front of <strong>the</strong><br />
speakers. Once you have <strong>the</strong> sound you<br />
like, move <strong>the</strong> microphones to beh<strong>in</strong>d <strong>the</strong><br />
speakers and raise <strong>the</strong> Ma<strong>in</strong> volume.<br />
Speaker Placement<br />
Whenever possible, it is a good idea<br />
to raise <strong>the</strong> speakers above <strong>the</strong> heads<br />
of <strong>the</strong> listen<strong>in</strong>g audience. The XP40i<br />
enclosures’ feature standard 1 3/8” pole<br />
mount receptacles, which are compatible<br />
with speaker stands from a variety of<br />
manufacturers. In a smaller sett<strong>in</strong>g like a<br />
school cafeteria, library, or a mall kiosk,<br />
you can also use <strong>the</strong> XP40i <strong>in</strong> one of <strong>the</strong><br />
tilt back monitor positions, which will<br />
improve <strong>the</strong> projection of <strong>the</strong> speakers<br />
and may elim<strong>in</strong>ate <strong>the</strong> need for speaker<br />
stands.<br />
9
Operat<strong>in</strong>g <strong>the</strong> XP40i and XP40iw<br />
Mak<strong>in</strong>g Connections<br />
Connect<strong>in</strong>g to <strong>the</strong> LINE Level Input<br />
Use <strong>the</strong>se <strong>in</strong>puts to connect a high<br />
impedance microphone, keyboard, guitar<br />
(with a pick-up), or any o<strong>the</strong>r l<strong>in</strong>e or<br />
<strong>in</strong>strument level signals. Use a standard<br />
shielded <strong>in</strong>strument cable term<strong>in</strong>ated<br />
with ¼-<strong>in</strong>ch phone plug to make your<br />
connection.<br />
Connect<strong>in</strong>g to <strong>the</strong> Microphone Input<br />
Use <strong>the</strong>se <strong>in</strong>puts to connect Low<br />
Impedance microphones. The MIC <strong>in</strong>puts<br />
have a nom<strong>in</strong>al operat<strong>in</strong>g level of –50dBV<br />
through -20dBV. Use a standard 3-p<strong>in</strong> XLR<br />
cable to make your connection.<br />
Sett<strong>in</strong>g a Good Level<br />
Use <strong>the</strong> Channel LEVEL controls to set <strong>the</strong><br />
<strong>in</strong>dividual volume of your microphone,<br />
<strong>in</strong>struments and iPod.<br />
The PEAK LED illum<strong>in</strong>ates when <strong>the</strong> signal<br />
send<strong>in</strong>g to <strong>the</strong> <strong>in</strong>ternal amplifier beg<strong>in</strong>s<br />
to reach a level where distortion occurs. If<br />
<strong>the</strong> CLIP lights stay on, your mix is too hot<br />
and you need to lower <strong>the</strong> LEVEL controls.<br />
It is okay for <strong>the</strong> PEAK light to occasionally<br />
light, however <strong>the</strong>y should go off quickly<br />
and not stay on.<br />
Us<strong>in</strong>g EQ<br />
The XP40i and XP40iw feature a 2-band<br />
equalizer allow<strong>in</strong>g you to adjust <strong>the</strong><br />
systems overall high and low frequencies.<br />
The system’s frequency response is flat<br />
when <strong>the</strong> knobs are <strong>in</strong> <strong>the</strong> "12:00" position.<br />
Rotat<strong>in</strong>g <strong>the</strong> knob towards <strong>the</strong> right will<br />
boost <strong>the</strong> correspond<strong>in</strong>g frequency band<br />
by 15dB, and rotat<strong>in</strong>g it towards <strong>the</strong> left<br />
will cut <strong>the</strong> frequency by 15dB.<br />
10
Sett<strong>in</strong>g <strong>the</strong> EQ for Music<br />
If you are us<strong>in</strong>g <strong>the</strong> XP40i or XP40iw<br />
for music playback turn up <strong>the</strong> BASS<br />
and TREBLE slightly to produce a “hi-fi”<br />
frequency response that accentuates <strong>the</strong><br />
low and high range.<br />
Sett<strong>in</strong>g <strong>the</strong> EQ for Vocal<br />
If you are us<strong>in</strong>g your XP40i with a<br />
microphone for speech only you and<br />
reduce <strong>the</strong> BASS and TREBLE slightly, which<br />
will produce a frequency response that<br />
accentuates <strong>the</strong> vocal range.<br />
Us<strong>in</strong>g <strong>the</strong> Aux <strong>in</strong>put<br />
The XP40i and XP40iw provide a convenient 1/8-<strong>in</strong>ch l<strong>in</strong>e level <strong>in</strong>put, which is ideal<br />
for connect<strong>in</strong>g a laptop or MP3 player. Use a standard 1/8-<strong>in</strong>ch shielded cable to<br />
make <strong>the</strong> connection. Note: Although <strong>the</strong> XP40i and XP40iw are mono units you<br />
can plug a stereo signal <strong>in</strong>to <strong>the</strong> AUX <strong>in</strong>put and it will automatically convert <strong>the</strong><br />
signal to mono.<br />
Monitor<br />
Operat<strong>in</strong>g <strong>the</strong> XP40i and XP40iw<br />
11
Operat<strong>in</strong>g <strong>the</strong> XP40i and XP40iw<br />
Charg<strong>in</strong>g <strong>the</strong> XP40i and XP40iw<br />
The XP40i and XP40iw have an <strong>in</strong>ternal<br />
Gel cell battery allow<strong>in</strong>g you to use <strong>the</strong><br />
sound system without a power cord for<br />
up to four hours. Your actual battery life<br />
will depend on what your application<br />
is. For example, if you use <strong>the</strong> XP40i to<br />
play back loud disco music, <strong>the</strong> battery<br />
life will be less than if you use it for light<br />
speech. To charge <strong>the</strong> XP40i or XP40iw<br />
battery follow <strong>the</strong>se simple steps:<br />
• Check that <strong>the</strong> POWER switch is set<br />
to <strong>the</strong> “OFF” position. Next, plug <strong>the</strong><br />
supplied power adapter <strong>in</strong>to <strong>the</strong><br />
rear panel DC <strong>in</strong>let and <strong>the</strong>n <strong>in</strong>to an<br />
appropriate power outlet.<br />
• Take notice of <strong>the</strong> rear panel CHARGE<br />
LED which will illum<strong>in</strong>ate red if <strong>the</strong><br />
battery level is not fully charged.<br />
• Leave <strong>the</strong> unit off for up to 4 hours<br />
until you see <strong>the</strong> CHARGE LED<br />
change to green <strong>in</strong>dicat<strong>in</strong>g <strong>the</strong><br />
XP40i or XP40iw battery is fully<br />
charged.<br />
Us<strong>in</strong>g <strong>the</strong> LINK connection<br />
You can expand you sound system a second XP40i or XP40iw us<strong>in</strong>g <strong>the</strong> LINK<br />
connector. Uses a standard shielded <strong>in</strong>strument cable term<strong>in</strong>ated with two ¼-<strong>in</strong>ch<br />
phone plugs and connect each end to <strong>the</strong> ¼-<strong>in</strong>ch LINK jacks located on <strong>the</strong> XP40i<br />
and XP40iw’s rear panels. Follow<strong>in</strong>g are some examples of connect<strong>in</strong>g multiple<br />
XP40i’s and XP40iw’s.<br />
12
Operat<strong>in</strong>g <strong>the</strong> XP40i and XP40iw<br />
Us<strong>in</strong>g LINK to Connect Two XP40i’s<br />
To use two XP40i’s as one system is simple. Just connect each side a standard<br />
¼-<strong>in</strong>ch Shielded <strong>in</strong>strument cable to <strong>the</strong> LINK jack located on <strong>the</strong> XP40i’s rear<br />
panels. Both mixers and <strong>the</strong> microphones or <strong>in</strong>struments connected to each of <strong>the</strong><br />
<strong>in</strong>dividual XP40i’s will be heard <strong>in</strong> both speakers.<br />
One XP40i and One XP40iw.<br />
To use an XP40i and XP40is as one system, just connect each side us<strong>in</strong>g a standard,<br />
¼-<strong>in</strong>ch, shielded <strong>in</strong>strument cable to <strong>the</strong> LINK jack located on <strong>the</strong> XP40i and<br />
XP40iw’s rear panels. Both mixers and <strong>the</strong> <strong>in</strong>struments or microphones (<strong>in</strong>clud<strong>in</strong>g<br />
<strong>the</strong> wireless microphone) connected to each of <strong>the</strong> <strong>in</strong>dividual XP40i’s will be heard<br />
<strong>in</strong> both speakers.<br />
13
Operat<strong>in</strong>g <strong>the</strong> XP40i and XP40iw<br />
Us<strong>in</strong>g LINK to Connect Two XP40iw's<br />
To use two XP40iw’s as one system, just connect each side us<strong>in</strong>g a standard, ¼-<strong>in</strong>ch, shielded<br />
<strong>in</strong>strument cable to <strong>the</strong> LINK jack located on <strong>the</strong> XP40iw’s rear panels. Both mixers and <strong>the</strong><br />
microphones (<strong>in</strong>clud<strong>in</strong>g <strong>the</strong> wireless microphone) or <strong>in</strong>struments connected to each of <strong>the</strong><br />
<strong>in</strong>dividual XP40iw’s will be heard <strong>in</strong> both speakers. Note: Be sure each XP40iw’s wireless<br />
frequency is on a different channel so that <strong>the</strong> two wireless mics will work toge<strong>the</strong>r<br />
simultaneously.<br />
14
Us<strong>in</strong>g <strong>the</strong> XP40iw Wireless Microphone<br />
1: Audio on-off switch -<br />
When set to <strong>the</strong> “ON”<br />
position, audio signal is<br />
transmitted. When set<br />
to <strong>the</strong> “OFF” position, <strong>the</strong><br />
audio signal is muted.<br />
Because <strong>the</strong> carrier signal<br />
rema<strong>in</strong>s dur<strong>in</strong>g mut<strong>in</strong>g,<br />
no “pop” or “thud” will<br />
be heard. Note that<br />
turn<strong>in</strong>g this off does not<br />
turn off <strong>the</strong> transmitter power—it is simply a way to<br />
temporarily mute <strong>the</strong> transmission of audio signal. If<br />
you don’t plan on us<strong>in</strong>g <strong>the</strong> HT5 for extended periods,<br />
turn off its power by us<strong>in</strong>g <strong>the</strong> power on-off switch (see<br />
#3 below).<br />
2: Battery level meter - This set of three multicolor<br />
LEDs <strong>in</strong>dicates relative battery power, <strong>in</strong>dicat<strong>in</strong>g<br />
whe<strong>the</strong>r <strong>the</strong> <strong>in</strong>stalled battery is at low (red), mid<br />
(yellow) or high (green) strength. One or more of<br />
<strong>the</strong>se will light whenever <strong>the</strong> HT5 is powered on (see<br />
#3 below). When all three are lit, <strong>the</strong> battery is at<br />
maximum strength. When only <strong>the</strong> red “low” <strong>in</strong>dicator<br />
lights, RF performance is degraded and <strong>the</strong> battery<br />
needs to be replaced.<br />
3: Power on-off switch* - Use this to turn <strong>the</strong> HT5 on<br />
or off (to conserve battery power, be sure to leave it off<br />
when not <strong>in</strong> use).<br />
4: Ga<strong>in</strong> control (trimpot) - This <strong>in</strong>put sensitivity<br />
control has been factory preset to provide optimum<br />
level for <strong>the</strong> particular microphone capsule provided<br />
with your XP40iw system and so we recommend that<br />
this not be adjusted manually. If necessary, however, you can use <strong>the</strong> supplied plastic<br />
screwdriver to raise or lower <strong>the</strong> <strong>in</strong>put level. See <strong>the</strong> “Sett<strong>in</strong>g Up and Us<strong>in</strong>g Your XP40iw<br />
System” section on page 5 <strong>in</strong> this manual for more <strong>in</strong><strong>format</strong>ion.<br />
5: Battery holder - Insert a standard 9-volt alkal<strong>in</strong>e battery here, be<strong>in</strong>g sure to observe<br />
<strong>the</strong> plus and m<strong>in</strong>us polarity mark<strong>in</strong>gs shown. We recommend <strong>the</strong> Duracell MN 1604 type<br />
battery. Although rechargeable Ni-Cad batteries can be used, <strong>the</strong>y do not supply adequate<br />
current for more than four hours. WARNING: Do not <strong>in</strong>sert <strong>the</strong> battery backwards; do<strong>in</strong>g<br />
so can cause severe damage to <strong>the</strong> HT5 and will void your warranty.<br />
* Be sure to turn down <strong>the</strong> WIRELESS LEVEL control before turn<strong>in</strong>g transmitter power on or off, or<br />
an audible pop may result.<br />
15
Us<strong>in</strong>g <strong>the</strong> XP40iw Wireless Microphone<br />
The basic procedure for sett<strong>in</strong>g up and us<strong>in</strong>g your XP40iw Wireless System takes<br />
only a few m<strong>in</strong>utes:<br />
1. For <strong>the</strong> XP40iw system to work correctly, both <strong>the</strong> receiver and transmitter<br />
must be set to <strong>the</strong> same channel. Remove all pack<strong>in</strong>g materials (save <strong>the</strong>m <strong>in</strong> case<br />
of need for future service) and check to make sure that <strong>the</strong> supplied receiver and<br />
transmitter are set to <strong>the</strong> same channel. If <strong>the</strong>se channels do not match, contact<br />
your <strong>Samson</strong> Technical Support at 1-800-372-6766.<br />
2. Physically place <strong>the</strong> XP40iw where it will be used (<strong>the</strong> general rule of thumb is<br />
to ma<strong>in</strong>ta<strong>in</strong> “l<strong>in</strong>e of sight” between <strong>the</strong> receiver and transmitter so that <strong>the</strong> person<br />
us<strong>in</strong>g <strong>the</strong> microphone can see <strong>the</strong> XP40iw).<br />
3. Make sure <strong>the</strong> Power on-off switch <strong>in</strong> your HT5 handheld transmitter is set to<br />
“Off.”<br />
4. On <strong>the</strong> HT5 handheld transmitter, unscrew <strong>the</strong> bottom section of <strong>the</strong><br />
microphone by turn<strong>in</strong>g it counterclockwise and <strong>the</strong>n slide it off.<br />
5. Place a fresh 9-volt alkal<strong>in</strong>e battery <strong>in</strong> <strong>the</strong> transmitter battery holder, tak<strong>in</strong>g care<br />
to observe <strong>the</strong> polarity mark<strong>in</strong>gs.<br />
6. Turn <strong>the</strong> WIRELESS LEVEL knob on <strong>the</strong> XP40iw completely counterclockwise.<br />
Connect <strong>the</strong> supplied AC adapter to <strong>the</strong> DC Input on <strong>the</strong> rear panel of <strong>the</strong> XP40iw,<br />
<strong>the</strong>n plug <strong>the</strong> adapter <strong>in</strong>to any standard AC outlet. Press <strong>the</strong> rear panel Power<br />
switch to turn on <strong>the</strong> XP40iw.<br />
7. Turn on <strong>the</strong> power to <strong>the</strong> HT5 transmitter (us<strong>in</strong>g its Power on-off switch); all<br />
three Battery strength LEDs will light if <strong>the</strong> battery is sufficiently strong. At this<br />
po<strong>in</strong>t, <strong>the</strong> RF LED on <strong>the</strong> rear panel of <strong>the</strong> receiver will light. Replace <strong>the</strong> bottom<br />
section of <strong>the</strong> HT5 handheld microphone by slid<strong>in</strong>g it on and <strong>the</strong>n screw<strong>in</strong>g it back<br />
on. Leave <strong>the</strong> transmitter off for <strong>the</strong> moment.<br />
8. Now it’s time to set <strong>the</strong> audio level. Make sure that your HT5 transmitter is<br />
unmuted by sett<strong>in</strong>g its Audio switch to “On.” Speak or s<strong>in</strong>g <strong>in</strong>to <strong>the</strong> mic at a normal<br />
performance level and raise <strong>the</strong> WIRELESS LEVEL control until <strong>the</strong> desired level is<br />
reached.<br />
Bear <strong>in</strong> m<strong>in</strong>d also that <strong>the</strong> HT5 microphone is unidirectional which means it picks<br />
up sound from <strong>the</strong> front of <strong>the</strong> mic and rejects sound from <strong>the</strong> rear. This will help<br />
16
Us<strong>in</strong>g <strong>the</strong> XP40iw Wireless Microphone<br />
reduce <strong>the</strong> chance of feedback. In general, you can avoid feedback by tak<strong>in</strong>g care<br />
not to use any microphone directly <strong>in</strong> front of a PA speaker (if this is unavoidable,<br />
try us<strong>in</strong>g <strong>the</strong> equalizer to attenuate those high- or mid-range frequencies which<br />
are caus<strong>in</strong>g <strong>the</strong> feedback “squeal<strong>in</strong>g”).<br />
9. If you hear distortion at <strong>the</strong> desired volume level, check <strong>the</strong> rear panel PEAK LED.<br />
If it is lit red, turn down <strong>the</strong> WIRELESS LEVEL until it lights only occasionally. If you<br />
still hear distortion, do <strong>the</strong> follow<strong>in</strong>g:<br />
• The HT5 transmitter's Ga<strong>in</strong> control has been factory preset to provide optimum<br />
level for <strong>the</strong> particular microphone model be<strong>in</strong>g used and so no adjustment<br />
should be necessary. Any distortion present should <strong>the</strong>refore simply be a matter<br />
of <strong>the</strong> microphone be<strong>in</strong>g too close to <strong>the</strong> mouth; try mov<strong>in</strong>g it fur<strong>the</strong>r away. If<br />
this does not solve <strong>the</strong> problem, use <strong>the</strong> supplied plastic screwdriver to turn <strong>the</strong><br />
Ga<strong>in</strong> control (trimpot) on <strong>the</strong> HT5 slowly counterclockwise until <strong>the</strong> distortion<br />
disappears.<br />
Note that follow<strong>in</strong>g this setup procedure, you can always lower <strong>the</strong> Volume knob of<br />
<strong>the</strong> XP40iw <strong>in</strong> order to fur<strong>the</strong>r attenuate <strong>the</strong> output signal if necessary.<br />
10. Conversely, if you hear a weak, noisy signal at <strong>the</strong> desired volume level (and<br />
with <strong>the</strong> WIRELESS control of <strong>the</strong> XP40iw turned fully clockwise), use <strong>the</strong> supplied<br />
plastic screwdriver to turn <strong>the</strong> Ga<strong>in</strong> control (trimpot) on <strong>the</strong> HT5 slowly clockwise<br />
until <strong>the</strong> signal reaches an acceptable level.<br />
17
Us<strong>in</strong>g <strong>the</strong> XP40iw Wireless Microphone<br />
11. When first sett<strong>in</strong>g up <strong>the</strong> XP40iw System <strong>in</strong> a new environment, it’s always a<br />
good idea to do a walk-around <strong>in</strong> order to make sure that coverage is provided for<br />
your entire performance area. As you do so, <strong>the</strong> “RF” LED on <strong>the</strong> rear panel of <strong>the</strong><br />
XP40iw should always rema<strong>in</strong> lit. Always try to m<strong>in</strong>imize <strong>the</strong> distance between<br />
transmitter and receiver as much as possible so that <strong>the</strong> strongest possible signal is<br />
received from all planned transmission po<strong>in</strong>ts.<br />
If you have followed all <strong>the</strong> steps above and are experienc<strong>in</strong>g difficulties, contact your<br />
local distributor or, if purchased <strong>in</strong> <strong>the</strong> United States, call <strong>Samson</strong> Technical Support<br />
(1-800-372-6766) between 9 AM and 5 PM EST.<br />
18
Specifications<br />
Amplifier<br />
Power Output. . . . . . . . . . . . . 40-Watt<br />
No. of Mic Input . . . . . . . . . . . 1 x Wired mic / 1 x Wireless mic (XP40iw only)<br />
LEVEL Controls . . . . . . . . . . . . 1 x Wired mic / 1 x Wireless mic (XP40iw only)<br />
iPod<br />
Tone Control . . . . . . . . . . . . . 1 x Treble / 1 x Bass, ±15dB Independent<br />
Mic/Instrument Input . . . . . . . . XLR / 1/4-<strong>in</strong>ch combi connector<br />
L<strong>in</strong>k Input/Output . . . . . . . . . . 1/4-<strong>in</strong>ch TS<br />
Aux. Input . . . . . . . . . . . . . . . 1 x 1/8-<strong>in</strong>ch TRS Stereo<br />
iPod Input . . . . . . . . . . . . . . . 30-p<strong>in</strong> <strong>in</strong>put dock<br />
Instrument Input. . . . . . . . . . . 1 x 1/4-<strong>in</strong>ch<br />
Speaker<br />
Drivers . . . . . . . . . . . . . . . . . 8" Woofer + 1" HF Driver<br />
Built-<strong>in</strong> Battery . . . . . . . . . . . . 12V / 7.5AH, Rechargeable & Sealed<br />
Operation . . . . . . . . . . . . . . . Approx. 8 - 10 hours subject to operat<strong>in</strong>g conditions<br />
Battery Charg<strong>in</strong>g. . . . . . . . . . . Approx. 3-5 hours for a S<strong>in</strong>gle charge<br />
AC/DC Adapter . . . . . . . . . . . . SMPS AC100~240V, 50~60Hz/ DC18V-1.5A<br />
Frequency Response . . . . . . . . 75 Hz to 15kHz +/-3dB<br />
Construction . . . . . . . . . . . . . Polypropylene <strong>in</strong>ternally ribbed<br />
Grill . . . . . . . . . . . . . . . . . . . Perforated Steel Grill, powder coated<br />
Mount<strong>in</strong>g . . . . . . . . . . . . . . . Integral 1 3/8-<strong>in</strong>ch Pole Mount Receptacle<br />
Dimensions . . . . . . . . . . . . . . 15"(H) x 25.5"(W) x 9.5"(D) / 375mm(H) x<br />
245mm(W) x 240mm(D)<br />
Weight . . . . . . . . . . . . . . . . . 18.5 lbs / 8.4kg Net<br />
19
Wireless Specifications<br />
HT5 Microphone Transmitter<br />
Transmission Mode Frequency modulation, 80KF3E, 15 kHz peak deviation<br />
Frequency Range 173.80 MHz to 213.20 MHz, 25 frequencies<br />
OSC System Crystal controlled, x12 multiplication<br />
RF Power 20 mW (USA models), 10 mW [(2 mW ERP) European / UK models)]<br />
Operat<strong>in</strong>g Range 300 ft.<br />
Frequency Stability ± 10 ppm<br />
Approvals Complies with ETS 300 422 and FCC Part 74<br />
Radiat<strong>in</strong>g Harmonic and Spurious Emission Below limits of applicable regulations<br />
Antenna Type Internal<br />
Audio Frequency Response 40 Hz to 15 kHz ±3 dB<br />
Pre-Emphasis 50 µSec<br />
Noise Reduction System NE571 based compandor<br />
Signal To Noise Ratio > 100 dB<br />
Maximum Input Level 0 dBv (ST5), -20 dBv (VH3)<br />
T.H.D. < 1% @ 1 kHz<br />
Current Consumption 34 mA (typical)<br />
Battery Life (MN1604 9-volt alkal<strong>in</strong>e) 6 hours (typical)<br />
Operat<strong>in</strong>g Temperature -10 to +55 degrees C<br />
Controls Power On/Off, Audio On/Off, Level Control (Trimpot)<br />
LED Indicator Battery high/medium/low<br />
Dimensions 37 (W) x 233 (H) mm (1.46 x 9.17 <strong>in</strong>.)<br />
Weight 200 grams • 7.1 oz.<br />
XP40iw Receiver<br />
Receiv<strong>in</strong>g System S<strong>in</strong>gle conversion Superheterodyne<br />
Frequency Range 173.80 MHz to 213.20 MHz, 25 frequencies<br />
Band A (European / UK models) 160.10 to 177.90 MHz<br />
Band B (European / UK models) 189.10 to 210.10 MHz<br />
Receiv<strong>in</strong>g Mode 80KF3E<br />
Sensitivity < 3 µV for 20 dB SINAD, < 10 µV for 50 dB S/N<br />
Selectivity 120 kHz BW, nom<strong>in</strong>al @ -6 dB, ± 300 kHz (adj CH), -75 dB<br />
Squelch Sensitivity 3 µV to 250 µV adjustable<br />
Intermediate Frequency 10.7 MHz<br />
Local Oscillator System Crystal controlled<br />
Noise Reduction System NE571 based compandor<br />
De-emphasis 50 µsec.<br />
Signal To Noise Ratio > 100 dB (IHF-A) l<strong>in</strong>e out, > 90 dB (IHF-A), mic out<br />
Audio Frequency Response 40 Hz to 15 kHz ±3 dB<br />
T.H.D. < 1% @ 1 kHz<br />
Specifications are subject to change without notice.<br />
20
FCC Rules and Regulations<br />
<strong>Samson</strong> wireless systems are type accepted under FCC<br />
rules parts 90, 74 and 15.<br />
Licens<strong>in</strong>g of <strong>Samson</strong> equipment is <strong>the</strong> user’s responsibility<br />
and licensability depends on <strong>the</strong> user’s classification,<br />
application and frequency selected.<br />
This device complies with RSS-210 of<br />
Industry & Science Canada.<br />
Operation is subject to <strong>the</strong> follow<strong>in</strong>g two conditions:<br />
(1) this device may not cause harmful <strong>in</strong>terference and (2)<br />
this device must accept any <strong>in</strong>terference received, <strong>in</strong>clud<strong>in</strong>g<br />
<strong>in</strong>terference that may cause<br />
Undesired operation.
<strong>Samson</strong> Technologies Corp.<br />
45 Gilp<strong>in</strong> Avenue<br />
Hauppauge, New York 11788-8816<br />
Phone: 1-800-3-SAMSON (1-800-372-6766)<br />
Fax: 631-784-2201<br />
www.samsontech.com