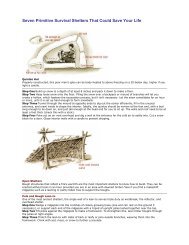
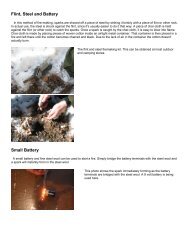
Vital Points for Medium Range Combatives - Judo Information Site
Vital Points for Medium Range Combatives - Judo Information Site
Vital Points for Medium Range Combatives - Judo Information Site

You also want an ePaper? Increase the reach of your titles
YUMPU automatically turns print PDFs into web optimized ePapers that Google loves.
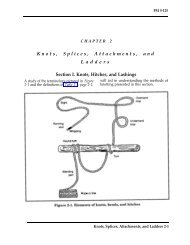
CHAPTER 4<br />
MEDIUM-RANGE COMBATIVES<br />
In medium-range combatives, two opponents are already within touching<br />
distance. The arsenal of possible body weapons includes short punches and<br />
strikes with elbows, knees, and hands. Head butts are also effective; do not <strong>for</strong>get<br />
them during medium-range combat. A soldier uses his peripheral vision to<br />
evaluate the targets presented by the opponent and choose his target. He should<br />
be aggressive and concentrate his attack on the opponent's vital points to end the<br />
fight as soon as possible.<br />
4-1. VITAL TARGETS<br />
The body is divided into three sections: high, middle, and low. Each<br />
section contains vital targets (Figure 4-1, pages 4-5 and 4-6). The effects of<br />
striking these targets follow:<br />
a. High Section. The high section includes the head and neck; it is the most<br />
dangerous target area.<br />
(1) Top of the head. The skull is weak where the frontal cranial bones join.<br />
A <strong>for</strong>ceful strike causes trauma to the cranial cavity, resulting in<br />
unconsciousness and hemorrhage. A severe strike can result in death.<br />
(2) Forehead. A <strong>for</strong>ceful blow can cause whiplash; a severe blow can<br />
cause cerebral hemorrhage and death.<br />
(3) Temple. The bones of the skull are weak at the temple, and an artery<br />
and large nerve lie close to the skin. A powerful strike can cause<br />
unconsciousness and brain concussion. If the artery is severed, the resulting<br />
massive hemorrhage compresses the brain, causing coma and or death.<br />
(4) Eyes. A slight jab in the eyes causes uncontrollable watering and<br />
blurred vision. A <strong>for</strong>ceful jab or poke can cause temporary blindness, or the<br />
eyes can be gouged out. Death can result if the fingers penetrate through the<br />
thin bone behind the eyes and into the brain.<br />
(5) Ears. A strike to the ear with cupped hands can rupture the eardrum<br />
and may cause a brain concussion.<br />
4-1
FM 21-150<br />
4-2<br />
(6) Nose. Any blow can easily break the thin bones of the nose, causing<br />
extreme pain and eye watering.<br />
(7) Under the nose. A blow to the nerve center, which is close to the<br />
surface under the nose, can cause great pain and watery eyes.<br />
(8) Jaw. A blow to the jaw can break or dislocate it. If the facial nerve is<br />
pinched against the lower jaw, one side of the face will be paralyzed.<br />
(9) Chin. A blow to the chin can cause paralysis, mild concussion, and<br />
unconsciousness. The jawbone acts as a lever that can transmit the <strong>for</strong>ce of<br />
a blow to the back of the brain where the cardiac and respiratory mechanisms<br />
are controlled.<br />
(10) Back of ears and base of skull. A moderate blow to the back of the<br />
ears or the base of the skull can cause unconsciousness by the jarring effect<br />
on the back of the brain. However, a powerful blow can cause a concussion<br />
or brain hemorrhage and death.<br />
(11) Throat. A powerful blow to the front of the throat can cause death<br />
by crushing the windpipe. A <strong>for</strong>ceful blow causes extreme pain and gagging<br />
or vomiting.<br />
(12) Side of neck. A sharp blow to the side of the neck causes<br />
unconsciousness by shock to the carotid artery, jugular vein, and vagus nerve.<br />
For maximum effect, the blow should be focused below and slightly in front<br />
of the ear. A less powerful blow causes involuntary muscle spasms and<br />
intense pain. The side of the neck is one of the best targets to use to drop an<br />
opponent immediately or to disable him temporarily to finish him later.<br />
(13) Back of neck. A powerful blow to the back of one’s neck can cause<br />
whiplash, concussion, or even a broken neck and death.<br />
b. Middle Section. The middle section extends from the shoulders to the<br />
area just above the hips. Most blows to vital points in this region are not fatal<br />
but can have serious, long-term complications that range from trauma to<br />
internal organs to spinal cord injuries.<br />
(1) Front of shoulder muscle. A large bundle of nerves passes in front of<br />
the shoulder joint. A <strong>for</strong>ceful blow causes extreme pain and can make the<br />
whole arm ineffective if the nerves are struck just right.<br />
(2) Collarbone. A blow to the collarbone can fracture it, causing intense<br />
pain and rendering the arm on the side of the fracture ineffective. The<br />
fracture can also sever the brachial nerve or subclavian artery.<br />
(3) Armpit. A large nerve lies close to the skin in each armpit. A blow to<br />
this nerve causes severe pain and partial paralysis. A knife inserted into the<br />
armpit is fatal as it severs a major artery leading from the heart.<br />
(4) Spine. A blow to the spinal column can sever the spinal cord, resulting<br />
in paralysis or in death.
(5) Nipples. A large network of nerves passes near the skin at the nipples.<br />
A blow here can cause extreme pain and hemorrhage to the many blood<br />
vessels beneath.<br />
(6) Heart. A jolting blow to the heart can stun the opponent and allow<br />
time <strong>for</strong> follow-up or finishing techniques.<br />
(7) Solar plexus. The solar plexus is a center <strong>for</strong> nerves that control the<br />
cardiorespiratory system. A blow to this location is painful and can take the<br />
breath from the opponent. A powerful blow causes unconsciousness by<br />
shock to the nerve center. A penetrating blow can also damage internal<br />
organs.<br />
(8) Diaphragm. A blow to the lower front of the ribs can cause the<br />
diaphragm and the other muscles that control breathing to relax. This causes<br />
loss of breath and can result in unconsciousness due to respiratory failure.<br />
(9) Floating ribs. A blow to the floating ribs can easily fracture them<br />
because they are not attached to the rib cage. Fractured ribs on the right side<br />
can cause internal injury to the liver; fractured ribs on either side can possibly<br />
puncture or collapse a lung.<br />
(10) Kidneys. A powerful blow to the kidneys can induce shock and can<br />
possibly cause internal injury to these organs. A stab to the kidneys induces<br />
instant shock and can cause death from severe internal bleeding.<br />
(11) Abdomen below navel. A powerful blow to the area below the navel<br />
and above the groin can cause shock, unconsciousness, and internal bleeding.<br />
(12) Biceps. A strike to the biceps is most painful and renders the arm<br />
ineffective. The biceps is an especially good target when an opponent holds<br />
a weapon.<br />
(13) Forearm muscle. The radial nerve, which controls much of the<br />
movement in the hand, passes over the <strong>for</strong>earm bone just below the elbow.<br />
A strike to the radial nerve renders the hand and arm ineffective. An<br />
opponent can be disarmed by a strike to the <strong>for</strong>earm; if the strike is powerful<br />
enough, he can be knocked unconscious.<br />
(14) Back of hand. The backs of the hands are sensitive. Since the nerves<br />
pass over the bones in the hand, a strike to this area is intensely painful. The<br />
small bones on the back of the hand are easily broken and such a strike can<br />
also render the hand ineffective.<br />
c. Low Section. The low section of the body includes everything from the<br />
groin area to the feet. Strikes to these areas are seldom fatal, but they can be<br />
incapacitating.<br />
(1) Groin. A moderate blow to the groin can incapacitate an opponent<br />
and cause intense pain. A powerful blow can result in unconsciousness and<br />
shock.<br />
FM 21-150<br />
4-3
4-4<br />
FM 21-150<br />
(2) Outside of thigh. A large nerve passes near the surface on the outside<br />
of the thigh about four finger-widths above the knee. A powerful strike to<br />
this region can render the entire leg ineffective, causing an opponent to drop.<br />
This target is especially suitable <strong>for</strong> knee strikes and shin kicks.<br />
(3) Inside of thigh. A large nerve passes over the bone about in the middle<br />
of the inner thigh. A blow to this area also incapacitates the leg and can cause<br />
the opponent to drop. Knee strikes and heel kicks are the weapons of choice<br />
<strong>for</strong> this target.<br />
(4) Hamstring. A severe strike to the hamstring can cause muscle spasms<br />
and inhibit mobility. If the hamstring is cut, the leg is useless.<br />
(5) Knee. Because the knee is a major supporting structure of the body,<br />
damage to this joint is especially detrimental to an opponent. The knee is<br />
easily dislocated when struck at an opposing angle to the joint’s normal range<br />
of motion, especially when it is bearing the opponent’s weight. The knee can<br />
be dislocated or hyperextended by kicks and strikes with the entire body.<br />
(6) Calf. A powerful blow to the top of the calf causes painful muscle<br />
spasms and also inhibits mobility.<br />
(7) Shin. A moderate blow to the shin produces great pain, especially a<br />
blow with a hard object. A powerful blow can possibly fracture the bone that<br />
supports most of the body weight.<br />
(8) Achilles tendon. A powerful strike to the Achilles tendon on the back<br />
of the heel can cause ankle sprain and dislocation of the foot. If the tendon<br />
is torn, the opponent is incapacitated. The Achilles tendon is a good target<br />
to cut with a knife.<br />
(9) Ankle. A blow to the ankle causes pain; if a <strong>for</strong>ceful blow is delivered,<br />
the ankle can be sprained or broken.<br />
(10) Instep. The small bones on the top of the foot are easily broken. A<br />
strike here will hinder the opponent’s mobility.
FM 21-150<br />
4-5
FM 21-150<br />
4-6
4-2. STRIKING PRINCIPLES<br />
Effective striking with the weapons of the body to the opponent’s vital points<br />
is essential <strong>for</strong> a victorious outcome in a hand-to-hand struggle. A soldier<br />
must be able to employ the principles of effective striking if he is to emerge<br />
as the survivor in a fight to the death.<br />
a. Attitude. Proper mental attitude is of primary importance in the<br />
soldier’s ability to strike an opponent. In hand-to-hand combat, the soldier<br />
must have the attitude that he will defeat the enemy and complete the mission,<br />
no matter what. In a fight to the death, the soldier must have the frame of<br />
mind to survive above all else; the prospect of losing cannot enter his mind.<br />
He must commit himself to hit the opponent continuously with whatever it<br />
takes to drive him to the ground or end his resistance. A memory aid is,<br />
“Thump him and dump him!”<br />
b. Fluid Shock Wave. A strike should be delivered so that the target is hit<br />
and the weapon remains on the impact site <strong>for</strong> at least a tenth of a second. This<br />
imparts all of the kinetic energy of the strike into the target area, producing<br />
a fluid shock wave that travels into the affected tissue and causes maximum<br />
damage. It is imperative that all strikes to vital points and nerve motor points are<br />
delivered with this principle in mind. The memory aid is, “Hit and stick!”<br />
c. Target Selection. Strikes should be targeted at the opponent’s vital<br />
points and nerve motor points. The results of effective strikes to vital points<br />
are discussed in paragraph 4-1. Strikes to nerve motor points cause<br />
temporary mental stunning and muscle motor dysfunction to the affected<br />
areas of the body. Mental stunning results when the brain is momentarily<br />
disoriented by overstimulation from too much input—<strong>for</strong> example, a strike<br />
to a major nerve. The stunning completely disables an opponent <strong>for</strong> three to<br />
seven seconds and allows the soldier to finish off the opponent, gain total<br />
control of the situation, or make his escape. Sometimes, such a strike causes<br />
unconsciousness. A successful strike to a nerve motor center also renders the<br />
affected body part immovable by causing muscle spasms and dysfunction due<br />
to nerve overload. (Readily available nerve motor points are shown in<br />
Figure 4-1, pages 4-5 and 4-6.)<br />
(1) Jugular notch pressure point. Located at the base of the neck just<br />
above the breastbone; pressure to this notch can distract and take away his<br />
balance. Pressure from fingers jabbed into the notch incurs intense pain that<br />
causes an the opponent to withdraw from the pressure involuntarily.<br />
(2) Suprascapular nerve motor point. This nerve is located where the<br />
trapezius muscle joins the side of the neck. A strike to this point causes<br />
intense pain, temporary dysfunction of the affected arm and hand, and mental<br />
stunning <strong>for</strong> three to seven seconds. The strike should be a downward<br />
knife-hand or hammer-fist strike from behind.<br />
FM 21-150<br />
4-7
FM 21-150<br />
4-8<br />
(3) Brachial plexus origin. This nerve motor center is on the side of the<br />
neck. It is probably the most reliable place to strike someone to stun them.<br />
Any part of the hand or arm may be applied—the palm heel, back of the hand,<br />
knife hand, ridge hand, hammer fist, thumb tip, or the <strong>for</strong>earm. A proper<br />
strike to the brachial plexus origin causes—<br />
Intense pain.<br />
Complete cessation of motor activity.<br />
Temporary dysfunction of the affected arm.<br />
Mental stunning <strong>for</strong> three to seven seconds.<br />
Possible unconsciousness.<br />
(4) Brachial plexus clavicle notch pressure point. This center is behind the<br />
collarbone in a hollow about halfway between the breastbone and the<br />
shoulder joint. The strike should be delivered with a small-impact weapon<br />
or the tip of the thumb to create high-level mental stunning and dysfunction<br />
of the affected arm.<br />
(5) Brachial plexus tie-in motor point. Located on the front of the shoulder<br />
joint, a strike to this point can cause the arm to be ineffective. Multiple strikes<br />
may be necessary to ensure total dysfunction of the arm and hand.<br />
(6) Stellate ganglion. The ganglion is at the top of the pectoral muscle<br />
centered above the nipple. A severe strike to this center can cause high-level<br />
stunning, respiratory dysfunction, and possible unconsciousness. A straight<br />
punch or hammer fist should be used to cause spasms in the nerves affecting<br />
the heart and respiratory systems.<br />
(7) Cervical vertebrae. Located at the base of the skull, a strike to this<br />
particular vertebrae can cause unconsciousness or possibly death. The<br />
harder the strike, the more likely death will occur.<br />
(8) Radial nerve motor point. This nerve motor point is on top of the<br />
<strong>for</strong>earm just below the elbow. Strikes to this point can create dysfunction of<br />
the affected arm and hand. The radial nerve should be struck with the<br />
hammer fist or the <strong>for</strong>earm bones or with an impact weapon, if available.<br />
Striking the radial nerve can be especially useful when disarming an opponent<br />
armed with a knife or other weapon.<br />
(9) Median nerve motor point. This nerve motor point is on the inside of<br />
the <strong>for</strong>earm at the base of the wrist, just above the heel of the hand. Striking<br />
this center produces similar effects to striking the radial nerve, although it is<br />
not as accessible as the radial nerve.<br />
(10) Sciatic nerve. A sciatic nerve is just above each buttock, but below<br />
the belt line. A substantial strike to this nerve can disable both legs and<br />
possibly cause respiratory failure. The sciatic nerve is the largest nerve in the
ody besides the spinal cord. Striking it can affect the entire body, especially<br />
if an impact weapon is used.<br />
(11) Femoral nerve. This nerve is in the center of the inside of the thigh;<br />
striking the femoral nerve can cause temporary motor dysfunction of the<br />
affected leg, high-intensity pain, and mental stunning <strong>for</strong> three to seven<br />
seconds. The knee is best to use to strike the femoral nerve.<br />
(12) Common peroneal nerve motor point. The peroneal nerve is on the<br />
outside of the thigh about four fingers above the knee. A severe strike to this<br />
center can cause collapse of the affected leg and high-intensity pain, as well<br />
as mental stunning <strong>for</strong> three to seven seconds. This highly accessible point is<br />
an effective way to drop an opponent quickly. This point should be struck<br />
with a knee, shin kick, or impact weapon.<br />
4-3. SHORT PUNCHES AND STRIKES<br />
During medium-range combat, punches and strikes are usually short because<br />
of the close distance between fighters. Power is generated by using the entire<br />
body mass in motion behind all punches and strikes.<br />
a. Hands as Weapons. A knowledge of hand-to-hand combat fighting<br />
provides the fighter another means to accomplish his mission. Hands can<br />
become deadly weapons when used by a skilled fighter.<br />
(1) Punch to solar plexus. The<br />
defender uses this punch <strong>for</strong><br />
close-in fighting when the<br />
opponent rushes or tries to grab<br />
him. The defender puts his full<br />
weight and <strong>for</strong>ce behind the<br />
punch and strikes his opponent in<br />
the solar plexus (Figure 4-2),<br />
knocking the breath out of his<br />
lungs. The defender can then<br />
follow-up with a knee to the groin,<br />
or he can use other disabling<br />
blows to vital areas.<br />
FM 21-150<br />
4-9
FM 21-150<br />
4-10<br />
(2) Thumb strike to throat.<br />
The defender uses the thumb<br />
strike to the throat (Figure 4-3) as<br />
an effective technique when an<br />
opponent is rushing him or trying<br />
to grab him. The defender thrusts<br />
his right arm and thumb out and<br />
strikes his opponent in the<br />
throat-larynx area while holding<br />
his left hand high <strong>for</strong> protection.<br />
He can follow up with a disabling<br />
blow to his opponent’s vital areas.<br />
(3) Thumb strike to shoulder<br />
joint. The opponent rushes the<br />
defender and tries to grab him.<br />
The defender strikes the<br />
opponent’s shoulder joint or<br />
upper pectoral muscle with his fist<br />
or thumb (Figure 4-4). This<br />
technique is painful and renders<br />
the opponent’s arm numb. The<br />
defender then follows up with a<br />
disabling movement.
(4) Hammer-fit strike to face.<br />
The opponent rushes the<br />
defender. The defender counters<br />
by rotating his body in the<br />
direction of his opponent and by<br />
striking him in the temple, ear, or<br />
face (Figure 4-5). The defender<br />
follows up with kicks to the groin<br />
or hand strikes to his opponent’s<br />
other vital areas.<br />
(5) Hammer-fist strike to side<br />
of neck. The defender catches his<br />
opponent off guard, rotates at the<br />
waist to generate power, and<br />
strikes his opponent on the side of<br />
the neck (carotid artery)<br />
(Figure 4-6) with his hand<br />
clenched into a fist. This strike<br />
can cause muscle spasms at the<br />
least and may knock his opponent<br />
unconscious.<br />
FM 21-150<br />
4-11
FM 21-150<br />
4-12<br />
(6) Hammer fist to pectoral<br />
muscle. When the opponent tries<br />
to grapple with the defender, the<br />
defender counters by <strong>for</strong>cefully<br />
striking his opponent in the<br />
pectoral muscle (Figure 4-7).<br />
This blow stuns the opponent, and<br />
the defender immediately follows<br />
up with a disabling blow to a vital<br />
area of his opponent’s body.<br />
(7) Hook punch to solar plexus<br />
or floating ribs. The opponent<br />
tries to wrestle the defender to the<br />
ground. The defender counters<br />
with a short hook punch to his<br />
opponent’s solar plexus or floating<br />
ribs (Figure 4-8). A sharply<br />
delivered blow can puncture or<br />
collapse a lung. The defender<br />
then follows up with a combination<br />
of blows to his opponent’s vital<br />
areas.
(8) Uppercut to chin. The<br />
defender steps between his<br />
opponent’s arms and strikes with an<br />
uppercut punch (Figure 4-9) to the<br />
chin or jaw. The defender then<br />
follows up with blows to his<br />
opponent’s vital areas.<br />
(9) Knife-hand strike to side of<br />
neck. The defender executes a<br />
knife-hand strike to the side of his<br />
opponent’s neck (Figure 4-10) the<br />
same way as the hammer-fist strike<br />
(Figure 4-6, page 4-11) except he<br />
uses the edge of his striking hand.<br />
FM 21-150<br />
4-13
FM 21-150<br />
4-14<br />
(10) Knife-hand strike to radial nerve. The opponent tries to strike the<br />
defender with a punch. The defender counters by striking his opponent on<br />
the top of the <strong>for</strong>earm just below the elbow (radial nerve) (Figure 4-11) and<br />
uses a follow-up technique to disable his opponent.
(11) Palm-heel strike to chin. The opponent tries to surprise the defender<br />
by lunging at him. The defender quickly counters by striking his opponent<br />
with a palm-heel strike to the chin (Figure 4-12), using maximum <strong>for</strong>ce.<br />
FM 21-150<br />
4-15
FM 21-150<br />
4-16<br />
(12) Palm-heel strike to solar plexus. The defender meets his opponent’s<br />
rush by striking him with a palm-heel strike to the solar plexus (Figure 4-13).<br />
The defender then executes a follow-up technique to his opponent’s vital<br />
organs.
(13) Palm-heel strike to kidneys. The defender grasps his opponent from<br />
behind by the collar and pulls him off balance. He quickly follows up with a<br />
hard palm-heel strike to the opponent’s kidney (Figure 4-14). The defender<br />
can then take down his opponent with a follow-up technique to the back of<br />
his knee.<br />
FM 21-150<br />
4-17
FM 21-150<br />
4-18<br />
b. Elbows as Weapons. The elbows are also <strong>for</strong>midable weapons;<br />
tremendous striking power can be generated from them. The point of the<br />
elbow should be the point of impact. The elbows are strongest when kept in<br />
front of the body and in alignment with the shoulder joint; that is, never strike<br />
with the elbow out to the side of the body.<br />
(1) Elbow strikes. When properly executed, elbow strikes (Figures 4-15<br />
through 4-21, pages 4-18 through 4-22) render an opponent ineffective.<br />
When using elbow strikes, execute them quickly, powerfully, and repetitively<br />
until the opponent is disabled.
FM 21-150<br />
4-19
FM 21-150<br />
4-20
FM 21-150<br />
4-21
FM 21-150<br />
4-22<br />
(2) Repetitive elbow strikes. The attacker on the right throws a punch<br />
(Figure 4-22, Step 1).<br />
The defender counters with an elbow strike to the biceps (Figure 4-22,<br />
Step 2). The attacker follows with a punch from his other arm.<br />
The defender again counters with an elbow strike to the shoulder joint<br />
(Figure 4-22, Step 3). He next strikes with an elbow from the opposite side<br />
to the throat.
c. Knees as Weapons. When the knees are used to strike opponents, they<br />
are especially potent weapons and are hard to defend or protect against.<br />
Great power is generated by thrusting the hips in with a knee strike; however,<br />
use the point of the knee as the impact surface. All knee strikes should be<br />
executed repetitively until the opponent is disabled. The following<br />
techniques are the most effective way to overpower or disable the opponent.<br />
(1) Front knee strike. When an opponent tries to grapple with the<br />
defender, the defender strikes his opponent in the stomach or solar plexus<br />
with his knee (Figure 4-23). This stuns the opponent and the defender can<br />
follow up with another technique.<br />
FM 21-150<br />
4-23
FM 21-150<br />
4-24<br />
(2) Knee strike to outside of thigh. The defender delivers a knee strike to<br />
the outside of his opponent’s thigh (common peroneal nerve) (Figure 4-24).<br />
This strike causes intense pain and renders the opponent’s leg ineffective.
(3) knee strike to inside of thigh. An effective technique <strong>for</strong> close-in<br />
grappling is when the defender delivers a knee strike to the inside of his<br />
opponent’s thigh (peroneal nerve) (Figure 4-25). The defender then<br />
executes a follow-up technique to a vital point.<br />
FM 21-150<br />
4-25
FM 21-150<br />
4-26<br />
(4) Knee strike to groin. The knee strike to the groin is effective during<br />
close-in grappling. The defender gains control by grabbing his opponent’s<br />
head, hair, ears, or shoulders and strikes him in the groin with his knee<br />
(Figure 4-26).
(5) Knee strike to face. The defender controls his opponent by grabbing<br />
behind his head with both hands and <strong>for</strong>cefully pushing his head down. At<br />
the same time, the defender brings his knee up and smashes the opponent in<br />
the face (Figure 4-27). When properly executed, the knee strike to the face<br />
is a devastating technique that can cause serious injury to the opponent.<br />
FM 21-150<br />
4-27