Amarr Epic Arc Guide by Jowen Datloran Introduction - EVE Files
Amarr Epic Arc Guide by Jowen Datloran Introduction - EVE Files
Amarr Epic Arc Guide by Jowen Datloran Introduction - EVE Files

Create successful ePaper yourself
Turn your PDF publications into a flip-book with our unique Google optimized e-Paper software.
<strong>Amarr</strong> <strong>Epic</strong> <strong>Arc</strong> <strong>Guide</strong><br />
<strong>by</strong> <strong>Jowen</strong> <strong>Datloran</strong><br />
Right to Rule<br />
<strong>Introduction</strong><br />
This is an epic mission arc mission guide that will take you through the various encounters and<br />
tasks in the <strong>Amarr</strong> epic arc level 4 mission chain called “Right to Rule”. While the guide contains<br />
detailed info on encounter opponents and provides hints on trigger spawn mechanics, this was not<br />
been my primary goal. Instead I focused on noting down all mission briefings and communications<br />
to provide clear insight in the ongoing story. I have included mission debriefings too, when they<br />
have contained a little more information than simply a pad on the back for a job well done. Also, in<br />
the end of the guide is an “Info on” section where all background info to the various missions is<br />
included.<br />
This particular epic arc starts out at the agent Karde Romu, who is located at the Karde Romu, MIO<br />
Agent beacon in the Kor-Azor solar system. Before Karde is willing to hand over the first mission<br />
of the arc (Aiding an Investigator) you need to have a minimum of 7.0 in effective standing (skills<br />
included) with either the Ministry of Internal Order corporation or the <strong>Amarr</strong> Empire faction. No<br />
other standing levels matter! As such, it does not matter what standings you have with any of the<br />
other corporations or factions that agents in the arc belongs to; you will have access to them as long<br />
as you have managed to start the arc. Though, completing a mission will provide an increase in<br />
standing with the corporation any particular agent belongs to.<br />
There are no time constraints on acceptance and completion of epic arc missions, only on the bonus<br />
rewards. But if you fail a mission or lose a mission critical item you can no longer complete the arc.<br />
An epic arc mission chain can be restarted after every 3 months (90 days), no matter if you failed or<br />
completed it the last time.<br />
Variation in hostile NPC spawns<br />
The composition of hostile NPCs you will encounter in the missions can vary within the ship<br />
classes as well as in numbers of ships within each class. This does not happen in all encounters or<br />
for all ship classes within some encounters. To report this, I list the possible ship type variants and<br />
write the total number of ships.<br />
The final boss<br />
When getting to a final encounter mission, you will be met with NPCs who are a bit out of the<br />
ordinary. Often one, sometimes more, of the NPCs in that mission will have what is called<br />
“advanced AI”, the same type of NPC AI applied to Sleeper drones in Wormhole space. This means<br />
a bit more cleverness from that NPC side than the rest. As example, such an NPC will target more<br />
than one hostile at a time, may switch between targets based on threat and can fire one weapon<br />
group (guns) against one target while firing another group (missiles) against a different target. They<br />
also try to position themselves a bit cleverer than <strong>by</strong> simply approaching you.<br />
Some arc paths do not have an encounter mission in its ending, and as such, will have no final boss.
Important in regard to this particular epic arc<br />
There are two major paths though this arc starting at the only arc branch point in the arc (Fate of a<br />
Madman). One where you continue siding with the <strong>Amarr</strong> Empire and another where you<br />
treacherously switch allegiance to Sansha‟s Nation. Both these paths have a unique item reward <strong>by</strong><br />
the end of the arc (Imperial Navy Modified „Noble‟ Implant for the <strong>Amarr</strong> Empire mission path and<br />
Sansha Modified „Gnome‟ Implant for the Sansha‟s Nations mission path). Both paths have<br />
missions unique for that path only, though their story intervenes.<br />
By following the <strong>Amarr</strong> Empire mission path, this epic arc can be completed without going to either<br />
low or no security space. But <strong>by</strong> selecting the Sansha‟s Nation path you will have missions in low<br />
security space. Sometimes a few of them, sometimes all. Do not despair though; the missions are<br />
against weak opponents and can be handled in an assault frigate, perhaps even an interceptor. Also<br />
some missions will require you to have the Hacking skill trained (see Mission Overview for which).
Contents<br />
<strong>Introduction</strong> .......................................................................................................................................... 1<br />
Variation in hostile NPC spawns ..................................................................................................... 1<br />
The final boss ................................................................................................................................... 1<br />
Important in regard to this particular epic arc .................................................................................. 2<br />
Mission Overview ................................................................................................................................ 4<br />
Missions ............................................................................................................................................... 5<br />
Mission name: A Digital Soul .......................................................................................................... 5<br />
Mission name: A Human Body ........................................................................................................ 6<br />
Mission name: A Metal Mind .......................................................................................................... 8<br />
Mission name: Aiding an Investigator ........................................................................................... 10<br />
Mission name: An Unfortunate End .............................................................................................. 11<br />
Mission name: Aralin Jick ............................................................................................................. 12<br />
Mission name: Ascending Nobles .................................................................................................. 13<br />
Mission name: Background Check ................................................................................................ 15<br />
Mission name: Cowardly Commander .......................................................................................... 17<br />
Mission name: Falling into Place ................................................................................................... 20<br />
Mission name: Fate of a Madman .................................................................................................. 21<br />
Mission name: Hunting the Hunter ................................................................................................ 22<br />
Mission name: Interrogation: Catching the Scent .......................................................................... 24<br />
Mission name: Languishing Lord .................................................................................................. 26<br />
Mission name: Late Reports .......................................................................................................... 27<br />
Mission name: Longing Leman ..................................................................................................... 29<br />
Mission name: Making an Arrest ................................................................................................... 31<br />
Mission name: Panic Response ...................................................................................................... 32<br />
Mission name: Raging Sansha ....................................................................................................... 34<br />
Mission name: Razing the Outpost ................................................................................................ 36<br />
Mission name: Regal Replacement ................................................................................................ 38<br />
Mission name: Silence Rahsa: The Nation‟s Path ......................................................................... 41<br />
Mission name: The Outclassed Outpost ......................................................................................... 42<br />
Mission name: The Right to Rule .................................................................................................. 43<br />
Deadspace Complexes ....................................................................................................................... 47<br />
Complex name: Karde Romu, MIO Agent .................................................................................... 47<br />
Complex name: Miyan Security Forces ......................................................................................... 47<br />
Info on ................................................................................................................................................ 48<br />
Deniability ...................................................................................................................................... 48<br />
Harkan‟s Behemoth........................................................................................................................ 48<br />
Harkan‟s Plan ................................................................................................................................. 48<br />
Harkan‟s Short Political Career ..................................................................................................... 48<br />
Loose Ends ..................................................................................................................................... 48<br />
Lord Darabi .................................................................................................................................... 49<br />
Lord Miyan .................................................................................................................................... 49<br />
Lord Miyan‟s Cruiser ..................................................................................................................... 49<br />
Terrus Harkan ................................................................................................................................ 49
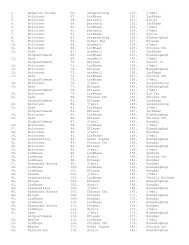
Mission Overview<br />
Chapter 2: Spiderweb Politics<br />
(c)<br />
Chapter 1: Interference<br />
Mission in low security space<br />
(
Missions<br />
Mission name: A Digital Soul<br />
Agent name: Krethar Mann<br />
Mission type: Encounter<br />
Mission briefing:<br />
There is one more piece that is required before we make our final play. As you have likely guessed<br />
we are building a clone, a doppelganger of Lord Miyan that we control. This is an extremely<br />
complex creation, as it must be both technologically sophisticated and detection-proof. To make the<br />
illusion truly convincing, we need one final thing: a mind scan.<br />
There is one particular mind scan that is perfect for our use. This man is long dead, executed, but<br />
the government considered his unique viewpoint still worthy of study. He was killed <strong>by</strong> the same<br />
mind scan process used <strong>by</strong> you capsuleers. This mind scan is kept on a planet side facility for<br />
psychiatric research. It has one vulnerable point, accessible <strong>by</strong> hacking the system‟s comm. relay.<br />
Find the comm. Relay at this location. Hack into the relay, and we can pull the mind scan directly to<br />
our server.<br />
Do not concern yourself with the mind‟s identity. The original personality was a close<br />
approximation for Miyan, and any variances will be overridden <strong>by</strong> our controls.<br />
Objective: Hack the communications relay.<br />
Deadspace entry point guards:<br />
4 Armed <strong>Amarr</strong> Repair Ships (frigate)<br />
Notes/hints: When engaging the repair ships you will receive the following message:<br />
“What are you doing? We’re just here to repair a loose circuit board!”<br />
After a successful attempt using a Codebreaker module on the Communications Array structure the<br />
mission is completed. No need to pick up anything.<br />
Debriefing: Yes, we are receiving the data stream now.<br />
Mission: Previous, Overview, Next
Mission name: A Human Body<br />
Agent name: Krethar Mann<br />
Mission type: Encounter<br />
Mission briefing:<br />
Hello, Capsuleer. Rahsa spoke highly of your tracking skills. You should feel proud; his praise<br />
never came easily. And do not worry about Aralin Jick. He has not betrayed his blessed ideals. The<br />
Nation has had no influence over him for many years.<br />
Myself? I am not Sansha, though for the purpose of our business I speak for their interest. And do<br />
keep in mind it would do no good to run back to the authorities to turn me in. You will find we are<br />
quite untouchable.<br />
On to business. My associates are engaged in a certain project that you can contribute greatly to.<br />
What we require first is a supply of biomass. We cannot use standard clone-grade biomass; any<br />
common thug could acquire vats of that from the local medical station. We are looking for a<br />
variation known as “primordial biomass.” It is currently only used in controlled science labs for<br />
extremeophile research. I have the location of one such base.<br />
Head to this location. One of my ships will meet you at the acceleration gate. Head to the science<br />
facility and retrieve the primordial biomass. You may have to assault the facility directly. Once you<br />
have the biomass, return it to our ship at the entrance. When it has been transferred to the ship's<br />
cargo, I'll contact you with the next mission<br />
Objective: Obtain 1 Primordial Biomass (1.0 m3) and place it in the cargo bay of the Business<br />
Associate vessel which you will encounter at the entrance stage of the deadspace complex.<br />
Deadspace entry point guards:<br />
None.<br />
Notes/hints: The Business Associate vessel, in which you are supposed to place the Primordial<br />
Biomass, is located at this stage.<br />
Deadspace stage 1 guards:<br />
None.<br />
Reinforcement wave 1:<br />
4 ┬ Imperial Bahir (frigate)<br />
└ Imperial Sixtus (frigate)<br />
Reinforcement wave 2:<br />
1 Imperial Templar Mathura (cruiser)<br />
0-1 Imperial Felix (frigate)<br />
2-3 Imperial Paladin (frigate)<br />
Reinforcement wave 3:<br />
1 Divine Imperial Felix (frigate)<br />
1 Divine Imperial Nabih (frigate)
Notes/hints: There are two <strong>Amarr</strong> Advanced Research Lab structures located at this stage.<br />
Attacking one of them will trigger reinforcement wave 1. The following reinforcement waves will<br />
arrive when the previous one has been completely destroyed. Damaging the <strong>Amarr</strong> Advanced<br />
Research Lab structures further will make a container appear with the Primordial Biomass.<br />
There is an acceleration gate at this stage leading back to the entry stage.<br />
Debriefing: Splendid. My associates will be very pleased to hear of your excellence.<br />
Mission: Previous, Overview, Next
Mission name: A Metal Mind<br />
Agent name: Krethar Mann<br />
Mission type: Encounter<br />
Mission briefing:<br />
Well, well, our friend at the MIO has been busy. We had assumed the authorities would have lost<br />
interest with the death of Rahsa, but they have proven persistent in assaulting the remaining Sansha<br />
forces.<br />
A very important flotilla was recently destroyed <strong>by</strong> the <strong>Amarr</strong>. This particular group was carrying a<br />
very important component to our plan; a command signal receiver. This is a very specialized and<br />
controlled piece of Nation hardware. Only a rare few Sansha are implanted with one, and upon a<br />
Slave‟s death the device self-destructs. A number of very taught strings had to be pulled to procure<br />
this device, and we do not want the <strong>Amarr</strong> to study the device in any detail.<br />
This is the battle site. You will find the Sansha ships already destroyed, but the MIO ships are still<br />
surveying the wreckage. Eliminate the <strong>Amarr</strong> ships and find the command signal receiver. When<br />
the <strong>Amarr</strong> ships have been cleared, I will send one of my ships to pick up the device, same as<br />
before.<br />
I do so enjoy the ironies of life.<br />
Objective: Obtain 1 Sansha Commander Signal Reciever (1.0 m3) and place it in the cargo bay of<br />
the Business Associate vessel.<br />
Deadspace entry point guards:<br />
4-5 ┬ Imperial Templar Forian (frigate)<br />
└ Imperial Templar Paladin (frigate)<br />
Reinforcement wave 1:<br />
1 Imperial Templar Agatho (cruiser)<br />
2 ┬ Divine Imperial Felix (frigate)<br />
└ Divine Imperial Nabih (frigate)<br />
Reinforcement wave 2:<br />
3 ┬ Imperial Felix (frigate)<br />
└ Imperial Paladin (frigate)<br />
Notes/hints: When attacking the initial guard group you will receive the following message from<br />
the agent Kandus Sandar:<br />
“I don’t know who you are, but this is an MIO action. You’d do best to not interfere.”<br />
Destroying the last ship of the initial group will make it drop the Sansha Commander Signal<br />
Receiver and trigger reinforcement wave 1. Reinforcement wave 2 and 3 appear when the previous<br />
group has been completely destroyed. After the destruction of all ships in reinforcement wave 3 the<br />
Business Associate will appear. Place the signal reciever in this vessel and it will disappear. By<br />
doing that, you will receive the following message from the agent Kandus Sandar:<br />
“I’ll find out who you are, traitor.”
Debriefing: We‟re one step closer to completing our project. More than that, you have earned my<br />
associate‟s trust<br />
Mission: Previous, Overview, Next
Mission name: Aiding an Investigator<br />
Mission type: Courier<br />
Mission briefing:<br />
Greetings, pilot. Her Majesty‟s Ministry of Internal Order wants your aid.<br />
My fellow agent, Kandus Sandar, is currently investigating Sansha activity in Kor-Azor, more<br />
specifically in the Miyan territories. Are you willing to lend help to his investigation?<br />
Objective: Report to given agent.<br />
Notes/hints: This is the starter mission of the arc.<br />
Mission: Overview, Next
Mission name: An Unfortunate End<br />
Agent name: Aralin Jick<br />
Mission type: Courier<br />
Mission briefing:<br />
You must inform Riff Hebian of Harkan‟s demise. He was very fond of the man, so he should be<br />
informed personally.<br />
Objective: Contact given agent.<br />
Notes/hints: None.<br />
Mission: Previous, Overview, Next
Mission name: Aralin Jick<br />
Agent name: Kandus Sandar<br />
Mission type: Courier<br />
Mission briefing:<br />
We need to get to the bottom of this. Those <strong>Amarr</strong> ships came from somewhere and someone.<br />
I can‟t do the legwork myself. My MIO clearance can open a lot of doors, but there‟s too much red<br />
tape for me to jump through. You, however, can do what I can‟t. You can break this thing wide<br />
open.<br />
You need to talk to someone with both a knowledge of the Sansha and local connections. Luckily, I<br />
have just such a contact: Aralin Jick.<br />
Objective: Report to given agent.<br />
Notes/hints: None.<br />
Mission: Previous, Overview, Next
Mission name: Ascending Nobles<br />
Agent name: Aralin Jick<br />
Mission type: Encounter<br />
Mission briefing:<br />
With the destruction of the mercenary camp, Lord Manik is denying he ever had any contact with<br />
them. I have a copy of your ship‟s logs from their meeting, but it may prove difficult to pin him<br />
with any conspiracy charges.<br />
Good thing I‟ve got a new lead. Remember Lord Darabi, Miyan‟s rival and the new target of<br />
Jariza‟s wooing? His daughter, Mina, has been one of my contacts. Mina says she has key<br />
information, but she will only tell me in person.<br />
This is where the fun part comes in. Daddy Darabi has kept Mina under tight surveillance because<br />
of a scandal that happened a few years ago. Thus, we have to stage a kidnapping. This is going to<br />
get bloody, but I trust Mina when she says her information is worth it.<br />
Fly to the Darabi estate where Mina is being kept and “kidnap” Mina Darabi. Any guards are<br />
expendable.<br />
Objective: Bring 1 Mina Darabi (1.0 m3) to agent.<br />
Deadspace stage 1 guards:<br />
5 ┬ Independent Veteran Abaddon (battleship)<br />
├ Independent Veteran Apocalypse (battleship)<br />
└ Independent Veteran Armageddon (battleship)<br />
2 <strong>Amarr</strong> Cruise Missile Battery (missile battery) 55000 ISK<br />
2 <strong>Amarr</strong> Light Missile Battery (missile battery) 25000 ISK<br />
Reinforcement wave 1:<br />
8 ┬ Independent Veteran Augoror (cruiser)<br />
├ Independent Veteran Arbitrator (cruiser)<br />
├ Independent Veteran Maller (cruiser)<br />
└ Independent Veteran Omen (cruiser)<br />
Reinforcement wave 2:<br />
7 ┬ Independent Green-Crewed Abaddon (battleship)<br />
├ Independent Green-Crewed Apocalypse (battleship)<br />
└ Independent Green-Crewed Armageddon (battleship)<br />
Reinforcement wave 3:<br />
6 ┬ Independent Abaddon (battleship)<br />
├ Independent Apocalypse (battleship)<br />
└ Independent Armageddon (battleship)<br />
Notes/hints: The Independent Veteran battleships can deliver a lot of damage if they get close.<br />
Further, the Veteran cruisers have all energy drain capacities. Caution is advised. Each<br />
reinforcement wave is triggered <strong>by</strong> the total destruction of the previous group.
When warping to the stage you will receive the following message from Mina Darabi:<br />
“I can’t leave until my father’s guards are destroyed. Don’t worry, I’ve sabotaged their<br />
transponder reader. You won’t be blamed for any violence here.”<br />
After destroying the last reinforcement wave, a structure called Cargo Container will appear and<br />
you will receive the following message from Mina Darabi:<br />
“Now’s your chance. I’ve ejected into a cargo container. Quickly, pick me up before my father<br />
sends more forces.”<br />
Pick up Mina Darabi from the structure and deliver her to the agent to complete the mission.<br />
Debriefing: If everything Mina says is true, then we‟re not going to blow this case wide open.<br />
We‟re going to blow it up.<br />
Mission: Previous, Overview, Next
Mission name: Background Check<br />
Agent name: Aralin Jick<br />
Mission type: Encounter<br />
Mission briefing:<br />
Sansha‟s Nation is targeting Touraj Miyan. Why? Miyan is a fool, yes, but the Sansha are unlikely<br />
to care about an ineffective noble. The other holders, however, are sharks. They can smell<br />
weakness. Miyan already lost half of his domains back in YC 110. The Holders are just circling,<br />
waiting for their chance to take another bite.<br />
If it wasn‟t for the effort of Lord Miyan‟s staff, he‟d be dead already. His current security chief,<br />
Riff Hebian, is a smart but skeptical man, and difficult to sway. Head over to Miyan‟s manor and<br />
convince Hebian that the Sansha are targeting Miyan directly. His help and trust would be<br />
invaluable.<br />
Objective: Destroy all guards.<br />
Deadspace entry point guards:<br />
None<br />
Reinforcement wave 1:<br />
2 ┬ Centus Tyrant (battleship) 1218750 ISK<br />
└ Centus Dread Lord (battleship) 1162500 ISK<br />
2-3 ┬ Centum Loyal Hellhound (cruiser) 281250 ISK<br />
├ Centum Loyal Torturer (cruiser) 258750 ISK<br />
└ Centum Loyal Mutilator (cruiser) 247500 ISK<br />
Reinforcement wave 2:<br />
2 ┬ Centatis Devil (battlecruiser) 142500 ISK<br />
└ Centatis Wraith (battlecruiser) 138750 ISK<br />
Reinforcement wave 3:<br />
3 ┬ Centii Loyal Minion (frigate) 19125 ISK<br />
└ Centii Loyal Servant (frigate) 18000 ISK<br />
Reinforcement wave 4:<br />
2-3 ┬ Centus Tyrant (battleship) 1218750 ISK<br />
└ Centus Dread Lord (battleship) 1162500 ISK<br />
2-3 ┬ Centum Loyal Torturer (cruiser) 258750 ISK<br />
└ Centum Loyal Mutilator (cruiser) 247500 ISK<br />
Reinforcement wave 5:<br />
2-3 Centatis Devil (battlecruiser) 142500 ISK<br />
Reinforcement wave 6:<br />
3 ┬ Centus Tyrant (battleship) 1218750 ISK<br />
└ Centus Dread Lord (battleship) 1162500 ISK<br />
2-3 ┬ Centum Loyal Hellhound (cruiser) 281250 ISK<br />
├ Centum Loyal Torturer (cruiser) 258750 ISK
└ Centum Loyal Mutilator (cruiser) 247500 ISK<br />
Reinforcement wave 7:<br />
2-3 ┬ Centatis Devil (battlecruiser) 142500 ISK<br />
└ Centatis Wraith (battlecruiser) 138750 ISK<br />
Reinforcement wave 8:<br />
1-2 Centii Loyal Minion (frigate) 19125 ISK<br />
Notes/hints:<br />
Reinforcement wave 2 arrives when any of the ships in reinforcement wave 1 is damaged.<br />
Reinforcement wave 3 arrives when any of the ships in reinforcement wave 2 is damaged.<br />
Reinforcement wave 4 arrives when all of the ships in reinforcement wave 1 are destroyed.<br />
Reinforcement wave 5 arrives when any of the ships in reinforcement wave 4 is damaged.<br />
Reinforcement wave 6 arrives when all of the ships in reinforcement wave 4 are destroyed.<br />
Reinforcement wave 7 arrives when any of the ships in reinforcement wave 6 is damaged.<br />
Reinforcement wave 8 arrives when any of the ships in reinforcement wave 5 is damaged.<br />
The Centii Loyal Minions and Servants might web and warp scramble your ship.<br />
After warping to the location you will receive the following message from the agent Riff Hebian:<br />
“Did Jick send you? I told him that those were just isolated incidents. If the Sansha were targeting<br />
Lord Miyan, I think I’d know about it.”<br />
Shortly after an explosion ravages the Miyan‟s Vacation Outpost structure and the first<br />
reinforcement wave enters the stage. You then receive the following message from Riff Hebian:<br />
“What the hell?”<br />
After destroying all ships in reinforcement wave 6 the mission is marked as complete and you will<br />
receive the following message from the agent Riff Hebian:<br />
“Fine. Jick has my support. But if I find out this is a trick, you will think the Empress herself<br />
slapped you down.”<br />
Debriefing: The Sansha attacked? The Empress‟ grace is upon us, friend. If we weren‟t going to<br />
kill every one of them, I‟d give whoever ordered that Sansha attack a medal.<br />
Mission: Previous, Overview, Next
Mission name: Cowardly Commander<br />
Agent name: Kandus Sandar<br />
Mission type: Encounter<br />
Mission briefing:<br />
Okay, we have his location. Follow the bookmark and take him down.<br />
You handle the commander. I‟ll figure out how the Sansha are getting past our defences.<br />
Objective: Destroy all guards.<br />
Deadspace entry point guards:<br />
1 Sansha Commander (battleship) 1218750 ISK<br />
3-4 ┬ Centus Beast Lord (battleship) 768750 ISK<br />
└ Centus Plague Lord (battleship) 712500 ISK<br />
4 ┬ Centii Loyal Ravener (frigate) 21375 ISK<br />
├ Centii Loyal Scavenger (frigate) 20250 ISK<br />
└ Centii Loyal Servant (frigate) 18000 ISK<br />
2 Tower Sentry Sansha III (sentry gun) 70000 ISK<br />
Reinforcement wave 1:<br />
3-4 ┬ Centus Dark Lord (battleship) 993750 ISK<br />
└ Centus Overlord (battleship) 881250 ISK<br />
3- 4 ┬ Centii Loyal Butcher (frigate) 28125 ISK<br />
├ Centii Loyal Manslayer (frigate) 27000 ISK<br />
├ Centii Loyal Plague (frigate) 25875 ISK<br />
└ Centii Loyal Enslaver (frigate) 24750 ISK<br />
Notes/hints: The Centii Loyal Raveners and Scavengers might web and warp scramble your ship.<br />
The reinforcement wave is triggered <strong>by</strong> the total destruction of the initial group. The Sansha<br />
Commander disappears a few seconds after you enter the stage.<br />
Deadspace stage 1 guards:<br />
1 Sansha Commander (battleship) 1218750 ISK<br />
3 ┬ Centus Dark Lord (battleship) 993750 ISK<br />
└ Centus Overlord (battleship) 881250 ISK<br />
3-4 ┬ Centii Loyal Slavehunter (frigate) 23625 ISK<br />
└ Centii Loyal Savage (frigate) 22500 ISK<br />
2 Sansha Energy Neutralizer Sentry I (energy neutralizer tower)<br />
2 Tower Sentry Sansha III (sentry gun) 70000 ISK<br />
Reinforcement wave 1:<br />
3-4 ┬ Centus Beast Lord (battleship) 768750 ISK<br />
└ Centus Plague Lord (battleship) 712500 ISK<br />
3 ┬ Centatis Daemon (battlecruiser) 146250 ISK<br />
├ Centatis Specter (battlecruiser) 135000 ISK<br />
└ Centatis Phantasm (battlecruiser) 131250 ISK
Notes/hints: The reinforcement wave is triggered <strong>by</strong> the total destruction of the initial group. The<br />
Sansha Commander disappears a few seconds after you enter the stage.<br />
Deadspace stage 2 guards:<br />
1 Sansha Commander (battleship) 1218750 ISK<br />
4 ┬ Centus Beast Lord (battleship) 768750 ISK<br />
└ Centus Plague Lord (battleship) 712500 ISK<br />
3-4 Centatis Behemoth (battlecruiser) 153750 ISK<br />
3 ┬ Centum Loyal Hellhound (cruiser) 281250 ISK<br />
├ Centum Loyal Fiend (cruiser) 270000 ISK<br />
└ Centum Loyal Torturer (cruiser) 258750 ISK<br />
3-4 ┬ Centii Loyal Minion (frigate) 19125 ISK<br />
└ Centii Loyal Servant (frigate) 18000 ISK<br />
1 Sansha Energy Neutralizer Sentry II (energy neutralizer tower)<br />
2 Tower Sentry Sansha III (sentry gun) 70000 ISK<br />
Reinforcement wave 1:<br />
3-4 ┬ Centus Dark Lord (battleship) 993750 ISK<br />
└ Centus Overlord (battleship) 881250 ISK<br />
2-4 ┬ Centii Loyal Butcher (frigate) 28125 ISK<br />
├ Centii Loyal Manslayer (frigate) 27000 ISK<br />
└ Centii Loyal Enslaver (frigate) 24750 ISK<br />
Reinforcement wave 2:<br />
3-4 ┬ Centus Tyrant (battleship) 1218750 ISK<br />
└ Centus Dread Lord (battleship) 1162500 ISK<br />
3-4 ┬ Centii Loyal Minion (frigate) 19125 ISK<br />
└ Centii Loyal Servant (frigate) 18000 ISK<br />
Notes/hints: The Centii Loyal Servants and Minions might web and warp scramble your ship.<br />
Reinforcement wave 1 is triggered <strong>by</strong> the total destruction of all battlecruisers in the initial group.<br />
Reinforcement wave 2 is triggered <strong>by</strong> the total destruction of all cruisers in the initial group. The<br />
Sansha Commander disappears a few seconds after you enter the stage.<br />
Deadspace stage 3 guards:<br />
3 ┬ Imperial Dominator (battleship)<br />
└ Imperial Martyr (battleship)<br />
3 ┬ Imperial Templar Donus (cruiser)<br />
└ Imperial Templar Tamir (cruiser)<br />
2 ┬ Divine Imperial Imran (frigate)<br />
└ Divine Imperial Sixtus (frigate)<br />
Reinforcement wave 1:<br />
2 ┬ Imperial Templar Dominator (battleship)<br />
└ Imperial Martyr (battleship)<br />
5 ┬ Imperial Templar Torah (battleship)<br />
├ Imperial Templar Ultara (battleship)<br />
└ Imperial Ultara (battleship)
2 ┬ Imperial Champion (battlecruiser)<br />
└ Imperial Templar Justicar (battlecruiser)<br />
3 ┬ Divine Imperial Tamir (cruiser)<br />
└ Divine Imperial Wrath (cruiser)<br />
3 Divine Imperial Valok (frigate)<br />
Reinforcement wave 2:<br />
2 Imperial Templar Martyr (battleship)<br />
2 Imperial Templar Phalanx (battlecruiser)<br />
3 ┬ Imperial Templar Caius (destroyer)<br />
└ Imperial Templar Crusader (destroyer)<br />
Notes/hints: The Divine Imperial Sixtus‟ might web and wrap scramble your ship. Destroying one<br />
of the Imperial Dominators will trigger spawning of reinforcement wave 1 and destroying one of<br />
the Imperial Templar Dominators will trigger spawning of reinforcement wave 2. Destroying the<br />
last wave completes the mission.<br />
Debriefing: I can‟t believe the commander got away again! Who was flying those <strong>Amarr</strong> ships?<br />
And where did that gate come from?<br />
Mission: Previous, Overview, Next
Mission name: Falling into Place<br />
Agent name: Aralin Jick<br />
Mission type: Encounter<br />
Mission briefing:<br />
Hang on just a second. They must have changed socket sizes…<br />
There. I present you one decoy Rahsa. Not a bad piece of work, if I do say so myself. Whoever<br />
Rahsa‟s friends were, they‟re properly looking for our departed Sansha right now. This device will<br />
mimic Rahsa‟s personal frequency: Just plug it into a broadcast tower and you‟ve gotten yourself an<br />
escapee Rahsa. Or the next best thing.<br />
There‟s the perfect broadcast tower in Shaha. Place the homemade Sansha beacon in the tower, and<br />
then wait to see if “rescue” arrives. Then blow them out of the sky.<br />
Objective: Destroy all guards.<br />
Deadspace entry point guards:<br />
None.<br />
Reinforcement wave 1:<br />
3-5 Independent Green-Crewed Apocalypse (battleship)<br />
4-5 Independent Green-Crewed Maller (cruiser)<br />
Notes/hints: Upon accepting this mission you are rewarded 1 Homemade Sansha Beacon (1.0 m3).<br />
When placing the beacon in the Linked Broadcast Array Hub structure you will receive the<br />
following message from the agent Aralin Jick:<br />
“Good. It’s sending out a strong signal. If there is someone looking for Rahsa, they’re going to pick<br />
this up real quick. I’d expect company soon.”<br />
A few seconds later the reinforcement group arrives.<br />
Debriefing: Harkan?! Terrus Harkan is the traitor? Harkan, former head of Lord Miyan‟s security<br />
and hero of the countless military campaigns, is the traitor?<br />
This is very bad.<br />
Mission: Previous, Overview, Next
Mission name: Fate of a Madman<br />
Agent name: Aralin Jick<br />
Mission type: Branch point<br />
Mission briefing:<br />
So this man, Rahsa Teff, was behind it all. Rahsa Teff was a native to this region and wanted Miyan<br />
out. He knew his Sansha buddies were attracting attention, so he used Jariza to pull funds from<br />
Darabi. Rahsa then gave the money to Manik to fund his little mercenary gang. Manik‟s build up<br />
was a distraction the whole time, as were the <strong>Amarr</strong> ships you encountered chasing Rahsa down.<br />
Now that we have Rahsa Teff in my custody, the question is what to do with him. We could keep<br />
him around for more questioning, but I‟d just as soon blow him out of the airlock. What do you<br />
think? Is his life worth it?<br />
Branch 1: Interrogation: Catching the Scent<br />
So Rahsa has something more to say? Give my people a few minutes alone with him…<br />
Branch 2: Silence Rahsa: The Nation’s Path<br />
You‟ve proven yourself to me time and again. Rahsa will be sent for sentencing immediately. I love<br />
it when systems work quickly.<br />
By the way, I got a message from a Krethar Mann. Seems your efforts have attracted her attention.<br />
Can‟t say I blame her. You did well. You‟ve again proven yourself a stalwart friend of the Empire.<br />
Krethar Mann is currently in her ship in Oguser you may want to try communicating with her<br />
remotely<br />
Notes/hints: None.<br />
Mission: Previous, Overview
Mission name: Hunting the Hunter<br />
Agent name: Aralin Jick<br />
Mission type: Encounter<br />
Mission briefing:<br />
Mina has quite a story to tell. Jariza has been courting Lord Darabi for some time. Jariza‟s been so<br />
good at winning Darabi‟s trust that Mina became suspicious. Mina proved an amazing spy: She‟s<br />
not only traced funds flowing from Darabi to Jariza, but she also found an interesting<br />
communication from one Rahsa Teff.<br />
Rahsa Teff is a know felon and former Blood Raider. The MIO lost track of him a year ago. Rumor<br />
was another pirate group poached him. It sounds as if the rumor is true. Not only is Rahsa Teff with<br />
the Sansha, but you met him already. He‟s the Sansha commander who kept eluding us.<br />
I‟ve traced the source of Rahsa‟s message. We know where he and the Sansha are located. Let‟s end<br />
this. Eliminate the Sansha base, and capture Rahsa Teff.<br />
Once you eliminate the base, the Sansha will be without at central hub in this region.<br />
Objective: Provide 1 Rahsa, Sansha Commander (1.0 m3) to agent.<br />
Deadspace entry point guards:<br />
3 ┬ Centus Dread Lord (battleship) 1162500 ISK<br />
└ Centus Dark Lord (battleship) 993750 ISK<br />
6 ┬ Centum Loyal Fiend (cruiser) 270000 ISK<br />
└ Centum Loyal Hellhound (cruiser) 281250 ISK<br />
6 Sansha Heavy Missile Battery (missile battery) 40000 ISK<br />
Notes/hints: None.<br />
Deadspace stage 1 guards:<br />
4 ┬ Centus Dread Lord (battleship) 1162500 ISK<br />
└ Centus Tyrant (battleship) 1218750 ISK<br />
3 ┬ Centus Overlord (battleship) 881250 ISK<br />
├ Centus Beast Lord (battleship) 768750 ISK<br />
└ Centus Savage Lord (battleship) 543750 ISK<br />
4 ┬ Centatis Daemon (battlecruiser) 146250 ISK<br />
└ Centatis Devil (battlecruiser) 142500 ISK<br />
3 ┬ Centum Loyal Torturer (cruiser) 258750 ISK<br />
└ Centum Loyal Mutilator (cruiser) 247500 ISK<br />
1 Centii Loyal Savage (frigate) 22500 ISK<br />
1 Centii Loyal Slavehunter (frigate) 23625 ISK<br />
1 Sansha Energy Neutralizer Sentry I (energy neutralizer tower)<br />
2 Tower Sentry Sansha III (sentry gun) 70000 ISK<br />
Reinforcement wave 1:<br />
3 ┬ Centus Beast Lord (battleship) 768750 ISK<br />
└ Centus Plague Lord (battleship) 712500 ISK<br />
3 ┬ Centii Loyal Butcher (frigate) 28125 ISK
└ Centii Loyal Enslaver (frigate) 24750 ISK<br />
Reinforcement wave 2:<br />
3 ┬ Centum Loyal Execrator (cruiser) 236250 ISK<br />
└ Centum Loyal Slaughterer (cruiser) 225000 ISK<br />
Notes/hints: Reinforcement wave 1 is triggered upon destruction of all Centus Dread Lord and<br />
Tyrant battleships from the initial group. Reinforcement wave 2 is triggered upon destruction of all<br />
Centatis Daemon and Devil battlecruisers from the initial group.<br />
You cannot use the acceleration to the next stage before destroying the Sansha Battletower<br />
structure. After destroying it you will receive the following message from your ships computer:<br />
”I've detected an energy surge from the near<strong>by</strong> acceleration gate. If I were a sentient being with<br />
rights, I'd wager our friend Rahsa escaped in a cloaked ship before the station exploded. Lucky for<br />
us it appears he forgot to lock the gate behind him. I suggest we give chase.”<br />
Deadspace stage 2 guards:<br />
Rahsa (battleship) 1218750 ISK<br />
Notes/hints: After destroying Rahsa‟s battleship he sends you the following message:<br />
“Well, you're quite the formidable one, aren't you? I have a proposal for you.<br />
When you report back to your agent, tell him that you've destroyed my forces, and that I should be<br />
executed. Yes, I'm a capsuleer too, but he doesn't need to know that. Do this and I'll make sure you<br />
get introduced to one of my friends. The Nation treats its friends well.”<br />
Debriefing: You‟ve eliminated the Sansha base? Excellent!<br />
Now the question remains: What do we do with Rahsa Teff?<br />
Mission: Previous, Overview, Next
Mission name: Interrogation: Catching the Scent<br />
Agent name: Aralin Jick<br />
Mission type: Encounter<br />
Mission briefing:<br />
So Rahsa has something more to say? Give my people a few minutes alone with him… ah, there‟s a<br />
message coming now.<br />
Hm. I‟ll be damned. You were right. Someone else was working with him. He managed to activate<br />
some sort of suicide short in his socket before we got a name out of him. Too bad for him he‟s still<br />
useful to us.<br />
What I need right now is a Sasha command signal receiver. They‟re found on Sansha ships to keep<br />
the crew going. And I know where some survivors of your last attack are right now. Eliminate these<br />
stragglers, and I‟m sure you‟ll find a command signal retriever among them.<br />
Objective: Destroy all guards and provide 1 Sansha Command Signal Reciever (1.0 m3) to agent.<br />
Deadspace entry point guards:<br />
6 Sansha Stragglers (battleship) 993750/881250 ISK<br />
5 Sansha Stragglers (cruiser) 74063/68438 ISK<br />
3 Sansha Stragglers (frigate) 23625/22500 ISK<br />
Reinforcement wave 1:<br />
4 Sansha Stragglers (cruiser) 79688/76875 ISK<br />
Reinforcement wave 2:<br />
3 Sansha Stragglers (cruiser) 258750/247500 ISK<br />
Reinforcement wave 3:<br />
2 Sansha Stragglers (cruiser) 270000 ISK<br />
Reinforcement wave 4:<br />
5 Sansha Stragglers (battleship) 1162500/993750 ISK<br />
Reinforcement wave 5:<br />
4 Sansha Stragglers (battleship) 1218750/1162500 ISK<br />
Reinforcement wave 6:<br />
3 Sansha Stragglers (battleship) 1218750 ISK<br />
Notes/hints: Destroying all cruiser type ships of the initial group triggers reinforcement wave 1.<br />
Destroying all ships of reinforcement wave 1 triggers reinforcement wave 2. Destroying all ships of<br />
reinforcement wave 2 triggers reinforcement wave 3. Destroying all battleship type ships of the<br />
initial group triggers reinforcement wave 4. Destroying all ships of reinforcement wave 4 triggers<br />
reinforcement wave 5. Destroying all ships of reinforcement wave 5 triggers reinforcement wave 6.<br />
The signal reciever is dropped <strong>by</strong> the last ship of reinforcement wave 4.
Mission: Previous, Overview, Next
Mission name: Languishing Lord<br />
Agent name: Aralin Jick<br />
Mission type: Encounter<br />
Mission briefing:<br />
I have a few contacts in Lord Darabi‟s territory. Maybe something will turn up with this Jariza<br />
connection, but I doubt it.<br />
I‟ve learned of a more pressing lead for you. Remember those <strong>Amarr</strong> ships you ran into? It seems<br />
that one Lord Manik has been shopping around for mercenaries.<br />
I‟m giving you the meeting location I found while innocently perusing Manik‟s records. There<br />
should be a mercenary contact. You‟re going to find out who they are, and then we‟re going to wipe<br />
them out. I‟ll have more instructions when you reach the site.<br />
Objective: Spy on the ships during their meeting.<br />
Deadspace entry point guards:<br />
None.<br />
Reinforcement wave 1:<br />
Lord Manik‟s Ship (battleship)<br />
Reinforcement wave 2:<br />
The Contact (battleship)<br />
Notes/hints: When arriving at the stage you will receive the following message from the agent<br />
Aralin Jick:<br />
“There should be a cloudy asteroid belt near<strong>by</strong>. Fly to the center of the belt, next to the crystal<br />
asteroid. It should prove a good hiding spot.”<br />
After flying close to the structure called Broken Metallic Crystal Asteroid you will receive the<br />
following message from Aralin Jick:<br />
“Good. You’re in position. Now just wait here for the target to arrive. Wait for their meeting to end,<br />
and for both parties to leave. I’ll trace the contact’s exit vector, leading us to their base.”<br />
Shortly after the first reinforcement wave appear, followed <strong>by</strong> the second wave a few seconds after.<br />
The guards linger around for a very short time before both disappearing again and the mission is<br />
marked as complete.<br />
Debriefing: I‟ve got a lock on the contact. I know where he‟s going.<br />
Mission: Previous, Overview, Next
Mission name: Late Reports<br />
Agent name: Kandus Sandar<br />
Mission type: Encounter<br />
Mission briefing:<br />
Ah, a capsuleer, are you? Fortunate.<br />
I am Kandus Sandar, the Ministry of Internal Order officer in charge of Pirate Affairs in this area.<br />
Under normal circumstances, I would send you to one of our many agents for proper work, but I<br />
have a special task for you.<br />
I am waiting for one of my investigators. He is now several hours overdue in delivering his reports.<br />
I need someone to fly out to his last known location. Despite whatever you may find there, I need<br />
those reports.<br />
I would fly out there, but a capsuleer like yourself will have less trouble should you encounter any<br />
complications. Plus, if you do encounter danger, you at least have a pod to save you. I do not have<br />
that luxury.<br />
I have uploaded the location of the last communiqué to your NeoCom. Head over there<br />
immediately. I cannot have more delays.<br />
Objective: Provide 1 Reports (0.1 m3) to agent.<br />
Deadspace entry point guards:<br />
3-4 ┬ Centus Savage Lord (battleship) 543750 ISK<br />
└ Centus Mutant Lord (battleship) 487500 ISK<br />
3-4 ┬ Centii Loyal Ravener (frigate) 21375 ISK<br />
├ Centii Loyal Scavenger (frigate) 20250 ISK<br />
└ Centii Loyal Minion (frigate) 19125 ISK<br />
Reinforcement wave 1:<br />
3 ┬ Centus Beast Lord (battleship) 768750 ISK<br />
└ Centus Plague Lord (battleship) 712500 ISK<br />
3 ┬ Centum Loyal Execrator (cruiser) 236250 ISK<br />
├ Centum Loyal Slaughterer (cruiser) 225000 ISK<br />
├ Centum Loyal Juggernaut (cruiser) 213750 ISK<br />
└ Centum Loyal Beast (cruiser) 202500 ISK<br />
Reinforcement wave 2:<br />
3-4 ┬ Centus Dark Lord (battleship) 993750 ISK<br />
└ Centus Overlord (battleship) 881250 ISK<br />
3-4 ┬ Centii Loyal Butcher (frigate) 28125 ISK<br />
├ Centii Loyal Manslayer (frigate) 27000 ISK<br />
└ Centii Loyal Plague (frigate) 25875 ISK<br />
Notes/hints: The Loyal Scavengers, Raveners and Minions might web and warp scramble your<br />
ship. Each reinforcement wave is triggered <strong>by</strong> the total destruction of the previous group. The last<br />
ship destroyed drops the reports.
Upon warping to the location you will receive the following message:<br />
“As you come upon the battle sight, you immediately see why the previous investigator was so late.<br />
His ship has been reduced to wreckage. The Sansha's Nation ships responsible are picking it over.<br />
Eliminate the Sansha ships and retrieve the investigator's reports they surely salvaged.”<br />
Debriefing: A Sansha ambush is disturbing. The Sansha that frequent this region are usually<br />
nothing more than rampaging drones, salvaging for parts and human life wherever they can find it.<br />
But an attack on my investigator implies purpose.<br />
Mission: Previous, Overview, Next
Mission name: Longing Leman<br />
Agent name: Aralin Jick<br />
Mission type: Encounter<br />
Mission briefing:<br />
Touraj Miyan has a lot of people who hate him. They want him dead, want his land, or just want to<br />
embarrass him. Some of these people are more powerful than others. It will take a while to<br />
investigate them all.<br />
First up is Lady Temari Jariza. Among Holders, she‟s a nobody. She doesn‟t even technically own<br />
any land holdings, just a small, floating citadel in Amdonen granted to her five-times-great<br />
grandfather for exceptional service putting down a rebellion.<br />
Unlike her ancestors, Lady Jariza actually has ambitions. Unfortunately for her, she‟s not taken very<br />
seriously. She‟s attempted to improve her standing through most of the common channels, ranging<br />
from patronage to marriage. She‟s even tried to court Lord Miyan numerous times, but she has thus<br />
far been unsuccessful. It‟s for this reason that she‟s on the suspect list. She has motive, but I need to<br />
know if she‟s had the means and opportunity.<br />
I need you to hack the encrypted communications array in her territory. This should provide you<br />
with logs of all the communications and transactions in recent weeks. Bring these logs back to me.<br />
Lady Jariza may be a minor noble, but she can still afford a small army. Don‟t mess with her guards<br />
directly unless you want a needless fight on your neck.<br />
Objective: Provide 1 Communications Logs (0.1 m3) to agent.<br />
Deadspace entry point guards:<br />
3 Imperial Templar Diviner (battleship)<br />
3-4 Imperial Templar Judgment (battleship)<br />
6 Imperial Templar Phalanx (battlecruiser)<br />
4 ┬ Divine Imperial Imran (frigate)<br />
└ Divine Imperial Sixtus (frigate)<br />
5 Outpost Defender (fighter)<br />
Notes/hints: The guards are about 100 km away from the stage entry point and will not aggress<br />
unless you get too close, and in that case the Divine Imperial Sixtus might web and wrap scramble<br />
your ship. The Communication Logs is found inside the Encrypted Communications Array<br />
structure, which required a successful attempt with a Codebreaker module to access. Upon success<br />
you will receive the following message from the agent Aralin Jick:<br />
“That’s it. Bring back the records and we’ll see what Lady Jariza has been up to.”<br />
Debriefing: Let me look over these logs.<br />
Strange. There‟s a lot of chatter between Lady Jariza and Lord Darabi, another local Holder. Been a<br />
lot of money transactions from him, too. Although Lord Darabi is a rival of Miyan, there‟s nothing<br />
here that appears sinister. Most likely Lady Jariza has merely given up on courting Miyan and is<br />
trying for the next titled family.
Mission: Previous, Overview, Next
Mission name: Making an Arrest<br />
Agent name: Aralin Jick<br />
Mission type: Encounter<br />
Mission briefing:<br />
Harkan must be dealt with immediately. His knowledge of Kor-Azor security and security codes<br />
make him a serious threat. I‟ll contact Kandus Sandar to get the MIO moving. Right now you need<br />
to arrest Harkan. He was granted a small fief upon his retirement. You have a good chance of<br />
catching him there.<br />
Be careful on this. Harkan has certainly already learned about the Rahsa trap. He is a skilled<br />
military commander and will most likely not go down without a fight.<br />
Objective: Attempt to arrest Terrus Harkan.<br />
Deadspace entry point guards:<br />
None.<br />
Notes/hints:<br />
When you arrive at the stage you will receive the following message from Terrus Harkan:<br />
“I was curious when the authorities would arrive. Very well, if you’ll be so kind to approach my<br />
estate, I’ll surrender peacefully.”<br />
After approaching within 28 km of the Harkan‟s Manor structures they both explode and the<br />
mission is flagged as completed.<br />
Debriefing: No! We were so close.<br />
He knew we were coming for him. By killing himself before we could make an arrest, he‟s<br />
effectively secured his legacy before it could be tarnished. No one will sully the name of a dead<br />
hero, guilty or not.<br />
Mission: Previous, Overview, Next
Mission name: Panic Response<br />
Agent name: Riff Hebian<br />
Mission type: Encounter<br />
Mission briefing:<br />
I have to apologize to you for my skepticism of your aims earlier. We‟ve been increasing our<br />
security since the attack on Miyan‟s manor. But we never imagined one of our own was a threat.<br />
You have to understand that many of us has nothing but reverence for the Commodore. To find out<br />
he was a traitor…<br />
But he‟s gone. The task of judgment is out of our hands now.<br />
Only one task remains. With the destruction of their base and the deaths of Rahsa and now Harkan,<br />
the remaining Sansha are panicking. They‟re throwing a last ditch assault at one of Miyan‟s<br />
facilities. Lord Miyan himself is perfectly safe. Per our heightened security measures, I‟ve sent him<br />
to a hidden safe house far from here.<br />
The Sansha attacked my Lord and corrupted my predecessor. Annihilate them.<br />
Objective: Destroy all guards<br />
Deadspace entry point guards:<br />
1 Centus Tyrant (battleship) 1218750 ISK<br />
4 Centum Ravager (cruiser) 43125 ISK<br />
4 Centii Minion (frigate) 3750 ISK<br />
Reinforcement wave 1:<br />
4 <strong>Amarr</strong> Battery (missile battery) 55000 ISK<br />
1 <strong>Amarr</strong> Energy Neutralizer Sentry III (energy neutralizer sentry)<br />
1 <strong>Amarr</strong> Stasis Tower (stasis tower) 35000 ISK<br />
Reinforcement wave 2:<br />
4 Centii Servant (frigate) 3000 ISK<br />
Reinforcement wave 3:<br />
4 Centum Ravisher (cruiser) 37500 ISK<br />
Notes/hints: When warping to the stage you will receive the following message from the agent Riff<br />
Hebian:<br />
“I’ve been tracking your progress. Be careful I’ve never known the Sansha to waste their forces on<br />
doomed missions like this”<br />
Reinforcement wave 1 appears slowly one unit at a time a minute after you have entered the stage.<br />
Destroying all frigate type of ships from the initial group will spawn a reinforcement wave 2 while<br />
destroying all cruiser type of ships from the initial group will spawn a reinforcement wave 3. Three<br />
minutes after entering the stage all hostile ships will suddenly disappear; all units from<br />
reinforcement wave 1 excluded. Destroying the <strong>Amarr</strong> Energy Neutralizer Sentry III will flag the<br />
mission as completed.
Debriefing: God damn him! It was all a ruse!<br />
Mission: Previous, Overview, Next
Mission name: Raging Sansha<br />
Agent name: Kandus Sandar<br />
Mission type: Encounter<br />
Mission briefing:<br />
This needs to be taken care of quickly, “name”. Another group of Sansha‟s Nation ships has<br />
launched an attack. This time, they targeted a slave convoy belonging to – take a guess – Lord<br />
Touraj Miyan.<br />
However, we‟ve got word that an unusual ship joined the Sansha in the attack. The transmission cut<br />
off before we could get concrete details on who or what it was, but I‟m willing to bet it‟s the<br />
commander of the bunch. The fleet is large, but should be a non-issue for a capsuleer.<br />
Stop the Sansha and their commander.<br />
Objective: Destroy all guards.<br />
Deadspace entry point guards:<br />
1 Sansha Commander (battleship) 1218750 ISK<br />
6-7 ┬ Centus Tyrant (battleship) 1218750 ISK<br />
├ Centus Dread Lord (battleship) 1162500 ISK<br />
└ Centus Dark Lord (battleship) 993750 ISK<br />
3-4 ┬ Centatis Devil (battlecruiser) 142500 ISK<br />
├ Centatis Wraith (battlecruiser) 138750 ISK<br />
└ Centatis Specter (battlecruiser) 135000 ISK<br />
3 ┬ Centum Loyal Hellhound (cruiser) 281250 ISK<br />
└ Centum Loyal Mutilator (cruiser) 247500 ISK<br />
2-3 ┬ Centum Juggernaut (cruiser) 51563 ISK<br />
└ Centum Beast (cruiser) 45938 ISK<br />
1 Centii Manslayer (frigate) 27000 ISK<br />
2-3 ┬ Centii Loyal Slavehunter (frigate) 23625 ISK<br />
└ Centii Loyal Savage (frigate) 22500 ISK<br />
3 Slave Transport (industrial)<br />
Reinforcement wave 1:<br />
2 Centatis Wraith (battlecruiser) 138750 ISK<br />
1 Centatis Specter (battlecruiser) 135000 ISK<br />
Reinforcement wave 2:<br />
2-3 ┬ Centum Loyal Execrator (cruiser) 236250 ISK<br />
└ Centum Loyal Slaughterer (cruiser) 225000 ISK<br />
3-4 ┬ Centii Loyal Plague (frigate) 25875 ISK<br />
├ Centii Loyal Enslaver (frigate) 24750 ISK<br />
└ Centii Loyal Minion (frigate) 19125 ISK<br />
2 Centii Loyal Servant (frigate) 18000 ISK<br />
Reinforcement wave 3:<br />
1 ┬ Centum Torturer (cruiser) 74063 ISK<br />
└ Centum Mutilator (cruiser) 68438 ISK
Reinforcement wave 4:<br />
1 ┬ Centus Beast Lord (battleship) 768750 ISK<br />
└ Centus Plague Lord (battleship) 712500 ISK<br />
2-3 ┬ Centum Loyal Hellhound (cruiser) 281250 ISK<br />
├ Centum Loyal Fiend (cruiser) 270000 ISK<br />
├ Centum Loyal Execrator (cruiser) 236250 ISK<br />
└ Centum Loyal Slaughterer (cruiser) 225000 ISK<br />
2 ┬ Centii Loyal Plague (frigate) 25875 ISK<br />
└ Centii Loyal Enslaver (frigate) 24750 ISK<br />
Notes/hints: The Loyal Servants might web and warp scramble your ship. The Sansha Commander<br />
battleship will disappear after having sustained minor damage. The Slave Transport ships are<br />
neutral and will not aggress unless fired upon. Reinforcement wave 1 is triggered <strong>by</strong> damaging the<br />
Sansha Commander. Reinforcement wave 2 is triggered <strong>by</strong> the destruction of all frigates from the<br />
initial group. Reinforcement wave 3 is triggered <strong>by</strong> the destruction of Centii Loyal Servant frigates<br />
from reinforcement wave 2. Reinforcement wave 4 is triggered <strong>by</strong> the destruction of reinforcement<br />
wave 3.<br />
Debriefing: Good job, but it‟s not over yet. I‟ve got a lock on the commander that ran away.<br />
Mission: Previous, Overview, Next
Mission name: Razing the Outpost<br />
Agent name: Aralin Jick<br />
Mission type: Encounter<br />
Mission briefing:<br />
I‟m sending you the mercenary‟s coordinates. This should be the base they‟ve been operating out<br />
of. Wipe them out. Leave no opportunity to rebuild.<br />
They‟re not Sansha, but popping mercs will do in a pinch.<br />
Objective: Destroy all guards and the outpost.<br />
Deadspace entry point guards:<br />
4 Mercenary Battleship (battleship) 800000/300000 ISK<br />
3 Mercenary Cruiser (cruiser) 110000 ISK<br />
3 Mercenary Frigate (frigate) 30000 ISK<br />
3 Caldari Cruise Missile Battery (missile battery) 55000 ISK<br />
Notes/hints: The frigates might web and warp scramble your ship. When you warp to the stage you<br />
will receive the following message:<br />
“What's this? Brave little capsuleer? You're going to regret poking your nose around here.”<br />
Deadspace stage 1 guards:<br />
4 Mercenary Battleship (battleship) 1000000/800000/300000 ISK<br />
6 Mercenary Cruiser (cruiser) 100000/75000 ISK<br />
3 Caldari Cruise Missile Battery (missile battery) 55000 ISK<br />
Notes/hints: When you warp to the stage you will receive the following message:<br />
“You've gone far enough, capsuleer.”<br />
Deadspace stage 2 guards:<br />
2 Mercenary Battleship (battleship) 800000 ISK<br />
4 Mercenary Cruiser (cruiser) 45000 ISK<br />
2 Mercenary Frigate (frigate) 30000 ISK<br />
3 Caldari Cruise Missile Battery (missile battery) 55000 ISK<br />
3 Caldari Heavy Missile Battery (missile battery) 40000 ISK<br />
Reinforcement wave 1:<br />
4 Mercenary Battleship (battleship) 1000000/800000 ISK<br />
4 Mercenary Cruiser (cruiser) 100000 ISK<br />
2 Mercenary Frigate (frigate) 30000 ISK<br />
Reinforcement wave 2:<br />
6 Mercenary Battleship (battleship) 1000000/800000/300000 ISK<br />
3 Mercenary Cruiser (cruiser) 110000 ISK<br />
4 Mercenary Frigate (frigate) 30000 ISK<br />
Notes/hints: The mercenary frigates might web and warp scramble your ship. Destroying the last<br />
battleship of the initial group triggers reinforcement wave 1. Destroying both 800000 ISK bounty
value battleships of reinforcement wave 1 triggers reinforcement wave 2. When you warp to the<br />
stage you will receive the following message:<br />
“We've had enough! No amount of money is worth this.”<br />
Remember to destroy The Outpost structure to complete the mission.<br />
Debriefing: I wish I was there. Looking at the damage estimates, I bet the gang will never be able<br />
to rebuild.<br />
Mission: Previous, Overview, Next
Mission name: Regal Replacement<br />
Agent name: Krethar Mann<br />
Mission type: Encounter<br />
Mission briefing:<br />
Now for the last step. The remaining Sansha ships are assaulting a Miyan station as we speak. Riff<br />
Hebian believes this is the final battle against the Sansha, so he has committed the majority of his<br />
forces. While they are away, you will attack our true target: Lord Miyan‟s safe house.<br />
Meet my ship at the entrance to the compound. It will provide you with Lord Miyan's<br />
"replacement." Fight your way through the levels of the compound until you find his safe house.<br />
Destroy the structure and any ships present, and in the wreckage place the replacement. The <strong>Amarr</strong><br />
forces will find him in the rubble and believe that Miyan survived. Then your work will be<br />
complete.<br />
After this is done, our fotthold in this region will be secured, and Harkan will have his revenge.<br />
Objective: Destroy all guards and obtain 1 Artificial Miyan (2.0 m3) to place in the Safe House<br />
Ruins in the fourth stage of the deadspace complex.<br />
Deadspace entry point guards:<br />
None.<br />
Notes/hints: At this stage you will encounter the Business Associate vessel, which will drop a<br />
cargo container containing the Artificial Miyan when you get close.<br />
Deadspace stage 1 guards:<br />
8 <strong>Amarr</strong> Cruise Missile Battery (missile battery) 55000 ISK<br />
Notes/hints: When warping to this stage you will receive the following message from the agent<br />
Terrus Harkan:<br />
“You are extremely resourceful, pilot. Were there more capsuleers like you, perhaps I would not<br />
need such schemes. But the Empire is decaying, and citizens like us are a dying breed.”<br />
Deadspace stage 2 guards:<br />
4 ┬ Imperial Felix (frigate)<br />
└ Imperial Paladin (frigate)<br />
Reinforcement wave 1:<br />
2 ┬ Imperial Agatho (cruiser)<br />
└ Imperial Donus (cruiser)<br />
Reinforcement wave 2:<br />
2 ┬ Imperial Templar Forian (frigate)<br />
└ Imperial Templar Paladin (frigate)<br />
Notes/hints: Each reinforcement wave is triggered <strong>by</strong> the total destruction of the previous group.<br />
When warping to this stage you will receive the following message from the agent Terrus Harkan:
“You are now entering the barracks. So many young men dying all because Miyan has proved<br />
himself incompetent and corrupt. No more. After today, I will guide House Miyan back to glory<br />
through the puppet creation you carry with you.”<br />
Deadspace stage 3 guards:<br />
3 ┬ Imperial Tamir (cruiser)<br />
└ Imperial Templar Nabih (cruiser)<br />
1 Divine Imperial Nabih (frigate)<br />
Reinforcement wave 1:<br />
4 ┬ Imperial Bahir (frigate)<br />
└ Imperial Sixtus (frigate)<br />
Reinforcement wave 2:<br />
2 Imperial Templar Mathura (cruiser)<br />
Notes/hints: Each reinforcement wave is triggered <strong>by</strong> the total destruction of the previous group.<br />
When warping to this stage you will receive the following message from the agent Terrus Harkan:<br />
“I am curious why you chose to aid our cause. Was it the thrill of law-breaking? Do you somehow<br />
support the Sansha cause, wishing to join their Nation? Or are you like me, recognizing the Empire<br />
for the rotten husk it is?”<br />
Deadspace stage 4 guards:<br />
2 ┬ Divine Imperial Sixtus (frigate)<br />
└ Divine Imperial Imran (frigate)<br />
Reinforcement wave 1:<br />
1 Lord Miyan (cruiser)<br />
Reinforcement wave 2:<br />
2 ┬ Divine Imperial Sprite (frigate)<br />
└ Divine Imperial Forian (frigate)<br />
Reinforcement wave 3:<br />
3 ┬ Imperial Templar Muzakir (cruiser)<br />
└ Imperial Tamir (cruiser)<br />
Notes/hints: The Divine Imperial Sixtus and Imran might web and warp scramble your ship.<br />
Reinforcement 1 appears after you damage any ship of the initial group. Reinforcement wave 2<br />
appears after Lord Miyan‟s cruiser has been damaged. Reinforcement wave 3 appears after both<br />
frigates from the initial groups have been destroyed.<br />
Either shoot at the Safe House structure to destroy it, or alternately shoot the Power Generator<br />
structure to speed up the destruction process. After the Safe House has been destroyed place the<br />
Artificial Miyan in the Safe House Ruins structure to complete the mission. After doing that you<br />
will receive the following message from the agent Terrus Harkan:<br />
“I’m getting a very strong signal. The device is stable. Your task is done. Speak to Krethar Man for<br />
your reward.”
Debriefing: Excellent! The new Miyan is awaking now. He will stand up to any medical scan and<br />
questioning. My clients can now influence this region as they see fit. The time may come when the<br />
Sansha need to be removed, but until then our position is good enough. Harkan is very pleased.<br />
You have done well, capsuleer. Perhaps one day my organization will make use of you again.<br />
Mission: Previous, Overview
Mission name: Silence Rahsa: The Nation‟s Path<br />
Agent name: Aralin Jick<br />
Mission type: Courier<br />
Mission briefing:<br />
Krethar Mann may be able to communicate wirelessly. Worth a shot.<br />
Objective: Report to given agent.<br />
Notes/hints: The agent is located in a low security system, but can be contact remotely.<br />
Mission: Previous, Overview, Next
Mission name: The Outclassed Outpost<br />
Agent name: Kandus Sandar<br />
Mission type: Encounter<br />
Mission briefing:<br />
These reports suggest that a group of Sansha‟s Nation ships were seen heading for a listening<br />
outpost owned <strong>by</strong> one of Lord Touraj Miyan, a local Holder. The Sansha must have killed my agent<br />
to prevent this information from getting out. Head over to the outpost and give the Sansha a<br />
surprise.<br />
Remember, destroy any and all Sansha. We don‟t want any escaping this fight.<br />
Objective: Destroy all guards.<br />
Deadspace entry point guards:<br />
3-4 Centus Beast Lord (battleship) 768750 ISK<br />
3-4 ┬ Centii Loyal Savage (frigate) 22500 ISK<br />
└Centii Loyal Servant (frigate) 18000 ISK<br />
Reinforcement wave 1:<br />
3-4 Centus Plague Lord (battleship) 712500 ISK<br />
3-4 ┬ Centii Loyal Scavenger (frigate) 20250 ISK<br />
└ Centii Loyal Servant (frigate) 18000 ISK<br />
Reinforcement wave 2:<br />
3-4 ┬ Centus Dark Lord (battleship) 993750 ISK<br />
└ Centus Overlord (battleship) 881250 ISK<br />
3 ┬ Centii Loyal Butcher (frigate) 28125 ISK<br />
├ Centii Loyal Manslayer (frigate) 27000 ISK<br />
├ Centii Loyal Plague (frigate) 25875 ISK<br />
└ Centii Loyal Enslaver (frigate) 24750 ISK<br />
Notes/hints: The Loyal Scavengers and Servants might web and warp scramble your ship. Each<br />
reinforcement wave is triggered <strong>by</strong> the total destruction of the previous group.<br />
Upon warping to the location you will receive the following message:<br />
“Just as reported, the Sansha ships have surrounded and are firing on a small outpost. Curiously,<br />
the outpost looks to be almost a century old and you aren't reading any life signs from it.”<br />
Debriefing: I‟ve taken the liberty of examining your ship‟s logs. That outpost was unmanned, in<br />
disrepair, and not particularly valuable. There‟s no reason a group of marauders would attack it.<br />
There must be something more.<br />
Mission: Previous, Overview, Next
Mission name: The Right to Rule<br />
Agent name: Riff Hebian<br />
Mission type: Encounter<br />
Mission briefing:<br />
Harkan‟s not dead! He‟s just launched an attack on Lord Miyan‟s safe house! Lord Miyan is in<br />
danger!<br />
He‟s already broken past the main acceleration gate. Harkan know our systems inside and out. Our<br />
automated defenses are useless. Worse, I‟ve reports that several of our own security forces are<br />
helping him!<br />
The safe house is in Choga. I need your help to rescue Miyan from Harkan‟s forces. I can‟t rely on<br />
my own security forces, because I don‟t know how many more will turn.<br />
Find Miyan‟s safe house in the Choga system. Consider every <strong>Amarr</strong> ship you find a traitor.<br />
Be careful. Harkan is a fierce military commander.<br />
Objective: Destroy Harkan‟s Behemoth.<br />
Deadspace entry point guards:<br />
3 Centatis Wraith (battlecruiser) 138750 ISK<br />
2 ┬ Centum Loyal Hellhound (cruiser) 281250 ISK<br />
└ Centum Loyal Torturer (cruiser) 258750 ISK<br />
Notes/hints: When entering the stage you will receive the following message from the agent Riff<br />
Hebian:<br />
“Harkan’s forces have started locking the gates behind them. You’ll have to fight your way through<br />
each security layer.”<br />
Upon destruction of the last ship in the initial group you will receive the following message from<br />
the agent Terrus Harkan:<br />
“Hush, Hebian. I had such high hopes for you, but you’ve proven yourself the same as all the<br />
others: weak.<br />
And who is this? Ah, you’re the Capsuleer that’s caused me so much frustration.<br />
Come then, immortal. I wish to see if your kind bleeds.”<br />
Deadspace stage 1 guards:<br />
4 Centus Plague Lord (battleship) 712500 ISK<br />
3 ┬ Centatis Behemoth (battlecruiser) 153750 ISK<br />
├ Centatis Wraith (battlecruiser) 138750 ISK<br />
├ Centatis Specter (battlecruiser) 135000 ISK<br />
└ Centatis Phantasm (battlecruiser) 131250 ISK<br />
4 ┬ Centum Loyal Hellhound (cruiser) 281250 ISK<br />
└ Centum Loyal Fiend (cruiser) 270000 ISK<br />
2 ┬ Centum Execrator (cruiser) 62813 ISK
└ Centum Slaughterer (cruiser) 57188 ISK<br />
1-2 ┬ Centii Loyal Scavenger (frigate) 20250 ISK<br />
└ Centii Loyal Servant (frigate) 18000 ISK<br />
Notes/hints: The Loyal Scavengers and Servants might web and warp scramble your ship. When<br />
entering the stage you will receive the following message from the agent Terrus Harkan:<br />
“Why do you degrade yourself <strong>by</strong> serving Miyan’s interests? Is protecting status quo that<br />
important?<br />
There was a time when the Empire burned with ambition and a holy flame. Now our Holders bicker<br />
amongst themselves like children, and our Empress weakens the Empire with appeasements to our<br />
enemies.”<br />
Deadspace stage 2 guards:<br />
2-3 ┬ Centus Savage Lord (battleship) 543750 ISK<br />
└ Centus Mutant Lord (battleship) 487,500ISK<br />
6 ┬ Centatis Daemon (battlecruiser) 146250 ISK<br />
└ Centatis Devil (battlecruiser) 142500 ISK<br />
3 ┬ Centum Loyal Torturer (cruiser) 258750 ISK<br />
└ Centum Loyal Mutilator (cruiser) 247,500 ISK<br />
Reinforcement wave 1:<br />
3 Centum Loyal Execrator (cruiser) 236250 ISK<br />
3-4 ┬ Centii Loyal Butcher (frigate) 28125 ISK<br />
└ Centii Loyal Plague (frigate) 25875 ISK<br />
Notes/hints: When entering the stage you will receive the following message from the agent Terrus<br />
Harkan:<br />
“I once believed in the strength of noble blood. It was Miyan’s surrender to Darabi that proved the<br />
weakness of men. Then I turned to politics to correct the fallings of our government, but Empress<br />
Jamyl demonstrated that even our highest halls are no longer holy.”<br />
Reinforcement wave 1 spawns about two minutes after you enter the stage.<br />
Deadspace stage 3 guards:<br />
1 Centus Tyrant (battleship) 1218750 ISK<br />
2 ┬ Centior Horror (destroyer) 15750 ISK<br />
└ Centior Monster (destroyer) 14625 ISK<br />
Reinforcement wave 1:<br />
2-3 ┬ Centus Dark Lord (battleship) 993750 ISK<br />
└ Centus Overlord (battleship) 881250 ISK<br />
2-3 ┬ Centii Loyal Butcher (frigate) 28125 ISK<br />
├ Centii Loyal Manslayer (frigate) 27000 ISK<br />
└ Centii Loyal Enslaver (frigate) 24750 ISK<br />
Reinforcement wave 2:<br />
1-2 ┬ Centatis Behemoth (battlecruiser) 153750 ISK
└ Centatis Daemon (battlecruiser) 146250 ISK<br />
1-2 ┬ Centum Loyal Fiend (cruiser) 270000 ISK<br />
├ Centum Loyal Torturer (cruiser) 258750 ISK<br />
└ Centum Loyal Mutilator (cruiser) 247500 ISK<br />
Notes/hints: When entering the stage you will receive the following message from the agent Terrus<br />
Harkan:<br />
“Though my body may be destroyed in battle, my actions will reignite the holy flame in the hearts of<br />
the citizens, and the universe will be lit <strong>by</strong> the flames of a new Reclaiming. Yes, for I am the servant<br />
of His will, and before my hand will fall all false prophets.”<br />
Damaging the Centus Tyrant battleship of the initial group triggers spawning of different group<br />
compositions of reinforcement wave 1. First instance will spawn when the battleship first time<br />
receives any damage. Second instance will spawn when the battleship first time receives<br />
approximately 90% damage to its shields. Third instance will spawn when the battleship first time<br />
receives approximately 90% damage to its armor. Fourth instance will spawn when the battleship is<br />
destroyed. Damaging any ship from an instance of reinforcement wave 1 will make an instance of<br />
reinforcement wave 2 spawn after a short time delay.<br />
When getting close to the acceleration gate to the next stage you will receive the following message<br />
from the agent Terrus Harkan:<br />
“Those who turn away from the light and walk in the darkness shall be struck down <strong>by</strong> His wrath,<br />
for I am retribution incarnate, His angel of vengeance.”<br />
Deadspace stage 4 guards:<br />
1 Harkan‟s Behemoth (battleship)<br />
1-2 ┬ Centus Tyrant (battleship) 1218750 ISK<br />
└ Centus Dread Lord (battleship) 1162500 ISK<br />
2-3 ┬ Centum Loyal Hellhound (cruiser) 281250 ISK<br />
└ Centum Loyal Torturer (cruiser) 258750 ISK<br />
Reinforcement wave 1:<br />
1-2 ┬ Centum Execrator (cruiser) 62813 ISK<br />
├ Centum Slaughterer (cruiser) 57188 ISK<br />
1-2 ┬ Centior Horror (destroyer) 15750 ISK<br />
├ Centior Abomination (destroyer) 13500 ISK<br />
├ Centior Cannibal (destroyer) 11813 ISK<br />
└ Centior Misshape (destroyer) 11250 ISK<br />
Reinforcement loop wave 1:<br />
2-3 ┬ Centatis Daemon (battlecruiser) 146250 ISK<br />
└ Centatis Behemoth (battlecruiser) 153750 ISK<br />
Reinforcement loop wave 2:<br />
2 ┬ Centii Loyal Ravener (frigate) 21375 ISK<br />
└ Centii Loyal Scavenger (frigate) 20250 ISK<br />
Reinforcement loop wave 3:
1-2 ┬ Centus Tyrant (battleship) 1218750 ISK<br />
└ Centus Dread Lord (battleship) 1162500 ISK<br />
1-3 ┬ Centum Loyal Hellhound (cruiser) 281250 ISK<br />
├ Centum Loyal Fiend (cruiser) 270000 ISK<br />
├ Centum Loyal Mutilator (cruiser) 247500 ISK<br />
└ Centum Loyal Execrator (cruiser) 236250 ISK<br />
2 ┬ Centii Loyal Savage (frigate) 22500 ISK (appears only the first time the group is triggered)<br />
└ Centii Loyal Slavehunter (frigate) 23625 ISK (appears only the first time the group is triggered)<br />
Notes/hints: When entering the stage you will receive the following message from the agent Terrus<br />
Harkan:<br />
“You fly well, immortal. I regret your death will never send you to our God, so you might be<br />
redeemed. Farewell.”<br />
The Loyal Centii Raveners and Scavengers might web and warp scramble your ship. Damaging the<br />
Harkan‟s Behemoth battleship triggers spawning of different group compositions of reinforcement<br />
wave 1. First instance will appear when the battleship first time receives any damage. Second<br />
instance will appear when the battleship first time receives damage to its armor. Third instance will<br />
appear when the battleship is destroyed.<br />
About a minute or so after you arrive at the stage an instance of reinforcement loop wave 1 will<br />
appear. Destroying all ship of this first group will spawn an instance of reinforcement loop wave 2.<br />
Destroying all ship of this second group will spawn an instance of reinforcement loop wave 3.<br />
Damaging any ship of this third group will spawn an instance of reinforcement loop wave 1. This<br />
loop goes on until loop wave 2 has been destroyed 5 times.<br />
Debriefing: Lord Miyan is safe. The political situation is returning to what passes for normal.<br />
The few remnants of the Sansha forces are fleeing back to Stain. The crews of the <strong>Amarr</strong> ships that<br />
joined Harkan‟s failed rebellion have been stripped of their ranks and any titles. Their commanders<br />
have the Empress‟ justice to look forward to.<br />
As for Harkan himself? His death allowed him to escape temporal justice. His name is being<br />
stripped from the Miyan records of service. My lord‟s men are tracking down Harkan‟s kin to end<br />
his line. In a generation, when the living memory of Harkan‟s betrayal fades with us, there will be<br />
no sign of Harkan‟s passing.<br />
You, “name”, will be remembered long after this. I envy your capsuleer lifespan, and pray you<br />
continue your good works in the name of the Empire for years to come.<br />
Mission: Previous, Overview
Deadspace Complexes<br />
Complex name: Karde Romu, MIO Agent<br />
System (security level): Kor-Azor Prime (0.9)<br />
DED rating: None<br />
Ship size restrictions: None.<br />
Beacon description: Fitted with a power flash-battery, this beacon sends out signals throughout the<br />
entire solarsystem.<br />
Entrance point<br />
Warp-in description: None.<br />
Agents: Karde Romu<br />
Guards: None.<br />
Destroyable structures: None.<br />
Lootable structures: None.<br />
Notes/hints: This location contains the agent who starts the arc.<br />
Complex name: Miyan Security Forces<br />
System (security level): Palas (0.5)<br />
DED rating: None.<br />
Ship size restrictions: None.<br />
Beacon description: Fitted with a power flash-battery, this beacon sends out signals throughout the<br />
entire solarsystem.<br />
Entrance point<br />
Warp-in description: None.<br />
Agents: Riff Hebian<br />
Guards: None.<br />
Destroyable structures: None.<br />
Lootable structures: None.<br />
Notes/hints: None.
Info on<br />
Deniability<br />
(A Human Body)<br />
Do not worry about your identity being decoded <strong>by</strong> the <strong>Amarr</strong> authorities. While you are acting in<br />
my employ, I will be masking your ID from their registered capsuleer database. I cannot protect you<br />
if you violate the law in other activities, but in any sites I specify you may engage <strong>Amarr</strong> without<br />
fear of retribution.<br />
Harkan’s Behemoth<br />
(Ship description)<br />
Lord Harkan‟s ship is an impressive example of <strong>Amarr</strong> engineering. It appears after his retirement<br />
his ship was refit with cobalt-plated armor. It is unclear if this was a personal decision or the sign of<br />
an even darker alliance.<br />
Harkan’s Plan<br />
(A Digital Soul)<br />
My associate is a man named Terrus Harkan. He was once the head of Lord Miyan's security forces<br />
and later an activist for slavery reform. After years of watching the Holders bicker and drag the<br />
Empire into pettiness and unrighteousness, he came to us with a fascinating plan. We are going to<br />
replace Lord Miyan with himself. Or something close.<br />
Sansha's Nation has a solid lead in mind-body cybernetics. Using the appropriate combination of<br />
implants the Sansha can create an effective verisimilitude of a human intelligence, and that can<br />
receive directives from the Nation. With this replacement Harkan wishes to turn the Kor-Azor<br />
political landscape around and restore the honor Harkan believes it once had.<br />
Harkan’s Short Political Career<br />
(An Unfortunate End)<br />
In Harkan‟s final years, he became a vocal critic of current <strong>Amarr</strong> slavery techniques. Though still<br />
in favor of slave labor, Harkan argued that the Empire‟s reliance on old methods of control such as<br />
Vitoc were too limiting. His views were cemented after the Elder invasion, which saw millions of<br />
slaves violently rebelling after they were freed of their Vitoc dependency. Harkan left the public eye<br />
after an outburst against Empress Jamyl‟s emancipation of ninth generation slaves cost him the<br />
favor of local Holders.<br />
Loose Ends<br />
(Panic Response)<br />
Lady Jariza is under investigation for her role in all of this, but the only charge we could actually<br />
bring is conspiracy. And accusing a noble of conspiracy is about as useful as charging a<br />
Slaverhound with indecent exposure. It‟s the nature of the beast.
Lord Darabi has been cleared of any wrong doings. Her daughter Mina has returned to their estate<br />
and is taking a larger role in family affairs.<br />
Lord Manik and Lord Miyan reached a gentleman‟s agreement after the destruction of Manik‟s<br />
mercenary fleet. A number of Manik‟s agricultural worlds have been given as a gift to House<br />
Miyan. Lord Miyan accepted the gift, and has declared a clean slate between them.<br />
Lord Darabi<br />
(Ascending Nobles)<br />
Rumor has it that Lord Darabi was imprisoned <strong>by</strong> Karsoth for daring to publicly disagree (albeit<br />
slightly) with Karsoth‟s policies about the Succession. When Empress Sarum returned, Darabi was<br />
freed, but rumors persist that he is not in the most stable condition.<br />
Lord Miyan<br />
(Background Check)<br />
Even though many Holder titles extend back thousands of years, the position is a precarious one.<br />
Families waxed and waned over the centuries. Most families realize the rule of fools is inevitable;<br />
all they can do is hope too much damage isn't done before a proper ruler can ascend again.<br />
House Miyan has ruled much of the Jatari constellation for centuries. Miyan grew to be one of the<br />
top Holder houses, rivaling Kor-Azor in local influence. In 109, Lord Miyan died and passed his<br />
title to his only son, Touraj Miyan.<br />
Touraj is considered a dolt, accused of being more likely to make a pass at subordinate Holders'<br />
wives than realize his chief advisor is dipping into senility. Lord Iraj Darabi, a minor but wellrespected<br />
neighboring Holder, used Touraj's unpopularity and foolishness to his own advantage. In<br />
110, he annexed two of the systems under House Miyan control for himself, sparking a minor<br />
conflict between the two Houses.<br />
In the end, Darabi's superior commanders and advisors forced Miyan to surrender. So far, Miyan<br />
has managed to hold on to his remaining lands.<br />
Lord Miyan’s Cruiser<br />
(Ship description)<br />
Lord Miyan‟s cruiser is packed with the latest <strong>Amarr</strong> technology. Still not advanced enough to stop<br />
the guns of a capsuleer.<br />
Terrus Harkan<br />
(Making an Arrest)<br />
Commodore Harkan is an old guard of the Kor-Azor family. After multiple tours with the <strong>Amarr</strong><br />
Navy, he became chief security officer for House Miyan. In his decades of service, he has only had<br />
one blemish. In YC 109, he led Miyan‟s forces into battle against those of Lord Darabi in Fensi, a<br />
battle which he lost when Miyan surrendered. Harkan‟s big mistake was objecting to Miyan‟s<br />
surrender in public. It was not long after that Harkan retired.