user manual rasmus 1 radar signal multiplying ... - Polaris-as.dk
user manual rasmus 1 radar signal multiplying ... - Polaris-as.dk
user manual rasmus 1 radar signal multiplying ... - Polaris-as.dk

Create successful ePaper yourself
Turn your PDF publications into a flip-book with our unique Google optimized e-Paper software.
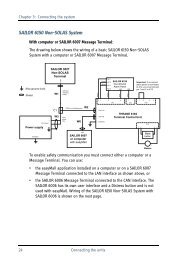
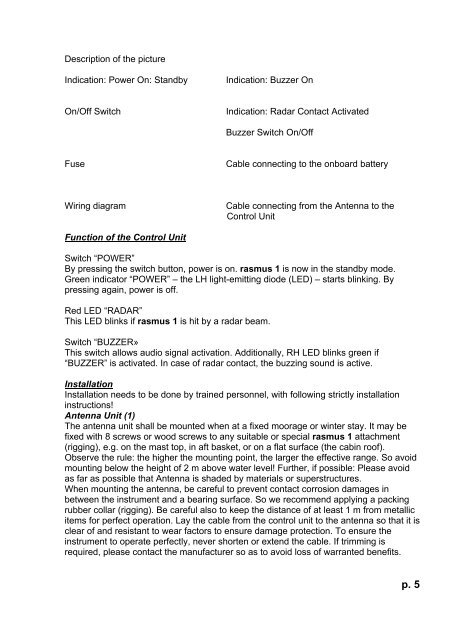
Description of the picture<br />
Indication: Power On: Standby Indication: Buzzer On<br />
On/Off Switch Indication: Radar Contact Activated<br />
Buzzer Switch On/Off<br />
Fuse Cable connecting to the onboard battery<br />
Wiring diagram Cable connecting from the Antenna to the<br />
Control Unit<br />
Function of the Control Unit<br />
Switch “POWER”<br />
By pressing the switch button, power is on. <strong>r<strong>as</strong>mus</strong> 1 is now in the standby mode.<br />
Green indicator “POWER” – the LH light-emitting diode (LED) – starts blinking. By<br />
pressing again, power is off.<br />
Red LED “RADAR”<br />
This LED blinks if <strong>r<strong>as</strong>mus</strong> 1 is hit by a <strong>radar</strong> beam.<br />
Switch “BUZZER»<br />
This switch allows audio <strong>signal</strong> activation. Additionally, RH LED blinks green if<br />
“BUZZER” is activated. In c<strong>as</strong>e of <strong>radar</strong> contact, the buzzing sound is active.<br />
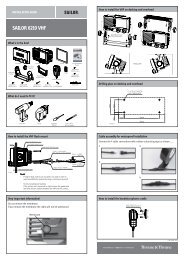
Installation<br />
Installation needs to be done by trained personnel, with following strictly installation<br />
instructions!<br />
Antenna Unit (1)<br />
The antenna unit shall be mounted when at a fixed moorage or winter stay. It may be<br />
fixed with 8 screws or wood screws to any suitable or special <strong>r<strong>as</strong>mus</strong> 1 attachment<br />
(rigging), e.g. on the m<strong>as</strong>t top, in aft b<strong>as</strong>ket, or on a flat surface (the cabin roof).<br />
Observe the rule: the higher the mounting point, the larger the effective range. So avoid<br />
mounting below the height of 2 m above water level! Further, if possible: Ple<strong>as</strong>e avoid<br />
<strong>as</strong> far <strong>as</strong> possible that Antenna is shaded by materials or superstructures.<br />
When mounting the antenna, be careful to prevent contact corrosion damages in<br />
between the instrument and a bearing surface. So we recommend applying a packing<br />
rubber collar (rigging). Be careful also to keep the distance of at le<strong>as</strong>t 1 m from metallic<br />
items for perfect operation. Lay the cable from the control unit to the antenna so that it is<br />
clear of and resistant to wear factors to ensure damage protection. To ensure the<br />
instrument to operate perfectly, never shorten or extend the cable. If trimming is<br />
required, ple<strong>as</strong>e contact the manufacturer so <strong>as</strong> to avoid loss of warranted benefits.<br />
p. 5