Electric Food Dehydrator - Presto
Electric Food Dehydrator - Presto
Electric Food Dehydrator - Presto

Create successful ePaper yourself
Turn your PDF publications into a flip-book with our unique Google optimized e-Paper software.
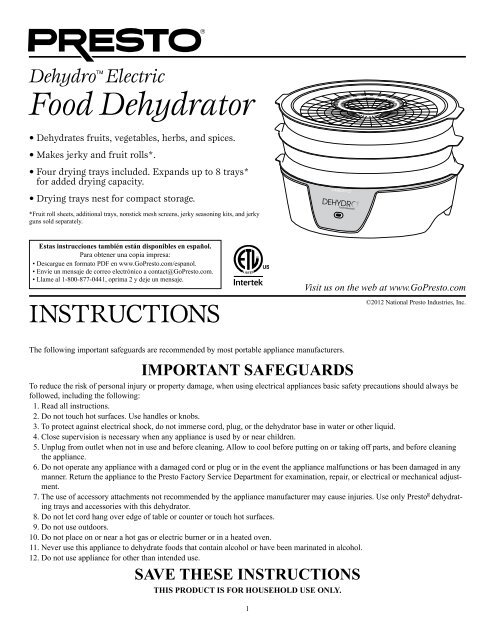
Dehydro <strong>Electric</strong><br />
<strong>Food</strong> <strong>Dehydrator</strong><br />
• Dehydrates fruits, vegetables, herbs, and spices.<br />
• Makes jerky and fruit rolls*.<br />
• Four drying trays included. Expands up to 8 trays*<br />
for added drying capacity.<br />
• Drying trays nest for compact storage.<br />
*Fruit roll sheets, additional trays, nonstick mesh screens, jerky seasoning kits, and jerky<br />
guns sold separately.<br />
Estas instrucciones también están disponibles en español.<br />
Para obtener una copia impresa:<br />
• Descargue en formato PDF en www.Go<strong>Presto</strong>.com/espanol.<br />
• Envíe un mensaje de correo electrónico a contact@Go<strong>Presto</strong>.com.<br />
• Llame al 1-800-877-0441, oprima 2 y deje un mensaje.<br />
InstructIons<br />
The following important safeguards are recommended by most portable appliance manufacturers.<br />
1<br />
Visit us on the web at www.Go<strong>Presto</strong>.com<br />
©2012 National <strong>Presto</strong> Industries, Inc.<br />
IMPORTANT SAFEGUARDS<br />
To reduce the risk of personal injury or property damage, when using electrical appliances basic safety precautions should always be<br />
followed, including the following:<br />
1. Read all instructions.<br />
2. Do not touch hot surfaces. Use handles or knobs.<br />
3. To protect against electrical shock, do not immerse cord, plug, or the dehydrator base in water or other liquid.<br />
4. Close supervision is necessary when any appliance is used by or near children.<br />
5. Unplug from outlet when not in use and before cleaning. Allow to cool before putting on or taking off parts, and before cleaning<br />
the appliance.<br />
6. Do not operate any appliance with a damaged cord or plug or in the event the appliance malfunctions or has been damaged in any<br />
manner. Return the appliance to the <strong>Presto</strong> Factory Service Department for examination, repair, or electrical or mechanical adjustment.<br />
7. The use of accessory attachments not recommended by the appliance manufacturer may cause injuries. Use only <strong>Presto</strong> ® dehydrating<br />
trays and accessories with this dehydrator.<br />
8. Do not let cord hang over edge of table or counter or touch hot surfaces.<br />
9. Do not use outdoors.<br />
10. Do not place on or near a hot gas or electric burner or in a heated oven.<br />
11. Never use this appliance to dehydrate foods that contain alcohol or have been marinated in alcohol.<br />
12. Do not use appliance for other than intended use.<br />
SAVE THESE INSTRUCTIONS<br />
THIS PRODUCT IS FOR HOUSEHOlD USE ONly.
Important Cord Information<br />
• This appliance has a polarized plug (one blade is wider than the other). To reduce the risk of electric shock, this plug is intended to<br />
fit into a polarized outlet only one way. If the plug does not fit fully into the outlet, reverse the plug. If it still does not fit, contact a<br />
qualified electrician. Do not attempt to modify the plug in any way.<br />
• A short power supply cord (or cord set) is provided to reduce the risk resulting from becoming entangled in or tripping over a longer<br />
cord. Extension cords may be used if care is properly exercised in their use.<br />
• If an extension cord is used, the marked electrical rating of the extension cord should be at least as great as the electrical rating of the<br />
appliance. The extension cord should be arranged so that it will not drape over the countertop or tabletop where it can be pulled on<br />
by children or tripped over unintentionally.<br />
• Connect the power supply cord to a 120VAC electrical outlet only.<br />
Before First Use<br />
Become familiar with the food dehydrator (Fig. A) and read and follow the instructions carefully. As received, your food dehydrator<br />
will be in the storage position. Remove the dehydrator trays and cover from the base and wash them according to the “Care and Cleaning”<br />
instructions on page 8.<br />
How To Assemble and load Trays for<br />
Dehydrating<br />
1. Remove trays and cover from unit.<br />
2. Turn power base over and locate cord. Uncoil from base.<br />
3. Set base, right side up, on a dry, level surface. In order<br />
to function properly, the dehydrator must have sufficient<br />
airflow; therefore, be sure the base and cover vents are not<br />
obstructed at any time. Never place dehydrator on carpet<br />
or a towel.<br />
4. Note that each tray has a smooth surface on one side and<br />
raised ribs on the reverse side. <strong>Food</strong> goes on the smooth<br />
side (see Fig. B1). The raised ribs should always be facing<br />
down (see Fig. B2).<br />
5. Select a tray with handles. Set the tray on the counter so<br />
the words “THIS SIDE UP”, which are molded onto the<br />
handles, are facing up. Begin loading tray with a single<br />
layer of food.<br />
6. Place loaded tray onto power base. The first tray placed<br />
onto the power base MUST have handles (see Fig. A).<br />
7. Select a tray without handles. Load food onto smooth surface<br />
and stack tray without handles onto tray with handles.<br />
8. Continue filling and stacking trays, alternating trays with<br />
handles and without handles (see Fig. A).<br />
9. Place clear cover over stacked trays. Position cover so that<br />
the words on the cover handles “THIS SIDE UP” are facing<br />
up.<br />
10. Plug cord into a 120VAC electrical outlet only and begin<br />
dehydrating. See pages 3 through 8 for dehydrating information<br />
for specific foods.<br />
General Dehydrating Information<br />
Safety precaution: Wash hands thoroughly prior to preparing food for dehydrating. Likewise,<br />
thoroughly clean all utensils, cutting boards, and counters that will be used for preparing food.<br />
Wash foods before preparing them for dehydrating.<br />
• When selecting food for drying, choose those that are at peak eating quality. Avoid overripe* or<br />
immature fruits and vegetables. Remove any parts of the food that are bruised or blemished.<br />
• For even drying, cut food into uniform sizes, shapes, and thicknesses. Use a <strong>Presto</strong> ®<br />
SaladShooter ® slicer/shredder, food processor, or mandoline to aid in cutting uniform slices.<br />
*Slightly overripe fruits are acceptable for making fruit rolls.<br />
2<br />
For dehydrating,<br />
stack trays onto base as shown<br />
See-through<br />
cover<br />
Four nestable<br />
drying trays*<br />
Center hub/<br />
center hub screen<br />
Power base<br />
Power light<br />
*Additional trays sold separately.<br />
Place food on<br />
smooth surface<br />
Tray without<br />
handles<br />
Tray with<br />
handles<br />
Tray without<br />
handles<br />
Tray with<br />
handles<br />
Base<br />
platform<br />
Cord<br />
storage<br />
Fig. A<br />
Fig. B1<br />
Raised ribs<br />
should be facing down Fig. B2
• Drying times are highly variable depending on the type and amount of food, thickness, evenness of food pieces, humidity, air<br />
temperature, personal preference, and even the age of the plant at the time of harvesting. That is why throughout the book you will<br />
notice there is a range of average drying times. In some cases you may find you may need to, or prefer to, dry your foods for shorter<br />
or longer periods than those listed. For best results, begin checking your food at the beginning of the range listed in the instructions.<br />
You should then gauge how often you should recheck the food based on how the drying is progressing. With some foods, such as<br />
herbs, that may mean every 10 minutes, and with other foods, such as fruits, that may mean every 1 to 2 hours.<br />
• Dehydration prevents microbial growth, however, chemical reactions caused by enzymes in fruits and vegetables can occur unless<br />
the product is pretreated before drying. Pretreatment will prevent or minimize undesirable color and texture changes during drying<br />
and storage. See specific sections for recommended pretreatment.<br />
• Place foods in a single layer on the trays. Do not allow food to touch or overlap.<br />
• When drying strong-smelling foods, such as onions and garlic, be aware that there will be a strong odor during the drying process.<br />
That odor may linger after drying has been completed.<br />
• Individual pieces of food may not all dry at the same time. <strong>Food</strong>s that are appropriately dried should be removed before those that<br />
still require additional drying. Always check all of the trays for foods that are appropriately dried. Allow dried pieces to cool<br />
and then place in a covered container.<br />
• Do not add fresh fruits and vegetables to a partially dried load. This will add moisture and increase the drying time.<br />
• Allow for continuous drying. Do not unplug dehydrator in the middle of the drying cycle and resume drying at a later time as this<br />
may result in poor quality and/or unsafe food.<br />
Packaging and Storage<br />
• Dried foods need to be properly packaged to prevent reabsorption of moisture and microbial deterioration. Pack food in clean, dry,<br />
airtight containers. Glass jars or freezer containers with tight-fitting lids are good for storage. Resealable plastic freezer bags are also<br />
acceptable.<br />
• Store packaged dried food in a dry, cool location away from light. Higher temperatures and exposure to light will shorten the storage<br />
time and result in loss of quality and nutrients. Most dried fruit, when properly packaged and stored, will be good for 1 year at 60°F,<br />
or 6 months at 80°F. Fruit leather/rolls should keep for up to 1 month at room temperature. Vegetables have about half the storage<br />
life as fruit. If food is to be kept longer, then store it in a freezer.<br />
• Package vegetables and fruits in separate storage containers to avoid flavor transfer.<br />
Drying Jerky<br />
Homemade jerky is a flavorful dried meat product that is especially popular with outdoor sports enthusiasts because it is light and easy<br />
to transport. Jerky can be made from almost any lean meat, including beef, pork, or venison**.<br />
Whenever handling meat, basic food safety precautions need to be observed:<br />
• Wash hands thoroughly before and after handling raw meat.<br />
• Keep meat refrigerated or frozen until ready to use.<br />
• Raw meat and its juice should be kept away from other foods. Wash cutting boards, utensils, counters, etc. with hot, soapy water<br />
after contact with raw meat. After washing, sanitize with a solution of 1 tablespoon chlorine bleach per gallon of water. Allow<br />
surface to air dry.<br />
• Marinate meat under refrigeration. Discard marinade after meat is removed.<br />
• Keep raw meat and dried jerky separate.<br />
NOTE: The United States Department of Agriculture recommends that meat be precooked prior to dehydrating or cooked after dehydrating<br />
to reduce the risk of foodborne illness.<br />
Preparing Jerky from Meat Strips<br />
Select lean meats such as beef and venison sirloin, rump, and round cuts and pork loin and ham cuts. Trim meat of visible fat, connective<br />
tissue, and gristle. Freeze meat until firm, but not solid, to make slicing easier. Slice meat into strips that are ¼ inch thick, 1 inch<br />
wide, and 5 to 6 inches long. Slice meat across the grain for a more tender jerky or with the grain for a chewier jerky.<br />
Flavor the meat slices by marinating in your own favorite marinade, a commercial marinade, or use the marinade recipe on page 4. If<br />
desired, <strong>Presto</strong> Jerky Seasoning* can also be used to marinate the meat strips. To use the <strong>Presto</strong> Jerky Seasoning, mix one packet of<br />
spice and one packet of cure with ¼ cup of water.<br />
Place marinade and meat strips in a resealable plastic storage bag. Seal bag and shake to thoroughly coat the meat strips. Refrigerate<br />
for 8 to 12 hours. Turn bag often to evenly coat the meat strips.<br />
* <strong>Presto</strong><br />
3<br />
Jerky Seasoning (spice and cure) sold separately.<br />
** Venison or wild game meat that has been contaminated with entrails should not be used for making jerky.
Refer to the note on page 3 about cooking the meat before or after dehydrating. For a more desirable texture, cook meat after dehydration.<br />
Meat that is precooked prior to dehydrating will have shorter drying times; however, the end product will have a dry, crumbly<br />
texture. If cooking the meat before dehydrating is preferred, follow the instructions below:<br />
Cooking meat before dehydrating – After marinating meat strips, place meat strips and liquid marinade into a shallow pan. If no<br />
liquid remains, add enough water to cover meat strips. Bring liquid to a boil and boil for 5 minutes.<br />
Remove meat strips from marinade, drain, and then position strips on dehydrator trays. Position strips on dehydrator trays close<br />
together, but not overlapping. The average drying time will be 4 to 8 hours. See “Determining Dryness” information below.<br />
If you did not cook the meat prior to dehydrating, cook it after, following the instructions below:<br />
Cooking meat after dehydrating – Preheat oven until the internal temperature is 275°F. (For an accurate temperature reading,<br />
check with an oven thermometer.) Remove jerky strips from dehydrator trays and place on a baking sheet close together, but not<br />
touching. Heat jerky in preheated oven for 10 minutes (jerky strips should be sizzling when removed from the oven). Remove<br />
jerky from baking sheet and cool to room temperature.<br />
Preparing Jerky from Ground Meat<br />
Mix one packet of <strong>Presto</strong> jerky spice* and one packet of <strong>Presto</strong> jerky cure* with 1 pound of ground meat that is about 93% lean.<br />
Place the ground meat mixture in a <strong>Presto</strong> jerky gun* or a cookie press and extrude meat directly onto dehydrator trays, making sure<br />
that the meat does not touch or overlap. The average drying time will be 4 to 8 hours. See “Determining Dryness” information below.<br />
Cook the meat after dehydrating, following the instructions above.<br />
Determining Dryness<br />
Begin checking jerky after about 4 hours and every 30 minutes thereafter. Drying time will depend on a variety of factors. These<br />
factors include the type of meat, the amount of fat in the meat, and whether or not you precooked the meat before dehydrating. In addition,<br />
times will vary depending on size/thickness of the pieces and how full the trays are. Jerky that is acceptably dry will crack when<br />
bent but will not break.<br />
Packaging and Storage<br />
After cooling, pat jerky with paper toweling to remove any fat droplets which may form on the jerky. Follow “Packaging and Storage”<br />
information on page 3. Jerky can be stored 1 to 2 months at room temperature. However, to maintain the best flavor and quality, store<br />
in the refrigerator or freezer.<br />
Jerky Marinade†<br />
1½ - 2 pounds of lean meat<br />
¼ cup soy sauce<br />
1 tablespoon Worcestershire sauce<br />
1 teaspoon hickory smoke-flavored salt<br />
½ teaspoon onion powder<br />
¼ teaspoon garlic powder<br />
¼ teaspoon black pepper<br />
Combine all ingredients in a small bowl and follow “Preparing Jerky from Meat Strips” instructions on page 3.<br />
How to Dehydrate Fruit and Fruit Rolls<br />
Dried fruits and fruit rolls (or leathers) are nutritious and portable snacks. Drying fruit intensifies the natural sweetness of the fruit<br />
because the moisture is removed.<br />
Fruit<br />
Selection and Preparation<br />
Select fruits that are at the peak of ripeness. Wash fruits to remove dirt and debris. There are many options when it comes to drying<br />
fruit and personal preference should be your guide. Fruits can be sliced, halved, or if small left whole; peeled or unpeeled; pretreated<br />
or left untreated. Fruits that are sliced thin and peeled will dry the fastest. Fruits left whole will require the most drying time.<br />
Slice fruit uniformly and in pieces about ¼ inch thick. Fruits that are left whole, such as blueberries, cranberries, and grapes, should<br />
be dipped in boiling water for 30 to 60 seconds and then plunged in ice water to crack the skin. This procedure will reduce the drying<br />
time.<br />
Pretreatment<br />
Many fruits will darken quickly once they are peeled and/or cut and will continue to darken even after the fruit is dried. This is due to<br />
the exposure of the natural enzymes in some fruits to air. There are several pretreatment options to prevent this discoloration. Pretreatment<br />
is not necessary but is recommended to prevent discoloration. Some people may detect a slight flavor change with pretreated<br />
* <strong>Presto</strong> jerky spice and cure and jerky gun are sold separately.<br />
† Jerky Marinade recipe provided by “So Easy To Preserve”, 5th ed., 2006 Bulletin 989, Cooperative Extension Service, The University of Georgia, Athens.<br />
Revised by Elizabeth L. Andress, Ph.D. and Judy A. Harrison, Ph.D., Extension <strong>Food</strong>s Specialists.<br />
4
fruit. See the Fruit Drying Guide on page 6 to determine which fruits will benefit from pretreatment. You may want to try the different<br />
options and see which you prefer:<br />
Ascorbic acid (vitamin C) – Ascorbic acid, available in tablet or powdered form, is available at drugstores. Mix 2½ tablespoons<br />
of powdered ascorbic acid in 1 quart cold water. Vitamin C tablets (six 500 mg tablets equal 1 teaspoon ascorbic acid) should be<br />
crushed before mixing with water. Place cut fruit, such as bananas, peaches, apples, or pears, in mixture and soak for 10 minutes.<br />
Remove fruit and drain well before placing on drying trays.<br />
Ascorbic acid mixtures – These commercially available products, such as Mrs. Wages Fresh Fruit Preserver*, are a combination<br />
of ascorbic acid and sugar and are commonly used for fresh fruits and for canning and freezing. Follow the manufacturers’ directions<br />
for use of these mixtures.<br />
lemon juice – Mix equal parts lemon juice and cold water. Place cut fruit in solution and soak for 10 minutes. Remove fruit and<br />
drain well before placing on drying trays.<br />
Place pieces of fruit on dehydrator trays in a single layer, close together but not touching or overlapping. Refer to the Fruit Drying<br />
Guide on page 6 for suggested preparation, pretreatment, and drying times.<br />
Determining Dryness<br />
Refer to the Fruit Drying Guide on page 6 and begin checking the fruit at the beginning of the average drying time range. Remove<br />
a few pieces of fruit from each dehydrator tray and allow to cool to room temperature. Fruits are acceptably dry when they are soft<br />
and pliable, but not sticky. Fruit folded in half should not stick together. Apple and banana slices can be dried until crisp, if desired. If<br />
fruits seem to have a lot of moisture remaining, recheck every 1 to 2 hours. If fruits appear to be almost done, check again in 30 minutes.<br />
Always check fruits from each tray.<br />
Conditioning<br />
After drying, allow fruit to cool for 30 minutes to 1 hour before packaging. Dried fruits may have uneven amounts of moisture remaining<br />
because of differences in the size of various pieces. Although fruit appears to be dry, there may still be moisture remaining in<br />
some of the individual pieces. Conditioning is a procedure that can be used to more evenly distribute moisture, which will reduce the<br />
chances of mold growth. It allows you to determine if you’ve removed enough moisture before you put it into storage. To condition,<br />
place the pieces of fruit loosely in a clean plastic or glass container and seal and let stand for 1 week. This will allow drier pieces of<br />
fruit to absorb excess moisture that may be present in other pieces. Daily shake the jar to separate the pieces and observe for condensation.<br />
If condensation develops, remove the fruit and dehydrate for additional time. After conditioning, follow “Packaging and Storage”<br />
information on page 3.<br />
Uses<br />
Dried fruits make great snacks. They can also be added to trail mixes, cereals, muffins, breads, and other baked products. Dried fruit<br />
can be used as is or softened prior to use. To soften dried fruit, submerge in boiling water and soak for 5 minutes or place fruit in a<br />
steaming basket over a pot of boiling water and steam for 5 minutes or until fruit is plumped.<br />
Fruit Rolls (leather)**<br />
Fruit rolls (or fruit leather) are made by drying a thin layer of puréed fruit on a flat surface. Once dried, the fruit layer is pulled from<br />
the surface and rolled. The term leather derives from the leather-like texture of the puréed fruit once it is dried.<br />
Almost any fruit or combination of fruit can be puréed and dried for fruit leather. The quality of the fruit leather depends on whether<br />
the fruit has a low or high amount of the naturally occurring starch called pectin. Fruits that have a high amount of pectin will make<br />
leathers that bond together in a solid sheet and easily peel, while fruits that have little pectin will flake and crack rather than peel.<br />
When making leather with fruits low in pectin, add another fruit that is high in pectin to improve the texture of the leather. Fruits<br />
naturally high in pectin are apples, apricots, blueberries, cranberries, figs, grapes, peaches, pears, pineapples, and plums. Fruits low<br />
in pectin include cherries, citrus fruits, raspberries, and strawberries. When using a low pectin fruit with a high pectin fruit, use equal<br />
parts of each to produce the best results.<br />
Preparation<br />
You will need a <strong>Presto</strong> Fruit Roll Sheet** to prepare fruit rolls. Apply a thin layer of vegetable oil or no-stick cooking spray to the<br />
fruit roll sheet. Caution: If using cooking spray, be sure to spray away from the dehydrator base.<br />
Use about 1½ cups of puréed fruit for each fruit roll sheet**.<br />
Select ripe or slightly overripe fruit and remove any bruised areas. Wash fruits and remove peel, seeds, and stems. Cut fruit into<br />
chunks and using a food processor or blender, purée until smooth (applesauce consistency). To get the puréeing process started, you<br />
may need to add approximately 1 tablespoon of fruit juice or water.<br />
If desired, fruit can be pretreated to preserve its natural color. Add 1½ teaspoons of lemon juice to each 1½ cups puréed fruit. See the<br />
Fruit Drying Guide on page 6 to determine which fruits will benefit from pretreatment.<br />
The natural sweetness of fruit is intensified with drying. However, if your preference is for a sweeter fruit roll, you can add honey,<br />
* Mrs. Wages is a registered trademark of Precision <strong>Food</strong>s, Inc.<br />
** Fruit roll sheets are sold separately.<br />
5
maple syrup, corn syrup, or sugar to the puréed fruit, if desired. Try different amounts of sweeteners, starting with 1 tablespoon<br />
for each 1½ cups of fruit purée, to find your preference. Fruit with sweeteners added will take longer to dry than fruit that is not<br />
sweetened.<br />
Canned fruit can also be used to easily make fruit leather. Drain juice from fruit, saving juice for later use. Place fruit in food processor<br />
or blender and purée until smooth. Applesauce can be used directly from the container.<br />
For frozen fruit, thaw and purée until smooth.<br />
Pour puréed fruit on lightly oiled fruit roll sheet and spread with a spatula to form a uniform layer about ¼ inch thick. Place fruit roll<br />
sheet on dehydrator tray and begin drying. Average drying time for all fruit rolls is 4 to 7 hours.<br />
Determining Dryness<br />
Acceptably dried fruit leather will be slightly tacky to the touch, but will not indent when touched in the center. Begin checking the<br />
fruit roll after 4 hours of drying. If additional drying time is needed, recheck every 30 minutes.<br />
While slightly warm, starting from the outer edge, carefully peel the fruit roll from the sheet. Loosely roll in plastic wrap or waxed<br />
paper and follow “Packaging and Storage” information on page 3. For immediate enjoyment, cut in strips or roll and cut into serving<br />
pieces.<br />
Note: Remove fruit rolls from sheets prior to cutting them.<br />
FRUIT DRyING GUIDE<br />
Drying times are highly variable depending on the type and amount of food, thickness, evenness of food pieces, humidity, air temperature, personal preference, and<br />
even the age of the plant at the time of harvesting.<br />
Fruit Preparation Pretreatment<br />
Apples Peel, if desired, core, and cut in rings or slices, ⅛˝ to ¼˝ thick. Ascorbic acid, ascorbic<br />
acid mixture, or lemon<br />
juice.<br />
6<br />
Average<br />
Drying Time<br />
3-8 hours<br />
Apricots Cut in half, remove pit, and cut in quarters or ¼˝ thick slices. (See apples) 7-15 hours<br />
Bananas Peel and cut into ¼˝ thick slices. (See apples) 5-7 hours<br />
Blueberries Remove stems. Dip in boiling water for 30 to 60 seconds and then plunge in<br />
ice water to crack the skin.<br />
None 8-16 hours<br />
Cherries Remove stems and pit. Cut in half, chop, or leave whole. None 14-22 hours<br />
Cranberries Remove stems. Dip in boiling water for 30 to 60 seconds and then plunge in<br />
ice water to crack the skin.<br />
Figs Remove stems. Small figs can be left whole. Otherwise, cut in half. Dip<br />
whole figs in boiling water for 30 to 60 seconds and then plunge in ice water<br />
to crack the skin.<br />
Grapes Leave whole or cut in half. Dip whole grapes in boiling water for 30 to<br />
60 seconds and then plunge in ice water to crack the skin.<br />
None 9-17 hours<br />
None 7-14 hours<br />
None 12-20 hours<br />
Kiwi Peel and cut into ¼˝ to ⅜˝ thick slices. None 3-5 hours<br />
Nectarines Cut in half and remove pit. May also quarter or slice ¼˝ thick. (See apples) 5-9 hours (slices)<br />
36-48 hours (halves or quarters)<br />
Peaches Peel if desired. Cut in half and remove pit. May also quarter or slice ¼˝ thick. (See apples) 5-9 hours (slices)<br />
36-48 hours (halves or quarters)<br />
Pears Peel, core, and slice ¼˝ thick. (See apples) 6-12 hours<br />
Pineapple Peel, core, and slice ¼˝ thick. None 5-11 hours<br />
Plums/Prunes Halve or quarter and remove pit. None 7-14 hours<br />
Rhubarb Trim and discard leaves. Cut stalk into ¼˝ slices. None 5-8 hours<br />
Strawberries Remove the leafy crown. Halve or slice ¼˝ thick. None 5-11 hours<br />
Drying Vegetables<br />
Vegetables dry much faster than fruits. At the end of the drying period moisture loss is rapid. As a result, vegetables need to be<br />
checked often towards the end of the drying time to prevent overdrying. <strong>Food</strong> turns brown when it is overdried.<br />
When drying smaller vegetables, such as peas or carrots, it is recommended that you use a mesh screen*. A mesh screen will help<br />
*Nonstick mesh screens are sold separately.
prevent smaller foods from falling through the grates in the tray as they dehydrate.<br />
Selection and Preparation<br />
Wash vegetables to remove dirt and debris. Trim vegetables to remove fibrous or woody portions or bruised and decayed areas, peel,<br />
and slice using the preparation information found on the Vegetable Drying Guide on page 8. Slice or cut vegetables into pieces that are<br />
uniform in size. See guide on page 8 for pretreatment information about specific vegetables.<br />
Pretreatment<br />
The process of blanching involves subjecting vegetables to a high enough temperature to deactivate the enzymes. Blanching is necessary<br />
to stop the naturally occurring enzymes from causing loss of color and flavor during drying and storage. Blanching also relaxes<br />
the tissue walls so moisture can more readily escape during drying and enter during rehydrating. Blanching can be done in water or<br />
steam. Water blanching causes a greater loss of nutrients but is faster than steam blanching and achieves a more even heat penetration.<br />
Steam blanching – Fill a deep pot with water and bring to a boil. Place vegetables loosely in a basket or colander that will allow<br />
steam to freely circulate around the vegetables. Do not fill basket or colander with more than a 2½-inch layer of vegetables. Position<br />
the basket or colander in the pot, making sure it does not contact the boiling water. Cover with a close fitting lid. Steam for<br />
the time indicated in the Vegetable Drying Guide on page 8.<br />
Water blanching – Fill a large pot ⅔ full with water. Cover and bring to a boil. Place vegetables loosely in a basket or colander<br />
and submerge in the boiling water. Cover and blanch for the time indicated in the Vegetable Drying Guide. Water should return to<br />
a boil in less than 1 minute. If not, too many vegetables were added to the basket; reduce the amount of vegetables added for the<br />
next batch. Water blanch for the time indicated in the Vegetable Drying Guide on page 8.<br />
Immediately after steam or water blanching, dip the vegetables in cold water to quickly cool them. Drain the vegetables and arrange<br />
them in a single layer on the dehydrator trays. Refer to the Vegetable Drying Guide on page 8 for drying times.<br />
Determining Dryness<br />
Refer to the Vegetable Drying Guide on page 8 and begin checking the vegetables at the beginning of the average drying time range.<br />
Remove a few pieces of vegetables from each dehydrator tray and allow to cool to room temperature. Test for dryness by breaking the<br />
pieces in half. Most vegetables will be crisp when appropriately dried and will break easily. If vegetables do not break easily, additional<br />
drying time is needed. If vegetables seem to have a lot of moisture remaining, recheck every 1 to 2 hours. If vegetables appear to be<br />
almost done, check again in 30 minutes. Always check vegetables from each tray.<br />
Follow “Packaging and Storage” information on page 3.<br />
Uses<br />
Dried vegetables have a unique flavor and texture and are best used as ingredients for soups, stews, casseroles, and sauces rather than<br />
stand-alone side dishes. When using in soups, dried vegetables can be added without soaking. Dried vegetables used for other purposes<br />
need to be soaked before cooking. To soak, start with 1½ to 2 cups of boiling water for every 1 cup of dried vegetables. Soak for<br />
1 to 2 hours or until vegetables have returned to nearly the same size they were before dehydrating. Additional water should be added<br />
as needed during the soaking process. After soaking, simmer the vegetables in the soaking water until tender, allowing excess water to<br />
evaporate.<br />
Drying Herbs<br />
Drying fresh herbs allows you to have a ready supply of economical herbs that are available to use all through the year. This dehydrator<br />
works best for herbs such as chives, cilantro, and parsley. Aromatic herbs, such as basil, mint, oregano, rosemary, and sage are not<br />
recommended.<br />
Selection and Preparation<br />
Pick herbs for drying just before the flowers first open. These herbs will be the most flavorful. The best time to pick herbs is early<br />
morning just after the dew has evaporated. Rinse leaves and stems in cool water to remove any dust or insects and then gently shake<br />
to remove excess water. Remove dead and bruised leaves or stems. Placing the herbs on a mesh screen* will help prevent them from<br />
falling through the grates in the tray as they dehydrate.<br />
Drying Time<br />
Herbs dry very quickly in this dehydrator. Check herbs from each of the dehydrator trays every ten minutes. Drying time will range<br />
from 30 minutes to 1 hour. Overdrying herbs will result in a scorched flavor.<br />
Determining Dryness<br />
Herbs are acceptably dry when they are crispy and crumble easily.<br />
Packaging and Storage<br />
Dried leaves are best stored whole and then crumbled when needed. Follow “Packaging and Storage” information on page 3.<br />
*Nonstick mesh screens are sold separately.<br />
7
Uses<br />
Most dried herbs are 3 to 4 times stronger than the fresh herbs, therefore when using dried herbs in a recipe that calls for fresh herbs,<br />
use ¼ to ⅓ of the amount called for in the recipe.<br />
VEGETABlE DRyING GUIDE<br />
Drying times are highly variable depending on the type and amount of food, thickness, evenness of food pieces, humidity, air temperature, personal preference, and<br />
even the age of the plant at the time of harvesting.<br />
Vegetable Preparation<br />
8<br />
Pretreatment<br />
water blanching or<br />
steam blanching<br />
Asparagus Cut into 1˝ pieces. water 3½-4½ minutes<br />
steam 4-5 minutes<br />
Beans, green/wax Remove ends and strings. Cut into 1˝ pieces. water 2 minutes<br />
steam 2-2½ minutes<br />
Beets Cook until tender. Cool and peel. Cut into shoestring<br />
strips ⅛˝ thick.<br />
Broccoli Cut in serving pieces. water 2 minutes<br />
steam 3-3½ minutes<br />
Carrots Peel and cut off ends. Cut into ⅛˝ to ¼˝ slices. water 3 minutes<br />
steam 3-3½ minutes<br />
Cauliflower Cut in serving pieces. water 3-4 minutes<br />
steam 4-5 minutes<br />
Celery Trim ends. Cut in ¼˝ slices. water 2 minutes<br />
steam 2 minutes<br />
Corn, cut Husk and remove silk. Blanch and cut corn from cob. water 1½ minutes<br />
steam 2-2½ minutes<br />
Average<br />
Drying Time<br />
5-7 hours<br />
5-10 hours<br />
None – Already cooked. 3-6 hours<br />
3-7 hours<br />
3-9 hours<br />
4-7 hours<br />
2-4 hours<br />
6-10 hours<br />
Mushrooms Wash and slice ⅜˝ thick. None 2-6 hours<br />
Onions Remove outer skin. Cut off top and root ends. Cut in<br />
¼˝ slices.<br />
Peas Shell. water 2 minutes<br />
steam 3 minutes<br />
Peppers and pimientos Remove stem, core, and inner partitions. Cut into ¼˝<br />
strips.<br />
Potatoes Peel and cut into ¼˝ slices. water 5-6 minutes<br />
steam 6-8 minutes<br />
Summer squash and<br />
zucchini<br />
Trim ends. Cut into ¼˝ slices. water 1½ minutes<br />
steam 2½-3 minutes<br />
None 2-6 hours<br />
4-8 hours<br />
None 5-9 hours<br />
3-7 hours<br />
3-5 hours<br />
Tomatoes Peel, if desired. Cut into sections ¾˝ wide. None 5-10 hours<br />
Care and Cleaning<br />
1. Remove plug from wall outlet before cleaning.<br />
2. Wash the dehydrator trays and cover in warm water and a mild detergent or wash in a dishwasher. If necessary, a soft brush may be<br />
used to loosen dried on food particles. Do not use steel wool scouring pads or abrasive cleaners on any of the dehydrator parts.<br />
3. Wipe the dehydrator base with a soft, damp cloth. DO nOT IMMERSE THE DEHYDRATOR BASE In WATER OR OTHER<br />
LIqUID.<br />
The screen which covers the center hub on the dehydrator platform lifts off for cleaning, if needed. Wash in warm water, dry thoroughly,<br />
reposition over hub, and snap in place.
Storing the <strong>Dehydrator</strong><br />
Before stacking the trays onto the base for storage, turn the base upside down and wrap the cord around the center hub, securing the<br />
cord under the clips.<br />
For compact storage, stack the trays onto the base so all of the trays with handles are upside down (raised ribs facing up) and all of the<br />
trays without handles are smooth side up. Once all of the trays are stacked onto the base, turn the cover upside down and place on top<br />
of the trays.<br />
Consumer Service Information<br />
If you have any questions regarding the operation of your <strong>Presto</strong> ® appliance or need parts for your appliance,<br />
contact us by any of these methods:<br />
• Call 1-800-877-0441 weekdays 8:00 AM to 4:00 PM (Central Time)<br />
• Email us through our website at www.Go<strong>Presto</strong>.com/contact<br />
• Write: national <strong>Presto</strong> Industries, Inc.<br />
Consumer Service Department<br />
3925 North Hastings Way, Eau Claire, WI 54703-3703<br />
When contacting the Consumer Service Department, please indicate the model number and the series code for the dehydrator. These<br />
numbers can be found on the bottom of the unit.<br />
Please record this information:<br />
Model Number _________________________ Series Code _________________ Date Purchased _________________________<br />
Inquiries will be answered promptly by telephone, email, or letter. When emailing or writing, please include a phone number and a<br />
time when you can be reached during weekdays if possible.<br />
The <strong>Presto</strong> Factory Service Department is equipped to service PRESTO ® appliances and supply genuine PRESTO ® parts. Genuine<br />
PRESTO ® replacement parts are manufactured to the same exacting quality standards as PRESTO ® appliances and are engineered<br />
specifically to function properly with its appliances. <strong>Presto</strong> can only guarantee the quality and performance of genuine PRESTO ®<br />
parts. “Look-alikes” might not be of the same quality or function in the same manner. To ensure that you are buying genuine<br />
PRESTO ® replacement parts, look for the PRESTO ® trademark.<br />
Canton Sales and Storage Company<br />
<strong>Presto</strong> Factory Service Department<br />
555 Matthews Dr.<br />
Canton, MS 39046-0529<br />
PRESTO ® Limited Warranty<br />
This quality PRESTO ® appliance is designed and built to provide many years of satisfactory performance under normal<br />
household use. <strong>Presto</strong> pledges to the original owner that should there be any defects in material or workmanship during<br />
the first year after purchase, we will repair or replace it at our option. Our pledge does not apply to damage caused by<br />
shipping. To obtain service under the warranty, call our Consumer Service Department @1-800-877-0441. If unable to<br />
resolve the problem, you will be instructed to send your PRESTO ® appliance to the <strong>Presto</strong> Factory Service Department<br />
for a quality inspection; shipping costs will be your responsibility. When returning an appliance, please include a description<br />
of the defect and indicate the date the appliance was purchased.<br />
We want you to obtain maximum enjoyment from using this PRESTO ® appliance and ask that you read and follow the<br />
instructions enclosed. Failure to follow instructions, damage caused by improper replacement parts, abuse, misuse, or<br />
neglect will void this pledge. This warranty gives you specific legal rights, and you may also have other rights which<br />
vary from state to state. This is <strong>Presto</strong>’s personal pledge to you and is being made in place of all other express warranties.<br />
NATIONAl PRESTO INDUSTRIES, INC.<br />
Eau Claire, WI 54703-3703<br />
9<br />
Form 76-029A