Cassette type fancoil Aermec FCLMC20 Installation manual
Cassette type fancoil Aermec FCLMC20 Installation manual
Cassette type fancoil Aermec FCLMC20 Installation manual

Create successful ePaper yourself
Turn your PDF publications into a flip-book with our unique Google optimized e-Paper software.
<strong>FCLMC20</strong><br />
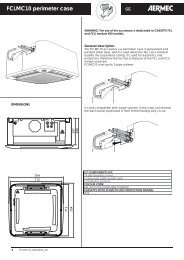
Fig. 1<br />
Fig. 2<br />
Fig. 3<br />
Getting started<br />
. Install the ‘L’ bracket to the unit by using the screws and<br />
holes on the basement as indicated to side (fig. 1)<br />
Assembly of the kit<br />
. Join the two semi-cases using 6 self-threading screws<br />
(supplied); the “Z” brackets are already installed. (fig.2).<br />
<strong>Installation</strong> of the accessory<br />
. The FCL-FCLI cassette unit must be already installed (see<br />
use and installation <strong>manual</strong>) (fig.3).<br />
. The electric and hydraulic connections must arrive from<br />
above and must not interfere with the case.<br />
. Make all hydraulic, electric and condensate<br />
drain connections.<br />
. Apply the <strong>FCLMC20</strong> accessory to the cassette unit.<br />
. Align the holes of the two case brackets with<br />
the holes in the cassette bracket, fixing them using the 4<br />
screws (supplied) using a long screwdriver (fig.4).<br />
. Continue with installation of the grid unit<br />
(GLL/GLLI) like in the normal procedure indicated in the<br />
<strong>manual</strong>.<br />
! The <strong>FCLMC20</strong> accessory is compatible with all grid units for<br />
module 840.<br />
Maintenance.<br />
To clean the case and the visible part of the fan coil, use soft<br />
cloths or sponges dampened in water at maximum temperature<br />
of 40°C. Do not use chemical products or solvents on any part of<br />
the fan coil. Do not spray water on interior or exterior surfaces of<br />
the fan coil (danger of short circuits).<br />
A<strong>FCLMC20</strong>UJ_ 6204350_00<br />
5