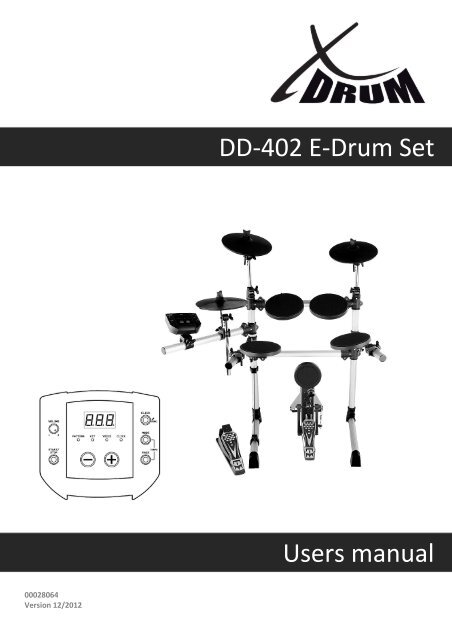
DD-402 E-Drum Set Users manual
DD-402 E-Drum Set Users manual
DD-402 E-Drum Set Users manual

Create successful ePaper yourself
Turn your PDF publications into a flip-book with our unique Google optimized e-Paper software.
00028064<br />
Version 12/2012<br />
<strong>DD</strong>-<strong>402</strong> E-<strong>Drum</strong> <strong>Set</strong><br />
<strong>Users</strong> <strong>manual</strong>
2<br />
THE FCC REGULATION WARNING (for USA)<br />
This equipment has been tested and found to comply with<br />
the limits for a Class B digital device, pursuant to Part 15 of<br />
the FCC Rules.<br />
These limits are designed to provide reasonable protection<br />
against harmful interference in a residential installation. This<br />
equipment generates, uses, and can radiate radio frequency<br />
energy and, if not installed and used in accordance with the<br />
instructions, may cause harmful interference to radio<br />
communications. However, there is no guarantee that<br />
interference will not occur in a particular installation.<br />
If this equipment does cause harmful interference to radio or<br />
television reception, which can be determined by turning the<br />
equipment off and on, the user is encouraged to try to<br />
correct the interference by one or more of the following<br />
measures:<br />
Reorient or relocate the receiving antenna.<br />
Increase the separation between the equipment and<br />
receiver.<br />
Connect the equipment into an outlet on a circuit different<br />
from that to which the receiver is connected.<br />
Consult the dealer or an experienced radio/TV technician<br />
for help.<br />
Unauthorized changes or modification to this system can<br />
void the user’s authority to operate this equipment.<br />
CAUTION<br />
The normal function of the product may be disturbed by<br />
Strong Electro Magnetic Interference. If so, simply reset<br />
the product to resume normal operation by following the<br />
owner’s <strong>manual</strong>. In case the function could not resume,<br />
please use the product in other location.<br />
CAUTION<br />
Changes or modifications not expressly approved<br />
by the party responsible for compliance could void<br />
the user's authority to operate the equipment.<br />
PRECAUTIONS<br />
PLEASE READ CAREFULLY BEFORE PROCEEDING<br />
Please keep this <strong>manual</strong> in a safe place for future reference.<br />
Power Supply<br />
Please connect the designated AC adaptor to an AC outlet<br />
of the correct voltage.<br />
Do not connect it to an AC outlet of voltage other than that<br />
for which your instrument is intended.<br />
Unplug the AC power adaptor when not using the<br />
instrument, or during electrical storms.<br />
Connections<br />
Before connecting the instrument to other devices, turn off<br />
the power to all units. This will help prevent malfunction and<br />
/ or damage to other devices.<br />
Location<br />
Do not expose the instrument to the following conditions to<br />
avoid deformation, discoloration, or more serious damage:<br />
Direct sunlight<br />
Extreme temperature or humidity<br />
Excessive dusty or dirty location<br />
Strong vibrations or shocks<br />
Close to magnetic fields<br />
Interference with other electrical devices<br />
Radios and televisions placed nearby may experience<br />
reception interference. Operate this unit at a suitable<br />
distance from radios and televisions.<br />
Cleaning<br />
Clean only with a soft, dry cloth.<br />
Do not use paint thinners, solvents, cleaning fluids, or<br />
chemical-impregnated wiping cloths.<br />
Handling<br />
Do not apply excessive force to the switches or controls.<br />
Do not let paper, metallic, or other objects into the<br />
instrument. If this happens, unplug the AC adaptor from the<br />
wall outlet. Then have the instrument inspected by qualified<br />
service personnel.<br />
Disconnect all cables before moving the instrument.
Panel Description<br />
Front Panel ................................................... 4<br />
Rear Panel .................................................... 4<br />
<strong>Set</strong>up<br />
Connect the pads and the pedal ...................... 5<br />
Connections<br />
Connect an audio equipment .......................... 6<br />
Connect a CD player, etc.(Aux in jack) ............. 6<br />
Connect headphones .................................... 6<br />
Connect the power supply jack ....................... 6<br />
MIDI and USB ................................................ 6<br />
MENU<br />
menu tree ...................................................... 7<br />
Operation<br />
Switch the power ON ...................................... 7<br />
<strong>Set</strong> the main volume ............................................... 7<br />
Pattern<br />
Select a pattern ............................................. 8<br />
Adjust the accompaniment volume .................. 8<br />
Adjust the drum volume .................................. 8<br />
<strong>Drum</strong> Kit<br />
Select a kit .................................................... 9<br />
Adjust the kit volume ...................................... 9<br />
Switch reverb on/off ....................................... 9<br />
Voice<br />
Select the voice ............................................10<br />
Adjust the voice volume ................................ 10<br />
Adjust the midi note ...................................... 11<br />
Tempo<br />
Adjust the tempo ......................................... 11<br />
Click<br />
Adjust the click time signature ....................... 12<br />
Adjust the click interval ................................. 12<br />
Adjust the click instrument ............................ 12<br />
Adjust the click volume ................................. 12<br />
Restore the factory preset .............. 13<br />
Play the demo ................................. 13<br />
Play the pattern .............................. 13<br />
Play the click .................................. 13<br />
Appendices<br />
Specifications .............................................. 14<br />
Preset <strong>Drum</strong> Kit List ..................................... 15<br />
<strong>Drum</strong> Instrument List .................................... 15<br />
Preset Pattern List ....................................... 15<br />
GM Backing Instrument List .......................... 16<br />
GM <strong>Drum</strong> Kit List .......................................... 18<br />
MIDI Implementation Chart ........................... 19
4<br />
Panel Description<br />
Front Panel<br />
MASTER VOLUME KNOB<br />
Control the volume of phone and line out.<br />
Turn it clockwise to increase the volume<br />
and anticlockwise to decrease the volume.<br />
[START/STOP] BUTTON<br />
Start or stop Pattern playing.<br />
3-DIGIT LED DISPLAY<br />
3-digit LED and LED indicators<br />
[CLICK] BUTTON<br />
Press [click] button to start/stop the click.<br />
Hold on the [click] button 2 seconds to enter<br />
the demo mode and play the demo.<br />
[MODE] BUTTON<br />
Press [mode] button to select the mode from PATTERN,<br />
KIT, VOICE, CLICK.<br />
[PAGE] BUTTON<br />
Press [page] button to browse the menu pages<br />
of current selected mode.<br />
Press both [mode] and [page] buttons,<br />
the 3-digit LED will display the tempo page,<br />
it will temporarily display for 3 seconds,<br />
then press [+] or [-] to adjust the volume.<br />
[+]/[-] BUTTON<br />
Press [+]/[-] button to adjust the parameters.<br />
Rear Panel<br />
POWER SUPPLY JACK ( DC IN 9V )<br />
Connect an AC adaptor to this jack.<br />
POWER SWITCH<br />
Turn the power on/off.<br />
USB PORT<br />
Connect to computer.<br />
MIDI OUT JACK<br />
Connect with external sound module.<br />
LINE OUTPUT JACKS (R, L/MONO)<br />
Made up of right channel output and left<br />
channel output which is also used as mono<br />
line output.<br />
AUX IN<br />
Connect with external sound source.<br />
PHONES JACK<br />
Connect a pair of stereo headphones to this jack.<br />
(Connect the headphones will not mute the output jack.)
Connecting Pads and Pedals<br />
<strong>Set</strong>up<br />
Caution!<br />
To prevent electric shock and damage to the device, make sure the power is switched OFF on<br />
the drum and all related device before making any connection.<br />
Using the provided cables, the cable received by marking the corresponding drum pads, cymbal pads and<br />
pedals. (See the below illustration for reference)<br />
Note:<br />
1. The voice of hi-hat pad hitting is controlled by hi-hat pedal. Similar to a real drum kit, the hi-hat pad functions<br />
as an 'open hi-hat' when the pedal is released. When the pedal is stepped, it functions as a 'closed hi-hat'.<br />
2. The valid striking area of cymbal pad (ride, crash or hi-hat) is near the edge of the pad, which is different from<br />
other pads.<br />
To Hi-Hat<br />
Cymbal Pad<br />
<strong>Drum</strong> Pad<br />
To Crash To<br />
Ride<br />
<strong>Drum</strong> Module<br />
To Hi-Hat<br />
control<br />
Hi-Hat Pedal<br />
1<br />
To Kick<br />
To Tom 1<br />
To Snare<br />
To Tom 2<br />
2<br />
Bass drum pedal<br />
To Tom 3<br />
5
Connect an audio equipment<br />
1.When you want to listen to the voices with an amplifier,<br />
connect amplifiers with the Output L/MONO and R jacks<br />
on the rear panel. (For monaural playback, use the L/MONO<br />
jack; for stereo playback, connect both L/MONO and R<br />
jacks.)<br />
2. The volume is adjusted with the VOLUME knob.<br />
Connect a CD player, etc.(Aux. In jack)<br />
1. The audio output of a CD player, or other audio source,<br />
to connect with the AUX IN jack on the rear panel can be<br />
mixed with the sound of the drum. This function is convenient<br />
that let you play along with a favourite song.<br />
2. The volume of the external signal is adjusted with the<br />
VOLUME knob.<br />
Connect headphones<br />
An optional set of stereo headphones can be connected with<br />
the PHONES jack located on the rear panel of the drum module.<br />
* Adjust the volume to a comfortable level.<br />
Connect the power supply jack<br />
Make sure the power is switched OFF and connect the power<br />
adaptor with the DC IN jack on the rear panel.<br />
Note:<br />
1. To protect the speakers, amplifier and the drum module from<br />
damage, rotate the volume knob to the minimum volume level<br />
before switching the power ON.<br />
2. Make sure the power is switched OFF when connecting drum<br />
module with external devices.<br />
MIDI and USB<br />
MIDI stands for Musical Instrument Digital Interface, this is a<br />
world-wide standard communication interface that enables<br />
electronic musical instruments and computers (of all brands)<br />
to communicate with each other so that MIDI command and<br />
other data can pass between them. This exchange of information<br />
makes it possible to create a system of MIDI instruments and<br />
devices that offer far greater versatility and control than is<br />
available with isolated instruments. Whether you interface with<br />
computers, sequencers, expanders or other controllers, your<br />
musical horizons will be greatly enhanced.<br />
MIDI connection<br />
MIDI OUT: This terminal transmits data from this instrument<br />
to other MIDI devices.<br />
USB connection<br />
The USB connector allows you to connect the module directly to<br />
your computer. It can be connected without driver installation<br />
under the Windows XP\ Vista\Windows 7& MAC OSX environment.<br />
The modulewill be recognized as 'USB Audio device' to receive and<br />
transmit MIDI messages through a single USB cable, USB is used<br />
only for MIDI messages(MIDI via USB).<br />
Note: When the USB is connected to a computer, all MIDI messages<br />
will be received and transmitted via USB.<br />
6<br />
Amplifier Amplifier
Menu tree<br />
PATTERN<br />
KIT<br />
VOICE<br />
CLICK<br />
In the main menu there are 4 menu items<br />
PATTERN<br />
DRUM KIT<br />
VOICE<br />
CLICK<br />
Operation<br />
Number<br />
Acmp Volume<br />
<strong>Drum</strong> Volume<br />
Number<br />
Volume<br />
Reverb<br />
Number<br />
Volume<br />
MIDI note<br />
Time Signature<br />
Interval<br />
Click Instrument<br />
Volume<br />
Press [MODE] button to change the mode.<br />
Press [PAGE] button to select the page of current mode.<br />
Press [+] / [-] button to adjust the parameters.<br />
Switch the power ON<br />
After confirming all connection have been completed, rotate<br />
the volume knob to the left ( minimum volume level) before<br />
switching the power on.<br />
<strong>Set</strong> the power switch to "ON" position to switch on the power.<br />
Display shows the kit’s number and its indicator lights up.<br />
<strong>Set</strong> the main volume<br />
While hitting a pad, gradually rotate the volume knob until a<br />
comfortable volume level is reached.<br />
PATTERN<br />
VOLUME<br />
KIT VOICE CLICK<br />
Kit indicator<br />
Menu<br />
ON OFF<br />
USB<br />
MIDI OUT<br />
VOLUME<br />
7
8<br />
Pattern<br />
In pattern mode, there are 3 pages:<br />
1.Pattern number (1- 40,default 1)<br />
2.Pattern accompaniment volume(0-32)<br />
3.Pattern drum volume(0-32)<br />
Select a pattern<br />
In pattern mode, Pattern number (001-040,default 001)<br />
1.Press the [MODE] button to select the pattern mode, the<br />
pattern LED indicator will be lighted up, the 3-digit-LED will<br />
display the pattern number(001)<br />
2. Press [+] or [-] button to adjust the value.<br />
Range :( 001 to 040)<br />
Adjust the accompaniment volume<br />
In pattern mode, pattern accompaniment volume(0-032)<br />
1. Press [MODE] button to select the pattern mode, the pattern<br />
LED indicator will be lighted up.<br />
2. Press [PAGE] button to select the accompaniment volume<br />
page, the 3-digit-LED will display the accompaniment<br />
volume(A22).<br />
3. Press [+] or [-] button to adjust the value.<br />
Range:(0 to 32).<br />
Play a Song<br />
Adjust the drum volume<br />
In pattern mode, pattern drum volume(0-032)<br />
1. Press [MODE] button to select the pattern mode, the pattern<br />
LED indicator will be lighted up,<br />
2. Press [PAGE] button to select the drum volume page, the<br />
3-digit-LED will display the drum volume(d22).<br />
3. Press [+] or [-] to adjust the value.<br />
Range:(0 to 32)<br />
Pattern LED indicator<br />
Pattern LED indicator<br />
Pattern LED indicator<br />
PATTERN KIT VOICE CLICK<br />
-<br />
+<br />
Figure Pattern number<br />
PATTERN KIT VOICE CLICK<br />
-<br />
+<br />
PATTERN KIT VOICE CLICK<br />
-<br />
PAGE 1<br />
PAGE 2<br />
Figure Pattern accompaniment volume<br />
PAGE 3<br />
+<br />
Figure Pattern drum volume<br />
CLICK<br />
MODE<br />
PAGE TEMPO<br />
CLICK<br />
MODE<br />
PAGE TEMPO<br />
CLICK<br />
MODE<br />
PAGE TEMPO
In kit mode, there are 3 pages:<br />
1. kit number(001-010,default 1).<br />
2. kit volume (0-32).<br />
3. kit reverb:(on/off, default on).<br />
Select a kit a kit<br />
In kit mode, kit number(001-010,default 1).<br />
1. Press [MODE] button to select the kit mode, the kit LED<br />
indicator will be lighted up, the 3-digit-LED will display the<br />
kit number(001).<br />
2. Press [ + ] or [ - ] to adjust the value.<br />
Range:(001-010).<br />
Adjust the kit volume<br />
In kit mode, kit volume (0-32).<br />
1. Press the [MODE] button to select the kit mode, the kit LED<br />
indicator will be lighted.<br />
2. Press the [PAGE] button to select the kit volume page, the<br />
3-digit-LED will display the kit volume(L30).<br />
3.Press [+] or [-] to adjust the value (Automatic save).<br />
Range:(0 to 32).<br />
Switch reverb on/off<br />
1. Press [MODE] button to select the kit mode, the kit LED<br />
indicator will be lighted up.<br />
2. Press the [PAGE] button to select the kit reverb page,<br />
reverb effect can be turn on or off by pressing button [+] or [-].<br />
Kit LED indicator<br />
Kit LED indicator<br />
Kit LED indicator<br />
PAGE 3<br />
Kit LED indicator<br />
PAGE 2<br />
PATTERN KIT VOICE CLICK<br />
-<br />
+<br />
Figure Kit volume<br />
<strong>Drum</strong> Kit<br />
PATTERN KIT VOICE CLICK<br />
Figure Kit number<br />
PATTERN KIT VOICE CLICK<br />
-<br />
PATTERN KIT VOICE CLICK<br />
-<br />
-<br />
PAGE 1<br />
+<br />
CLICK<br />
MODE<br />
PAGE TEMPO<br />
9
In voice mode, there are 3pages:<br />
1. Voice number:(1-108).<br />
2. Voice volume:(0-32).<br />
3. Midi note:(0-99).<br />
In voice mode, voice number:(1-108).<br />
1. Press [MODE] button to select the voice mode,<br />
the voice LED indicator will be lighted up, strike a drum pad,<br />
the 3-digit-LED will display the voice number.<br />
2. Press [+] or [-] to adjust the value(Automatic save).<br />
Range:(001 to 108).<br />
NOTE:<br />
When you select a voice for hi-hit drum, you only can select<br />
the hi-hat group voices, from group 1-group 4(Automatic save),<br />
the display is:(H-I).<br />
In voice mode, voice volume:(0-32).<br />
1. Press [MODE] button to select the voice mode, the voice<br />
LED indicator will be lighted up.<br />
2. Press [PAGE] button to select the voice volume page, strike<br />
a drum pad, the 3-digit-LED will display the voice volume(L30).<br />
3. Press [+] or [-] to adjust the value(Automatic save).<br />
Range:(0 to 32).<br />
10<br />
Voice<br />
Select the voice<br />
Adjust the voice volume<br />
PAGE 1<br />
Voice LED indicator<br />
PATTERN KIT VOICE CLICK<br />
-<br />
+<br />
PATTERN KIT VOICE CLICK<br />
-<br />
+<br />
PATTERN KIT VOICE CLICK<br />
-<br />
PAGE 2<br />
+
Adjust the midi note<br />
In voice mode, midi note:(0-99).<br />
1. Press [MODE] button to select the voice mode, the voice<br />
LED indicator will be lighted up.<br />
2. Press [PAGE] button to select the midi note page, strike a<br />
strike a drum pad, the 3-digit-LED will display the midi note<br />
(n48).<br />
3.Press [+] or [-] to adjust the value(Automatic save).<br />
Range:(0 to 99).<br />
THE DEFAULT MIDI NOTE:<br />
NO.<br />
1<br />
2<br />
3<br />
4<br />
5<br />
6<br />
7<br />
8<br />
9<br />
10<br />
Tempo<br />
NAME<br />
CRASH1<br />
TOM 1<br />
TOM 2<br />
TOM 3<br />
RIDE<br />
KICK<br />
SNARE<br />
HIHAT CLOSE<br />
HIHAT OPEN<br />
HIHAT PEDAL<br />
The tempo range is 30-280<br />
Adjust the tempo<br />
NOTE<br />
1.Press both [MODE] and [ PAGE ] buttons, the 3-digit-LED<br />
will display the tempo page, it will temporarily display for<br />
3 seconds.<br />
49<br />
48<br />
45<br />
43<br />
51<br />
36<br />
38<br />
42<br />
46<br />
44<br />
2. Press [+] or [-] to adjust the value.<br />
PATTERN KIT VOICE CLICK<br />
-<br />
PATTERN KIT VOICE CLICK<br />
-<br />
+<br />
PAGE 3<br />
+<br />
Voice<br />
CLICK<br />
MODE<br />
PAGE TEMPO<br />
11
In click mode, there are 4 pages:<br />
1.Time signature:(1/4-7/4,3/8,6/8).<br />
2. Interval:(1/4,1/8,1/12,1/16,1/24,default 1/4).<br />
3. Instrument:(1-5,default 1).<br />
4. Click volume:(0-32).<br />
In click mode, Time signature:(1/4-7/4,3/8,6/8).<br />
1. Press [MODE] button select the click mode, the click LED<br />
indicator will be lighted up.<br />
2. Press [PAGE] button select the click time signature page,<br />
the 3-digit-LED will display the click time signature(4-4).<br />
3. Press [+] or [-] to adjust the value.<br />
Range:(1/4-7/4 or 3/8 or 6/8).<br />
Note: The click time signature will follow the pattern, when<br />
pattern is playing, it can not be edit.<br />
In click mode, interval:(1/4,1/8,1/12,1/16,1/24,default 1/4).<br />
1. Press [MODE] button to select the click mode, the click LED<br />
indicator will be lighted up.<br />
2. Press [PAGE] button to select the click interval page, the<br />
3-digit-LED will display the click interval (--4) .<br />
3. Press the [+] or [-] button to adjust the value.<br />
Range:(--4 to -24).<br />
In click mode, instrument:(1-5,default 1).<br />
1. Press [MODE] button to select the click mode, the click LED<br />
indicator will be lighted up.<br />
2. Press [PAGE] button to select the click instrument page, the<br />
3-digit-LED will display the click instrument(CL1).<br />
3. Press [+] or [-] to adjust the value.<br />
Range:(CL1 to CL5).<br />
In click mode, click volume:(0-32).<br />
1. Press [MODE] button to select the click mode, the click LED<br />
indicator will be lighted up.<br />
12<br />
Click<br />
Adjust the click time signature<br />
Adjust the click interval<br />
Adjust the click instrument<br />
Adjust the click volume<br />
2. Press [PAGE] button to select the click volume page, the<br />
3-digit-LED will display the click volume(L24).<br />
3. Press [+] or [-] to adjust the value.<br />
Range:(0 to 32)<br />
PATTERN KIT VOICE CLICK<br />
-<br />
+<br />
PATTERN KIT VOICE CLICK<br />
-<br />
+<br />
PATTERN KIT VOICE CLICK<br />
-<br />
+<br />
PATTERN KIT VOICE CLICK<br />
-<br />
PAGE 1<br />
PAGE 2<br />
PAGE 3<br />
PAGE 4<br />
+
Restoring the factory preset can be implemented by following<br />
operations:<br />
Turn on the power with<br />
both [ + ] and [ - ] unreleased.<br />
This function will replace the current settings of following<br />
parameters by their default preset values:<br />
Kit volume, voice number, voice volume and MIDI note.<br />
Play the demo<br />
1. Hold on the [CLICK] button 2 seconds to enter the demo and<br />
play the demo, the 3-digit-LED will display the demo “dE”.<br />
2. Press [START/STOP] button to stop the demo playing.<br />
Play the pattern<br />
1. Press [START/STOP] button play the pattern.<br />
2. Press [ START/STOP]<br />
button again to stop the pattern playing.<br />
Play the click<br />
1. Press the [CLICK] button to start the click, the click indicator<br />
will flash follow the beat.<br />
2. Press the [CLICK] button again to stop the click.<br />
Restore the factory preset<br />
PATTERN KIT VOICE CLICK<br />
-<br />
+<br />
CLICK<br />
MODE<br />
DEMO<br />
PAGE TEMPO<br />
13
<strong>Drum</strong> Pad<br />
4 drum pads , 3 cymbal pads ,1 hi-hat<br />
control pedal , 1 kick pedal<br />
Preset <strong>Drum</strong> kits<br />
10 preset kits<br />
<strong>Drum</strong> Instrument<br />
108<br />
Preset Pattern<br />
40<br />
Controls<br />
MIDI OUT, POWER SWITCH, USB,<br />
PHONES, START/STOP,PATTERN,<br />
KIT, VOICE, CLICK, MODE, PAGE,<br />
DEMO, TEMPO, VOLUME, + / -<br />
14<br />
Specifications<br />
Display<br />
LED display<br />
Connections<br />
PHONES<br />
AUX IN<br />
OUTPUT (R & L/MONO)<br />
MIDI OUT<br />
USB<br />
ON/OFF<br />
Power Supply<br />
AC adaptor ( 9V)
No. Name<br />
001<br />
002<br />
003<br />
004<br />
005<br />
006<br />
007<br />
008<br />
009<br />
010<br />
Acoustic<br />
Standard 1<br />
Rock<br />
Standard 2<br />
Funk<br />
Jazz<br />
Brush<br />
Electronic<br />
808<br />
House<br />
<strong>Drum</strong> Instrument List<br />
No. Name No. Name No. Name No. Name No. Name<br />
001<br />
002<br />
003<br />
004<br />
005<br />
006<br />
007<br />
008<br />
009<br />
010<br />
011<br />
012<br />
013<br />
014<br />
015<br />
016<br />
017<br />
018<br />
019<br />
020<br />
021<br />
KICK<br />
Standard Kick 1<br />
Standard Kick 2<br />
Room Kick<br />
Rock Kick 1<br />
Rock Kick 2<br />
Acoustic Kick<br />
HipHop Kick<br />
Funk Kick<br />
Jazz Kick 1<br />
Jazz Kick 2<br />
Electronic Kick<br />
808 Kick<br />
House Kick 1<br />
House Kick 2<br />
SNARE<br />
Classic Snare 1<br />
Classic Snare Rim 1<br />
Classic Snare 2<br />
Classic Snare Rim 2<br />
Room Snare 1<br />
Room Snare 2<br />
Acoustic Snare<br />
022<br />
023<br />
024<br />
025<br />
026<br />
027<br />
028<br />
029<br />
030<br />
031<br />
032<br />
033<br />
034<br />
035<br />
036<br />
037<br />
038<br />
039<br />
040<br />
041<br />
042<br />
Acoustic Snare Rim<br />
Funk Band Snare<br />
Funk Band Snare Rim<br />
Camco Snare<br />
Camco Snare Rim<br />
Brush Snare<br />
Brush Snare Rim<br />
Electronic Snare 1<br />
Electronic Snare 2<br />
808 Snare<br />
House Snare 1<br />
House Snare 2<br />
TOM<br />
Classic Tom 1<br />
Classic Tom 2<br />
Classic Tom 3<br />
Classic Tom 4<br />
Classic Tom 5<br />
Classic Tom 6<br />
Camco Tom 1<br />
Camco Tom 2<br />
Camco Tom 3<br />
Preset Pattern List<br />
043<br />
044<br />
045<br />
046<br />
047<br />
048<br />
049<br />
050<br />
051<br />
052<br />
053<br />
054<br />
055<br />
056<br />
057<br />
058<br />
059<br />
060<br />
061<br />
Camco Tom 4<br />
Camco Tom 5<br />
Camco Tom 6<br />
808 Tom 1<br />
808 Tom 2<br />
808 Tom 3<br />
808 Tom 4<br />
808 Tom 5<br />
Electronic Tom 1<br />
Electronic Tom 2<br />
Electronic Tom 3<br />
Electronic Tom 4<br />
Electronic Tom 5<br />
Electronic Tom 6<br />
RIDE<br />
Classic Ride<br />
Classic Ride Bell<br />
Rock Ride<br />
808 Ride<br />
063<br />
064<br />
065<br />
066<br />
067<br />
068<br />
808 Tom 6 069<br />
070<br />
071<br />
072<br />
073<br />
074<br />
075<br />
076<br />
077<br />
078<br />
079<br />
080<br />
Standard Crash 2<br />
Rock Crash<br />
Splash 1<br />
Splash 2<br />
Brush Crash<br />
808 Crash<br />
HI-HAT<br />
Standard Hi-hat Open<br />
Jazz Hi-hat Open<br />
Electronic Hi-hat Open<br />
808 Hi-hat Open<br />
Standard Hi-hat Close<br />
Jazz Hi-hat Close<br />
Electronic Hi-hat Close<br />
808 Hi-hat Close<br />
Standard Hi-hat Pad<br />
Jazz Hi-hat Pad<br />
Electronic Hi-hat Pad<br />
808 Hi-hat Pad<br />
CRASH<br />
PERCUSSTION<br />
062 Standard Crash 1 081 Bongo High<br />
No. Name Tempo Kit No. Name Tempo Kit<br />
001<br />
002<br />
003<br />
004<br />
005<br />
006<br />
007<br />
008<br />
009<br />
010<br />
011<br />
012<br />
013<br />
014<br />
015<br />
016<br />
017<br />
018<br />
019<br />
020<br />
Fusion 1<br />
Electronic & Funk<br />
Modern Pop<br />
HipHop<br />
Latin Jazz 1<br />
Funk 1<br />
Big Band 1<br />
Funk 2<br />
Pop Funk 1<br />
Fusion 2<br />
Funk 3<br />
Fusion 3<br />
Fusion 4<br />
Pop Funk 2<br />
R&B<br />
<strong>Drum</strong> & Bass 1<br />
Break Beat<br />
Dance<br />
<strong>Drum</strong> & Bass 2<br />
Latin Dance<br />
103<br />
116<br />
136<br />
110<br />
130<br />
120<br />
170<br />
112<br />
112<br />
112<br />
120<br />
108<br />
116<br />
106<br />
86<br />
168<br />
108<br />
130<br />
170<br />
126<br />
1<br />
9<br />
1<br />
9<br />
7<br />
5<br />
6<br />
1<br />
1<br />
1<br />
5<br />
1<br />
1<br />
5<br />
9<br />
9<br />
5<br />
9<br />
1<br />
5<br />
021 Swing<br />
022 Latin Jazz 2<br />
023 Big Band 2<br />
024 3/4 Jazz<br />
025 Jazz<br />
026 6/8 Ballad<br />
027 Pop Ballad<br />
028 Pop Bossa<br />
029 16Beat Pop<br />
030 Pop Shuffle<br />
031 Samba<br />
032 Mambo<br />
033 Latin Rock<br />
034 Latin Pop<br />
035 Guitar Bossa<br />
036 Country Blues<br />
037 Rock<br />
038 Reggae<br />
039 60’s Rock<br />
040 Blues<br />
Demo Funk<br />
Preset <strong>Drum</strong> KIT list<br />
172<br />
126<br />
152<br />
120<br />
150<br />
96<br />
80<br />
120<br />
120<br />
86<br />
236<br />
126<br />
136<br />
126<br />
84<br />
128<br />
100<br />
78<br />
120<br />
96<br />
100<br />
6<br />
7<br />
6<br />
7<br />
7<br />
3<br />
3<br />
2<br />
5<br />
5<br />
1<br />
5<br />
1<br />
5<br />
5<br />
3<br />
1<br />
1<br />
2<br />
2<br />
1<br />
082 Bongo Low<br />
083 Mute Conga Hi-hat<br />
084 Open Conga Hi-hat<br />
085 Conga Low<br />
086 Timbale High<br />
087 Timale Low<br />
088 Agogo High<br />
089 Agogo Low<br />
090 Cabasa<br />
091 Maracas<br />
092 Short Whistle<br />
093 Long Whistle<br />
094 Short Guiro<br />
095 Long Guiro<br />
096 Claves<br />
097 Wood Block High<br />
098<br />
099<br />
100<br />
101<br />
102<br />
103<br />
104<br />
105<br />
106<br />
107<br />
108<br />
Wood Block Low<br />
Mute Cuica<br />
Open Cuica<br />
Mute Triangle<br />
Open Triangle<br />
Shaker<br />
Jingle Bell<br />
Belltree<br />
Castanets<br />
Mute Surdo<br />
Open Surdo<br />
15
16<br />
GM Backing Instrument List<br />
PIANO<br />
1<br />
2<br />
3<br />
4<br />
5<br />
6<br />
7<br />
8<br />
Acoustic Grand Piano<br />
Bright Acoustic Piano<br />
Electric Grand Piano<br />
Honky-Tonk Piano<br />
E.Piano 1<br />
E.Piano 2<br />
Harpsichord<br />
Clavi<br />
MALLET<br />
9 Celesta<br />
10 Glockenspiel<br />
11 Music Box<br />
12 Vibraphone<br />
13 Marimba<br />
14 Xylophone<br />
15 Tubular Bells<br />
16 Dulcimer<br />
ORGAN<br />
17<br />
18<br />
19<br />
20<br />
21<br />
22<br />
23<br />
24<br />
Drawbar Organ<br />
Percussive Organ<br />
Rock Organ<br />
Church Organ<br />
Reed Organ<br />
Accordion<br />
Harmonica<br />
Tango Accordion<br />
GUITAR<br />
25<br />
26<br />
27<br />
28<br />
29<br />
30<br />
31<br />
32<br />
BASS<br />
33<br />
34<br />
35<br />
36<br />
37<br />
38<br />
39<br />
40<br />
Nylon Guitar<br />
Steel Guitar<br />
Jazz Guitar<br />
Clean Guitar<br />
Muted Guitar<br />
Overdriven Guitar<br />
Distortion Guitar<br />
Guitar Harmonics<br />
Acoustic Bass<br />
Finger Bass<br />
Pick Bass<br />
Fretless Bass<br />
Slap Bass 1<br />
Slap Bass 2<br />
Synth Bass 1<br />
Synth Bass 2<br />
STRINGS<br />
41<br />
42<br />
43<br />
44<br />
45<br />
46<br />
47<br />
48<br />
Violin<br />
Viola<br />
Cello<br />
Contrabass<br />
Tremolo Strings<br />
Pizzicato Strings<br />
Orchestral Harp<br />
Timpani<br />
STRINGS ENSEMBLE<br />
49<br />
50<br />
51<br />
52<br />
53<br />
54<br />
55<br />
56<br />
Strings Ensemble 1<br />
Strings Ensemble 2<br />
Synth Strings 1<br />
Synth Strings 2<br />
Choir Aahs<br />
Voice Oohs<br />
Synth Voice<br />
Orchestra Hit<br />
BRASS<br />
57<br />
58<br />
59<br />
60<br />
61<br />
62<br />
63<br />
64<br />
REED<br />
65<br />
66<br />
67<br />
68<br />
69<br />
70<br />
71<br />
72<br />
PIPE<br />
73<br />
74<br />
75<br />
76<br />
77<br />
78<br />
79<br />
80<br />
LEAD<br />
81<br />
82<br />
83<br />
84<br />
85<br />
86<br />
87<br />
88<br />
PAD<br />
89<br />
90<br />
91<br />
92<br />
93<br />
94<br />
95<br />
96<br />
Trumpet<br />
Trombone<br />
Tuba<br />
Muted Trumpet<br />
French Horn<br />
Brass Section<br />
Synth Brass 1<br />
Synth Brass 2<br />
Soprano Sax<br />
Alto Sax<br />
Tenor Sax<br />
Baritone Sax<br />
Oboe<br />
English Horn<br />
Bassoon<br />
Clarinet<br />
Piccolo<br />
Flute<br />
Recorder<br />
Pan Flute<br />
Blown Bottle<br />
Shakuhachi<br />
Whistle<br />
Ocarina<br />
Lead1 (square)<br />
Lead2 (sawtooth)<br />
Lead3 (calliope)<br />
Lead4 (chiff)<br />
Lead5 (charang)<br />
Lead6 (voice)<br />
Lead7 (fifths)<br />
Lead8 (bass & Lead)<br />
Pad1 (newage)<br />
Pad2 (warm)<br />
Pad3 (Polysynth)<br />
Pad4 (choir)<br />
Pad5 (bowed)<br />
Pad6(metallic)<br />
Pad7 (halo)<br />
Pad8 (sweep)<br />
EFFECTS<br />
97<br />
98<br />
99<br />
100<br />
101<br />
102<br />
103<br />
104<br />
ETHNIC<br />
105<br />
106<br />
107<br />
108<br />
109<br />
110<br />
111<br />
112<br />
113<br />
114<br />
115<br />
116<br />
117<br />
118<br />
119<br />
120<br />
FX1 (rain)<br />
FX2 (soundtrack)<br />
FX3 (crystal)<br />
FX4 (atmosphere)<br />
FX5 (brightness)<br />
FX6 (goblins)<br />
FX7 (echoes)<br />
FX8 (sci-fi)<br />
Sitar<br />
Banjo<br />
Shamisen<br />
Koto<br />
Kalimba<br />
Bagpipe<br />
Fiddle<br />
Shanai<br />
PERCUSSIVE<br />
Tinkle Bell<br />
Agogo<br />
Steel <strong>Drum</strong>s<br />
Wood Block<br />
Taiko <strong>Drum</strong><br />
Melodic Tom<br />
Synth <strong>Drum</strong><br />
Reverse Cymbal<br />
SOUND EFFECTS<br />
121<br />
122<br />
123<br />
124<br />
125<br />
126<br />
127<br />
128<br />
Guitar Fret Noise<br />
Breath Noise<br />
Seashore<br />
Bird Tweet<br />
Telephone Ring<br />
Helicopter<br />
Applause<br />
Gunshot
GM <strong>Drum</strong> Kit List Click<br />
NET NO. Standard 1 (bank 0 ) Standard 2 (bank 4 ) Room (bank 8 ) Rock (bank 16 )<br />
27-D#1<br />
High Q
18<br />
GM <strong>Drum</strong> Kit List<br />
NET NO.<br />
27-D#1<br />
28-E1 29-F1<br />
30-F#1<br />
31-G1<br />
32-G#1<br />
33-A1<br />
34-A#1<br />
35-B1<br />
36-C2<br />
37-C#2<br />
38-D2<br />
39-D#2<br />
40-E2<br />
41-F2<br />
42-F#2<br />
43-G2<br />
44-G#2<br />
45-A2<br />
46-A#2<br />
47-B2<br />
48-C3<br />
49-C#3<br />
50-D3<br />
51-D#3<br />
52-E3<br />
53-F3<br />
54-F#3<br />
55-G3<br />
56-G#3<br />
57-A3<br />
58-A#3<br />
59-B3<br />
60-C4<br />
61-C#4<br />
62-D4<br />
63-D#4<br />
64-E4<br />
65-F4<br />
66-F#4<br />
67-G4<br />
68-G#4<br />
69-A4<br />
70-A#4<br />
71-B4<br />
72-C5<br />
73-C#5<br />
74-D5<br />
75-D#5<br />
76-E5<br />
77-F5<br />
78-F#5<br />
79-G5<br />
80-G#5<br />
81-A5<br />
82-A#5<br />
83-B5<br />
84-C6<br />
85-C#6<br />
86-D6<br />
87-D#6<br />
Electronic (bank 24 ) 808 (bank 25 ) House (bank 28 ) Jazz (bank 32 )<br />
MIDI Implementation Chart<br />
Function... Transmitted Recognized Remarks<br />
Basic Default 10 ch<br />
1-16<br />
Channel Changed X X<br />
Default X X<br />
Mode Messages X X<br />
Altered ************** **************<br />
Note 0-127 0-127<br />
Number: True voice ************** 0-127<br />
Velocity Note on O 9 9 H, V=1-127 0-127<br />
Note off O (9 9H. V=0) 0-127<br />
After Key's X<br />
X<br />
Touch Channel's X<br />
X<br />
Pitch Bend<br />
X<br />
O<br />
Control 0<br />
X<br />
O<br />
Change 1<br />
X<br />
O<br />
5<br />
X<br />
O<br />
6<br />
X<br />
O<br />
7<br />
X<br />
O<br />
10<br />
X<br />
O<br />
11<br />
X<br />
O<br />
64<br />
X<br />
O<br />
65<br />
X<br />
O<br />
66<br />
X X<br />
O<br />
67<br />
X<br />
O<br />
Soft Pedal<br />
80<br />
X<br />
O<br />
81<br />
X<br />
O<br />
91<br />
X<br />
O<br />
93<br />
X<br />
O<br />
120<br />
X<br />
O<br />
121<br />
X<br />
O<br />
123<br />
X<br />
O<br />
Program Change<br />
X<br />
O<br />
System Exclusive<br />
X<br />
O<br />
System : Song Position<br />
Common : Song Select<br />
: Tune<br />
System : Clock<br />
Real Time : Commands<br />
Aux : Local ON/OFF<br />
: All Notes OFF<br />
Messages : Active Sense<br />
: Reset<br />
O : YES<br />
X : NO<br />
X<br />
X<br />
X<br />
O<br />
O<br />
X<br />
X<br />
O<br />
X<br />
X<br />
X<br />
X<br />
X<br />
X<br />
X<br />
X<br />
X<br />
X<br />
Bank Select<br />
Modulation<br />
Portamento Time<br />
Data Entry<br />
Volume<br />
Pan<br />
Expression<br />
Sustain Pedal<br />
Portamento ON/OFF<br />
Sostenuto Pedal<br />
Reverb Program<br />
Chorus Program<br />
Reverb Level<br />
Chorus Level<br />
All Sound OFF<br />
Reset All Controller<br />
All Notes OFF<br />
START \ STOP<br />
19