
You also want an ePaper? Increase the reach of your titles
YUMPU automatically turns print PDFs into web optimized ePapers that Google loves.
00022173<br />
Version 01/2010<br />
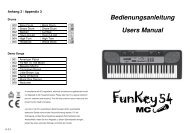
<strong>DD</strong>-<strong>501</strong> E-<strong>Drum</strong> <strong>Set</strong><br />
<strong>Users</strong> <strong>manual</strong>
Thank you for purchasing this digital drum module. The drum module has been<br />
developed to act and play like a drum set but with greater ease. Before you use<br />
the instrument, we recommend you to read through this <strong>manual</strong>.<br />
Taking Care of Your Digital <strong>Drum</strong> <strong>Set</strong><br />
Location<br />
Do not expose the unit to the following<br />
c o n d i t i o n s t o a v o i d d e f o r m a t i o n ,<br />
discoloration, or more serious damage.<br />
Direct sunlight.<br />
High temperature (near a heat source, or<br />
in a car during the day time).<br />
Excessive humidity.<br />
Excessive dust.<br />
Strong vibration<br />
Power Supply<br />
Make sure to use the suitable AC adaptor,<br />
and also make sure the AC outlet voltage<br />
at your country matches the input voltage<br />
specified on the AC adaptor`s label.<br />
Turn the power switch OFF when the<br />
instrument is not in use.<br />
An AC adaptor should be unplugged from<br />
the AC outlet if the instrument is not be<br />
used for an extended period of time.<br />
Unplug the AC adaptor during electric<br />
storms.<br />
Avoid plugging the AC adaptor into the<br />
same AC outlet as appliance with high<br />
power consumption, such as electric<br />
heaters or ovens. Also avoid using multiplug<br />
adaptors since these can result in<br />
reducing the sound quality, operation<br />
errors, and possibly damage.<br />
Radiated Immunity<br />
Congratulations!<br />
The normal function of the product may<br />
be disturbed by Strong Electro<br />
Magnetic Interference. If so, simply reset<br />
the product to resume normal operation<br />
by following the instruction <strong>manual</strong>. In<br />
case the function could not resume,<br />
please use the product in other location.<br />
ESD, Fast Transient and Surge may<br />
cause the unit to temporary malfunction.<br />
Switch off and on again to resume normal<br />
operation.<br />
2<br />
Handling and Transport<br />
Never apply excessive force to the<br />
controls, connectors or other parts of the<br />
instrument.<br />
Always unplug cables by gripping the<br />
plug firmly, but not pulling on the cable.<br />
Disconnect all cables before moving the<br />
instrument.<br />
Physical shocks caused by dropping,<br />
bumping, or placing heavy objects on the<br />
instrument can result in scratches and<br />
more serious damage.<br />
Cleaning<br />
Clean the unit with a dry soft cloth.<br />
A slightly damp cloth may be used to<br />
remove stubborn grime and dirt.<br />
Never use cleaners such as alcohol or<br />
thinner.<br />
Avoid placing vinyl object on top of the<br />
unit (vinyl can stick to and discolor the<br />
surface).<br />
Electrical Interference<br />
This instrument contains digital circuitry<br />
and may cause interference if placed too<br />
close to radio or television receivers. If<br />
this occurs, move the instrument further<br />
away from the affected equipment.<br />
Turn Power OFF When Making<br />
Connections<br />
To avoid damage to the instrument and<br />
other devices to which it is connected,<br />
turn the power switches of all related<br />
device OFF prior to connecting or<br />
disconnecting cables.<br />
THIS DEVICE COMPLIES WITH PART 15 OF THE FCC RULES.<br />
OPERATION IS SUBJECT TO THE FOLLOWING TWO CONDITIONS:<br />
(1) THIS DEVICE MAY NOT CAUSE HARMFUL INTERFERENCE, AND<br />
(2) THIS DEVICE MUST ACCEPT ANY INTERFERENCE RECEIVED,<br />
INCLUDING INTERFERENCE THAT MAY CAUSE UNDESIRED OPERATION.
Contents<br />
Panel Controls<br />
- Front Panel<br />
- Rear Panel<br />
<strong>Set</strong>up<br />
- Connect the Pads and the Pedals<br />
- Connect the Power supply jack<br />
- Connect a audio equipment<br />
- Connect a CD player, etc.(Mix in jack)<br />
- Connect Headphones<br />
- Connect a MIDI and USB device<br />
- MIDI out format<br />
Functions<br />
- Switch the power ON<br />
- <strong>Set</strong> the main volume<br />
- Select a drum kit<br />
- Adjust the kit volume<br />
- Select a pad voice<br />
- Adjust the pad volume<br />
- Save kit<br />
- Select a pattern<br />
- Listen to the pattern<br />
- Adjust the pattern volume<br />
- Recording<br />
- <strong>Drum</strong> off<br />
- Adjust the pattern tempo<br />
- Click<br />
- Select a click sound<br />
- Adjust the click volume<br />
- Factory reset<br />
- Hi-Hat control<br />
Specifications<br />
Voice list<br />
Pattern list<br />
Percussion <strong>Set</strong> List<br />
MIDI implementation chart<br />
3<br />
4<br />
4<br />
5<br />
6<br />
6<br />
7<br />
7<br />
7<br />
7<br />
8<br />
8<br />
9<br />
9<br />
9<br />
9<br />
9<br />
10<br />
10<br />
10<br />
11<br />
11<br />
11<br />
12-13<br />
13<br />
14<br />
14<br />
14<br />
15<br />
15<br />
15<br />
16<br />
17<br />
18<br />
19<br />
20
Panel Controls<br />
Front Panel<br />
3<br />
3<br />
[volume] knob<br />
Control the volume of phone.<br />
Turn it clockwise to increase the volume<br />
and anticlockwise to decrease it.<br />
[ + ] and [ - ] buttons<br />
Adjust the parameter of the current menu<br />
(KIT, voice, pattern, click value, tempo<br />
value, etc.).<br />
[tempo] Button<br />
Enter the tempo adjustment mode.<br />
Pads indicators<br />
It shows the trigger sound in process of<br />
pattern play.<br />
[click] Button and indicator<br />
Turn on or off the metronome.<br />
[drum off] Button and indicator<br />
It is used to mute on or mute off the drum<br />
part of the song.<br />
[start/stop] Button<br />
Start or stop song playing.<br />
4<br />
[pattern] Button<br />
Enter the pattern select mode and provide<br />
MIDI output format choice.<br />
[voice] Button<br />
Enter the voice select mode.<br />
[kit] Button<br />
Enter the kit select mode.<br />
3-digit LED<br />
Display the parameters of current menu .<br />
[volume] Button<br />
Enter the volume adjustment mode and to<br />
separately adjust the kit volume, voice<br />
volume, click volume and pattern volume.<br />
[save/rec] Button<br />
Afford two modes:<br />
Short pressing [save/rec] button to save the<br />
current kit setting to a user kit.<br />
Press and hold on [save/rec] button to enter<br />
recording mode.<br />
Power Switch<br />
Turn the power on or off .
Rear Panel<br />
3<br />
DC Input<br />
Support DC 9V power.<br />
Phone Jack<br />
Connect headphone or loudspeaker.<br />
Output Jacks<br />
Support Line stereo output.<br />
MIX Input Jacks<br />
Connect with external sound source.<br />
3<br />
USB Port<br />
Connect to computer or other USB host devices.<br />
Trigger Input Jacks<br />
Connect with kick, snare, tom1~tom3, ride,<br />
crash, hi-hat, hi-hat control triggers.<br />
5
<strong>Set</strong>up<br />
Caution!<br />
To prevent electric shock and damage to the device, make sure the power is switched OFF<br />
on the drum and all related device before making any connection.<br />
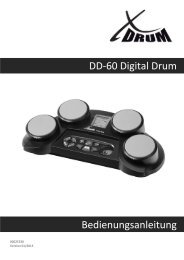
Connect the Pads and the Pedal<br />
Using the provided cables, connect with kick, snare, tom1~tom3, ride, crash, hi-hat, hi-hat control triggers.<br />
Snare is stereo input, supports double triggering (increase edge triggering); cymbal (includes ride and crash)<br />
kick, tom, Hi-Hat are mono input, which can't response edge triggering. Hi-Hat pedal is stereo input.<br />
Note:<br />
1. The voice of hi-hat pad hitting is controlled by hi-hat pedal. Similar to a real drum kit, the hi-hat pad functions<br />
as an 'open hi-hat' when the pedal is released. When the pedal is stepped, it functions as a 'closed hi-hat' .<br />
2. The valid striking area of a cymbal pad (ride, crash or hi-hat) is half part of the pad on the player side, which<br />
is different from other pads.<br />
crash ride<br />
hi-hat<br />
tom 1<br />
<strong>Drum</strong> Module<br />
snare<br />
Hi-Hat control pedal<br />
6<br />
tom 2<br />
Kick Trigger<br />
tom 3
Connect the Power supply jack<br />
Make sure the power is switched OFF and connect the power<br />
adaptor with the DC jack on the rear panel.<br />
Note:<br />
1. To protect the speakers, amplifier and the drum module from<br />
damage, rotate the volume knob to the minimum volume level<br />
before switching the power ON.<br />
2. Make sure the power is switched OFF when connecting drum<br />
module with external devices.<br />
Connect a audio equipment<br />
When you want to listen to the voices with an amplifier,<br />
connect amplifiers with the Output jacks on the rear panel.<br />
Connect a CD player, etc.(Mix. In jack)<br />
The audio output of a CD player, or other audio source,<br />
to connect with the MIX IN jack on the rear panel can be<br />
mixed with the sound of the drum. This function is convenient<br />
that let you play along with a favourite song.<br />
Connect Headphones<br />
An optional set of stereo headphones can be connected with<br />
the PHONES jack located on the rear of the drum module.<br />
* Adjust the volume to a comfortable level.<br />
7<br />
Amplifier
Connect a MIDI and USB device<br />
1. Connect PC or other USB host devices that support USB Audio.<br />
2. For devices with USB cable, you can choose USB Audio Device in<br />
the device menu of the software to transfer midi data. The USB is<br />
compatible with XP, Vista and Mac OS without any PC driver.<br />
3.<br />
The drum module sends the MIDI data by hitting pads or stepping<br />
pedal through USB port. But the data of the click and song<br />
playing is not included. USB port only sends and receives<br />
MIDI information.<br />
Note:<br />
Channel 11 is default percussion channel.<br />
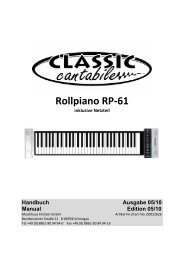
MIDI out format<br />
One of the two different MIDI output formats can be selected for<br />
the <strong>Drum</strong> Module: the internal format (default setting) and the GM<br />
format.<br />
The internal format is used when the <strong>Drum</strong> Module works as<br />
sound source ( <strong>Drum</strong> Module must connect to computer or other<br />
Module with USB host device by USB, and send midi data to<br />
another <strong>Drum</strong> Module. One <strong>Drum</strong> Module can't connect to another<br />
<strong>Drum</strong> Module by USB).<br />
The GM format is used when some other sound source applied<br />
(<strong>Drum</strong> Module to other product which support GM format), such<br />
as computer.<br />
If you record your own drum play to PC software with internal format,<br />
then only the drum module could recognize and playback your own<br />
song(recorded midi file) correctly.<br />
Nevertheless, if you would like to playback your recorded midi song<br />
in any sound source device which support GM format ,we suggest<br />
you to record your own drum performance with GM format output.<br />
In pattern selecting mode, press [pattern] button to enter MIDI<br />
output format choice mode, LED displays that the current MIDI<br />
output format “P-N”(default setting, internal format) or “--N”(GM<br />
format), it can be switched by pressing [+] and [-] button.<br />
If the internal format (P-N) is selected, which means “program<br />
change” and “note on/off” be transmitted. When the GM format<br />
(--N) is selected, which means only 'note on/off' will be transmitted.<br />
Note:<br />
The above setting only affect to the primary percussion channel.<br />
(MIDI channel 10)<br />
8<br />
<strong>Drum</strong> Module<br />
GM format<br />
internal format<br />
internal format<br />
<strong>Drum</strong> Module<br />
other MIDI device<br />
with USB host<br />
GM format
Functions<br />
Switch the power ON<br />
After confirming all connection have been completed, rotate<br />
the volume knob to the left ( minimum volume level) before<br />
switching the power on.<br />
<strong>Set</strong> the power switch to "on" position to switch on the power.<br />
Display shows the kit's number and its indicator lights up.<br />
<strong>Set</strong> the main volume<br />
While hitting a pad, gradually rotate the volume knob until a<br />
comfortable volume level is reached.<br />
Select a drum kit<br />
The unit comes with 10 (001-010) preset drum kits and 5<br />
user kits (011-015).<br />
Press [kit] button to enter KIT selecting mode, 3-digit LED<br />
displays the current KIT number and KIT indicator lights up.<br />
In kit selecting mode, press [+] or [-] button to choose any<br />
KIT(001-015,in cycle) as the current KIT.<br />
Adjust the kit volume<br />
In KIT selecting mode, press [volume] button to enter volume<br />
adjusting mode, volume indicator lights, 3-digit LED displays<br />
the current kit volume value, adjust its value by pressing [+]<br />
and [-] button. (0-16, not in cycle); Then press [kit] button<br />
again to enter KIT selecting mode and volume indicator off.<br />
Be note that in recording waiting mode, the KIT volume value<br />
could be shown on LED but it could not be adjusted.<br />
9<br />
Kit indicator<br />
Kit indicator<br />
Kit indicator<br />
Volume indicator lights
Select a pad voice<br />
It provides 108 built-in drum voices in all to choose.<br />
Press [voice] button to enter pad voice selecting mode,<br />
3-digit LED displays the current pad voice number and<br />
voice indicator lights.<br />
In the pad voice selecting mode, press [+] and [-] button<br />
to choose the voice of current pad or cymbal (1-108, in<br />
cycle).<br />
Adjust the pad volume<br />
In voice selecting mode, press [volume] button to enter<br />
pad volume adjusting mode, volume indicator lights,<br />
3-digit LED displays the current pad volume value.<br />
Press [+] and [-] button to adjust its value (0-16, not in<br />
cycle).<br />
Press [voice] button again to enter voice selecting mode.<br />
Save kit<br />
Press [save] button to enter KIT saving mode, 3-digit<br />
LED displays the user KIT number to save, KIT indicator<br />
lights and user KIT number flash.<br />
Press [+] and [-] button to choose the user KIT (11-15,<br />
in cycle) to save. During choosing the KIT, the user KIT<br />
number will be kept flashing.<br />
Press [save] button again, the current KIT setting<br />
(includes all pads voice numbers and volume ) is saved<br />
into the chosen user KIT.<br />
When in recording mode, the user are not allowed to use<br />
this function.<br />
10<br />
Voice indicator<br />
Voice indicator<br />
Volume indicator lights<br />
Kit indicator<br />
flash
Select a pattern<br />
It offer 41 built-in patterns (40 preset patterns and one<br />
user pattern).<br />
Press [pattern] button to enter pattern choice mode,<br />
3-digit LED displays the current pattern number and<br />
pattern indicator lights.<br />
Press [+] and [-] button to choose the current pattern<br />
number (1-41, in cycle).<br />
Listen to the pattern<br />
Press [start/stop] button to start/stop pattern playing.<br />
In process of pattern playing, click indicator lights and<br />
flash, which shows the beat of the playing pattern, and<br />
the pad indicators lights in accompany with the variable<br />
trigger sound in process of pattern play, for easy learning<br />
and practsing. If another pattern be selected in<br />
current song playing, it will start to play at the next<br />
measure.<br />
In pattern playing mode, press [start/stop] button to stop<br />
pattern play.<br />
Note:<br />
The pattern and the MIDI IN use the same 16 midi<br />
channels, when you use MIDI IN to play a song, it maybe<br />
affect the built-in pattern playing. So you must reset the<br />
drum module.<br />
Adjust the pattern volume<br />
In pattern choice mode, press [volume] button to enter<br />
pattern volume adjusting mode,3-digit LED displays the<br />
accompaniment volume value of current pattern (be note<br />
that the percussion part volume can not be adjusted, it<br />
just could be mute on/off by using [drum off] button), and<br />
volume indicator lights, press [+] and [-] button to adjust<br />
pattern volume value (0-16, not in cycle). Then press<br />
[pattern] button again to enter pattern choice mode.<br />
Be note that in recording waiting mode, the pattern<br />
volume value could be shown on LED but it could not be<br />
adjusted.<br />
Note:<br />
pattern volume only control the accompaniment part<br />
volume of the pattern.<br />
11<br />
Pattern indicator<br />
Pattern indicator<br />
click indicator lights and flash,<br />
show pattern is playing<br />
Pattern indicator<br />
Volume indicator lights
Recording<br />
Enter the Recording Waiting Mode<br />
Press and hold [save] button more than 2 seconds, to<br />
enter user pattern recording waiting mode,3-digit LED<br />
displays KIT number and REC indicator flashes.<br />
In recording waiting mode, the correspondent<br />
parameter can be adjusted.<br />
Adjust pattern number as accompaniment.<br />
Adjust tempo value.<br />
Adjust KIT number.<br />
Switch drum off status.<br />
Turn on/off click<br />
In the Recording Waiting Mode, press [pattern] to show<br />
the pattern (---~001~040) as accompaniment for recording.<br />
Use [+] or [-]to select the accompaniment, if “---” be<br />
selected, that means the user would like to record a solo<br />
drum part.<br />
Note:<br />
VOICE selecting function are not allowed for user in<br />
recording waiting mode and time signature.<br />
Enter Recording Mode<br />
Press [start/stop] button or hit pads to enter recording<br />
mode, then REC indicator lights all along, 3-digit LED<br />
displays recording measures.<br />
During recording, the original data will be covered<br />
with the newly recorded user pattern.<br />
One measure introductory beat (such as 4/4,display:<br />
-4,-3, -2, -1).<br />
All parameter could not be adjusted in process of<br />
recording. Only "START/STOP" and "CLICK" button<br />
are valid during recording.<br />
Click would not be recorded.<br />
Stop Recording<br />
When recording is full, it will automatically stop recording,<br />
and REC indicator goes out, 3-digit LED displays 'ful',<br />
then press [start/stop] button to returns to NO.41<br />
PATTERN display.<br />
During recording, if press [start/stop] button, it will stop<br />
recording, REC indicator goes out, then it returns to<br />
NO.41 PATTERN display.<br />
12<br />
light and flash<br />
press and hold<br />
more than 2 seconds<br />
light all along<br />
go out<br />
Pattern indicator
Playback User Pattern<br />
Choose the pattern number 41, press [start/stop] button<br />
to play user pattern.<br />
If there is no recording data, 3-digit LED displays<br />
“N-P”.<br />
The user are allowed to change pattern volume and<br />
tempo value when playing user pattern.<br />
Response pads operations realistically.<br />
No measures displayed on LED.<br />
It plays the user pattern not in cycle<br />
When using [<strong>Drum</strong> off] button, it just mute the drum<br />
part of the accompaniment and will not mute the<br />
recorded part.<br />
Pattern volume and Kit volume only control the<br />
corresponding part of the accompaniment.<br />
Note:<br />
If the user selecting another kit when playbacking the<br />
user pattern, the recorded kit data will also be changed<br />
to the current selected kit.<br />
Recording notes<br />
The recording capacity is about 5000 notes.<br />
Quick recording<br />
After choosing a favorite KIT and adjusting the<br />
parameter well,(includes tempo, click ……), the user<br />
could easily press and hold [save] button to enter<br />
recording waiting mode, then hit pads or press<br />
[start/stop] button to start recording.<br />
<strong>Drum</strong> off<br />
Press [drum off] button to mute on/off the drum part.<br />
If “drum off” activated, the drum sound of the current<br />
playing pattern will be muted and “drum off” indicator<br />
lights. This function is convenient for user pracitise.<br />
13<br />
light and flash<br />
press and hold<br />
more than 2 seconds<br />
drum off<br />
indicator lights
Adjust the pattern tempo<br />
Press [tempo] button to enter tempo adjustment mode,<br />
3-digit LED temporarily displays TEMPO value.<br />
Press [+] and [-] button to change the tempo of click and<br />
pattern playing (30-280, not in cycle).<br />
Press [+] and [-] button at the same time, to reset to the<br />
default value(the current pattern default tempo).<br />
Click<br />
Press [click] button to turn on/off click , 3-digit LED<br />
displays the current time signature, and the click<br />
indicator lights and flash, press [+] and [-] button to<br />
change the current time signature. Press [click] button<br />
again to turn off click.<br />
9 kinds of time signature can be chosen (1/4,2/4,3/4,<br />
4/4,5/4,6/4,7/4,3/8,6/8)<br />
As pattern playing, the click indicator automatically<br />
flash according the pattern beat, but the click sound<br />
will not be turned on automatically.<br />
Select a click sound<br />
Press and hold [click] button, then press [+] or [-] button<br />
to adjust the click sound, 3-digit LED temporarily<br />
displays the current click sound 'CLX'.<br />
The drum module supports 4 click sounds: metronome,<br />
beep, cowbell and voice. When turn on the click , the<br />
default sound is “metronome” .<br />
14<br />
click indicator<br />
lights<br />
press at<br />
the same time
Adjust the click volume<br />
In click time signature choice mode, press [volume]<br />
button to enter click volume adjusting mode, volume<br />
indicator lights, 3-digit LED displays the click current<br />
volume value; Its volume value can be, adjusted by<br />
pressing [+] and [-] button (0-16 not in cycle).<br />
Return click time signature choice mode<br />
In click volume adjusting mode, press [click] button to<br />
exit volume adjusting mode, return to click time signature<br />
choice mode.<br />
Factory reset<br />
Press [+] and [-] button at the same time to turn on the<br />
drum module, it resets to factory setting. The following<br />
data will be replaced to the factory data:<br />
All users kits (include voice, volume setting).<br />
Clear recording data.<br />
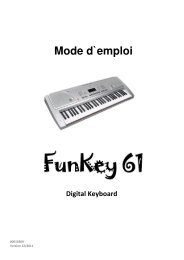
Hi-Hat control<br />
Open Hi-Hat: Strike the hi-hat without stepping the pedal.<br />
Closed Hi-Hat: Strike the hi-hat with the pedal stepped.<br />
Foot Closed: Completely step down the pedal.<br />
Splash: play the hi-hat with the pedal fully stepped and<br />
then instantly releasing it.<br />
15<br />
volume indicator lights<br />
volume lights<br />
press at<br />
the same time
Specifications<br />
<strong>Drum</strong> Pad:<br />
Voices:<br />
<strong>Drum</strong> kits:<br />
Patterns:<br />
Controls:<br />
Display:<br />
Connections:<br />
Power Supply:<br />
3 tom pads , 2 cymbal pads ,1 snare pad(dual trigger),<br />
1 hi-hat control pedal , 1 hi-hat, 1 kick<br />
108 voices<br />
10 preset kits, 5 user kits<br />
40 preset songs and 1 user pattern<br />
POWER SWITCH, START/STOP, SAVE/RECORD, KIT, PATTERN,<br />
VOICE, KIT/VOICE/PATTERN/CLICK VOLUME, DRUM OFF, CLICK,<br />
HI-HAT, CRASH, RIDE, HI-HAT CONTROL, SNARE, TOM 1, TOM 2,<br />
TOM3, KICK, RECORD LIGHT, VOLUME + / -, TEMPO, +/-<br />
LED display<br />
PHONES<br />
USB<br />
OUTPUT<br />
MIX IN<br />
DC POWER<br />
Hi-hat control<br />
Hi-hat<br />
Crash<br />
Ride<br />
Snare<br />
Tom 1<br />
Tom 2<br />
Tom 3<br />
Kick<br />
AC adaptor ( 9V)<br />
16
Voice List<br />
No.<br />
SNARE<br />
013<br />
014<br />
015<br />
016<br />
017<br />
018<br />
019<br />
020<br />
021<br />
022<br />
023<br />
024<br />
025<br />
026<br />
NAME<br />
KICK<br />
001 Standard Kick 1<br />
002 Standard Kick 2<br />
003 Classic Kick 1<br />
004 Classic Kick 2<br />
005 Rock Kick<br />
006 Camco Kick 1<br />
007 Camco Kick 2<br />
008 Acoustic Kick 1<br />
009 Acoustic Kick 2<br />
010 Acoustic Kick 3<br />
011 Acoustic Kick 4<br />
012 TR606 Kick<br />
TOM<br />
027<br />
028<br />
029<br />
030<br />
031<br />
032<br />
033<br />
034<br />
035<br />
Standard Snare<br />
Standard Snare Rim<br />
Funk Snare<br />
Funk Snare Rim<br />
Funk Stick<br />
Classic Snare<br />
Classic Snare Rim<br />
Rock Snare<br />
Rock Snare Rim<br />
Brush Snare<br />
Brush Snare Rim<br />
Camco Snare<br />
Camco Snare rim<br />
TR606 Snare<br />
Classic Tom 1<br />
Classic Tom 2<br />
Classic Tom 3<br />
Classic Tom 4<br />
Classic Tom 5<br />
Classic Tom 6<br />
Rock Tom 1<br />
Rock Tom 2<br />
Rock Tom 3<br />
Preset KIT and Default user KIT<br />
No. NAME<br />
036<br />
037<br />
038<br />
039<br />
040<br />
041<br />
042<br />
043<br />
044<br />
045<br />
046<br />
047<br />
048<br />
049<br />
050<br />
051<br />
052<br />
053<br />
054<br />
055<br />
056<br />
Rock Tom 4<br />
Rock Tom 5<br />
Rock Tom 6<br />
Brush Tom 1<br />
Brush Tom 2<br />
Brush Tom 3<br />
Brush Tom 4<br />
Brush Tom 5<br />
Brush Tom 6<br />
Camco Tom 1<br />
Camco Tom 2<br />
Camco Tom 3<br />
Camco Tom 4<br />
Camco Tom 5<br />
Camco Tom 6<br />
TR606 Tom 1<br />
TR606 Tom 2<br />
TR606 Tom 3<br />
TR606 Tom 4<br />
TR606 Tom 5<br />
TR606 Tom 6<br />
RIDE<br />
057 Classic Ride<br />
058 Rock Ride<br />
059 Brush Ride<br />
060 TR606 Ride<br />
CRASH<br />
061 Classic Crash<br />
062 Rock Crash 1<br />
063 Rock Crash 2<br />
064 Brush Crash<br />
065 China Crash<br />
066 TR606 Crash<br />
HIHAT<br />
067 Classic Open Hi hat<br />
068 Rock Open Hi hat<br />
069 TR606 Open Hi hat<br />
No. KIT No. KIT<br />
001<br />
002<br />
003<br />
004<br />
005<br />
006<br />
007<br />
008<br />
Standard<br />
Rock<br />
Pop<br />
Funk<br />
Brush<br />
Jazz<br />
Table<br />
Latin<br />
009<br />
010<br />
011<br />
012<br />
013<br />
014<br />
015<br />
TR606<br />
DJ<br />
User kit1 (Standard)<br />
User kit2 (Rock)<br />
User kit3 (Pop)<br />
User kit4 (Funk)<br />
User kit5 (Brush)<br />
Note:<br />
Number 001~010 are preset kits, number 011~015 are users kits.<br />
17<br />
No.<br />
NAME<br />
Percussion<br />
070<br />
071<br />
372<br />
073<br />
074<br />
075<br />
076<br />
077<br />
078<br />
079<br />
080<br />
081<br />
082<br />
083<br />
084<br />
085<br />
086<br />
087<br />
088<br />
089<br />
090<br />
091<br />
092<br />
093<br />
094<br />
095<br />
096<br />
097<br />
098<br />
099<br />
100<br />
101<br />
102<br />
103<br />
104<br />
105<br />
106<br />
107<br />
108<br />
Tabla 001<br />
Tabla 002<br />
Tabla 003<br />
Tabla 004<br />
Tabla 005<br />
Tabla 006<br />
Bongo High<br />
Bongo Low<br />
Conga 1<br />
Conga 2<br />
Conga 3<br />
Timbale High<br />
Timbale Low<br />
Agogo High<br />
Agogo Low<br />
Cowbell 1<br />
Cowbell 2<br />
Cowbell 3<br />
Cowbell 4<br />
Cowbell 5<br />
Cowbell 6<br />
Cowbell 7<br />
Cowbell 8<br />
Cowbell 9<br />
Cowbell 10<br />
Hi Hat 001<br />
Hi Hat 002<br />
Hi Hat 003<br />
Hi Hat 004<br />
Hi Hat 005<br />
Hi Hat 006<br />
Hi Hat 007<br />
Hi Hat 008<br />
Hi Hat 009<br />
Dj001<br />
Dj002<br />
Dj003<br />
Dj004<br />
Dj005
Pattern List<br />
No.<br />
001<br />
002<br />
003<br />
004<br />
005<br />
006<br />
007<br />
008<br />
009<br />
010<br />
011<br />
012<br />
013<br />
014<br />
015<br />
016<br />
017<br />
018<br />
019<br />
020<br />
021<br />
PATTERN<br />
Fusion1<br />
Latin Jazz1<br />
Funk1<br />
Latin Pop1<br />
60's Rock<br />
Big Band1<br />
<strong>Drum</strong> N'Bass<br />
Ballad<br />
Swing<br />
Pop1<br />
Funk2<br />
Latin Jazz2<br />
Pop Funk1<br />
Latin Rock1<br />
Big Band2<br />
Pop Ballad<br />
Pop Funk2<br />
3/4Jazz<br />
Pop Bossa<br />
Samba1<br />
6/8Ballad<br />
No. PATTERN<br />
022<br />
023<br />
024<br />
025<br />
026<br />
027<br />
028<br />
029<br />
030<br />
031<br />
032<br />
033<br />
034<br />
035<br />
036<br />
037<br />
038<br />
039<br />
040<br />
041<br />
Fusion2<br />
Jazz1<br />
Guitar Bossa<br />
Break Beat<br />
World1<br />
Funk3<br />
Latin Jazz3<br />
Latin Pop2<br />
Reggae1<br />
World2<br />
Latin<br />
Bossa<br />
Samba2<br />
3/4Pop<br />
Pop2<br />
Jazz2<br />
Reggae2<br />
Reggae3<br />
Latin Rock2<br />
User Pattern<br />
18
Percussion <strong>Set</strong> List<br />
Standard(PC0) Rock(PC1) Pop(PC2) Funk(PC3) Brush(PC4) Jazz(PC5) 606(PC6) DJ(PC7)<br />
27 High Q<br />
MIDI Implementation Chart<br />
Function<br />
Transmitted<br />
Basic Default<br />
10 ch<br />
1-16<br />
Channel Changed X<br />
X<br />
Default<br />
X<br />
X<br />
Mode Messages X<br />
X<br />
Altered<br />
**************<br />
Note<br />
0 - 127<br />
***********<br />
0-127<br />
Number: True voice **************<br />
0-127<br />
Velocity Note on O 99 H, V= 1-127<br />
O<br />
Note off O (9 9H, V=0) O<br />
After Key's<br />
Touch Channel's<br />
Pitch Bend<br />
C ontrol 0<br />
Change 1<br />
5<br />
Program<br />
Change<br />
System Exclusive<br />
System : Song Position<br />
Common : Song Select<br />
: Tune<br />
System : Clock<br />
Real Time : Commands<br />
Aux : Local ON/OFF<br />
: All Notes OFF<br />
Messages : Active Sense<br />
: Reset<br />
O : YES X : NO<br />
6<br />
7<br />
10<br />
11<br />
64<br />
65<br />
66<br />
67<br />
80<br />
81<br />
91<br />
93<br />
120<br />
121<br />
123<br />
X<br />
X<br />
X<br />
Recognized Remarks<br />
X O<br />
Bank Select<br />
X O<br />
Modulation<br />
X O<br />
Portamento Time<br />
X<br />
X<br />
X<br />
X<br />
X<br />
X<br />
X<br />
X<br />
O<br />
X<br />
Note 1: Reverb program vv=00H to 07H (default 04H)<br />
00H : Room1 01H : Room2<br />
02H : Room3 03H : Hall1<br />
04H : Hall2 05H : Plate<br />
06H : Delay 07H : Pan delay<br />
20<br />
X<br />
X<br />
O<br />
X O<br />
Data Entry<br />
X O<br />
Volume<br />
X O<br />
Pan<br />
X O<br />
Expression<br />
X O<br />
Sustain Pedal<br />
X O<br />
Portamento ON/OFF<br />
X O<br />
Sostenuto Pedal<br />
X O<br />
Soft Pedal<br />
X O<br />
Reverb Program<br />
X O<br />
Chorus Program<br />
X O<br />
Reverb Level<br />
X O<br />
Chorus Level<br />
X O<br />
All Sound OFF<br />
X O<br />
Reset All Controller<br />
X O<br />
All Notes OFF<br />
O<br />
O<br />
O<br />
X<br />
X<br />
X<br />
X<br />
X<br />
X<br />
O<br />
X<br />
X<br />
Note2: Chorus program vv=00H to 07H (default 02H)<br />
00H : Chorus1 01H : Chorus2<br />
02H : Chorus3 03H : Chorus4<br />
04H : Feedback 05H : Flanger<br />
06H : Short delay 07H : FB delay<br />
Note3: Just respond 3 type of RPN 000~002.