performance - KD-Tuning
performance - KD-Tuning
performance - KD-Tuning

Create successful ePaper yourself
Turn your PDF publications into a flip-book with our unique Google optimized e-Paper software.
Instructions and Information about Haldex<br />
Performance part<br />
<strong>performance</strong><br />
All VW, Audi, Skoda equipped with<br />
Haldex gen1 system<br />
Document nr. 20042990<br />
Note! Describes a situation, action or an event<br />
where a recommendation is made that will enable<br />
a repair to be correctly carried out without<br />
personal injury or damage to the product.<br />
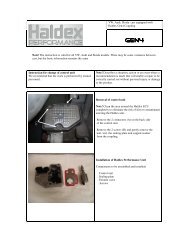
Instructions how to change the control unit Note! The instruction is valid for all VW, Audi, and<br />
Skoda car models. There may be some slight<br />
variances between cars, but the basic information<br />
remains the same.<br />
Preparation<br />
Following tools is needed to change the Ecu.<br />
. Tool for socket head cap (nr 4).<br />
. Pliers<br />
. Flashlight<br />
. Rubber band<br />
Clean the area round the electronic unit as<br />
accurately as possible.<br />
It’s very important that no dirt or contamination<br />
enters the unit because that can cause a<br />
malfunction in the system.<br />
Removal of control unit<br />
Note! The engine must be turned off at least 5<br />
minutes before the change.<br />
Place an collecting tray under the coupling<br />
to collect any oil spillage.<br />
. Disconnect the main connector from the back of<br />
the rear axle (A).<br />
Page 1
Instructions and Information about Haldex<br />
Performance part<br />
All VW, Audi, Skoda equipped with<br />
Haldex gen1 system<br />
Document nr. 20042990<br />
. Remove the pump connector from the electronic<br />
Unit (B).<br />
. Remove the 2 screws for the control unit incl.<br />
the gasket and remove it.<br />
Installation of new Control Unit<br />
. Clean the area for the control unit with a clean<br />
cloth (not paper).<br />
. Mount the sealing and screws and hold it in<br />
place with a rubber band.<br />
. Place the Unit to the coupling and fix the screws<br />
only slightly. Cut of and remove the rubber band.<br />
. Tighten the screws with 6 Nm torque<br />
. Reconnect the pump and main connector.<br />
Final check.<br />
. Start engine and check that there is no oil<br />
leakage from the Haldex coupling.<br />
. If the car is on a hoist or the wheels is free<br />
above the ground then<br />
put it in 1:th gear and check that all 4 wheels are<br />
running<br />
Note! In case of a oil leak use only Haldex oil<br />
with artnr. G 052 175 A1.<br />
Page 2
Instructions and Information about Haldex<br />
Performance part<br />
<strong>Tuning</strong> kit features<br />
<strong>performance</strong><br />
All VW, Audi, Skoda equipped with<br />
Haldex gen1 system<br />
Document nr. 20042990<br />
. Increased torque transfer to the rear at accelerations gives more consistent<br />
behaviour and more oversteered handling for sportier behaviour<br />
. Faster torque transfer respond as a function of how fast the driver pushes the<br />
throttle pedal. Haldex system prepares to transfer torque before actual torque is<br />
delivered from Engine to the driveline.<br />
. At higher speeds the torque will decrease which gives less oversteering and safer<br />
handling. Understeering gives a safer feeling of the vehicle.<br />
. All safety features works as in the original software, for example during ABS braking<br />
or an ESP intervention the coupling will stop transferring torque to avoid<br />
interference with the safety systems.<br />
Example: Torque transfer during acceleration<br />
Page 3