Build a Circle or large radius with Concrete Blocks - Allan Block
Build a Circle or large radius with Concrete Blocks - Allan Block
Build a Circle or large radius with Concrete Blocks - Allan Block

Create successful ePaper yourself
Turn your PDF publications into a flip-book with our unique Google optimized e-Paper software.
AB Y<strong>or</strong>k<br />
center-split<br />
block<br />
Wall Cap<br />
allanblock.com<br />
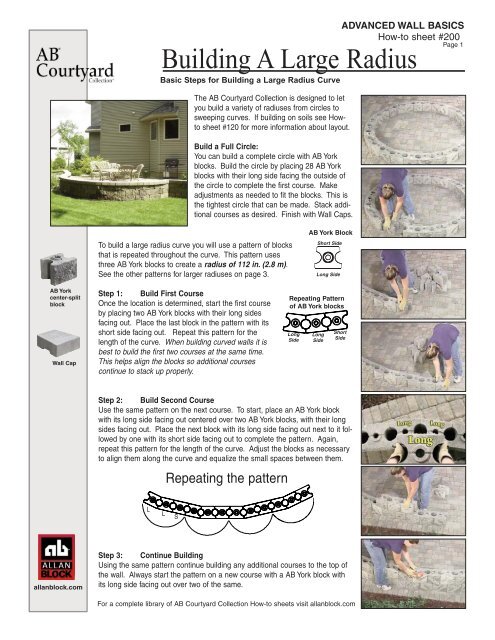
<strong>Build</strong>ing A Large Radius<br />
Basic Steps f<strong>or</strong> <strong>Build</strong>ing a Large Radius Curve<br />
The AB Courtyard Collection is designed to let<br />
you build a variety of <strong>radius</strong>es from circles to<br />
sweeping curves. If building on soils see Howto<br />
sheet #120 f<strong>or</strong> m<strong>or</strong>e inf<strong>or</strong>mation about layout.<br />
To build a <strong>large</strong> <strong>radius</strong> curve you will use a pattern of blocks<br />
that is repeated throughout the curve. This pattern uses<br />
three AB Y<strong>or</strong>k blocks to create a <strong>radius</strong> of 112 in. (2.8 m).<br />
See the other patterns f<strong>or</strong> <strong>large</strong>r <strong>radius</strong>es on page 3.<br />
Step 1: <strong>Build</strong> First Course<br />
Once the location is determined, start the first course<br />
by placing two AB Y<strong>or</strong>k blocks <strong>with</strong> their long sides<br />
facing out. Place the last block in the pattern <strong>with</strong> its<br />
sh<strong>or</strong>t side facing out. Repeat this pattern f<strong>or</strong> the<br />
length of the curve. When building curved walls it is<br />
best to build the first two courses at the same time.<br />
This helps align the blocks so additional courses<br />
continue to stack up properly.<br />
<strong>Build</strong> a Full <strong>Circle</strong>:<br />
You can build a complete circle <strong>with</strong> AB Y<strong>or</strong>k<br />
blocks. <strong>Build</strong> the circle by placing 28 AB Y<strong>or</strong>k<br />
blocks <strong>with</strong> their long side facing the outside of<br />
the circle to complete the first course. Make<br />
adjustments as needed to fit the blocks. This is<br />
the tightest circle that can be made. Stack additional<br />
courses as desired. Finish <strong>with</strong> Wall Caps.<br />
Step 2: <strong>Build</strong> Second Course<br />
Use the same pattern on the next course. To start, place an AB Y<strong>or</strong>k block<br />
<strong>with</strong> its long side facing out centered over two AB Y<strong>or</strong>k blocks, <strong>with</strong> their long<br />
sides facing out. Place the next block <strong>with</strong> its long side facing out next to it followed<br />
by one <strong>with</strong> its sh<strong>or</strong>t side facing out to complete the pattern. Again,<br />
repeat this pattern f<strong>or</strong> the length of the curve. Adjust the blocks as necessary<br />
to align them along the curve and equalize the small spaces between them.<br />
L<br />
L<br />
Repeating the pattern<br />
S<br />
AB Y<strong>or</strong>k <strong>Block</strong><br />
Sh<strong>or</strong>t Side<br />
Long Side<br />
Repeating Pattern<br />
of AB Y<strong>or</strong>k blocks<br />
Long<br />
Side<br />
Long<br />
Side<br />
Step 3: Continue <strong>Build</strong>ing<br />
Using the same pattern continue building any additional courses to the top of<br />
the wall. Always start the pattern on a new course <strong>with</strong> a AB Y<strong>or</strong>k block <strong>with</strong><br />
its long side facing out over two of the same.<br />
F<strong>or</strong> a complete library of AB Courtyard Collection How-to sheets visit allanblock.com<br />
ADVANCED WALL BASICS<br />
How-to sheet #200<br />
Page 1<br />
Sh<strong>or</strong>t<br />
Side
allanblock.com<br />
<strong>Build</strong>ing A Large Radius<br />
Basic Steps f<strong>or</strong> <strong>Build</strong>ing a Large Radius Curve<br />
Step 4: Wall Cap Pattern<br />
Finish <strong>with</strong> Wall Caps using the same pattern as done <strong>with</strong><br />
the AB Y<strong>or</strong>k blocks. Place the first Wall Cap <strong>with</strong> its long<br />
end facing out centered over two AB Y<strong>or</strong>k blocks, <strong>with</strong> their<br />
long sides facing out. Place the next cap <strong>with</strong> its long end<br />
facing out next to it followed by one <strong>with</strong> its sh<strong>or</strong>t end facing<br />
out to complete the pattern. Repeat this pattern f<strong>or</strong> the<br />
length of the curve.<br />
Wall Cap<br />
Long End<br />
Sh<strong>or</strong>t End<br />
Step 4: Finish<br />
Once all the Wall Caps are in place, secure them in place <strong>with</strong> a bead of<br />
masonry adhesive along both sides of the raised rings and along the side of<br />
each Wall Cap (adhesive optional).<br />
Alternate Pattern<br />
This example showed how to build using only the AB Y<strong>or</strong>k blocks. You can<br />
also build this same curve <strong>with</strong> a mixture of AB Y<strong>or</strong>k and AB Dublin blocks<br />
by replacing two AB Y<strong>or</strong>k blocks f<strong>or</strong> one AB Dublin block that have<br />
matching angles.<br />
AB Dublin <strong>Block</strong><br />
Replace AB Y<strong>or</strong>k<br />
blocks <strong>with</strong> a AB<br />
Dublin block where<br />
the angles match<br />
AB Dublin <strong>Block</strong><br />
L L S L<br />
L<br />
S<br />
© 2003-2005 <strong>Allan</strong> <strong>Block</strong> C<strong>or</strong>p<strong>or</strong>ation, 5300 Edina Industrial Blvd., Ste 100, Edina, MN 55439 952-835-5309-phone, 952-835-0013-fax<br />
US Patent 6,948,282 Patents Pending W<strong>or</strong>ldwide DOC. #L0508 - 0705<br />
L<br />
L S L<br />
ADVANCED WALL BASICS<br />
How-to sheet #200<br />
Page 2<br />
Long Long Sh<strong>or</strong>t<br />
Use AB Dublin blocks in<br />
place of two AB Y<strong>or</strong>k blocks<br />
<strong>with</strong> matching angles<br />
F<strong>or</strong> a complete library of AB Courtyard Collection How-to sheets visit allanblock.com<br />
L<br />
S
AB Dublin centersplit<br />
block<br />
AB Y<strong>or</strong>k<br />
center-split<br />
block<br />
The inf<strong>or</strong>mation<br />
shown here is<br />
f<strong>or</strong> use <strong>with</strong> the<br />
<strong>Allan</strong> <strong>Block</strong><br />
Courtyard<br />
products only.<br />
allanblock.com<br />
ADVANCED WALL BASICS<br />
How-to sheet #200<br />
<strong>Build</strong>ing A Large Radius<br />
Use the following two patterns to build <strong>large</strong>r <strong>radius</strong>es. When building curved walls<br />
it is best to build the first two courses at the same time. This helps align the blocks<br />
so additional courses continue to stack up properly.<br />
Pattern 2: 75.5 in. (1.9 m)<br />
Use the pattern below to build a 75.5 in (1.9 m) <strong>radius</strong>. Start by laying out this pattern using the AB Y<strong>or</strong>k blocks.<br />
If you would like to inc<strong>or</strong>p<strong>or</strong>ate AB Dublin blocks in the pattern replace two AB Y<strong>or</strong>k blocks <strong>with</strong> one AB Dublin<br />
block where the angles match. See page 2 f<strong>or</strong> m<strong>or</strong>e inf<strong>or</strong>mation.<br />
Pattern 3: 184.0 in. Radius (4.7 m)<br />
Expand on the pattern above by adding two m<strong>or</strong>e AB Y<strong>or</strong>k block to the pattern will increases the <strong>radius</strong><br />
to 184 in. (4.7 m). To inc<strong>or</strong>p<strong>or</strong>ate AB Dublin blocks replace two Y<strong>or</strong>k blocks where the angles match.<br />
Sh<strong>or</strong>t<br />
Long<br />
Basic Steps f<strong>or</strong> <strong>Build</strong>ing a Large Radius Curve<br />
Long<br />
Long Long<br />
The <strong>radius</strong>es of the<br />
block are preset.<br />
F<strong>or</strong> a specific<br />
<strong>radius</strong> the blocks<br />
may need to be cut.<br />
Long<br />
Sh<strong>or</strong>t<br />
Sh<strong>or</strong>t<br />
Long<br />
When placing second course, start the pattern<br />
above the pattern below and slide down to line<br />
up <strong>with</strong> the raised rings.<br />
Pattern<br />
40.5 in.<br />
(1.0 m)<br />
Pattern Pattern<br />
75.5 in.<br />
(2.0 m) 112 in.<br />
(2.8 m)<br />
Wall Caps<br />
Install the Wall Caps in the same pattern as chosen f<strong>or</strong> the wall. Wall Caps also have a long and sh<strong>or</strong>t end<br />
similar to the AB Y<strong>or</strong>k blocks.<br />
F<strong>or</strong> a complete library of AB Courtyard Collection How-to sheets visit allanblock.com<br />
© 2003-2005 <strong>Allan</strong> <strong>Block</strong> C<strong>or</strong>p<strong>or</strong>ation, 5300 Edina Industrial Blvd., Ste 100, Edina, MN 55439 952-835-5309-phone, 952-835-0013-fax<br />
US Patent 6,948,282 Patents Pending W<strong>or</strong>ldwide DOC. #L0515 - 0705<br />
Start the second course pattern<br />
centered above the first and<br />
second block of the<br />
pattern below<br />
Pattern<br />
184 in.<br />
(4.7 m)<br />
Start the second course pattern centered<br />
above the first and second block of the<br />
pattern below<br />
Pattern<br />
Page 3<br />
Pattern