

User Manual
User Manual
User Manual

Create successful ePaper yourself
Turn your PDF publications into a flip-book with our unique Google optimized e-Paper software.
1<br />
3<br />
5<br />
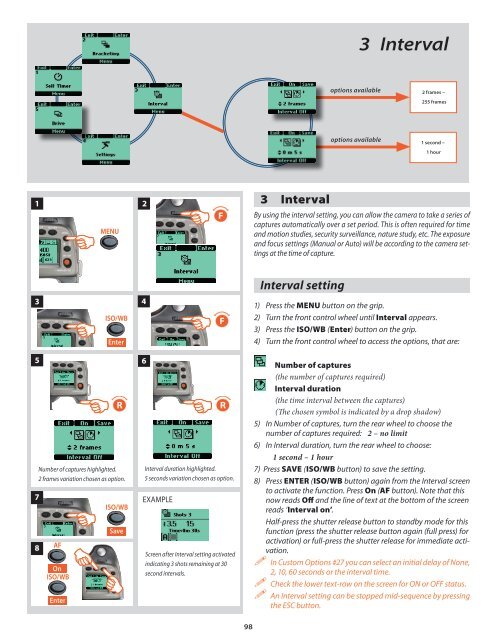
Number of captures highlighted.<br />
2 frames variation chosen as option.<br />
7<br />
8<br />
AF<br />
On<br />
ISO/WB<br />
Enter<br />
MENU<br />
2<br />
4<br />
ISO/WB F<br />
Enter<br />
6<br />
R R<br />
ISO/WB<br />
Save<br />
EXAMPLE<br />
F<br />
Interval duration highlighted.<br />
5 seconds variation chosen as option.<br />
Screen after Interval setting activated<br />
indicating 3 shots remaining at 30<br />
second intervals.<br />
98<br />
3 Interval<br />
3 Interval<br />
options available 2 frames −<br />
255 frames<br />
options available 1 second −<br />
1 hour<br />
By using the interval setting, you can allow the camera to take a series of<br />
captures automatically over a set period. This is often required for time<br />
and motion studies, security surveillance, nature study, etc. The exposure<br />
and focus settings (<strong>Manual</strong> or Auto) will be according to the camera settings<br />
at the time of capture.<br />
Interval setting<br />
1) Press the MENU button on the grip.<br />
2) Turn the front control wheel until Interval appears.<br />
3) Press the ISO/WB (Enter) button on the grip.<br />
4) Turn the front control wheel to access the options, that are:<br />
Number of captures<br />
(the number of captures required)<br />
Interval duration<br />
(the time interval between the captures)<br />
(The chosen symbol is indicated by a drop shadow)<br />
5) In Number of captures, turn the rear wheel to choose the<br />
number of captures required: 2 – no limit<br />
6) In Interval duration, turn the rear wheel to choose:<br />
1 second – 1 hour<br />
7) Press SAVE (ISO/WB button) to save the setting.<br />
8) Press ENTER (ISO/WB button) again from the Interval screen<br />
to activate the function. Press On (AF button). Note that this<br />
now reads Off and the line of text at the bottom of the screen<br />
reads ‘Interval on’.<br />
Half-press the shutter release button to standby mode for this<br />
function (press the shutter release button again (full press) for<br />
activation) or full-press the shutter release for immediate activation.<br />
In Custom Options #27 you can select an initial delay of None,<br />
2, 10, 60 seconds or the interval time.<br />
Check the lower text-row on the screen for ON or OFF status.<br />
An Interval setting can be stopped mid-sequence by pressing<br />
the ESC button.


![Einladung [07.02.2006] - Hochschule für Gestaltung Offenbach am ...](https://img.yumpu.com/13375413/1/184x260/einladung-07022006-hochschule-fur-gestaltung-offenbach-am-.jpg?quality=85)


