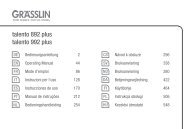
talento 471-472-791-792-881-882 pro - Graesslin.de
talento 471-472-791-792-881-882 pro - Graesslin.de
talento 471-472-791-792-881-882 pro - Graesslin.de

Create successful ePaper yourself
Turn your PDF publications into a flip-book with our unique Google optimized e-Paper software.
<strong>talento</strong> <strong>471</strong>/<strong>472</strong> <strong>pro</strong>, <strong>talento</strong> <strong>881</strong>/<strong>882</strong> <strong>pro</strong><br />
<strong>talento</strong> <strong>791</strong>/<strong>792</strong> <strong>pro</strong><br />
80.10.1321.7/11/11/01<br />
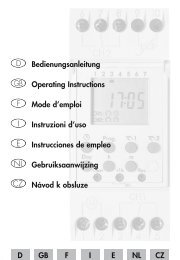
EN<br />
Operating manual<br />
1 6 12 18 24<br />
1 2<br />
15:26<br />
1 OFF ON 2<br />
MENU<br />
Safety Instructions<br />
www.graesslin.<strong>de</strong><br />
info@graesslin.<strong>de</strong><br />
Phone: +49 (0) 7724 / 933-0<br />
Fax: +49 (0) 7724 / 933-240<br />
Bun<strong>de</strong>sstraße 36<br />
D-78112 St. Georgen<br />
Germany<br />
Grässlin GmbH<br />
Danger! Risk of electric shock!<br />
ZZInstallation must be carried out by a<br />
WARNING <strong>pro</strong>fessional electrician!<br />
• To avoid injuries, the <strong>de</strong>vice must be installed by a skilled<br />
electrician only!<br />
• Before changing the battery, the <strong>de</strong>vice must be disconnected<br />
from the power supply!<br />
• Please observe the national regulations and safety instructions.<br />
• Interferences and changes to the <strong>de</strong>vice will invalidate the<br />
warranty and guaranty rights.<br />
• Minimum diameter of the flexible lines for the terminals: 1 mm 2 .<br />
Maximum diameter: 4 mm 2 .<br />
Read and observe these instructions to guarantee a perfect function<br />
of the <strong>de</strong>vice and a safe operation.<br />
Information about the <strong>de</strong>vice<br />
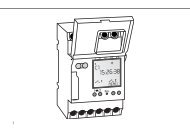
Description of the <strong>de</strong>vice<br />
Universal digital timer<br />
• 100 or 400 memory locations 1)<br />
• Date-based <strong>pro</strong>gramming<br />
• Pulse, cycle <strong>pro</strong>gram<br />
• PC-assisted <strong>pro</strong>gram generation<br />
• Weekly <strong>pro</strong>gram / annual <strong>pro</strong>gram 1) / holiday <strong>pro</strong>gram /<br />
astro <strong>pro</strong>gram 1)<br />
Designated use<br />
• The timer is used for<br />
– lighting in private homes and commerce<br />
– advertising / street lighting / shop window lighting<br />
– controlling <strong>de</strong>vices, motors and pumps<br />
– controlling shutters and blinds<br />
– Presence simulation<br />
• Mounting only on DIN rail.<br />
• Suitable for use in dry rooms only!<br />
• Do not install in the vicinity of <strong>de</strong>vices having inductive<br />
discharges (motors, transformers, etc.)<br />
Technical data<br />
Dimensions Hx W x D (mm) 45 x 35 x 60<br />
Weight g (ap<strong>pro</strong>x.) 220<br />
Main voltage See rating plate<br />
Protection class ||<br />
Power consumption 1 VA<br />
Switching capacity<br />
– Ohmic load (VDE, IEC)<br />
– Inductive load cos φ 0.6<br />
– Incan<strong>de</strong>scent-/Halogen lamp load<br />
– Fluorescent lamp<br />
– Rated load AC1 / AC15<br />
Installation and mounting<br />
Mounting on DIN rail<br />
Put the <strong>de</strong>vice slightly inclined on top<br />
of the rail. Then push it backwards<br />
until it engages.<br />
Connection diagram<br />
CH1 = channel 1<br />
CH2 = channel 2 1)<br />
S =external input<br />
A momentary action push-button can<br />
be assigned to remotely operate one<br />
of the channels. See separate section<br />
hea<strong>de</strong>d EXT I/P.<br />
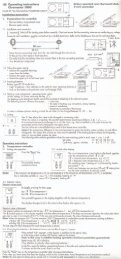
Operation and configuration<br />
Display and function keys<br />
• Switch-off commands have a higher priority than switch-on<br />
commands.<br />
• The central line of the display, in which the adjusted values and<br />
selected menu items are displayed, is displayed larger.<br />
• Flashing means that an entry is required. If you do not enter anything<br />
within two minutes, the timer switches back to automatic operation.<br />
• “MAINSOFF” appears on the display when the <strong>de</strong>vice is not supplied<br />
with power.<br />
• “LOW BATT” appears on the display when a battery change is<br />
required within the next two weeks.<br />
• The <strong>pro</strong>grams are retained after a reset, although you will need to<br />
readjust date and time. Press all 4 buttons at the same time to reset<br />
the <strong>de</strong>vice.<br />
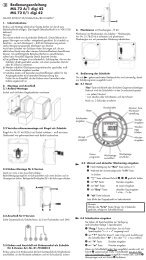
Display<br />
A Function displays of the two<br />
left keys<br />
B Switching state displays (ON/<br />
OFF/OVR/FIX)<br />
C 3display lines<br />
D Weekdays<br />
The assignment can be<br />
changed in the DATETIME<br />
menu, for example to<br />
1 = Sunday.<br />
Default setting 1 = Monday<br />
E Programmed switching times<br />
F Radio antenna<br />
G Display of summer/winter time<br />
H Function displays of the two<br />
right keys<br />
Function displays of the two left keys:<br />
Scroll upwards in the menu<br />
Scroll downwards in the menu<br />
Accept selection/<strong>pro</strong>posal<br />
+ Brief key press = +1 / long key press (about 2 sec) = fast forward<br />
- Brief key press = -1 / long key press (about 2 sec) = fast forward<br />
Function displays of the two right keys:<br />
MENU Leaves Automatic mo<strong>de</strong> and enters Programming mo<strong>de</strong><br />
ESC Brief key press = one step backward<br />
Long key press (about 2 sec) = Back to Automatic mo<strong>de</strong><br />
OK Make a selection and accept<br />
EDT Change <strong>pro</strong>grams in “Read mo<strong>de</strong>”<br />
NO Do not execute command<br />
YES Execute command<br />
DEL Delete<br />
1) Function not available for all <strong>pro</strong>ducts.<br />
16 A / 250 V AC<br />
10 A / 250 V AC<br />
2600 W<br />
1000 W<br />
3700 W / 750 W<br />
Switching contacts Change-over contact<br />
Ambient temperature -10°C ... + 55°C<br />
Accuracy Type ± 0,3 sec./day at +20°C<br />
Shortest switching interval 1 sec..<br />
Switching state display Yes<br />
Sealable Yes<br />
Danger! Risk of electric shock!<br />
ZZInstallation must be carried out by a<br />
WARNING <strong>pro</strong>fessional electrician!<br />
D<br />
C<br />
5 6 S L<br />
CH2<br />
M<br />
~<br />
CH1<br />
M<br />
~<br />
1 2 3 N<br />
1 6 12 18 24<br />
15:26<br />
max. 100 m<br />
E<br />
F<br />
G<br />
B FIX OVR<br />
1 OFF ON 2<br />
A<br />
1 2<br />
ESC OK<br />
H<br />
I<br />
J<br />
K<br />
Keys/Interfaces<br />
I Right keys<br />
J Infrared interface<br />
K Left keys with manual<br />
switch function in<br />
Automatic mo<strong>de</strong><br />
Menu structure<br />
MENU<br />
PROGRAM<br />
NEW<br />
ANNUAL 1)<br />
WEEKLY<br />
HOLIDAY<br />
ASTRO 1)<br />
DELETE<br />
REVIEW<br />
Select menu language<br />
When <strong>de</strong>livered, the timer is in automatic<br />
mo<strong>de</strong> with preset time, date (CET) and<br />
menu in English.<br />
Press the Menu button to make settings.<br />
Then select the <strong>de</strong>sired setting.<br />
Set date and time<br />
MENU<br />
Switchover summertime/wintertime<br />
Create weekly <strong>pro</strong>gram<br />
MENU<br />
DAYLIGHT<br />
AUTO<br />
NO<br />
CALIBR 1<br />
CALIBR 2<br />
The following settings are<br />
possible:<br />
AUTO<br />
In-factory <strong>de</strong>fault setting as<br />
specified by law (USA or EU). It will<br />
be recalculated every year.<br />
NO<br />
No changeover.<br />
CONFIG<br />
TAXIMODE<br />
LIGHT<br />
PIN<br />
H COUNTER<br />
EXT I/P<br />
ASTRO 1)<br />
RANDOM 12H 24H<br />
LANGUAGE<br />
DATETIME<br />
DATETIME<br />
YEAR<br />
MONTH<br />
DAY<br />
DAY 3)<br />
MENU<br />
DAYLIGHT<br />
OK<br />
AUTO<br />
NO<br />
CALIBR 1<br />
CALIBR 2<br />
AM PM<br />
24H<br />
ENGLISH<br />
DEUTSCH<br />
...<br />
CALIBR 1 (AUTO)<br />
Manual Programming. The <strong>pro</strong>grammed summer/winter time will be<br />
recalculated automatically for each year.<br />
– The change-over always takes place on the first Sunday of the<br />
selected month, if the entered date lies between 1. and 15.<br />
– The change-over always takes place on the last Sunday of the<br />
selected month, if the entered date lies between 16. and 31.<br />
– The time change-over (summertime/wintertime) occurs on the<br />
respective Sunday at 1 o‘clock UTC (Coordinated Universal<br />
Time).<br />
CALIBR 2 (FIX)<br />
Manual Programming.<br />
The change-over takes place every year always on the same date.<br />
PROGRAM<br />
NEW<br />
WEEKLY<br />
CYCLE<br />
ONOFF<br />
PULSE<br />
OK<br />
OK<br />
OK<br />
OK<br />
OK<br />
OK<br />
OK<br />
OK<br />
2) Available only if individual days have been selected for the ON<br />
command.<br />
3) Set the weekday in accordance with the current date.<br />
4) Only appears when the Astro-settings are not set.<br />
C<br />
A<br />
B<br />
MENU<br />
LANGUAGE<br />
ENGLISH<br />
HOUR<br />
MINUTE<br />
TIMEZONE<br />
OK<br />
OK<br />
OK<br />
OK<br />
OK<br />
A ON/OFF <strong>pro</strong>gramming<br />
ON/OFF<br />
OK<br />
SELECT CHL 1) OK<br />
DAY CHL ON OK<br />
HOUR CHL ON OK<br />
1. Confirm ON/OFF by pressing OK.<br />
ZZFree memory locations are briefly displayed.<br />
2. When <strong>pro</strong>mpted, select channels<br />
OK<br />
and confirm by pressing .<br />
ZZThe weekday display is flashing.<br />
ON command:<br />
3. Select the <strong>de</strong>sired days and confirm by pressing OK<br />
4. Enter hour (+/-) OK<br />
5. Enter minutes (+/-) OK<br />
OFF command:<br />
6. When <strong>pro</strong>mpted, select <strong>de</strong>sired days<br />
OK<br />
and confirm by pressing<br />
7. Enter hour (+/-) OK<br />
8. Enter minutes (+/-) OK<br />
ZZThe <strong>pro</strong>gram is saved.<br />
B Pulse <strong>pro</strong>gramming<br />
start time<br />
15.00 h<br />
duration<br />
A pulse switching command consists of:<br />
• Start time<br />
• Duration =ON switching duration<br />
shortest ON switching duration = 1 sec.<br />
longest ON switching duration = 59 min., 59 sec.<br />
Example:<br />
ON command for channel 1 daily from Monday to Friday at 3.00 pm.<br />
ON switching duration 15 minutes.<br />
PULSE<br />
OK<br />
SELECT CHL 1) OK<br />
DAY CHL ON OK<br />
HOUR CHL ON OK<br />
1. Confirm PULSE by pressing OK.<br />
ZZFree memory locations are briefly displayed.<br />
2. When <strong>pro</strong>mpted, select channels<br />
OK<br />
and confirm by pressing .<br />
ZZThe weekday display is flashing.<br />
ON command:<br />
3. Select the <strong>de</strong>sired days and confirm by pressing OK<br />
4. Enter hour (+/-) OK<br />
5. Enter minutes (+/-) OK<br />
Duration:<br />
6. Enter minutes or seconds (+/-) and confirm by pressing OK.<br />
ZZThe <strong>pro</strong>gram is saved.<br />
C Cycle <strong>pro</strong>gramming<br />
start time<br />
9.00 h<br />
duration<br />
period<br />
pause<br />
duration of the cycle<br />
MIN CHL ON OK<br />
DAY CHL OFF 2) OK<br />
HOUR CHL OFF OK<br />
MIN CHL OFF OK<br />
SAVED<br />
MIN CHL ON OK<br />
MIN DURATION OK<br />
SEC DURATION OK<br />
19.00 h<br />
channel ON channel OFF<br />
SAVED<br />
stop time<br />
The cycle duration must not be less than the period.<br />
No nesting of cycle <strong>pro</strong>grams is allowed.<br />
A cycle switching command consists of:<br />
• Start time<br />
• Duration = ON switching duration<br />
• Period = ON switching duration + pause<br />
• Cycle duration = time between channel<br />
ON and channel OFF<br />
• Stop time<br />
Example:<br />
Channel 1 is switched on every 30 minutes for 10 minutes, starting on<br />
Monday 9.00 am.<br />
The stop time is Friday 7.00 pm.<br />
Start time Monday 09.00 am<br />
Duration 10 min.<br />
Period 40 min.<br />
Stop time Friday 07.00 pm<br />
CYCLE OK<br />
SELECT CHL 1)<br />
DURATION DAY OK<br />
OK<br />
DURATION HOUR OK<br />
DAY CHL ON OK<br />
DURATION MIN OK<br />
HOUR CHL ON OK<br />
DURATION SEC OK<br />
MIN CHL ON OK<br />
DAY CHL OFF<br />
PERIOD DAY OK<br />
PERIOD HOURS OK<br />
PERIOD MIN OK<br />
PERIOD SEC OK<br />
2) OK<br />
HOUR CHL OFF OK<br />
MIN CHL OFF OK<br />
SAVED<br />
1. Confirm CYCLE by pressing OK.<br />
ZZFree memory locations are briefly displayed.<br />
2. When <strong>pro</strong>mpted, select channels<br />
OK<br />
and confirm by pressing .<br />
ZZThe weekday display is flashing.<br />
ON command:<br />
3. Select the <strong>de</strong>sired days and confirm by pressing OK<br />
4. Enter hour (+/-) OK<br />
5. Enter minutes (+/-) OK<br />
Period:<br />
6. Enter days, hours, minutes or seconds (+/-) and confirm by<br />
pressing OK.<br />
Duration:<br />
7. Enter days, hours, minutes or seconds (+/-) and confirm by<br />
pressing OK.<br />
OFF command:<br />
8. When <strong>pro</strong>mpted, select <strong>de</strong>sired days<br />
OK<br />
and confirm by pressing<br />
9. Enter hour (+/-) OK<br />
10. Enter minutes (+/-) OK<br />
ZZThe <strong>pro</strong>gram is saved.<br />
Create annual <strong>pro</strong>gram 1)<br />
MENU<br />
PROGRAM<br />
OK<br />
NEW<br />
OK<br />
ANNUAL<br />
OK<br />
REPEAT<br />
NO REPEAT<br />
CYCLE<br />
ONOFF<br />
PULSE<br />
A NO REPEAT - ON/OFF <strong>pro</strong>gramming<br />
A NO REPEAT<br />
Switching once.<br />
Start and stop date (year,<br />
month, day,) are set by you.<br />
B REPEAT<br />
Recurring <strong>pro</strong>gram.<br />
This is done each year at<br />
the same time until you<br />
remove the <strong>pro</strong>gram in the<br />
menu un<strong>de</strong>r Program <br />
Delete.<br />
1. Confirm ON/OFF by pressing OK.<br />
ZZFree memory locations are briefly displayed.<br />
2. When <strong>pro</strong>mpted, select channels<br />
OK<br />
and confirm by pressing .<br />
ZZThe weekday display is flashing.<br />
ON command:<br />
3. Select the <strong>de</strong>sired days and confirm by pressing OK<br />
4. Enter start date (year, month and day) in the relevant box (+/-)<br />
OK<br />
5. Enter stop date (year, month and day) in<br />
the relevant box (+/-) OK<br />
6. Enter hour (+/-) OK<br />
7. Enter minutes (+/-) OK<br />
OK<br />
ON/OFF<br />
OK<br />
SELECT CHL HOUR CHL ON<br />
MIN CHL ON<br />
OK<br />
OK<br />
2) DAY CHL OFF OK<br />
HOUR CHL OFF OK<br />
MIN CHL OFF OK<br />
SAVED<br />
1)<br />
DAY CHL ON<br />
OK<br />
OK<br />
YEAR START OK<br />
MONTH START OK<br />
DAY START OK<br />
YEAR END<br />
OK<br />
MONTH END<br />
DAY END<br />
OK<br />
OK<br />
B<br />
A<br />
OFF command:<br />
8. When <strong>pro</strong>mpted, select <strong>de</strong>sired days<br />
OK<br />
and confirm by pressing<br />
9. Enter hour (+/-) OK<br />
10. Enter minutes (+/-) OK<br />
ZZThe <strong>pro</strong>gram is saved.<br />
For CYCLE and PULSE, you also have to set the duration and/<br />
or period. The <strong>pro</strong>cedure is the same as for creating a weekly<br />
<strong>pro</strong>gram.<br />
B REPEAT - ON/OFF <strong>pro</strong>gramming<br />
ON/OFF<br />
OK<br />
SELECT CHL<br />
HOUR CHL ON OK<br />
MIN CHL ON OK<br />
2) DAY CHL OFF OK<br />
HOUR CHL OFF OK<br />
MIN CHL OFF OK<br />
SAVED<br />
1) OK<br />
DAY CHL ON OK<br />
MONTH START OK<br />
DAY START OK<br />
MONTH END OK<br />
DAY END<br />
OK<br />
1. Confirm ON/OFF by pressing OK.<br />
ZZFree memory locations are briefly displayed.<br />
2. When <strong>pro</strong>mpted, select channels<br />
OK<br />
and confirm by pressing .<br />
ZZThe weekday display is flashing.<br />
ON command:<br />
3. Select the <strong>de</strong>sired days and confirm by pressing OK<br />
4. Enter start date (month and day) in the relevant box (+/-) OK<br />
5. Enter stop date (month and day) in the relevant box (+/-) OK<br />
6. Enter hour (+/-) OK<br />
7. Enter minutes (+/-) OK<br />
OFF command:<br />
8. When <strong>pro</strong>mpted, select <strong>de</strong>sired days<br />
OK<br />
and confirm by pressing<br />
9. Enter hour (+/-) OK<br />
10. Enter minutes (+/-) OK<br />
ZZThe <strong>pro</strong>gram is saved.<br />
For CYCLE and PULSE, you also have to set the duration and/<br />
or period. The <strong>pro</strong>cedure is the same as for creating a weekly<br />
<strong>pro</strong>gram.
Creating an ASTRO <strong>pro</strong>gram 1)<br />
MENU<br />
The following settings are possible:<br />
SUNSET ON<br />
SUNRISE OFF<br />
SUNSET OFF<br />
SUNRISE ON<br />
The time switch switches ON at sunset and<br />
switches OFF at sunrise<br />
The time switch switches OFF at sunset and<br />
switches ON at sunrise<br />
SUNRISE PULSE The time switch switches ON at sunrise for a<br />
certain time (pulse)<br />
SUNSET PULSE The time switch switches ON at sunset for a<br />
certain time (pulse))<br />
SUNRISE<br />
SUNSET<br />
PULSE<br />
PROGRAM<br />
OK<br />
NEW<br />
OK<br />
ASTRO<br />
OK<br />
SUNSET ON<br />
SUNRISE OFF<br />
OK<br />
Sunset ON / Sunrise OFF<br />
The time switch switches ON at sunrise and<br />
sunset for a certain time (pulse)<br />
SUNSET ON<br />
SUNRISE OFF OK<br />
4) ASTRO OK<br />
1) SELECT CHL OK<br />
DAY CHL ON OK<br />
MONTH START OK<br />
DAY START OK<br />
MONTH END OK<br />
DAY END<br />
OK<br />
1. Confirm SUNSET ON / SUNRISE OFF by pressing OK.<br />
Z<br />
Z Free memory locations are briefly displayed.<br />
2. When <strong>pro</strong>mpted, select Astro-settings.<br />
3. When <strong>pro</strong>mpted, select channels and confirm by pressing .<br />
OK<br />
Z<br />
Z The weekday display is flashing.<br />
ON command:<br />
4. Select the <strong>de</strong>sired days and confirm by pressing OK<br />
5. Enter start date (month and day) in the relevant box (+/-) OK<br />
6. Enter stop date (month and day) in the relevant box (+/-) OK<br />
MINUTES OFFSET OK<br />
OFF PERIOD YES<br />
HOUR CHL OFF OK<br />
MIN CHL OFF OK<br />
CHL ON<br />
HOUR CHL ON<br />
MIN CHL ON<br />
SAVED<br />
YES<br />
OK<br />
OK<br />
7. Enter minutes for the OFFSET (+/-) OK<br />
Offset can be used to offset the ON and OFF switching times of<br />
the Astro <strong>pro</strong>gram. This is done in or<strong>de</strong>r to adapt them to the<br />
local conditions.<br />
Example SUNSET ON / SUNRISE OFF:<br />
Offset = + 00:15 The time switch switches ON 15 minutes after<br />
the calculated sunset and switches OFF 15 minutes after the<br />
calculated sunrise.<br />
8. Select the OFF PERIOD: YES or NO<br />
XZSelect YES to set the time period (hours and minutes)<br />
during which the time switch should switch off, e.g.<br />
night-time switch-off from 23 - 5 h.<br />
XZSelect NO to set no OFF period.<br />
OFF period: YES<br />
9. Enter hour and minute for the OFF command (+/-) OK<br />
10. When <strong>pro</strong>mpted, select <strong>de</strong>sired days and confirm by pressing<br />
OK<br />
1) Function not available for all <strong>pro</strong>ducts.<br />
2) Available only if individual days have been selected for the ON<br />
command.<br />
4) Only appears when the Astro-settings are not set.<br />
11. Select CHANNEL ON: YES or NO<br />
XZSelect YES to set the time period (hours and minutes) during<br />
which the time switch should switch on again.<br />
23 h Sunrise<br />
ON OFF ON OFF<br />
Sunset 5 h<br />
XZSelect NO if the night-time switch-off should last to the next<br />
sunset.<br />
23 h 23 h<br />
ON OFF ON OFF<br />
Sunset Sunset<br />
Channel ON: YES<br />
12. Enter hour and minute for the ON command (+/-) OK<br />
ZZThe <strong>pro</strong>gram is saved.<br />
Creating a holiday <strong>pro</strong>gram<br />
MENU<br />
PROGRAM<br />
NEW<br />
HOLIDAY<br />
ON/OFF<br />
PULSE<br />
CYCLE<br />
OFF<br />
A ON/OFF <strong>pro</strong>gramming<br />
For CYCLE and PULSE, you also have to set the duration and/or<br />
period.<br />
If ON is set, you can select the days of the week on which the<br />
time switch is switched off during holidays.<br />
The <strong>pro</strong>cedure is the same as for creating a weekly <strong>pro</strong>gram.<br />
View and edit <strong>pro</strong>gram<br />
Weekly, yearly, holiday<br />
and astro <strong>pro</strong>grams can<br />
be viewed and edited<br />
separately.<br />
• Press to scroll<br />
through the different<br />
<strong>pro</strong>gram steps.<br />
• Press EDT to edit a<br />
<strong>pro</strong>gram.<br />
This <strong>pro</strong>cedure is<br />
similar to creating a<br />
new <strong>pro</strong>gram.<br />
OK<br />
OK<br />
OK<br />
ON/OFF<br />
OK<br />
SELECT CHL 1) OK<br />
DAY CHL ON OK<br />
MONTH START OK<br />
DAY START OK<br />
MONTH END OK<br />
DAY END OK<br />
Delete <strong>pro</strong>gram<br />
Delete all <strong>pro</strong>grams<br />
• Press YES to <strong>de</strong>lete all<br />
<strong>pro</strong>grams.<br />
• Press NO to <strong>de</strong>lete individual<br />
<strong>pro</strong>grams.<br />
MENU<br />
PROGRAM<br />
DELETE<br />
DELETE ALL<br />
CONFIRM<br />
OK<br />
OK<br />
YES<br />
YES<br />
MENU<br />
A<br />
HOUR CHL ON OK<br />
MIN CHL ON OK<br />
2) DAY CHL OFF OK<br />
HOUR CHL OFF OK<br />
MIN CHL OFF OK<br />
SAVED<br />
PROGRAM<br />
OK<br />
REVIEW<br />
OK<br />
ALL<br />
OK<br />
ONO P001<br />
CHANNELS<br />
1<br />
EDT/OK<br />
Delete individual <strong>pro</strong>grams<br />
• Press to scroll through the<br />
different <strong>pro</strong>gram steps.<br />
DELETE<br />
OK<br />
DELETE ALL NO<br />
ONO PO01 DEL<br />
YES<br />
CONFIRM<br />
Random switching <strong>pro</strong>gram 1)<br />
The <strong>pro</strong>grammed switching command is <strong>de</strong>layed by a variable (random)<br />
period of 0-30 minutes..<br />
MENU<br />
RANDOM<br />
RANDOM<br />
XZPress OK to start the random switching <strong>pro</strong>gram.<br />
ZZRANDOM flashes.<br />
Finish random switching <strong>pro</strong>gram<br />
RANDOM<br />
RANDOM<br />
XZPress DEL to finish the random switching <strong>pro</strong>gram.<br />
ZZThe timer returns to Automatic mo<strong>de</strong>.<br />
Configuration<br />
MENU<br />
ASTRO – Astro settings 1)<br />
OK<br />
OK<br />
OK<br />
DEL<br />
CONFIG<br />
OK<br />
TAXIMODE<br />
LIGHT<br />
PIN<br />
HCOUNTER<br />
EXT I/P<br />
ASTRO 1)<br />
ASTRO<br />
OK<br />
COUNTRY<br />
OK<br />
UNITED KINGDOM OK<br />
LONDON<br />
OK<br />
ON<br />
7:00 20:00<br />
OFF<br />
7:30 20:30<br />
Click the COUNTRY menu item to<br />
select the <strong>de</strong>sired country and city.<br />
The longitu<strong>de</strong>s and latitu<strong>de</strong>s are<br />
generated automatically.<br />
If the <strong>de</strong>sired city is not inclu<strong>de</strong>d in<br />
the list, you can manually set the<br />
longitu<strong>de</strong>s and latitu<strong>de</strong>s via the<br />
LAT/LON menu item.<br />
TAXIMODE – Transmission of <strong>pro</strong>grams<br />
• A handheld <strong>pro</strong>gramming <strong>de</strong>vice can be used to exchange <strong>pro</strong>grams<br />
via the IR interface. To do so, the <strong>de</strong>vice must be in the TAXIMODE<br />
and connected to power.<br />
• Press ESC to finish the TAXIMODE..<br />
TAXXI<br />
RS232<br />
out<br />
<strong>pro</strong>g<br />
in<br />
Operation of handheld <strong>pro</strong>gramming <strong>de</strong>vice:<br />
1. Press PROG to select the <strong>pro</strong>gram number.<br />
2. Press IN to read in a <strong>pro</strong>gram.<br />
Press OUT to read out a <strong>pro</strong>gram.<br />
3. Hold the handheld <strong>pro</strong>gramming <strong>de</strong>vice<br />
vertically over the IR interface.<br />
4. Pressing IN or OUT again will start the transmission.<br />
A wrong transmission is shown by Er2.<br />
For further information, see the separate operating manual<br />
“handheld <strong>pro</strong>gramming <strong>de</strong>vice”.<br />
LIGHT – Background illumination<br />
• Select FIX ON to set<br />
the background lighting<br />
permanently.<br />
• Select 2 MIN if you want the<br />
background lighting to be<br />
automatically switched off 2<br />
minutes after your last input.<br />
PIN – Set PIN<br />
• Press + - to set a numeric<br />
value.<br />
• Press OK to set the next number.<br />
• Select NO PIN, to remove the<br />
PIN.<br />
HCOUNTER – Set hour counter<br />
• Press to select the<br />
channels.<br />
• Select REVIEW to check the hour<br />
counter.<br />
• Press to scroll through the<br />
different <strong>pro</strong>gram steps<br />
• Press RES to reset the hour<br />
counter for this channel.<br />
HCOUNTER – Set service counter<br />
You can set the number of<br />
operating hours after which a<br />
service message is to appear. It<br />
will be shown on the display as<br />
soon as the counter has reached<br />
the number of hours set by you.<br />
• Press to select the<br />
channels.<br />
• Press + - to set a numeric<br />
value.<br />
EXT I/P – External input<br />
I/P COUNT – Pulse counter<br />
Select I/P COUNT to check the pulse<br />
counter. It will count how many times<br />
the external button was pressed.<br />
Press RES to reset the pulse counter<br />
to zero and confirm by pressing YES.<br />
EXT O/R – Manual switch<br />
Select EXT O/R to assign a channel<br />
to an external button.<br />
Upon pressing the button, an<br />
overri<strong>de</strong> switching command will<br />
be executed. It will be in effect<br />
until the next time the button is<br />
pressed or until the next automatic<br />
switching command.<br />
COUNTDOWN – Countdown timer<br />
Select COUNTDOWN to set the<br />
time for a countdown timer.<br />
Upon pressing the button, an<br />
ON switching command will be<br />
carried out. It switches the selected<br />
channel ON for the set time.<br />
Pressing the button again will start<br />
the countdown timer again at the<br />
set time.<br />
If a <strong>pro</strong>gram is already running on the selected channel, no switching<br />
command will be executed! After the time has expired, the timer returns<br />
to Automatic mo<strong>de</strong>.<br />
Shortest ON switching duration: 30 seconds<br />
Longest ON switching duration: 90 minutes<br />
LIGHT<br />
FIX ON<br />
2 MIN<br />
PIN<br />
PIN<br />
PIN<br />
0000<br />
HCOUNTER<br />
SELECT<br />
SELECT<br />
CHANNEL 1)<br />
EXT I/P<br />
I/P COUNT<br />
I/P<br />
00000<br />
EXT I/P<br />
EXT O/R<br />
SELECT<br />
CHANNEL 1)<br />
OK<br />
OK<br />
OK<br />
OK<br />
OK<br />
OK<br />
OK<br />
OK<br />
HCOUNTER OK<br />
SERVICE<br />
OK<br />
CHANNEL 1) OK<br />
HOURS<br />
00000 H<br />
SERVICE<br />
OK<br />
OK<br />
OK<br />
OK<br />
OK<br />
OK<br />
OK<br />
EXT I/P<br />
OK<br />
COUNTDOWN OK<br />
SELECT CHL 1) OK<br />
DURATION<br />
MIN:SEC<br />
OK<br />
Countdown timer and manual switch cannot be selected at the<br />
same time! The function selected last always applies.<br />
Automatic/Manual mo<strong>de</strong><br />
• Manual switch: Duration ON / Duration OFF / OVR / Automatic mo<strong>de</strong><br />
• Left button = channel 1 / Right button = channel 2<br />
Press 1x = FIX ON = Duration ON<br />
Press 2x = FIX OFF = Duration OFF<br />
Press 3x = OVR = Overri<strong>de</strong> mo<strong>de</strong><br />
Press 4x = Automatic mo<strong>de</strong><br />
Overri<strong>de</strong> mo<strong>de</strong><br />
The Overri<strong>de</strong> function (temporary <strong>pro</strong>gram<br />
overwrite) allows the user to switch ON or OFF early. This <strong>de</strong>pends on<br />
the current channel status. The Overri<strong>de</strong> function applies only to the<br />
current <strong>pro</strong>gram and remains active until the next <strong>pro</strong>gram change.<br />
After that, the timer returns to Automatic mo<strong>de</strong>.<br />
Maintenance and repair<br />
Battery change<br />
Before changing the battery, the <strong>de</strong>vice must be disconnected from the<br />
power supply! Date and time will be lost!<br />
1. Lift the battery compartment using a<br />
screwdriver.<br />
2. Take the battery out of the support.<br />
3. Insert new (Lithium battery type CR2450)<br />
battery into support.<br />
1 6 12 18 24<br />
Observe polarity of the battery!<br />
4. Push battery support downward until it<br />
15:26<br />
engages.<br />
1 OFF ON 2<br />
ESC OK<br />
5. Dispose of the battery in an<br />
environmentally friendly manner.<br />
1 2<br />
Disposal / Recycling<br />
Dispose of the packing material correctly according to legal<br />
requirements and regulations.<br />
1 6 12 18 24<br />
15:26<br />
FIX OVR<br />
1 OFF ON 2<br />
ESC OK<br />
1 2<br />
Observe the following notes for disposing of <strong>de</strong>fective system<br />
components or the system after its service life:<br />
• Dispose of ap<strong>pro</strong>priately, i.e. separating the parts to be disposed of<br />
according to material groups.<br />
• Do not throw electrical and electronic components in the bin. Bring<br />
these parts to the recycling centers.<br />
• Always ensure the environmentally sound disposal conform to the<br />
state-of-the-art environment <strong>pro</strong>tection, recycling and disposal<br />
engineering.