GeNUGate 7.0 Release Notes Important â Backup! - GeNUA
GeNUGate 7.0 Release Notes Important â Backup! - GeNUA
GeNUGate 7.0 Release Notes Important â Backup! - GeNUA

You also want an ePaper? Increase the reach of your titles
YUMPU automatically turns print PDFs into web optimized ePapers that Google loves.
<strong>GeNUGate</strong> <strong>7.0</strong> <strong>Release</strong> <strong>Notes</strong><br />
Information on the <strong>GeNUGate</strong> <strong>7.0</strong> product family is available in these release notes.<br />
Please read this document carefully! You are advised to install this upgrade, as this release both resolves<br />
various problems, and provides new features.<br />
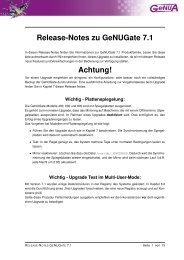
<strong>Important</strong> – <strong>Backup</strong>!<br />
We strongly recommend performing a configuration or preferably full backup of your <strong>GeNUGate</strong> system<br />
BEFORE upgrading.<br />
Detailed instructions on how to perform this upgrade are available in section 6 of these release notes.<br />
<strong>Important</strong> – Mirroring:<br />
The models <strong>GeNUGate</strong> 400, 600 and 800 are equipped with mirror disks.<br />
During the upgrade procedure, systems with mirror disks (offline mirror) will DEACTIVATE mirroring.<br />
This enables testing of the upgrade.<br />
Upgrading of systems with mirroring is performed as follows:<br />
• Upgrade system as described in section 6. The mirror update is automatically deactivated.<br />
• Test: It usually is sufficient to let the upgraded system run under normal conditions for a few days.<br />
• Reactivate mirror: After testing, delete the file /var/db/.NOMIRROR. This reactivates the automatic<br />
mirror update and synchronizes the mirror at the next cron job run (nightly at 2.05 a.m.).<br />
<strong>Important</strong> - Upgrade Test in Multi User Mode:<br />
Numerous registry data structures were changed in version <strong>7.0</strong>. Section 5.2 describes how to run a<br />
“Test Upgrade”, generate a new registry and check for inconsistencies.<br />
If this test generates error messages, we recommend fixing the inconsistencies before the real upgrade.<br />
GENUGATE <strong>7.0</strong> RELEASE NOTES Page 1 of 16
CONTENTS<br />
Contents<br />
1 <strong>Release</strong> Note Contents 4<br />
2 New Features in <strong>GeNUGate</strong> <strong>7.0</strong> 4<br />
2.1 IPv6 Support . . . . . . . . . . . . . . . . . . . . . . . . . . . . . . . . . . . . . . . . . . . 4<br />
2.1.1 Configuration of Rules . . . . . . . . . . . . . . . . . . . . . . . . . . . . . . . . . . 4<br />
2.1.2 DNS . . . . . . . . . . . . . . . . . . . . . . . . . . . . . . . . . . . . . . . . . . . . 4<br />
2.1.3 High Availability . . . . . . . . . . . . . . . . . . . . . . . . . . . . . . . . . . . . . . 4<br />
2.2 New Connection Features . . . . . . . . . . . . . . . . . . . . . . . . . . . . . . . . . . . . 5<br />
2.2.1 PFL Rules . . . . . . . . . . . . . . . . . . . . . . . . . . . . . . . . . . . . . . . . . 5<br />
2.2.2 Routing . . . . . . . . . . . . . . . . . . . . . . . . . . . . . . . . . . . . . . . . . . 5<br />
2.3 Improved Performance . . . . . . . . . . . . . . . . . . . . . . . . . . . . . . . . . . . . . . 5<br />
2.3.1 Acceleration of TCP, WWW and FTP Connections Without Content Analysis . . . 5<br />
2.3.2 Caching of Virus Scan Results . . . . . . . . . . . . . . . . . . . . . . . . . . . . . 6<br />
2.3.3 Virus Scan of a RAM Disk . . . . . . . . . . . . . . . . . . . . . . . . . . . . . . . . 6<br />
2.4 Remote Maintenance with GeNUCenter . . . . . . . . . . . . . . . . . . . . . . . . . . . . 6<br />
2.5 Authentication with Password Files . . . . . . . . . . . . . . . . . . . . . . . . . . . . . . . 6<br />
2.6 SMTP AUTH . . . . . . . . . . . . . . . . . . . . . . . . . . . . . . . . . . . . . . . . . . . 6<br />
2.7 DNS Rules . . . . . . . . . . . . . . . . . . . . . . . . . . . . . . . . . . . . . . . . . . . . 6<br />
2.8 PFL Remote Upgrade . . . . . . . . . . . . . . . . . . . . . . . . . . . . . . . . . . . . . . 7<br />
2.8.1 Certificate Chain . . . . . . . . . . . . . . . . . . . . . . . . . . . . . . . . . . . . . 7<br />
2.8.2 New Logwatch Patternis . . . . . . . . . . . . . . . . . . . . . . . . . . . . . . . . . 7<br />
2.9 Usability . . . . . . . . . . . . . . . . . . . . . . . . . . . . . . . . . . . . . . . . . . . . . . 7<br />
3 Software Updates and Changes 8<br />
3.1 Operating System . . . . . . . . . . . . . . . . . . . . . . . . . . . . . . . . . . . . . . . . 8<br />
3.2 VPN Option Deprecated . . . . . . . . . . . . . . . . . . . . . . . . . . . . . . . . . . . . . 8<br />
3.3 Option High Availability . . . . . . . . . . . . . . . . . . . . . . . . . . . . . . . . . . . . . 8<br />
3.3.1 Manual Modification of the OSPF Configuration . . . . . . . . . . . . . . . . . . . . 8<br />
3.4 MIME Magic File Update . . . . . . . . . . . . . . . . . . . . . . . . . . . . . . . . . . . . . 9<br />
3.5 PFL . . . . . . . . . . . . . . . . . . . . . . . . . . . . . . . . . . . . . . . . . . . . . . . . 9<br />
3.5.1 Floppy Support Discontinued . . . . . . . . . . . . . . . . . . . . . . . . . . . . . . 9<br />
3.5.2 Logging and Time Server . . . . . . . . . . . . . . . . . . . . . . . . . . . . . . . . 9<br />
3.5.3 Internal Services: Active FTP . . . . . . . . . . . . . . . . . . . . . . . . . . . . . . 9<br />
3.6 SSH Key Generator Removed from the GUI . . . . . . . . . . . . . . . . . . . . . . . . . . 9<br />
3.7 Compatibility Option Removed . . . . . . . . . . . . . . . . . . . . . . . . . . . . . . . . . 9<br />
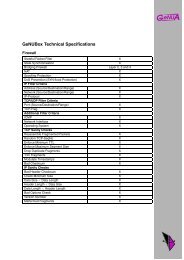
4 Overview: Versions with Update Support 10<br />
5 Before Upgrading 10<br />
5.1 System . . . . . . . . . . . . . . . . . . . . . . . . . . . . . . . . . . . . . . . . . . . . . . 10<br />
5.2 Test Upgrade in Multi User Mode . . . . . . . . . . . . . . . . . . . . . . . . . . . . . . . . 10<br />
Page 2 of 16 GENUGATE <strong>7.0</strong> RELEASE NOTES
CONTENTS<br />
6 Upgrade Installation 11<br />
6.1 Upgrade Path . . . . . . . . . . . . . . . . . . . . . . . . . . . . . . . . . . . . . . . . . . . 11<br />
6.2 Data <strong>Backup</strong> . . . . . . . . . . . . . . . . . . . . . . . . . . . . . . . . . . . . . . . . . . . 11<br />
6.3 Minimum Available Disk Space . . . . . . . . . . . . . . . . . . . . . . . . . . . . . . . . . 11<br />
6.4 Performing the Upgrade . . . . . . . . . . . . . . . . . . . . . . . . . . . . . . . . . . . . . 11<br />
7 Information in the Web 16<br />
8 How to Contact Us 16<br />
GENUGATE <strong>7.0</strong> RELEASE NOTES Page 3 of 16
2 NEW FEATURES IN GENUGATE <strong>7.0</strong><br />
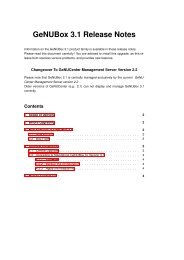
1 <strong>Release</strong> Note Contents<br />
These release notes describe the changes, bugfixes and new features available by updating from<br />
<strong>GeNUGate</strong> 6.3 to the current version <strong>7.0</strong>. The detailed product configuration is described in the <strong>GeNUGate</strong><br />
<strong>7.0</strong> manual.<br />
An electronic version of these release notes, the software itself, and the product manual are available<br />
at http://www.genua.de/index.en.html in the Internal Customers Area. Please mail us at auftrag@genua.de<br />
if you prefer us to send you a CD-ROM.<br />
2 New Features in <strong>GeNUGate</strong> <strong>7.0</strong><br />
2.1 IPv6 Support<br />
The major new feature in version <strong>7.0</strong> is support for Internet Protocol Version 6. On the ALG and PFL the<br />
network interfaces are automatically assigned link-local addresses, but both systems ignore IPv6 router<br />
advertisements and do not perform autoconfiguration.<br />
When entering IP addresses or host and network objects for the <strong>GeNUGate</strong>, the IPv4 or IPv6 address<br />
family is automatically detected. Depending on the host and network objects used, ALG and PFL rules<br />
are then either restricted to an IP version, or configured with both v4 and v6. Per default, IPv6 traffic will<br />
not be handled by the <strong>GeNUGate</strong> system if no IPv6 addresses and routes have been configured.<br />
2.1.1 Configuration of Rules<br />
As mentioned above, IPv4 and v6 will be automatically configured in new rules, depending on the source<br />
/ destination ACLs and transparency settings of the rule.<br />
To restrict destination transparent rules to IPv4 only, simply add exclusively IPv4 entries to at least one<br />
of the ACLs. To select any IPv4 address, specify the ACL “0.0.0.0/0” (or “::/0” for IPv6).<br />
All rules specifying a proxy address on the <strong>GeNUGate</strong> are automatically set to the protocol family of this<br />
proxy address.<br />
Further information is available in the product manual.<br />
2.1.2 DNS<br />
Once IPv6 routes are available, the <strong>GeNUGate</strong> DNS server will send queries via IPv6. If name resolution<br />
returns both IPv4 and IPv6 addresses, Squid and sendmail will preferentially connect to IPv6 addresses.<br />
Please keep this in mind when setting up an IPv6 default route.<br />
The reason for this is that DNS queries by <strong>GeNUGate</strong> ask for both IPv6 (“AAAA”) and IPv4 (“A”) records.<br />
If results from both families are returned for a hostname, address selection is based on the “Default Policy<br />
Table” from RFC 3484, thus preferring IPv6 communication.<br />
In the upcoming version of <strong>GeNUGate</strong> 7.1, configuration of IPv6 DNS entries will be possible in the GUI.<br />
2.1.3 High Availability<br />
As in IPv4 OSPF is used in IPv6 configurations to ensure the stability of HA setups. No additional<br />
GUI input fields are provided as the link-local addresses are used for OSPF communication. Only<br />
Page 4 of 16 GENUGATE <strong>7.0</strong> RELEASE NOTES
2 NEW FEATURES IN GENUGATE <strong>7.0</strong><br />
manually configured IPv6 and IPv4 addresses need to be entered in the menu field SYSTEM → HA →<br />
CONFIGURATION → HA ADDRESSES for all systems in the cluster.<br />
2.2 New Connection Features<br />
<strong>GeNUGate</strong> 6.3 already introduced the connection based configuration of ALG rules. Additional info is<br />
available in the <strong>GeNUGate</strong> product manual, section “2.4 Connections on the <strong>GeNUGate</strong>”. This concept<br />
was now extended to cover PFL and routing configuration as well.<br />
This also simplified the menu structure. Routing and PFL configuration are now performed in the GUI<br />
menu CONNECTIONS, with direct access to configuration objects, such as “Hosts & Networks”.<br />
2.2.1 PFL Rules<br />
The ALG configuration objects such as services, policies and networks now can be reused in PFL<br />
configuration. The policy type determines which IP protocols are permitted on the PFL. For example,<br />
a DNS policy would automatically impact TCP and UDP connections on the PFL. In addition, incoming<br />
source and destination ports from the service are reused for filtering on the PFL.<br />
Unlike the ALG, only two association types are permitted on the PFL:<br />
• Pass<br />
• Block<br />
These determine if the connection is permitted or not.<br />
Much as on the ALG, logging on the PFL is defined in the policy field “Logging”. Further filter options<br />
can be configured in the policy field “Options”.<br />
Additional information is available in the product manual.<br />
2.2.2 Routing<br />
In the same way as rules, routing tables access “Hosts & Networks”. Both object types may be selected<br />
as destination networks, while only hosts directly connected to the <strong>GeNUGate</strong> system may be gateways.<br />
Additional information is available in the product manual, section 4.9.1 “Routing”.<br />
2.3 Improved Performance<br />
2.3.1 Acceleration of TCP, WWW and FTP Connections Without Content Analysis<br />
Incoming TCP connections are terminated on the ALG, and new connections are initiated to the destination<br />
hosts. At the same time, ACLs and policy settings are checked, and new IP packets with new<br />
TCP headers are genereated, protecting the destination host’s IP and TCP stacks.<br />
As a new feature in <strong>GeNUGate</strong> <strong>7.0</strong> the data payload now is processed directly by the kernel, which is<br />
significantly faster.<br />
The same applies to FTP and WWW connections, if no content analysis (weeding or virus scan) is<br />
activated. The respective protocol is of course still checked. Reducing the number of context changes<br />
between kernel and userland processes improves the performance of many connections.<br />
GENUGATE <strong>7.0</strong> RELEASE NOTES Page 5 of 16
2 NEW FEATURES IN GENUGATE <strong>7.0</strong><br />
2.3.2 Caching of Virus Scan Results<br />
In the default configuration, only initial downloads are scanned for viruses, and the SHA256 sum of the<br />
contents is cached to check for future downloads of the same file. If the file is subjected to multiple<br />
parallel scans, only the first one is performed. Subsequent scans have to wait, and use the cached<br />
checksum.<br />
Pattern updates and changes in the virus scanner configuration will invalidate the cache, and a full scan<br />
will be performed again. Please note that scan errors (e.g. due to low disk space) will not be cached.<br />
2.3.3 Virus Scan of a RAM Disk<br />
On systems with at least 16GB RAM, <strong>GeNUGate</strong> <strong>7.0</strong> creates a RAM disk to unpack and scan downloads<br />
in. The download itself is at first stored on the regular hard drive in /cage/vscan. If space on the RAM<br />
disk is insufficient, the virus scan is automatically repeated on the hard drive.<br />
Depending on file type and content, using a RAM disk speeds up scanning by a factor of up to 10. This<br />
feature also works with the virus scanner cache.<br />
2.4 Remote Maintenance with GeNUCenter<br />
<strong>GeNUGate</strong> <strong>7.0</strong> supports central management by GeNUCenter again. Further adjustments will be implemeted<br />
by the next GeNUCenter patch, and will be described in the respective readme.<br />
2.5 Authentication with Password Files<br />
In addition to previously available authentication methods, <strong>GeNUGate</strong> <strong>7.0</strong> now supports storing usernames<br />
and passwords in a file. For policies with authentication (such as FTP or SMTP), the “Authentication”<br />
menu provides the options “Password File” und “Path to Password File”.<br />
Further information on supported formats is available in the <strong>GeNUGate</strong> manual in the sections on the<br />
respective policies.<br />
2.6 SMTP AUTH<br />
The SMTP policy field “Authentication” can be used to require incoming mailservers to authenticate with<br />
a username and password, as defined in RFC 4954. The following methods are available:<br />
• PLAIN<br />
• CRAM-MD5<br />
The unencrypted “PLAIN” method can be restricted to TLS secured connections only by disabling the<br />
option “Insecure Authentication”.<br />
2.7 DNS Rules<br />
<strong>GeNUGate</strong> <strong>7.0</strong> introduces the new DNS policy type. Services using this policy are configured to directly<br />
access the TCP and UDP port 53. To save on resources, only one response packet per UDP query<br />
packet will be accepted. The connection will then close and free up system resources.<br />
Page 6 of 16 GENUGATE <strong>7.0</strong> RELEASE NOTES
2 NEW FEATURES IN GENUGATE <strong>7.0</strong><br />
The DNS relay option “Close After Last Reponse Packet” is available in the “Options” field of every UDP<br />
policy.<br />
2.8 PFL Remote Upgrade<br />
The new PFL operating mode “USB Remote Upgrade” was introduced, permitting full remote maintenance<br />
of the PFL without physical access. The kernel and the entire configuration can be exchanged<br />
while applyng patches. See “USB Remote-Administration”.<br />
The necessary PFL reboot to activate a new configuration or patches now kann be triggered in the GUI<br />
menu PACKET FILTER → BOOT MEDIA.<br />
Further information is available in the product manual section 4.6.3 “Packet Filter Hardware”.<br />
2.8.1 Certificate Chain<br />
Certificate management on <strong>GeNUGate</strong> <strong>7.0</strong> now supports certificate chains. WWW and TCP relays with<br />
the activated SSLify option now also transmit the root and intermediate certificates belonging to the<br />
server certificate used. A prerequisite is that these certificates were specified when generating proxy or<br />
server certificates.<br />
2.8.2 New Logwatch Patternis<br />
Two new patterns are available in the menu SYSTEM → SYSADMIN → SETTINGS → LOGWATCH. The<br />
first triggers alerts when possible ARP spoofing attacks are detected, the other in case of duplicate IP<br />
addresses. Both patterns can be applied to the ALG or the PFL by configuring the field “kern”-Log oder<br />
“screen”-Log.<br />
2.9 Usability<br />
A number of usability modifications now simplify <strong>GeNUGate</strong> operation. Some of the more important<br />
ones are:<br />
• Table sorting: Tables now can be sorted by any column, except for the display of ALG and PFL<br />
rules, as their sequence is important during processing.<br />
• Back links in configuration run: The display of saving and activating the configuration has been<br />
improved, and a link back to the previous higher level configuration page is available.<br />
• Boot from mirror disk: It previously depended on the RAID controller used in <strong>GeNUGate</strong> systems<br />
if booting from the mirror disk (e.g. in case of config or hard drive problems) was possible without<br />
manual intervention in the RAID BIOS. <strong>GeNUGate</strong> <strong>7.0</strong> now will always automatically boot from the<br />
mirror disk.<br />
The GUI and the command line will display warnings concerning the mirror disk.<br />
• GUI: username and fully qualified host name: The user logged in and the fully qualified host<br />
name of the <strong>GeNUGate</strong> are dispayed in the upper right hand corner of the GUI.<br />
GENUGATE <strong>7.0</strong> RELEASE NOTES Page 7 of 16
3 SOFTWARE UPDATES AND CHANGES<br />
• PFL configuration update only requested when necessary:<br />
Detection of PFL configuration changes has been improved. A PFL update after configuration<br />
changed will now only be requested if it really affects the PFL.<br />
3 Software Updates and Changes<br />
3.1 Operating System<br />
• Patches included: <strong>GeNUGate</strong> <strong>7.0</strong> includes all changes and patches of version 6.3 up to and<br />
including patch 9.<br />
• Update to OpenBSD version 4.6: The operating system OpenBSD was completely updated to<br />
version 4.6.<br />
3.2 VPN Option Deprecated<br />
As announced with the <strong>GeNUGate</strong> 6.3 release, <strong>GeNUGate</strong> <strong>7.0</strong> has deprecated the VPN option. It no<br />
longer is possible to terminate VPN connections on the ALG. Any existing VPN configuration will be<br />
removed by the upgrade to version <strong>7.0</strong>.<br />
VPN appliances located in a <strong>GeNUGate</strong> DMZ are not affected. Any existing VPN configuration will be<br />
removed by the upgrade to version <strong>7.0</strong>. This is also the method we recommend for migration, for example<br />
with GeNUCrypts or GeNUScreens, which can be configured with the <strong>GeNUGate</strong> in the GeNUCenter.<br />
3.3 Option High Availability<br />
• Network interfaces: Starting with this version, HA setups require that all systems within a cluster<br />
have the same number of configured interfaces on ALG and PFL.<br />
• HA synchronization of PFL interfaces:<br />
After upgrade, the network interface and address mapping on the HA master must be completed<br />
for the PFL to ensure HA synchronization. This can be done in the menus SYSTEM → HA →<br />
CONFIGURATION → HA ADDRESSES or SYSTEM → PACKET FILTER → PFL ADDRESSES → HA<br />
INTERFACES.<br />
Thus, a copy of the entire cluster configuration is available on the HA master.<br />
3.3.1 Manual Modification of the OSPF Configuration<br />
Previously, modification of the OSPF settings was performed in the registry and via local configuration<br />
files. The syntax of address to interface allocations has changed in <strong>GeNUGate</strong> <strong>7.0</strong>.<br />
For example, specific <strong>GeNUGate</strong> addresses could be exempted from the OSPF export. This registry<br />
setting now no longer applies to single addresses, but instead entire interfaces with all their addresses.<br />
In addition, these settings can also be made in the GUI menu SYSTEM → ALG INTERFACES.<br />
A local configuration file is needed to exempt single addresses from the export. Please contact <strong>GeNUA</strong><br />
support for the correct pre-upgrade configuration syntax.<br />
Page 8 of 16 GENUGATE <strong>7.0</strong> RELEASE NOTES
3.4 MIME Magic File Update<br />
3 SOFTWARE UPDATES AND CHANGES<br />
Virus scanner policies permit configuration of whether files of a certain MIME type should be blocked in<br />
the “MIME-Type ACL”. This heuristic detection method also works on archives, as the original file first is<br />
unpacked.<br />
The MIME type pattern file for <strong>GeNUGate</strong> <strong>7.0</strong> was updated to include more types and improve detection.<br />
The commandline tool mime type can check individual files for their mime type.<br />
3.5 PFL<br />
3.5.1 Floppy Support Discontinued<br />
Due to the PFL IPv6 kernel’s size, support for floppy disk boot media was discontinued. Configuration<br />
and boot now are performed with USB sticks, which are still written and administered on the ALG.<br />
Any backups performed on floppy disk by the cfgbu command on the ALG need to be written to USB<br />
stick, as current hardware no longer has a floppy drive.<br />
3.5.2 Logging and Time Server<br />
It previously was possible to specify separate logging and time servers on the PFL. To standardize<br />
behaviour, <strong>GeNUGate</strong> <strong>7.0</strong> moves these configuration options from the PFL to ALG. The necessary rules<br />
are automatically generated.<br />
3.5.3 Internal Services: Active FTP<br />
Activation of the FTP “internal Service” in the PFL configuration is possible in different scenarios on<br />
<strong>GeNUGate</strong> <strong>7.0</strong>. The automatic configuration update might not create enough rules to cover this.<br />
Therefore, please check the rules for active FTP in the PFL rules menu after upgrade.<br />
3.6 SSH Key Generator Removed from the GUI<br />
Previously, SSH keys could be generated in the “Remote Access” field in the user administration menu.<br />
This option has been discontinued in <strong>GeNUGate</strong> <strong>7.0</strong> and the keys will be deleted from the system during<br />
upgrade.<br />
Existing user remote access setups are not affected by this change, and the public key remains saved<br />
in the <strong>GeNUGate</strong> registry.<br />
3.7 Compatibility Option Removed<br />
The “compatibility option” provided a number of paths and symbolic links to files of earlier <strong>GeNUGate</strong><br />
versions (pre-6.0). This option has been completely removed.<br />
GENUGATE <strong>7.0</strong> RELEASE NOTES Page 9 of 16
5 BEFORE UPGRADING<br />
4 Overview: Versions with Update Support<br />
Patches and security updates are available for <strong>GeNUGate</strong> <strong>7.0</strong> and the following verions:<br />
• <strong>GeNUGate</strong> 6.0:<br />
This is the older CC EAL4+ certified version. Patches and security updates will be available until<br />
May 2011.<br />
• <strong>GeNUGate</strong> 6.2:<br />
Security updates for <strong>GeNUGate</strong> version 6.2 will be available until May 2011.<br />
• <strong>GeNUGate</strong> 6.3: This version has been certified at CC EAL4+ in September 2010 and thus replaces<br />
<strong>GeNUGate</strong> 6.0. It will remain in support until at least December 2012.<br />
As described in our contract conditions, software versions previous to <strong>GeNUGate</strong> 6.3 may not be fully<br />
supported, especially <strong>GeNUGate</strong> 6.1. Please upgrade older systems as soon as possible.<br />
5 Before Upgrading<br />
5.1 System<br />
• The upgrade to verson <strong>7.0</strong> is supported by any version 6.3 patch level.<br />
• At least 512MB RAM in the ALG, and 128 MB RAM in the PFL system are needed to run version<br />
<strong>7.0</strong>.<br />
• Sufficient hard drive space is needed on the ALG to perform the upgrade. The procedure to<br />
determine hard drive space is described in chapter 6.3.<br />
5.2 Test Upgrade in Multi User Mode<br />
A “test upgrade” of the <strong>GeNUGate</strong> system is recommended to detect and handle problems and inconsistencies.<br />
The procedure is as follows:<br />
• In normal multi user mode, insert the CD-ROM in the system’s drive.<br />
• Execute the command ggupgrade as the user root.<br />
The first thing the test upgrade does is to convert the registry and write the result to the human readable<br />
file /etc/configfw/fw.cfg.pretty-G700 000.<br />
The running system’s registry itself is not modified. Any occurring inconsistency will trigger error messages,<br />
and serious problems must be explicitly acknowledged.<br />
Please note the test upgrade cannot diagnose if there is sufficient hard drive space in older hardware.<br />
To determine needed space, follow the procedure described in chapter 6.3.<br />
After the registry test conversion, the command configfw is executed to check if configuration files are<br />
correctly generated from the converted data.<br />
Afterwards, normal systems operation can continue with the original, unconverted configuration, or the<br />
actual upgrade can be performed as described in chapter 6.<br />
Page 10 of 16 GENUGATE <strong>7.0</strong> RELEASE NOTES
6 UPGRADE INSTALLATION<br />
Please contact your service partner for further support. Detailed information is available in the files<br />
/var/gg/patches/G700 000.upgrade.log (registry upgrade) and<br />
/var/gg/patches/G700 000.configfw.log.<br />
6 Upgrade Installation<br />
6.1 Upgrade Path<br />
Beginning from version 6.3, <strong>GeNUGate</strong> systems can be upgraded to version <strong>7.0</strong>.<br />
No specific patch level within version 6.3 is necessary.<br />
6.2 Data <strong>Backup</strong><br />
The upgrade to <strong>GeNUGate</strong> <strong>7.0</strong> will not affect log files and e-mails in the system spool directory.<br />
Nevertheless, please back up your configuration before upgrade with:<br />
# cfgbu -s<br />
To back up log files and e-mails, a full system backup is necessary, as described in the product manual,<br />
chapter “<strong>Backup</strong> and Restore”.<br />
6.3 Minimum Available Disk Space<br />
Sufficient space in the partitions on the hard drive is needed for a successful upgrade. Above all, the<br />
partitions / and /usr need more than 50% available space. Enter the command df to determine file<br />
system usage:<br />
admin@ggd132:˜# df -h<br />
Filesystem Size Used Avail Capacity Mounted on<br />
/dev/wd0a 126M 40.8M 78.9M 34% /<br />
/dev/wd0f 1.5G 113M 1.3G 8% /cage<br />
mfs:6239 62.9M 2.0K 59.8M 0% /tmp<br />
/dev/wd0d 502M 238M 239M 50% /usr<br />
/dev/wd0e 251M 33.5M 205M 14% /var<br />
The column “Capacity” states the used percentage of the respective file system.<br />
6.4 Performing the Upgrade<br />
Please note:<br />
Physical access to the <strong>GeNUGate</strong> system itself, or to a connected serial console is necessary,<br />
as a CD-ROM and possibly a USB stick (or a floppy in older hardware) need to be inserted or<br />
switched.<br />
Insert the <strong>GeNUGate</strong> <strong>7.0</strong> CD-ROM in the drive, log on to the system as the user “admin”, and become<br />
“root” with the command su.<br />
GENUGATE <strong>7.0</strong> RELEASE NOTES Page 11 of 16
6 UPGRADE INSTALLATION<br />
admin@ggd132:˜# su -<br />
Password:<br />
Sep 18 08:06:33 ggd132 su: admin to root on /dev/console<br />
root@ggd132:˜#<br />
Enter the command ggupgrade to start the upgrade.<br />
root@ggd132:˜# /usr/local/gg/sbin/ggupgrade<br />
Executing upgrade script from cdrom.<br />
Starting /cdrom/usr/local/gg/sbin/ggupgrade ...<br />
Before the upgrade starts, the patches for the new release are<br />
transferred. This ensures your <strong>GeNUGate</strong> system will be running with<br />
the latest patchlevel immediately after upgrade.<br />
Get upgrade patch from cdrom ...<br />
Retrieving G700_000.tar<br />
The patches for the new version can be fetched from <strong>GeNUA</strong> over the<br />
Internet.<br />
Patches from <strong>GeNUA</strong> (yes no) [yes]? yes<br />
You can check for published patches before restarting the system by typing yes.<br />
At this point, you will be asked some questions for the installation. Simply enter [RETURN] here - the<br />
upgrade procedure will skip these questions and continue.<br />
Now a registry test upgrade and test run of configfw is performed to check for problems during the<br />
procedure. If any problems occur, please contact your service partner.<br />
Reboot the system now.<br />
root@ggd132:˜# reboot<br />
Sep 18 08:11:42 ggd132 reboot: rebooted by admin<br />
/etc/rc.shutdown in progress...<br />
IP is OFF<br />
/etc/rc.shutdown complete.<br />
Sep 18 08:11:45 ggd132 syslogd: exiting on signal 15<br />
syncing disks... done<br />
rebooting...<br />
Be sure the system boots from the inserted <strong>GeNUGate</strong> <strong>7.0</strong> CD-ROM by checking for the message<br />
CDBOOT 2.02 in the boot prompt.<br />
>> OpenBSD/i386 CDBOOT 2.02<br />
boot><br />
booting cd0a:bsd.install: 4020108+930528 [52+215856+195731]=0x51d3d8<br />
entry point at 0x200120<br />
[ using 412012 bytes of bsd ELF symbol table ]<br />
Copyright (c) 1982, 1986, 1989, 1991, 1993<br />
The Regents of the University of California. All rights reserved.<br />
Copyright (c) 1995-2008 OpenBSD. All rights reserved.<br />
http://www.OpenBSD.org<br />
OpenBSD 4.6-stable (ALG.install) #0: Fri Oct 1 19:52:17 CEST 2010<br />
bluhm@g701.genua.de:/build/gg.70/70.D020/ALG.install<br />
cpu0: Dual Core AMD Opteron(tm) Processor 265 ("AuthenticAMD"<br />
686-class, 1024KB L2 cache) 1.80 GHz<br />
cpu0:<br />
Page 12 of 16 GENUGATE <strong>7.0</strong> RELEASE NOTES
6 UPGRADE INSTALLATION<br />
FPU,V86,DE,PSE,TSC,MSR,PAE,MCE,CX8,APIC,SEP,MTRR,PGE,MCA,CMOV,PAT,PSE36,CFLUSH,MMX,FXSR,SSE,SSE2,SSE3<br />
...<br />
After loading the kernel, the <strong>GeNUGate</strong> <strong>7.0</strong> installation routine will prompt you for the installation language<br />
and keyboard mapping. Afterwards, please select the installation mode upgrade.<br />
<strong>GeNUGate</strong> Installation<br />
Sprache auswaehlen.<br />
Sprache/Language (de en) [de] ? en<br />
Select the layout of the keyboard connected to the <strong>GeNUGate</strong>.<br />
Keyboard layout (us de de.nodead ... pl hu si cf cf.nodead) [cf.nodead] ?<br />
us<br />
kbd: keyboard mapping set to us<br />
Probing system.<br />
Choose installation, upgrade or recovery from backup.<br />
Mode (install upgrade recover) [upgrade] ? upgrade<br />
The hard drives and file systems are checked, mounts performed and the upgrade is started.<br />
Mount hard disk.<br />
Select boot hard disk.<br />
Detecting hard drives in system.<br />
Boot hard disk selected.<br />
Unmount all partitions.<br />
Read in fstab.<br />
Check file systems.<br />
/dev/rwd0a: file system is clean; not checking<br />
/dev/rwd0f: file system is clean; not checking<br />
/dev/rwd0d: file system is clean; not checking<br />
/dev/rwd0e: file system is clean; not checking<br />
Mount all partitions.<br />
Remove flags.<br />
<strong>GeNUGate</strong> licenses.<br />
Initialize license.<br />
You are prompted for the <strong>GeNUGate</strong> license number and hardware serial number. The values from<br />
<strong>GeNUGate</strong> 6.3 still are valid. Press [RETURN] to accept them.<br />
Enter license.<br />
The value to be entered has the format 1234-GG-ABCD-EFGH-IJKL-MNOP.<br />
License [1234-GG-ABCD-EFGH-IJKL-MNOP] ? [RETURN]<br />
Enter serial number.<br />
The value to be entered has the format XXXXX-XX-XXXX.<br />
Serial number [12345-CD-89AB] ? [RETURN]<br />
You now can transfer patches from USB stick, an HA peer or over the network.<br />
Get patches from USB stick.<br />
Fetch patches from USB medium (yes no) [no] ? [RETURN]<br />
GENUGATE <strong>7.0</strong> RELEASE NOTES Page 13 of 16
6 UPGRADE INSTALLATION<br />
Get patches from HA peer.<br />
Fetch patches from HA network (yes no) [no] ? [RETURN]<br />
Get patches from <strong>GeNUA</strong>.<br />
Fetch patches from network (yes no) [no] ? [RETURN]<br />
Upgrade begins now. The new software is copied to the system and configuration starts.<br />
Begin upgrade.<br />
Copy upgrade patch from cdrom.<br />
Retrieving G700_000.tar<br />
...<br />
At the end of the upgrade, you are prompted to set new passwords for the administrative accounts<br />
“admin” and “root”. Alternatively, keep the existing passwords by pressing [RETURN] to select no.<br />
Set administrator passwords.<br />
Set passwords (yes no) [no] ? no<br />
The upgrade is done. Press [RETURN] to restart the system and remove the CD-ROM from the drive.<br />
Press to reboot, remove the cdrom after the ’rebooting...’<br />
message.<br />
Reboot now (reboot) [reboot] ? [RETURN]<br />
The system now starts the new software. After the kernel has been loaded, you are prompted for<br />
the “root” password, as a bootinstall script needs to be run to upgrade the PFL (packet filter) system<br />
component.<br />
At least one bootinstall script was found. You can only run them as root.<br />
You will be askied for the root password now. If you do not know it, enter<br />
an empty string three times, and boot will continue without<br />
executing the bootinstall scripts. Enter your root password now.<br />
You have 60 seconds to authenticate!<br />
Enter root password!<br />
Password:<br />
Select the script with 1 und [RETURN]. Start the script by entering y.<br />
Select a list of bootinstall scripts by entering their numbers or by<br />
entering * to select all.<br />
================================================================<br />
1) /var/gg/boot/bootinst..2010.10.02-15.12.02.exe<br />
Initialize packet filter disk<br />
Auswahl (1) []: 1<br />
1) /var/gg/boot/bootinst.2010.10.02-15.12.02.exe<br />
Initialize packet filter disk<br />
Is this ok? (y/n) [n]: y<br />
Insert the PFL floppy in the ALG drive, or insert the PFL USB stick in an available USB slot of the ALG,<br />
and rewrite the PFL medium. Follow the displayed instructions to restart the PFL.<br />
After restart, log on to the ALG. A banner will displayed with the new version number.<br />
Page 14 of 16 GENUGATE <strong>7.0</strong> RELEASE NOTES
login: admin<br />
Password:<br />
Last login: Mon Sep 10 15:05:02 on console<br />
Welcome to your <strong>GeNUGate</strong> Firewall System.<br />
This system is running <strong>GeNUGate</strong> Version <strong>7.0</strong> 000 based on OpenBSD 4.6<br />
admin@ggd132:/var/home/admin$<br />
6 UPGRADE INSTALLATION<br />
Enter the command su to become “root”, and execute the command configfw. This is necessary to<br />
perform syntax checks of configuration files (the upgrade does not perform these checks):<br />
root@ggd132:˜# configfw<br />
zone file /cage/ALG_2_INTERN/etc/namedb/gg.de.db: new serial<br />
(2009081061)
8 HOW TO CONTACT US<br />
If the option GeNUScan is installed on your system, be sure to update the virus scanner! As root,<br />
execute the command getpatterns:<br />
root@ggd132:˜# getpatterns<br />
...<br />
Enjoy your new <strong>GeNUGate</strong> system!<br />
7 Information in the Web<br />
These release notes also are available on our Web server in the “Customer Service” area:<br />
http://www.genua.de/customer/index.en.html ,<br />
“Internal Customers Area”.<br />
Further information is available in the “Internal Customers Area”, qq<strong>GeNUGate</strong> Support –> “Knowledge<br />
Base” (login required).<br />
8 How to Contact Us<br />
<strong>GeNUA</strong> Gesellschaft fuer Netzwerk– und Unix–Administration mbH<br />
Domagkstrasse 7, 85551 Kirchheim/Munich,<br />
Tel. +49 89 99 19 50-0, Fax. +49 89 99 19 50-999<br />
E-Mail: info@genua.de, WWW: http://www.genua.de/<br />
© 2010 <strong>GeNUA</strong> mbH, Kirchheim, All rights reserved. <strong>GeNUGate</strong> and <strong>GeNUA</strong> are registered trade<br />
marks of <strong>GeNUA</strong> mbH.<br />
Page 16 of 16 GENUGATE <strong>7.0</strong> RELEASE NOTES