400/500 Series Garmin Optional Displays
400/500 Series Garmin Optional Displays
400/500 Series Garmin Optional Displays

You also want an ePaper? Increase the reach of your titles
YUMPU automatically turns print PDFs into web optimized ePapers that Google loves.
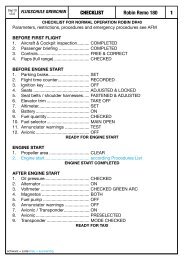
34<br />
Section 2<br />
TERRAIN Operation<br />
Figure 2-5: Enabling Terrain<br />
Color Terrain/Obstacle Location<br />
Red Terrain/Obstacle is within 100’ or<br />
above aircraft altitude.<br />
Yellow Terrain/Obstacle is within 1000’ of<br />
aircraft altitude.<br />
Black Terrain/Obstacle is more than 1000’<br />
below aircraft altitude.<br />
Table 2-1: TERRAIN Color Symbology<br />
To enable TERRAIN:<br />
1. Select the TERRAIN Page and press MENU. ‘Enable Terrain?’ is selected by default (Figure 2-<br />
5).<br />
2. Press ENT. The TERRAIN system is functional again.<br />
TERRAIN Symbols<br />
The following symbols are used to represent obstacles and potential impact points on the Terrain Page.<br />
Note that obstacle symbols are shown on display zoom ranges up to 10 nm:<br />
Unlighted Obstacles<br />
1000’ AGL<br />
Potential Impact Points<br />
The <strong>Garmin</strong> TERRAIN system uses black, yellow, and red to depict terrain information relative to<br />
aircraft altitude (Figure 2-6 and Table 2-1).<br />
1000' AGL<br />
100' Threshold<br />
Projected Flight Path<br />
Unlighted Obstacle<br />
Figure 2-6: TERRAIN Altitude/Color Correlation<br />
Potential Impact Point