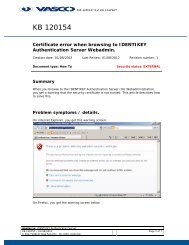
DIGIPASS Authentication for FortiGate VPN SSL IDENTIKEY - Vasco
DIGIPASS Authentication for FortiGate VPN SSL IDENTIKEY - Vasco
DIGIPASS Authentication for FortiGate VPN SSL IDENTIKEY - Vasco

Create successful ePaper yourself
Turn your PDF publications into a flip-book with our unique Google optimized e-Paper software.
<strong>DIGIPASS</strong> <strong>Authentication</strong> <strong>for</strong> Fortigate <strong>SSL</strong>-<strong>VPN</strong><br />
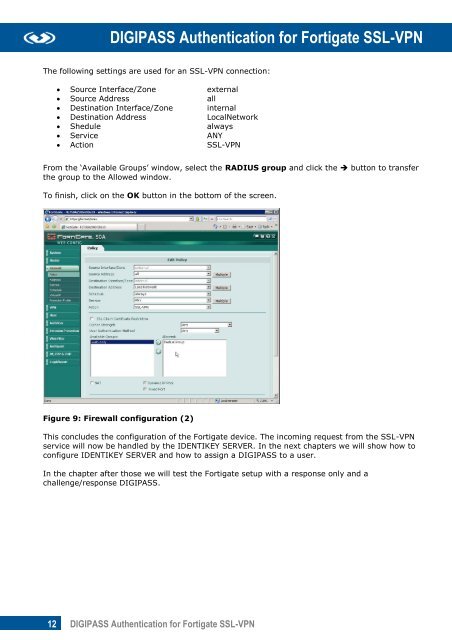
The following settings are used <strong>for</strong> an <strong>SSL</strong>-<strong>VPN</strong> connection:<br />
Source Interface/Zone external<br />
Source Address all<br />
Destination Interface/Zone internal<br />
Destination Address LocalNetwork<br />
Shedule always<br />
Service ANY<br />
Action <strong>SSL</strong>-<strong>VPN</strong><br />
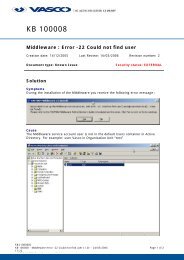
From the ‘Available Groups’ window, select the RADIUS group and click the button to transfer<br />
the group to the Allowed window.<br />
To finish, click on the OK button in the bottom of the screen.<br />
Figure 9: Firewall configuration (2)<br />
This concludes the configuration of the Fortigate device. The incoming request from the <strong>SSL</strong>-<strong>VPN</strong><br />
service will now be handled by the <strong>IDENTIKEY</strong> SERVER. In the next chapters we will show how to<br />
configure <strong>IDENTIKEY</strong> SERVER and how to assign a <strong>DIGIPASS</strong> to a user.<br />
In the chapter after those we will test the Fortigate setup with a response only and a<br />
challenge/response <strong>DIGIPASS</strong>.<br />
12 <strong>DIGIPASS</strong> <strong>Authentication</strong> <strong>for</strong> Fortigate <strong>SSL</strong>-<strong>VPN</strong>


![KB [100006] - Vasco](https://img.yumpu.com/12539350/1/184x260/kb-100006-vasco.jpg?quality=85)