The Wreck of DKM Bismarck − A Marine Forensics Analysis 1 The ...
The Wreck of DKM Bismarck − A Marine Forensics Analysis 1 The ...
The Wreck of DKM Bismarck − A Marine Forensics Analysis 1 The ...

Create successful ePaper yourself
Turn your PDF publications into a flip-book with our unique Google optimized e-Paper software.
<strong>The</strong> <strong>Wreck</strong> <strong>of</strong> <strong>DKM</strong> <strong>Bismarck</strong> <strong>−</strong> A <strong>Marine</strong> <strong>Forensics</strong> <strong>Analysis</strong><br />
ricocheted, striking the ship or passing harmlessly over. Accuracy does not seem to have been all<br />
that impressive, given the close range for most <strong>of</strong> the engagement.<br />
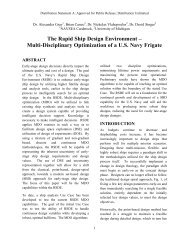
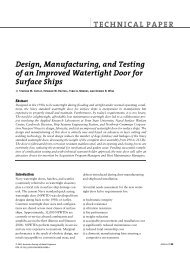
This sketch depicts the battered <strong>DKM</strong> <strong>Bismarck</strong> shortly before the ship capsized and sank, about 1040<br />
on the morning <strong>of</strong> 27 May 1941. (Courtesy Steve Smith)<br />
It is significant to note that Jim Cameron’s complete survey <strong>of</strong> the hull detected only two<br />
instances where armor-piercing shells actually penetrated all the way through the 320-mm main<br />
side belt armor. <strong>The</strong>se are both on the starboard side amidships, presumably caused by 406-mm<br />
shellfire, since Rodney was firing from that side sometime during 0950-1010 at very close range.<br />
One hole forward <strong>of</strong> the 320-mm displaced armor belt is an obvious penetration. <strong>The</strong> second is<br />
rather unusual, with a rectangular hole at the end <strong>of</strong> an armor plate. <strong>The</strong> shell possibly caused a<br />
failure <strong>of</strong> the armor, freeing a rectangular segment <strong>of</strong> the 320-mm armor, rather thgan the<br />
classical conic-frustum cartwheel shape. In addition, there are two holes through the upper side<br />
belt (145-mm) between the main belt armor and the gunwale. One <strong>of</strong> these is a previouslydiscussed<br />
hole on the port side adjacent to turret Caesar (a 356-mm round from King George V).<br />
After 1000, when the survivors were leaving the machinery spaces, the generator rooms<br />
were still functioning. <strong>The</strong> passageways were mostly clear. Enlisted survivors Walter Weintz,<br />
Karl August Schuldt, and Heinz Steeg did not remember seeing water until they got above the<br />
armor deck. Mr. Statz, whose position was in Damage Control Central below the armor deck,<br />
recalled encountering water when he attempted to enter a space aft <strong>of</strong> DC Central in<br />
Compartment XIV around 0930.<br />
Gunnery <strong>of</strong> mediocre accuracy, coupled with <strong>Bismarck</strong>’s armor scheme designed for<br />
close-in engagements in the North Sea, resulted in a relatively drawn-out gunnery engagement,<br />
much the opposite <strong>of</strong> the brief engagement and destruction <strong>of</strong> Hood three days earlier.<br />
ROYAL NAVY GUNNERY EFFECTIVENESS<br />
<strong>The</strong> battered, defenseless <strong>Bismarck</strong> must have seemed amazingly resilient to the British<br />
as they poured shell after shell into her. It is a tribute to her designers that the ship survived as<br />
long as it did. Tragically, ironically, the resultant protracted sinking process meant a hellish<br />
ordeal for many <strong>of</strong> the crew <strong>of</strong> the stricken battleship, with many suffering agonizing deaths.<br />
Eventually, some 700 to 800 men escaped into the cold, cruel North Atlantic. Slightly more than<br />
30