The Wreck of DKM Bismarck − A Marine Forensics Analysis 1 The ...
The Wreck of DKM Bismarck − A Marine Forensics Analysis 1 The ...
The Wreck of DKM Bismarck − A Marine Forensics Analysis 1 The ...

You also want an ePaper? Increase the reach of your titles
YUMPU automatically turns print PDFs into web optimized ePapers that Google loves.
<strong>The</strong> <strong>Wreck</strong> <strong>of</strong> <strong>DKM</strong> <strong>Bismarck</strong> <strong>−</strong> A <strong>Marine</strong> <strong>Forensics</strong> <strong>Analysis</strong><br />
<strong>The</strong> <strong>Wreck</strong> <strong>of</strong> <strong>DKM</strong> <strong>Bismarck</strong><br />
A <strong>Marine</strong> <strong>Forensics</strong> <strong>Analysis</strong><br />
by<br />
James Cameron<br />
Robert O. Dulin, Jr.<br />
William H. Garzke, Jr.<br />
William Jurens<br />
Kenneth M. Smith, Jr.<br />
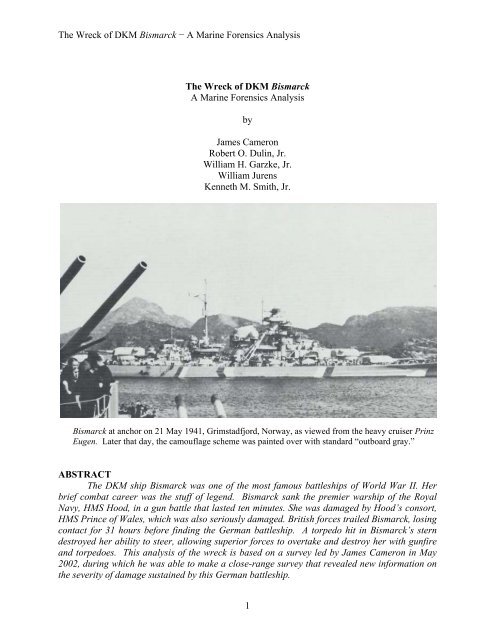
<strong>Bismarck</strong> at anchor on 21 May 1941, Grimstadfjord, Norway, as viewed from the heavy cruiser Prinz<br />
Eugen. Later that day, the camouflage scheme was painted over with standard “outboard gray.”<br />
ABSTRACT<br />
<strong>The</strong> <strong>DKM</strong> ship <strong>Bismarck</strong> was one <strong>of</strong> the most famous battleships <strong>of</strong> World War II. Her<br />
brief combat career was the stuff <strong>of</strong> legend. <strong>Bismarck</strong> sank the premier warship <strong>of</strong> the Royal<br />
Navy, HMS Hood, in a gun battle that lasted ten minutes. She was damaged by Hood’s consort,<br />
HMS Prince <strong>of</strong> Wales, which was also seriously damaged. British forces trailed <strong>Bismarck</strong>, losing<br />
contact for 31 hours before finding the German battleship. A torpedo hit in <strong>Bismarck</strong>’s stern<br />
destroyed her ability to steer, allowing superior forces to overtake and destroy her with gunfire<br />
and torpedoes. This analysis <strong>of</strong> the wreck is based on a survey led by James Cameron in May<br />
2002, during which he was able to make a close-range survey that revealed new information on<br />
the severity <strong>of</strong> damage sustained by this German battleship.<br />
1
<strong>The</strong> <strong>Wreck</strong> <strong>of</strong> <strong>DKM</strong> <strong>Bismarck</strong> <strong>−</strong> A <strong>Marine</strong> <strong>Forensics</strong> <strong>Analysis</strong><br />
INTRODUCTION<br />
This report is the distillation <strong>of</strong> decades <strong>of</strong> research into the design, characteristics, and<br />
operation <strong>of</strong> Germany’s most famous battleship, augmented by interviews and correspondence<br />
with <strong>Bismarck</strong> survivors and the dramatic results <strong>of</strong> a survey <strong>of</strong> the <strong>Bismarck</strong> wreck completed<br />
by James Cameron in May 2002. This has permitted the authors to accomplish this thorough<br />
marine forensics analysis <strong>of</strong> <strong>Bismarck</strong>.<br />
<strong>Bismarck</strong> was the first battleship delivered to the German Navy in over 24 years.<br />
Restrained by the Versailles Treaty from building such ships, the Anglo-German Naval Treaty <strong>of</strong><br />
June 1935 allowed the Germans to build to battleships with a standard displacement <strong>of</strong> 35,000<br />
tons 1 . <strong>The</strong> <strong>Bismarck</strong> and Tirpitz were much larger than this limiting displacement because the<br />
German Navy was unwilling to use triple or quadruple turrets for their main armament 2 .<br />
Although <strong>Bismarck</strong> and Tirpitz have a similar arrangement to the Baden/Bayern design <strong>of</strong> World<br />
War I, the details <strong>of</strong> their armor, armament, and propulsion plants were very different. <strong>The</strong> actual<br />
displacement <strong>of</strong> these ships was kept secret.<br />
<strong>The</strong> keel for “Battleship F” was laid on 1 July 1936 at the Blohm and Voss Shipyard in<br />
Hamburg. <strong>The</strong> battleship was launched on 14 February 1939. <strong>Bismarck</strong> was commissioned on<br />
24 August 1940. Table 1 highlights the characteristics <strong>of</strong> this powerful, well-protected ship.<br />
Table 1<br />
Characteristics <strong>of</strong> <strong>Bismarck</strong><br />
Full Load Displacement 49,406 tonnes<br />
Maximum Displacement 50,405 tonnes<br />
Waterline Length 241.55 meters<br />
Waterline Beam 36.00 meters<br />
Draft (design) 9.30 meters<br />
Armament Eight 380mm in Twin Turrets<br />
Twelve 150mm in Twin Turrets<br />
Sixteen 105mm in Twin Mounts<br />
Sixteen 37mm Semi-Automatic Guns in Twin Mounts<br />
Twelve 20mm Single Machine Guns<br />
Four Arado-196 Floatplanes<br />
Shaft Horsepower 138,000 mhp<br />
Speed 30.12 Knots<br />
Endurance 9,500 miles at 19 Knots<br />
Fuel 8,294 tonnes<br />
Protection 320mm – Main Side Belt<br />
95mm – Deck (Magazines)<br />
80mm – Deck (Machinery)<br />
1 <strong>The</strong> Washington Naval Treaty, signed in 1922, defined standard displacement as “… the displacement<br />
<strong>of</strong> the vessel complete, fully manned, equipped, and ready for sea, including ammunition, provisions,<br />
fresh water for her crew, and miscellaneous stores and implements <strong>of</strong> every description to be carried in<br />
war, but not including fuel or reserve feed water.” Standard displacement was measured in long tons,<br />
2,240 pounds. Metric tons (tonnes) are defined as 1,000 kilograms (2,204 pounds).<br />
2 By the mid-1930s, naval design staffs struggled with the displacement limitations imposed by a series<br />
<strong>of</strong> naval disarmament treaties. For all practical purposes, all treaty displacement limitations expired on 31<br />
December 1936. Most battleships that were completed during the World War II era exceeded Treaty<br />
constraints.<br />
2
<strong>The</strong> <strong>Wreck</strong> <strong>of</strong> <strong>DKM</strong> <strong>Bismarck</strong> <strong>−</strong> A <strong>Marine</strong> <strong>Forensics</strong> <strong>Analysis</strong><br />
FLAWS IN THE DESIGN OF BISMARCK<br />
<strong>The</strong> dramatic story <strong>of</strong> the pursuit and destruction <strong>of</strong> the <strong>Bismarck</strong> was markedly<br />
influenced by deficiencies in her machinery arrangement, her radar equipment, and her<br />
antiaircraft armament:<br />
MACHINERY ARRANGEMENT<br />
<strong>The</strong> <strong>Bismarck</strong>, as was typical for German capital ships <strong>of</strong> both the World War I and<br />
World War II eras, featured a three-shaft main propulsion arrangement. Twin rudders, coupled<br />
together, were positioned aft <strong>of</strong> the three propellers. <strong>The</strong> leading edges <strong>of</strong> these rudders were<br />
less than two meters aft <strong>of</strong> the centerline propeller. <strong>The</strong> proximity the rudders to the centerline<br />
propeller was to be a major factor in the destruction <strong>of</strong> the German battleship.<br />
During engineering trials in the Baltic, as recalled by Baron von Mullenheim-Rechberg:<br />
“It was found with both rudders locked in an amidships position, the <strong>Bismarck</strong> could be held on<br />
course only with great difficulty. <strong>The</strong> reason for this was that the convergent design <strong>of</strong> her<br />
propeller shafts provided only a weak turning movement, even with the outboard shafts rotating<br />
in opposition at full power. 3 ” <strong>The</strong>se problems, encountered in calm water with the rudders<br />
locked amidships, revealed the near-impossibility <strong>of</strong> using her engines to steer a damaged<br />
<strong>Bismarck</strong> with no operational rudders, especially in heavy weather.<br />
RADAR EQUIPMENT<br />
During 1940, the German Navy began introducing new shipboard radar equipment on<br />
their warships. <strong>The</strong> radar aboard <strong>Bismarck</strong> was fitted after the trials <strong>of</strong> the 380-mm guns had<br />
been completed based on information gleaned from Baron von Müllenheim Rechberg 4 . <strong>The</strong><br />
Baron was puzzled by the decision to outfit the ship with radar equipment following the gunnery<br />
trials. When Norfolk was engaged on 23 May in the Denmark Strait, the firing <strong>of</strong> the two<br />
forward turrets disabled the two forward radars, making it necessary for Prinz Eugen to take the<br />
lead to search sector ahead <strong>of</strong> the formation with her radar. This exchange in ships would cause<br />
great confusion on board Hood in identifying <strong>Bismarck</strong> on 24 May. (<strong>The</strong> German heavy cruisers<br />
were very similar in appearance to the <strong>Bismarck</strong> and Tirpitz.)<br />
ANTIAIRCRAFT ARMAMENT<br />
<strong>Bismarck</strong> featured a mixed-caliber secondary armament, with six twin turrets mounting<br />
150mm guns intended to engage enemy surface ships combined with eight twin mounts fitted<br />
with 105mm guns for antiaircraft fire. This design feature, typical <strong>of</strong> German, Italian, and<br />
Japanese capital ships, was inferior to the concept adopted by the United States and British Royal<br />
navies <strong>of</strong> mounting a single battery <strong>of</strong> dual-purpose guns, adequate for both surface engagements<br />
and for antiaircraft fire. (<strong>The</strong> American dual-purpose gun was 127mm; the Royal Navy adopted<br />
a 134-mm gun for this service.)<br />
3<br />
Baron Burkard von Müllenheim-Rechberg. Battleship <strong>Bismarck</strong> <strong>−</strong> A Survivor’s Story. Annapolis,<br />
Naval Institute Press, 1980. Page 39.<br />
4<br />
Baron Burkard von Müllenheim-Rechbereg, as recalled during a conversation with authors Bill Garzke<br />
and Bob Dulin in Annapoolis, MD, 20 September 1980.<br />
3
<strong>The</strong> <strong>Wreck</strong> <strong>of</strong> <strong>DKM</strong> <strong>Bismarck</strong> <strong>−</strong> A <strong>Marine</strong> <strong>Forensics</strong> <strong>Analysis</strong><br />
<strong>The</strong> 105mm battery on <strong>Bismarck</strong> was flawed in several other aspects. Due to the<br />
diversion <strong>of</strong> four new mounts to be used in a trade arrangement with the Soviet Union, four <strong>of</strong><br />
the older Dopp LC/31 type being used forward instead <strong>of</strong> the more modern Dopp LC/37 type,<br />
which were mounted aft. <strong>The</strong> 105mm mounts, interestingly, were unable to fully depress to<br />
engage very low-flying targets, such as enemy biplane torpedo bombers.<br />
<strong>The</strong> 37mm guns mounted on <strong>Bismarck</strong> were single-shot, semi-automatic weapons,<br />
capable <strong>of</strong> a maximum rate <strong>of</strong> fire <strong>of</strong> about 30 rounds per minute per gun. <strong>The</strong> comparable<br />
40mm B<strong>of</strong>ors machine guns mounted on modern American warships were capable <strong>of</strong> firing<br />
about 160 rounds per minute per gun.<br />
<strong>The</strong> antiaircraft armament on <strong>Bismarck</strong> was fatally flawed, as events were to show on the<br />
evening <strong>of</strong> the 26 th <strong>of</strong> May.<br />
PRINCE OF WALES AND HOOD ENGAGE BISMARCK<br />
<strong>Bismarck</strong> left Gydnia (Gotenhafen) at 0200 on 19 May 1941 and was joined by the heavy<br />
cruiser Prinz Eugen <strong>of</strong>f Cape Arkona later that day. This was to be <strong>Bismarck</strong>’s first operational<br />
mission. <strong>The</strong> purpose <strong>of</strong> the sortie was to attack British convoy shipping in the North Atlantic.<br />
<strong>The</strong> German ships eluded British forces until detected by HMS Suffolk at 1922 on 23 May during<br />
their attempt to break out into the North Atlantic through the Denmark Strait, between Iceland<br />
and Greenland.<br />
Hood was the largest warship in service in the Royal Navy in 1941. This beautiful ship, completed at<br />
the end <strong>of</strong> World War I, was typical <strong>of</strong> battle cruisers <strong>of</strong> that era, with high speed attained at the cost<br />
<strong>of</strong> inferior armor protection. Hood had adequate side armor protection, but her inferior horizontal<br />
protection doomed the ship during her brief engagement with <strong>Bismarck</strong>.<br />
4
<strong>The</strong> <strong>Wreck</strong> <strong>of</strong> <strong>DKM</strong> <strong>Bismarck</strong> <strong>−</strong> A <strong>Marine</strong> <strong>Forensics</strong> <strong>Analysis</strong><br />
<strong>The</strong> newly-commissioned Prince <strong>of</strong> Wales and the older battle cruiser Hood engaged<br />
<strong>Bismarck</strong> early on the morning <strong>of</strong> 24 May 1941. Hood was hit and destroyed only 9 minutes<br />
after opening fire.<br />
Hood was utterly destroyed by the fifth salvo fired by <strong>Bismarck</strong>. A single 380-mm shell,<br />
possibly two, did the job. This was the consequence <strong>of</strong> stunningly accurate gunnery coupled<br />
with a flawed protective system <strong>−</strong> Hood was the last <strong>of</strong> the World War One-era battle cruisers,<br />
ships designed and built with an emphasis on speed and gun power at a time when such could<br />
only be achieved by sacrificing protection.<br />
Prince <strong>of</strong> Wales managed to hit <strong>Bismarck</strong> with three 356-mm shells, two <strong>of</strong> which caused serious<br />
damage and the loss <strong>of</strong> critical fuel 5 . (In turn, the British battleship was damaged by seven shell hits,<br />
four 380-mm from <strong>Bismarck</strong> and three 203-mm from Prinz Eugen.)<br />
Although the Hood design was modified to marginally improve her armor protection, the<br />
ship remained fatally vulnerable to long-range, plunging shellfire from heavy guns. (<strong>The</strong><br />
<strong>Bismarck</strong>’s modern 380-mm guns fired 800-kilogram shells at a substantially higher muzzle<br />
velocity than the older 381-mm guns on the Hood. <strong>The</strong> German guns out-ranged the Hood’s<br />
5 This was confirmed during an extensive correspondence with two <strong>of</strong>ficers who served on Prince <strong>of</strong><br />
Wales, the spotting <strong>of</strong>ficer, CDR Arthur Skipwith (RN, Ret.) and the gunnery <strong>of</strong>ficer, CAPT Colin<br />
McMullen (RN, Ret.). CDR Skipwith recalled that he had his binoculars trained on <strong>Bismarck</strong> during the<br />
entire engagement and was able to follow the fall <strong>of</strong> shot for each salvo fired from his ship. At no time<br />
did he note the fall <strong>of</strong> any rounds fired by Hood.<br />
5
<strong>The</strong> <strong>Wreck</strong> <strong>of</strong> <strong>DKM</strong> <strong>Bismarck</strong> <strong>−</strong> A <strong>Marine</strong> <strong>Forensics</strong> <strong>Analysis</strong><br />
guns by more than 5,000 meters.) Painfully aware <strong>of</strong> the vulnerability <strong>of</strong> the Hood, the British<br />
were attempting to close the range and lessen the risk <strong>of</strong> destruction resulting from plunging fire.<br />
Less than ten minutes after opening fire, Hood blew up and sank, destroyed by 381-mm shellfire<br />
which penetrated to and detonated her magazines.<br />
<strong>The</strong> ammunition on Hood was destroyed by deflagration <strong>−</strong> intense burning (<strong>of</strong> some 112<br />
tons <strong>of</strong> cordite) with no means to dissipate its energy vertically or horizontally <strong>−</strong> which wrecked<br />
the Hood’s hull structure, causing the ship to break apart into two sections before beginning its<br />
plunge to the sea bed.<br />
A KEY HIT ON THE BISMARCK’s BOW<br />
Abeam <strong>of</strong> the capstans on the forecastle <strong>of</strong> <strong>Bismarck</strong> is a large oblique-shaped hole in the<br />
starboard side, above the water line and Batteriedeck 6 and forward <strong>of</strong> the 60-mm splinter belt. It<br />
occurs just above the forward edge <strong>of</strong> a faded painted fake bow wave. <strong>The</strong> hole is clearly bent<br />
outward, apparently from the effects <strong>of</strong> a shell passing through the ship from the port side 7 . An<br />
elongated hole in the deck above was first thought to be the entry hole for this round, but careful<br />
measurement indicates the two holes are unrelated.<br />
<strong>The</strong> entry hole on the port side was not imaged, as there were a number <strong>of</strong> shell holes<br />
noted in the area where the shell was believed to have entered. <strong>The</strong> exit hole is consistent with a<br />
trajectory through the bow with an angle <strong>of</strong> fall <strong>of</strong> about 15 degrees and a shell path from astern.<br />
This is consistent with the expected angle <strong>of</strong> fall for a shell fired by Prince <strong>of</strong> Wales at a range <strong>of</strong><br />
about 16,000 meters <strong>−</strong> refer to Table 2.<br />
Table 2<br />
Range Table Data for the 356-mm Gun 8<br />
Range Angle <strong>of</strong> Fall Striking Velocity<br />
13,720 meters 11.5 degrees 526 meters per second<br />
18,290 meters 18.2 degrees 476 meters per second<br />
<strong>The</strong> shell’s path was an oblique one from port to starboard across Compartments XX and<br />
XXI; the second, third, and fourth watertight compartments aft <strong>of</strong> the forward perpendicular<br />
(XX, XXI, and XXII) were damaged by fragments caused by the passage <strong>of</strong> this heavy projectile<br />
through the ship. <strong>The</strong> entry hole is above the Batteriedeck, while the exit hole, above that deck<br />
or near that deck’s intersection with the side shell. <strong>The</strong> plating around the exit hole is bent<br />
outward. <strong>The</strong> condition <strong>of</strong> the exit hole in the <strong>Bismarck</strong>’s starboard bow supports the judgment<br />
that the shell passed through the ship without exploding 9 .<br />
Compartments XX and XXI are roughly centered on the fore capstans, which correspond<br />
perfectly to the exit hole. Since the exit hole was slightly above the waterline but was within the<br />
bow wave, water flowed in and eventually flooded compartments on the Upper, Middle and<br />
Lower Platform Decks. <strong>The</strong> ship’s trim down by the bow aggravated this problem. <strong>The</strong> reserve<br />
oil tanks were located in way <strong>of</strong> the shell trajectory, but below the Middle Platform Deck. Hence<br />
we believe that none <strong>of</strong> the reserve tanks were affected by this shell’s trajectory. If there was a<br />
6 This is the Second Deck in the US Navy.<br />
7 LT Gerhard Junack mentioned in correspondence with William Garzke that the shell passed through the<br />
ship without exploding. We believe it may have detonated in the water adjacent to the ship.<br />
8 John Campbell. Naval Weapons <strong>of</strong> World War Two. London: Conway Maritime Press, Ltd., 1985.<br />
9 Admiral Lütjens reported this in a message after the battle was over.<br />
6
<strong>The</strong> <strong>Wreck</strong> <strong>of</strong> <strong>DKM</strong> <strong>Bismarck</strong> <strong>−</strong> A <strong>Marine</strong> <strong>Forensics</strong> <strong>Analysis</strong><br />
loss <strong>of</strong> fuel in this area <strong>of</strong> the ship, then it must have come from shell or ship fragments that<br />
severed pipes to these tanks and damaged structure in the deck or platform over these tanks.<br />
Such damage would mean that the shell may have exploded within the bow structure in the<br />
vicinity <strong>of</strong> the exit hole (which appears unlikely) or more probably from fragments associated<br />
with the shell’s passage through the ship.<br />
It should be noted that when <strong>Bismarck</strong> refueled for this mission on 18 May, a fuel hose<br />
broke. Since time was spent in cleaning up the spill, the reserve fuel oil tanks were probably the<br />
last ones that would be filled. Inexplicably, Admiral Lütjens did not complete the refueling<br />
evolution after the loss <strong>of</strong> time resulting from the parted fuel hose incident. <strong>Bismarck</strong> left<br />
Gotenhafen (now Gdynia) with 200 tons <strong>of</strong> fuel less than full load capacity.<br />
<strong>The</strong>se reserve fuel tanks were intended for <strong>Bismarck</strong>’s consorts. <strong>The</strong> pump room for<br />
them was located outside the armored citadel. In an emergency, <strong>of</strong> course, this fuel could have<br />
been used by the battleship. To retrieve the oil in the reserve oil tanks, the <strong>Bismarck</strong>’s damage<br />
control team devised a plan to run a refueling hose over the main deck to the forward tanks, so<br />
the problem was isolation, not rupture <strong>of</strong> these tanks. Observers aboard Prinz Eugen reported oil<br />
on both sides <strong>of</strong> <strong>Bismarck</strong>'s wake. Some <strong>of</strong> the reserve oil tanks could have been holed by<br />
fragments caused by this hit in the bow.<br />
<strong>The</strong> damage in Compartment XXI was examined by LT Karl-Ludwig Richter, second engineer<br />
<strong>of</strong>ficer <strong>of</strong> Damage Control Central. Richter noted that there was about a meter <strong>of</strong> water on the<br />
Batteriedeck level 10 . <strong>The</strong> main bulkhead between Compartments XX and XXI and<br />
Compartments XXI and XXII were holed and no longer watertight. A gaping hole about a meter<br />
in diameter was torn in the ship's starboard hull and another hole <strong>of</strong> similar size was made in the<br />
port side plating. This was confirmed by James Cameron’s survey. <strong>The</strong> 356-mm shell passed<br />
through Compartments XXI and XXII, with fragments rupturing two emergency fuel tanks and<br />
flooding the forward pump room, where manifolds to the fuel and ballast tanks were located.<br />
<strong>Bismarck</strong> began to lose what little fuel remained in those forward tanks. <strong>The</strong> battleship now had<br />
as much as 1,000 tons <strong>of</strong> seawater in her bow.<br />
<strong>The</strong> question as to how much fuel oil was lost from this area <strong>of</strong> the ship has never been<br />
determined. <strong>The</strong> reserve fuel tanks were located below the Middle Platform Deck with a pipe<br />
tunnel running along the centerline <strong>of</strong> the ship to port. Was a fuel line, air vent piping, or<br />
sounding tube severed? Did downflooding prevent access to valves, manifolds, or pumps used to<br />
remove or stow fuel? Did downflooding in vent pipes, sounding tubes, or fill piping contaminate<br />
the fuel? Another visit to the wreck to examine the inner spaces may resolve this enigma.<br />
Counter-flooding voids, provided to allow counter-flooding to compensate for list and<br />
trim due to damage below the waterline and resultant flooding, were filled to starboard,<br />
according to information provided to author William Garzke by Seaman Josef Statz 11 .<br />
10 From German Battleship <strong>Bismarck</strong>, Interrogation <strong>of</strong> Survivors, CB4051 (24), page 13. Although LT<br />
Richter was not a survivor, several survivors who were damage control specialists recalled his report <strong>of</strong><br />
the damage in the bow.<br />
11 Josef Statz, with relevant draftsman experience (Lübeck Shipyard) prior to his naval service, was<br />
assigned to Damage Control Central, which was supervised by the Executive Officer, CDR Hans Oels.<br />
7
<strong>The</strong> <strong>Wreck</strong> <strong>of</strong> <strong>DKM</strong> <strong>Bismarck</strong> <strong>−</strong> A <strong>Marine</strong> <strong>Forensics</strong> <strong>Analysis</strong><br />
This depiction <strong>of</strong> the subdivision numbering scheme on <strong>Bismarck</strong> will help in visualizing and locating<br />
the damage described in this paper.<br />
ANOTHER DAMAGING HIT AMIDSHIPS ON THE PORT SIDE<br />
Prince <strong>of</strong> Wales achieved another important hit, abeam <strong>of</strong> the forward superstructure. A<br />
356-mm shell with an underwater trajectory penetrated the port side hull plating below the<br />
termination <strong>of</strong> the armor belt and passed into the side protection system. <strong>The</strong> shell exploded near<br />
the main transverse bulkhead between Compartments XIII and XIV, detonating with great force<br />
against the 45-mm torpedo bulkhead outboard <strong>of</strong> Electrical Power Station No. 4. This detonation<br />
also affected the watertight boundaries between that space and the adjacent port No. 2 Boiler<br />
Room, as well as the inboard auxiliary boiler room inboard in Compartment XIV. Shell splinters<br />
also passed into double bottom tanks and wing fuel bunkers in Compartment XIV, causing the<br />
eventual flooding <strong>of</strong> those tanks and contaminating the feed water in the double bottom <strong>of</strong><br />
Compartment XIV. <strong>The</strong> damaged wing tank in Compartment XIV also began leaking oil into the<br />
sea, as salt water gradually replaced those tanks’ contents. It is believed that the shell and<br />
structural fragments did not reach the double bottom below Boiler Room No. 2.<br />
British observers on the Prince <strong>of</strong> Wales saw a burst <strong>of</strong> black smoke come from the<br />
<strong>Bismarck</strong>’s funnel at this time. Some German survivors recalled a slight shock response from<br />
this hit.<br />
8
<strong>The</strong> <strong>Wreck</strong> <strong>of</strong> <strong>DKM</strong> <strong>Bismarck</strong> <strong>−</strong> A <strong>Marine</strong> <strong>Forensics</strong> <strong>Analysis</strong><br />
Two views <strong>of</strong> the exit hole for the key hit achieved by Prince <strong>of</strong> Wales during her engagement with<br />
<strong>Bismarck</strong>. This hole is on the starboard side, just above the forward edge <strong>of</strong> the false bow wave.<br />
This hole was below the bow wave created by the battleship at 28 knots, once the ship trimmed down<br />
by the bow. After this damage and the hit in Compartment XIV, fuel trailed in the <strong>Bismarck</strong>’s wake.<br />
9
<strong>The</strong> <strong>Wreck</strong> <strong>of</strong> <strong>DKM</strong> <strong>Bismarck</strong> <strong>−</strong> A <strong>Marine</strong> <strong>Forensics</strong> <strong>Analysis</strong><br />
According to survivors, large cracks appeared in the welded seams in the outboard<br />
strakes <strong>of</strong> the main transverse bulkhead, which was also the forward boundary <strong>of</strong> Port Boiler<br />
Room No. 2 in Compartment XIII. Seawater seeped through these cracks and caused gradual<br />
flooding <strong>of</strong> this boiler room. A damage-control team attempted to seal <strong>of</strong>f these leaks with<br />
hammocks, but their efforts only slowed the seepage. <strong>The</strong> boiler room was back in operation for<br />
a short time. Boiler III was lighted, while Boiler IV was salt-contaminated and had to be shut<br />
down because there was a real danger <strong>of</strong> saltwater intrusion into the feed water system. By midafternoon,<br />
Boiler III also had to be shut down and the space was evacuated. Fuel from the<br />
damaged wing tanks in Compartment XIV was leaking into the sea.<br />
Soon after the action with Prince <strong>of</strong> Wales ended, a damage-control team attempted to<br />
seal <strong>of</strong>f the leaks in the 45-mm torpedo bulkhead on the portside in Compartment XIV with<br />
hammocks and mating, but their efforts only slowed the seepage into the boiler room. Eventually<br />
the boiler room was evacuated after the water became chest deep.<br />
Steam from other boilers was rerouted to the turbine in the port engine room. Splinters<br />
from the exploding shell also severed a main steam line in the No. 4 Turbo-Generator Room,<br />
scalding five <strong>of</strong> its occupants and necessitating the shutdown <strong>of</strong> the generators. <strong>The</strong> Turbo-<br />
Generator Room also flooded 12 . <strong>The</strong> loss <strong>of</strong> this electrical generating station was not serious,<br />
because the power supply <strong>of</strong> German battleships was so conceived that either the forward or the<br />
after station could supply the battle circuit load individually (i.e., the ship had 100% reserve<br />
battle load power).<br />
<strong>The</strong> bow flooding, coupled with the displacement <strong>of</strong> fuel oil in Compartment XIV and<br />
subsequent flooding <strong>of</strong> spaces there, caused the battleship to trim 1.5 meters by the bow, with a<br />
three-degree list to port <strong>−</strong> not nine degrees previously estimated. <strong>The</strong>se hits came around 0605<br />
(after Hood had sunk). <strong>The</strong> combination <strong>of</strong> trim and list caused the starboard propeller blades to<br />
break the water surface.<br />
Soon after the action with Prince <strong>of</strong> Wales ended, a damage-control team attempted to<br />
seal <strong>of</strong>f the leaks in the 45-mm torpedo bulkhead on the portside in Compartment XIV with<br />
hammocks and mating, but their efforts only slowed the seepage into the boiler room. Eventually<br />
the water was chest deep. <strong>The</strong>re was a real danger <strong>of</strong> saltwater intrusion into the feed water<br />
system. <strong>The</strong> crew managed to get Port Boiler Room No. 2 temporarily back in operation. Boiler<br />
III was back in service, although while Boiler IV was salt contaminated and had to be shut down.<br />
By mid-afternoon, however, Boiler III also had to be shut down and the boiler room was<br />
evacuated. Shell splinters also passed into double bottom tanks and wing fuel bunkers, causing<br />
the eventual flooding <strong>of</strong> that tankage and contaminating the fuel.<br />
<strong>The</strong>se reserve fuel tanks were intended for <strong>Bismarck</strong>’s consorts. <strong>The</strong> pump room for<br />
them was located outside the armored citadel. In an emergency, <strong>of</strong> course, this fuel could have<br />
been used by the battleship. To retrieve the oil in the reserve oil tanks, the <strong>Bismarck</strong>’s damage<br />
control team devised a plan to run a refueling hose over the main deck to the forward tanks, so<br />
the problem was isolation, not rupture <strong>of</strong> these tanks. Some <strong>of</strong> the reserve oil tanks could have<br />
been holed by fragments caused by this hit in the bow. Fuel leaking into the sea would have<br />
flowed along the side <strong>of</strong> the ship, being mixed by the turbulence in the wake, convincing<br />
observers aboard Prinz Eugen that there was oil on both sides <strong>of</strong> <strong>Bismarck</strong>'s wake.<br />
12 Midshipman Hans-Georg Stiegler, a naval constructor in training, was assigned to the electrical shop.<br />
He recalled that this compartment was successfully dewatered the next day.<br />
10
<strong>The</strong> <strong>Wreck</strong> <strong>of</strong> <strong>DKM</strong> <strong>Bismarck</strong> <strong>−</strong> A <strong>Marine</strong> <strong>Forensics</strong> <strong>Analysis</strong><br />
ADMIRAL LÜTJENS’ DAMAGE REPORT TO NAVAL GROUP NORTH<br />
Admiral Lütjens’ report to Naval Group North, based on damage assessments by<br />
<strong>Bismarck</strong>’s damage control teams, is most revealing:<br />
"Two heavy hits. One in Compartments XIII-XIV with the loss <strong>of</strong> electrical station 4; port<br />
boiler room is taking water, which we can control. Second hit Compartment XX-XXI in<br />
the forecastle. Shell entered port, exited starboard above armor deck. Third hit on a<br />
boat, <strong>of</strong> no concern."<br />
Most <strong>of</strong> the port list was due to the flooded No 4 turbo-generator room, the port No. 2<br />
Boiler Room, fuel tanks outboard <strong>of</strong> these spaces, and some <strong>of</strong> the port counterflooding tanks in<br />
Compartments XIII-XIV. Lütjens’ report about the shell hit forward that exited the starboard<br />
side shell and the size <strong>of</strong> the hole would indicate that the shell did not explode within the ship.<br />
However, its penetration through ship structure did create fragments that had sufficient energy to<br />
penetrate through the deck structure to the port reserve fuel oil tanks and perhaps the pipe tunnel.<br />
<strong>The</strong> starboard tanks were probably intact. What fuel was left in those tanks would have mixed<br />
with seawater and because the exit hole was below the bow wave created by the ship’s forward<br />
motion and trim the fuel/seawater mix would exit from the starboard and port side. <strong>The</strong> flooding<br />
<strong>of</strong> the pipe tunnel and port fuel reserve tanks that were partially empty would also contribute to<br />
the port list, which reached about 4.5 degrees.<br />
What is significant is that two shells fired at a range <strong>of</strong> 15,000-16,000 meters by the 356mm<br />
guns <strong>of</strong> Prince <strong>of</strong> Wales materially damaged <strong>Bismarck</strong>, leading to the eventual decision to<br />
abort the <strong>Bismarck</strong>’s commerce-raiding mission. It would not be possible to conceal <strong>Bismarck</strong>’s<br />
presence at sea with fuel leaking into the sea. This gunfire damage is important, because it<br />
clearly documents the effectiveness <strong>of</strong> main armament-caliber plunging fire at long range. <strong>The</strong>se<br />
are the precise conditions <strong>of</strong> the earliest part <strong>of</strong> the final battle on 27 May, but most definitely<br />
were not the situation during the latter part <strong>of</strong> that battle, when Rodney had moved to starboard<br />
(firing at low angles <strong>of</strong> elevation at less than 3,700 meters) and King George V was also firing at<br />
close range from port.<br />
<strong>The</strong>se two shell hits 13 achieved by Prince <strong>of</strong> Wales occurred about the time Hood<br />
sustained her fatal damage, approximately 0600. Prince <strong>of</strong> Wales was about 16,000 meters<br />
distant at the time, eventually closing to 14,500 meters. Angle <strong>of</strong> fall <strong>of</strong> both shells would have<br />
been between 12-15 degrees. It is interesting that the descent angle was sufficient to allow one<br />
shell which fell short to follow an underwater trajectory, being deflected and substantially<br />
slowed by the water, to pass under the armor belt and enter the hull abeam <strong>of</strong> the bridge. It is<br />
unlikely the latter projectile could have crossed the width <strong>of</strong> the Batteriedeck at that angle <strong>of</strong> fall,<br />
unless it ricocheted <strong>of</strong>f the deck before it exploded against the shell plating (a possibility). <strong>The</strong><br />
level <strong>of</strong> the exit hole for the forward shell hit, however, seems to correspond to Zwischendeck<br />
level, not the Batteriedeck level.<br />
After the engagement with Hood and Prince <strong>of</strong> Wales, the ship’s engineers suggested<br />
slowing <strong>Bismarck</strong> and heeling the ship once to port and then to starboard and welding on steel<br />
13 An analysis <strong>of</strong> the gunnery report <strong>of</strong> Prince <strong>of</strong> Wales and an extensive correspondence by William<br />
Garzke with then-CDR Colin McMullen, the gunnery <strong>of</strong>ficer, and LCDR Arthur Skipwith, spotting<br />
<strong>of</strong>ficer, confirms it was the Prince <strong>of</strong> Wales (not Hood) that achieved these two hits. Gunners on the new<br />
British battleship had only two weeks <strong>of</strong> gunnery drills, NONE firing live rounds.<br />
11
<strong>The</strong> <strong>Wreck</strong> <strong>of</strong> <strong>DKM</strong> <strong>Bismarck</strong> <strong>−</strong> A <strong>Marine</strong> <strong>Forensics</strong> <strong>Analysis</strong><br />
patches over the entrance and exit holes to repair the damage at the bow. <strong>The</strong> plates to cover the<br />
entrance and exit holes were cut and ready to install. This plan was rejected by Admiral Lütjens,<br />
as it would involve slowing the ship and creating a list to port or starboard to permit the repairs.<br />
From pictures, it appears the bow was down 1.5 to 2.5 meters, so one could anticipate a<br />
commensurate rise at the stern. In fact, the underside <strong>of</strong> the stern was clear <strong>of</strong> the water in one<br />
picture. Survivor accounts say the starboard screw was running with its blade tips out <strong>of</strong> the<br />
water after the 24 May battle.<br />
Captain Lindemann ordered the flooding <strong>of</strong> starboard voids in Compartments II and III in<br />
the stern to restore trim and list, but it is unknown how effective this was. Presumably, trim was<br />
not fully restored. Unfortunately, these counter flooding measures increased draft and decreased<br />
the overall freeboard. This could have been a factor in later events, since a lower freeboard<br />
meant less reserve buoyancy. A lower freeboard made it more difficult to hit below the main<br />
side belt when firing at close range. Close-range gunfire is more likely to have shells ricochet <strong>of</strong>f<br />
the water surface, substantially reducing the likelihood <strong>of</strong> shells having an underwater trajectory.<br />
THE CHASE ─ 24 May through 26 May 1941<br />
<strong>Bismarck</strong> was hit by one torpedo dropped by a Swordfish torpedo bomber launched from<br />
HMS Victorious the evening <strong>of</strong> 24 May. This contact detonation, on the starboard side in way <strong>of</strong><br />
the 320-mm main side belt armor was not a factor in the ultimate destruction <strong>of</strong> the German<br />
This minor damage on the starboard side amidships was caused by an aerial torpedo the evening <strong>of</strong> 24<br />
May 1941. <strong>The</strong> torpedo detonated against the 320-mm main side belt armor, failing to penetrate. <strong>The</strong><br />
gouges in the upper (145-mm) and main side belts are from hits by 203-mm or smaller caliber shells<br />
that did not penetrate.<br />
12
<strong>The</strong> <strong>Wreck</strong> <strong>of</strong> <strong>DKM</strong> <strong>Bismarck</strong> <strong>−</strong> A <strong>Marine</strong> <strong>Forensics</strong> <strong>Analysis</strong><br />
battleship. Minor flooding resulted, as the belt armor displaced inboard and damage control<br />
packing in way <strong>of</strong> the shell hit in way <strong>of</strong> Compartments XIII and XIV was loosened.<br />
Overnight, <strong>Bismarck</strong> broke contact with her British pursuers and headed for shelter and<br />
major repair facilities at the Penhoet-Loire Shipyard in St. Nazaire, France. <strong>The</strong> heavy cruiser<br />
Prinz Eugen was detached to continue the originally-planned commerce-raiding mission into the<br />
Atlantic. After an interval <strong>of</strong> 31 hours, the German battleship was spotted by a British Catalina<br />
aircraft, piloted by an American naval aviator, ENS Leonard B. (“Tuck”) Smith. 14<br />
This sighting permitted aircraft from HMS Ark Royal to attack the German ship during<br />
the evening <strong>of</strong> 26 May. If the Germans were not diverted from their course to France in the next<br />
few hours, they would soon be within range <strong>of</strong> friendly shore-based aircraft and likely out <strong>of</strong><br />
danger, despite the best efforts <strong>of</strong> the men and ships <strong>of</strong> the Royal Navy.<br />
At this time, the light cruiser Sheffield was shadowing the German ship. Fortunately, as<br />
matters turned out, the Royal Navy aviators, unaware <strong>of</strong> the presence <strong>of</strong> the friendly cruiser,<br />
attacked one <strong>of</strong> their own ships! This near-tragic incident was <strong>of</strong> enormous importance, since the<br />
men on the cruiser reported that those torpedoes directed at their ship detonated prematurely. It<br />
was judged that the magnetic-fused detonators fitted to the torpedoes were defective.<br />
When a last-gasp attempt by Swordfish torpedo bombers to stop <strong>Bismarck</strong> was launched<br />
later on the afternoon <strong>of</strong> the 26 th <strong>of</strong> May, more reliable contact fuses were installed. <strong>The</strong><br />
torpedoes were also set for a relatively shallow running depth, about three meters. This attach<br />
was successful, scoring three torpedo hits. Two hits amidships caused relatively inconsequential<br />
damage ─ minor inboard flooding was caused by a hit on the port side, in way <strong>of</strong> Compartment<br />
VII. <strong>The</strong> detonation severed the degaussing system cable in the vicinity. <strong>The</strong> damaged cable<br />
can be seen adjacent to the torpedo hole. A second hit on the starboard side in way <strong>of</strong><br />
Compartment VII caused some flooding, which was confined to the side protective system.<br />
Unfortunately for the Germans, the third torpedo detonated in the stern near the starboard<br />
rudder. This damage caused the instantaneous and devastating loss <strong>of</strong> steering control.<br />
THE MORTAL TORPEDO HIT<br />
Identification <strong>of</strong> torpedo hits was extremely difficult except for the mortal torpedo hit in<br />
way <strong>of</strong> the rudders. It is very important to remember that water was frequently forced out by the<br />
phenomenon <strong>of</strong> hydraulic outburst, discussed later in this paper, even where there were no preexisting<br />
holes. We believe this phenomenon accounts for the majority <strong>of</strong> the damage to the<br />
lower hull. Jim Cameron’s team clearly imaged an area on the port side where the lower hull<br />
shell was detached from the main side belt and the plating forced outward, but the separation<br />
attenuated to zero both forward and aft, and there was absolutely no evidence <strong>of</strong> torpedo or shell<br />
damage in the vicinity, thus indicating the start <strong>of</strong> the hydraulic outburst process which was<br />
stopped before the lower hull section completely detached. <strong>The</strong> forensic evidence at the wreck<br />
site strongly supports the conclusion that any pre-existing torpedo or shell damage acted to stop<br />
the propagation <strong>of</strong> cracks running along the joint between main side belt armor and the lower<br />
hull shell, probably by acting as a relief valve to vent the overpressure. When a crack is running<br />
in a piece <strong>of</strong> plexi-glass, for example, a hole is drilled ahead <strong>of</strong> the crack and that measure halts<br />
the crack propagation at the hole. We believe what is seen on <strong>Bismarck</strong> is a similar mechanism<br />
on a much larger scale. Almost all the damage that the team has seen from the May 2002 survey<br />
14 As related by CAPT Leonard Smith (USN, Ret.) in correspondence with author William Garzke.<br />
13
<strong>The</strong> <strong>Wreck</strong> <strong>of</strong> <strong>DKM</strong> <strong>Bismarck</strong> <strong>−</strong> A <strong>Marine</strong> <strong>Forensics</strong> <strong>Analysis</strong><br />
can be explained in this manner, including the explosion damage starboard in way <strong>of</strong> Turret<br />
Dora. What is seen there is an outburst propagation which ended at a pre-existing torpedo hole.<br />
<strong>The</strong>re may be other, similar instances <strong>of</strong> this, but the evidence is masked by sediment.<br />
<strong>Bismarck</strong> had a slight list to port before the Swordfish aircraft made their torpedo attacks<br />
during the evening <strong>of</strong> 26 May. A review <strong>of</strong> the British airmen’s report <strong>of</strong> the attack is<br />
inconclusive as to the number <strong>of</strong> torpedo hits or where they may have struck the battleship. As<br />
has been mentioned earlier, German survivor testimony is rather conclusive that there were two<br />
torpedo hits sustained amidships, one on either side 15 .<br />
One <strong>of</strong> the last attacking planes reported <strong>Bismarck</strong> was in a port turn. Several survivors<br />
(LCDR Baron von Müllenheim-Rechberg, and Apprentice Seamen Bruno Rzonca and Georg<br />
Herzog) observed two low-flying aircraft making their approach from starboard aft. With the<br />
ship turning to port, the two aircraft made a turn toward <strong>Bismarck</strong> and dropped their torpedoes<br />
very close to the stern 16 . <strong>The</strong>y then over-flew <strong>Bismarck</strong> in their successful effort to escape.<br />
Herzog noted that the 105-mm guns couldn’t depress their barrels low enough to engage the<br />
aircraft as they approached 17 .<br />
During the last torpedo attack that came from astern, two torpedoes quickly approached<br />
<strong>Bismarck</strong>. One missed. <strong>The</strong> other torpedo continued on its fateful path toward the stern. <strong>The</strong>re<br />
are three plausible scenarios regarding the location <strong>of</strong> its detonation:<br />
○ It exploded against the trailing edge <strong>of</strong> the starboard rudder.<br />
○ It exploded to the starboard side <strong>of</strong> the centerline between the two rudders.<br />
○ It exploded in the wake <strong>of</strong> centerline propeller.<br />
We believe that this torpedo passed under the stern and that the wake from the propellers<br />
forced it upwards against the underside <strong>of</strong> <strong>Bismarck</strong>’s stern plating, between the two rudders,<br />
whereupon it exploded with tremendous force. Based on the nature <strong>of</strong> the damage to the hull, we<br />
believe that the torpedo actually exploded to the starboard side <strong>of</strong> the centerline, destroying a<br />
large amount <strong>of</strong> structure, including the structural support for the starboard rudder stock. <strong>The</strong><br />
venting force <strong>of</strong> the torpedo explosion was carried to the port side, causing the port rudder stock<br />
to fail. None <strong>of</strong> the British airmen observed the characteristic water plume <strong>of</strong> an exploding<br />
torpedo in the stern area. This is strong evidence that almost all <strong>of</strong> the force <strong>of</strong> the exploding<br />
torpedo was vented against and into <strong>Bismarck</strong>’s overhanging stern structure.<br />
<strong>The</strong> torpedo hit or exploded under the stern. Its explosion also caused the failure <strong>of</strong> a<br />
large portion <strong>of</strong> the trailing edge <strong>of</strong> the starboard rudder (about 25-50% <strong>of</strong> the total rudder area).<br />
<strong>The</strong> starboard rudder stock and the rudder itself were pushed forward and towards the centerline<br />
15<br />
This information was provided by Baron von Müllenheim-Rechberg during a discussion aboard the<br />
heavy cruiser Dorsetshire after his recovery, as related to authors William Garzke and Robert Dulin<br />
during an interview in Annapolis, Maryland during September 1980. <strong>The</strong> Baron, an artillery specialist,<br />
was the fourth gunnery <strong>of</strong>ficer on <strong>Bismarck</strong>, with a rank <strong>of</strong> LT. Seaman Josef Statz, who was assigned to<br />
Damage Control Central, provided Mr. Garzke a detailed flooding diagram <strong>of</strong> the ship, further confirming<br />
this information.<br />
16<br />
Baron von Müllenheim-Rechberg in his book, Battleship <strong>Bismarck</strong>, A Survivor’s Story, commented<br />
that the torpedo was dropped from only 20 meters astern. That estimate cannot be correct, for that short a<br />
distance would not allow the torpedo to arm. Perhaps the distance was 200 meters.<br />
17<br />
<strong>The</strong> extreme motions <strong>of</strong> the ship in the sea way, coupled with the port list and the trim down by the<br />
bow, may have contributed to this difficulty.<br />
14
<strong>The</strong> <strong>Wreck</strong> <strong>of</strong> <strong>DKM</strong> <strong>Bismarck</strong> <strong>−</strong> A <strong>Marine</strong> <strong>Forensics</strong> <strong>Analysis</strong><br />
about 3 meters, causing the lower portion <strong>of</strong> the rudder’s leading edge to enter the turning circle<br />
<strong>of</strong> the spinning center propeller.<br />
<strong>The</strong> most interesting find during the 2002 Cameron Expedition was the damage sustained<br />
by the center propeller. Only one <strong>of</strong> the three blades is visible, while the other two are buried in<br />
sediment. <strong>The</strong> centerline propeller gouged the rudder repeatedly until finally there was no<br />
contact. Striations were found in the forward and after edges <strong>of</strong> the exposed propeller blade.<br />
<strong>The</strong>se marks are consistent with repeated strikes <strong>of</strong> the rudder by the rotating propeller. <strong>The</strong> tips<br />
<strong>of</strong> the three blades were damaged, and part <strong>of</strong> one blade was torn away. Most <strong>of</strong> one blade from<br />
the centerline propeller was found embedded in the lower leading edge <strong>of</strong> what remains <strong>of</strong> the<br />
starboard rudder. Whether the blades were bolted to the propeller hub or the propeller was a<br />
one-piece manganese-bronze casting, we believe this blade fractured at the root <strong>of</strong> the blade near<br />
the hub. <strong>The</strong> starboard rudder was found displaced forward <strong>of</strong> the plane <strong>of</strong> the centerline<br />
propeller. This displacement occurred either during the explosion event, due to stern slamming<br />
prior to the sinking, or during the sinking event. <strong>The</strong> broken propeller blade is now more than a<br />
meter aft <strong>of</strong> the visible centerline propeller blade 18 .<br />
This is a view <strong>of</strong> the starboard rudder and the centerline propeller, as seen from the port side<br />
<strong>of</strong> the wreck. Note that one <strong>of</strong> the three blades <strong>of</strong> the centerline propeller is projecting above<br />
the sediments below the remains <strong>of</strong> the rudder. Note the outer portion <strong>of</strong> its blade is chipped.<br />
It must have taken quite a force to break <strong>of</strong>f such a blade. We are not sure whether<br />
<strong>Bismarck</strong> actually had single-piece propellers or propellers with removable blades. <strong>The</strong> drawing<br />
set shows both types <strong>of</strong> installation. We suspect that Blohm and Voss put a hub with removable<br />
18 All <strong>of</strong> these conclusions are based on stereoscopic HD imaging done from the Mir submersibles and on<br />
an extremely close ROV survey done with the “JAKE” spiderbot ROV, both during the May 2002<br />
expedition. <strong>The</strong> “JAKE” ROV was also piloted inside the steering gear room.<br />
15
<strong>The</strong> <strong>Wreck</strong> <strong>of</strong> <strong>DKM</strong> <strong>Bismarck</strong> <strong>−</strong> A <strong>Marine</strong> <strong>Forensics</strong> <strong>Analysis</strong><br />
blades on first, with slotted bolt holes to allow the propeller to be adjusted slightly for maximum<br />
efficiency, then <strong>−</strong> once the best position was found from tests in the Baltic in the fall <strong>of</strong> 1940 <strong>−</strong><br />
manufactured and installed solid, one-piece propellers to replace the experimental ones.<br />
In his recollection <strong>of</strong> leaving the center engine room after placing scuttling charges, LT<br />
Gerhard Junack advised author Bill Garzke, Jochen Brennecke 19 , and Dr. Oscar Parkes 20 that he<br />
left the engine room around 1010 with shining lights and a slowly turning shaft. For that shaft to<br />
keep turning, either the coupling in the shafting was parted by the jamming <strong>of</strong> the rudder into the<br />
center propeller, the keys holding the center propeller to the shaft failed in shear, or the propeller<br />
was able to keep turning once the intact portions <strong>of</strong> the three blades were free <strong>of</strong> the rudder<br />
structure.<br />
<strong>Bismarck</strong> underwent an extensive stay in the Blohm & Voss Shipyard from December<br />
1940 until March 5, 1941. We have seen no photographs taken <strong>of</strong> the propellers during that stay<br />
<strong>−</strong> views taken in July 1940 cannot answer the question as to what was fitted when the battleship<br />
sortied for combat. It is very probable that single-piece propellers were fitted during that final<br />
availability. <strong>The</strong> dramatic discovery <strong>of</strong> the embedded blade in the rudder gives a new insight<br />
into the condition <strong>of</strong> the propellers and rudders at the time <strong>of</strong> the sinking <strong>of</strong> the battleship. Bolted<br />
blades are used today in controllable pitch propellers in FFG-7 and DDG-51 class ships, with<br />
hefty bolts.<br />
Until the James Cameron May 2002 Expedition, the seriousness <strong>of</strong> damage to the rudders<br />
was unknown. Photography <strong>of</strong> the underside <strong>of</strong> the hull revealed that the rudder stock for the<br />
port rudder had fractured. Did the force <strong>of</strong> the torpedo explosion bend this rudder, which was<br />
already canted outboard about 8 degrees, further to port causing it to contact the port propeller?<br />
<strong>The</strong> answer to that question is “no”, because the port propeller shows no sign <strong>of</strong> damage. Did the<br />
subsequent slamming <strong>of</strong> the hull in the heavy seas lead to the failure <strong>of</strong> the rudder stock through<br />
the forces <strong>of</strong> accelerated fatigue? <strong>The</strong> answer can never be known with certainty.<br />
In the meantime, the light cruiser Sheffield reported that <strong>Bismarck</strong> was heading to the<br />
northeast at a slow speed. Sea conditions hampered the Sheffield’s efforts to determine the nature<br />
<strong>of</strong> the damage caused by the torpedo attack. Due to her port turn, <strong>Bismarck</strong> closed range and<br />
then opened fire with her 380-mm guns in a brief engagement. Before the cruiser could open the<br />
range, <strong>Bismarck</strong>’s gunfire disabled Sheffield’s radar, caused minor fragment damage, and<br />
inflicted several casualties. This incident reminded the British that the <strong>Bismarck</strong> remained a<br />
formidable adversary, even if damaged and apparently unable to escape.<br />
Captain Lindemann ordered the ship to be slowed so that assessment <strong>of</strong> the damage in the<br />
stern could begin. He ordered two <strong>of</strong> his best damage control personnel, LT Gerhard Junack and<br />
LTJG Hermann Giese, to the area to determine the nature <strong>of</strong> the damage and to commence the<br />
needed temporary repairs. <strong>The</strong>ir efforts had to be halted at times, as Admiral Lütjens, Captain<br />
Lindemann, and CDR Oels wanted reports regarding the efforts to restore the steering function.<br />
Oels also sent two divers to the area to determine what damage occurred in the steering gear<br />
rooms. Lowering divers over the side was discussed, but sea conditions were causing the stern to<br />
rise and fall with such force that an accurate inspection was impossible and might have caused<br />
the death <strong>of</strong> the divers,as well. Attempts to steer the ship with the propellers were unsuccessful,<br />
due to the position <strong>of</strong> the starboard rudder in the race <strong>of</strong> the center propeller. <strong>Bismarck</strong> was<br />
doomed.<br />
19 Schlachtschiffe <strong>Bismarck</strong>, Kohlers Verlag, 1960, page 361.<br />
20 Dr. Oscar Parkes’ paper on <strong>Bismarck</strong> in the 1948 Transactions <strong>of</strong> the Royal Institution <strong>of</strong> Naval<br />
Architects. Dr. Parkes did not name the source except as a survivor.<br />
16
<strong>The</strong> <strong>Wreck</strong> <strong>of</strong> <strong>DKM</strong> <strong>Bismarck</strong> <strong>−</strong> A <strong>Marine</strong> <strong>Forensics</strong> <strong>Analysis</strong><br />
<strong>The</strong> edge <strong>of</strong> the damaged starboard rudder is shown below the hull opening for the fractured<br />
port rudder stock (arrow.)<br />
<strong>The</strong> damaged starboard rudder with the embedded centerline propeller blade.<br />
17
<strong>The</strong> <strong>Wreck</strong> <strong>of</strong> <strong>DKM</strong> <strong>Bismarck</strong> <strong>−</strong> A <strong>Marine</strong> <strong>Forensics</strong> <strong>Analysis</strong><br />
This drawing, showing the proximity <strong>of</strong> the centerline propeller to the two rudders, shows how it was<br />
possible that the damaged rudder was forced into contact with the centerline propeller.<br />
<strong>The</strong>re was no mention <strong>of</strong> the center propeller being disabled in dialog with the Baron and<br />
with LT Junack 21 , who were the senior surviving <strong>of</strong>ficers. Because <strong>of</strong> the rough sea conditions,<br />
the Germans were unaware <strong>of</strong> the damage to the centerline propeller and the seriousness <strong>of</strong> the<br />
rudder damage. <strong>The</strong>y did hear or feel banging and vibration after the torpedo explosion. As<br />
ordered by Captain Lindemann, LCDR Walter Lehmann, the battleship’s Chief Engineer 22 ,<br />
varied the propeller rotations on the three shafts in an effort to counter the effects <strong>of</strong> what they<br />
believed were jammed rudders.<br />
LCDR Lehmann called each <strong>of</strong> the <strong>of</strong>ficers in charge <strong>of</strong> the three engine rooms and told<br />
them to station a man at the forward throttle to the turbines, another at the throttle for the astern<br />
turbine, and a standby in case <strong>of</strong> an emergency, instead <strong>of</strong> manning the engine controls in each <strong>of</strong><br />
the engine rooms. This procedure was followed to respond precisely to the commands that would<br />
be given by Captain Lindemann from the bridge. According to LCDR von Müllenheim-<br />
Rechberg:<br />
21 Author Bill Garzke corresponded with CDR Junack from 1961-1975 and the Baron from 1965-1993.<br />
Bob Dulin and Bill Garzke interviewed the Baron in Annapolis, Maryland in September 1980.<br />
22 Although <strong>of</strong>ficial USN terminology is “engineer <strong>of</strong>ficer,” “chief engineer” is the most common usage.<br />
18
<strong>The</strong> <strong>Wreck</strong> <strong>of</strong> <strong>DKM</strong> <strong>Bismarck</strong> <strong>−</strong> A <strong>Marine</strong> <strong>Forensics</strong> <strong>Analysis</strong><br />
"<strong>The</strong> <strong>Bismarck</strong>'s hull shook noticeably as Lindemann ordered various speeds and combinations<br />
<strong>of</strong> propellers in an attempt to bring us back on course. <strong>The</strong> orders came down from the bridge in<br />
rapid succession: 'Port engines half ahead, center and starboard engines stop' - 'Port and center<br />
engines half ahead, starboard engines back slow' – ‘Port engines full ahead, starboard engines<br />
stop.' ”<br />
<strong>The</strong>se orders were carried out in the machinery spaces in violation <strong>of</strong> all routine safety<br />
procedures for waiting between "full ahead," “full astern,” or "all stop." It was a desperate effort<br />
to bring the ship back on a course away from the enemy. Severe vibrations were noted,<br />
particularly in the region <strong>of</strong> the center engine room. With the machinery space ventilation and<br />
accesses closed due to a night engagement with the British destroyers, temperatures in the boiler<br />
and engine rooms reached 50 o Centigrade <strong>−</strong> 122° Fahrenheit <strong>−</strong> with men in leather jackets! 23<br />
Efforts to restore the steering continued until the divers realized that they could not<br />
continue any damage repairs due to the swirling <strong>of</strong> water within the steering gear room. <strong>The</strong>re<br />
was some discussion <strong>of</strong> using explosives to sever the rudder shafts, but Captain Lindemann<br />
would not allow this, as he felt it would cause damage the centerline propeller, which was<br />
located very close to the rudders.<br />
<strong>The</strong>se efforts lasted for about 15 minutes until Captain Lindemann realized that any<br />
further attempts to use the propellers for steering were futile. At one point, the ship would<br />
respond and take a favorable heading, but in the next instant the rudder position and the wind and<br />
sea conditions would turn the ship around to the northwest again. Such behavior in a seaway is<br />
typical <strong>of</strong> a ship with no steering control. When Captain Lindemann tried variations in speed<br />
and combinations <strong>of</strong> propellers in an attempt to resume a course to the southeast, the <strong>Bismarck</strong>’s<br />
hull shook noticeably. It was unknown to the crew that this vibration was caused by the<br />
damaged centerline propeller.<br />
<strong>The</strong> lack <strong>of</strong> steering control caused the ship to head into the prevailing heavy seas,<br />
leading to stern slamming that might have changed the damaged rudder’s position. Since the gas<br />
bubble from the torpedo explosion was trapped under the stern and not free to vent to the water<br />
surface, as it would be at the side <strong>of</strong> the ship, the force <strong>of</strong> the torpedo explosion caused a<br />
sensation <strong>of</strong> lifting the stern. It also ripped a hole in the underside <strong>of</strong> the hull that allowed water<br />
to enter the steering gear rooms. <strong>The</strong> foundation surrounding the starboard rudder stock was<br />
very severely damaged. Since both the port and starboard rudder were cross-connected, the<br />
steering machinery was mangled and the steering system was permanently disabled. <strong>The</strong><br />
position <strong>of</strong> the damaged starboard rudder in the wake <strong>of</strong> the center propeller kept the ship in a<br />
port turn. Just after the torpedo hit occurred, the ship heeled violently to port. <strong>The</strong> sensation<br />
from that heeling was such that some survivors thought she might capsize. LT Gerhard Junack,<br />
who was in charge <strong>of</strong> the center engine room, reported that "floor plates in the center engine<br />
were moved upward about 0.5 meters 24 . Welds failed. Water poured in through the port shaft<br />
alley. <strong>The</strong> safety valve in the starboard engine room closed and the turbines were shut down or<br />
slowed.”<br />
23<br />
<strong>The</strong> Baron interviewed LT Junack to obtain this information.<br />
24<br />
<strong>The</strong> vertical displacement <strong>of</strong> the floor plates may have been caused by the damaged out-<strong>of</strong>-balance<br />
centerline propeller.<br />
19
<strong>The</strong> <strong>Wreck</strong> <strong>of</strong> <strong>DKM</strong> <strong>Bismarck</strong> <strong>−</strong> A <strong>Marine</strong> <strong>Forensics</strong> <strong>Analysis</strong><br />
<strong>The</strong> stormy night <strong>of</strong> 26-27, the battleship was harassed by a series <strong>of</strong> determined but<br />
unsuccessful torpedo attacks by five destroyers. By day break on the following morning, most <strong>of</strong><br />
the <strong>Bismarck</strong>’s crew were physically and mentally exhausted. <strong>The</strong>se men were confronted with<br />
the likelihood <strong>of</strong> imminent death.<br />
THE FINAL BATTLE ─ 27 May, 1941<br />
<strong>Bismarck</strong> was making no more than 5 knots when the action started, unable to maneuver<br />
or take evasive action. Later, she had no forward speed due to the prevailing sea conditions. For<br />
her later salvos, Rodney closed from 18,000 to 3,700 meters, firing at virtually point-blank range<br />
by naval gunnery standards. King George V eventually closed to less than 3,700 meters, as well.<br />
<strong>The</strong> heavy sea conditions (20' swells or higher) affected gunnery accuracy, even at close range.<br />
<strong>The</strong> 356-mm and 406-mm guns had malfunctions. King George V was especially plagued by<br />
mechanical breakdowns <strong>of</strong> her heavy guns during the battle.<br />
During the morning <strong>of</strong> 27 May, the battleships Rodney and King George V, accompanied<br />
by heavy cruisers Dorsetshire and Norfolk, shelled <strong>Bismarck</strong> for a period <strong>of</strong> 92 minutes, firing a<br />
total <strong>of</strong> 2,876 shells. (See Table 3.) <strong>The</strong> German battleship’s main battery gunfire control system<br />
was disabled in the first few minutes <strong>of</strong> the gunnery engagement. All four 380-mm main battery<br />
turrets were silenced in less than 45 minutes.<br />
Table 3<br />
British Shells Fired at the <strong>Bismarck</strong> (27 May 1941)<br />
406-mm 356-mm 203-mm 152-mm 134-mm<br />
King George V --- 339 --- --- 660<br />
Rodney 380 --- --- 716 ---<br />
Dorsetshire --- --- 254 --- ---<br />
Norfolk --- --- 527 --- ---<br />
<strong>The</strong>re were hundreds <strong>of</strong> hits ranging from 134-mm to 406-mm in caliber. <strong>The</strong><br />
devastation caused by the shellfire combined with the effects <strong>of</strong> several torpedo hits to<br />
overwhelm and defeat the <strong>Bismarck</strong>, causing the ship to begin sinking due to uncontrollable<br />
progressive flooding. <strong>The</strong> German crew sped the inevitable demise <strong>of</strong> their ship by initiating<br />
scuttling measures.<br />
THE GUNNERY ENGAGEMENT ─ A DAMAGE ANALYSIS<br />
<strong>The</strong>re are several large shell entry holes that correspond to the 406-mm guns on Rodney<br />
and the 356-mm guns on King George V. <strong>The</strong>re are also many shell gouges on the 145-mm and<br />
320-mm armor belts where 203-mm, 152-mm, and 134-mm shells hit and ricocheted <strong>of</strong>f before<br />
exploding, detonated without penetrating the armor, or were disarmed by their impact. <strong>The</strong>re are<br />
numerous entry holes about the diameters <strong>of</strong> the penetrating projectiles, varying from circular to<br />
elongated ellipses, depending upon the angle <strong>of</strong> entry. <strong>The</strong>re are approximately twenty holes<br />
caused by the larger caliber shells. In a few cases, the explosion was at or just above deck level,<br />
producing a large irregular hole and a depressed area in the deck structure.<br />
20
<strong>The</strong> <strong>Wreck</strong> <strong>of</strong> <strong>DKM</strong> <strong>Bismarck</strong> <strong>−</strong> A <strong>Marine</strong> <strong>Forensics</strong> <strong>Analysis</strong><br />
DAMAGE HIGHLIGHTS<br />
○ About 0859, one <strong>of</strong> Rodney’s 406-mm shells damaged Turret Bruno and blew <strong>of</strong>f<br />
pieces <strong>of</strong> armor from the turret back plate, killing almost all men in exposed portions on<br />
the bridge. Another 406-mm projectile holed the fore bulkhead <strong>of</strong> the lower bridge.<br />
○ At 0859, a 203-mm shell fired by Norfolk hit and disabled the forward fire-control<br />
director. This certainly resulted in a disruption <strong>of</strong> the fire-control function and the deaths<br />
<strong>of</strong> personnel there, including LCDR Adalbert Schneider, the gunnery <strong>of</strong>ficer.<br />
○ Around 0900, several 406-mm shells struck in the vicinity <strong>of</strong> Turret Bruno. One<br />
<strong>of</strong> these shells hit the upper course <strong>of</strong> 220-mm armor on the port side <strong>of</strong> this turret’s<br />
barbette, creating a significant hole that can be seen on the wreck. <strong>The</strong> turret was trained<br />
to port at the time, engaging Rodney. A chunk <strong>of</strong> 220-mm armor was thrust into the<br />
barbette structure as the shell tore its way through the armor. <strong>The</strong>re was a splinter screen<br />
inside the barbette, which appears designed to absorb the fragments from just such<br />
impacts. However, heavy shells which penetrated the barbette armor more-or-less intact<br />
probably would easily pass through the fragment screen, exploding within the barbette<br />
structure. <strong>The</strong>re is every indication that this is what occurred in this instance. Pieces <strong>of</strong><br />
the shell or debris created a chip about 0.5 meters in length in the upper course <strong>of</strong> 220mm<br />
armor on the far (starboard) side <strong>of</strong> the barbette. Other fragments probably found<br />
their way to the powder magazine, where they caused powder canisters to ignite, along<br />
with some charges within the hoists to the turret above. Since both turrets Anton and<br />
Bruno were in action with Rodney at the time <strong>of</strong> this shell hit, the crew in the gun house<br />
was busy loading shells and powder and canisters into the breeches <strong>of</strong> both guns. Pieces<br />
from that shell’s detonation could have found their way into the turret’s inner spaces and<br />
caused a fire or an explosion to occur there.<br />
○ <strong>The</strong>re is also the possibility that another 406-mm shell penetrated the turret<br />
structure itself at the same time. That situation cannot be confirmed until a thorough<br />
examination <strong>of</strong> Turret Bruno is made from its location on the side <strong>of</strong> the seamount, a<br />
challenging task which may never be possible. It is known that the turret’s back plate was<br />
blown <strong>of</strong>f with pieces <strong>of</strong> that wreckage projected aft, killing all personnel in exposed<br />
positions on the bridge. <strong>The</strong> pressure <strong>of</strong> burning powder and cartridges devastated Turret<br />
Bruno, as the rear <strong>of</strong> the turret was uplifted and thrust forward. That massive pivoting<br />
motion created a divot some one-meter in circumference in the inner forward portion <strong>of</strong><br />
the 220-mm armor plate. <strong>The</strong> turret magazines were flooded shortly thereafter to prevent<br />
a catastrophic explosion. Turret Anton was also silenced around this time. <strong>The</strong> turret’s<br />
guns ran down to maximum depression, probably due to the loss <strong>of</strong> hydraulic power.<br />
○ Sometime during 0900-0915, a 203-mm shell from Norfolk struck the S61 turret<br />
(forward starboard secondary turret) jamming its access hatch. <strong>The</strong> turret crew was<br />
trapped and doomed.<br />
○ About the same time, another 406-mm shell from Rodney hit the forward conning<br />
tower. A series <strong>of</strong> 356-mm and 406-mm hits occurred in rapid sequence, killing many <strong>of</strong><br />
the men inside and chipping or holing the 350-mm armor 25 . <strong>The</strong> port door to the conning<br />
tower is open on the seabed, with some apparent damage to its hinges.<br />
25 Frequently, even non-penetrating hits can cause damage and casualties on the interior due to spalling,<br />
with fragments <strong>of</strong> armor ricocheting around the interior. Another devastating phenomenon is the noise<br />
caused as supersonic projectiles impact on the armor, much like being inside a huge bell as it is rung.<br />
21
<strong>The</strong> <strong>Wreck</strong> <strong>of</strong> <strong>DKM</strong> <strong>Bismarck</strong> <strong>−</strong> A <strong>Marine</strong> <strong>Forensics</strong> <strong>Analysis</strong><br />
○ At 0913, a 356-mm shell hit the aft rangefinder over the secondary conning<br />
position and carried away the cupola, optics, and rotating arms. <strong>The</strong> 2001 Expedition<br />
found this cupola with a shell hole (356-mm) clean through.<br />
○ At 0921, a 356-mm shell struck and exploded against the face plate <strong>of</strong> Turret<br />
Caesar. <strong>The</strong>re was no damage within the turret, but its left gun would not elevate. Shell<br />
fragments from the shell’s detonation penetrated the Aufbaudeck and other decks below,<br />
starting small fires that were easily extinguished. <strong>The</strong>se penetrations are still visible in the<br />
deck outside the barbette. <strong>The</strong> Turret Officer, LT Günter Brückner, was forced to halt<br />
firing his guns. He turned to his gun crew and said, “Comrades, we have loved life. Now,<br />
if nothing changes, we will die as good seamen. You may abandon this turret.”<br />
○ Shells struck the forward port side 150-mm secondary turret (P62) and its<br />
magazine, causing internal explosions that tore <strong>of</strong>f the after portion <strong>of</strong> the ro<strong>of</strong> armor<br />
plate (80 mm) and riddled the adjacent superstructure with shell fragments and debris<br />
from the turret.<br />
○ At 0927, gun spotters aboard Norfolk observed a 356-mm shell hit near Turret<br />
Anton. Firing range <strong>of</strong> the shell was estimated to be between 7,300 and 10,000 meters.<br />
○ Sometime during 0930-0935 there was a probable shell hit on the upper main<br />
battery director, which subsequently toppled over to port.<br />
○ Around 0931, the right barrel 26 <strong>of</strong> Turret Dora burst. This probably occurred when<br />
the turret crew fired the gun after it had been damaged by British shellfire. Petty Officer<br />
Friedrich Helms, the gun captain, was able to fire two more rounds from the undamaged<br />
left barrel. <strong>The</strong> hit on the barrel was likely from a 406-mm shell, because soon after the<br />
bursting <strong>of</strong> the right gun, another shell hit the forward port quadrant <strong>of</strong> Turret Dora’s<br />
220-mm barbette and exploded, making a hole in the surrounding deck and sending<br />
splinters through the floor <strong>of</strong> the turret.<br />
○ Between 0935-0940, LT Emil Jahreis and his party <strong>of</strong> four men from Damage<br />
Control Central were killed by the explosion <strong>of</strong> a 203-mm shell when they tried to exit<br />
the damaged conning tower on the starboard side <strong>−</strong> the heavy armor door was damaged<br />
but left open 27 . Capsizing to port later caused the door to close.<br />
○ At 0940, several 406-mm shells fired from a range <strong>of</strong> 6,900 to 7,400 meters<br />
caused a large explosion just abaft Turret Bruno. A large hole was made in the main deck<br />
around the aft port segment <strong>of</strong> the barbette. A small fire also was reported in the turret.<br />
○ Several shells struck the housing and boom for the port aircraft crane. All that is<br />
left <strong>of</strong> this crane is a stud on the deck, around which the crane rotated. <strong>The</strong> boom <strong>of</strong> this<br />
crane was torn into two pieces by a shell hit, and the sheave at the tip <strong>of</strong> the boom was<br />
destroyed by a small caliber shell. <strong>The</strong> impact <strong>of</strong> these shells carried the part <strong>of</strong> the boom<br />
forward against the port side <strong>of</strong> the fore command tower 28 . <strong>The</strong> wrecked boom now lies<br />
on the seabed just outside the slide scar.<br />
26<br />
Turret and gun mount barrels are identified as “left” or “right” based on their positioning, as viewed<br />
from inside the turret or mount looking towards the gun muzzles. This avoids confusion which can result<br />
from identifying a gun based on its location to the port or starboard side <strong>of</strong> the ship, depending on the<br />
direction to which the turret is pointing.<br />
27<br />
Seaman Statz reported the door being open when he was on the Bridge between 0945 and 1020. Statz<br />
saw the five bodies there.<br />
28<br />
Observed by Seaman Statz as he swam astern <strong>of</strong> <strong>Bismarck</strong> prior to her capsizing.<br />
22
<strong>The</strong> <strong>Wreck</strong> <strong>of</strong> <strong>DKM</strong> <strong>Bismarck</strong> <strong>−</strong> A <strong>Marine</strong> <strong>Forensics</strong> <strong>Analysis</strong><br />
○ Between 0950 and 1000, Rodney began her trek down the starboard side <strong>of</strong><br />
<strong>Bismarck</strong> at very close range, from 3,500 to 4,000 meters. <strong>The</strong>re is evidence <strong>of</strong> several<br />
406-mm shell hits on the battleship’s starboard side. One shell tore out the 145-mm<br />
upper side belt abreast <strong>of</strong> Turret Anton. Another 406-mm projectile found its way into<br />
the windlass room, tearing its way aft before detonating in a berthing space. Another<br />
shell penetrated the upper side belt between Turrets Anton and Bruno, burrowing its way<br />
below the 50-mm upper armor deck before exploding within. This explosion caused part<br />
<strong>of</strong> the upper belt to be blown out <strong>−</strong> part <strong>of</strong> the damaged 145-mm belt armor is<br />
overhanging the 320-mm main side belt. <strong>The</strong> main side belt is angled slightly outward.<br />
○ Around 1005, one <strong>of</strong> Rodney’s 406-mm shells struck and penetrated the main side<br />
belt between 150-mm turrets S61 and S63. It is probable that this projectile exploded<br />
within the ship, but this cannot be verified. One survivor recalled that a shell penetrated<br />
into one <strong>of</strong> the starboard boiler rooms; his recollection was contradicted by other<br />
survivors.<br />
○ At 1003 a 406-mm shell struck the foredeck on the starboard side and proceeded<br />
aft, exploding a crew compartment. It is not clear whether this shell or others caused the<br />
ripping away <strong>of</strong> several starboard 145-mm upper armor belt plates near one the<br />
breakwaters.<br />
○ Around 1005, a 356- or 406-mm shell penetrated the bulwark and either<br />
ricocheted <strong>of</strong>f the 350-mm armor or passed overboard. Seaman Josef Statz and LTJG<br />
Cardinal took shelter in the corner <strong>of</strong> the bridge wing under fallen comrades before<br />
thishell struck. Fragments from that bulwark wounded Statz, despite the fact that he had<br />
sought cover under dead comrades and was wearing a leather jacket.<br />
○ A 406-mm shell, possibly in the same salvo, penetrated the Upper Bridge Deck<br />
and ripped a path absolutely level across the deck for a distance <strong>of</strong> 7 meters, before<br />
exploding. <strong>The</strong> point <strong>of</strong> explosion is indicated by a sudden widening <strong>of</strong> the previously<br />
parallel sides <strong>of</strong> the shell path. <strong>The</strong> port side <strong>of</strong> the bridge was blown out by the violent<br />
explosion. <strong>The</strong> ballistic effects <strong>of</strong> this 1,077-kilogram shell ripping across the deck are<br />
quite graphic. Steel that is 10-12 mm thick has been cut open as if by a can opener and<br />
rolled back into two absolutely parallel curls, After 7 meters <strong>of</strong> travel, the angle diverges<br />
rapidly , and one can visualize the shell beginning its detonation. <strong>The</strong> epicenter <strong>of</strong> that<br />
detonation traveled at almost 700 meters per second along the shell’s trajectory. This<br />
damage indicates a shell fired from close range and maximum depression by Rodney after<br />
she had circled to starboard and began firing from 3-4,000 meters away.<br />
○ Seaman Statz witnessed the latter shell’s trajectory from a point on the starboard<br />
side. He noted that there was a badly wounded <strong>of</strong>ficer, whom we have tentatively<br />
identified as CAPT Netzbandt, Admiral Lütjens’ chief staff <strong>of</strong>ficer, who might have been<br />
taking in the scene from a position on the port side <strong>of</strong> the bridge. This shell probably<br />
struck and killed him in its trajectory across the deck.<br />
○ Another heavy hit occurred on the port side <strong>of</strong> the Upper Bridge Deck. <strong>The</strong> shell<br />
penetrated the bulwark and exploded against the port 350-mm armor door <strong>of</strong> the forward<br />
conning tower. <strong>The</strong> resulting explosion damaged this door and its hinges. <strong>The</strong> nature <strong>of</strong><br />
this damage is sufficient to conclude that this was a 406-mm shell hit. <strong>The</strong> impact on the<br />
port side suggests that it may have occurred as early as 0902 just after the hit on Turret<br />
Bruno. It is impossible to judge the trajectory angle (plunging or flat). This could have<br />
been the shell that killed the Gunnery Officer, LCDR Adalbert Schneider, and resulted in<br />
23
<strong>The</strong> <strong>Wreck</strong> <strong>of</strong> <strong>DKM</strong> <strong>Bismarck</strong> <strong>−</strong> A <strong>Marine</strong> <strong>Forensics</strong> <strong>Analysis</strong><br />
Baron von Müllenheim-Rechberg taking command <strong>of</strong> the aft turrets. LTJG Friedrich<br />
Cardinal, in the Forward Gun Computing Station, telephoned the Baron at about this time<br />
to inform him that he should take control <strong>of</strong> the gunfire, since Schneider was not<br />
answering his calls.<br />
○ <strong>The</strong>re is the possibility that this same round also killed or incapacitated Admiral<br />
Günther Lütjens and Captain Ernst Lindemann 29 . <strong>The</strong>re was an interior bulkhead within<br />
the forward conning tower that may have provided some shielding, but if this projectile’s<br />
fragments made it inside the conning tower, there is the likelihood that everyone in there<br />
was killed or severely wounded. CAPT Netzbandt is known to have made it out <strong>of</strong> that<br />
position, so severely wounded that he propped himself against the port bulwark only to<br />
be the victim <strong>of</strong> another 406-mm shell.<br />
○ A shell <strong>of</strong> unknown size brought down the foremast about 0940-1000.<br />
○ Some time after 1005, as Rodney fell astern <strong>of</strong> <strong>Bismarck</strong>, two 406-mm shell hits<br />
occurred in Compartment IV, damaging access ladders. One shell penetrated the<br />
starboard aft quadrant <strong>of</strong> the barbette for Turret Dora. Red hot shell splinters started a fire<br />
in the lower platforms <strong>of</strong> the turret. <strong>The</strong> shell’s explosion hurled the hatch to the<br />
magazines high into the air. Machinist Mate Helms and others standing near Turret Dora<br />
suffered serious burns to their faces and hands in the aftermath <strong>of</strong> the shell’s explosion.<br />
Turret Dora was disabled by 406-mm shell fire, including this damage on the fore port side <strong>of</strong> the<br />
barbette. Note the armor penetration and the blast damage to the deck structure.<br />
29 In a letter interview with the senior surviving <strong>of</strong>ficer, Baron von Müllenheim-Rechberg, Author Bill<br />
Garzke mentioned the nature <strong>of</strong> damage to the Forward Conning Tower. <strong>The</strong> Baron conceded that it in all<br />
likelihood Captain Lindemann perished during the early phases <strong>of</strong> the battle.<br />
24
<strong>The</strong> <strong>Wreck</strong> <strong>of</strong> <strong>DKM</strong> <strong>Bismarck</strong> <strong>−</strong> A <strong>Marine</strong> <strong>Forensics</strong> <strong>Analysis</strong><br />
<strong>The</strong> fore bridge tower was the natural center <strong>of</strong> aim for the British gunners. This view from the<br />
starboard side <strong>of</strong>fers stark evidence <strong>of</strong> the effects <strong>of</strong> this concentrated fire. <strong>The</strong>re were no survivors<br />
who had battle stations inside the conning tower structure.<br />
Chief Warrant Officer (Machinist) Wilhelm Schmidt, in charge <strong>of</strong> Damage Control Team<br />
No. 1, quickly flooded the turret’s magazines to prevent a catastrophic magazine<br />
explosion 30 .<br />
○ Around 1005-1010, a 356-mm shell penetrated the 145-mm upper splinter belt in<br />
Compartment VII on the port side. Its trajectory carried it forward through a main<br />
transverse bulkhead to Compartment VIII and exploded just above deck level outside the<br />
Aft Canteen, where 200 men had assembled to make their escape to the main deck. Over<br />
a hundred <strong>of</strong> these men were killed, including the executive <strong>of</strong>ficer, CDR Hans Oels.<br />
○ King George V resumed fire at 1018, hitting <strong>Bismarck</strong>'s turret Bruno, bridge, and<br />
conning tower. Fire ignited in a pyrotechnic locker. This British battleship ceased fire at<br />
1021.<br />
o It appears that one 203-mm shell from either Norfolk or Dorsetshire penetrated or<br />
became lodged in the 145-mm upper citadel belt abreast <strong>of</strong> Turret 63 (starboard). <strong>The</strong><br />
projectile exploded, however, causing a fire in this turrets’ magazine.<br />
o <strong>The</strong>re are a number <strong>of</strong> gouges and splashes in the upper and lower armor belts from<br />
203-, 152-, andr 134-mm shells.<br />
30 Evidence from Chief Warrant Officer Schmidt in correspondence with author Bill Garzke.<br />
25
<strong>The</strong> <strong>Wreck</strong> <strong>of</strong> <strong>DKM</strong> <strong>Bismarck</strong> <strong>−</strong> A <strong>Marine</strong> <strong>Forensics</strong> <strong>Analysis</strong><br />
THE STERN FRACTURE<br />
Survivors, including Seaman Statz, recalled the sight <strong>of</strong> the battleship capsizing to port<br />
and beginning her plunge to the sea bed. As the <strong>Bismarck</strong> capsized, her heavily-damaged stern<br />
structure was still in place. Early in the ship’s plunge to the sea floor, the stern structure failed<br />
and separated from the hull structure. <strong>The</strong> design <strong>of</strong> the stern structures <strong>of</strong> German heavy ships<br />
was flawed, as shown by several instances <strong>of</strong> ships experiencing dramatic structure failures after<br />
sustaining torpedo or mine damage.<br />
We are convinced that stern end (Compartment I) was torn away during the initial plunge<br />
<strong>of</strong> the ship by hydrodynamic forces after being weakened along the seam that joined much<br />
thicker plate with thinner ones. This flaw in the design created a structural discontinuity just aft<br />
<strong>of</strong> the aft armored bulkhead <strong>of</strong> the steering gear room. Cumulative forces from fatigue from stern<br />
slamming, the mortal torpedo hit that occurred a few meters from where the stern detached, and<br />
damage from shells exploding within Compartment I, particularly a late 406-mm shell hit that<br />
tore away a large piece <strong>of</strong> plate caused the stern end to break away as the ship rolled on her side<br />
to port and began her plunge stern first. That structural discontinuity was recognized by German<br />
naval constructors after Prinz Eugen was torpedoed in the stern in February 1942.<br />
<strong>The</strong> <strong>Bismarck</strong> stern break, in line with the armored bulkhead at the after end <strong>of</strong> the steering gear<br />
room, occurred after the ship capsized and began plunging to the sea bed.<br />
26
<strong>The</strong> <strong>Wreck</strong> <strong>of</strong> <strong>DKM</strong> <strong>Bismarck</strong> <strong>−</strong> A <strong>Marine</strong> <strong>Forensics</strong> <strong>Analysis</strong><br />
Gunfire and torpedo damage weakened the stern structure, which was susceptible to failure due to a<br />
defective structural design <strong>−</strong> a major hull structural discontinuity at the after end <strong>of</strong> the steering gear<br />
room <strong>−</strong> as shown to the right. After the <strong>Bismarck</strong> capsized and sank, the structure failed along this<br />
line, leaving this dramatic view.<br />
GUNFIRE DAMAGE SURVEY <strong>−</strong> HIGHLIGHTS<br />
An internal examination <strong>of</strong> some areas <strong>of</strong> the ship was accomplished by miniature ROVs<br />
Jake and Elwood. <strong>The</strong>y surveyed inside the holes in the Upper Bridge Deck and the holes in the<br />
deck over the Adjutant’s Office. One <strong>of</strong> the ROVs also entered the large shell hole in the main<br />
deck just aft and to port <strong>of</strong> the barbette for Turret Bruno (Compartment XV). This was a berthing<br />
space being used as an emergency hospital. Two hundred men were trapped here, below jammed<br />
hatches that had heavy wreckage lying over them. <strong>The</strong>y were killed by the shell that detonated<br />
here. <strong>The</strong> space was unrecognizable <strong>−</strong> just a jumble <strong>of</strong> debris.<br />
A large shell hole in the main deck over the Adjutant’s Office just inboard <strong>of</strong> S63<br />
secondary turret was explored twice. This hole was 0.6 by 1.0 meters and very irregular. This<br />
penetration was caused by either a 406-mm or 203-mm shell which detonated right at or just<br />
above the deck level. Inside the <strong>of</strong>fice, the damage was pr<strong>of</strong>ound, but desks were visible against<br />
a wall some three meters away, still intact. Door openings and non-structural bulkheads were still<br />
intact some 3-4 meters away. This situation suggests that the explosion took place outside, but<br />
penetrated the 50-mm deck plate with a consequent reduction <strong>of</strong> its blast effects. This suggests<br />
that this was a 203-mm high-explosive shell.<br />
A single shell hole was detected in the 145-mm upper citadel belt in way <strong>of</strong> Compartment<br />
VII to port. This elliptical hole was caused by a 356-mm shell from King George V that was fired<br />
from the close range <strong>of</strong> 3,700 meters. <strong>The</strong> shell’s trajectory carried it through a main transverse<br />
bulkhead and the Batteriedeck whereupon it exploded just below the deck level in Compartment<br />
VIII. This was the round that killed CDR Hans Oels, who was leading some 100-200 men trying<br />
to lead an escape to the topside at an access ladder outside the Aft Canteen. This access ladder<br />
led to a hatch on the main deck in Compartment VIII. Most <strong>of</strong> the men in this area were killed or<br />
seriously wounded by the shell burst. <strong>The</strong> blast effect was devastating. <strong>The</strong> detonation created an<br />
overpressure that knocked survivor Seaman Heinz Steeg on his behind, some 7 meters away.<br />
Steeg still managed to reach the safety <strong>of</strong> the port side just after the shelling ceased.<br />
27
<strong>The</strong> <strong>Wreck</strong> <strong>of</strong> <strong>DKM</strong> <strong>Bismarck</strong> <strong>−</strong> A <strong>Marine</strong> <strong>Forensics</strong> <strong>Analysis</strong><br />
<strong>The</strong>re is a 2 to 3 meter hole in the main deck at the port forward quadrant <strong>of</strong> Turret Dora.<br />
<strong>The</strong> shell exploded about 0.7 meters above the main deck and the nose <strong>of</strong> the shell created a hole<br />
in the 220-mm barbette armor at the deck’s intersection with the barbette. <strong>The</strong> hole is very<br />
irregular and the deck plating is curled inward. <strong>The</strong> teak deck around the barbette is missing,<br />
blown <strong>of</strong>f the steel deck by concussion effects. <strong>The</strong> shell’s explosion or its fragments bent the<br />
rim <strong>of</strong> port quarterdeck hatch. <strong>The</strong> rim was bent enough to prevent its opening from within.<br />
It is known that bags <strong>of</strong> potatoes and life rafts were stored under the aft overhang <strong>of</strong><br />
Turret Dora. According to surviving Seaman Apprentice Manthey, some men tried to find cover<br />
there and were certainly killed by the fragments <strong>of</strong> this shell that also sent shell splinters into<br />
Turret Dora, starting a fire there. <strong>The</strong> paint on the port side <strong>of</strong> the turret was scorched from the<br />
fire in the teak deck on the forward port quadrant <strong>of</strong> the barbette.<br />
<strong>The</strong> hole in the rim <strong>of</strong> the barbette is a mystery. It would appear that the shell came from<br />
the forward quadrant, perhaps when King George V or Rodney were making their way northward<br />
on <strong>Bismarck</strong>’s port side between 0930-0950. Since King George V was having problems with her<br />
356-mm guns around this time, it is likely that the shell was 406-mm and approached with a flat<br />
trajectory. <strong>The</strong> bent or curled main deck plate indicates that the shell exploded at or just after its<br />
moment <strong>of</strong> impact with the 220-mm barbette armor.<br />
This may have occurred in two ways:<br />
o If the shell had no fuse delay, it would have struck the barbette and exploded<br />
while the hardened cap <strong>of</strong> the shell was dislodging a large chunk <strong>of</strong> armor on the<br />
rim <strong>of</strong> the barbette.<br />
o If the shell struck something first in its trajectory toward the barbette, the fuse<br />
might have been triggered and in the process <strong>of</strong> detonating when the projectile hit<br />
the barbette armor. Since Turret Dora had been aimed to port at this time to<br />
engage King George V, then the shell may also have hit one <strong>of</strong> the gun barrels<br />
about 7 to 8 meters before it struck the barbette armor. It is known that one <strong>of</strong><br />
Turret Dora’s guns was damaged by a shell impact and one <strong>of</strong> its rounds later<br />
exploded within the barrel, splitting it like a “banana peel” <strong>−</strong> Confirmed by<br />
correspondence with the Baron and also by the gunnery report <strong>of</strong> King George V.<br />
This shell’s explosion was probably responsible for killing or wounding a number <strong>of</strong><br />
<strong>Bismarck</strong> crew members using this area as a battle dressing station and attempting to escape<br />
from the carnage. Survivor Steeg noted a number <strong>of</strong> persons lying on the deck, gruesomely<br />
wounded. Anyone standing in the vicinity <strong>of</strong> Turret Dora would have been thrust against the<br />
barbette <strong>of</strong> Turret Caesar by the blast. Steeg recounted that he saw body parts and dead or dying<br />
men at the base <strong>of</strong> the barbette for this turret. This is where he gave a cigarette to a dying friend.<br />
<strong>The</strong> bulk <strong>of</strong> Turret Dora would have protected men on the starboard or lee side, where many men<br />
were attempting an escape.<br />
AFTER THE MAIN BATTERY WAS SILENCED<br />
It would seem that the sequence <strong>of</strong> events after the main guns had fallen silent was this:<br />
○ With the bridge personnel no longer responding after 0920, CDR Hans Oels, the<br />
executive <strong>of</strong>ficer, took command <strong>of</strong> the ship and decided to issue an order to<br />
abandon and scuttle the ship when he left the Damage Control Central around<br />
0930.<br />
28
<strong>The</strong> <strong>Wreck</strong> <strong>of</strong> <strong>DKM</strong> <strong>Bismarck</strong> <strong>−</strong> A <strong>Marine</strong> <strong>Forensics</strong> <strong>Analysis</strong><br />
○ Around 0930 LT Emil Jahreis, with a party <strong>of</strong> four men, left Damage Control<br />
Central to pass the scuttling and abandon ship orders to topside positions. <strong>The</strong>y<br />
went up the access (or communication) tube to the forward conning tower.<br />
○ Around 1000, men started coming up on deck through the port quarterdeck hatch<br />
in Compartment VIII. CDR Oels reached as far aft as Compartment VII in his<br />
quest to relay the scuttling order.<br />
○ Coming forward to Compartment VIII and seeing the mass chaos, CDR Oels<br />
ordered these men to follow him up an escape ladder to the main deck. A huge<br />
crowd formed, with the single-file ladder as a choke point. As many as 300 men<br />
crowded the Batteriedeck there. Oels yelled at the men to step aside and plunged<br />
into the crowd.<br />
○ Just after CDR Oels arrived, a 356-mm shell passed through the 145-mm upper<br />
citadel belt, a main transverse bulkhead, and the 50-mm main deck before<br />
exploding just aft <strong>of</strong> the Aft Canteen, where Oels was organizing an escape<br />
attempt. Most <strong>of</strong> the men in this area were killed, including CDR Oels.<br />
○ In the meantime, a crowd <strong>of</strong> men formed on the quarterdeck, both to port and to<br />
starboard, hoping to escape from the seriously damaged ship.<br />
When Baron von Müllenheim-Rechberg left the secondary conning station through the<br />
starboard door, he went forward on the Deckhouse Deck toward the searchlight control station.<br />
<strong>The</strong> searchlights had been shot away and their control station no longer existed. <strong>The</strong> antiaircraft<br />
guns that had once surrounded the secondary conning station no longer existed or were reduced<br />
to unrecognizable rubble. <strong>The</strong> deck, on which he was standing and those below, was littered with<br />
torn plates or pieces <strong>of</strong> equipment or gun mounts. Looking forward through a whitish haze that<br />
extended to the forward superstructure, he noticed that the decks there were still intact and men<br />
were trying to find their way down to the main deck. Access ladders probably had been damaged<br />
or shot away that hindered descent. <strong>The</strong> funnel had been holed by shell splinters or direct hits.<br />
A low-lying fog-like smoke cloud had formed between the shell-riddled funnel and the<br />
after superstructure, originating from severed uptakes within the funnel itself and fires raging in<br />
the vicinity <strong>of</strong> the funnel. Returning briefly to the secondary conning station, von Müllenheim-<br />
Rechberg went down to the main deck, past Turret Caesar trained toward the port bow with its<br />
barrels in an elevated position. <strong>The</strong> Baron had to climb over debris and avoid shell holes in the<br />
decks. He noticed the body <strong>of</strong> one <strong>of</strong> Admiral Lütjens’ staff <strong>of</strong>ficers, who had apparently left his<br />
battle station before the shellfire had ceased.<br />
Arriving on the main deck, the Baron noted the blackened port side <strong>of</strong> Turret Dora, with<br />
its left gun barrel shredded like a peeled banana. Turret Caesar, with its light gray paint,<br />
exhibited no damage except that its guns were at a high elevation. A 356-mm shell from King<br />
George V had hit its face plate and detonated, sending shell splinters onto the deck below. That<br />
hit disabled the turret’s two guns. Groups <strong>of</strong> men were waiting to jump into the sea. He also<br />
noticed Rodney at 2,500 meters away with her nine 406-mm guns still pointed in his direction.<br />
<strong>The</strong>re are a large number <strong>of</strong> smaller entry holes in the hull shell plating and<br />
superstructure. <strong>The</strong>se correspond in diameter to medium-caliber projectiles (140-mm, 152-mm,<br />
and 203-mm). An initial estimate is that there are perhaps 100 to 200 <strong>of</strong> these. Some 2,876 shells<br />
were fired, but only about ten percent hit. With <strong>Bismarck</strong> low in the water and the British ships<br />
closing the range, their guns were firing at minimum elevation. Many <strong>of</strong> these shells impacted<br />
the water surface in front <strong>of</strong> their intended target and then either detonated prematurely or<br />
29
<strong>The</strong> <strong>Wreck</strong> <strong>of</strong> <strong>DKM</strong> <strong>Bismarck</strong> <strong>−</strong> A <strong>Marine</strong> <strong>Forensics</strong> <strong>Analysis</strong><br />
ricocheted, striking the ship or passing harmlessly over. Accuracy does not seem to have been all<br />
that impressive, given the close range for most <strong>of</strong> the engagement.<br />
This sketch depicts the battered <strong>DKM</strong> <strong>Bismarck</strong> shortly before the ship capsized and sank, about 1040<br />
on the morning <strong>of</strong> 27 May 1941. (Courtesy Steve Smith)<br />
It is significant to note that Jim Cameron’s complete survey <strong>of</strong> the hull detected only two<br />
instances where armor-piercing shells actually penetrated all the way through the 320-mm main<br />
side belt armor. <strong>The</strong>se are both on the starboard side amidships, presumably caused by 406-mm<br />
shellfire, since Rodney was firing from that side sometime during 0950-1010 at very close range.<br />
One hole forward <strong>of</strong> the 320-mm displaced armor belt is an obvious penetration. <strong>The</strong> second is<br />
rather unusual, with a rectangular hole at the end <strong>of</strong> an armor plate. <strong>The</strong> shell possibly caused a<br />
failure <strong>of</strong> the armor, freeing a rectangular segment <strong>of</strong> the 320-mm armor, rather thgan the<br />
classical conic-frustum cartwheel shape. In addition, there are two holes through the upper side<br />
belt (145-mm) between the main belt armor and the gunwale. One <strong>of</strong> these is a previouslydiscussed<br />
hole on the port side adjacent to turret Caesar (a 356-mm round from King George V).<br />
After 1000, when the survivors were leaving the machinery spaces, the generator rooms<br />
were still functioning. <strong>The</strong> passageways were mostly clear. Enlisted survivors Walter Weintz,<br />
Karl August Schuldt, and Heinz Steeg did not remember seeing water until they got above the<br />
armor deck. Mr. Statz, whose position was in Damage Control Central below the armor deck,<br />
recalled encountering water when he attempted to enter a space aft <strong>of</strong> DC Central in<br />
Compartment XIV around 0930.<br />
Gunnery <strong>of</strong> mediocre accuracy, coupled with <strong>Bismarck</strong>’s armor scheme designed for<br />
close-in engagements in the North Sea, resulted in a relatively drawn-out gunnery engagement,<br />
much the opposite <strong>of</strong> the brief engagement and destruction <strong>of</strong> Hood three days earlier.<br />
ROYAL NAVY GUNNERY EFFECTIVENESS<br />
<strong>The</strong> battered, defenseless <strong>Bismarck</strong> must have seemed amazingly resilient to the British<br />
as they poured shell after shell into her. It is a tribute to her designers that the ship survived as<br />
long as it did. Tragically, ironically, the resultant protracted sinking process meant a hellish<br />
ordeal for many <strong>of</strong> the crew <strong>of</strong> the stricken battleship, with many suffering agonizing deaths.<br />
Eventually, some 700 to 800 men escaped into the cold, cruel North Atlantic. Slightly more than<br />
30
<strong>The</strong> <strong>Wreck</strong> <strong>of</strong> <strong>DKM</strong> <strong>Bismarck</strong> <strong>−</strong> A <strong>Marine</strong> <strong>Forensics</strong> <strong>Analysis</strong><br />
a hundred <strong>of</strong> these sailors were rescued, almost all by Royal Navy ships 31 . <strong>The</strong> British broke <strong>of</strong>f<br />
rescue operations when a submarine contact was suspected.<br />
A thorough bow to stem and gunwale-to-mudline survey <strong>of</strong> the hull in high definition<br />
video and by visual inspection revealed only two hits which penetrated all the way through the<br />
main side belt armor. This is an astounding result, given the number <strong>of</strong> large caliber shells (719)<br />
fired at <strong>Bismarck</strong> from 0847 until 1014.<br />
On the 320-mm main side belt and on the 145-mm upper belt above the level <strong>of</strong> the<br />
Batteriedeck level, there are a very large number <strong>of</strong> "splash" and gouge marks with spray<br />
patterns <strong>of</strong> smaller splinter impacts. Most if not all <strong>of</strong> these are hits from secondary guns, and<br />
none penetrated the armor. This vindicated the purpose <strong>of</strong> the upper belt, which was designed to<br />
prevent penetration by anything other than shells fired by battleship main battery guns, typically<br />
from 283-mm to 406-mm caliber.<br />
Long-range plunging fire was almost completely responsible for the damage inflicted by<br />
the British gunfire in the final battle that directly contributed to the sinking <strong>of</strong> <strong>Bismarck</strong>.<br />
Torpedoes launched during the final battle were almost completely ineffective in the effort to<br />
sink the ship. <strong>The</strong>re is also the likelihood that some <strong>of</strong> the claimed hits were torpedoes that<br />
exploded prematurely due to the heavy seas. <strong>The</strong> close-range shelling that took place from 0930<br />
to 1014 was largely ineffective in damaging the vitals <strong>of</strong> the ship.<br />
One <strong>of</strong> the two instances <strong>of</strong> known full penetration <strong>of</strong> the 320-mm main side belt armor. This is<br />
amidships on the starboard side.<br />
It is important to distinguish between damage to the superstructure and the two deck<br />
levels above the armor deck, which was severe, but would not have contributed significantly to<br />
the sinking process. Damage inflicted below the armor deck and below the side armor and<br />
31 <strong>The</strong> heavy cruiser Dorsetshire rescued 85 (one <strong>of</strong> these died <strong>of</strong> his injuries on 28 May), the destroyer<br />
Maori saved 25, the German submarine U-74 rescued 3, and another 2 were rescued by the German<br />
weather trawler Sachsenwald. No survivors had been stationed in the forward superstructure.<br />
31
<strong>The</strong> <strong>Wreck</strong> <strong>of</strong> <strong>DKM</strong> <strong>Bismarck</strong> <strong>−</strong> A <strong>Marine</strong> <strong>Forensics</strong> <strong>Analysis</strong><br />
through the torpedo bulkhead would have contributed to sinking the <strong>Bismarck</strong>. This is an<br />
important distinction. It is also important to note that a 356-mm shell fired at long range from<br />
Prince <strong>of</strong> Wales, falling short and striking below the main side belt, was able to damage the<br />
torpedo bulkhead enough to cause flooding beyond the side protective system.<br />
Each <strong>of</strong> the six 150-mm secondary turrets aboard <strong>Bismarck</strong> has been observed to have<br />
sustained at least one direct hit, mostly achieved by the 134- and 152-mm batteries on the<br />
battleships and the 203-mm guns on the heavy cruisers. We believe these hits were the results <strong>of</strong><br />
the random dispersion <strong>of</strong> salvo fire, with accurate fire inhibited by the Sea State Six conditions<br />
and the heat <strong>of</strong> battle. This was certainly be the case on the starboard side, where Norfolk and<br />
Dorsetshire expended 781 203-mm shells.<br />
<strong>The</strong> British gunnery accuracy was mediocre at best. This certainly drew the attention <strong>of</strong><br />
Admiral Tovey aboard King George V, when he noticed at 0930 that <strong>Bismarck</strong> was still afloat<br />
despite the pounding she was taking. He told CAPT Patterson, “Get closer; I do not see enough<br />
hits.” Some 2,000 medium-caliber shells were fired and only about 10% <strong>of</strong> them hit <strong>Bismarck</strong> (a<br />
large, barely moving target usually only a few miles away,)<br />
During the morning battle <strong>of</strong> 24 May, the Prince <strong>of</strong> Wales’ gunnery had been rather<br />
effective, despite the fact that the battleship’s turret crews were very inexperienced 32 . <strong>The</strong> Prince<br />
<strong>of</strong> Wales had been in service only three weeks before being dispatched to fight <strong>Bismarck</strong>. Her<br />
356-mm shell hits were achieved during a very short engagement. Two <strong>of</strong> these hits changed<br />
history, causing <strong>Bismarck</strong> to slow down with a bow-down trim. This damage allowed Victorious<br />
to get within range to make her air attack later in the day. Later in the day, Admiral Lütjens<br />
changed his plans, turning <strong>Bismarck</strong> to head for France for battle damage repairs. Days later,<br />
<strong>Bismarck</strong> would encounter aircraft with more experienced aviators launched by Ark Royal.<br />
Prince <strong>of</strong> Wales and King George V each had ten 356-mm guns that fired shells weighing<br />
721 kilograms. Hood had eight 381-mm guns firing shells weighing 879 kilograms. <strong>The</strong> Rodney,<br />
was armed with the largest guns in the Royal Navy, nine 406-mm guns that could fire 929kilogram<br />
shells. <strong>The</strong> heavy cruisers Norfolk and Dorsetshire were armed with 203-mm guns that<br />
fired a 116-kilogram shell. <strong>The</strong> cruiser guns were vastly inferior in power to the 406-mm guns,<br />
with their shells having a kinetic energy only about 15 per cent <strong>of</strong> that <strong>of</strong> the larger shells. <strong>The</strong><br />
burster charges <strong>of</strong> the two shells differed similarly.<br />
<strong>The</strong> inevitable sinking process was accelerated by the detonation <strong>of</strong> scuttling charges by<br />
the Germans. (This is our conviction, albeit a mildly controversial one for those who insist that<br />
there was no scuttling <strong>of</strong> the German battleship. Certainly, <strong>Bismarck</strong> would have sunk even if not<br />
scuttled by her crew. 33 )<br />
TORPEDO DAMAGE DURING THE FINAL BATTLE<br />
Two large sections <strong>of</strong> the lower side and bottom shell structure below the armor belt on<br />
the starboard are missing from the main hull. Unique hydraulic outburst phenomena, described<br />
later in this paper, separated this plating from the ship on impact with the sea bed. <strong>The</strong> aft end <strong>of</strong><br />
one long hole created by hydraulic outburst, on the starboard side aft, shows evidence <strong>of</strong><br />
probable torpedo damage. It is unclear if the torpedo may have weakened the shell structure and<br />
contributed to the outburst effect, <strong>of</strong> if the effect occurred without prior weakening, and was in<br />
32 Prince <strong>of</strong> Wales was completed on 31 March 1941, less than two months before her engagement with<br />
<strong>Bismarck</strong>. <strong>The</strong> German battleship was completed on 24 August 1940.<br />
33 <strong>Bismarck</strong> had prize crew personnel with associated scuttling charge equipment on board.<br />
32
<strong>The</strong> <strong>Wreck</strong> <strong>of</strong> <strong>DKM</strong> <strong>Bismarck</strong> <strong>−</strong> A <strong>Marine</strong> <strong>Forensics</strong> <strong>Analysis</strong><br />
fact halted from propagating by the pre-existing battle damage. <strong>The</strong>re is some evidence<br />
supporting the latter scenario.<br />
As many as five torpedo hits on <strong>Bismarck</strong> were claimed during the final engagement on<br />
27 May 1941. None <strong>of</strong> these had any consequential effect on the outcome <strong>of</strong> the engagement,<br />
although they may have contributed to the massive destruction (aggravated by hydraulic<br />
outburst) that has been observed on the sea bed:<br />
○ Dorsetshire ─ Two hits claimed on the starboard side, at the turn <strong>of</strong> the bilge,<br />
locations unknown. One <strong>of</strong> these hits may have been in the vicinity <strong>of</strong> the middle<br />
150-mm turret on the starboard side, as observers on Dorsetshire claimed a hit<br />
amidships. As the wreck <strong>of</strong> <strong>Bismarck</strong> plummeted down the seamount on the sea<br />
bed, hull structure weakened by battle damage <strong>−</strong> primarily torpedo hits but also<br />
gunfire damage <strong>−</strong> ripped away. This makes the confirmation and localization <strong>of</strong><br />
torpedo damage over much <strong>of</strong> the hull structure impossible.<br />
○ Dorsetshire ─ A hit on the port side, as <strong>Bismarck</strong> was beginning to capsize. This<br />
torpedo struck on the port side abreast <strong>of</strong> the fore bridge tower, just forward <strong>of</strong><br />
turret 62. This torpedo ran onto or slightly above the main deck, probably<br />
detonating among the debris from the gunnery engagement. This may account for<br />
the damage to the boom<strong>of</strong> the port aircraft and boat crane.<br />
○ Rodney ─ A claimed torpedo hit on the starboard side, in way <strong>of</strong> Turret Bruno.<br />
<strong>The</strong>re was no visible evidence <strong>of</strong> this torpedo hit, but the mud line is fairly high in<br />
way <strong>of</strong> Turret Bruno. If this hit occurred around 1000 as reported, it may have<br />
struck below the bilge keel.<br />
○ Norfolk ─ A possible hit was observed on the starboard side aft in way <strong>of</strong> the after<br />
main battery turrets.<br />
<strong>The</strong>re is evidence <strong>of</strong> a possible torpedo hit on the starboard side aft in way <strong>of</strong> the after<br />
main battery turrets. A large flap <strong>of</strong> hull plating, bent outward and aft, may be physical evidence<br />
<strong>of</strong> this torpedo hit. <strong>The</strong> inner tank wall is holed in a manner consistent with a torpedo explosion,<br />
but just inboard from it the torpedo bulkhead is intact. Forward, the unaffected tank wall is<br />
vertically compressed, evidence <strong>of</strong> the ship’s powerful impact with the sea bed. It is impossible<br />
to determine with certainty if this is a torpedo hit because <strong>of</strong> the enormous influence <strong>of</strong> the<br />
hydraulic outburst that took place when the ship hit the seabed. <strong>The</strong> excretion <strong>of</strong> entrained water<br />
through damaged structure can enlarge the original damage, and can create pr<strong>of</strong>ound damage<br />
even in previously undamaged sections. However, this aft starboard hole seems to be our most<br />
unequivocal example <strong>of</strong> torpedo damage.<br />
One <strong>of</strong> the great challenges confronting a marine forensics analyst on analyzing a ship<br />
wreck is evaluating observed damage on the sea bed <strong>−</strong> determining what occurred on the surface<br />
that caused the ship to sink as opposed to damage caused during the sinking process, including<br />
the impact with the sea bed. In the case <strong>of</strong> <strong>Bismarck</strong>, the structural damage to the ship caused by<br />
impact was significantly greater than the battle damage. Impact effects, and subsequent events,<br />
such as the slide down the slope, must be clearly understood in order to accurately subtract them<br />
from the total damage in order to confirm the battle damage.<br />
33
<strong>The</strong> <strong>Wreck</strong> <strong>of</strong> <strong>DKM</strong> <strong>Bismarck</strong> <strong>−</strong> A <strong>Marine</strong> <strong>Forensics</strong> <strong>Analysis</strong><br />
SOME OBSERVATIONS<br />
<strong>Bismarck</strong>'s sinking was a brutal, up-close action. Admiral Tovey wanted to sink <strong>Bismarck</strong><br />
with the gunfire at his disposal. Swordfish aircraft with torpedoes were in the vicinity but were<br />
not called upon to enter the action. Point-blank fire was relatively ineffective, with many shells<br />
skipping <strong>of</strong>f the water and riddling the superstructure pointlessly, or missing entirely because <strong>of</strong><br />
the low freeboard. At short ranges, the salvo dispersion pattern was narrower and more<br />
elongated. Since both British battleships were firing almost straight abeam <strong>Bismarck</strong>, on either<br />
side, they were trying to hit a target with very little freeboard in a high sea state. <strong>The</strong>se miserable<br />
conditions <strong>−</strong> violent seas and marginal visibility <strong>−</strong> made good gunnery accuracy an “iffy”<br />
prospect, at best.<br />
Unless the shells hit below the armor belt, very unlikely at such close ranges because <strong>of</strong><br />
protective effect <strong>of</strong> water with such flat trajectories, they were not going to cause damage that<br />
would sink the ship.<br />
As a result <strong>of</strong> the port list, by the end <strong>of</strong> the gunnery engagement, the lower edge <strong>of</strong> the<br />
armor belt on the port side may have been submerged some 7-8 meters below the water (perhaps<br />
two deck heights) <strong>−</strong> much more than normal. In a sense, the port list contributed to protecting the<br />
port side <strong>of</strong> the damaged ship from gunfire, every degree <strong>of</strong> added list decreasing the<br />
vulnerability <strong>of</strong> many vital compartments.<br />
By 0945; it was becoming obvious that British shellfire was not contributing to sinking<br />
the ship. <strong>The</strong> two battleships and two heavy cruisers had fired away for the last hour without any<br />
apparent effect. Shellfire had riddled the stack structure, swept away searchlights, demolished<br />
the antiaircraft batteries, pummeled the superstructure, carried away hose reels and fire<br />
extinguishers, and destroyed the teak deck in areas. Crew members who were in exposed areas<br />
were killed or severely wounded. Close-range gunnery later in the engagement devastated<br />
<strong>Bismarck</strong>’s superstructure and the parts <strong>of</strong> the hull structure above the waterline, overwhelming<br />
and defeating the ship and causing massive casualties, but not speeding the sinking <strong>of</strong> the ship.<br />
<strong>Bismarck</strong> was overwhelmed and defeated by the gunfire and torpedoes <strong>of</strong> the Royal<br />
Navy, gradually sinking due to uncontrollable progressive flooding. Scuttling charges were<br />
detonated shortly after 1020, and the battered ship listed heavily to port around 1035. Shortly<br />
thereafter, the ship capsized to port and sank by the stern, her bow disappearing around 1040.<br />
THE WRECK<br />
<strong>The</strong> hulk <strong>of</strong> <strong>Bismarck</strong> is lying upright, with its bow facing West across the slope <strong>of</strong> an<br />
extinct volcano on a heading between 250-290°. <strong>The</strong> bow-first impact caused an enormous<br />
disturbance to the terrain, including an impact crater where the bow first hit, and an impact<br />
trough where the hull slammed down moments later, both <strong>of</strong> which are surrounded by ejecta.<br />
<strong>The</strong> hull immediately slid South down the seamount stern first, gouging a deep slide scar which<br />
widened as the hull turned broadside to the slope and continued to slide at a slight bow-first<br />
angle. In this broadside area the slide scar is shallower and more chaotic. Down slope, beyond<br />
the wreck, there is a huge alluvial fan <strong>of</strong> sediment and debris. <strong>The</strong> wreck caused a terrestrial<br />
avalanche on the seabed which was exacerbated by a powerful turbidity flow.<br />
During her plunge through the water column, <strong>Bismarck</strong> planed north, transiting about 500<br />
meters horizontally to the North from her sinking position on the surface. She struck the side <strong>of</strong> a<br />
34
<strong>The</strong> <strong>Wreck</strong> <strong>of</strong> <strong>DKM</strong> <strong>Bismarck</strong> <strong>−</strong> A <strong>Marine</strong> <strong>Forensics</strong> <strong>Analysis</strong><br />
seamount (extinct volcano) and subsequently slid down its slope for a distance <strong>of</strong> 1,000 meters.<br />
During that slide, she passed directly across Ground Zero (directly beneath the epicenter <strong>of</strong> the<br />
sinking where <strong>Bismarck</strong> left the surface.) This is significant, because heavier debris, such as the<br />
four main battery turrets, fell more directly to the seafloor without planning, which put them in<br />
the path <strong>of</strong> the ship as it slid downhill. <strong>Bismarck</strong> slid through part <strong>of</strong> her own debris field. This<br />
caused the displacement <strong>of</strong> Turret Bruno and the forward command tower and the burial <strong>of</strong> other<br />
parts <strong>of</strong> the ship that had fallen into the sea during the capsizing process.<br />
<strong>Bismarck</strong> slid one kilometer down the slope, accompanied and partially propelled by a<br />
powerful turbidity flow and avanlanche <strong>of</strong> disturbed sediment. <strong>The</strong> avalanche/turbidity flow was<br />
induced by the impact and slide <strong>of</strong> the ship, and also by the continued downward flow <strong>of</strong> the<br />
entrained water flow-field created above the ship as it sank through the water column.<br />
<strong>The</strong> four main battery turrets landed upside down with their gunhouses buried in the<br />
sediment, and their substructures exposed in varying degrees. Minutes later the sliding hull came<br />
through the debris field, missing Turrets Caesar and Dora, which lie only meters west <strong>of</strong> the slide<br />
scar, but impacting Turrets Anton and Bruno. Turret Bruno was pushed downhill and came to<br />
rest approximately 200 meters south <strong>of</strong> <strong>Bismarck</strong>’s bow. This turret can be identified by the fact<br />
that the rear <strong>of</strong> the turret is missing, as had been reported by Seaman Josef Statz to author<br />
William Garzke. <strong>The</strong> gunnery reports <strong>of</strong> both Rodney and King George V attest to heavy damage<br />
to this turret during the course <strong>of</strong> the battle on 27 May. <strong>The</strong> other three turrets are located about<br />
350 meters north <strong>of</strong> the wreck, two just west <strong>of</strong> the slide scar and what is probably Turret Anton<br />
just inside the scar, to the east. Anton shows clear evidence that the ship actually slid right over<br />
it, removing the turret’s substructure and jamming it into a rock outcropping, leaving behind a<br />
large piece <strong>of</strong> red bottom shell plating wrapped around the turret. Extrapolating Turret Bruno<br />
north to its original impact position yields a clear pattern. All four turrets landed in an east-west<br />
line, in the same order and spacing as they were on the ship. Very little planning took place on<br />
descent, despite a fall <strong>of</strong> 5,000 meters through the water column. From this the ship’s heading<br />
and position at the exact moment she capsized can actually be confirmed.<br />
<strong>The</strong> main hull is upright with no discernible list or trim. Examination <strong>of</strong> the hull revealed<br />
that there was not any visible longitudinal bending <strong>of</strong> the hull. <strong>The</strong>re is some localized buckling<br />
<strong>of</strong> the hull and armor plates abeam the Turret Bruno barbette, particularly on the starboard side.<br />
This buckling was likely caused at the first moment <strong>of</strong> impact, as the bending moment pushed<br />
the bow up relative to the longitudinal axis <strong>of</strong> the ship. Moments later, as the ship settled, this<br />
bending moment reversed itself, leaving a buckled region but no permanent bending <strong>of</strong> the hull.<br />
This same effect is prominently visible at the Titanic wreck.<br />
<strong>The</strong> upper citadel (145 mm) and lower (320 mm) main side belts show evidence <strong>of</strong> shell<br />
hits, with two penetrations in each. <strong>The</strong> decks and remaining superstructure are covered with<br />
rubble and fine-particle sediment that was stirred up during the hull’s slide and subsequent<br />
settlement.<br />
All six 150-mm secondary turrets remain in their barbettes, with all their guns in place.<br />
Turret 62 34 has the back portion <strong>of</strong> its 80-mm armor ro<strong>of</strong> missing. All secondary turrets exhibit<br />
shell hits from 134-, 152-, and 203-mm shells. Some <strong>of</strong> these are non-penetrating hits, but there<br />
34 <strong>The</strong> 150-mm (about 6-inch) secondary turrets have been identified in this paper by a two-digit number,<br />
such as 62. <strong>The</strong> “6” denotes the gun caliber, while the second number locates the turret. Odd numbers are<br />
to starboard and even ones are port locations, with the lower numbers being forward.<br />
35
<strong>The</strong> <strong>Wreck</strong> <strong>of</strong> <strong>DKM</strong> <strong>Bismarck</strong> <strong>−</strong> A <strong>Marine</strong> <strong>Forensics</strong> <strong>Analysis</strong><br />
is a shell penetration in each turret, with the starboard side turrets damaged by 203-mm hits from<br />
either Norfolk or Dorsetshire. <strong>The</strong> penetrations to port were likely caused by 152-mm shells<br />
from Rodney.<br />
<strong>Bismarck</strong>’s antiaircraft batteries were devastated during this engagement. <strong>The</strong> 105-mm<br />
antiaircraft gun mounts were heavily damaged, although seven <strong>of</strong> the gun carriages still exist.<br />
One port 105-mm mount, forward, was completely obliterated, apparently from direct hits from a<br />
large caliber shells from either Rodney or King George V. Some <strong>of</strong> the 37-mm and 20-mm<br />
machine guns remain, but several were swept away during the heavy shelling.<br />
<strong>The</strong> remaining attached forward superstructure is heavily damaged on the port side and<br />
shows intense fire damage on both sides. <strong>The</strong> teak deck on the port side in way <strong>of</strong> the 105-mm<br />
mounts is completely missing, a victim <strong>of</strong> fire. <strong>The</strong>re is a 406-mm shell hole on the port side<br />
from a low angle hit from Rodney. This shell hit killed a number <strong>of</strong> the antiaircraft personnel<br />
who had taken shelter there. One survivor, Ordinary Seaman <strong>The</strong>o Klaes, was a witness to this<br />
shell’s penetration and explosion. Just as he was about to enter the space where the shell exploded,<br />
a 406-mm shell came through the overhead and exploded in the middle <strong>of</strong> the room where almost<br />
all <strong>of</strong> his gun crew had assembled. Klaes was thrown to the deck by the force <strong>of</strong> the detonation. He<br />
likened the scene to a flickering picture on a movie screen <strong>of</strong> a man who did not know where he was<br />
or where he was going.<br />
This sketch gives an idea <strong>of</strong> the condition <strong>of</strong> the wreck <strong>of</strong> <strong>Bismarck</strong> on the sea bed.<br />
36
<strong>The</strong> <strong>Wreck</strong> <strong>of</strong> <strong>DKM</strong> <strong>Bismarck</strong> <strong>−</strong> A <strong>Marine</strong> <strong>Forensics</strong> <strong>Analysis</strong><br />
<strong>The</strong> superstructure decks <strong>of</strong> the forward command tower aft <strong>of</strong> the heavily armored<br />
forward conning tower are missing from the main hull. (<strong>The</strong> missing decks range from the Lower<br />
Bridge Deck to the foretop, including the Admiral’s Bridge and the decks from the fore tower<br />
mast.) <strong>The</strong> failure is believed to be the result <strong>of</strong> shell damage to the lower bridge deck and the<br />
inability <strong>of</strong> the welded connection to resist the impact force <strong>of</strong> the capsizing and subsequent<br />
rotation <strong>of</strong> the hull before and after the plunge. Seaman Statz recalled that a number <strong>of</strong> shells<br />
struck the forward command tower above and below his position on the Upper Bridge Deck.<br />
Welded connections could have been weakened by such shell damage.<br />
This portion <strong>of</strong> the superstructure was found upside down a few meters west <strong>of</strong> the slide<br />
scar, 350 meters north <strong>of</strong> the main hull. It appears to be complete and is at the lower terminus <strong>of</strong><br />
its own small slide scar, evidence <strong>of</strong> the main hull striking it during its slide downhill. <strong>The</strong> port<br />
side windows <strong>of</strong> the Admiral’s bridge are without glass but otherwise intact. Some <strong>of</strong> the access<br />
ladders were torn away or severely damaged during the final battle. Baron von Müllenheim-<br />
Rechberg confirmed this, noting that several men were running around the forward command<br />
tower looking for a route <strong>of</strong> escape during the time before capsizing 35 . It is believed that this<br />
structure, like the main battery turrets, made a direct plunge to the bottom. <strong>The</strong> forward windows<br />
appear to have been damaged by shell hits or fragments, as well as from the impact <strong>of</strong> this<br />
structure with the seabed. <strong>The</strong> windows are heavily overgrown with rusticles 36 , suggesting fire<br />
damage. <strong>The</strong> foretop main battery director cupola and rangefinders are missing. This was<br />
probably shot away by one <strong>of</strong> Norfolk’s early 203-mm shell from King George V at its base<br />
brought it down near the end <strong>of</strong> the engagement.<br />
<strong>The</strong> funnel is missing. It was not found in the debris field, but could have been buried by the<br />
avalanche that preceded the main hull in its slide down the seamount, or it may have<br />
disintegrated in its plunge to the seabed. According to the senior surviving <strong>of</strong>ficer, Baron von<br />
Mǖllenheim-Rechberg, the funnel was heavily holed by shell fire. <strong>The</strong> structure around the<br />
attachment <strong>of</strong> the funnel to the main hull exhibits heavy shell damage. <strong>The</strong> funnel probably was<br />
detached from the ship during the capsizing and subsequent rotations <strong>of</strong> the hull during its<br />
plunge to the bottom.<br />
All three aircraft hangars still exist, but the two forward ones were heavily damaged by<br />
shellfire. <strong>The</strong> doors are missing from all three. Since the aft hangar doors were missing, it was<br />
possible to examine that hangar’s interior. A large piece <strong>of</strong> one <strong>of</strong> the aft hangar doors was found<br />
inside the forward starboard hangar, lying within a very large shell burst hole three meters in<br />
diameter. This hole might have created by a shell hit from Rodney, whose fragments may have<br />
penetrated to one <strong>of</strong> the starboard boiler rooms, as reported by one survivor. One Arado seaplane<br />
was found in the center <strong>of</strong> the aft hangar. Only the front half remains, including the left wing and<br />
float, the radial engine, and propeller. Parts <strong>of</strong> a second Arado were found in the port forward<br />
hangar that was heavily damaged by shell hits. <strong>The</strong>re was a spare propeller found still mounted<br />
on the forward bulkhead.<br />
35<br />
Baron Burkard von Müllenheim-Rechberg. Page 256, Battleship <strong>Bismarck</strong>, A Survivor’s Story.<br />
Annapolis: Naval Institute Press, 1980.<br />
36<br />
Rusticles are bacterial growths that will eventually recycle metal into the environment. <strong>The</strong>y are<br />
discussed later in this paper.<br />
37
<strong>The</strong> <strong>Wreck</strong> <strong>of</strong> <strong>DKM</strong> <strong>Bismarck</strong> <strong>−</strong> A <strong>Marine</strong> <strong>Forensics</strong> <strong>Analysis</strong><br />
A 203-mm shell caused this damage to the left 105-mm gun on antiaircraft Mount 41. (Slide 45D)<br />
<strong>The</strong> port aircraft catapult, an 18-meter truss-like structure, was located on the seafloor<br />
perfectly upright like a tower, 500 meters northeast <strong>of</strong> the main wreck. Approximately 13-14<br />
meters <strong>of</strong> the structure are visible above the sediment. It may have fallen <strong>of</strong>f when the ship listed<br />
or when it capsized, or been blown <strong>of</strong>f the ship by a torpedo hit amidships at deck level, after the<br />
port Batteriedeck had submerged due to the port list. Since it is partially buried, it is not possible<br />
to determine if it was damaged by shellfire.<br />
<strong>The</strong> port and starboard cranes are missing. <strong>The</strong> boom <strong>of</strong> the starboard crane is detached<br />
and lying on the port aft superstructure, projecting over the barbette <strong>of</strong> Turret Caesar. This<br />
anomaly leads to interesting speculation <strong>−</strong> as the ship righted itself in the water column, possibly<br />
the boom, having some buoyancy and probably entangled in the wrecked superstructure <strong>of</strong><br />
<strong>Bismarck</strong>, settled onto the after superstructure and barbette opening as the wreck continued its<br />
plunge to the seafloor, eventually sliding down a seamount. <strong>The</strong> forward end <strong>of</strong> the port crane<br />
boom was found alongside the slide scar. It was detached from its after portion by a direct shell<br />
hit, while rollers for the wire rope rigging were shot away by small caliber shell fire.<br />
Even a cursory examination reveals that the damage on the port side is more extensive<br />
than to starboard. <strong>The</strong> battleships concentrated their fire on the port side in the initial stages <strong>of</strong><br />
the battle. Rodney moved to the starboard side for a short time after 0950. King George V<br />
remained on the starboard side, closing to a range <strong>of</strong> 6-8,000 meters near the conclusion <strong>of</strong> her<br />
gunfire. <strong>The</strong> capsizing process caused much <strong>of</strong> the loose material to slide into the sea.<br />
38
<strong>The</strong> <strong>Wreck</strong> <strong>of</strong> <strong>DKM</strong> <strong>Bismarck</strong> <strong>−</strong> A <strong>Marine</strong> <strong>Forensics</strong> <strong>Analysis</strong><br />
This is a view <strong>of</strong> the starboard amidships 150-mm gun turret. Note the penetration in the barbette<br />
structure, caused by a 203-mm shell hit.<br />
<strong>The</strong> paint on the hull sides was found to be in very good condition during the May 2002<br />
expedition, including the demarcation between the black boot topping and the battleship gray just<br />
above the waterline. <strong>The</strong> red anti-fouling paint below the boot topping is clearly visible.<br />
Evidence <strong>of</strong> the camouflage “dazzle” paint pattern can be seen here and there on the hull. <strong>The</strong><br />
camouflage pattern that was apparent when the ship left Gotenhafen (Gydnia) on 19 May was<br />
painted over in Norway.<br />
<strong>The</strong> ROVs, Jake and Elwood, were able to explore some <strong>of</strong> the interior spaces above the<br />
armor deck during the Cameron expedition. <strong>The</strong>ir surveys revealed that the interior paint was<br />
less visible and rusticle activity much more pronounced. This may have been due to the amount<br />
<strong>of</strong> paint used, the contents <strong>of</strong> the paint, or fire damage. <strong>The</strong> ROV surveys also discovered that<br />
some <strong>of</strong> the spaces explored were severely damaged by explosions <strong>of</strong> armor-piercing shells.<br />
Overall, the interior spaces that were explored were in worse condition than the exterior, because<br />
<strong>of</strong> the nature <strong>of</strong> an armor-piercing shell fused to detonate after a delay to allow for the set-back<br />
and brief delay as the shell tears its way through the armor, then detonating about 7-8 meters<br />
beyond, creating a large field <strong>of</strong> blast and splinter damage. Fire damage and bottom impact<br />
effects have also contributed to these spaces’ destruction, rendering some spaces virtually<br />
unrecognizable. Most <strong>of</strong> the survivors came from battle stations below the armor deck.<br />
39
<strong>The</strong> <strong>Wreck</strong> <strong>of</strong> <strong>DKM</strong> <strong>Bismarck</strong> <strong>−</strong> A <strong>Marine</strong> <strong>Forensics</strong> <strong>Analysis</strong><br />
<strong>The</strong> battered superstructure on the port side forward, one deck level down from the conning tower<br />
level. Seaman <strong>The</strong>o Klaes just avoided death, as a 406-mm shell tore its way through this bulkhead,<br />
detonating inside and killing all the personnel there just before he entered. [6072ADL6073C2]<br />
<strong>The</strong> remains <strong>of</strong> the port aircraft-boat crane lies in the debris field, adjacent to the slide scar. A shell<br />
hit carried away the sheaves, hook, and cable. To the right, a close-up view <strong>of</strong> the detached, crushed<br />
fore command tower, discovered lying upside down alongside the slide scar. This structure came<br />
down on the side <strong>of</strong> the seamount down-slope from where the main hull landed.<br />
HYDRAULIC OUTBURST<br />
From above the main hull looks in excellent condition. More than a decade earlier, after<br />
Dr. Ballard examined his photography from his down-looking Argo sled, he pronounced the ship<br />
remarkably intact. This erroneous initial insight was shattered during Jim Cameron’s 2002<br />
40
<strong>The</strong> <strong>Wreck</strong> <strong>of</strong> <strong>DKM</strong> <strong>Bismarck</strong> <strong>−</strong> A <strong>Marine</strong> <strong>Forensics</strong> <strong>Analysis</strong><br />
expedition, following a close examination <strong>of</strong> the hull at and below the sediment line.<br />
A number <strong>of</strong> long sections <strong>of</strong> hull (some upwards <strong>of</strong> 100' long) are completely missing or<br />
are flayed outward on the bottom, severed cleanly at the bottom edge <strong>of</strong> the main armor belt.<br />
This damage appears to be from a hydraulic "outburst" effect that was caused by ship’s impact<br />
with the seamount, which created internal loading on the hull as the incompressible water inside<br />
the ship was "squeezed" between the ship's bottom, which had stopped moving upon contact<br />
with the dense sediments, and the great weight <strong>of</strong> the upper decks/superstructure concentrated<br />
and supported by the relatively rigid deck armor system, which were still traveling downwards at<br />
This is part <strong>of</strong> the hull <strong>of</strong> <strong>Bismarck</strong><strong>−</strong>”large section <strong>of</strong> lower hull” as depicted on the sketch on page 44<br />
<strong>−</strong> found a few meters south <strong>of</strong> the boundary <strong>of</strong> the impact trough. It appears that torpedo damage<br />
helped to weaken the bottom structure. This massive structural failure was caused by hydraulic<br />
outburst resulting from massive compressive forces caused by the severe impact with the sea bed.<br />
This piece <strong>of</strong> hull is almost bent 90 degrees from the compression caused from that impact.<br />
a speed <strong>of</strong> approximately 20 knots. This down-force would have been the combined kinetic<br />
energy <strong>of</strong> the steel structure, the water contained within the structure, and the water in a volume<br />
<strong>of</strong> entrained flow above the ship. This enormous mass came down like a hydraulic press on the<br />
structures below the armor deck, all <strong>of</strong> which are buckled and compressed.<br />
<strong>The</strong> Panzerdeck or Armor Deck <strong>of</strong> <strong>Bismarck</strong> was designed with relatively few<br />
penetrations, just a few relatively small armored hatches for crew access and the boiler uptakes.<br />
This Armor Deck acted as a sealed barrier <strong>of</strong> great strength over most <strong>of</strong> the area <strong>of</strong> the ship,<br />
forcing the water beneath it to virtually explode laterally out <strong>of</strong> the hull when compressed<br />
vertically. <strong>The</strong> hull failed at join between the lower hull and the bottom <strong>of</strong> the main armor belt,<br />
due to the discontinuity in strength and rigidity between the armor and the relatively thin shell<br />
plating immediately below it. <strong>The</strong> shell plate separated in a perfectly straight line, leaving<br />
gaping openings in the lower hull, some <strong>of</strong> them 30 meters long.<br />
41
<strong>The</strong> <strong>Wreck</strong> <strong>of</strong> <strong>DKM</strong> <strong>Bismarck</strong> <strong>−</strong> A <strong>Marine</strong> <strong>Forensics</strong> <strong>Analysis</strong><br />
Although bottom sediments prevented a survey <strong>of</strong> the forward 25% <strong>of</strong> the hull below<br />
Batteriedeck level, it has been estimated from the damage survey done in May 2002 that<br />
approximately 30% <strong>of</strong> the lower hull is completely missing as a result <strong>of</strong> this hydraulic outburst.<br />
<strong>The</strong> lower decks <strong>of</strong> the ship, beneath the armor deck, have been compressed vertically by 3-4<br />
meters. Most <strong>of</strong> the missing hull components remain at or near the impact point, 1000 meters upslope<br />
from the main wreck. In a few areas, the lower hull has remained attached to the ship's<br />
bottom, and can be seen lying on top <strong>of</strong> the sediment next to the wreck. <strong>The</strong>se lower hull<br />
fragments are bent and twisted, probably from the slide down the slope. This slide has also<br />
shoveled tons <strong>of</strong> bottom sediment into the wreck, like a large scoop. This sediment slopes<br />
downhill inside the wreck, indicating a raised edge just below the sediment, and a cavity inside.<br />
This would be consistent with the shell plating blowing outward down to about the curvature <strong>of</strong><br />
the double-bottom, which would be stronger. <strong>The</strong> combination <strong>of</strong> hydraulic outburst and the<br />
tearing away <strong>of</strong> the shell plating make it difficult to determine where there was torpedo damage.<br />
Forward, the hull has been blown outward and is lying on the bottom sediment. This<br />
seems to be true on both sides from forward <strong>of</strong> the capstans to abeam turret Anton, though on<br />
the starboard side the effect is largely buried by sediments.<strong>The</strong> blown-out hull emerges from<br />
these sediments just abeam <strong>of</strong> turret Anton. <strong>The</strong>re is also evidence <strong>of</strong> buckling in the hull plating<br />
outside <strong>of</strong> turret Bruno. This is further evidence that the bow struck the seamount first.<br />
Where the “blow-out” effect can be seen clearly is on the port side. It is evident that the<br />
upper decks <strong>of</strong> the ship (Batteriedeck and Zwischendeck) have been crushed down with the<br />
spaces under them by at least one deck level, possibly two. This would indicate that powerful<br />
forces have crushed the ship in the foc'sle region. <strong>The</strong> increased intensity <strong>of</strong> the outburst effect<br />
forward is consistent with a bow-first impact.<br />
An ROV inspection <strong>of</strong> the interior <strong>of</strong> the long hole in the hull on the aft starboard side<br />
indicates that the longitudinal bulkhead, which divided the outer trim tank space from the inner<br />
oil tank, has been crushed down in a long, uniform accordion fold, almost like a piece <strong>of</strong> thick<br />
fabric. This would indicate that the Middle and Lower Platforms have been severely crushed.<br />
This tank inner wall was otherwise undamaged, indicating that its condition was not the result <strong>of</strong><br />
the explosion <strong>of</strong> torpedoes or shells. For this wall to be warped, but not affected by explosion<br />
damage over such a long area, and lying just inboard <strong>of</strong> such a long open hole in the outer hull,<br />
clearly shows that the outer hole is the result <strong>of</strong> hydraulic forces and not explosion damage.<br />
An inspection <strong>of</strong> the overhead inside this long "outburst" hole revealed that the underside<br />
<strong>of</strong> the massive plating <strong>of</strong> the armor deck, including its outboard slope, was not damaged and<br />
virtually intact, despite being adjacent to such wholesale destruction <strong>of</strong> the outer portion <strong>of</strong> the<br />
ship. Only 0.5 meters from where the hull had been ripped away for more than 30 meters, the<br />
armor deck appears intact. This again supports the idea <strong>of</strong> uniform fluid pressure creating the<br />
outburst, rather than torpedo or shell explosions. This conclusion seems inescapable.<br />
<strong>The</strong> 2001 ITN expedition that explored the <strong>Bismarck</strong> wreck identified these holes as the<br />
evidence <strong>of</strong> torpedo damage. This supposed "torpedo damage" was as great on the port side as<br />
the starboard, even though most <strong>of</strong> the torpedo hits were claimed to have occurred on the<br />
starboard side. Previous forensic analysts concluded that a number <strong>of</strong> unlikely but possible<br />
claimed hits by the cruiser Norfolk and the battleship Rodney could now be confirmed. <strong>The</strong>se<br />
analysts also concluded, as a consequence, that the scuttling claimed by the German survivors<br />
was unlikely and irrelevant, that the torpedo damage inflicted by the British torpedo hits was<br />
more than enough to have caused the ship to sink when it did 37 .<br />
37 Mearns, David, and White, Rob. Hood and <strong>Bismarck</strong>. London: Channel 4 Books, 2001.<br />
42
<strong>The</strong> <strong>Wreck</strong> <strong>of</strong> <strong>DKM</strong> <strong>Bismarck</strong> <strong>−</strong> A <strong>Marine</strong> <strong>Forensics</strong> <strong>Analysis</strong><br />
<strong>The</strong> latter conclusion is incorrect and another example <strong>of</strong> the always humbling fact<br />
confounding serious historians and forensic analysts that “… <strong>The</strong> best available<br />
information in fact may not be very good …”<br />
IMPACT WITH THE SEA BED<br />
<strong>The</strong> relatively intact appearance <strong>of</strong> the outboard propellers is consistent with the<br />
conclusion that the wreck <strong>of</strong> the <strong>Bismarck</strong> impacted the sea bed bow-first with great force 38 .<br />
<strong>The</strong> outboard propellers are partially visible in the sediments and show no damage to the<br />
exposed blades. <strong>The</strong>ir supporting strut arms are also intact, a strong indication that the stern was<br />
not the first point <strong>of</strong> impact with the seamount. However, the outer potion <strong>of</strong> one blade <strong>of</strong> the<br />
centerline propeller has been severely chipped and the torn edge slightly bent.<br />
<strong>The</strong> rudders are a very important feature <strong>of</strong> the wreck. <strong>The</strong> port rudder is missing with a<br />
fracture to its rudder stock inside the hull opening. No trace <strong>of</strong> the port rudder was found around<br />
the slide scar or impact crater. It has been confirmed that the rudder stocks <strong>of</strong> <strong>Bismarck</strong> were cast<br />
steel, not a forging. Cast steel is a technology that the Germans had perfected in their submarine<br />
construction in World War I.<br />
<strong>The</strong>re was little or no collateral damage to the starboard rudder from the initial slide<br />
down the side <strong>of</strong> the seamount. <strong>The</strong> damaged rudder is at a distance above the sediment that<br />
would have prevented contact with the seabed. <strong>The</strong> starboard rudder stock has been pushed<br />
forward about 1-1.5 meters, which opening permitted the mini ROVs, Elwood or Jake, to enter<br />
the steering gear room. <strong>The</strong> hole in the hull created by the torpedo explosion is approximately 1<br />
by 3 meters in size and spans the transverse bulkhead in the steering gear room. Based upon the<br />
nature <strong>of</strong> the damage that could be observed externally, the internal supporting structure <strong>of</strong> the<br />
starboard rudder stock was destroyed by the torpedo explosion whose venting path was<br />
completely against the underside structure between the rudders.<br />
SITE ANALYSIS – CRATER, TROUGH, SLIDE SCAR, AVALANCHE, DEBRIS FIELD<br />
<strong>The</strong> main hull is lying near the bottom <strong>of</strong> a long slope with the bow facing west. <strong>The</strong><br />
gradient <strong>of</strong> the slope is approximately 10° with a 190 meter drop over a distance <strong>of</strong> 1,000 meters.<br />
<strong>The</strong> sediment is hard clay that is uniform, smooth, and slightly undulating.<br />
A slide scar or “skidmark” extends down the south side <strong>of</strong> the seamount, down slope from the<br />
impact crater to the position <strong>of</strong> the main hull. Sidescan sonar images reveal that the crater is<br />
irregular with a ragged pattern <strong>of</strong> ejecta surrounding it. Extending south from it there is an<br />
impact trough where presumably the full length <strong>of</strong> the hull slammed down moments after the<br />
initial point <strong>of</strong> contact created a crater. This elliptical trough has its long axis north and south.<br />
Extending south from this trough is a narrow “throat” section <strong>of</strong> the slide scar that has sharply<br />
defined cut-bank sides and no evidence <strong>of</strong> ejecta. This is where the hull, lacking much <strong>of</strong> its<br />
38<br />
<strong>The</strong> outboard propellers <strong>of</strong> Titanic, enclosed in bossings, were lifted up about 1.5 meters as a result <strong>of</strong><br />
that ship’s stern impact with the sea bed.<br />
43
<strong>The</strong> <strong>Wreck</strong> <strong>of</strong> <strong>DKM</strong> <strong>Bismarck</strong> <strong>−</strong> A <strong>Marine</strong> <strong>Forensics</strong> <strong>Analysis</strong><br />
<strong>The</strong> wreck <strong>of</strong> <strong>Bismarck</strong> crashed into a seamount, sliding hundreds <strong>of</strong> meters down its side before<br />
coming to rest. Note the alignment <strong>of</strong> the turrets with the wreck <strong>of</strong> the Admiral’s bridge.<br />
44
<strong>The</strong> <strong>Wreck</strong> <strong>of</strong> <strong>DKM</strong> <strong>Bismarck</strong> <strong>−</strong> A <strong>Marine</strong> <strong>Forensics</strong> <strong>Analysis</strong><br />
superstructure and the four main battery turrets, began its slide downhill, with its line <strong>of</strong> travel<br />
roughly aligned to its longitudinal axis. <strong>The</strong>re is much evidence that the bow end hit at the top <strong>of</strong><br />
the seamount and then the remainder <strong>of</strong> the hull slammed down over the remaining length<br />
with a great amount <strong>of</strong> force before beginning its slide. Evidence around Turret Bruno supports a<br />
bow-first impact.<strong>The</strong> area adjacent to the slide scar contains most <strong>of</strong> the large components <strong>of</strong> the<br />
ship that fell away during the capsizing process, such as the main battery turrets, the forward<br />
command tower, and the mainmast. A field <strong>of</strong> lighter debris lies to the west and southwest <strong>of</strong> the<br />
heavier pieces, carried to those locations by the prevailing current at the time <strong>of</strong> sinking because<br />
they took more time to fall to the seabed.<br />
Jim Cameron’s only regret is that there was not time to properly survey the impact crater.<br />
<strong>The</strong> only instance <strong>of</strong> bottom/side plate debris left in the slide scar was found near the impact<br />
crater a few meters to the south. <strong>The</strong> section <strong>of</strong> hull left there is approximately 25 meters long<br />
and relatively intact. However it is bent very cleanly on its longitudinal axis almost 90 degrees<br />
from the compressive forces which was accompanied by the hydraulic outburst. <strong>The</strong> survey <strong>of</strong><br />
this piece seems to indicate that it was shaped by evenly applied forces from compressive and<br />
hydraulic loading and not torn away by the sliding hull. It was simply shed by the hull as it began<br />
its journey down the seamount.<br />
<strong>The</strong> concentration <strong>of</strong> the debris field is consistent with the situation <strong>of</strong> the <strong>Bismarck</strong><br />
during her battle during the morning <strong>of</strong> 27 May <strong>−</strong> the ship had little or no forward movement<br />
while struggling in heavy seas without rudders.<br />
<strong>The</strong> avalanche/turbidity flow was induced by the impact and slide <strong>of</strong> the ship, and also by<br />
the continued downflow <strong>of</strong> the entrained water flow-field above the ship as it sank though the<br />
water column. When this volume <strong>of</strong> moving water reached the slope <strong>of</strong> the seamount much <strong>of</strong> its<br />
energy was dispersed down slope, maintaining its momentum. Add to the flow-field created by<br />
the wreck itself sliding down the side <strong>of</strong> the seamount, this combined to increase the flow effect<br />
downhill. This flow field would have picked many tons <strong>of</strong> sediment in the form <strong>of</strong> suspended<br />
particles and small rubble. This suspended material produced a turbidity flow condition, a heavy<br />
layer <strong>of</strong> water and sediment moving downhill much like the pyroclastic cloud <strong>of</strong> a volcanic<br />
eruption.<br />
<strong>The</strong> flow-field followed the fall-line <strong>of</strong> the slope, driven by gravity. <strong>The</strong> flow and the<br />
ship were moving together at times, and independently at times. <strong>The</strong> ship was descending in a<br />
path induced by the interaction <strong>of</strong> the hull with the terrain. It began sliding stern first South<br />
/South East with its long axis downhill, then rotated until it was sliding broadside down the hill,<br />
and eventually moved laterally to the West like a skier across the grade, coming to rest with the<br />
forward third <strong>of</strong> the ship outside the flow effects <strong>of</strong> the avalanche, in undisturbed terrain. In the<br />
ship’s last seconds <strong>of</strong> movement, the flow around the stern rotated the ship an additional 30<br />
degrees, swinging the stern downhill after the bow came to rest outside the flow. In a complex<br />
interaction between ship and flow, the movement <strong>of</strong> the ship in the water column and on the<br />
seafloor induced the flow, but subsequently the flow’s momentum contributed to the movement<br />
<strong>of</strong> the ship over the ground. Ultimately the ship came to rest and the flow continued around its<br />
stern and on downhill for an additional half kilometer.<br />
Turret Anton is inverted and relatively intact just within the east margin <strong>of</strong> the slide scar, lying<br />
on top <strong>of</strong> the sediments, though its guns and gunhouse are largely buried. Its rotating structure<br />
was torn away and could not be found. <strong>The</strong> turret lies just downhill from a large rock<br />
outcropping, and the turret has a piece <strong>of</strong> red painted lower hull embedded into the uphill side <strong>of</strong><br />
45
<strong>The</strong> <strong>Wreck</strong> <strong>of</strong> <strong>DKM</strong> <strong>Bismarck</strong> <strong>−</strong> A <strong>Marine</strong> <strong>Forensics</strong> <strong>Analysis</strong><br />
<strong>The</strong> <strong>Bismarck</strong>’s main mast in the debris field on the sea bed. A 356-mm shell fired by the King<br />
George V approximately 1015 on the morning <strong>of</strong> May 27, 1941 brought the mast down.<br />
the gunhouse. <strong>The</strong> piece <strong>of</strong> hull plating is crumpled in a way which strongly suggests that this<br />
plate was ripped away from the ship when it struck the uphill side <strong>of</strong> the turret. <strong>The</strong> position <strong>of</strong><br />
the turret and the rock outcrop strongly suggests that the sliding wreck <strong>of</strong> <strong>Bismarck</strong> scraped over<br />
the top <strong>of</strong> the outcrop and struck the turret. However, that outcrop prevented the hull from<br />
bulldozing the turret downhill as it clearly did with turret Bruno that is lying on the seamount to<br />
the southeast <strong>of</strong> turret Anton. <strong>The</strong> hull debris on the turret clearly indicates an impact and<br />
interaction with the sliding hull. <strong>The</strong> plating ripped from the ship may have been ripped out <strong>of</strong><br />
the bottom plating by the turret, or may have already been damaged by the hull’s impact with the<br />
seamount and being dragged along by the ship as it slid, only peeled away when the hull<br />
impacted Turret Anton. <strong>The</strong> turret’s sub-structure was not found and it is believed that it was<br />
pushed further down slope in the avalanche to an area not explored or it was plowed under the<br />
hull and buried.<br />
Main battery turret Bruno is laying 200 meters abeam and downhill <strong>of</strong> the main hull, to<br />
port near amidships. It is inverted, lying partially buried by avalanche materials. <strong>The</strong> backwall <strong>of</strong><br />
its gunhouse is ripped open like the petals <strong>of</strong> a flower from shell damage during the battle.<br />
Observers aboard Rodney and King George V also reported the rear wall <strong>of</strong> this turret as being<br />
blown away. An interview <strong>of</strong> Seaman Josef Statz, who was on the Upper Bridge Deck at the end<br />
<strong>of</strong> the engagement, described this damage to author William Garzke, recalling that he witnessed<br />
chunks <strong>of</strong> armor being torn away by shell hits from Rodney. Statz also mentioned that turret<br />
Bruno was tipped forward in its barbette, probably from the shell hit that penetrated its barbette<br />
and started a fire in its magazine. <strong>The</strong> geographical position <strong>of</strong> this turret fits its position as the<br />
46
<strong>The</strong> <strong>Wreck</strong> <strong>of</strong> <strong>DKM</strong> <strong>Bismarck</strong> <strong>−</strong> A <strong>Marine</strong> <strong>Forensics</strong> <strong>Analysis</strong><br />
second forward battery turret as it is third in line from west to east (assuming that it is directly<br />
downhill from where it originally landed).<br />
It is likely that the large pieces <strong>of</strong> debris that were lying on the decks fell directly from<br />
the site <strong>of</strong> the sinking, having come <strong>of</strong>f the ship when it capsized. <strong>The</strong> displacement <strong>of</strong> the<br />
impact crater from the sinking site is probably the result <strong>of</strong> the wreck’s plunge and stall motion<br />
as it plummeted through the 4,700-meter water column. It is likely that <strong>Bismarck</strong> planed forward,<br />
bow first. <strong>The</strong> configuration <strong>of</strong> the impact crater and trough relative to the side scar and sinking<br />
site supports the theory <strong>of</strong> a bow-first impact. It is consistent with a scenario in which the ship<br />
planed north from its sinking position approximately 500 meters before striking the seamount.<br />
Since the axis <strong>of</strong> displacement from surface to bottom aligns closely with the long axis <strong>of</strong> the<br />
trough, it is fairly obvious that the wreck was planing lengthwise away from its sinking point. 39<br />
What is clear from damage to the wreck and conspicuous lack <strong>of</strong> the lower hull in some<br />
places is that the stern did not hit first, as Dr. Robert Ballard had postulated after he discovered<br />
the wreck in June 1989. Large pieces <strong>of</strong> the lower hull residing within the slide scar also<br />
disprove the conclusion <strong>of</strong> David Mearns from the 2001 ITN Expedition that torpedo hits tore<br />
these away during the battles on the surface.<br />
It is also obvious that the ship turned almost completely broadside to the slope for part <strong>of</strong><br />
the slide. It is likely that the hull slid a short distance stern first for the initial part <strong>of</strong> the slide,<br />
then turned broadside before beginning a more bow-first plunge downhill. Once the bow dug<br />
into the sediments then the stern swung around, again leading downhill. This scenario apparently<br />
was repeated. <strong>The</strong> evidence for this conclusion will be discussed later.<br />
Since <strong>Bismarck</strong> was observed to be oriented beam to the oncoming waves, during the<br />
northwester storm with her starboard side to the lee side at the moment <strong>of</strong> sinking, it is likely that<br />
the bow was facing to the northeast when the ship sank. This orientation is very consistent with<br />
the distribution <strong>of</strong> turrets and mainmast along a similar longitudinal axis on the seamount.<br />
Much evidence supports the conclusion that the ship plunged almost vertically for some<br />
period <strong>of</strong> time in the water column. It may have undergone some complex gyrations as it righted<br />
itself for the latter portion <strong>of</strong> its fall. Once the hull righted itself, the effects <strong>of</strong> the hull form were<br />
probably responsible for the displacement <strong>of</strong> sediment we observed at the impact point with the<br />
seamount.<br />
At the moment <strong>of</strong> sinking, the stern end was still attached 40 . As the ship capsized and the<br />
stern swung down relative to the more buoyant bow, hydrodynamic forces over the broad flat<br />
surface <strong>of</strong> the stern may have detached it. Teak decking is snapped cleanly in a straight line<br />
where the stern detached, suggesting a downward bending force (actually upward since the ship<br />
was inverted). It is also possible that the stern was detached by other hydrodynamic forces as the<br />
ship plunged. A piece <strong>of</strong> the stern was found by Dr. Ballard’s team, located with other light<br />
debris in the debris field Northwest <strong>of</strong> the wreck. This is consistent with the stern separating<br />
violently high in the water column.<br />
As the ship sank through the water column, it is very probable that the bow was facing<br />
north with a slight bow-down attitude, and was moving forward in stable “flight.” <strong>The</strong> starboard<br />
rudder is severely damaged and bent. <strong>The</strong> clearances between the tips <strong>of</strong> the centerline propeller<br />
39<br />
This concept is frequently paraphrased as “All things being equal, the simplest solution tends to be the<br />
best one.”<br />
40<br />
Seaman Statz, who was swimming 100 meters from the sinking ship before the final plunge, recalled<br />
that the stern end was still attached. Mr. Statz’ memory proved to be remarkably accurate, based on<br />
numerous details confirmed by imagery retrieved during the 1989 exploration <strong>of</strong> the <strong>Bismarck</strong> wreck.<br />
47
<strong>The</strong> <strong>Wreck</strong> <strong>of</strong> <strong>DKM</strong> <strong>Bismarck</strong> <strong>−</strong> A <strong>Marine</strong> <strong>Forensics</strong> <strong>Analysis</strong><br />
were very tight, perhaps no more than 1-2 meters. This was done to allow better flow to the<br />
rudders thereby enhancing their turning ability. <strong>The</strong> rudder is also missing about 50% <strong>of</strong> its<br />
trailing structure, leading one to conclude that the fatal torpedo hit actually struck the trailing<br />
edge <strong>of</strong> that rudder whereupon it exploded or the explosion took place just inboard but between<br />
the two rudders.<br />
With the turret positions correctly identified, then the heading <strong>of</strong> the ship at the moment<br />
<strong>of</strong> sinking can be confirmed. It was on a generally northern heading during the battle, changing<br />
at times between northwest and northeast. So the closest configuration to this known range <strong>of</strong><br />
headings would put Anton to the east, with the ship sinking on a northeast heading.<br />
RUSTICLES<br />
Rusticle phenomena, first encountered during the exploration <strong>of</strong> the wreck <strong>of</strong> the Titanic,<br />
are still very imperfectly understood. As is the case for much forensic analysis, as some<br />
questions <strong>of</strong> fact are resolved, more puzzlements arise to confound and fascinate the analysts.<br />
A number <strong>of</strong> different varieties <strong>of</strong> rusticles 41 were found on the wreck <strong>of</strong> <strong>Bismarck</strong>.<br />
Rusticles are bioconcretious structures that have been found on deep-ocean wrecks like<br />
RMS Titanic and USS Yorktown (CV-6). <strong>The</strong>y involve water channels, reservoirs, iron plate-like<br />
structures, thread-like spans, porous matrices, and ducts connecting to the outside. Within these<br />
structures there appear to be a number <strong>of</strong> microbial strains <strong>of</strong> sulfate reducing bacteria, iron-<br />
related bacteria, heterotropic aerobic bacteria, denitrifying bacteria, and archaeobacteria. <strong>The</strong>re<br />
are different bacteria consortia on the wreck <strong>of</strong> <strong>Bismarck</strong> with strikingly differing colors. <strong>The</strong>se<br />
bacteria exist together with a range <strong>of</strong> fungi 42 .<br />
Most areas with no structural damage have very little rusticle development. <strong>The</strong>re are a<br />
few areas with little or no structural damage that have a great deal <strong>of</strong> rusticle activity. It is<br />
believed that these represent fire-damaged areas. <strong>The</strong> general impression is that rusticles have<br />
invaded burn-damaged areas.<br />
Rusticles have attacked severed edges <strong>of</strong> hull steel. Buckling and separation <strong>of</strong> thick<br />
armor plates allows rusticles to attack edges. Rusticles do not always attack "splash" marks from<br />
splinter hits, even though bare metal is present. Is there a chemical residue that may be negative<br />
to rusticle growth?<br />
Rusticle activity varies widely in different areas <strong>of</strong> ship. Some areas seem completely<br />
unaffected. <strong>The</strong> areas <strong>of</strong> greatest structural damage from explosions have almost complete<br />
rusticle involvement.<br />
Photographic images taken by ROVs Jake and Elwood show that rusticle growth inside<br />
the wreck is equivalent to that on Titanic, and is very mature. Almost no interior paint is still<br />
visible except in the transverse corridor running athwartship beneath the seaplane catapult.<br />
Rusticles are about one meter long. Interior rusticles seem to grow as pr<strong>of</strong>usely in structurally<br />
intact areas as well as heavily damaged locations, indicating that paint thickness may be a factor.<br />
Fire damage may also be a contributor.<br />
41<br />
First named by Dr. Robert Ballard in 1986 when he explored the wreck <strong>of</strong> the RMS Titanic because <strong>of</strong><br />
their likeness to icicles.<br />
42<br />
“<strong>The</strong> Impact <strong>of</strong> Bioconcretious Structures (Rusticles) for the RMS Titanic: Implications for Maritime<br />
Steel Structures,” by Dr. Roy Cullimore and Kori Johnston. Transactions <strong>of</strong> the Society <strong>of</strong> Naval<br />
Architects and <strong>Marine</strong> Engineers, Volume 107, 2000, pp 179-195.<br />
48
<strong>The</strong> <strong>Wreck</strong> <strong>of</strong> <strong>DKM</strong> <strong>Bismarck</strong> <strong>−</strong> A <strong>Marine</strong> <strong>Forensics</strong> <strong>Analysis</strong><br />
Rusticles are micro-organisms which are gradually consuming the iron structure <strong>of</strong> the wreck.<br />
<strong>The</strong> interior rusticles seem to come in two types: (1) the familiar orange-brown rustcolored<br />
type as first seen on Titanic and (2) a new type, which is pure white. ROV footage<br />
indicates that these white structures are uniformly white throughout, and not just on the surface.<br />
Within <strong>Bismarck</strong>, the rust-colored rusticles and the white rusticles seemed to vie for dominance.<br />
One space would be completely white, while the next is completely red. <strong>The</strong> boundary zone, at<br />
the door-frame between the rooms, was very clear. A white room might have an entry door<br />
whose doorframe is completely overgrown by white growth, while the adjacent wall is<br />
completely red growth. <strong>The</strong> space, beyond the door, might be completely white with absolutely<br />
no evidence <strong>of</strong> red growth. <strong>The</strong>n the space beyond that might be opposite. Some areas dominated<br />
by red growth might blend into areas <strong>of</strong> white, if there was no clear boundary, like a bulkhead.<br />
<strong>The</strong> result would be an area <strong>of</strong> mixed growth. <strong>The</strong> impression is that a closed volume would lend<br />
itself to dominance by one type or the other, whereas open spaces would have boundary zones<br />
where mixing occurred, with patches <strong>of</strong> white. Overall, the red seems the more successful type,<br />
and the whites only seemed to fully dominate when they had a closed space with limited access.<br />
<strong>The</strong> inside environment would have a lower rate <strong>of</strong> exchange <strong>of</strong> water by currents, and<br />
might have PH and other chemical concentrations as a result <strong>of</strong> the slower exchange relative to<br />
waste products from biological processes taking place inside, and because <strong>of</strong> chemical sources<br />
within the rooms. Little is known about these factors, and analysts are still very much in the<br />
49
<strong>The</strong> <strong>Wreck</strong> <strong>of</strong> <strong>DKM</strong> <strong>Bismarck</strong> <strong>−</strong> A <strong>Marine</strong> <strong>Forensics</strong> <strong>Analysis</strong><br />
“good question” stage with few “good answers”:<br />
What can explain the differences in rusticle growth in two adjacent rooms equally far<br />
inside the structure? Would it be the result <strong>of</strong> fire damage? Could it be that one space burned,<br />
another didn't, creating different chemistry in the substrate? Was it due to the accumulation <strong>of</strong> oil<br />
or other substances during the sinking? Fuel oil may have entered some spaces as the ship<br />
capsized, or even after the impact with the bottom, as it burst from the tanks and rose up to the<br />
surface. When the ship was sliding down the seamount, oil may have been blown into some<br />
spaces and not into others, and may have been trapped in some closed volumes or excluded from<br />
others. Could it be organics that may have been in some spaces or been forced into others during<br />
the sinking? Was it from food in the ships stores? Was it a product <strong>of</strong> human remains?<br />
What is the white substance which is aggregated in some <strong>of</strong> these structures? Presumably,<br />
it is not calcium, which is so low in concentration at these depths that bones completely dissolve<br />
in only a few years. Is it anhydrate or is it some kind <strong>of</strong> white bacterial tissue, like bacterial mats.<br />
Tube worms and galathea crabs at this depth are white.<br />
WHO SANK THE BISMARCK – <strong>The</strong> British or the Germans?<br />
We are convinced the answer is … “BOTH!!”<br />
<strong>Bismarck</strong> unquestionably would have sunk due to progressive flooding hours after the<br />
battle ended. By 0930, CDR Oels heard no response from the Bridge and he knew that the ship<br />
was defenseless, when turrets Caesar and Dora were no longer operational. <strong>The</strong>re is enough<br />
evidence to indicate that he ordered the ship scuttled to prevent her boarding by the British and<br />
to end the agony <strong>of</strong> the prolonged battering by British shellfire that was hindering escape into the<br />
sea.<br />
<strong>The</strong> German Navy, prompted by memories <strong>of</strong> the scuttling <strong>of</strong> High Seas Fleet ships<br />
interned at Scapa Flow after the end <strong>of</strong> World War One and the Graf Spee at Montivideo,<br />
Uruguay in 1939, had provided scuttling charges and timers in major vital spaces on the<br />
<strong>Bismarck</strong>. This information was provided by Lt. Gerhard Junack, who set charges in the middle<br />
engine room, and Seaman Josef Statz in correspondence with author Bill Garzke. Scuttling <strong>of</strong><br />
<strong>Bismarck</strong> to speed an inevitable sinking was likely and eminently probable.<br />
This does not detract from the fact that the men, ships, and aircraft <strong>of</strong> the Royal<br />
Navy had finally succeeded in their determined quest to “SINK THE BISMARCK!”<br />
CONCLUSION<br />
<strong>The</strong>re are a number <strong>of</strong> useful historical insights that have resulted from the combination<br />
<strong>of</strong> decades <strong>of</strong> technical and historical research with the results <strong>of</strong> Jim Cameron’s 2002 survey <strong>of</strong><br />
the wreck <strong>of</strong> <strong>Bismarck</strong> on the seabed:<br />
○ Long-range gunfire (16,000 to 18,000 meters) from Prince <strong>of</strong> Wales the morning <strong>of</strong><br />
24 May was crucial to the early stages <strong>of</strong> the British effort to destroy the German<br />
battleship. This damage resulted in the loss <strong>of</strong> fuel and flooding (and counterflooding)<br />
which amounted to 3,000 to 4,000 tonnes, a significant loss <strong>of</strong> reserve<br />
50
<strong>The</strong> <strong>Wreck</strong> <strong>of</strong> <strong>DKM</strong> <strong>Bismarck</strong> <strong>−</strong> A <strong>Marine</strong> <strong>Forensics</strong> <strong>Analysis</strong><br />
buoyancy. Following this engagement, Admiral Lütjens to abort the mission and<br />
head to France for repairs.<br />
○ <strong>The</strong> aerial torpedo hit in the stern late in the afternoon <strong>of</strong> 26 May wrecked the<br />
<strong>Bismarck</strong>’s steering gear, making the ship un-maneuverable. <strong>The</strong> ship gradually<br />
turned into the prevailing seas, heading directly towards the pursuing British.<br />
○ Long-range gunfire from the battleships King George V and Rodney on the morning<br />
<strong>of</strong> 27 May early on in the final engagement destroyed much <strong>of</strong> the <strong>Bismarck</strong>’s main<br />
battery and destroyed the ship’s primary gunfire control system. <strong>The</strong> gunnery<br />
engagement lasted from 0847 to 1021.<br />
○ Closer-range gunfire (eventually, at virtually point-blank range for battleship main<br />
battery guns) later in the engagement devastated the superstructure and exposed<br />
sections <strong>of</strong> the hull (above the waterline) and caused massive casualties, but<br />
contributed little to the eventual sinking <strong>of</strong> the ship.<br />
○ Late in the final engagement, the Bismark was defeated, sinking as the result <strong>of</strong><br />
uncontrollable progressive flooding, and virtually defenseless. <strong>The</strong> Executive Officer,<br />
CDR Hans Oels, ordered the scuttling <strong>of</strong> the ship <strong>−</strong> “Measure V [V = ‘Versunken’]”<br />
<strong>−</strong> and the charges were detonated shortly after 1020. By 1035, the ship had assumed<br />
a heavy port list, capsizing slowly and sinking by the stern. <strong>The</strong> bow disappeared<br />
about 1040.<br />
TORPEDO DAMAGE ANALYSIS:<br />
One <strong>of</strong> the significant achievements <strong>of</strong> the 2002 Cameron Expedition was the exploration<br />
<strong>of</strong> damage on the starboard side aft, which is believed to have been caused by the combination <strong>of</strong><br />
the effects <strong>of</strong> a torpedo hit and by hydraulic outburst. While a torpedo likely damaged this area<br />
<strong>of</strong> the hull aft, it did not warp, buckle <strong>of</strong> displace the 45-mm torpedo bulkhead inboard <strong>of</strong> the<br />
tank. <strong>The</strong> sacrificial tankage served its purpose by dispersing the explosive force. No individual<br />
armored plates were displaced in either the armored bulkhead or the armor deck over the tank.<br />
While there was leakage through small cracks <strong>of</strong> failed welds from a torpedo hit on the port side<br />
aft from one <strong>of</strong> the Ark Royal aircraft on 26 May, as confirmed by evidence from Josef Statz and<br />
Gerhard Junack, the resulting flooding contributed little to the sinking <strong>of</strong> the ship. <strong>The</strong> hits<br />
claimed for ship-launched torpedoes during the final battle on 27 May came minutes before the<br />
battleship foundered, when some <strong>of</strong> the major vitals were already flooding from scuttling<br />
charges. Some German survivors, including Baron von Müllenheim-Rechberg during an<br />
interview with authors Dulin and Garzke, have stated that no torpedo holes could be observed<br />
when the ship capsized. It is very probable that these torpedo holes were probably hidden from<br />
sight.<br />
51
<strong>The</strong> <strong>Wreck</strong> <strong>of</strong> <strong>DKM</strong> <strong>Bismarck</strong> <strong>−</strong> A <strong>Marine</strong> <strong>Forensics</strong> <strong>Analysis</strong><br />
LESSONS FOR THE MARINE FORENSIC ANALYST<br />
EPILOG<br />
○ Survivor Testimony can be helpful but is a suspect source:<br />
- <strong>The</strong> brain fills in details and ignores “impossible” sights<br />
- Small details are recalled as large.<br />
- Details can be rationalized or imagined<br />
- Testimony very close to the time <strong>of</strong> the event is most useful<br />
- Prejudice can be a factor (fear <strong>of</strong> torpedo, mine, or shell hits)<br />
- Reality (at times, this is the only source <strong>of</strong> information)<br />
○ Ship Damage <strong>−</strong> difficult to determine the cause <strong>of</strong> damage on the wreck:<br />
- Damage that caused the ship to sink<br />
- Damage sustained as the ship plunged through the water column<br />
- Damage sustained at the time <strong>of</strong> impact with the seabed<br />
- Damage resulting from deterioration on the seabed<br />
○ Documentation:<br />
- Very important to have the latest plans <strong>of</strong> the ship<br />
- Helpful to have recent photographs <strong>of</strong> the ship<br />
- Historical analysis is a helpful starting point for the marine forensics specialist<br />
○ Reverse Engineering:<br />
- Very dependent on the skill <strong>of</strong> the person(s) doing the analysis<br />
- Always a degree <strong>of</strong> uncertainly in the details<br />
- Sadly, experience reminds the analyst that the “Best Available Information”<br />
frequently is later shown to be “Not Very Good”<br />
○ Humility is a GREAT virtue for the marine forensic analyst<br />
<strong>The</strong> May 2002 Cameron Expedition to the <strong>Bismarck</strong> wreck has answered some questions<br />
but raised others. Further exploration <strong>of</strong> the wreck may answer some <strong>of</strong> those questions.<br />
Unquestionably, this 2002 encounter demonstrated what can be gained from a thorough<br />
photographic examination <strong>of</strong> sunken marine wrecks, an important resource for any thorough<br />
marine forensic analysis.<br />
ACKNOWLEDGEMENT:<br />
<strong>The</strong> authors want to acknowledge the technical assistance <strong>of</strong> Otto Jons, Sean Kery, Michael<br />
Bateman, and Dennis Breen <strong>of</strong> CSC Advanced <strong>Marine</strong> in the preparation <strong>of</strong> this report. We particularly<br />
appreciate the assistance <strong>of</strong> Dennis Breen in the analysis <strong>of</strong> damage to the propeller and rudder. We also<br />
want to thank Steven Smith <strong>of</strong> Engineering Solutions, Inc. for his graphic work on Turret Bruno and the<br />
damaged pr<strong>of</strong>ile <strong>of</strong> <strong>Bismarck</strong>.<br />
52