Intercostal Catheter and UWSD - Intensive Care & Coordination ...
Intercostal Catheter and UWSD - Intensive Care & Coordination ...
Intercostal Catheter and UWSD - Intensive Care & Coordination ...

You also want an ePaper? Increase the reach of your titles
YUMPU automatically turns print PDFs into web optimized ePapers that Google loves.
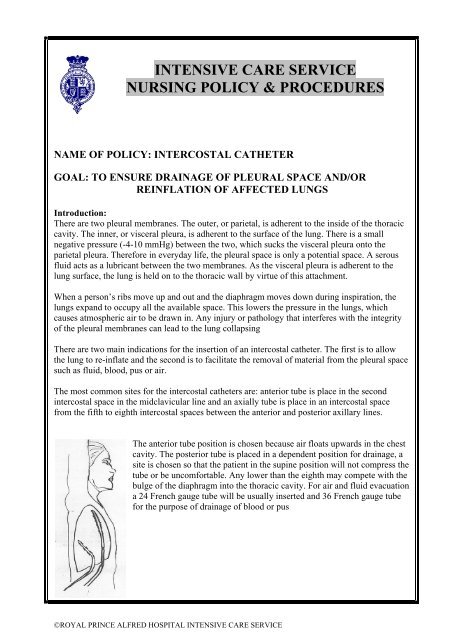
INTENSIVE CARE SERVICE<br />
NURSING POLICY & PROCEDURES<br />
NAME OF POLICY: INTERCOSTAL CATHETER<br />
GOAL: TO ENSURE DRAINAGE OF PLEURAL SPACE AND/OR<br />
REINFLATION OF AFFECTED LUNGS<br />
Introduction:<br />
There are two pleural membranes. The outer, or parietal, is adherent to the inside of the thoracic<br />
cavity. The inner, or visceral pleura, is adherent to the surface of the lung. There is a small<br />
negative pressure (-4-10 mmHg) between the two, which sucks the visceral pleura onto the<br />
parietal pleura. Therefore in everyday life, the pleural space is only a potential space. A serous<br />
fluid acts as a lubricant between the two membranes. As the visceral pleura is adherent to the<br />
lung surface, the lung is held on to the thoracic wall by virtue of this attachment.<br />
When a person’s ribs move up <strong>and</strong> out <strong>and</strong> the diaphragm moves down during inspiration, the<br />
lungs exp<strong>and</strong> to occupy all the available space. This lowers the pressure in the lungs, which<br />
causes atmospheric air to be drawn in. Any injury or pathology that interferes with the integrity<br />
of the pleural membranes can lead to the lung collapsing<br />
There are two main indications for the insertion of an intercostal catheter. The first is to allow<br />
the lung to re-inflate <strong>and</strong> the second is to facilitate the removal of material from the pleural space<br />
such as fluid, blood, pus or air.<br />
The most common sites for the intercostal catheters are: anterior tube is place in the second<br />
intercostal space in the midclavicular line <strong>and</strong> an axially tube is place in an intercostal space<br />
from the fifth to eighth intercostal spaces between the anterior <strong>and</strong> posterior axillary lines.<br />
The anterior tube position is chosen because air floats upwards in the chest<br />
cavity. The posterior tube is placed in a dependent position for drainage, a<br />
site is chosen so that the patient in the supine position will not compress the<br />
tube or be uncomfortable. Any lower than the eighth may compete with the<br />
bulge of the diaphragm into the thoracic cavity. For air <strong>and</strong> fluid evacuation<br />
a 24 French gauge tube will be usually inserted <strong>and</strong> 36 French gauge tube<br />
for the purpose of drainage of blood or pus<br />
©ROYAL PRINCE ALFRED HOSPITAL INTENSIVE CARE SERVICE
Pneumothorax can be related to a surgery procedure (lobectomy, open-heart surgery) or from<br />
trauma (penetrating knife wound, blunt trauma from a fall, or from (baro-trauma) positive<br />
pressure ventilation). Blister <strong>and</strong> blebs on the lung parenchyma usually cause spontaneous<br />
pneumothorax. All these allow air to enter the pleural space. Air entering the pleural space brings<br />
about an increase in the intrapleural pressure from negative to positive pressure <strong>and</strong> terminates<br />
the suctioning or pulling effects of the pleural cavity on the elastic lung tissue. The lung<br />
immediately collapses to an unstretched condition, which is about one-third of its exp<strong>and</strong>ed size.<br />
Haemothorax is a collection of blood in the pleural space. Haemopneumothorax is both air <strong>and</strong><br />
blood in the pleural apace. Like pneumothorax, these conditions result in high intra-<br />
pleural pressures <strong>and</strong> partially collapse the lung.<br />
Haemothorax<br />
Tension pneumothorax is a more serious complication that can develop when air continues to<br />
leak from hole in the lung into the pleural space <strong>and</strong> has no way to escape. As more <strong>and</strong> more air<br />
accumulates in the pleural space, pressure within this space rises significantly. If the pressure<br />
builds up enough, it causes “medialstinal shift” which mean that the entire mediastinal area<br />
including the heart <strong>and</strong> other structures pushed towards the unaffected or good side. This reduces<br />
the size of the unaffected lung. This is a critical life-threatening situation <strong>and</strong> requires<br />
immediate attention. Early signs of mediastinal shift may include an overextended chest,<br />
shallow gasping respiration, shift of the trachea in the suprasternal notch <strong>and</strong> changes in arterial<br />
pulse.<br />
©ROYAL PRINCE ALFRED HOSPITAL INTENSIVE CARE SERVICE
Pleural effusion is an excess of fluid in the pleural space. Normally the pleural space contains<br />
10mls of fluid. However the volume can increase to more than 1500mls with an effusion.<br />
Effusions typically occur at the base of the pleural space (due to gravity) <strong>and</strong> can be unilateral or<br />
bilateral. It develops after an underlying condition disrupts the mechanisms that normally control<br />
the movement of fluids into <strong>and</strong> out of the pleural space. These mechanisms include:<br />
Hydrostatic pressure, which tends to push fluids out of compartment<br />
Colloid osmotic pressure, which tends to pull fluid into compartments<br />
Intact structures such as, capillaries, lymphatic vessels <strong>and</strong> pleurae<br />
There are two types of pleural effusions<br />
They both cause the same signs <strong>and</strong> symptoms <strong>and</strong> require similar treatment. However each<br />
points to different underlying problems<br />
Exudative effusion is generally associated with pleural disease, develops when capillaries<br />
become more permeable <strong>and</strong> leak protein-rich fluids into the pleural space. Because of its<br />
high protein content, this type of effusion usually resembles plasma. Inflammation of<br />
tissue, lungs, <strong>and</strong> lymphatic vessels can bring this on; fungal, viral or bacterial lung<br />
infections, subphrenic abscess <strong>and</strong> cancer.<br />
Transudative effusion occurs when protein-free fluids leak from intact capillaries <strong>and</strong><br />
pass through the pores of membranes. This type of effusion is generally associated with<br />
normal lung tissue. It can be found in conditions such as: congestive heart failure,<br />
pulmonary oedema, renal disease <strong>and</strong> hepatic disease. This type of effusion is also known<br />
as hydrothorax.<br />
Chylothorax is lymphatic leakage into the pleural space with subsequent accumulation. It<br />
usually is milky-white in colour related to its high fat <strong>and</strong> fat-soluble vitamin content as well as it<br />
being high in protein. The fluid can accumulate at a rate of 1500mls a day causing<br />
haemodynamic compromise <strong>and</strong> metabolic sequelae due to this loss. The primary causes of a<br />
chylothorax are malignancy, congenital, subclavian vein obstruction, trauma including surgical;<br />
related to mobilization of aortic arch (eg. repair of aortic coarctation, patent ductus arteriosus or<br />
vascular rings) or esophageal resection. The treatment consists of not only the drainage of this<br />
fluid but also aggressive maintenance of fluid <strong>and</strong> nutritional status.<br />
©ROYAL PRINCE ALFRED HOSPITAL INTENSIVE CARE SERVICE
Assisting with the Insertion of a Pleural Drain<br />
Equipment:<br />
Sterile pack, gown <strong>and</strong> gloves<br />
24 or 36 size tube will be required<br />
Dressing pack<br />
Petroleum impregnated gauze (gelonet)<br />
Aseptic antibacterial solution<br />
One Key-hole gauze<br />
<strong>Intercostal</strong> set (sterile)<br />
Suture <strong>and</strong> blade<br />
Single plastic bottle or Thoraseal 111<br />
50mls catheter syringe for usage in one bottle system<br />
Sterile water (500mls)<br />
Kocker clamps, two for each tube. Ensure teeth of the clamp are covered with plastic to<br />
provide safety during clamping<br />
ICC adapters (small, medium large)<br />
Low suction port connected to outlet source (working order) if required<br />
Appropriate “Y” connectors (if multiple ICC are required)<br />
Rack or st<strong>and</strong> for 1 bottle system<br />
Sterile scissors or large stitch cutter if required<br />
Adhesive for dressing (white large width)<br />
Adhesive for occlusion over each connection site (brown)<br />
<strong>UWSD</strong> Set-Up Using 1 Bottle System:<br />
Inform patient <strong>and</strong> significant others where possible<br />
Ensure patient has adequate analgesia (review with RMO)<br />
Reassure patient throughout procedure if conscious<br />
Sit bottle into holding basket<br />
Remove plastic cover from the “vent” side of the one bottle system<br />
Insert 50ml sterile syringe catheter into “vent” side<br />
Using sterile water fill to “0” marker inscribed on the bottle. Do not replace plastic cover<br />
over this “vent”<br />
Ensure sterile drainage tubing is place on Dr.’s. sterile field<br />
Dr. will connect one end of the tubing to the intercostal catheter when ready, the other end<br />
will be connected to the <strong>UWSD</strong> marked “patient”<br />
Ascertain the size of the ICC tube to that of the drainage tube, it usually is too big. anticipate<br />
using one of the selected connectors (S/M/L)<br />
If suction required follow steps below<br />
Connect suction tubing to suction outlet source <strong>and</strong> place to the “vent” side of the<br />
bottle<br />
When ready for use turn on the suction at the required kPa as ordered (usually 3-5 )<br />
If no suction is required ensure the “vent” side of the bottle is open to air<br />
©ROYAL PRINCE ALFRED HOSPITAL INTENSIVE CARE SERVICE
Ensure clamp is immediately released from ICC after connection<br />
Observe <strong>and</strong> monitor the system to ensure it’s working correctly (see nursing<br />
responsibilities <strong>and</strong> trouble shooting below)<br />
Once the purse string has been inserted clean <strong>and</strong> dress the ICC site<br />
Secure tube to decrease traction<br />
Secure all connection site with adhesive tape<br />
Assess patient respiratory status, during <strong>and</strong> post insertion<br />
X-ray to clarify tube position <strong>and</strong> evaluate lung expansion<br />
<strong>UWSD</strong> Set-Up Using Thoraseal 111 System:<br />
Use the picture below to assist with the set-up<br />
See below for further instructions for Thoraseal setup<br />
©ROYAL PRINCE ALFRED HOSPITAL INTENSIVE CARE SERVICE
Fill suction outlet to desired level per RMO orders (usually 15-25cm H20)<br />
Fill water seal to inscribed “marked”<br />
level<br />
Connect suction to suction port<br />
After connection to patient, turn on the suction so that gentle bubbling is noted in the<br />
suction chamber. (Vigorous bubbling will cause noise <strong>and</strong> evaporate the water)<br />
Use Thoraseal built-in hanging device for security<br />
Nursing Responsibilities<br />
At the start of each shift ensure patency the system (see trouble shooting for guidance)<br />
Respiratory assessment<br />
Palpate skin around tube insertion site for subcutaneous emphysema (notify Dr. if present,<br />
see under air leak)<br />
If patient is on suction, turn off the suction for evaluation, at the same time check the<br />
amount of kPa or cm H20 is correct with Dr. orders. If water has evaporated from the<br />
required amount, restore it.<br />
Observe for oscillation/swing/tidelling in the tubing (reversed on PPV)<br />
Observe of air leak (bubbling, continuous or intermittent) If concerned about “air leak” see<br />
under trouble shooting<br />
Amount of drainage, this is usually recorded every 6/24hr on the flow chart <strong>and</strong> marked on<br />
the bottle accordingly<br />
Ensure there are no kinks in the tubing<br />
Ensure all connections site are secure <strong>and</strong> have insulate adhesive around each site<br />
Ensure the tubing is secure <strong>and</strong> that insertion dressing is intact<br />
Record <strong>and</strong> document finding of each <strong>UWSD</strong> hourly, report abnormal finding if trouble<br />
shooting has not found <strong>and</strong> or solved the problem.<br />
Dressings are changed every 48hr or when necessary<br />
Ensure bottle is change if greater than 200mls of fluid is insitu (if using one bottle system<br />
<strong>and</strong> it is not on suction)<br />
Daily X-ray to assess progress of the condition <strong>and</strong> to detect complications<br />
©ROYAL PRINCE ALFRED HOSPITAL INTENSIVE CARE SERVICE
Requiring Fluid Specimens:<br />
The Thoraseal tubing is made of self-sealing silicone, permitting a small needle to be inserted to<br />
withdraw fluid. Follow steps below:<br />
Thoraseal<br />
Ensure universal precaution are undertaken<br />
Anticipate specimen collection when there is drainage in the tubing<br />
Use a 25 gauge needle attached to 5-10mls syringe<br />
Insert needle into tubing with care <strong>and</strong> extract fluid required<br />
Syringe into yellow top jar <strong>and</strong> send to appropriate laboratory with forms<br />
Document when specimen was taken<br />
One-bottle system<br />
Do not remove fluid from the drainage bottle as this has been laying insitu for a period of<br />
time <strong>and</strong> may be contaminated<br />
Ensure universal precautions <strong>and</strong> apply aseptic technique<br />
Anticipate specimen collection when there is drainage in the tubing<br />
Assess patient respiratory status prior, during <strong>and</strong> after this procedure<br />
Turn off suction if applicable<br />
Remove adhesive from connector site (closest to the patient) apply antibacterial solution<br />
with gauze<br />
Clamp closest to the patient chest cavity<br />
Disconnect tubing <strong>and</strong> allow fluid to drain into the yellow top jar<br />
Re-connect tubing <strong>and</strong> unclamp<br />
Apply adhesive tape to connection site<br />
Re-evaluate drainage system<br />
Trouble shooting<br />
Fluctuation (tidaling/oscillation/swinging)<br />
Tidaling is indicated by fluctuations in the water seal chamber that correlates with the respiratory<br />
cycle. This action reflects the changes in the pleural pressures that occur with respiration.<br />
Fluctuations will be the reverse when PPV in applied.<br />
A rise in the tubing will indicate inspiration <strong>and</strong> a fall will indicate expiration.<br />
©ROYAL PRINCE ALFRED HOSPITAL INTENSIVE CARE SERVICE
As suction diminishes tidaling One must evaluate with the suction off. Tidaling will not be<br />
noted if there is an obstruction or if the lung has fully exp<strong>and</strong>ed or if suction is on.<br />
Solution:<br />
Observe X-ray for re-expansion of lung, this will be the definitive answer. Even after the<br />
chest tube has ceased to function <strong>and</strong> the lung has re-inflated sometime the ICC may be<br />
left in for another 24-48hr depending on the patient’s overall physical condition <strong>and</strong> the<br />
degree of potential recurrence<br />
Auscultate lung field<br />
To clear obstruction check for<br />
Kinks (increases pressure)<br />
Dependent loops (lie tubing flat along the length of the bed)<br />
Clot formation (cough, take a deep breath, change patient position)<br />
Bubbling:<br />
Turn the suction off to evaluate the system <strong>and</strong> the patient. Diminished bubbling should be a<br />
sign that the lung is re-exp<strong>and</strong>ing. Absence of bubbling indicates that evacuation is complete <strong>and</strong><br />
the pressure of the exp<strong>and</strong>ed lung has sealed the chest tube opening or that the tube is blocked. If<br />
there is a patient air leak, bubbling will be noted on spontaneous expiration, if it is noted that<br />
bubbling is continuous both inspiration <strong>and</strong> expiration one should suspect an airleak. If PPV is<br />
applied continuous bubbling is present, but if vigorous bubbling occurs suspect an airleak in the<br />
system<br />
Solution:<br />
Check X-ray to confirm lung expansion<br />
Check all connection sites are secure <strong>and</strong> have appropriate adhesive tape around them<br />
If leak persists follow these steps<br />
Clamp starting at the chest wall <strong>and</strong> work at intervals moving down the tubing. (For<br />
example you have clamped near the chest wall than bubbling has ceased, the leak<br />
must be in the patient <strong>and</strong> not in the system, due to dislodged tube or from around the<br />
insertion site. Inform Dr if tube is or has migrated out (one can often see the eyelets).<br />
It may need replacing, no not push it back in. Apply Vaseline gauze (gelonet)<br />
Consider bronchopleural fistula<br />
Milking <strong>and</strong> Striping:<br />
Striping is controversial <strong>and</strong> should not be done with out the Intensivist order. Stripping is<br />
known to create transient high levels of negative pressure (-400cmH20) within the pleural space<br />
<strong>and</strong> cause barotrauma. Milking a chest tube is less stressful on the pleura. It is performed by<br />
gently squeezing the chest tube between your fingers <strong>and</strong> performing this process down the<br />
length of the tube. Clots <strong>and</strong> fibrin can obstruct the drainage system, which may require milking.<br />
Ensure Dr. has given the permission<br />
Metal stripping device<br />
©ROYAL PRINCE ALFRED HOSPITAL INTENSIVE CARE SERVICE
Clamping:<br />
Clamping the tube is only used in the event of tube disconnection or breakage of the bottle. In<br />
such cases the pleural tube can be quickly clamped off, preventing renewed pneumothorax <strong>and</strong><br />
consequent collapse of the lung. The clamp should not be left on for long periods as a tension<br />
pneumothorax can develop, putting pressure on the heart, which in turn can lead to cardiac<br />
arrest. The patient should never be left unattended when the clamps are on.<br />
When transporting a patient there is no need to clamp the tubes as long as the system remains<br />
below the patient’s chest cavity <strong>and</strong> is secure so that no fluid is sucked or poured into the pleural<br />
cavity. If this can not be achieve then clamp the tubes for the shortest possible time.<br />
<strong>Intercostal</strong> <strong>Catheter</strong> Falls Out:<br />
Ask Patient to cough (if applicable)<br />
Cover site with petroleum gauze <strong>and</strong> dry dressing<br />
Stay with patient <strong>and</strong> assess respiratory/haemodynamic<br />
Notify RMO<br />
X-ray required<br />
Anticipate re-insertion<br />
When to Change the Tubing <strong>and</strong> Drainage System<br />
One-Bottle System:<br />
If no suction is applied, change drainage bottle if 200ml plus is present. As the drainage<br />
increases the patient effort to expel the air on expiration is made more difficult due to the<br />
increasing pressure the patient has to overcome as the fluid submerges the straw. When<br />
suction is applied this negates the effort on the patient’s part to expel the air so the bottle<br />
does not require changing as often.<br />
Tubing is changed every 48hr along with the dressing. It is usually undertaken at midnight as this<br />
coincides with the overall fluid balance of the patient. (See below for Thoraseal 111 change)<br />
©ROYAL PRINCE ALFRED HOSPITAL INTENSIVE CARE SERVICE
Procedure:<br />
Universal precautions <strong>and</strong> aseptic technique<br />
Chose an appropriate time (eg. not after pulmonary toileting)<br />
Monitor respiratory status during <strong>and</strong> post procedure<br />
Inform patient of procedure<br />
Prepare equipment (as above)<br />
Remove adhesive tape form all connection sites<br />
Ensure new drainage bottle is secure in rack<br />
Swab connection site, closest to the patient<br />
Clamp as close to the patient as possible (as above)<br />
Disconnect old tubing <strong>and</strong> reinsert new tubing<br />
Unclamp<br />
Apply adhesive tape to all connection sites<br />
Document change <strong>and</strong> drainage<br />
Assess drainage system<br />
Thoraseal:<br />
The Thoraseal system should be changed every 7 days or if an air-leak is detected in the system.<br />
The same principles <strong>and</strong> steps are as for the one-bottle system (see above). The need to change<br />
the drainage bottle only may apply. Follow steps below:<br />
Ensure universal precautions<br />
When full, remove adhesive tape around connectors<br />
Clamp closest to the patient <strong>and</strong> disconnect the tubing<br />
Twist drainage bottle as shown in picture below <strong>and</strong> replace it with a new one<br />
Connect to patient <strong>and</strong> unclamp<br />
Ensure adhesive tape around connection site<br />
Dispose of drainage container appropriately<br />
Document change <strong>and</strong> drainage<br />
Dispose of equipment appropriately<br />
©ROYAL PRINCE ALFRED HOSPITAL INTENSIVE CARE SERVICE
Removal of an ICC: (Two RNs required)<br />
Inform patient <strong>and</strong> significant others if applicable<br />
Ensure X-ray confirms re-expansion<br />
Assess for fluctuations in the tubing, there should be none<br />
Sit patient in high fowler position if possible<br />
Consider analgesia if applicable<br />
Remove dressing<br />
Demonstrate action of the Valsalva manoeuvre (increasing the intra-thoracic pressure by<br />
holding ones’ breath <strong>and</strong> attempting to breath out against a closed glottis)<br />
Clamp tube<br />
Obtain purse string<br />
Evenly <strong>and</strong> gently pull the tube out while the other RN pulls on the purse string to draw<br />
the wound margins together, preventing re-entry of air into the pleural space<br />
Dress with occlusive dressing<br />
Post removal<br />
Monitor respiratory status<br />
Document time of removal<br />
Order an chest x-ray approx. 30min post removal<br />
©ROYAL PRINCE ALFRED HOSPITAL INTENSIVE CARE SERVICE
COLLECTION CHAMBERS<br />
One-way mechanism:<br />
The simplest way to create a one-way valve is the use of an underwater seal. The distal end of<br />
the drainage tube is placed about 2cm beneath the surface of a solution, preferably sterile water<br />
or saline. This water seal creates a closed chest drainage system by closing off the open end of<br />
the tubing from the atmosphere.<br />
A slightly positive pressure in the pleural space during exhalation or coughing will force air out<br />
of the pleural space through the tubing. Once the small amount of water in the straw is pushed<br />
out of the way, the air will bubble out into the solution. But air can no longer be drawn back up<br />
through the solution into the chest.<br />
One-Bottle System:<br />
This is the simplest closed chest drainage system. The drainage tubing is connected to a rigid<br />
straw that extends into a single sterile plastic bottle that serves as both a collection chamber <strong>and</strong><br />
a waterseal. Sterile water or saline is poured into the bottle so the straw is submerged about 2cm.<br />
An exit “vent” lets incoming pleural air form the patient escape from the chamber into the<br />
atmosphere. Otherwise enough pressure could build up in the bottle to prevent any more pleural<br />
air from coming in (ensure the protective plastic cap is removed)<br />
Drawbacks of a One-Bottle System:<br />
The bottle is used not only as the waterseal but as a drainage bottle <strong>and</strong> at times suction chamber<br />
too. As drainage fills the bottle, more of the waterseal is submerged. More force is then needed<br />
(by the patient) to push the solution inside the straw out of the way allowing pleural air <strong>and</strong><br />
liquid drainage into the bottle. Emptying the drainage bottle once it reaches 200mls or more can<br />
solve this problem. Alternatively separate collection bottle between the drainage tubing <strong>and</strong> the<br />
water-seal bottle can be used (see two-bottle system below).<br />
©ROYAL PRINCE ALFRED HOSPITAL INTENSIVE CARE SERVICE
Two-Bottle System:<br />
In the two-bottle system, drainage falls into the collection bottle <strong>and</strong> air flows beyond into the<br />
separate waterseal bottle. This setup keeps the waterseal at a fixed level <strong>and</strong> allows more<br />
accurate observation of the volume <strong>and</strong> type of drainage. As with the one-bottle system, the<br />
water seal bottle must have an exit vent to the atmosphere that allows incoming pleural air to<br />
escape. Bubbling from an air leak <strong>and</strong> fluctuations in the waterseal straw will occur in the same<br />
way as they do in the one-bottle system.<br />
Drawbacks in the Two-Bottle System:<br />
The separate collection bottle adds dear-air space to the drainage system – a reservoir of air that<br />
can be drawn into the pleural space. The two-bottle system (<strong>and</strong> one-bottle system) limits gravity<br />
chest drainage. To drain air <strong>and</strong> liquid from the pleural space, pressure must be higher in the<br />
chest the in the bottles. Placing the bottles below the chest creates the pressure difference;<br />
additional pressure is created at the patient end of the tubing by expiration <strong>and</strong> coughing. The<br />
drainage system must be able to h<strong>and</strong>le enough airflow to match the size of the patient’s air leak.<br />
Sometimes the pressure difference <strong>and</strong> airflow capacity of gravity drainage system aren’t enough<br />
<strong>and</strong> suction must be added.<br />
Three-Bottle System:<br />
The safest way to regulate the amount of suction is to add a third, or control bottle to the<br />
drainage system. The third bottle in the system is used to set a maximum limit on the negative<br />
suction pressure that is imposed on the pleural space. This maximum pressure is determined by<br />
the height of the water column in the air inlet tube. Negative pressure (from wall suction) draws<br />
the water down the air inlet tube, <strong>and</strong> when the negative pressure exceeds the height of the water<br />
column, air is entrained from the atmosphere. Water is added to the suction-control chamber to<br />
achieve a water level of 20cm. The wall suction is then activated <strong>and</strong> slowly increased until<br />
bubbles appear in the water. This bubbling indicates that atmospheric air is being entrained <strong>and</strong><br />
the maximum negative pressure has been achieved.<br />
©ROYAL PRINCE ALFRED HOSPITAL INTENSIVE CARE SERVICE
Dry Suction system<br />
The Heimlich valve, created by Dr. Henry Heimlich is best suited for an uncomplicated<br />
pneumothorax or haemothorax that requires little or no drainage collection or suction. This valve<br />
is not used in the general intensive care areas but may be seen on patients on intra hospital<br />
transfers due to its portability, lightweight <strong>and</strong> the ability of the valve to function in any position.<br />
It does not need to be below the chest cavity.<br />
The Heimlich valve is made of clear plastic <strong>and</strong> attached to connecting tubing, which in turn<br />
attaches to the patient’s chest tube or small bore percutaneous catheter. The valve consists of<br />
rubber flutter leaflets that are compressed at the distal end. These leaflets allow one-way flow so<br />
that air, fluid or blood clots exiting through the valve can’t return to the pleural space.<br />
If drainage is excessive,<br />
Physician can withdraw air or fluid with a syringe by unscrewing the connecting tubing<br />
form the stopcock. A bag can be attached to the valve if there is a persistent amount of<br />
small drainage. Small holes or a .5cm tear should be made towards the top of the bag to<br />
allow air to escape otherwise tension pneumothorax may result.<br />
The drainage fluid can also cause the valve to stick so both nurse <strong>and</strong> the patient need to<br />
be aware of the signs of tension pneumothorax: increasing dyspnoea, +/- pain, reduced air<br />
entry to the affected side <strong>and</strong> a mediastinal shift / tracheal displacement to unaffected side.<br />
Should you suspect a tension pneumothorax the valve should be changed immediately. In<br />
an emergency or in the absence of another valve, disconnecting the valve from the ICC<br />
will allow air to escape giving immediate relief to the patient. The tube can then be<br />
attached to a conventional <strong>UWSD</strong> bottle system.<br />
Dressings to the ICC site should be done as required when wet or at least Daily to observe<br />
the site.<br />
The valve should be changed weekly. The tube is clamped with Kocher clamps<br />
momentarily while the valve is changed <strong>and</strong> secured as per instructions earlier in this<br />
protocol.<br />
The bag should be changed as frequently as required or weekly. It is important that fluid<br />
does not cause the tear in the bag to stick together preventing air escaping.<br />
It can also be attached to suction if required. (See pictures below)<br />
©ROYAL PRINCE ALFRED HOSPITAL INTENSIVE CARE SERVICE
REFERENCES<br />
Butcher L & Melinda, S. (1999). Critical <strong>Care</strong> Nursing. W. B> Saunders Company, Philadelphia<br />
Marino, P. L. (1998). The ICU Book.Lippincott Williams & Wilkins, Philadelphia<br />
O’Hanlon-Nuchols, T (1996). Commonly Asked Question about Chest Tubes. American Journal<br />
of Nursing (AJN) May 1996. Vol.96, No5<br />
Oh, T. E. (1997). <strong>Intensive</strong> <strong>Care</strong> Manual. Butterworth Heinemann, London.<br />
Pettinichhi, T. A. (1998) Trouble shooting chest Tubes. Nursing98, March pp58-60<br />
Peek, J.G (2000) Clinical review: The Pleural Cavity. BMJ Vol.320 13 May 2000<br />
Product Information Sherwood Davis & Gecko (1999). Underst<strong>and</strong>ing Underwater Chest<br />
Drainage.<br />
Occupational Health <strong>and</strong> Safety: Universal precautions taken in the preparation, administration of drug <strong>and</strong><br />
disposal of equipment <strong>and</strong> sharps.<br />
Cross Referenced: RPAH Occ. Health & Safety Manual <strong>and</strong> Infection Control Manual<br />
NSW Infection Control Policy 98/99<br />
Revised by: Frankie Hopkins (ACNC) January 2002<br />
Reviewed by: Morgan Smith (Ed.Cardiothoracic)<br />
Authorised <strong>and</strong> assisted by: Dr. Richard Totaro (Intensivist ICU) January 2002<br />
Revision January 2004<br />
With the introduction of Powerchart online ordering, a clinical agreement has been set up<br />
with the Director of ICS <strong>and</strong> other Staff Specialists. Nursing Management, with the<br />
agreement of the hospital executive, have made arrangement that allows all permanently<br />
employed RPAH Nursing Staff to place orders for a variety of tests on their behalf. It is a<br />
Health Insurance Commission (HIC) directive that all orders placed by nursing staff are<br />
countersigned by the responsible MO within 14 days.<br />
©ROYAL PRINCE ALFRED HOSPITAL INTENSIVE CARE SERVICE