Tbm dv8r manual - Troy Built Models
Tbm dv8r manual - Troy Built Models
Tbm dv8r manual - Troy Built Models

Create successful ePaper yourself
Turn your PDF publications into a flip-book with our unique Google optimized e-Paper software.
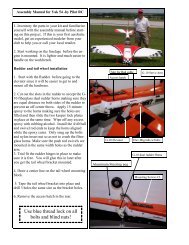
Photo of another pilot’s layout of equipment inside the fuselage.<br />
NOSEWHEEL AND STEERING INSTALLATION<br />
Install nosewheel steering servo as shown.<br />
Install the nosewheel retract. Install the nosewheel steering.<br />
The nose gear steering is activated via pull-pull set up. Locate the materials to make up the control<br />
lines and proceed as follows.<br />
NOTE: When setting up your steering, first screw the four 2-56 eyelet screws into the 2-56 clevises<br />
about a 1/16 th of an inch only. Connect the clevises to the servo arm and steering arm at the top of<br />
the strut. Holding the strut and servo straight, use the supplied steering cable and make up the two<br />
pull-pull lines.<br />
TIP: Remember that these lines will stretch a little when first used and you will need to read adjust the<br />
connections. This is why you do not want to screw the clevises all the way onto the eyelet screws<br />
when first setting up this control run. Also keep in mind that when the model is rolling the nose gear<br />
strut will be pressed backwards against its stop, tightening these lines somewhat. When the model is<br />
at rest, there will be a little play or “slop” in the lines so adjust accordingly. You can install the servo<br />
either before or after sheeting the bottom of the fuselage. If you run out of available threads for<br />
adjustment, you may tie a knot in the Kevlar thus shortening it to allow for fine-tuning. Use thin CA on<br />
all knots to ensure they will not come loose.<br />
11