Pierce Co-Immunoprecipitation (Co-IP) Kit
Pierce Co-Immunoprecipitation (Co-IP) Kit
Pierce Co-Immunoprecipitation (Co-IP) Kit

Create successful ePaper yourself
Turn your PDF publications into a flip-book with our unique Google optimized e-Paper software.
Additional Information<br />
A. <strong>Co</strong>ntrol Experiments<br />
When the co-<strong>IP</strong> results are analyzed by SDS-PAGE, several protein bands may appear, indicating possible interacting<br />
proteins; however, these bands may also be caused by nonspecific interactions with the resin matrix. Use of proper controls is<br />
vital for identifying relevant interactions. This kit provides the necessary components to perform several types of controls.<br />
Any of the following controls may be performed along side the co-<strong>IP</strong>. When results are analyzed by SDS-PAGE, bands that<br />
appear in both the co-<strong>IP</strong> and control lanes represent nonspecific interactions and may be disregarded.<br />
• <strong>Co</strong>ntrol Resin: The supplied <strong>Co</strong>ntrol Resin is composed of the same support material as the co-<strong>IP</strong> resin, but it is not<br />
activated. This resin provides an excellent negative control when processed the same as the Antibody <strong>Co</strong>upling resin.<br />
• Quenched Antibody <strong>Co</strong>upling Resin: Create a quenched resin control by adding 200µL of Quenching Buffer to the<br />
Antibody <strong>Co</strong>upling Resin instead of the antibody and continue with the standard procedure.<br />
• Non-relevant antibody: <strong>Co</strong>uple an unrelated antibody to the Antibody <strong>Co</strong>upling Resin and continue with the standard<br />
procedure.<br />
B. Sample-buffer elution<br />
To troubleshoot if the antibody is coupled to the gel, perform an elution using the sample buffer. This elution method<br />
may also be used if you are certain that antibody fragments will not interfere with Western blot target detection.<br />
1. Prepare 50µL of 2X Non-reducing Lane Marker Sample Buffer (i.e., dilute the 5X sample buffer to 2X with ultrapure<br />
water) and add DTT to a final concentration of 20mM. Place the spin column containing the resin into a new collection<br />
tube and add the 2X reducing sample buffer.<br />
2. Keep the column unplugged and in the collection tube, and incubate at 100ºC for 5-10 minutes. Centrifuge tube to collect<br />
eluate. Allow the sample to cool to room temperature before performing the SDS-PAGE.<br />
Note: After heating the resin with SDS sample buffer, the resin cannot be reused and must be discarded.<br />
C. Additional Applications<br />
• Using prey and bait proteins from different samples: In addition to studying native protein complexes, this kit can be<br />
used for co-<strong>IP</strong> using a bait protein from one sample and a prey protein from another sample. In this case, the bait and<br />
prey proteins are co-purified after they are allowed to interact in solution, or the bait protein is coupled directly to the<br />
antibody coupling resin and then used to capture the prey protein. When the bait and prey proteins exist in separate<br />
samples a different control experiment may be used; the prey protein may be incubated with the antibody-coupled resin<br />
in the absence of bait protein. Because the prey protein should not bind in the absence of bait protein, any protein bands<br />
recovered in this control experiment can be considered a nonspecific interaction and disregarded.<br />
• Protein:protein interaction disruption: Attempts to disrupt protein:protein interactions are often performed. The<br />
ability to disrupt a complex indicates the degree of specificity to the interaction and provides some insight into the mode<br />
of interaction of the two proteins. Disrupting a protein complex is often accomplished by increasing the ionic strength of<br />
the buffer, adding a detergent to the buffer or removing a cofactor that is required for the binding interaction.<br />
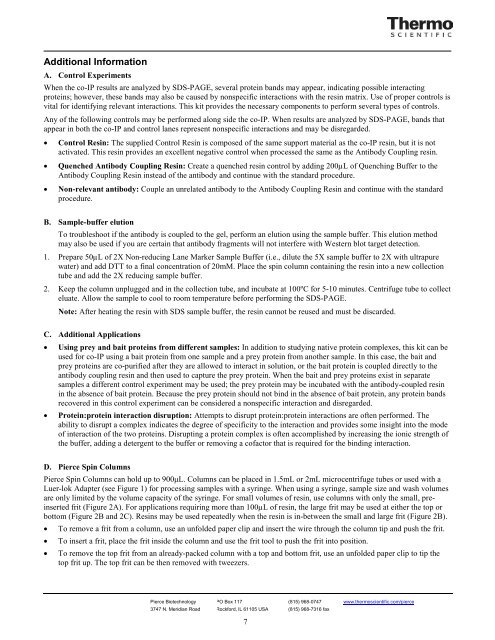
D. <strong>Pierce</strong> Spin <strong>Co</strong>lumns<br />
<strong>Pierce</strong> Spin <strong>Co</strong>lumns can hold up to 900μL. <strong>Co</strong>lumns can be placed in 1.5mL or 2mL microcentrifuge tubes or used with a<br />
Luer-lok Adapter (see Figure 1) for processing samples with a syringe. When using a syringe, sample size and wash volumes<br />
are only limited by the volume capacity of the syringe. For small volumes of resin, use columns with only the small, preinserted<br />
frit (Figure 2A). For applications requiring more than 100µL of resin, the large frit may be used at either the top or<br />
bottom (Figure 2B and 2C). Resins may be used repeatedly when the resin is in-between the small and large frit (Figure 2B).<br />
• To remove a frit from a column, use an unfolded paper clip and insert the wire through the column tip and push the frit.<br />
• To insert a frit, place the frit inside the column and use the frit tool to push the frit into position.<br />
• To remove the top frit from an already-packed column with a top and bottom frit, use an unfolded paper clip to tip the<br />
top frit up. The top frit can be then removed with tweezers.<br />
<strong>Pierce</strong> Biotechnology PO Box 117 (815) 968-0747 www.thermoscientific.com/pierce<br />
3747 N. Meridian Road Rockford, lL 61105 USA (815) 968-7316 fax<br />
7